![]()
| SP-561 / SP-588
| KP-88
|
| AK-61
|

User Manual
Version: 01/2021
Thank you for choosing this product. To ensure that you are completely satisfied with this product, please read and understand this manual carefully.
 PLEASE READ CAREFULLY
Please keep this manual in a safe place for future reference. Please also hand over all documents when passing on the product to third parties. Never leave children unattended with the packaging material. Products packed in plastic bags may cause suffocation due to packaging materials. The product should only be used under adult supervision. Only use the product if it is in perfect condition. Do not use the product if damage is visible or suspected. We are not liable for damage resulting from failure to observe the safety instructions or from incorrect or improper handling.
Observe operating instructions!
![]() The signal word WARNING indicates dangers which can lead to serious injuries if no precautionary measures are taken.
The signal word WARNING indicates dangers which can lead to serious injuries if no precautionary measures are taken.![]() The signal word NOTE indicates general precautions to be taken when handling the product.
The signal word NOTE indicates general precautions to be taken when handling the product.![]() Images and screen-displays in this manual may differ slightly from the appearance of the actual product, as long as this does not have a negative effect on the technical properties and safety of the product.
Images and screen-displays in this manual may differ slightly from the appearance of the actual product, as long as this does not have a negative effect on the technical properties and safety of the product.![]() All personal formulations in these operating instructions are to be considered gender-neutral.
All personal formulations in these operating instructions are to be considered gender-neutral.
These operating instructions apply to responsible users and to persons who have been supervised or instructed in the operation of the device by a person responsible for their safety and who have proven that they are capable of handling the device.
![]() Children should be supervised to ensure that they do not use this device as a toy.
Children should be supervised to ensure that they do not use this device as a toy.
Never allow children to play with the packaging material unattended.
![]() Risk of damage to property! We are not liable for accidents that occur as a result of non-observance of the safety instructions or incorrect handling.
Risk of damage to property! We are not liable for accidents that occur as a result of non-observance of the safety instructions or incorrect handling.
All information in this operating manual has been checked to the best of our knowledge and belief. However, neither the author nor the publisher can be held liable for any damages in connection with the use of this manual.
Other product, brand and company names mentioned in this document may be the trademarks of their respective owners. The user of this document is responsible for compliance with all applicable copyright laws.
![]()
Caution
Please observe the following basic instructions in order not to endanger yourself or others and to avoid damage to external devices.
![]()
Warnings
Do not disassemble or modify the product. This could result in injury from electric shock.
If you notice that the power cord shows obvious signs of wear, the appliance is malfunctioning, smells burnt or smokes, immediately unplug the appliance from the wall outlet and refer servicing, maintenance or repair to an authorized service center, or contact your dealer.
Before cleaning the product, you should turn it off and disconnect it from the power supply.
Always place the product on a flat, stable surface to ensure a secure footing.
Do not use the product in a damp or wet environment.
Do not place any vessels filled with liquids, such as vases, glasses or bottles, on the product.
Do not place small objects on top of it that could slide in, such as hairpins, sewing needles or coins.
![]()
Precautions
To avoid damage to the product, do not place it in places with high temperatures or a lot of dust, do not place it directly next to an air conditioner and avoid direct sunlight. Do not place the product near other electrical equipment to avoid interference.
Do not use force or place heavy objects on the product.
Disconnect the power supply if you do not use the device for a longer period of time. To disconnect the device from the power supply, please pull the plug, not the cable. Be careful with the power cord. It should not be placed near any heaters, heavy objects, or objects that could be walked on or dropped.
![]()
Mains voltage
If an external power supply unit is required for use, connect it to an outlet with the correct voltage.
Do not connect the device to a power supply voltage other than that for which your product is intended. Unplug the AC adapter from the wall outlet when you are not using the product or when a thunderstorm is brewing.
![]()
Place
Do not expose the product to the following conditions to avoid deformation, discoloration or major damage:
Direct sunlight, extreme temperature or humidity, excessively dusty or dirty place, strong vibrations or shocks, strong magnetic fields
![]()
Cleaning
Clean the product only with a soft, dry cloth. Do not use paint thinners, solvents, cleaning fluids or chemically impregnated wipes.
![]()
Handling
Do not exert excessive force on operating elements such as switches, knobs, buttons, fixing screws.
Do not put paper, metal or other objects inside. In this case, unplug the AC adapter/power cord from the wall outlet. Have the product checked by qualified service personnel.
© 2020
This manual is protected by copyright. Copying or reprinting, even in extracts, is only permitted with the consent of Musikhaus Kirstein GmbH. The same applies to the reproduction or copying of pictures, also in modified form.
1. Instructions for proper use, cleaning and storage.
The instrument can be wiped with a soft and clean cloth. Do not use any liquids or cleaning agents for cleaning.
It should be carefully stowed away after use.
Do not use the product in a hot and/or humid place.
Use the instrument only on a flat, hard surface, otherwise normal operation may be impaired and the instrument may be damaged.
Do not charge the battery when you are not at home or when you are sleeping.
2. Simple troubleshooting
If the instrument does not work as expected, sounds strange or individual contacts do not work, turn off the instrument and restart it to reset it to the default settings.
3. SP-561 / SP-588
1. Operating unit

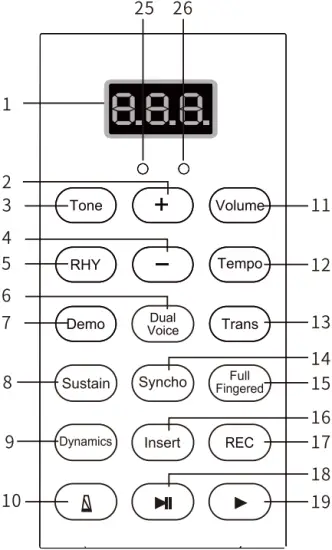
| 1 |  | LED display | 15 | Full | FullFingered button |
| 2 |  | Power ON/OFF | 16 | Start / stop button | |
| 3 | Control button + | 17 | Insert | FILL-In button | |
| 4 | Control button – | 18 | Syncho | Synchro button | |
| 5 | Vol | Volume button | 19 | Demo | Demo button |
| 6 | Tempo | Tempo button | 20 | Sustain | Sustain button |
| 7 | Tone | Tone button | 21 | Drum Kit | Drum Kit Button |
| 8 | Trans | Transpose button | 22 | Reset | Reset button |
| 9 | Dynamics | Velocity On/Off | 23 | LED charging indicator | |
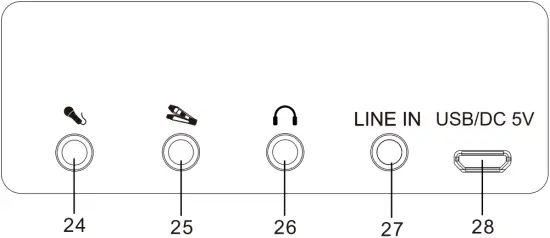
| 10 | RHY | Rhythm button | 24 | Microphone connector | |
| 11 | Metronome | 25 | Pedal connection | ||
| 12 | REC | Record button | 26 | Headphone jack | |
| 13 | Dual | Dual button | 27 |  | LINE-In |
| 14 | Play | 28 | 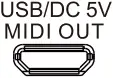 | USB DC 5V connector / MIDI output interface |
2. General operation
1) Power On
Press the Power On / Off button for approx. 1 second to switch the instrument on.
To turn the instrument off, press the button again. The Power On/Off switch does not work in standby mode. Wake up the instrument to use the Power On/Off switch.
2) Auto Standby
If you do not use the instrument for a few minutes, it automatically switches to standby mode. Wake up the instrument by pressing any key on the keyboard. Turn off the instrument completely using the On / Off switch if you do not plan to use it for a long time.
3) Volume control
Press the Volume button to enter the volume control menu. Increase or decrease the volume with the control keys.
4) Tone selection
Press the Tone button to enter the tone selection menu. Select the desired tone color using the control buttons.
5) Accompaniment rhythm selection
By pressing the RHY button you enter the rhythm selection menu. You will now hear the currently selected rhythm. Select the desired rhythm using the control buttons. Stop the rhythm accompaniment by pressing the Start/Stop button.
6) Tempo
Press the Tempo button to enter the speed setting menu. Increase or decrease the speed with the control buttons.
7) Demo
Press the Demo button to enter the demo song playback menu. Select the desired song using the control buttons. Stop the demo playback by pressing the Start/Stop button.
8) Chord accompaniment
Press the FullFingered button to activate the chord recognition. Now you can determine simple major and minor chords by means of two input possibilities while the rhythm accompaniment is started. The rhythm accompaniment is now supplemented by a complete chord accompaniment. The following two input possibilities are automatically recognized by the instrument.
Single Finger
In this mode, by means of a single arbitrary key in the range C3 ~ F4 #, you can specify the chord for the corresponding chord accompaniment. Here, the pressed key sets the root of the accompaniment chord in major. The nearest left black key can be pressed to change the chord gender to minor.
Multi-Finger
In this mode you can specify the chord for the corresponding chord accompaniment by means of three keys in the range of C3 ~ F4 # which define a whole chord. As long as you do not specify a three-part chord, only the drum rhythm will sound.
9) Synchro
By pressing the Synchro button you activate the Sync-Start mode. If rhythm is selected and chord recognition is active, the rhythm or chord accompaniment will now start automatically when you press a key in the left keyboard area (C3 ~ F4 #).
10) Touch dynamics
Press the Dynamics key to switch the velocity dynamics active or inactive.
11) Transpose function
By pressing the trans button you enter the menu for the transpose function. Raise or lower the pitch in semitone steps using the control buttons.
12) Metronome
Press the metronome button to activate the metronome. Press repeatedly to choose between ¼, 2/4, ¾ and 4/4 time signatures. Press Start / Stop to stop the metronome.
13) Recording function
Press REC to switch to the recording mode. Press any key on the keyboard to start recording. During recording, press the Play button to play back the recorded data. Stop playback by pressing the Play button. To play back again, press Play again.
Pressing REC again clears the memory and returns you to the recording mode.
14) Drum Kit
Press the DrumKit button to use the keyboard as a percussion instrument. You leave this setting by pressing the DrumKit button again.
15) Dual Keyboard
Press the Dual Keyboard button to split the keyboard in two. A bass tone is now set in the left keyboard area. The timbre of the right keyboard area can be changed using the control keys. Exit this mode by pressing the Dual Keyboard button again.
16) Sustain
Press the Sustain button to prolong the decay of the selected sound. Press the button again to exit this setting.
3. Rear connections
1) Midi connection via cable
The piano can be connected to any midi-enabled program on your computer via the midi interface.
If you do not have a midi capable software installed on your computer, you can find a free software for Windows to test the function of your piano at https://www.kirstein.de/produkte/00046/00046319/en-piano.zip for download.
2) Pedal connector
Connect the supplied sustain pedal to the pedal jack on the back of your instrument
3) Charging the integrated battery
Connect the included po wer supply to the USB DC 5V connector on the back of your instrument. The LED charging indicator signals the charging process. When the battery is fully charged, the LED goes out.
4. Bluetooth
The Bluetooth function is automatically active when the instrument is switched on.
Bluetooth MIDI
Connect your instrument to a Bluetooth-enabled cell phone or tablet to transmit MIDI data from the instrument to the smart device. The Bluetooth name for MIDI connection is “MIDI Piano”.
Bluetooth audio
Connect your instrument to a Bluetooth-enabled cell phone or tablet to play music from your smart device through the piano. The Bluetooth name for audio transmission is “Music Piano”.
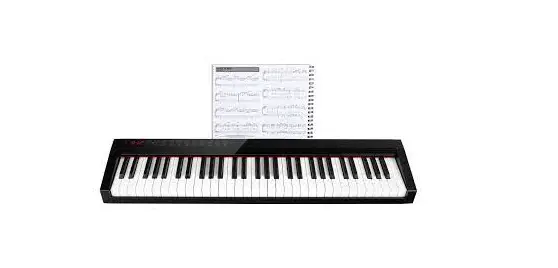
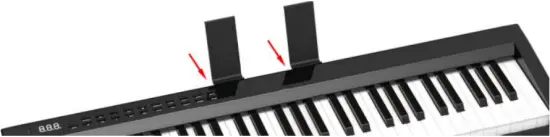
5. Sheet music / Tablet holder
Insert the supplied plastic brackets into the narrow bead on the back of the top edge of the instrument to use them as sheet music or tablet holders.
6. Reset
Press the Reset key to reset the instrument to the factory settings.
4. KP-88
1. Operating unit
| 1 | | LED display | 14 | Syncho | Synchro Start button |
| 2 | + | Control button + | 15 | Full | FullFingered button |
| 3 | Tone | Tone button | 16 | Insert | FILL-In button |
| 4 | – | Control button – | 17 | REC | Record button |
| 5 | RHY | RHY button | 18 | Stop / Pause button | |
| 6 | Dual Voice | Dual Voice button | 19 | Play button | |
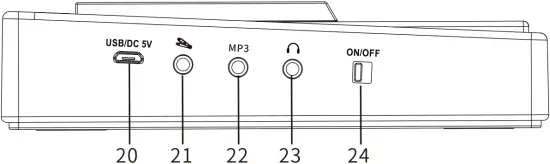
| 7 | Demo | Demo button | 20 | USB DC 5V connector / MIDI output interface | |
| 8 | Sustain | Sustain button | 21 | Pedal connection | |
| 9 | Dynamics | Velocity On/Off | 22 | Aux input | |
| 10 | Metronome | 23 | Headphone jack | ||
| 11 | Vol | Volume button | 24 |  | On / Off switch |
| 12 | Tempo | Tempo button | 25 | LED operation indicator | |
| 13 | Trans | Transpose button | 26 | LINE charge indicator |
2. General operation
1) Switch on
Switch the instrument on or off with the On / Off switch.
2) Auto Standby
If you do not use the instrument for a few minutes, it automatically switches to standby mode. Wake up the instrument by pressing any key on the keyboard. Turn off the instrument completely using the On / Off switch if you do not plan to use it for a long time.
3) Volume control
Press the Volume button to enter the volume control menu. Increase or decrease the volume with the control keys.
4) Tone selection
Press the Tone button to enter the tone selection menu. Select the desired tone color using the control buttons.
5) Accompaniment rhythm selection
By pressing the RHY button you enter the rhythm selection menu. You will now hear the currently selected rhythm. Select the desired rhythm using the control buttons. Stop the rhythm accompaniment by pressing the Stop / Pause button.
6) Tempo
Press the Tempo kebutton to enter the speed setting menu. Increase or decrease the speed with the control buttons.
7) Demo
Press the Demo button to enter the demo song playback menu. Select the desired song using the control buttons. Stop the demo playback by pressing the Stop / Pause button.
8) Chord accompaniment
By pressing the FullFingered button to activate the chord recognition. Now you can determine simple major and minor chords by means of two input possibilities while the rhythm accompaniment is started. The rhythm accompaniment is now supplemented by a complete chord accompaniment. The following two input possibilities are automatically recognized by the instrument.
Single Finger
In this mode, by means of a single arbitrary key in the range C3 ~ F4 #, you can specify the chord for the corresponding chord accompaniment. Here, the pressed key sets the root of the accompaniment chord in major. The nearest left black key can be pressed to change the chord gender to minor.
Multi-Finger
In this mode you can specify the chord for the corresponding chord accompaniment by means of three keys in the range of C3 ~ F4 # which define a whole chord. As long as you do not specify a three-part chord, only the drum rhythm will sound.
9) Synchro
By pressing the Synchro button you activate the Sync-Start mode. If rhythm is selected and chord recognition is active, the rhythm or chord accompaniment will now start automatically when you press a key in the left keyboard area (C3 ~ F4 #).
10) Touch dynamics
Press the Dynamics button to switch the velocity dynamics active or inactive.
11) Transpose function
By pressing the trans button you enter the menu for the transpose function. Raise or lower the pitch in semitone steps using the control buttons.
12) Metronome
Press the metronome button to activate the metronome. By pressing it several times, you can choose between ¼, 2/4, ¾ and 4/4 time signatures. Press the Stop / Pause button to stop the metro nome.
13) Recording function
Press REC to switch to the recording mode. Press any key on the keyboard to start recording. During recording, press the Play button to play back the recorded data. Stop playback by pressing the Play button. To play back again, press Play again.
Pressing REC again clears the memory and returns you to the recording mode.
14) Dual Voice
Press the Dual Voice button to overlay two tones. First select one timbre with the control keys, then press Dual Voice and now select the second timbre with the control buttons. Exit this mode by pressing the Dual Keyboard button again.
15) Sustain
Press the Sustain button to prolong the decay of the selected sound. Press the button again to exit this setting. Sustain does not work in Dual Voice.
3. Connections
1) Midi connection via cable
The piano can be connected to any midi-enabled program on your computer via the USB midi interface.
If you don’t have a midi capable software installed on your computer yet, you can find a free software for Windows to test the function of your piano at https://www.kirstein.de/produkte/00046/00046319/en-piano.zip for download.
2) Pedal connector
Connect the supplied sustain pedal to the side pedal jack of your instrument.
3) Charging the integrated battery
Connect the included power supply to the USB DC 5V port of your instrument. The LED charging indicator signals when the battery is fully charged.
4. Bluetooth
The Bluetooth function is automatically active when the instrument is switched on.
Bluetooth MIDI
Connect your instrument to a Bluetooth-enabled cell phone or tablet to transmit MIDI data from the instrument to the smart device. The Bluetooth name for MIDI connection is “MIDI Piano”.
Bluetooth Audio
Connect your instrument with a Bluetooth-enabled cell phone or tablet to play music from your smart device through the piano. The Bluetooth name for audio transmission is “M usic Piano”.
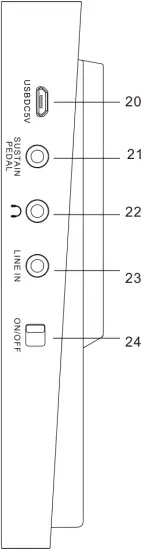
5. AK-61
1. Operating unit
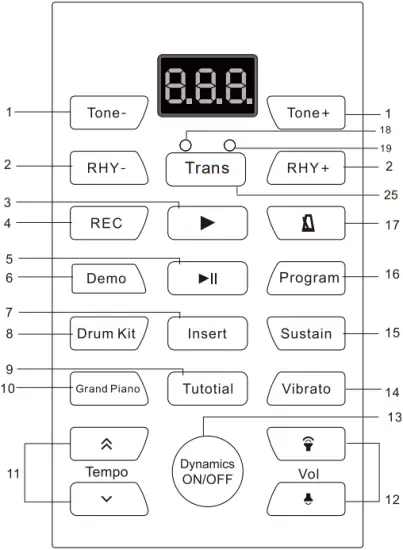
| 1 | Tone -/+ | Tone selection | 14 | Vibrato | Vibrato button |
| 2 | RHY -/+ | Rhythm selection | 15 | Sustain | Sustain button |
| 3 | Play | 16 | Program | Rhythm recording | |
| 4 | REC | Record button | 17 | Metronome | |
| 5 | Stop / Pause button | 18 | LED charge control | ||
| 6 | Demo | Demo button | 19 | LED operation indicator | |
| 7 | Insert | Fill-In button | 20 | USB DC 5V connector / MIDI output interface | |
| 8 | DrumKit | Drum Kit button | 21 |  | Pedal connection |
| 9 | Tutorial | Learning function | 22 | Headphone jack | |
| 10 | Grand piano | Grand piano button | 23 |  | Line-In jack |
| 11 | Tempo control buttons | 24 |  | On / Off switch | |
| 12 | Volume buttons | 25 | Trans | Transpose button | |
| 13 | Dynamics | Touch dynamics |
2. General operation
1) Switch on
Switch the instrument on or off with the On / Off switch.
2) Volume control
Increase or decrease the volume with the volume buttons.
4) Selecting the tone color
Select the desired tone color using the Tone – / Tone + buttons.
5) Selection of the accompaniment rhythm
Select the desired rhythm using the RHY – / RHY + keys. Stop the rhythm accompaniment by pressing the Stop / Pause button.
6) Tempo
Increase or decrease the speed with the tempo control buttons.
7) Demo
By pressing the Demo button, you enter the menu for playing the demo songs. Select the desired song by pressing the Demo button several times. Stop the demo playback by pressing the Stop / Pause button.
8) Touch dynamics
Press the Dynamics button to toggle touch dynamics active or inactive.
9) Transpose function
By pressing the Trans button you enter the menu for the transpose function. Raise or lower the pitch in semitone steps by pressing the Trans button several times.
10) Metronome
Press the metronome button to activate the metronome. Press this button again to deactivate the metronome.
11) Recording function
Press REC to switch to the recording mode. Press any key on the keyboard to start recording. During recording, press the Play button to play back the recorded data. Stop the playback by pressing the Stop / Pause button. To play back again, press Play again.
Press REC again to clear the memory and return to the recording mode.
12) Sustain
Press the Sustain button to prolong the decay of the selected sound. Press the button again to exit this setting.
13) Vibrato
Press the Vibrato button to add a vibrato effect to the played sound. Press the button again to exit this setting.
14) Drum Kit
Press the Drum Kit button to use the keyboard as a percussion instrument. Press this button again to exit this mode.
15) Grand Piano
Press the Grand Piano button to switch to piano sound at any time. Press this button again to exit the Piano mode.
16) Tutorial function
Press the Tutorial button to switch to the teaching mode. By repeatedly pressing the Tutorial key, you can choose between different songs. The instrument will no w play the left hand accompaniment. The melody part will be played by the instrument independently when you press any key on the keyboard in the correct rhythm. Exit this function by pressing the Stop / Pause button.
3. Connections
1) Midi connection via cable
The piano can be connected to any midi-enabled program on your computer via the USB midi interface.
If you don’t have a midi capable software installed on your computer yet, you can find a free software for Windows to test the function of your piano at https://www.kirstein.de/produkte/00046/00046319/en-piano.zip for download.
2) Pedal connector
Connect the supplied sustain pedal to the side pedal connector of your instrument.
3) Charging the built-in battery
Connect the supplied power adapter to the USB DC 5V port of your instrument. The LED charging indicator signals when the battery is fully charged.
WEEE Declaration
(Waste of Electrical and Electronic Equipment)
Your product has been designed and manufactured with high quality materials and components that can be recycled and reused.
This symbol means that electrical and electronic equipment must be disposed of separately from household waste at the end of its useful life.![]() Please dispose of this device at your local municipal collection point or recycling center. Please help preserve the environment in which we live.
Please dispose of this device at your local municipal collection point or recycling center. Please help preserve the environment in which we live.
Technical changes and changes in appearance are reserved.
All information is correct at the time of going to press.
Musikhaus Kirstein GmbH does not assume any liability for the correctness and completeness of the descriptions, illustrations and information contained therein.
Colors and specifications shown may vary slightly from the product.
Musikhaus Kirstein GmbH – Products are only available through authorized dealers.
Distributors and dealers are not authorized agents of Musikhaus Kirstein GmbH and have no authority to legally bind Musikhaus Kirstein GmbH in any way, whether expressly or by conclusive action.
SIMPLIFIED EU DECLARATION OF CONFORMITY
Musikhaus Kirstein GmbH hereby declares that the radio equipment type [Funkey SP-561 / SP588 / KP-88] is in compliance with Directive 2014/53/EU. The full text of the EU Declaration of Conformity is available at the following internet address:
http://www.kirstein.de/docs/Konformitaetserklaerung/CE_Konformitaetserklaerung_00074008.pdf
![]()
Musikhaus Kirstein GmbH![]() Bernbeurener Str. 11
Bernbeurener Str. 11
86956 Schongau – Germany
Phone: 0049-8861-909494-0
Fax: 0049-8861-909494-19


