![]()
![]()
 Owner’s Manual
Main features
5 The Loop Mix function lets you perform great-sounding music simply by selecting a genre and pressing keys.You can perform easily, without paying attention to pitch or timing. In addition, you can use the performance pads to apply e”ects in real time.
5 Bluetooth functionality allows interoperation with your smartphone or tablet.
Music or the audio from a music video on your smartphone or tablet can be played via this instrument while you perform along with the music. You can also use this instrument’s keyboard to play a music app that supports Bluetooth MIDI (only for units equipped with Bluetooth). 5 The portable all-in-one design is compact and light-weight, featuring batterypowered operation, built-in high-quality speakers, and a stylish shape that’s free of protrusions.
Provision of Bluetooth functionality
Please be aware that depending on the country in which you purchased the unit, Bluetooth functionality might not be included.
If Bluetooth functionality is included
The Bluetooth logo appears when you turn on the power.
![]()
Before using this unit, carefully read “USING THE UNIT SAFELY” and “IMPORTANT NOTES” (the lea!et “USING THE UNIT SAFELY” and the Owner’s Manual (p. 13)). After reading, keep the document(s) where it will be available for immediate reference.
Copyright © 2017 ROLAND CORPORATION
Operating Guide
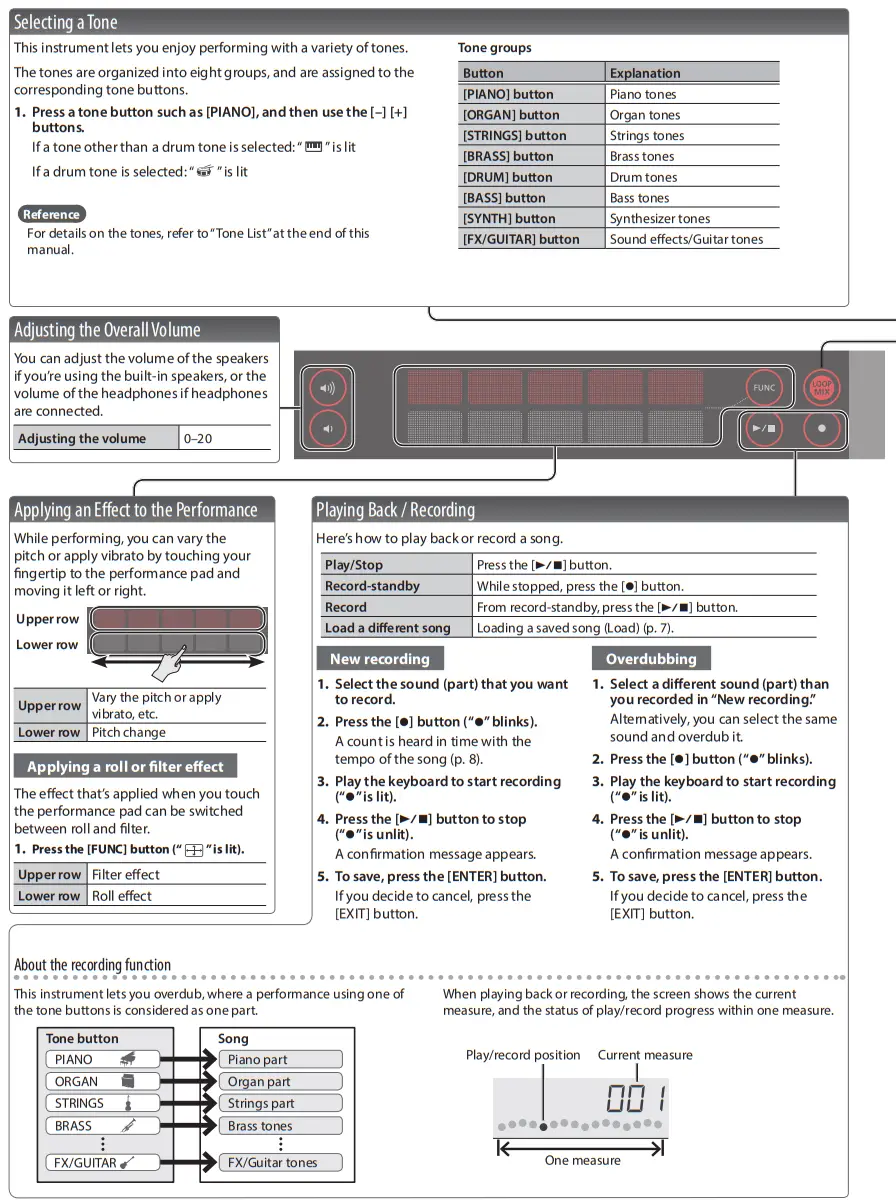
Selecting a Tone
This instrument lets you enjoy performing with a variety of tones.
The tones are organized into eight groups, and are assigned to the corresponding tone buttons.
1. Press a tone button such as [PIANO], and then use the [–] [+] buttons.
If a tone other than a drum tone is selected: “![]() ” is lit
” is lit
If a drum tone is selected: “ ![]() ” is lit
” is lit
Reference
For details on the tones, refer to “Tone List” at the end of this manual.
Tone groups
| Button | Explanation |
| [PIANO] button | Piano tones |
| [ORGAN] button | Organ tones |
| [STRINGS] button | Strings tones |
| [BRASS] button | Brass tones |
| [DRUM] button | Drum tones |
| [BASS] button | Bass tones |
| [SYNTH] button | Synthesizer tones |
| [FX/GUITAR] button | Sound e”ects/Guitar tones |
Connecting Equipment
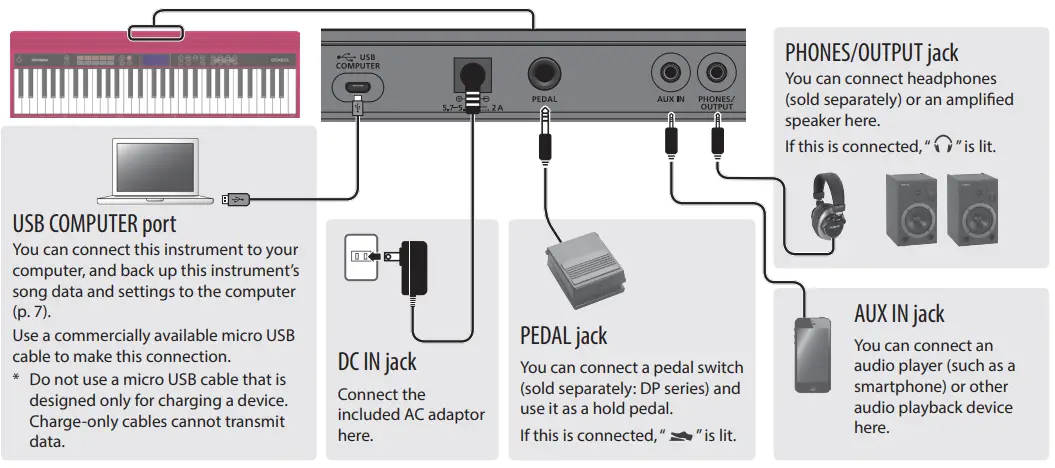
* To prevent malfunction and equipment failure, always turn down the volume, and turn o” all the units before making any connections.
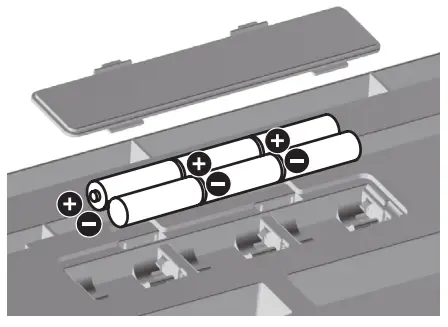
Installing Batteries
If six commercially available nickel-metal hydride or alkaline AA batteries are installed, you can perform without connecting an AC adaptor.
- Remove the battery cover.
- Install the batteries, making sure that they are oriented correctly.
- Close the battery cover.
* If you handle batteries improperly, you risk explosion and !uid leakage. Make sure that you carefully observe all of the items related to batteries that are listed in “USING THE UNIT SAFELY” and “IMPORTANT NOTES” (lea!et “USING THE UNIT SAFELY” and Owner’s Manual p. 13).
* When the batteries run low, the display indicates “Battery Low!” When this occurs, install fresh batteries.
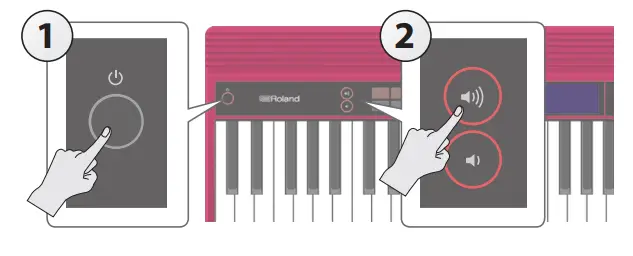
Turning the Power On/O!
- Press the [L] (power) button to turn on the power.
- Use the [ ] [ ] buttons to adjust the volume.
- To turn the power o!, hold down the [L](power) button for one second or longer.
Concerning the Auto O! function
The power to this unit will be turned o” automatically after a predetermined amount of time has passed since it was last used for playing music, or its buttons or controls were operated (Auto O” function).
If you do not want the power to be turned o” automatically, disengage the Auto O” function (p. 9).
NOTE
To restore power, turn the power on again.
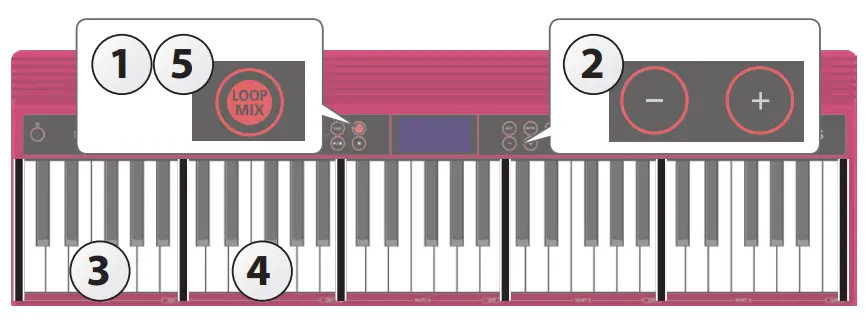
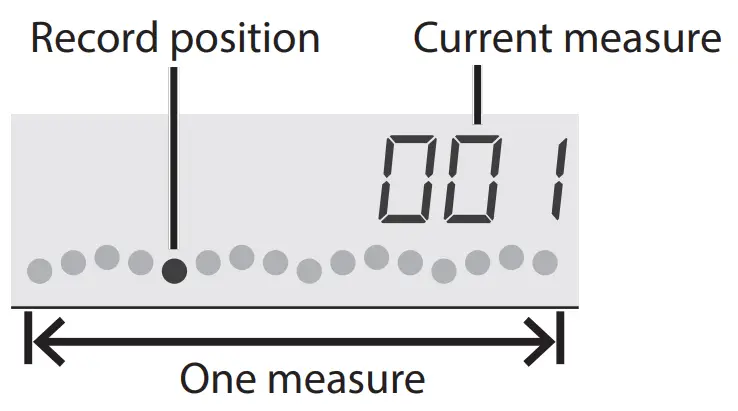
Performing with the Loop Mix Function
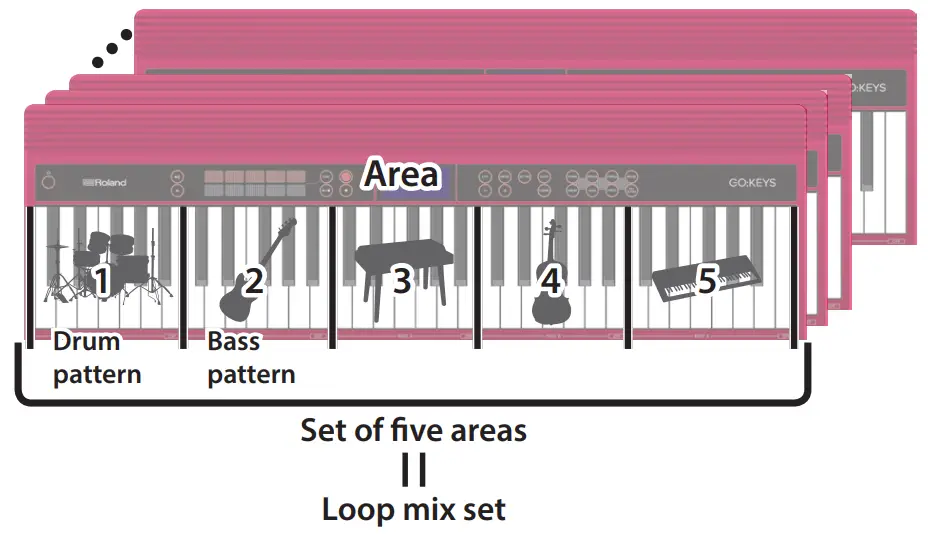
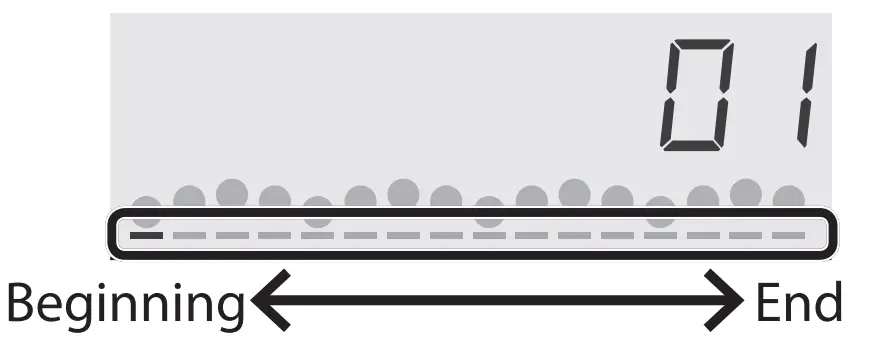
Loop mix is a function that lets you play patterns (accompaniment tones or drum tones) by pressing notes on the keyboard.
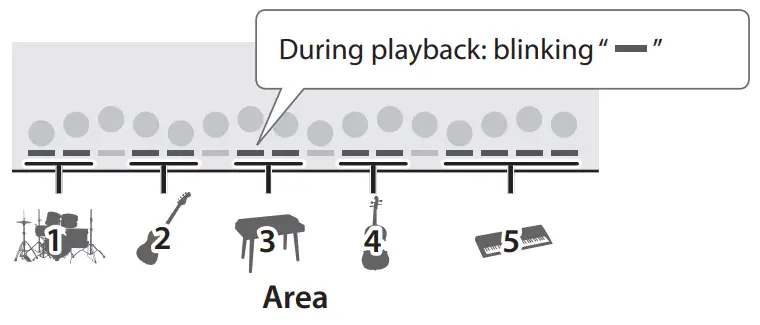
Patterns for each tone part are assigned to #ve areas of the keyboard. These #ve areas are collectively called a “loop mix set.”
One pattern can be played in each area; patterns are two measures long, and play back repeatedly (as a loop).
In every loop mix set, a drum pattern is assigned to area 1 and a bass pattern is assigned to area 2.
This instrument lets you enjoy performing with loop mix sets that cover a wide variety of musical genres.
* The song function and the loop mix function can’t be used at the same time.
MEMO
- You can change the tempo of the pattern (p. 8).
- Only in area 5, you can play patterns with multiple tone parameters. You can also press multiple keys at the same time to play them simultaneously.
- For details on the loop mix sets and patterns, refer to “Loop Mix Set List” at the end of this manual.
Here we explain the procedure for performing a bass tone while sounding a drum tone.
Selecting a loop mix set
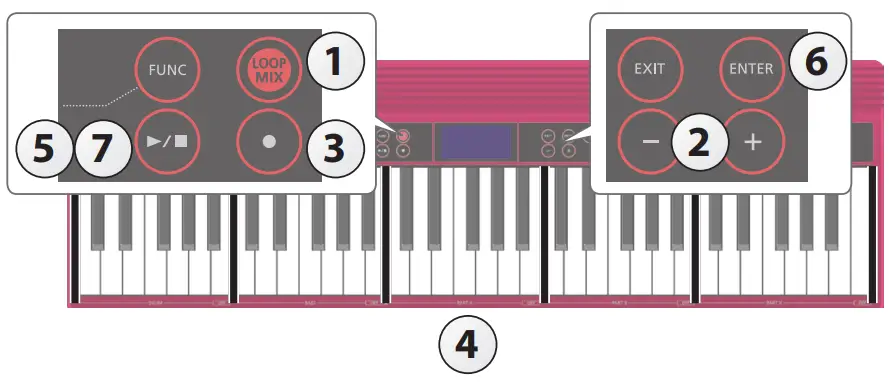
- Press the [LOOP MIX] button to turn the loop mix function on (“
 ” is lit).
If you press the [LOOP MIX] button while a song is loaded, the display indicates “CLEAR SONG?”
If you want to use the loop mix function, press the [ENTER] button to clear the song. You can recall the cleared song by loading it again (p. 7). - Use the [–] [+] buttons to select the loop mix set that you want.
 Playing a drum part pattern
 - Press one of the keys in area 1.
A drum tone pattern sounds. To stop the patterns
To stop one pattern Press the right-most key of the area whose pattern you want to stop. 
To stop all patterns Press the [  ] button.
If you press the [] button once again, the patterns play in the previous state. - Press keys in area 2 one at a time.
A bass tone pattern sounds.
If you want to add more parts to the playback, press keys in each of the other areas. - Press the [LOOP MIX] button to return to the normal performance state (“ ” is unlit).
To stop the pattern, press the [] button.
 To stop the patterns
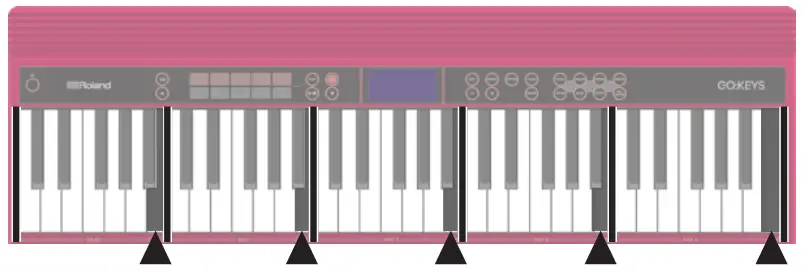
Playing Patterns According to the Chord You Play (Interactive Chord)
While the loop mix function is playing patterns, you can use the interactive chord function to vary the patterns according to the chords that you play.
For more about the interactive chord function, refer to “Sounding Patterns According to the Chord You Play (Interactive Chord)” (p. 3).
Recording with the Loop Mix Function
You can easily create a song by recording with the loop mix function.
* If you want to record a new song, clear the song before you proceed (p. 3).
Here we explain the procedure for recording the drum tone and bass tone.
Selecting a loop mix set
- Press the [LOOP MIX] button to turn the loop mix function on (“ ” is lit).
- Use the [–] [+] buttons to select the loop mix set that you want.
Recording your performance - Press the [t] button (“
 ” blinks).
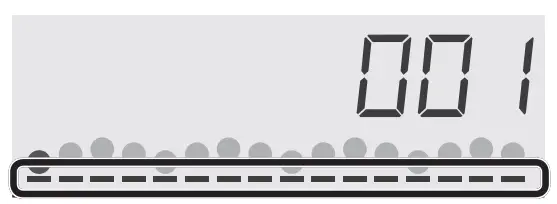
Now you’re in the record-standby state. - Press a key in each area to start recording (“” is lit).
When you press a key, recording starts and the number of recorded measures is shown in the screen. MEMO
MEMO
Your performance using the interactive chord function (p. 3) is also recorded. - Press the [] button to stop recording (“t” is unlit).
A con#rmation message appears. - To save, press the [ENTER] button.
If you decide to cancel, press the [EXIT] button. - When you once again press the [] button, the recorded performance plays back.
 MEMO
MEMOConvenient Functions
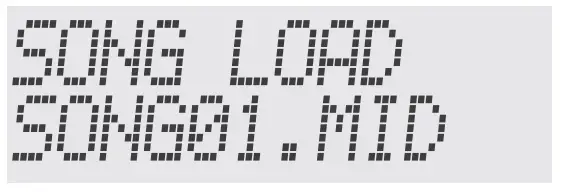
Loading a Song (SONG LOAD)
Here’s how to load a song that’s saved in internal memory.
* When you load a song, the recorded data of the current song is lost. If you’ve created a song that you want to keep, you should save it.
- Press the [SETTING] button several times to make the display indicate SONG LOAD.

- Press the [ENTER] button.
- Use the [–] [+] buttons to select the song that you want to load.

- Press the [ENTER] button.
When a song is loaded, the indicator in the lower part of the screen is lit.

Deleting a Song (SONG DEL)
Here’s how to delete a song that’s saved in internal memory.
- Press the [SETTING] button several times to make the display indicate SONG DEL.

- Press the [ENTER] button.
- Use the [–] [+] buttons to select the song that you want to delete.

- Press the [ENTER] button.
A con#rmation message appears. If you decide to cancel, press the [EXIT] button.
 - Press the [ENTER] button.
The song is deleted.


 If you decide to cancel, press the [EXIT] button.
Backing-Up or Restoring Songs and Settings
Songs (SMF format) and settings that you’ve saved in this instrument can be backed-up to your computer. Songs and settings that you’ve backed-up on your computer can also be restored to this instrument.
* Before you execute backup or restore, use a micro USB cable to connect this instrument to your computer.
MEMO
Since songs are in SMF format, you can use them in your DAW or other music software.
Backing Up (BACKUP)
- Press the [SETTING] button several times to make the display indicate BACKUP.

- Press the [ENTER] button.
The BACKUP drive appears in the screen of your computer. - Copy the GO-61 folder of the BACKUP drive to your computer.
* Copy this entire “GO-61” folder to your computer. Similarly when executing restore, copy the entire “GO-61” folder.
Backup or restore won’t occur correctly if you copy just the folder that’s inside the “GO-61” folder, or if you copy only some of the #les. - On your computer, perform the appropriate steps to end (unmount) the connection with this instrument.
The normal screen of this instrument reappears.
MEMO
When backing up or restoring data, there might be cases in which backup or restore does not proceed even if you end (unmount) the connection on your computer.
If so, end the connection on your computer, and then press the [EXIT] button of this instrument.
If you’re using a Mac, end the connection; then when you’re #nished, press this instrument’s [EXIT] button.

Restoring (RESTORE)
- Press the [SETTING] button several times to make the display indicate RESTORE.

- Press the [ENTER] button.
The RESTORE drive appears in the screen of your computer. - Copy the GO-61 folder into the RESTORE drive.
- On your computer, perform the appropriate steps to end (unmount) the connection with this instrument.
When the connection is ended, restore begins.
When restore is completed, the screen indicates “Completed.
TurnO”Power.” - Turn the power of this instrument o! and on again (p. 4).

Restoring the Factory Settings (FACTORY RST)
Here’s how the settings of this instrument can be returned to their factory-set state. This operation is called factory reset.
NOTE
When you execute this operation, all songs and settings saved in this instrument are lost. If there are songs that you want to keep, back them up to your computer (p. 7).
- Press the [SETTING] button several times to make the display indicate FACTORY RST.

- Press the [ENTER] button.
A con#rmation message appears. If you decide to cancel, press the [EXIT] button.
 - Press the [ENTER] button.
The factory reset is executed.

 If you decide to cancel, press the [EXIT] button.
Setting Various Functions (Setting)
Basic Operations in Setting
- Press the [SETTING] button to select an item (“ ” is lit).
The item switches each time you press the [SETTING] button - Use the [–] [+] buttons to change the value of the setting.
- Press the [EXIT] button when you’re “nished making settings (“ ” is unlit).
MEMO
- When you’re making settings (while
 “
“
” is lit), you can press the performance pad to select the setting item
- The lower part of the screen shows the position of the selected item.

- These settings can be backed up (p. 7).
| Indication | Value/Explanation |
| PART VOLUME *1 | Adjusting the Volume of the Part (PART VOLUME) This adjusts the volume of the part. * Use a tone button to select the part that you want to adjust. 0–127 |
| TEMPO *1 | Changing the Tempo (TEMPO) This changes the tempo of the song and pattern. MEMO You can also specify the tempo by pressing the performance pad at the appropriate interval of timing (tap tempo). 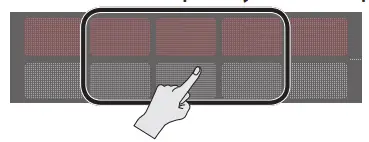 |
| REVERB LEVEL *1 | Adjusting the Reverberation (REVERB LEVEL) This adds reverberation that is characteristic of a performance in a concert hall. 0–10 |
| OCTAVE SHIFT *1 | Changing the Pitch Range of the Keyboard in Steps of an Octave (OCTAVE SHIFT) This shifts the pitch of the keyboard in steps of an octave. -3–0–3 |
| TRANSPOSE *1 | Transposing the Pitch (TRANSPOSE) The keyboard can be transposed in semitone steps.  For example if a song is in the key of E major but you want to play it using the #ngering of the C major scale, you would set the keyboard transpose setting to “4.” -5–0–+6 For example if a song is in the key of E major but you want to play it using the #ngering of the C major scale, you would set the keyboard transpose setting to “4.” -5–0–+6 |
| MASTER TUNE | Matching the Pitch with Other Instruments (MASTER TUNE) When playing ensemble with other instruments and in other such instances, you can match the standard pitch to another instrument. The standard pitch generally refers to the pitch of the note that’s played when you #nger the middle A key. For a cleaner ensemble sound while performing with one or more other instruments, ensure that each instrument’s standard pitch is in tune with that of the other instruments. This tuning of all the instruments to a standard pitch is called “master tuning.” 415.3 Hz–440.0 Hz–466.2 Hz |
| KEY TOUCH | Specifying the Feel (Touch Response) of the Keyboard (KEY TOUCH) This changes the feel (touch response) of the keyboard. If you’ve speci#ed “Fix,” notes will sound at the same volume regardless of how strongly you play the keyboard. Fix, Light, Medium, Heavy |
| TOUCH SOUND | Emitting an Operation Sound When You Press a Button (TOUCH SOUND) You can specify whether an operation sound is played (On) or is not played (O” ) when you press one of this instrument’s buttons. |
| SP PHONES SW | Muting the Speakers When Headphones Are Connected (SP PHONES SW) This speci#es whether connecting headphones automatically mutes this instrument’s speakers (On) or does not mute them (O” ). |
| GM2 TONE | Displaying GM2 Tones (GM2 TONE) This speci#es whether GM2 tones are shown (On) or not shown (O” ) when you’re selecting tones. Reference For details on the GM2 tones, refer to “Tone List” at the end of this manual. |
| KEEP SETTING | Preserving the Settings When the Power Turns o! (KEEP SETTING) The following settings return to their default values when you turn o” the power; however by turning this setting “On,” you can preserve the settings that were in use when the power was turned o”. The next time the power turns on, those previous settings are reproduced. Settings that can be preserved: PART VOLUME, TEMPO, REVERB LEVEL, OCTAVE SHIFT, TRANSPOSE, and the tone that is selected for each group |
| SONG LOAD | Refer to “Loading a Song (SONG LOAD)” (p. 7). |
| SONG DEL | Refer to “Deleting a Song (SONG DEL)” (p. 7). |
| BLUETOOTH | Refer to “Using the Bluetooth® Functionality” (p. 10). |
| BT PAIRING | |
| BLUETOOTH ID | |
| BACKUP | Refer to “Backing-Up or Restoring Songs and Settings” (p. 7). |
| RESTORE | |
| AUTO OFF | Making the Power Automatically Turn o! After a Time (AUTO OFF) This instrument automatically turns o” its power when 30 minutes have elapsed since it was last played or operated (this is the factory setting). If you don’t want the power to turn o” automatically, set Auto O” to “O”.” O!, 30, 240 (min) |
| LCD CONTRAST | Adjusting the Brightness of the Display (LCD CONTRAST) Adjusts the brightness of this instrument’s display. 0–10 |
| FACTORY RST | Refer to “Restoring the Factory Settings (FACTORY RST)” (p. 8). |
| VERSION | This shows the version of this instrument’s program. |
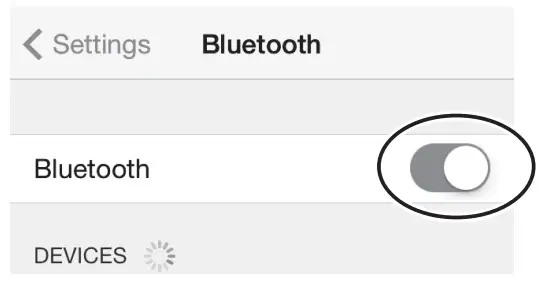
Using the Bluetooth® Functionality
Provision of Bluetooth functionality
Please be aware that depending on the country in which you purchased the unit, Bluetooth functionality might not be included.
If Bluetooth functionality is included
![]()
Here’s What You Can Do
Bluetooth functionality creates a wireless connection between a mobile device such as a smartphone or tablet (subsequently referred to as the “mobile device”) and this unit, allowing you to do the following.
Bluetooth audio
You can use the speakers of this instrument to listen to music or music videos played on your mobile device.
MIDI data transmission and reception
MIDI data can be exchanged between this unit and the mobile device.
You can use the keyboard of this instrument to play a music app that supports Bluetooth MIDI.
Using Bluetooth Audio
* The volume of the Bluetooth audio cannot be adjusted from this unit. Adjust the volume on the mobile device.
Registering a Mobile Device (Pairing)
“Pairing” is the procedure by which the mobile device that you want to use is registered on this unit (the two devices recognize each other).
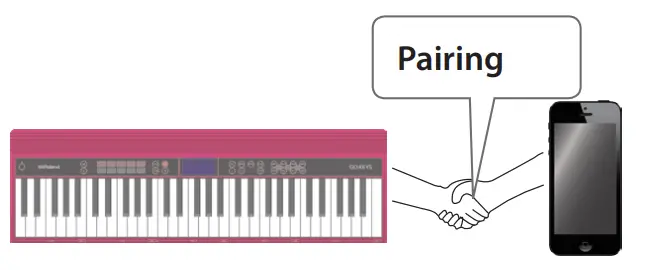
Make settings so that music data saved on the mobile device can be played wirelessly via this unit.
MEMO
- Once a mobile device has been paired with this unit, there is no need to perform pairing again. If you want to connect this unit with a mobile device that has already been paired, refer to “Connecting an Already-Paired Mobile Device” (p. 10).
- Pairing is required again if you execute a Factory Reset (p. 8).
- The following explanation of the procedure is only one example. For details, refer to the owner’s manual of your mobile device.
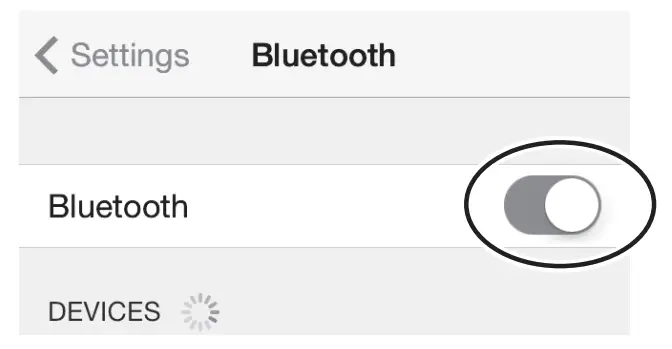
* Make sure that this unit’s Bluetooth function is “On” (settings0“BLUETOOTH” turned “On”).
- Place the mobile device that you want to connect nearby this unit.
MEMO
If you have more than one unit of this model, power-on only the unit that you want to pair (power-o” the other units). - Press the [SETTING] button several times to make the display indicate BT PAIRING.
- Press the [ENTER] button.
The display indicates “PAIRING…,” and this unit waits for a response from the mobile device. MEMO
If you decide to cancel pairing, press the [Exit] button. - Turn on the Bluetooth function of the mobile device.
 The explanation here uses the iPhone as an example. For details, refer to the owner’s manual of your mobile device.
 - Tap “GO:KEYS Audio” that is shown in the Bluetooth device screen of your mobile device.
This unit is paired with the mobile device. When pairing succeeds, “GO:KEYS Audio” is added to the list of “Paired Devices” on your mobile device. - Press the [EXIT] button when you’re “nished making settings.
 The explanation here uses the iPhone as an example. For details, refer to the owner’s manual of your mobile device.
Specifying the Bluetooth ID
You can specify a number that is added following the device name of this unit when it is displayed by a Bluetooth connected application.
If you own multiple units of the same instrument, this is a convenient way to distinguish them.
- Press the [SETTING] button several times to make the display indicate BLUETOOTH ID.
- Use the [–] [+] buttons to edit the value of the setting.
| Parameter | Explanation |
| O!, 1–9 | Set to “O””: “ GO:KEYS Audio,” “GO:KEYS MIDI” (default value) Set to “1”: “GO:KEYS Audio 1,” “GO:KEYS MIDI 1” |
Connecting an Already-Paired Mobile Device
- Turn on the Bluetooth function of the mobile device.
MEMO
If you were unable to establish a connection using the procedure above, tap “GO:KEYS Audio” that is displayed in the Bluetooth device screen of the mobile device.
To disconnect, either turn this unit’s Bluetooth Audio function “O”” (Setting0turn ”BLUETOOTH” O” ) or turn the mobile device’s Bluetooth function o”.
Transferring MIDI Data
Here’s how to make settings for transmitting and receiving MIDI data between this unit and the mobile device.
Note when using an already-paired iOS device The following operation is required after each time that you execute a factory reset.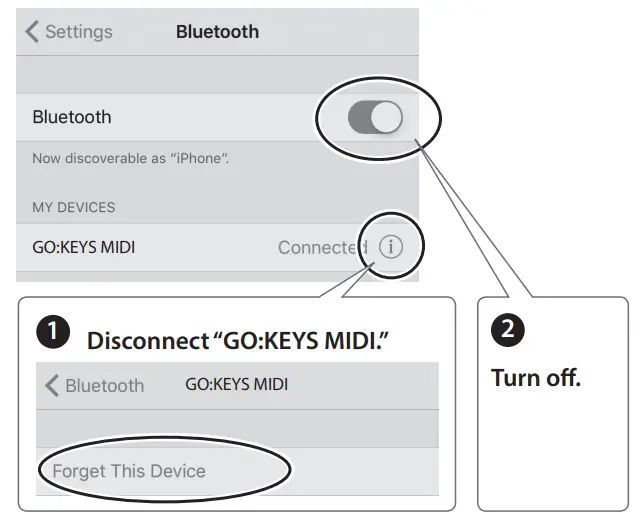
For details, refer to the owner’s manual of your iOS device.
* Make sure that this unit’s Bluetooth function is “On” (settings0“BLUETOOTH” turned “On”).
- Place the mobile device that you want to connect nearby this unit.
MEMO
If you have more than one unit of this model, power-on only the unit that you want to pair (power-o” the other units). - Turn on the Bluetooth function of the mobile device.
 MEMO
MEMO
The explanation here uses the iPhone as an example. For details, refer to the owner’s manual of your mobile device. - In the mobile device’s app (e.g., GarageBand), establish a connection with this unit.
NOTE
Do not tap the “GO:KEYS MIDI” that is shown in the Bluetooth settings of the mobile device.
 MEMO
MEMODisabling the Bluetooth Functionality
Disable the Bluetooth functionality if you don’t want this unit to be connected via Bluetooth with your mobile device.
- Press the [SETTING] button several times to make the display indicate BLUETOOTH.
- Use the [–] [+] buttons to turn the setting “O!.”
- Press the [EXIT] button when you’re “nished making settings.
Troubleshooting
Problem | Items to check | Action | Page |
| Power turns off on its own | Could the auto-off setting be something other than “Off”? | If you don’t need the power to turn off automatically,turn the Auto Off setting “Off.” | p. 9 |
| Power turns on unexpectedly | Is the AC adaptor connected correctly? | – | |
| Could the batteries be exhausted? | Install fresh batteries. | p. 4 | |
| If you connect the AC adaptor and turn on the power when batteries are installed, the AC adaptor will be used preferentially. Even if batteries are installed, the power will not turn on unless the AC adaptor is connected to an AC outlet. If you’re using batteries, disconnect the AC adaptor from this unit. If batteries are installed, connecting or disconnecting the power cord from the outlet or connecting or disconnecting the DC plug of the AC adaptor while this unit is turned on will cause the power to turn off. |
– | ||
| Pedal does not work, or is “stuck” | Is the pedal connected correctly? | p. 4 | |
| The volume level of the unit connected to AUX IN jack is too low | Could the volume of the connected device be turned down? | – | |
| No sound | Are your amp, speakers, headphones, etc., connected correctly? | p. 4 | |
| Is the volume turned down? | p. 2 | ||
| Could the interactive chord function be turned on? | Turn off the interactive chord function. While the chord function is on, the left-most two octaves of the keyboard are used only for inputting chords. Playing the keys in this region won’t produce sound. |
p. 3 | |
| Notes don’t sound right | |||
| The notes you play on the keyboard don’t sound | Could the loop mix function be turned on? | Turn off the loop mix function. | p. 5 |
| The notes have the wrong pitch | Could you have changed the transpose setting? | p. 9 | |
Problems with Bluetooth functionality
| Problem | Items to check/Action | Page | |
| This unit does not appear in the Bluetooth device list of your mobile device | Could the Bluetooth function be turned “Off”? | Turn the Bluetooth function “On.” Setting0turn ”BLUETOOTH” On Bluetooth Audio function: A device named “GO:KEYS Audio” appears. Bluetooth MIDI function: A device named “GO:KEYS MIDI” appears. You can check this from the settings inside an app such as GarageBand. |
p. 11 |
| Can’t connect to Bluetooth audio | If this unit is visible as a device in the mobile device’s Bluetooth settings | Delete the device’s registration, turn the Bluetooth Audio function “Off” and then “On” again, and establish pairing once again. | p. 11 |
| If this unit is not visible as a device | Turn the mobile device’s Bluetooth function off and then on again, and initiate pairing from this unit to re-establish pairing. | p. 10 | |
| Can’t connect to Bluetooth MIDI | In some cases, the connection with the mobile device might become unavailable when you switch the Bluetooth MIDI function. | – | |
| After unpairing the “GO:KEYS MIDI” that is registered on the mobile device, turn the mobile device’s Bluetooth function off and then on again, and reconnect it. | |||
| Can’t connect via MIDI | You must make the connection not from the mobile device’s Bluetooth setting but from the setting within GarageBand or other app that you’re using. | ||
| Can’t establish pairing with the MIDI function | The MIDI function is paired when you first select a device on the mobile device and establish a connection. There is no need to initiate pairing from this unit. | ||
| Can’t connect a paired mobile device | If the connection breaks immediately after it is established, turning the Bluetooth device’s Bluetooth switch off and then on again may allow connection to occur. | ||
MEMO
If checking these points does not solve the problem, please refer to the Roland support website. http://www.roland.com/support/
USING THE UNIT SAFELY
![]() WARNING
WARNING
Concerning the Auto O! function
The power to this unit will be turned o” automatically after a predetermined amount of time has passed since it was last used for playing music, or its buttons or controls were operated (Auto O” function). If you do not want the power to be turned o” automatically, disengage the Auto O” function (p. 9).![]() Use only the stand that is recommended This unit should be used only with a stand that is recommended by Roland.
Use only the stand that is recommended This unit should be used only with a stand that is recommended by Roland.![]() Do not place in a location that is unstable
Do not place in a location that is unstable
When using the unit with a stand recommended by Roland, the stand must be carefully placed so it is level and sure to remain stable. If not using a stand, you still need to make sure that any location you choose for placing the unit provides a level surface that will properly support the unit, and keep it from wobbling.![]() WARNING
WARNING
Precautions regarding placement of this unit on a stand![]() Be sure to follow the instructions in the Owner’s Manual carefully when placing this unit on a stand (p. 14).
Be sure to follow the instructions in the Owner’s Manual carefully when placing this unit on a stand (p. 14).
If it is not set up properly, you risk creating an unstable situation which could lead to the unit falling or the stand toppling, and may result in injury.
Use only the supplied AC adaptor and the correct voltage![]() Be sure to use only the AC adaptor supplied with the unit.
Be sure to use only the AC adaptor supplied with the unit.
Also, make sure the line voltage at the installation matches the input voltage specified on the AC adaptor’s body. Other AC adaptors may use a di”erent polarity, or be designed for a di”erent voltage, so their use could result in damage, malfunction, or electric shock.![]() CAUTION
CAUTION
Use only the speci”ed stand(s)![]() This unit is designed to be used in combination with specific stands (KS-12) manufactured by Roland. If used in combination with other stands, you risk sustaining injuries as the result of this product dropping down or toppling over due to a lack of stability.
This unit is designed to be used in combination with specific stands (KS-12) manufactured by Roland. If used in combination with other stands, you risk sustaining injuries as the result of this product dropping down or toppling over due to a lack of stability.![]() Evaluate safety issues before using stands
Evaluate safety issues before using stands
Even if you observe the cautions given in the owner’s manual, certain types of handling may allow this product to fall from the stand, or cause the stand to overturn. Please be mindful of any safety issues before using this product.
IMPORTANT NOTES
Power Supply: Use of Batteries
- If operating this unit on batteries, please use alkaline batteries, rechargeable NiMH batteries.
- Even if batteries are installed, the power turns o” if the power cord is disconnected from the AC outlet while the power is on, or if the AC adaptor is disconnected from this instrument. In this case, unsaved data might be lost. Be sure to turn o” the power before you disconnect the power cord or the AC adaptor.
Placement - Do not allow objects to remain on top of the keyboard. This can be the cause of malfunction, such as keys ceasing to produce sound.
- Depending on the material and temperature of the surface on which you place the unit, its rubber feet may discolor or mar the surface.
Repairs and Data - Before sending the unit away for repairs, be sure to make a backup of the data stored within it; or you may prefer to write down the needed information. Although we will do our utmost to preserve the data stored in your unit when we carry out repairs, in some cases, such as when the memory section is physically damaged, restoration of the stored content may be impossible. Roland assumes no liability concerning the restoration of any stored content that has been lost.
Care of the Keyboard
- Do not write on the keyboard with any pen or other implement, and do not stamp or place any marking on the instrument. Ink will seep into the surface lines and become unremovable.
- Do not a$x stickers on the keyboard. You may be unable to remove stickers that use strong adhesives, and the adhesive may cause discoloration.
- To remove stubborn dirt, use a commercially available keyboard cleaner that does not contain abrasives. Start by wiping lightly. If the dirt does not come o”, wipe using gradually increasing amounts of pressure while taking care not to scratch the keys.
Additional Precautions - Any data stored within the unit can be lost as the result of equipment failure, incorrect operation, etc. To protect yourself against the irretrievable loss of data, try to make a habit of creating regular backups of the data you’ve stored in the unit.
- Roland assumes no liability concerning the restoration of any stored content that has been lost.
- Never strike or apply strong pressure to the display.
- Do not use connection cables that contain a built-in resistor.
Caution Regarding Radio Frequency Emissions
- The following actions may subject you to penalty of law.
- Disassembling or modifying this device.
- Removing the certi#cation label a$xed to the back of this device.
IMPORTANT NOTES
Intellectual Property Right
- It is forbidden by law to make an audio recording, video recording, copy or revision of a third party’s copyrighted work (musical work, video work, broadcast, live performance, or other work), whether in whole or in part, and distribute, sell, lease, perform, or broadcast it without the permission of the copyright owner.
- Do not use this product for purposes that could infringe on a copyright held by a third party. We assume no responsibility whatsoever with regard to any infringements of third-party copyrights arising through your use of this product.
- The copyright of content in this product (the sound waveform data, style data, accompaniment patterns, phrase data, audio loops and image data) is reserved by Roland Corporation.
- Purchasers of this product are permitted to utilize said content (except song data such as Demo Songs) for the creating, performing, recording and distributing original musical works.
- Purchasers of this product are NOT permitted to extract said content in original or modi#ed form, for the purpose of distributing recorded medium of said content or making them available on a computer network
- The Bluetooth® word mark and logos are registered trademarks owned by Bluetooth SIG, Inc. and any use of such marks by Roland is under license.
- Roland and GO:KEYS are either registered trademarks or trademarks of Roland Corporation in the United States and/or other countries.
- Company names and product names appearing in this document are registered trademarks or trademarks of their respective owners.
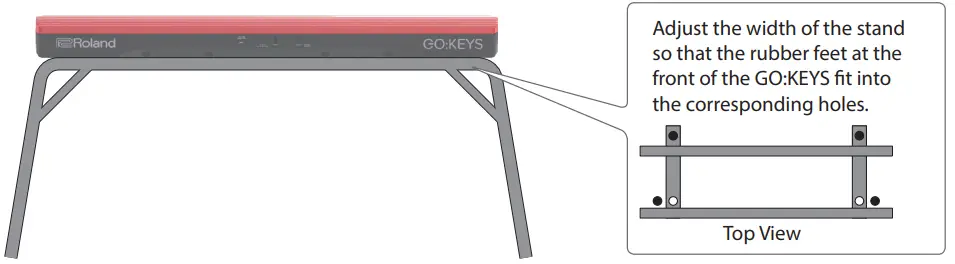
Placing This Unit on a Stand
Be careful not to pinch your #ngers when setting up the stand (KS-12; sold separately).
Place the instrument on the stand as follows.
Main Speci”cations
Roland GO:KEYS : Music Creation Keyboard
| Keyboard | 61 keys (Ivory Feel and Box-shape Keys with velocity) |
| Bluetooth | Bluetooth Ver 4.2 Profile Support: A2DP (Audio), GATT (MIDI over Bluetooth Low Energy) Codec: SBC (Support to the content protection of the SCMS-T method) |
| Power Supply | AC adaptor or Alkaline battery (AA, LR6) / Rechargeable Ni-MH battery (AA, HR6) x 6 * Carbon-zinc batteries cannot be used. |
| Current Draw | 1,000 mA |
| Battery Life for Continuous Use | Rechargeable Ni-MH batteries (AA, HR6): Approximately 6 hours (When using batteries having a capacity of 1,900 mAh.) Alkaline batteries (AA, LR6): Approximately 4 hours * This figure will vary depending on the actual conditions of use. |
| Dimensions | 877 (W) x 271 (D) x 82 (H) mm 34-9/16 (W) x 10-11/16 (D) x 3-1/4 (H) inches |
| Weight | 3.9 kg/8 lbs 10 oz (excluding AC adaptor) |
| Accessories | Owner’s manual, Leaflet “USING THE UNIT SAFELY,” AC adaptor |
| Options (sold separately) | Keyboard stand: KS-12 Pedal switch: DP series |
This document explains the specifications of the product at the time that the document was issued. For the latest information, refer to the Roland website.
Tone List
BASS
| No. | Tone name |
| 01 | Stage Grand |
| 02 | Concert Grand |
| 03 | Pop Piano |
| 04 | Rokkin’ pF |
| 05 | Mellow Tune |
| 06 | Phase EP |
| 07 | Pure EP Trem |
| 08 | sin(EP) |
| 09 | FM EP mix |
| 10 | Pop Bell |
| 11 | Frends Bell |
| 12 | D50Fantasia |
| 13 | Fairy Piano |
| 14 | Grand Hall |
| 15 | Piano+Str |
| 16 | Piano+Pad |
| 17 | Layers |
| 18 | Rapsody |
| 19 | Dyno EP |
| 20 | SA Dance Pno |
| 21 | TEL Stage EP |
| 22 | Back2the60s |
| 23 | Mk2 Stg phsr |
| 24 | TineEP+Pad |
| 25 | Wurly Trem |
| 26 | Vintage Tine |
| 27 | Pulse Clavi |
| 28 | Snappy Clavi |
| 29 | Funky D |
| 30 | Biting Clavi |
| 31 | BPF Clavi Ph |
| 32 | EP Bell |
| 33 | Candy Bell |
| 34 | J-Bell |
| 35 | Chime |
| 36 | Vibe Trem |
| 37 | 50`SteelDrms |
| 38 | Housechord |
| GM2 | |
| 39 | Piano 1 |
| 40 | Piano 1w |
| 41 | European Pf |
| 42 | Piano 2 |
| 43 | Piano 2w |
| 44 | Piano 3 |
| 45 | Piano 3w |
| 46 | Honky-tonk |
| 47 | Honky-tonk 2 |
| 48 | E.Piano 1 |
| 49 | St.Soft EP |
| 50 | FM+SA EP |
| 51 | Wurly |
| 52 | E.Piano 2 |
| 53 | Detuned EP 2 |
| 54 | St.FM EP |
| 55 | EP Legend |
| 56 | EP Phase |
| 57 | Harpsichord |
| 58 | Coupled Hps. |
| 59 | Harpsi.w |
| 60 | Harpsi.o |
| 61 | Clav. |
| 62 | Pulse Clav |
| 63 | Celesta |
| 64 | Glockenspiel |
| 65 | Music Box |
| 66 | Vibraphone |
| 67 | Vibraphone w |
| 68 | Marimba |
| 69 | Marimba w |
| 70 | Xylophone |
| 71 | Tubular-bell |
| 72 | Church Bell |
| 73 | Carillon |
| 74 | Tinkle Bell |
| 75 | Echo Drops |
| 76 | Echo Bell |
| 77 | Echo Pan |
| 78 | Star Theme |
ORGAN
| No. | Tone name |
| 01 | Pop Organ |
| 02 | B Org |
| 03 | Perc Organ |
| 04 | Rochno Org |
| 05 | HardRockORG |
| 06 | GT Org Stack |
| 07 | FullStop Org |
| 08 | FullDraw Org |
| 09 | StakDraw Org |
| 10 | D.Bar Org 1 |
| 11 | D.Bar Org 2 |
| 12 | D.Bar Org 3 |
| 13 | Rhythm’n’B |
| 14 | R&B Organ 1 |
| 15 | R&B Organ 2 |
| 16 | SuperDist Ld |
| 17 | Smoky Organ |
| 18 | Soap Opera |
| 19 | Crummy Organ |
| 20 | Chapel Organ |
| 21 | Cathedral |
| 22 | Pipe Organ 1 |
| 23 | Pipe Organ 2 |
| 24 | Squeeze Me! |
| 25 | J-Harm |
| 26 | Blues harp |
| 27 | Jazz Scat |
| 28 | Syn Opera |
| 29 | Vox Pad |
| 30 | Gospel Oohs |
| 31 | Morning Star |
| 32 | Paradise |
| GM2 | |
| 33 | Organ 1 |
| 34 | Trem. Organ |
| 35 | 60’s Organ 1 |
| 36 | 70’s E.Organ |
| 37 | Organ 2 |
| 38 | Chorus Or.2 |
| 39 | Perc. Organ |
| 40 | Organ 3 |
| 41 | Church Org.1 |
| 42 | Church Org.2 |
| 43 | Church Org.3 |
| 44 | Reed Organ |
| 45 | Puff Organ |
| 46 | Accordion Fr |
| 47 | Accordion It |
| 48 | Harmonica |
| 49 | Bandoneon |
STRINGS
| No. | Tone name |
| 01 | String Ens |
| 02 | Staccato |
| 03 | Pizzicato |
| 04 | Super SynStr |
| 05 | JP Strings |
| 06 | Syn Strings |
| 07 | Strings Pad |
| 08 | Stringship |
| 09 | Sahara Str |
| 10 | Chamber Str |
| 11 | Marcato |
| 12 | Full Strings |
| 13 | Oct Strings |
| 14 | Biggie Bows |
| 15 | Str Stacc mp |
| 16 | Orch Pizz |
| 17 | BrightViolin |
| 18 | Bright Cello |
| 19 | Clustered!?! |
| 20 | Movie Scene |
| 21 | Tronic Str |
| 22 | Symphonika |
| 23 | Cheezy Movie |
| 24 | StepPitShift |
| 25 | NuSoundtrack |
| 26 | Reso Pad |
| 27 | Slow Saw Str |
| 28 | Summer Pad |
| 29 | Frends Pad |
| 30 | Borealis |
| GM2 | |
| 31 | Violin |
| 32 | Slow Violin |
| 33 | Viola |
| 34 | Cello |
| 35 | Contrabass |
| 36 | Tremolo Str |
| 37 | PizzicatoStr |
| 38 | Strings |
| 39 | Orchestra |
| 40 | 60s Strings |
| 41 | Slow Strings |
| 42 | Syn.Strings1 |
| 43 | Syn.Strings3 |
| 44 | Syn.Strings2 |
| 45 | Choir Aahs |
| 46 | Chorus Aahs |
| 47 | Voice Oohs |
| 48 | Humming |
| 49 | SynVox |
| 50 | Analog Voice |
| 51 | Fiddle |
| 52 | OrchestraHit |
| 53 | Bass Hit |
| 54 | 6th Hit |
| 55 | Euro Hit |
BRASS
| No. | Tone name |
| 01 | BreakOut Brs |
| 02 | DetuneSawBrs |
| 03 | J-Pop Brass |
| 04 | JUNO-106 Brs |
| 05 | Wide Syn Brs |
| 06 | 80s Brass |
| 07 | Dual Saw Brs |
| 08 | Poly Brass |
| 09 | BreakOut Key |
| 10 | Brass & Sax |
| 11 | BrassPartOut |
| 12 | Ambi Tp |
| 13 | Harmon Mute |
| 14 | Soft Tb |
| 15 | Spit Flugel |
| 16 | JP8000 Brass |
| 17 | J-Brass |
| 18 | Super Saw |
| 19 | SoftSynBrass |
| 20 | Windy Synth |
| 21 | Silky JP |
| 22 | Cheesy Brass |
| 23 | Stacked Brs |
| 24 | Horny Sax |
| 25 | XP TnrBrethy |
| 26 | Ethnic Lead |
| 27 | Lochscape |
| GM2 | |
| 28 | Trumpet |
| 29 | Dark Trumpet |
| 30 | Trombone |
| 31 | Trombone 2 |
| 32 | Bright Tb |
| 33 | Tuba |
| 34 | MutedTrumpet |
| 35 | MuteTrumpet2 |
| 36 | French Horns |
| 37 | Fr.Horn 2 |
| 38 | Brass 1 |
| 39 | Brass 2 |
| 40 | Synth Brass1 |
| 41 | Pro Brass |
| 42 | Oct SynBrass |
| 43 | Jump Brass |
| 44 | Synth Brass2 |
| 45 | SynBrass sfz |
| 46 | Velo Brass 1 |
| 47 | Soprano Sax |
| 48 | Alto Sax |
| 49 | Tenor Sax |
| 50 | Baritone Sax |
| 51 | Oboe |
| 52 | English Horn |
| 53 | Bassoon |
| 54 | Clarinet |
| 55 | Piccolo |
| 56 | Flute |
| 57 | Recorder |
| 58 | Pan Flute |
| 59 | Bottle Blow |
| 60 | Shakuhachi |
| 61 | Whistle |
| 62 | Ocarina |
| 63 | Bagpipe |
| 64 | Shanai |
DRUM
| No. | Tone name |
| 01 | HipHop Kit |
| 02 | R&B Kit |
| 03 | Pop Kit 1 |
| 04 | Pop Kit 2 |
| 05 | Rock Kit |
| 06 | Dance Kit 1 |
| 07 | Dance Kit 2 |
| 08 | Dance Kit 3 |
| 09 | Dance Kit 4 |
| 10 | Brush Jz Kit |
| GM2 | |
| 11 | GM2 STANDARD |
| 12 | GM2 ROOM |
| 13 | GM2 POWER |
| 14 | GM2 ELECTRIC |
| 15 | GM2 ANALOG |
| 16 | GM2 JAZZ |
| 17 | GM2 BRUSH |
| 18 | GM2 ORCHSTRA |
| 19 | GM2 SFX |
| 20 | Timpani |
| 21 | Agogo |
| 22 | Steel Drums |
| 23 | Woodblock |
| 24 | Castanets |
| 25 | Taiko |
| 26 | Concert BD |
| 27 | Melo. Tom 1 |
| 28 | Melo. Tom 2 |
| 29 | Synth Drum |
| 30 | 808 Tom |
| 31 | Elec Perc |
| 32 | Reverse Cym. |
BASS
No. | Tone name |
| 01 | Saw&MG Bass1 |
| 02 | Mini Like! |
| 03 | Moogy Bass |
| 04 | SH Sawtooth |
| 05 | Foundation |
| 06 | Return2Base! |
| 07 | Chorus Bass |
| 08 | A Big Pick |
| 09 | Ulti Ac Bass |
| 10 | Big Mini 1 |
| 11 | Big Mini 2 |
| 12 | Bs TB |
| 13 | SH-101 Bs |
| 14 | SH-2 Bs |
| 15 | JUNO-106 Bs |
| 16 | Garage Bass |
| 17 | Low Bass |
| 18 | Downright Bs |
| 19 | Cmp’d Fng Bs |
| 20 | FingerMaster |
| 21 | Finger Bs |
| 22 | RichFretless |
| 23 | Fat RubberBs |
| 24 | JUNO Acid Bs |
| 25 | Oil Can Bass |
| 26 | Big Mini 3 |
| 27 | Moogy Bass 2 |
| 28 | JUNO Reso |
| 29 | Alpha SynBs2 |
| 30 | SH Square |
| 31 | MC-404 Bass |
| 32 | Electro Rubb |
| 33 | DCO Bass |
| 34 | Saw&MG Bass2 |
| 35 | Not a Bass |
| 36 | Punch MG 1 |
| 37 | MKS-50 SynBs |
| 38 | Kickin’ Bass |
| 39 | OilDrum Bass |
| 40 | Dust Bass |
| 41 | Glide-iator |
| 42 | Acid Punch |
| 43 | MC-TB Bass |
| 44 | Acdg Bass |
| 45 | Unplug it! |
| 46 | S&H Bass |
| 47 | Destroyed Bs |
| 48 | Muffled MG |
| 49 | Intrusive Bs |
| 50 | TransistorBs |
GM2 | |
| 51 | Acoustic Bs. |
| 52 | Fingered Bs. |
| 53 | Finger Slap |
| 54 | Picked Bass |
| 55 | Fretless Bs. |
| 56 | Slap Bass 1 |
| 57 | Slap Bass 2 |
| 58 | Synth Bass 1 |
| 59 | SynthBass101 |
| 60 | Acid Bass |
| 61 | Clavi Bass |
| 62 | Hammer |
| 63 | Synth Bass 2 |
| 64 | Beef FM Bass |
| 65 | RubberBass 2 |
| 66 | Attack Pulse |
SYNTH
| No. | Tone name |
| 01 | Saw Lead |
| 02 | Jump Poly |
| 03 | JP OctAttack |
| 04 | Gwyo Press |
| 05 | Spooky Lead |
| 06 | GR Lead |
| 07 | Anadroid |
| 08 | Octa Juice |
| 09 | Saw Keystep |
| 10 | Synth Key |
| 11 | Pure Square |
| 12 | Sqr-Seqence |
| 13 | forSequence |
| 14 | Synthi Fizz |
| 15 | Legato Saw |
| 16 | Digitaless |
| 17 | Dance Saws |
| 18 | Houze Clavi |
| 19 | Hot Coffee |
| 20 | Digi-vox Syn |
| 21 | Wind Syn Ld |
| 22 | JUNO Lead |
| 23 | Octa Sync |
| 24 | DC Triangle |
| 25 | Griggley |
| 26 | Dual Profs |
| 27 | Clean? |
| 28 | Syn Lead 1 |
| 29 | Syn Lead 2 |
| 30 | Destroyed Ld |
| 31 | Sync Ld |
| 32 | Vintagolizer |
| 33 | Tri Lead |
| 34 | Sine Lead |
| 35 | Sqr Lead |
| 36 | Evangelized |
| 37 | Stacc Heaven |
| 38 | Oct Unison |
| 39 | Tempest |
| 40 | HPF Sweep |
| 41 | BPF Saw |
| 42 | Tekno Gargle |
| 43 | Dance floor |
| 44 | Nu Trance X |
| 45 | AllinOneRiff |
| 46 | YZ Again |
| 47 | LoFiSequence |
| 48 | Strobe |
| 49 | Rhythmic 5th |
| 50 | Step Trance |
| 51 | Jazzy Arps |
| 52 | Echo Echo |
| 53 | Keep going |
GM2 | |
| 54 | Square Wave |
| 55 | MG Square |
| 56 | 2600 Sine |
| 57 | Saw Wave |
| 58 | OB2 Saw |
| 59 | Doctor Solo |
| 60 | Natural Lead |
| 61 | SequencedSaw |
| 62 | Syn.Calliope |
| 63 | Chiffer Lead |
| 64 | Charang |
| 65 | Wire Lead |
| 66 | Solo Vox |
| 67 | 5th Saw Wave |
| 68 | Bass & Lead |
| 69 | Delayed Lead |
| 70 | Fantasia |
| 71 | Warm Pad |
| 72 | Sine Pad |
| 73 | Polysynth |
| 74 | Space Voice |
| 75 | Itopia |
| 76 | Bowed Glass |
| 77 | Metal Pad |
| 78 | Halo Pad |
| 79 | Sweep Pad |
| 80 | Ice Rain |
| 81 | Soundtrack |
| 82 | Crystal |
| 83 | Syn Mallet |
| 84 | Brightness |
FX/GUITAR
No. | Tone name |
| 01 | Morpher |
| 02 | Alpha Said.. |
| 03 | Try This! |
| 04 | C64 Lead |
| 05 | Synchro Lead |
| 06 | TB Booster |
| 07 | Mini Growl |
| 08 | DoubleBubble |
| 09 | Periscope |
| 10 | MelodicDrums |
| 11 | Acid Lead |
| 12 | Shroomy |
| 13 | Lazer Points |
| 14 | Hot Sync |
| 15 | CerealKiller |
| 16 | Dance Steam |
| 17 | Philly Hit |
| 18 | Good Old Hit |
| 19 | 2ble Action |
| 20 | In da Cave |
| 21 | Fairy’s Song |
| 22 | New Planetz |
| 23 | Seq Saw |
| 24 | Repertition |
| 25 | Technotribe |
| 26 | Crunch Twin |
| 27 | Hurtling Gtr |
| 28 | Wet Nyln Gtr |
| 29 | SoftNyln Gtr |
| 30 | So good ! |
| 31 | DynoJazz Gtr |
| 32 | Clean Gtr |
| 33 | Funk Gtr |
| 34 | Nice Oct Gtr |
| 35 | Crimson Gtr |
| 36 | Plugged!! |
| 37 | Chunk Atk |
| 38 | Power Chord |
| 39 | Sitar on C |
| 40 | Elec Sitar |
| 41 | Pat is away |
| 42 | Nice Kalimba |
| 43 | Harpiness |
| 44 | Monsoon |
| 45 | Bend Koto |
| 46 | Wired Synth |
| 47 | 4DaCommonMan |
| 48 | Orgaenia |
| 49 | Sleeper |
GM2 | |
| 50 | Nylon-str.Gt |
| 51 | Ukulele |
| 52 | Nylon Gt.o |
| 53 | Nylon Gt.2 |
| 54 | Steel-str.Gt |
| 55 | 12-str.Gt |
| 56 | Mandolin |
| 57 | Steel + Body |
| 58 | Jazz Gt. |
| 59 | Pedal Steel |
| 60 | Clean Gt. |
| 61 | Chorus Gt. |
| 62 | Mid Tone GTR |
| 63 | Muted Gt. |
| 64 | Funk Pop |
| 65 | Funk Gt.2 |
| 66 | Jazz Man |
| 67 | Overdrive Gt |
| 68 | Guitar Pinch |
| 69 | DistortionGt |
| 70 | Feedback Gt. |
| 71 | Dist Rtm GTR |
| 72 | Gt.Harmonics |
| 73 | Gt. Feedback |
| 74 | Santur |
| 75 | Atmosphere |
| 76 | Harp |
| 77 | Yang Qin |
| 78 | Goblin |
| 79 | Sitar |
| 80 | Sitar 2 |
| 81 | Banjo |
| 82 | Shamisen |
| 83 | Koto |
| 84 | Taisho Koto |
| 85 | Kalimba |
| 86 | Gt.FretNoise |
| 87 | Gt.Cut Noise |
| 88 | String Slap |
| 89 | Breath Noise |
| 90 | Fl.Key Click |
| 91 | Seashore |
| 92 | Rain |
| 93 | Thunder |
| 94 | Wind |
| 95 | Stream |
| 96 | Bubble |
| 97 | Bird |
| 98 | Dog |
| 99 | Horse-Gallop |
| 100 | Bird 2 |
| 101 | Telephone 1 |
| 102 | Telephone 2 |
| 103 | DoorCreaking |
| 104 | Door |
| 105 | Scratch |
| 106 | Wind Chimes |
| 107 | Helicopter |
| 108 | Car-Engine |
| 109 | Car-Stop |
| 110 | Car-Pass |
| 111 | Car-Crash |
| 112 | Siren |
| 113 | Train |
| 114 | Jetplane |
| 115 | Starship |
| 116 | Burst Noise |
| 117 | Applause |
| 118 | Laughing |
| 119 | Screaming |
| 120 | Punch |
| 121 | Heart Beat |
| 122 | Footsteps |
| 123 | Gun Shot |
| 124 | Machine Gun |
| 125 | Lasergun |
| 126 | Explosion |
Loop Mix Set List
Loop mix set name | Tone name | Key | Tempo | ||||
| 01: Trance | Dance Kit 2 | Mini Like! | Hot Sync (FX/GUITAR) | Synthi Fizz (SYNTH) |  | Cm | 128 |
| 02: Funk (*1) | Pop Kit 1 | SH Sawtooth | DetuneSawBrs (BRASS) | Pure EP Trem (PIANO) |  | Dm | 116 |
| 03: House | Dance Kit 2 | Garage Bass | Piano+Pad (PIANO) | JP OctAttack (SYNTH) |  | Cm | 1420 |
| 04: Drum N’ Bass | Dance Kit 2 | MKS-50 SynBs | Tempest (SYNTH) | Synchro Lead (FX/GUITAR) |  | Cm | 175 |
| 05: Neo HipHop (*1) | HipHop Kit | Ulti Ac Bass | Wurly Trem (PIANO) | BreakOut Key (BRASS) | 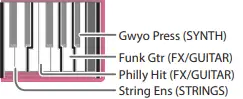 | C | 100 |
| 06: Pop (*1) | Rock Kit | Big Pick | Anadroid (SYNTH) | Pop Bell (PIANO) | 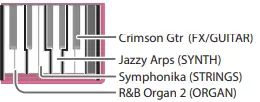 | Cm | 119 |
| 07: Bright Rock (*1) | Rock Kit | A Big Pick | Clean Gtr (FX/GUITAR) | Plugged! (FX/GUITAR) | 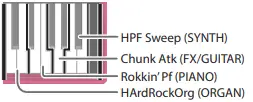 | C | 180 |
| 08: Trap Step | Dance Kit 2 | MKS-50 SynBs | C64 Lead (FX/GUITAR) | Hot Coffee (SYNTH) | 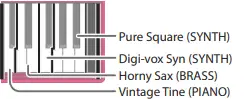 | Cm | 152 |
| 09: Future Bass (*1) | Dance Kit 2 | SH Square | J-Pop Brass (BRASS) | Syn Lead 2 (SYNTH) |  | Am | 120 |
| 10: Trad HipHop | R&B Kit | Finger Bs | Staccato (STRINGS) | StageGrand (PIANO) |  | Cm | 96 |
| 11: EDM | Dance Kit 2 | DCO Bass | JP OctAttack (SYNTH) | Synchro Lead (FX/GUITAR) |  | Cm | 132 |
Loop mix set name | Tone name | Key | Tempo | ||||
| 12: R&B | HipHop Kit | Oil Can Bass | Repertition (FX/GUITAR) | Mellow Tune (PIANO) |  | Bp | 110 |
| 13: Reggaeton (*1) | HipHop Kit | SH Square | SA Dance Pno (PIANO) | Wet Nyln Gtr (FX/GUITAR) |  | Dm | 100 |
| 14: Cumbia | Pop Kit 1 | FingerMaster | Rokkin’ pF (PIANO) | Chorus Gt. (FX/GUITAR) |  | Cm | 180 |
| 15: ColombianPop | Pop Kit 1 | FingerMaster | So good ! (FX/GUITAR) | Accordion Fr (ORGAN) |  | C | 106 |
| 16: Bossa Lounge | R&B Kit | Garage Bass | TEL Stage EP (PIANO) | DynoJazz Gtr (FX/GUITAR) |  | C | 78 |
| 17: Arrocha | Pop Kit 1 | FingerMaster | Phase EP (PIANO) | Smoky Organ (ORGAN) |  | C | 135 |
| 18: Drum’n Bossa | Dance Kit 2 | Foundation | HPF Sweep (SYNTH) | Wet Nyln Gtr (FX/GUITAR) | 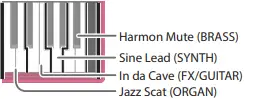 | D | 169 |
| 19: Bahia Mix | Pop Kit 1 | Return2Base | Phase EP (PIANO) | D.Bar Org 1 (ORGAN) | 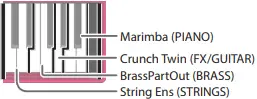 | C | 85 |
| 20: Power Rock | Rock Kit | Cmp’d Fng Bs | Hurtling Gtr (FX/GUITAR) | Plugged (FX/GUITAR) | 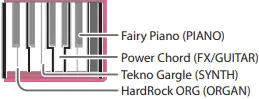 | Am | 154 |
| 21: Classic Rock | Pop Kit 1 | A Big Pick | Rokkin’ pF (PIANO) | R&B Organ2 (ORGAN) | 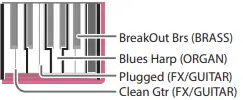 | C | 72 |
| 22: J-Pop | Pop Kit 1 | A Big Pick | So good ! (FX/GUITAR) | Rokkin’ pF (PIANO) |  | C | 156 |

*1: Chord speci”cation is limited; only the key can be speci”ed.![]()


