![]() GP-9 Digital Grand Piano
GP-9 Digital Grand Piano
Owner’s Manual
Here’s What You Can Do
Having Fun Playing the Piano![]() Playing Various Tones
Playing Various Tones
In addition to grand piano tones for use in concerts, this instrument features a wide range of built-in instrument tones. Use these tones as you like according to the song you’re playing and the mood. You can also play two tones layered together to discover your own favorite original combinations.![]() Listening to and Practicing with the Built-in Songs
Listening to and Practicing with the Built-in Songs
This piano comes with built-in songs that are well-known in a variety of genres from classical to jazz, as well as songs for practicing and more. You can use these built-in songs as examples when you practice. A built-in metronome is also available to help develop your sense of rhythm when you play.![]() Recording Your Performance
Recording Your Performance
You can record your own keyboard performance, and then play it back to hear how you did. By listening back to what you played on the spot, you can improve what you did for the next time, or copy your performance to a USB flash drive as a song.
Adjusting the Piano![]() Changing the playing feel (key touch)
Changing the playing feel (key touch)
You can adjust the how the keyboard feels (the key touch) when you play, according to your tastes.![]() Making the pitch match other instruments
Making the pitch match other instruments
When playing in an ensemble or similar situations, you can adjust the reference pitch of this piano to match its tuning with other instruments (master tuning).![]() Creating Your Own Piano Tone (Piano Designer)
Creating Your Own Piano Tone (Piano Designer)
Adjusts the different elements of the grand piano sound, letting you customize the piano sound as you like.![]() Registering your favorite settings (Registration)
Registering your favorite settings (Registration)
You can register your customized settings and then instantly switch between settings for each song or for different players.
More Ways to Further Enjoy This Instrument![]() Playing music through the piano’s speakers (Bluetooth® Audio)
Playing music through the piano’s speakers (Bluetooth® Audio)
You can connect your smartphone or tablet to this instrument and listen to your favorite songs through the piano’s speakers. This lets
you “play along” with the performances of the musicians you admire.![]() Connecting to an app to enjoy various added features (via Bluetooth MIDI)
Connecting to an app to enjoy various added features (via Bluetooth MIDI)
By connecting this piano to an app, you can select even more varied tones, discover new music via Roland Cloud, and use features such as digital sheet music to assist you when you practice… all of which lets you experience a new world of piano performance.
Downloading the app
Download the app for your smartphone or tablet for use with the piano.
 https://www.roland.com/products/roland_piano_app/
This app lets you view sheet music in digital form, practice songs as if you were playing a game, or keep a record of your practicing.
Before using this unit, carefully read “USING THE UNIT SAFELY” and “IMPORTANT NOTES” (leaflet “USING THE UNIT SAFELY” and Owner’s Manual p. 37 and p. 38). After reading, keep the document(s) where it will be available for immediate reference.
Main Specifications
| Sound generator | Piano Sound: Piano Reality Modeling Concert Sound Engine (compatible with Piano Reality Ambience) |
| Keyboard | Piano Reality Hybrid Concert Keyboard (88keys): with Escapement, Ebony/Ivory Feel, Dynamic Sensor Acceleration Technology and Haptic Key Vibration |
| Bluetooth | Bluetooth Ver 4.2 Supported profiles: A2DP (Audio), GATT (MIDI over Bluetooth Low Energy) Supported codec: SBC (compatible with SCMS-T content protection) |
| Power Supply | AC Adaptor |
| Power consumption | 33 W (When using the included AC adaptor) |
| Approximate power consumption when playing the piano at medium volume: 23 W Power consumption when sound has not been played after power-on: 21 W | |
| Dimensions | Top opened (with music rest) 1,445 (W) x 1,501 (D) x 1,787 (H) mm 56-15/16 (W) x 59-1/8 (D) x 70-3/8 (H) inches Top closed (with music rest): 1,440 (W) x 1,501 (D) x 999 (H) mm 56-3/4 (W) x 59-1/8 (D) x 39-3/8 (H) inches |
| Weight | 169.0 kg/372 lbs 10 oz |
| Accessories | Owner’s Manual, “Roland Piano Masterpieces”, Leaflet “Leaflet Stand Assembly”, Leaflet “USING THE UNIT SAFELY”, Power cord, Maintenance set, Key cover, Caster cups, Headphone hook, Cord clamps |
* This document explains the specifications of the product at the time that the document was issued. For the latest information, refer to the Roland website.
Settings Saved Even If the Power Is Turned Off
This piano remembers the “settings that are saved automatically” even when the power is turned off and then on again. You can also configure your favorite settings (Registration), so that the instrument remembers the favorite settings you’ve saved. Other settings return to their default values when you turn the power off and on again.
Settings that are saved automatically
This piano automatically saves the following settings. These settings are remembered even if the power is turned off.
| Setting | Page |
| Speaker Volume | p. 8 |
| Headphones Volume | p. 8 |
| Bluetooth On/Off | p. 25 |
| Bluetooth Volume | p. 25 |
| Bluetooth ID | p. 25 |
| Song Volume SMF | p. 25 |
| Song Volume Audio | p. 25 |
| Input Volume | p. 25 |
| USB Audio Input Vol. | p. 25 |
| SMF Play Mode | p. 26 |
| Count-in Measure | p. 26 |
| Reg. Pedal Shift | p. 27 |
| Language | p. 27 |
| Display Contrast | p. 27 |
| Screen Saver | p. 27 |
| Touch Click Volume | p. 27 |
| Volume Limit | p. 27 |
| Haptic Key Vibration | p. 27 |
| Power Off by the Lid | p. 27 |
| Speaker Auto Mute | p. 28 |
| Auto Off | p. 28 |
| Master Tuning | p. 18 |
| Temperament | p. 18 |
| Temperament Key | p. 18 |
| Metronome Type | p. 12 |
| Beat | p. 12 |
| Metronome Downbeat | p. 12 |
| Metronome Pattern | p. 12 |
| Metronome Volume | p. 12 |
| Metronome Tone | p. 12 |
| Rhythm Pattern | p. 12 |
Settings saved in Registration
Turn the “Registering Your Favorite Settings” (p. 11) setting on to save the following settings.
| Setting | Page |
| Ambience Type | p. 9 |
| Kbd Ambience | p. 9 |
| Brilliance | p. 9 |
| Keyboard Mode | p. 29 |
| Kbd Transpose On/Off * | p. 11 |
| Kbd Transpose | p. 11 |
| Key Touch | p. 11 |
| Hammer Response | p. 11 |
| Whole – Tone/Split – Right Tone/Dual – Tone 1 | p. 9, p. 10 |
| Split – Left Tone | p. 9 |
| Split – Point | p. 9 |
| Split – Balance | p. 9 |
| Split – Left Shift | p. 9 |
| Split – Right Shift | p. 9 |
| Dual – Tone 2 | p. 10 |
| Dual – Balance | p. 10 |
| Dual – Tone1 Shift | p. 10 |
| Dual – Tone2 Shift | p. 10 |
| Twin Piano Mode | p. 29 |
| Song Transpose | p. 25 |
| Damper Pedal Part | p. 26 |
| Center Pedal | p. 26 |
| Left Pedal | p. 26 |
| MIDI Transmit Ch. | p. 27 |
| Rotary speed | p. 9 |
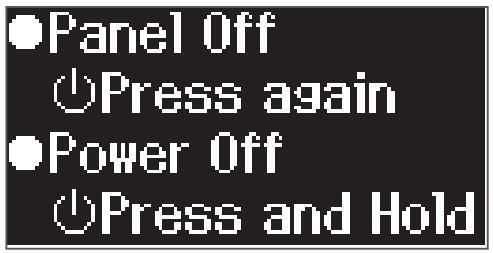
To prevent settings from being accidentally changed while you perform, you can disable all buttons other than the [Ā] button and the [ ![]() ] knob.
] knob.
| Lock the panel | Hold down the [ |
| Unlock the panel | Hold down the [ |
Panel Descriptions
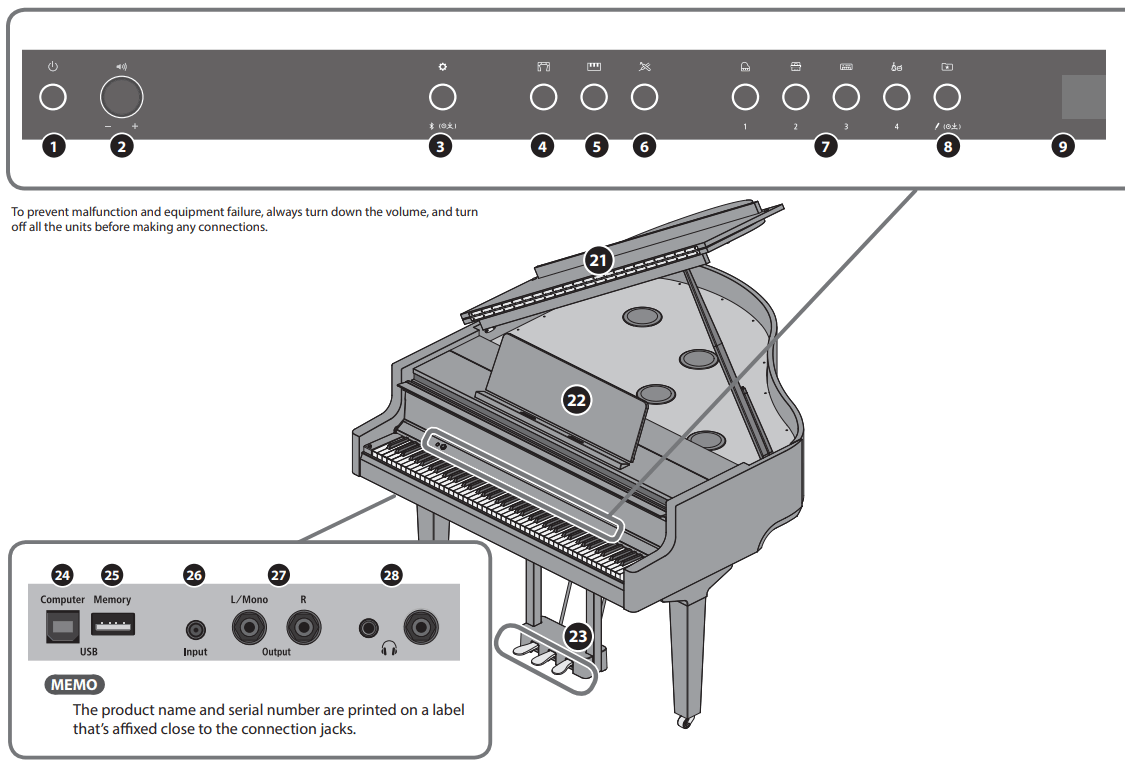
- [
 ] (Power) button
Turns the power on/off.
You can open and close the keyboard cover to turn the piano on/off (p. 7). - [
 ] (Volume) knob
Adjusts the volume of the entire piano.
This adjusts the volume for playing the piano or playing back the songs.
If headphones are connected, it adjusts the volume of the headphones (p. 8). - [
 ] (Function) button
Lets you access function mode, where you can change various settings (p. 25). - [
 ] (Ambience) button
Adds reverberation that makes it sound like you’re playing in a spacious place like a concert hall or a cathedral. Change the type of reverberation to simulate the sound of playing the piano in different places (p. 9).
* You can apply different types of reverberation effects only to the tones in the Grand group. - [
 ] (Keyboard Mode) button
Use this to access Keyboard mode, where you can change various keyboard settings (p. 29). - [
 ] (Piano Designer) button
Adjusts various elements of the piano’s sound, allowing you to customize the sound to your preference (p. 18). - Tone [
 ] (Grand) [
  ] (Upright / Classical) [ ] (E Piano / Organ) [
  ] (Other) buttons
Select the sound that’s played by the keyboard (p. 9).
Press the [ ] (Registration) button to switch these to the [1] [2] [3] [4] buttons. - [ ] (Registration) button
Use this button to select and register the Registration settings (p. 11). - Display
This shows information such as the tone name, song name, tempo, and time signature. - [–] [+] (selection) button
Changes the item or value shown onscreen (p. 8). - [
 ] (Exit) button
Returns to the previous screen, or exits the current screen (p. 8). - [
 ] (Enter) button
Confirms an item or value shown in the screen (p. 8). - [ ] (Metronome) button
Turns the metronome on/off (p. 12). - [
 ] (Tempo) button
Changes the tempo of the metronome or song.
¹ Changing the metronome tempo (p. 12) ¹ Changing the song tempo (p. 13)
- [ ] (Song) button
Selects the built-in song or recorded performance that will be played back (p. 13). - [
 ] (Cue up) button
Selects the beginning of the song (p. 13, p. 15). - [
 ] (Play/Stop) button
Plays/stops the song playback, or start/stops recording (p. 13, p. 15). - [

 ] (Measure) button
Moves the playback position forward or backward to a desired measure in the song (p. 13, p. 15). - [•] (Recording) button
Records the performance that you play (p. 15). - [
 ] (part) button
Lets you select the performance part (right-hand, left-hand, accompaniment) that will play back. This also lets you record parts separately (p. 13, p. 16). - Top lid
The top lid can be opened. Opening the top lid allows the sound to be more clearly defined; closing it produces a softer sound (p. 6). - Music Rest
Place printed music here (p. 6). - Pedal
By pressing the pedals, you can apply effects to the sound of the piano.
You can also assign a variety of functions to the pedals.
¹ Apply effects to the sound of the piano (p. 8)
¹ Assign functions to the pedals (p. 26, p. 27) - USB Computer port
Here you can connect your computer via a USB cable (sold separately). If your computer is connected, performance data can be transferred between the piano and sequencer software (sold separately) on your computer, allowing you to produce or edit music. - USB Memory port
Here you can connect a USB flash drive. You can use it to record your piano performance as audio, or use the piano to play back music data (WAVE files, MIDI files, MP3 files) from the USB flash drive (p. 14, p. 17). - Input jack
Here you can connect a stereo mini-plug cable (commercially available) for connecting your audio player. The sound that’s played back from your audio player can be heard from the piano’s speakers. You can also play the piano along with the playback audio. - Output jacks (L/Mono, R)
Here you can connect external speakers via cables that are equipped with mono 1/4” plugs (commercially available). This is useful when you want to connect to external audio equipment and play in front of many people. - Phones jacks
Here you can connect stereo headphones. This piano has two headphone jacks, so two people can use headphones at the same time (p. 8).

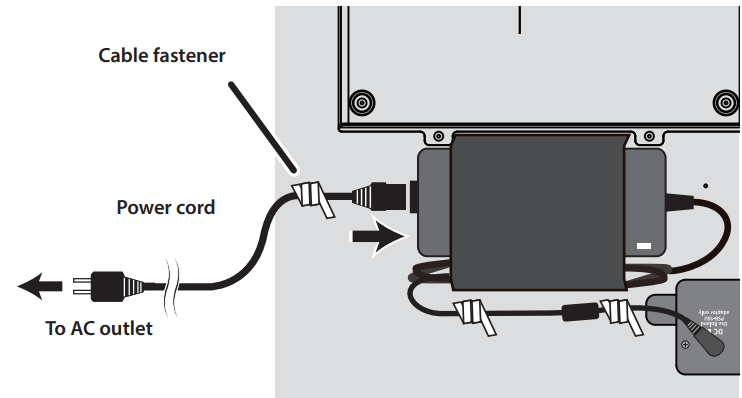
Connecting the pedal cord and the power cord
- Connect the pedal cord to the Pedal jack, and fasten the pedal cord with the single cable fastener.
 NOTE
NOTE
The pedal cord plug may be damaged if you rotate it while the plug is only halfway inserted.
Check the illustration above to make sure that the plug faces correctly before you insert it
- Plug the power cord into an AC outlet.

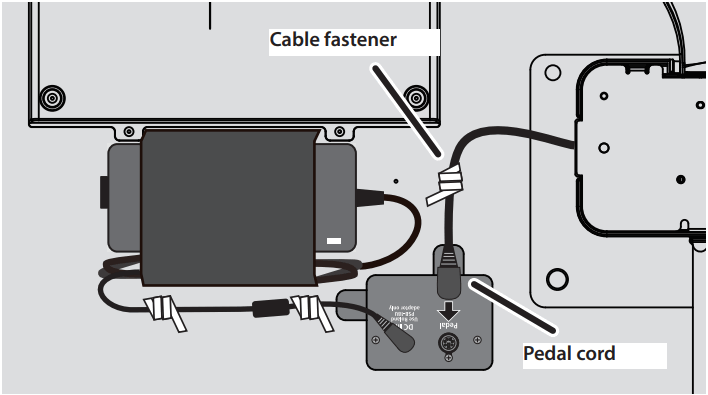 NOTE
NOTE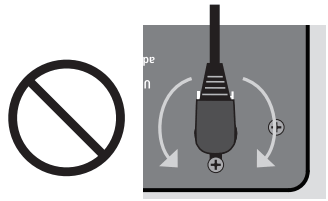
Before You Play
Using the Music Rest
Setting up the music rest
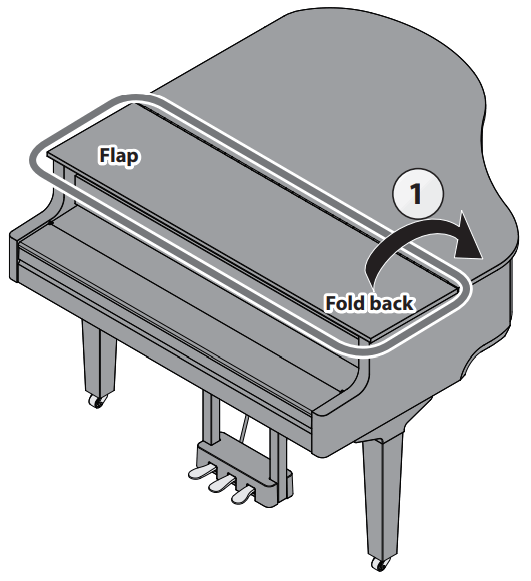
- Fold the flap of the top lid back to open it.

- Gently raise the music rest.
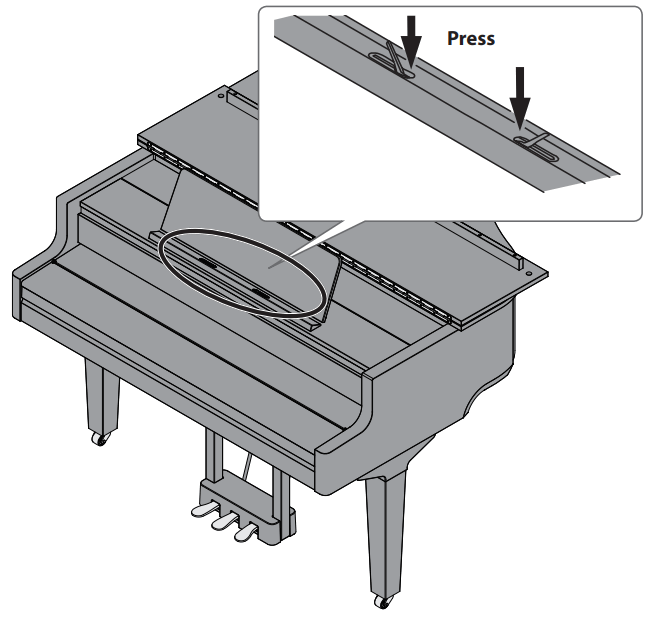
* When raising the music rest, take care not to pinch your fingers between the moving part and the body of the unit. In places where small children are present, make sure that an adult provides supervision and guidance. - Fit the latch into one of the slots so that the music rest is at the desired angle.

Using the page retainers
You can make the page retainers stand up, so that the pages of your sheet music stay flat.
If not using them, leave them folded down. Opening/Closing the Top Lid
 Opening/Closing the Top Lid
Opening the top lid
- The top lid must only be opened and closed by an adult.
- When opening or closing the top lid, take care not to pinch your
fingers between the moving part and the body of the unit. Pay special attention to this when using the unit where children are present.
- Fold the flap of the top lid back to open it.
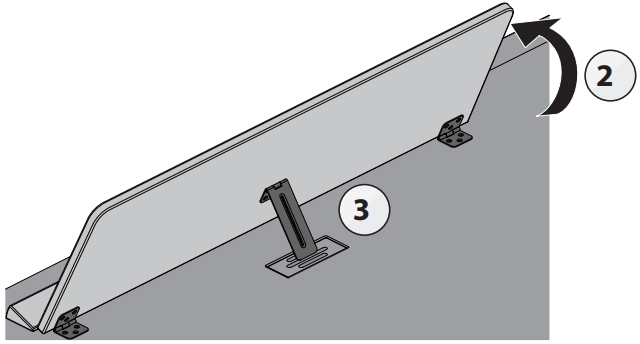
- Firmly grasp the right side of the top lid (position A on the treble side, as shown in the illustration) with both hands, and gently pull the top lid up.
 NOTE
NOTE
• Don’t pull up on the flap—make sure to pull up on the top lid side.
• Do not open or close the top lid while the flap is closed.
• Be careful not to open the top lid up too much (the lid should be opened to around a 30º angle). If the top lid is opened up too much, this might damage the piano unit or cause the top lid to fall down. Also, make sure that nobody is in the way before opening the top lid.
• Do not move the piano with the top lid still open. Doing so might make the top stick come out of the holder, causing the top lid to slam shut. - Prop up the top stick and insert it into the holder while supporting the piano lid with your other hand.
* When raising the lid stick, please be careful not to get your fingers pinched between the movable part and the panel. In places where small children are present, make sure that an adult provides supervision and guidance. - Move the tip of the top stick to lock it into place.

 NOTE
NOTE
NOTE
- To prevent the top lid from falling down, make sure to lock the top stick in place into the holder. Don’t take your hand off the top lid until the top stick is fully locked into the holder.
- Close the top lid when you are not using the piano.
- Follow these steps in reverse when closing the top lid.
About the top sticks and holders
This piano features two top sticks with different lengths. Use the different sticks to change how much the top lid opens. Use the correct holder for the stick length, as shown below.
- Long top stick: use the inner holder (position B)
- Short top stick: use the outer holder (position C)

Opening/Closing the Keyboard Cover (Turning the Power On/Off)
Opening the keyboard cover (turning the power on)
- Turn the volume of the devices connected to this instrument all the way down.
- Open the keyboard cover.
The power turns on automatically.
When opening the keyboard cover, use both hands to lift it.
- You might hear some sound when switching the unit on/off. However, this is normal and does not indicate a malfunction.
- After turning on the power, do not touch any of the touch switches on the operating panel until the instrument starts up The touch switches might become unresponsive as a result.
- Do not use this instrument if there is condensation on the operating panel. This could cause the touch switches to malfunction.
- Press the [Ā] button when the keyboard cover is opened.
Closing the keyboard cover (turning off the power)
- Turn the volume of the devices connected to this instrumentally the way down.
- Close the keyboard cover.
The power turns off automatically.
When closing the keyboard cover, use both hands to close it.
* When opening the top, take care not to pinch your fingers between the moving part and the body of the unit. In places where small children are present, make sure that an adult provides supervision and guidance.
MEMO
- You can also long-press the [Ā] button to turn off the power.
- When you disable the “Auto-Power Off When Keyboard Cover is Closed” (p. 27) setting in Function mode (p. 25), the power does not turn off when you close the keyboard cover.
Turning the Operating Panel Lights On/Off
When you want to focus on your playing, you can turn both the operating panel and the display off.
Turning off the operating panel
- Press the [ ] button.
A confirmation message appears.
- Press the [] button once again.
The operating panel and display turn off.
MEMO
Only the [ ] (Volume) knob and the [Ā] button can be used when the operating panel is off.
* You can also long-press the [Ā] button to turn off the power.
Turning on the operating panel
1 While the operating panel and display are off, press the [![]() ] button
] button
The operating panel and display turn on.
Adjusting the Overall Volume
Turn the [ ![]() ] knob to adjust the volume. The speaker volume and headphone volume can be set separately. If headphones are connected, this automatically switches to adjusting the volume of the headphones.
] knob to adjust the volume. The speaker volume and headphone volume can be set separately. If headphones are connected, this automatically switches to adjusting the volume of the headphones.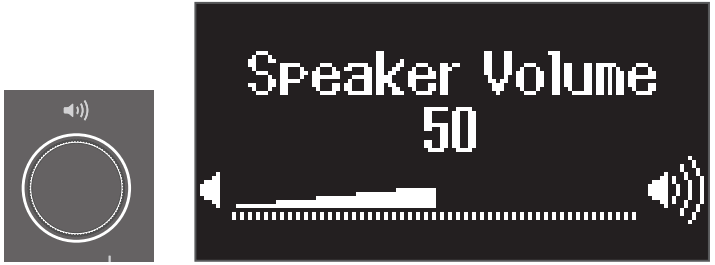 Turn the [
 ![]() ] knob
] knob
Turning the knob toward the right increases the volume, and turning the knob to the left decreases the volume.
Using the Headphones
Use headphones if you want to perform without the sound being heard nearby. This piano has two headphone jacks, so two people can use headphones at the same time.
MEMO
When you want to play a duet with someone else while listening to headphones, switch the piano to Twin Piano mode. This lets you play the piano as if it was two separate pianos.
- Connect your headphones to the headphone jack.
When you connect headphones, sound is no longer heard from the piano’s speakers. - Use the [ ] knob to adjust the volume of the headphones.
MEMO
Whenever you are not using the headphones, you can hang them on the headphone hook. 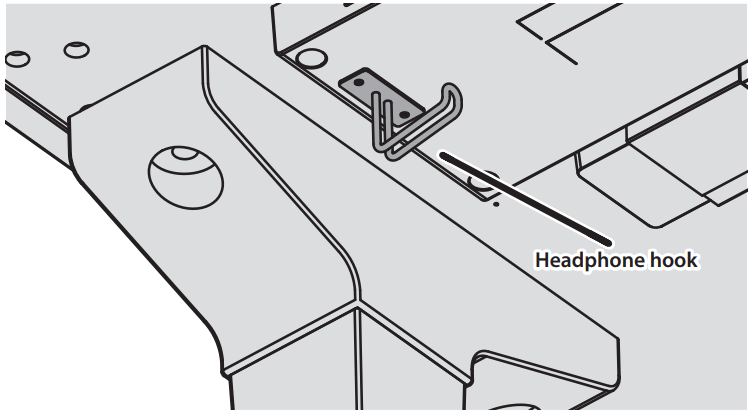 Concerning the Auto Off function
The power to this unit will be turned off automatically after a predetermined amount of time has passed since it was last used for playing music, or its buttons or controls were operated (Auto Off function). If you do not want the power to be turned off automatically, disengage the Auto Off function (p. 28).
- When the power is turned off, any settings you were editing will be lost. You must save settings that you want to keep (p. 3).
- To restore power, turn the power on again.
Using the Pedals
By pressing the pedals, you can apply effects to the sound of the piano.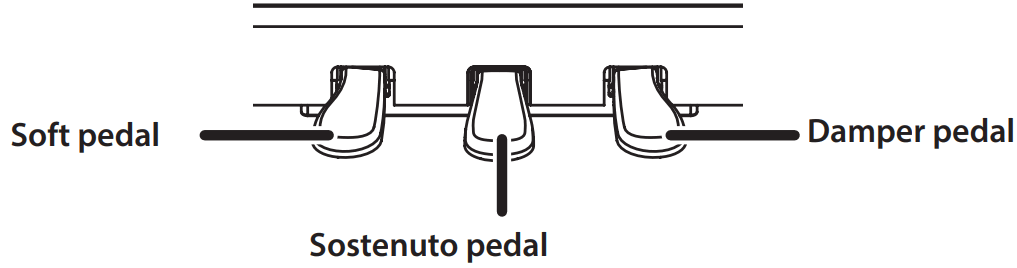
| Damper pedal (right) | Use this pedal to sustain the sound. While this pedal is held down, notes will be sustained for an extended time even if you release your fingers from the keyboard. The resonance of the sound is affected by how deeply you press the pedal. |
| Sostenuto pedal (center) | The notes you are pressing when this pedal is depressed will be sustained. |
| Soft pedal (left) | This pedal is used to make the sound softer. Playing with the soft pedal depressed produces a sound that is not as strong as when otherwise played with the equivalent strength. The softness of the tone can be varied subtly by the depth to which you press the pedal. |
- When operating the pedal, take care not to pinch your fingers between the moving part and the piano unit. In places where small children are present, make sure that an adult provides supervision and guidance.
- This piano is designed with a grand piano pedal arrangement.
Note that this differs from the pedal operations and effects you can achieve on an upright piano.
Basic Operations of Functions
Use the [–] [+] (selection) buttons, the [ ] (Enter) button and the [ ] (Back) button.
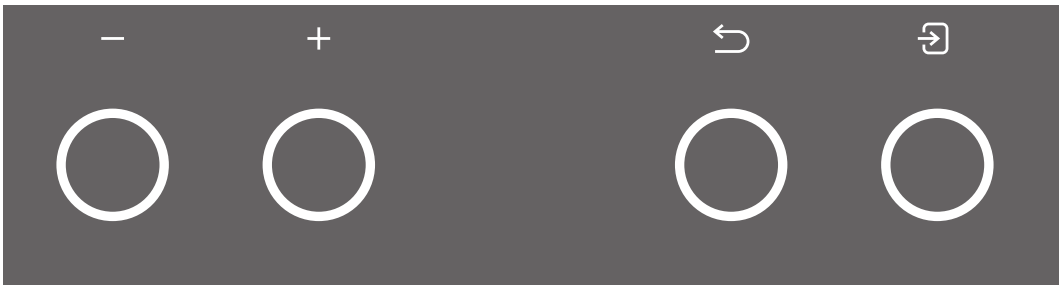
| Change an on-screen item or value | Press the [–] [+] buttons |
| Confirm | Press the [ |
| Return to the previous screen / Exit the current screen | Press the [ |
| Return to the default value | Long-press the [ |
Concerning the Auto Off function
The power to this unit will be turned off automatically after a predetermined amount of time has passed since it was last used for playing music, or its buttons or controls were operated (Auto
Off function). If you do not want the power to be turned off automatically, disengage the Auto Off function (p. 28).
* When the power is turned off, any settings you were editing will be lost. You must save settings that you want to keep (p. 3).
* To restore power, turn the power on again.
Performing
Playing Various Tones
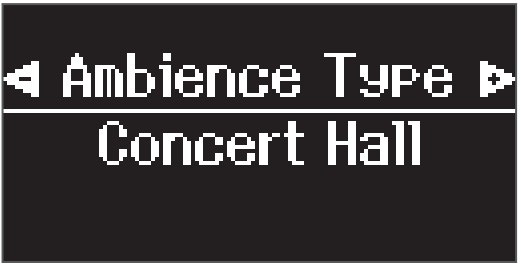
Selecting the Type and Depth of Reverberation
This feature adds reverberation to the sound, as if you’re playing in a spacious place like a concert hall or a cathedral. Change the “Ambience Type” to recreate the sound of playing the piano in different places.
- Press the [ ] button.
The Ambience screen appears.
- Press the [–] [+] buttons to select what to set, either the
“Ambience Type”, “Kbd Ambience” or “Brilliance”. - Press the [ ] button.
- Press the [–] [+] buttons to select the type and value.
Ambience Type Selects from various types of reverberation that are applied to the sound when you play the piano. Studio, Lounge, Concert Hall, Wooden Hall, Stone Hall, Cathedral Kbd Ambience Adjusts the depth of reverberation. Higher values produce deeper ambience; lower values produce shallower ambience.
* The reverberation effect is not applied to audio files.0–10 Brilliance Higher values produce brighter sounds. -10–0–+10 - To exit the settings, press the [ ] button. The [ ] button goes dark.
Selecting a Tone
In addition to piano sounds, the piano lets you enjoy performing with many other sounds. There are four groups of tones; each tone button selects a group.
“Tone List” (p. 33)
Tone groups
| Tone buttons | Explanation |
| Grand | Lets you select one of the grand piano tones. |
| Upright / Classical | Tones including cembalo (harpsichord), fortepiano and upright piano |
| Espino / Organ | Tones including electric piano and organ * If you’ve selected an organ sound that provides a rotary effect which simulates the sound of rotating speakers, pressing the [ ] button will switch the speed of the rotary effect |
| Other | Various tones such as stringed instruments and drums |
- Press a tone button.
The tone group is selected. The name of the currently selected tone is shown.
- Press the [–] [+] buttons.
You can select other tones in the tone group.
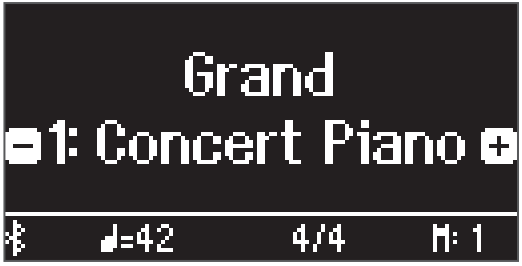
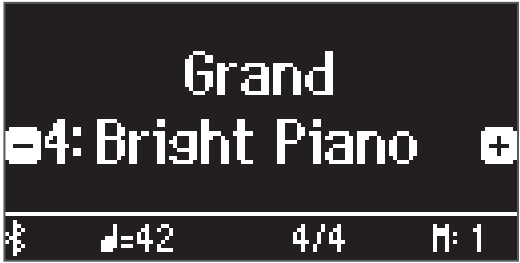
MEMO
The tone you previously selected is memorized for each tone button while the power is on. Select a tone for each tone button beforehand to instantly switch between tones.
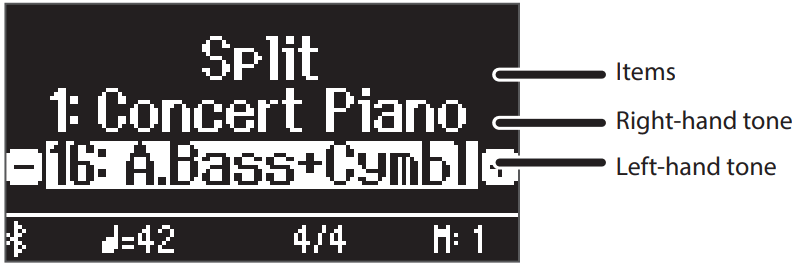
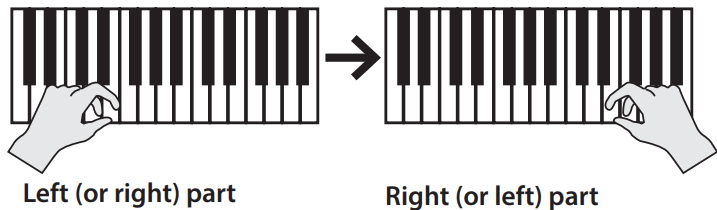
Playing Different Tones with the Left and Right Hand
You can perform using different tones in the left and right regions of the keyboard, divided at a specific note. This setting is called “Split Play”, and the point at which the keyboard is divided is called the “split point”.
- Press the [ ] button.
- Press the [–] [+] buttons, select “Keyboard Mode” and then press the [ ] button.
- Press the [–] [+] buttons to select “Split”.
- Press the [ ] button to exit Keyboard mode. The split screen appears.
 When you turn on the power, “Concert Piano” is selected as the righhand tone and “A.Bass+Cymbl” is selected as the left-hand tone.
When split turns on, the keyboard settings are as follows.
Split point (Power-up default): F#3
- To exit split play, press the [ ] button to enter Keyboard Mode, and set “Keyboard Mode” to “Whole”.
 When you turn on the power, “Concert Piano” is selected as the righhand tone and “A.Bass+Cymbl” is selected as the left-hand tone.
Changing the settings for Split Play
To edit the following settings, access the Split screen.
| Operation | |
| Changing the left-hand tone (Split–Left Tone) | 1 Press the [ |
| Changing the right-hand tone (Split–Right Tone) | 1 Press the [ |
| Changing the point at which tones are separated (Split–Point) | 1 Press the [ 2 Press the [ 3 Press the [–] [+] buttons to access the screen of the item you want to set 4 Press the [ 5 Press the [–] [+] buttons to select the value that you want to change |
| Changing the volume balance of the left-hand tone and right-hand tone (Split–Balance) | |
| Changing the octave of the left-hand tone and righthand tone (Split–Left Shift / Split–Right Shift) | |
| Changing the volume balance of the two tones (Dual–Balance) | 1 Press the [ 2 Press the [ 3 Press the [–] [+] buttons to access the screen of the item you want to set 4 Press the [ 5 Press the [–] [+] buttons to select the value that you want to change |
| Changing the octave of the two tones (Dual–Tone1 Shift / Dual– Tone2 Shift) |
Instantly recalling the Grand Piano tone
Long-press the [ ![]() ] button to cancel Split Play or Dual Play and recall the
] button to cancel Split Play or Dual Play and recall the
Grand Piano (Concert Piano) tone.
MEMO
With the split screen shown, hold down the [ ] button and press a key to set the split point from the keyboard.
Layering Two Tones
You can play two tones simultaneously from a single key. This function is called “Dual Play”.
- Press the [ ] button.
- Press the [–] [+] buttons to select “Keyboard Mode” and press the [ ] button.
- Press the [–] [+] buttons to select “Dual”.
- Press the [ ] button to exit Keyboard mode. The split screen appears.
 When you turn on the power, “Concert Piano” is selected as the tone 1 and “SymphonicStr1” is selected as the tone 2.
 - To exit Dual Play, press the [ ] button to enter Keyboard
Mode, and set “Keyboard Mode” to “Whole”.
 When you turn on the power, “Concert Piano” is selected as the tone 1 and “SymphonicStr1” is selected as the tone 2.
Changing the settings for Dual Play
To edit the following settings, access the Dual screen.
| Operation | |
| Changing Tone 2 (Dual–Tone 2) | 1 Press the [ ] button so that “-” “+” is shown in the lowest line of the screen 2 Press a tone button The tone group is selected. 3 Press the [–] [+] buttons to select a tone |
| Changing Tone 1 (Dual–Tone 1) | 1 Press the [ ] button so that “-” “+” is shown in the top line of the screen 2 Press a tone button The tone group is selected. 3 Press the [–] [+] buttons to select a tone |
Playing in a Different Key (Transpose)
You can transpose the keyboard in semitone steps.
For instance, if you wanted to play a song in the key of C that was written in the key of E, set the keyboard transpose value to “4”.
When you play “C-E-G”, you hear “E G B”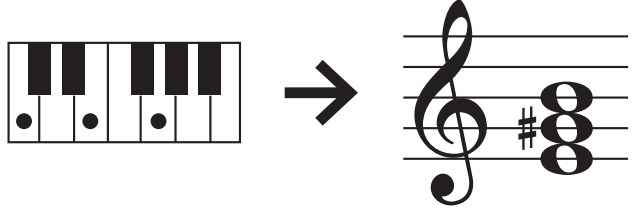
- Press the [ ] button.
- Press the [–] [+] buttons to select “KBDL Transpose”.
- Press the [ ] button.
- Press the [–] [+] buttons to select a value.
Value
-6–0–5 (default value: 0) - Press the [ ] button to exit Keyboard mode.
Reading the note name (e g , C4)
The alphabetical indication for settings such as “split point” shows the name of the note. The solfege equivalents are as follows: A is “la”, B is “ti”, C is “do”, D is “re”, E is “mi”, F is “fa” and G is “so”. For example, the indication “C4” means “the fourth ’C’ from the left edge of the keyboard”.
Change the Key Touch (Key Touch)
You can change the playing feel (touch) of the keyboard.
- Press the [ ] button.
- Press the [–] [+] buttons to select “Key Touch”.
- Press the [ ] button.
- Press the [–] [+] buttons to select a value.\
Value Explanation Fix, 1–100 (default value: 50) The default value of 50 provides a key touch that is closest to that of an acoustic piano. Higher settings make the keyboard feel heavier. With the “Fix”, notes sound at a fixed volume regardless of how strongly you play the keyboard. - Press the [ ] button to exit Keyboard mode.
Adjusting the Time from When You Play the Key Until the Piano Is Heard (Hammer Response)
You can adjust the time from when you play the key until the piano sound is heard.
- Press the [ ] button.
- Press the [–] [+] buttons to select “Hammer Response”.
- Press the [ ] button.
- Press the [–] [+] buttons to select a value.
Value Explanation Off, 1–10 (default value: 1) Higher values produce a greater delay. - Press the [ ] button to exit Keyboard mode.
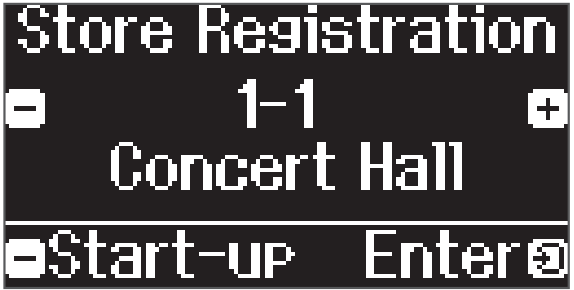
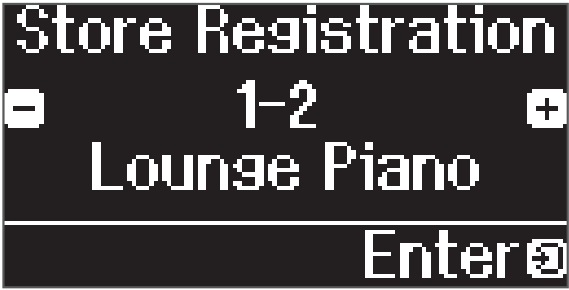
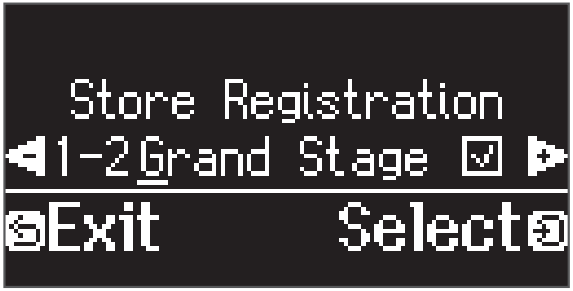
Registering Your Favorite Settings
You can register the settings you’ve adjusted to the way you like, and then switch between settings for each song or for different players.
Registering the current performance settings
- Long-press the [ ] button.
The “Store Registration” screen appears.
- Use the [1] [2] [3] [4] buttons and the [–] [+] buttons to select the registration number where you want to store the current settings, and press the [ ] button to execute.

- Edit the name.
 a Press the [–] [+] buttons to select the character to edit, and press the [ ] button to execute.
b Press the [–] [+] buttons to edit the character, and press the [ ] button to execute.
• To insert a character, press the [] button.
• To delete a character, press the [•] button. - Using the steps for editing a character, press the [–] [+] buttons to select µ on the right side of the screen, and press the [ ] button to execute.
 The Registration screen appears, and the settings you registered are shown.
 a Press the [–] [+] buttons to select the character to edit, and press the [
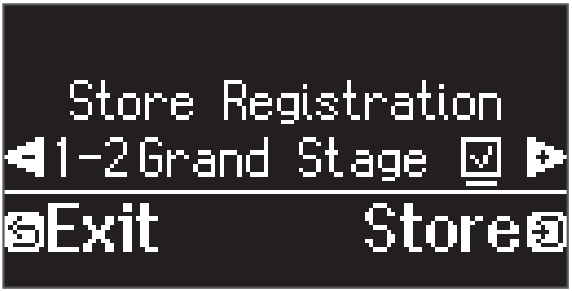 The Registration screen appears, and the settings you registered are shown.
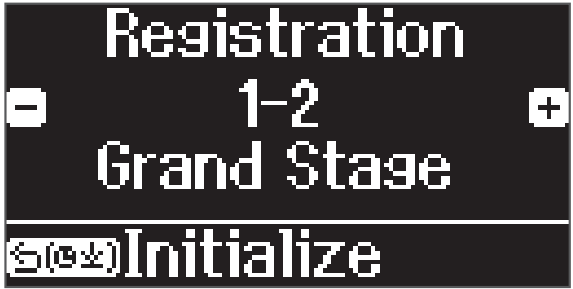
MEMO
When yo u select “Start-up”, you can register these settings as the settings used right when the instrument is turned on.
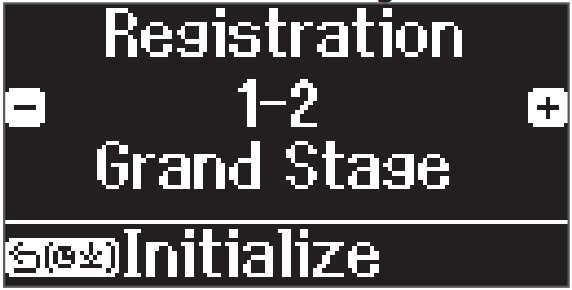
Recalling Your Favorite Settings
- Press the [ ] button.
This selects the registration group. The name of the currently selected registration is shown. - Press the [1] [2] [3] [4] buttons.
- Press the [–] [+] buttons.
This selects the settings within the registration group.
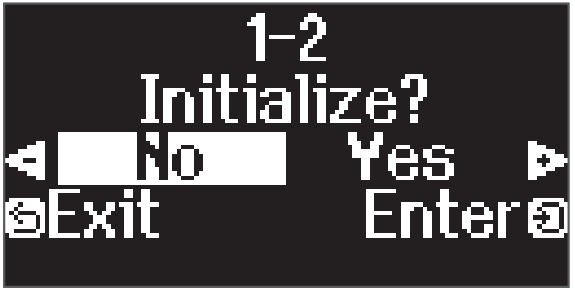
Initializing Your Favorite Settings
- Press the [
 ] button to display the registration settings screen, and then press the [1] [2] [3] [4] buttons and the [–] [+] buttons to select the registration to initialize.
- Long-press the [ ] button.
A confirmation message appears.
- Press the [–] [+] buttons to select “Yes”, and press the [ ] button to execute.
This initializes the selected registration.
Practicing with the Metronome
You can practice while hearing a metronome.
MEMO
Change the metronome type to a rhythm pattern if you want to play along with the rhythm.
- Press the [
 ] button.
The [] button blinks, and the metronome sounds.
MEMO
If a song is playing, the metronome sounds at the tempo and time signature of that song. - To change the tempo, press the [ = ] button and then press the [–] [+] buttons to select the desired tempo.
You can change the tempo by pressing the [ ] button and then using the [ = ] button to select the word that describes the tempo. - To stop the metronome, press the [ ] button once again. The [ ] button goes dark.
MEMO
If you press both [–] [+] buttons at the same time at the tempo setting screen, the tempo returns to that of the currently selected song (The tempo is set to 108 when you turn on the power.).
Changing the settings for metronome
Change the following settings while the [![]() ] button is on. The setting that you can edit change depending on the metronome type settings.
] button is on. The setting that you can edit change depending on the metronome type settings.
| Operation | |
| Common | Change the metronome type (Metronome Type) |
| When the Metronome Type is “Metronome” | Change the time signature (Beat) |
| Play the metronome without emphasizing the downbeat (Metronome Downbeat) | |
| Change the metronome pattern (Metronome Pattern) | |
| Change the metronome volume (Metronome Volume) | |
| Change the metronome tone (Metronome Tone) | |
| When the metronome type is “Rhythm Pattern” | Change the rhythm pattern (Rhythm Pattern) |
| Change the rhythm volume(Metronome Volume) |
| Available time signatures | 2/2, 3/2, 2/4, 3/4, 4/4, 5/4, 6/4, 7/4, 3/8, 6/8, 8/8, 9/8, 12/8 (default value: 4/4) |
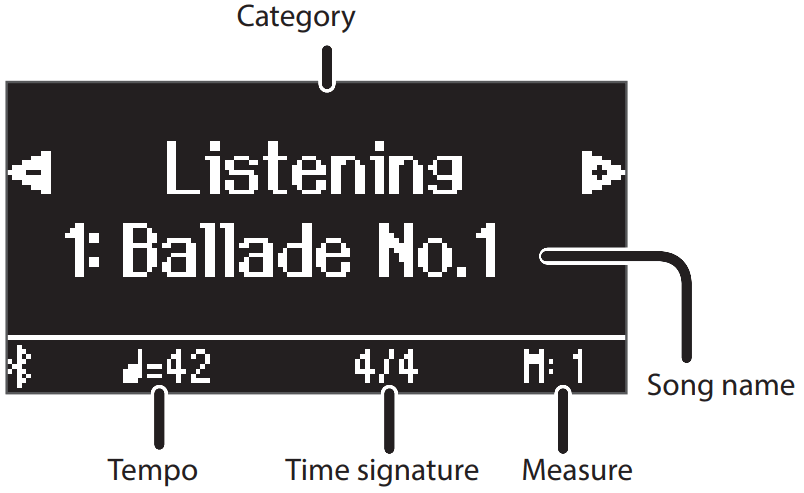
Listening to Songs
Playing Back a Song
Here’s how you can listen to the built-in songs. You can listen to these internal songs as models for your own playing, or practice one hand at a time along with them.![]() “Internal Song List” (p. 35)
“Internal Song List” (p. 35)
Category list
| Category | Explanation | |
| Listening | Piano’s internal song | Piano songs recommended for listening |
| Ensemble (*) | Famous songs, mainly classical pieces. These include piano concertos, duets, and jazz arrangements of classical pieces. Since this collection contains songs that are challenging to play, they are recommended for those at intermediate level or above. | |
| Entertainment (*) | Arrangements of well-known songs from around the world, including pop, jazz, and children’s songs, in arrangements that can be enjoyed by a wide range of people from the beginner to the advanced player. | |
| Do Re Mi Lesson (*) | You can use these lessons to learn the basics of music, by singing solfege along with the songs or practicing score-reading. | |
| Scales (*) | Scales in all keys (major scales, minor scales) | |
| Hanon | The Virtuoso Pianist No.1–20 | |
| Beyer | Vorschule I’m Klavierspiel Op.101 No.1–106 | |
| Burg muller | 25 Études facile et progressives Op.100 | |
| Czerny100 | 100 Übungsstücke Op.139 | |
| USB Memory | Songs saved on a USB flash drive | |
| Internal Memory | Songs saved in internal memory | |
(*) Songs corresponding to the included collection of scores, “Roland Piano Masterpieces”.
- Press the [
 ] button.
The Song screen appears.
- Press the [–] [+] buttons to select a song category.
- Press the [] button.
- Press the [–] [+] buttons to select a song within a category.
MEMO
If you decide to select a different song category, press the [] button. - Press the [
 ] button.
The songs plays back, with the [] button blinking in time with the tempo. - To stop the song, press the [] button once again.
The [] button goes dark. - To exit song settings, press the [] button.
The [] button goes dark.
Changing how songs play back
| Operation | |
| Playing back individual performance parts | The built-in songs consist of three parts (right-hand, left-hand, accompaniment), and you can play back just the part(s) that you want to hear. * Some songs don’t have a left-hand part or an accompaniment part. In this case, you can’t select the corresponding part. 1. Press the [ 2. Press the [–] [+] buttons to select the part that you want to mute 3. Press the [ The selected part is muted. 4. Press the [ Only the selected part(s) song play back. |
| Changing the song tempo | 1. Press the [ MEMO Long-press the [–] [+] buttons to return to the default tempo value. |
| Playing back the song at a constant tempo | This is convenient when you want to practice along with the song playback. 1. While holding down the [ The message “Tempo Mute On” appears, and the song plays back at a fixed tempo. Press and hold down the [ |
| Selecting the measure to play back | 1. Follow steps 1–4 in “Playing Back a Song” (p 13) 2. Press the [ The measure screen appears. 3. Press the [–] [+] buttons to select how many measures to play 4. Press the [ The song plays from the specified measure. MEMO • Press the [ • Press the [ |
| Sounding a count before the song plays | 1. While holding down the [ The metronome button blinks in time with the tempo. |
| Playing all songs in the selected category | 1. While holding down the [ The [ |
| Playing back in a different key | 1. Press the [ The [ 2 Press the [–] [+] buttons to access the “Song Transpose” screen 3 Press the [ 4 Press the [–] [+] buttons to select how far the pitch is to be transposed (the number of semitones) 5 Press the [ The song playback is transposed. |
| Playing songs from a folder on a USB flash drive | 1. Press the [ 2. Press the [–] [+] buttons to display “USB Flash Drive” 3. Press the [ a. Press the [–] [+] buttons to select the desired folder. b. Press the [ Exit the folder a. Press the [–] [+] buttons to select “Up”. b. Press the [ 4. Press the play/stop button The songs on the USB flash drive begin playing back |
Recording Your Performance
Recording Your Keyboard Performance
You can record your own keyboard performance, and then play it back to hear how you did.
Getting Ready to Record
- Select the tone that you want to play.
- You can sound the metronome if you like.
Set the metronome’s tempo and time signature. The metronome setting is stored in the song, and you can use the same settings during playback. - Press the [•] button.
The [•] button lights, the [] button blinks, and the piano enters record-standby mode.
If you decide to cancel recording, press the [•] button once again.
Starting/Stopping Recording - Press the [] button.
After a one-measure count, recording starts, and the [•] button and [] button are both lit. The performance is saved automatically.
MEMO
You can also start recording by playing the keyboard instead of pressing the [ò] button. In this case, a count is not sounded. - To stop recording, press the [] button once again.
Recording stops.
Listening to the Recorded Performance - Press the [] button.
After you record, the newly recorded song is selected.
The recorded song starts playing back.
Deleting a Saved Song
You can delete a song that you saved.
MEMO
- You can also delete a recorded song by holding down the [•] button and pressing the [] button.
- If you want to delete all songs that have been saved to internal memory, initialize the memory (“Initializing the Memory (Format Media)” (p. 24)).
- Press the [
 ] button.
The [] button is lit, and the piano is in function mode. - Press the [–] [+] buttons to access the “Delete Song” screen.
- Press the [] knob to confirm.
The Delete Song screen appears.
- Press the [–] [+] buttons to select the media where the data is saved, and press the [] knob to confirm.
- Press the [–] [+] buttons to select the song to delete, and press the [] knob to confirm.
A confirmation message appears. If you decide to cancel, press the [ ] button.
 - Press the [–] [+] buttons to select “Yes”, and press the [] button to execute.
The deletion is executed.
* Never turn off the power or disconnect the USB flash drive while the screen indicates “Executing…”.
* Never turn off the power, disconnect the USB flash drive or unplug the power cord while the indicator of GP-9 shows that an operation is in progress.

 If you decide to cancel, press the [ ] button.
Managing songs you recorded
| Operation | |||||||||
| Renaming a recorded song | You can rename a saved song. 1. Press the [ The [ 2. Press the [–] [+] buttons to access the “Rename Song” screen, and press the [ 3. Press the [–] [+] buttons to select the media that contains the song you want to rename, and press the [ 4. Press the [–] [+] buttons to select the song that you want to rename, and press the [ Rename the song
6. Press the [–] [+] buttons to select µ on the right side of the screen, and press the [ | ||||||||
| Copying a recorded song | Songs that have been saved in internal memory can be copied to USB flash drive. Alternatively, songs stored on a USB flash drive can be copied to internal memory. 1. Press the [ The [ 2. Press the [–] [+] buttons to access the “Copy Song” screen, and press the [ 3. Press the [–] [+] buttons to select the copy source and destination media, and press the [ 4. Press the [–] [+] buttons to select the song that you want to copy If you decide to cancel, press the [ 5. Press the [ The copy is executed. * Never turn off the power, disconnect the USB flash drive or unplug the power cord while the screen indicates “Executing…”. 6. Press the [ You exit function mode. |
Advanced Recording Methods
Recording Your Performance One Hand at a Time
By recording your left-hand performance to the Left part and your right-hand performance to the Right part, you can record each hand of your performance separately.
Getting ready to record
- Select the tone that you want to play.
- You can sound the metronome if you like.
Set the metronome’s tempo and time signature. The metronome setting is stored in the song, and you can use the same settings during playback. - Press the [•] button.
The [•] button lights, the [] button blinks, and the piano enters record-standby mode.
If you decide to cancel recording, press the [ó] button once again. - Press the [] button, press the [–] [+] buttons to select the part that you don’t want to record, and then press the [] button to make it go dark.
Only the part that you’re recording will blink.
MEMO
If you don’t select a part at this time, your performance is recorded to the following parts.Performing with one tone “Right” part Playing different tones with the left and right hand (Split Play) The left-hand tone is the “Left” part, and the right-hand tone is the “Right” part Performing with two tones layered
(Dual Play)The tone 1 is the “Right” part, and the tone 2
is the “Accomp” partStarting/stopping recording
- Press the [] button.
After a one-measure count, recording starts, and the [•] button and [] button are both lit. The performance is saved automatically.
MEMO
You can also start recording by playing the keyboard instead of pressing the [ò] button. In this case, a count is not sounded. - To stop recording, press the [] button once again.
Recording stops.
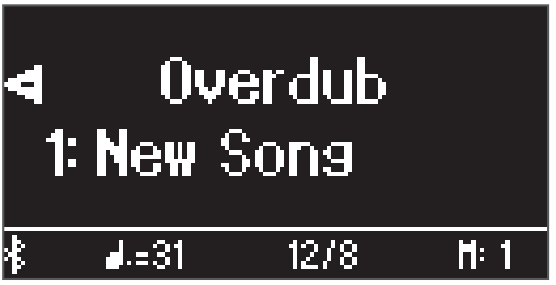
Overdubbing a Recorded Performance
After recording one hand of your performance, you can overdub-record the performance of the other hand.
You can also overdub-record onto a built-in song.
Getting ready to record
- Press the [] button.
The Song screen appears.
MEMO
If the measure screen appears, press the [] button to return to the song-select screen. - Press the [–] [+] buttons to select the category of the song that you want to overdub, and press the [] button to confirm.
- Press the [–] [+] buttons to select the song that you want to overdub.
You can select songs within the category.
MEMO
If you’re recording your performance along with a built-in song, you can fix the tempo of the built-in song (p. 13). - Press the [•] button.
The [•] button lights, the [] button blinks, and the piano enters record-standby mode.
If you decide to cancel recording, press the [•] button once again. - Press the [–] [+] buttons to access the “Overdub” screen.
The song of step 3 is selected.
- Press the [] button. If a part that you don’t want to record is blinking, press the [–] [+] buttons to select the part, and press the [] button to make it go dark.
Only the part that you’re recording will blink.
If you select a part that is already recorded (lit) and then press the [] button to make it blink, that part will be overwrite-recorded.
Starting/stopping recording - Press the [] button.
After a one-measure count, recording starts, and the [•] button and [] button are both lit. The performance is saved automatically.
MEMO
You can also start recording by playing the keyboard instead of pressing the [] button. In this case, a count is not sounded. - To stop recording, press the [] button once again.
Recording stops.
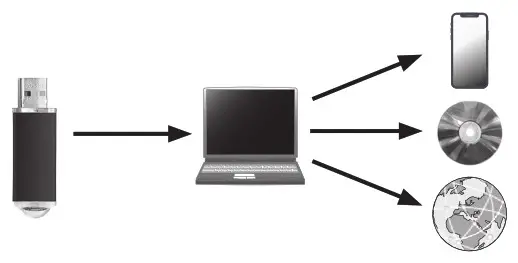
Recording Audio to USB Flash Drive
If you audio-record your performance, you’ll be able to listen to it on your computer or audio player, use it to create a music CD, or publish it on the internet.
Getting ready to record
- Connect your USB flash drive to the USB Memory port.
* Audio data can’t be saved in the piano’s internal memory.
* Never turn off the power or disconnect the USB flash drive while the screen indicates “Executing…”.
* Never turn off the power or disconnect a USB flash drive or the power cord while the USB flash drive access indicator is blinking. - Select the tone that you want to play.
- Hold down the [•] button and press the [–] [+] buttons to select “Audio”.
MEMO
You can also specify this via the Function mode “Recording Mode” setting (p. 26). - Press the [•] button.
The [•] button lights, the [] button blinks, and the piano enters record-standby mode.
If you decide to cancel recording, press the [•] button once again. - You can sound the metronome if you like.
Starting/stopping recording - Press the [] button.
Recording starts, and the [•] button and [] button are lit. The performance is saved automatically.
NOTE
Never turn off the power or disconnect the USB flash drive during recording. - To stop recording, press the [] button once again.
Recording stops.
* Never turn off the power or disconnect the USB flash drive while the screen indicates “Executing…”.
* Never turn off the power or disconnect a USB flash drive or the power cord while the USB flash drive access indicator is blinking.
MEMO
• You can delete the song that you recorded (p. 15).
• You can rename the song that you recorded (p. 15).
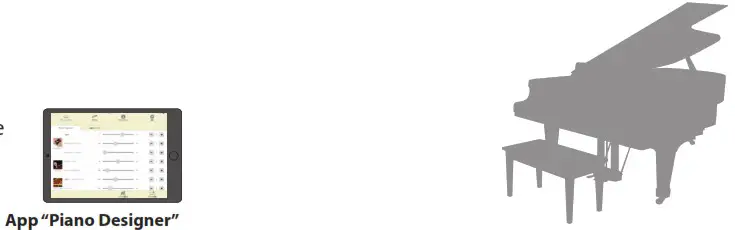
Creating Your Own Piano Tone (Piano Designer)
This piano lets you adjust various elements of the sound, so you can personalize the piano tone to your taste.
This function is called “Piano Designer”.
MEMO
The process of creating your own piano tone can also be done using touch operations on the dedicated app.![]() “Using the Piano with an App” (p. 21)
“Using the Piano with an App” (p. 21)
Adjusting the Sound of the Overall Piano
- Press the [ ] button.
- Press the [–] [+] buttons to access the screen of the item that you want to adjust.
- Press the [ ] knob to confirm.
- Press the [–] [+] buttons to select the value.
- To exit the settings, press the [ ] button.
The [ ] button goes dark.
| Items | Value | Explanation |
| Master Tuning | 415.3 Hz–466.2 Hz (default value: 442.0 Hz) | When playing in an ensemble with other instruments, you can adjust the reference pitch of this piano so that you will harmonize correctly with the other instruments. The reference pitch is usually expressed as the frequency that is heard when you play the middle A (A4) note. The action of matching the reference pitch to other instruments is called “tuning”. |
| Temperament | You can play classical styles such as Baroque using historic temperaments (tuning methods). Most modern songs are composed for and played in equal temperament, the most common tuning in use today. But at one time, there were a wide variety of other tuning systems in existence. By playing in the temperament that was in use when a composition was created, you can experience the sonorities of chords originally intended for that song. | |
| Equal (default setting) | This temperament divides the octave into twelve equal steps. It is the temperament that is most commonly used on today’s pianos. Every interval has the same slight amount of dissonance. | |
| Just Major | This temperament divides the octave into twelve equal steps. It is the temperament that is most commonly used on today’s pianos. Every interval has the same slight amount of dissonance. | |
| Just Minor | ||
| Pythagorean | This tuning, devised by the philosopher Pythagoras, eliminates dissonance in fourths and fifths. Although triadic chords are slightly dissonant, this tuning is suitable for songs that have a simple melody. | |
| Kirnberger I | Kirnberger I. As in the Just temperaments, the primary triads are consonant in this tuning. Beautiful sonorities are obtained when playing songs that are written in keys appropriate for this tuning. | |
| Kirnberger II | Kirnberger II. This is a revision of Kirnberger I that reduces the limitations on the usable keys. | |
| Kirnberger III | Kirnberger III. This is an improvement of the Meantone and Just tunings that provides a high degree of freedom of modulation. Performances are possible in all keys. Since the resonance differs depending on the key, chords played in this temperament resonate in diverse ways when compared to equal temperament. | |
| Meantone | This temperament slightly narrows the fifth relative to Just temperaments. While the Just temperaments contains two types of whole tone (major whole tone and minor whole tone), meantone temperament uses only one type of whole tone (mean whole tone). Transposition within a limited range of keys is possible. | |
| Werckmeister | Werckmeister. This temperament consists of eight perfect fifths and four narrowed fifths. Performances are possible in all keys. Since the resonance differs depending on the key, chords played in this temperament resonate in diverse ways when compared to equal temperament. | |
| Arabic | This tuning is suitable for the music of Arabia. | |
| Temperament key | C–B (default value: C) | This sets the primary key of the temperament. When playing with tuning other than equal temperament, you need to specify the temperament key for tuning the song to be performed (that is, the note that corresponds to C for a major key or to A for a minor key). If you choose an equal temperament, there’s no need to select a temperament key. |
Editing the Grand Piano Tone
You can adjust various aspects of the grand piano’s tone, including the string and pedal resonances, and the sound of the hammers striking the strings.
* Only tones belonging to the “Grand” group can be adjusted.
- Press the [ ] button.
- Press the [–] [+] buttons to access the “Piano Tone Edit” screen.
- Press the [ ] knob to confirm.
- Press the [–] [+] buttons to access the screen of the item that you want to adjust.
- Press the [ ] button to confirm, and press the [–] [+] buttons to select the value of the setting.
- When you are finished editing the piano tone, press [ ] button.
A confirmation message appears. If you decide to cancel, press the [ ] button.
 - Press the [–] [+] buttons to select “Yes”, and press the [ ] button to execute.
The Grand Piano tone settings are saved.
 If you decide to cancel, press the [
 | Items | Value | Explanation | |
| Piano Tone Edit | Lid | 0–6 (default value: 4) | Adjusts the extent to which the top lid of the grand piano is open. The sound will become more mellow as you close the top lid of the piano in the screen. The sound will become brighter as you open the top lid of the piano in the screen. |
| Key Off Noise | Off, 1–10 (default value: 3) | Adjusts the action noise that is heard when you release a key. Higher settings produce a louder action noise. | |
| Hammer Noise | -5–0–+5 (default value: 0) | Adjusts the sound produced when the hammer of an acoustic piano strikes the string. Higher settings will produce a louder sound of the hammer striking the string. | |
| Duplex Scale | Off, 1–10 (default value: 2) | Adjusts the sympathetic vibrations of an acoustic piano’s Duplex Scale. Higher settings will make the sympathetic vibration louder. The Duplex Scale is a system of sympathetically vibrating strings sometimes included in grand pianos. These sympathetically vibrating strings are not struck directly with hammers, but sound by vibrating in sympathy with the vibrations of other strings. By resonating with the overtones, these strings add richness and brilliance to the sound. These sympathetic strings are added only to the high register above approximately C4. Since they do not have a damper (a mechanism that stops them from sounding), they will continue sounding even after you play a note and then release it to stop the sound of the string that was actually struck. | |
| Full Scale String Res | Off, 1–10 (default value: 4) | Adjusts the resonant sound of an acoustic piano (the sound produced by the strings of previously-pressed keys vibrating in sympathy with newly played notes, or the sound of other strings vibrating in sympathy with the notes you play while pressing the damper pedal). Higher settings produce louder sympathetic resonance. | |
| Key Off Resonance | Off, 1–10 (default value: 3) | Adjusts the resonance of the subtle sounds that occur when a key of an acoustic piano is released. A higher value produces a larger tonal change during the decay. | |
| Cabinet Resonance | Off, 1–10 (default value: 4) | Adjusts the body resonance of the grand piano itself. Higher values will produce a larger body resonance. | |
| Soundboard Type | 1–5 (default value: 1) | Selects how the soundboard of the acoustic piano will resonate. You can choose from five different types of resonance. | |
| Damper Modeling | Off, 1–10 (default value: 5) | Adjusts the damper noise of the acoustic piano sound (the sound of the damper releasing the strings when you press the damper pedal). | |
| Soft Pedal | 1–10 (default value: 2) | Adjusts the depth of the effect that occurs when you press the soft pedal. With higher values, the change will be greater. | |
| Single Note Tuning (*) | -50.0–0–+50.0 (per key) | Adjusts the tuning of each individual key. For example, you can adjust the width of stretched tuning, which tunes the higher register slightly higher and the lower register slightly lower. | |
| Single Note Volume (*) | -50–0 (per key) | Adjusts the volume of each key. Lower settings decrease the volume. | |
| Single Note Character (*) | -5–0–+5 (per key) | Adjusts the tonal character of each key. Higher settings produce a harder sound, and lower settings produce a softer tone. * The result of this effect will differ depending on the pitch range. | |
| Reset Setting | Resets the “Piano Tone Edit” settings of the selected tone to their factory settings. | ||
Single Note settings (*)
- Select the Single Note settings screen, and press the [ ] button to confirm
- Press the key on the keyboard that you want to select, and press the [–] [+] buttons to edit the value
- Press the [ ] button to exit the screen of that item
Connecting the Piano and a Mobile Device via Bluetooth®

Here’s What You Can Do
Bluetooth functionality creates a wireless connection between a mobile device such as a smartphone or tablet (subsequently referred to as “mobile
device”) and the piano, letting you do the following.
→ Play Music Through the Piano’s Speakers
page 20
Music data stored on your mobile device can be played wirelessly through the piano’s speakers.

→ Using the Piano with an App
page 21
Install the app (“Roland Piano App” by Roland) on your mobile device to exchange data with the piano.
Play Music Through the Piano’s Speakers
Here’s how to configure the settings so that music data saved on your mobile device can be played wirelessly through the piano’s speakers.
* Once a mobile device has been paired with the piano, there is no need to pair again. Refer to “Connecting an Already-Paired Mobile Device” (p. 21).
Initializing the Settings (Pairing)
This example shows how to configure the settings for iOS/pads devices.
If you are using an Android device, refer to the instructions for settings in the owner’s manual that came with your mobile device.
- Place the mobile device that you want to connect near the piano.
- Press the [ ] button.
The [ ] button is lit, and the piano is in function mode. - Press the [–] [+] buttons to access the “Bluetooth” screen, and
press the [ ] button to confirm. The following screen appears. - Press the [ ] knob to begin pairing. If you decide to cancel pairing, press the [ ] button.
MEMO
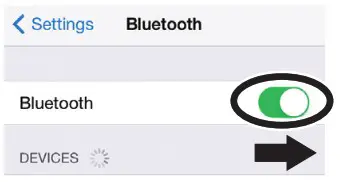
Long-press the [ ] button to start pairing immediately. - Turn on the Bluetooth function of the mobile device.
 Pairing
To use Bluetooth, you must first “pair” the piano with your mobile device to create a one-to-one connection between them.
“Pairing” is the procedure of registering (mutually authenticating) your mobile device with the piano.
Pair the devices by following the steps shown for each function. The pairing process
Separate pairing is required for “playing music through the piano’s speakers” and for “using the piano with an app”. Note that these processes are different.
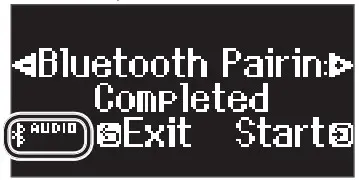
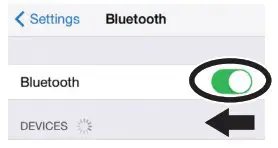
- Tap “GP-9 Audio” that appears in the mobile device’s Bluetooth “DEVICES” field.
The piano and mobile device are paired. When pairing is completed, a display like the following appears.Mobile device “GP-9 Audio” is added in the “My Devices” field Piano The screen indicates “Completed”, and “AUDIO” is shown beside the Bluetooth symbol 
- Press the piano’s [ ] button to exit function mode.
Pairing is complete.
 If you decide to cancel pairing, press the [ ] button.
 Pairing
 The pairing process
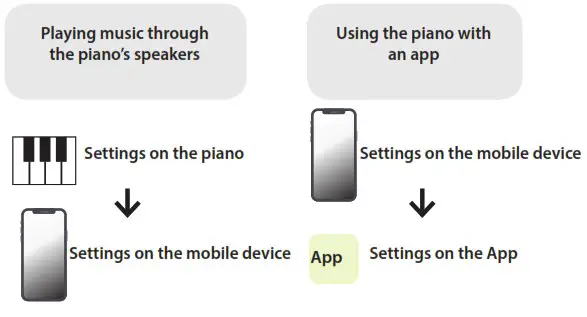
Playing back audio
When you play back music data on the mobile device, the sound is heard from the piano’s speakers.
MEMO
To adjust the volume of the audio, make adjustments on your mobile device. If this does not produce the desired volume, you can adjust the piano’s settings.![]() “Adjusting the Volume of Bluetooth Audio (Bluetooth Volume)” (p. 25)
“Adjusting the Volume of Bluetooth Audio (Bluetooth Volume)” (p. 25)
Connecting an Already-Paired Mobile Device
- Turn on the Bluetooth function of the mobile device.
The piano and mobile device are connected wirelessly.
* If the above step does not establish a connection, tap “GP-9 Audio” that is shown in the “DEVICES” field of the mobile device.
Using the Piano with an App
Apps You Can Use with This Piano
| App name | Supported OS | Explanation |
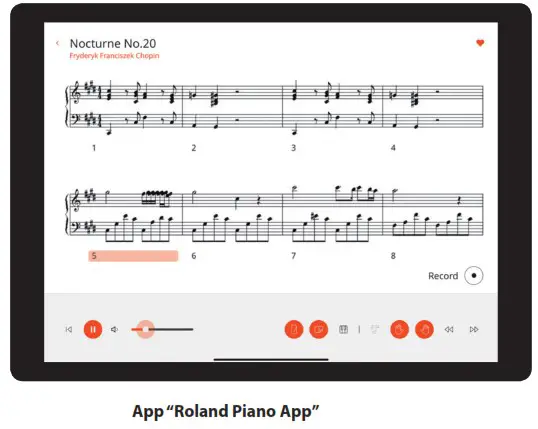
 | iOS/iPadOS/ Android | This app lets you view sheet music in digital form, practice songs as if you were playing a game, or keep a record of your practicing.  |
 | iOS/iPadOS/ Android | This app lets you customize the piano sound to your taste. You can use the “Piano Designer” (p. 18) to adjust the various elements of the sound via touch-based editing within the app.  |
* Apps can be downloaded from the App Store (iOS/iPadOS products) or from Google Play (Android products).
* In addition to the above, you can also use music apps (such as Garage Band) that are compatible with Bluetooth MIDI.
* The information provided about apps made by Roland was current when this manual was published. For the latest information, refer to the Roland website.
Making the Settings (Pairing)
You can make settings for using the piano together with an app that’s installed on your mobile device. This shows the steps for using the “Roland Piano App” app with the iPad as an example.
* In the case of “using the piano with an app”, settings on the piano are not necessary. Perform operations in the app to pair it with the piano.
- Turn on the Bluetooth function of the mobile device.
 NOTE
NOTE
Even if the “DEVICES” field shows the name of the device you’re using (such as “GP-9 MIDI”), do not tap it. - Start the app that you installed on your mobile device.
- Tap “Connection” at the top of the app screen, and tap “Connect to Piano”.
 “GP-9 MIDI” is shown in the app screen.
 - Tap “GP-9 MIDI” (the name of the unit that you’re using).
The piano and mobile device are paired. When pairing is completed, a display like the following appears.
 NOTE
NOTE “GP-9 MIDI” is shown in the app screen.
| Mobile device | “GP-9 MIDI” is added in the “My Devices” field |
| Piano | The “MIDI” is shown beside the Bluetooth symbol |
This completes the settings.
If Pairing Doesn’t Work
If the pairing process shown in “Using the Piano with an App” (p. 21) is not successful, try steps 1–4 as shown below.
- Make sure that the piano’s Bluetooth function is “On”
- Press the piano’s [ ] button.
The [ ] button is lit, and the piano is in function mode. - Press the [–] [+] buttons to access the “Bluetooth” screen, and press the [ ] knob to confirm. You enter the Bluetooth setting screen.
- Press the [–] [+] buttons to access the “Bluetooth On/Off” screen, and press the [ ] button to confirm.
- Press the [–] [+] buttons to select “On”. The piano’s Bluetooth function turns on.
- Press the [ ] button. The [ ] button goes dark, and you exit function mode.
- Press the piano’s [
- Exit all apps on your mobile device
Closing the app- Swipe up from the bottom of the home screen, stopping your finger around the middle of the screen. Next, swipe the app screen up.
 * The method for closing apps may differ depending on your mobile device.
Use the method that’s appropriate for your device to close the apps.
- Swipe up from the bottom of the home screen, stopping your finger around the middle of the screen. Next, swipe the app screen up.
- If already paired, cancel pairing, and turn off the Bluetooth function
Clearing the pairing- In the mobile device’s screen, tap the “i” located beside “Connected”, and tap “Forget This Device”.

- Turn the Bluetooth switch off.

- In the mobile device’s screen, tap the “i” located beside “Connected”, and tap “Forget This Device”.
- Restart your mobile device
- Perform the pairing procedure of p 21 from step 1
MEMO
If you’ve checked these points and the problem still occurs, please refer to the Roland support website. https://www.roland.com/support/
 * The method for closing apps may differ depending on your mobile device.
If you have more than one piano
When pairing with a mobile device in a situation where there are multiple pianos, such as in a music classroom, you can assign an ID to each piano.
Assigning an ID
When you make this setting, an ID number is added to the end of the device name that’s shown on the mobile device. (such as “GP-9 Audio 1” “GP-9 MIDI 1”)
- Press the [ ] (Function) button
- Press the [–] [+] buttons to access the “Bluetooth” screen, and press the [ ] knob to confirm
- Press the [–] [+] buttons to select “Bluetooth ID”
- Press the [ ] button to confirm, and press the [–] [+] buttons to change the number
| ID | Explanation |
| 0–99 | Set to “0”: “ GP-9 Audio” “GP-9 MIDI” (default setting) Set to “1”: “GP-9 Audio 1” “GP-9 MIDI 1” |
* If you are pairing in an environment where there are multiple pianos, we recommend that you turn on the power of the mobile device and only those pianos that you want to pair (turn off the power of other devices).
Convenient Functions
Loading/Saving Your Favorite Settings and Piano Setups
You can save your favorite settings or the piano’s setup to a USB flash drive, or load these settings that are saved to a USB flash drive into the piano.
* Settings can be loaded only into another piano of the same model.
Piano settings that are saved
| Setting | Page |
| Speaker volume | p. 8 |
| Headphone volume | p. 8 |
| Ambience Type | p. 9 |
| Ambience Depth | p. 9 |
| Key Touch | p. 11 |
| Brilliance | p. 9 |
| Master Tuning | p. 18 |
| Temperament | p. 18 |
| Temperament Key | p. 18 |
| Hammer Response | p. 11 |
| Piano Tone Edit | p. 19 |
| Volume Limit | p. 27 |
* For the favorite settings that are saved, refer to the list of favorite settings as shown in “Settings Saved Even If the Power Is Turned Off” (p. 3).
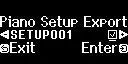
Saving Your Favorite Settings and Piano Setups (Registration Export/Piano Setup Export)
- Connect your USB flash drive to the USB Memory port.
- Press the [ ] button.
The [ ] button is lit, and the piano is in function mode. - Press the [–] [+] buttons to show either the “Registration
Export” or “Piano Setup Export” screen, and then press the [ ] button to confirm.
The Registration or Piano Setup Export screen appears. - Edit the name of the registration or the piano setup.
Select the character which you want to change Press the [–] [+] buttons Change the character Press the [ ] button (confirm)→ press the [–] [+]
buttons (edit character)→ press the [ ] button (back)Insert one character Press the [ ] buttonDelete one character Press the [●] button - Press the [–] [+] buttons to select √ on the right side of the screen, and press the [ ] button to execute.
The settings are saved.
NOTE
Never turn off the power, disconnect the USB flash drive or unplug the power cord while the screen indicates “Executing…”. - Press the [ ] button to exit function mode.
The [ ] button goes dark.
* Never turn off the power, disconnect the USB flash drive or unplug the power cord while the indicator of GP-9 shows that an operation is in progress.
Loading Your Favorite Settings and Piano Setups (Registration Import/Piano Setup Import)
- Connect your USB flash drive to the USB Memory port.
- Press the [ ] button.
The [ ] button is lit, and the piano is in function mode. - Press the [–] [+] buttons to show either the “Registration Import” or “Piano Setup Import” screen, and then press the [ ] button to confirm.
The Registration or Piano Setup Import screen appears.
- Press the [–] [+] buttons to select either Registration Import or Piano Setup Import.
- Press the [ ] button to confirm.
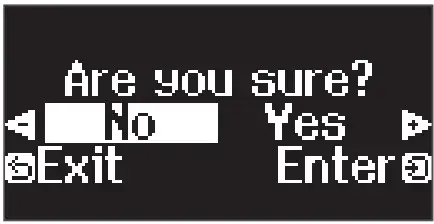
A confirmation message appears. If you decide to cancel, press the [ ] button.
 - Press the [–] [+] buttons to select “Yes”, and press the [ ] button to execute.
This loads the settings.
NOTE
Never turn off the power, disconnect the USB flash drive or unplug the power cord while the screen indicates “Executing…”. - Press the [ ] button to exit function mode.
The [ ] button goes dark.
* Never turn off the power, disconnect the USB flash drive or unplug the power cord while the indicator of GP-9 shows that an operation is in progress.
* When you load favorite settings (registration) for which the start-up settings have been changed, the unit switches to those settings right after the power is turned on.

 If you decide to cancel, press the [
 Initializing the Memory (Format Media)
Here’s how to erase all of the files that you saved in internal memory or on a USB flash drive (commercially available).
NOTE
- When you initialize, all registrations or files that you saved in internal memory or on a USB flash drive are lost.
- If you want settings other than the memory settings to be returned to their factory-set state, execute a Factory Reset (p. 24).
- If you want to initialize a USB flash drive, connect the USB flash drive to the USB Memory port.
- Press the [ ] button. The [ ] button is lit, and the piano is in function mode.
- Press the [–] [+] buttons to access the “Format Media” screen, and then press the [ ] button to confirm.
The Format Media screen appears.If you decide to cancel, press the [ ] button. - Press the [–] [+] buttons to select the media (Internal Memory or USB Memory) that you want to format.
- Press the [ ] button to confirm.
A confirmation message appears.If you decide to cancel, press the [ ] button. - Press the [–] [+] buttons to select “Yes”, and press the [ ] button to execute.
This formats the media.
NOTE
Never turn off the power, disconnect the USB flash drive or unplug the power cord while the screen indicates “Executing…”. - Press the [ ] button to exit function mode. The [ ] button goes dark.
* Never turn off the power, disconnect the USB flash drive or unplug the power cord while the indicator of GP-9 shows that an operation is in progress.
 If you decide to cancel, press the [
 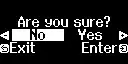 If you decide to cancel, press the [
 Restoring the Factory Settings (Factory Reset)
Here’s how to restore all registrations and internally saved settings to the factory-set condition. This function is called “Factory Reset”.
NOTE
Factory Reset erases all settings that you have stored, and returns them to the factory-set condition. For details on the settings that are reset, refer to
“Settings Saved Even If the Power Is Turned Off” (p. 3).
MEMO
Executing this function does not erase the files in internal memory or on a USB flash drive (commercially available). If you want to erase all files from internal memory or from a USB flash drive, refer to (“Initializing the Memory (Format Media)” (p. 24)).
- Press the [ ] button.
The [ ] button is lit, and the piano is in function mode. - Press the [–] [+] buttons to access the “Factory Reset” screen, and then press the [ ] button.
A confirmation message appears.If you decide to cancel, press the [ ] button. - Press the [–] [+] buttons to select “Yes”, and press the [ ] button to execute.
This performs the factory reset.
NOTE
Never turn off the power, disconnect the USB flash drive or unplug the power cord while the screen indicates “Executing…”. - When the display indicates “Power off, then on”, turn the power off and then on again.
* Never turn off the power, disconnect the USB flash drive or unplug the power cord while the indicator of GP-9 shows that an operation is in progress.
 If you decide to cancel, press the [
 Configuring the Various Settings
Function Mode
Basic Settings in Function Mode
- Press the [ ] button.
The [ ] button is lit, and the piano is in function mode. - Press the [–] [+] buttons to access the screen of the item you want to set.
- Press the [ ] knob to confirm.
* Depending on the item you select, there might be another screen for selecting additional items. - Press the [–] [+] buttons to select the value.
- Press the [ ] button to exit function mode.
The [ ] button goes dark.
| Indication | Value | Explanation |
| Bluetooth-related settings | ||
| Bluetooth | Bluetooth On/Off | Turning the Bluetooth Function On/Off (Bluetooth On/Off) If the Bluetooth function is on, you’ll be able to wirelessly connect the piano and your mobile device, so that music played back from the mobile device can be heard through the piano’s speakers, or so that you can use the piano with an app (p. 20). |
| On, Off (default value: On) | ||
| Bluetooth Pairing | Perform the pairing to wirelessly connect the piano and mobile device for “Playing Music Through the Piano’s Speakers” (p. 20). | |
| Bluetooth Volume | Adjusting the Volume of Bluetooth Audio (Bluetooth Volume) This is the volume setting for playing music from your mobile device through the piano’s speakers (p. 21). | |
| 0–10 (default value: 4) | ||
| Bluetooth ID | If you are using the Bluetooth function in a location where there are multiple pianos, you can assign a separate ID to each piano (p. 22). | |
| 0–99 (default value: 0) | ||
Song playback settings
| Song Transpose | Transposing the Pitch of the Song Playback (Song Transpose) You can transpose the song playback in semitone steps (p. 13). |
| -12–0–+12 (default value: 0) | |
| Song Volume SMF | Adjusting the Song (SMF) Volume (Song Volume SMF) This setting adjusts the the volume of the song that is played back while you play the keyboard. This adjusts the volume of the song (SMF data) that is played back. |
| 0–10 (default value: 10) | |
| Song Volume Audio | Adjusting the Song (Audio) Volume (Song Volume Audio) This setting adjusts the the volume of the song that is played back while you play the keyboard. This adjusts the volume of the song (audio data) that is played back. |
| 0–10 (default value: 7) | |
| Input Volume | Adjusting the Volume of an Audio Playback Device (Input Volume) This setting adjusts the the volume of the song that is played back while you play the keyboard. You can adjust the volume of an audio playback device that’s connected to the Input jacks. |
| 0–10 (default value: 7) | |
| USB Audio Input Vol. | Adjusting the Volume from Your Computer (USB Audio Input Volume) When using a computer that’s connected to the USB COMPUTER port to play back audio, adjust the volume using the computer. |
| 0–10 (default value: 7) |
| Indication | Value | Explanation |
| SMF Play Mode | Specifying the Keyboard Tone for Song (SMF) Playback (SMF Play Mode) This setting specifies the tone that you play on the keyboard while a song is playing back. Normally you will use the “Auto-Select” setting. This determines whether the setting that is most suitable for the internal song or most suitable for external data is selected when you play back a song whose file format is SMF. MEMO You can also switch the SMF Play Mode by holding down the [ | |
| SMF Play Mode | ||
| SMF Play Mode | Auto-Select (default setting) | Either “Internal” or “External” is selected automatically depending on the song that you play back. |
| SMF Play Mode | Internal | When you play back a song, the tone that you play from the keyboard changes to the tone that is saved in the song. This is recommended when you play back an internal song or a song that you recorded on this piano. |
| SMF Play Mode | External | The tone that you play from the keyboard does not change when you play back a song. This is recommended when you play back external data such as commercially available music data. |
Recording-related settings
| Recording Mode | This piano lets you record in two different modes. You can choose whether to record as SMF or as audio. MEMO You can also switch recording modes by holding down the [•] button and pressing the [–] [+] buttons. | |
| SMF (default setting) | Your performance is recorded to “Internal Memory” and played back on the piano. You can overdub your left-hand performance onto your right-hand performance, and then listen to the playback of both hands together (p. 27). | |
| Audio | Your performance is recorded to a USB flash drive as audio data. You can listen to your recorded piano performance on a computer or audio playeruse it to create a CD, or publish it on the internet (p. 17). | |
| Delete Song | Deletes a song that was saved in the piano’s internal memory or on a USB flash drive (p. 15). | |
| Rename Song | Renames a saved song (p. 15). | |
| Copy Song | Songs that have been saved in internal memory can be copied to USB flash drive. Alternatively, songs stored on a USB flash drive can be copied to internal memory (p. 15). | |
| Count-in Measure | You can change the number of measures that are sounded as a count before song playback or recording begins. | |
| 1 Measure, 2 Measures (default value: 1 Measure) | ||
Pedal-related settings
| Center Pedal | Changing How the Pedals Work (Center Pedal) When you turn on the power, the center pedal functions as the sostenuto pedal (p. 8). You can change the function of the pedal to a variety of other operations. By assigning a function to the pedal, you can instantly change a setting by pressing the pedal while you perform. | |
| Sostenuto (default setting) | The pedal functions as a sostenuto pedal. | |
| Play / Stop | The pedal has the same function as the [ò] button. | |
| Layer | Pressing the pedal will layer on Tone 2, used for Dual Play. * This is available only when using Dual Play. | |
| Left Pedal | Changing the Effect of the Pedal (Left Pedal) When you turn on the power, the left pedal functions as a soft pedal (p. 8). You can change the function of the pedal to a variety of other operations. By assigning a function to the pedal, you can instantly change a setting by pressing the pedal while you perform. | |
| Soft (default setting) | The pedal functions as a soft pedal. | |
| Play / Stop | The pedal has the same function as the [ | |
| Layer | Pressing the pedal will layer on Tone 2, used for Dual Play. * This is available only when using Dual Play. | |
| Reg. Pedal Shift | Using the Pedal to Switch Between Registrations (Reg. Pedal Shift) You can use the pedal to switch between the registrations (p. 11). This lets you switch to the next registration by depressing the pedal. * The pedal function settings are prioritized as follows: “Reg. Pedal Shift”Ó“Center Pedal/Left Pedal”. | |
| Off (default setting) | The registration doesn’t change when you depress the pedal. | |
| Left Pedal | The left pedal (soft pedal) is used to switch between registrations. When doing so, you can’t use the Left Pedal settings when assigned. | |
| Center Pedal | The center pedal (sostenuto pedal) is used to switch between registrations. When doing so, you can’t use the Center Pedal settings when assigned. | |
MIDI-related settings
| Local Control | Preventing Doubled Notes When Connected to a Sequencer (Local Control) When you have a MIDI sequencer connected via USB, set this parameter to Local Off. Since most sequencers have their Thru function turned on, notes you play on the keyboard may be sounded in duplicate, or get dropped. To prevent this, you can enable the “Local Off” setting so that the keyboard and internal sound generator will be disconnected. | |
| On (default setting) | Local Control is on. The keyboard is connected to the internal sound generator. | |
| Off | Local Control is off. The keyboard is disconnected from the internal sound generator. Playing the keyboard will not produce sound. | |
| MIDI Transmit Ch. | MIDI Transmit Channel Settings (MIDI Transmit Ch.) This setting specifies the MIDI channel on which the unit will transmit. This unit will receive all sixteen channels (1–16). | |
| Off, 1–16 (default value: 1) | ||
Overall operation settings
| Language | Changing the Language Displayed in the Screen (Language) You can change the language that is displayed in the screen. |
| English, Japanese, Chinese (default value: English) | |
| Display Contrast | Adjusting the Brightness of the Display (Display Contrast) You can adjust the brightness of the piano’s display. |
| 1–10 (default value: 5) | |
| Screen Saver | Specifying the Time Until the Operating Panel Is Dimmed (Screen Saver) If no operations are performed for a specific length of time, the operating panel’s button LEDs and display are dimmed. You can specify the time until they are dimmed. |
| Off, 30 sec., 1 min., 5 min., 10 min. (default value: off) | |
| Touch Click Volume | Setting the Operating Panel Click Sound (Touch Click Volume) You can adjust the click sound that’s heard when you touch the buttons on the operating panel. |
| Off, 1–10 (default value: 5) | |
| Volume Limit | Specifying a Maximum Volume (Volume Limit) You can specify a maximum volume value. This lets you prevent loud sound from being produced unintentionally. |
| 20, 40, 60, 80, 100 (maximum) (default value: 100) |
| Haptic Key Vibration | Adjusting the Haptic Key Vibration (Haptic Key Vibration) When a tone in the “Grand” group is selected, this simulates the way in which the keyboard vibrates when you play an acoustic piano. If headphones are connected, this function turns off. If you want the haptic key vibration characteristic of an acoustic piano to be added even when using headphones, set “Effect When Headphones Plugged” to “Effective”. * When you switch the effect to “Effective” while using headphones, the haptic key vibration generator produces a slight sound resembling that of a real piano, even when you’re listening to your playing via headphones. | |
| Vibration Level | Off, Small, Standard, Large, Extra Large (default value: Standard) | |
| Effect When Headphones Plugged | Ineffective, Effective (default value: Ineffective) | |
| Auto-Power Off When Keyboard Cover is Closed | Turning Off the Power When You Close the Keyboard Cover (Power Off by the Lid) You can choose whether the power turns off when you close the keyboard cover. | |
| Effective (default setting) | The power turns off when you close the keyboard cover. | |
| Ineffective | The power does not turn off when you close the keyboard cover. To turn off the power, press the [Ā] button. * If Auto Off is specified, the power automatically turns off when a certain length of time has elapsed after you stop playing or operating the instrument. | |
| Indication | Value | Explanation |
| Speaker Auto Mute | Outputting Sound from Both Headphones and the Built-in Speakers (Speaker Auto Mute) By factory default, the built-in speakers are set not to make sound when you connect a pair of headphones into the Phones jack. By changing the settings, you can make sound come from both the headphones and the built-in speakers. * Changing the setting to “Off” also changes the tonal character of the sound you hear in your headphones. | |
| Off | Sound comes from both headphones and built-in speakers. | |
| On (default setting) | Sound comes only from headphones. | |
| Auto Off | Making the Power Automatically Turn off After a Time (Auto Off) With the factory settings, the unit’s power automatically switches off after you stop playing or operating the unit for the amount of time you set. (This is the factory default setting.) If you don’t want the power to turn off automatically, change the “Auto Off” setting to “Off”. | |
| Off, 10 min., 30 min., 240 min. (default value: 30 min.) | ||
| Registration Export | You can save your favorite settings or the piano’s setup to a USB flash drive, or load these settings that are saved to a USB flash drive into the piano (p. 23). * Settings can be loaded only into another piano of the same model. | |
| Registration Import | ||
| Piano Setup Export | ||
| Piano Setup Import | ||
| Format Media | All files saved in the piano’s internal memory or on a USB flash drive (commercially available) can be deleted (p. 24). | |
| Factory Reset | Here’s how to restore all registrations and internally saved settings to the factory-set condition (p. 24). | |
| Version | Displays the version of the unit’s system program. If a new system program becomes available, it can be used to update your piano. For details, refer to the following URL. http://www.roland.com/support/ Enter the model name → refer to “Updater and Driver” | |
Keyboard Mode
Basic Settings in Keyboard Mode
- Press the [
 ] button.
The [] button is lit, and the piano is in keyboard mode. - Press the [–] [+] buttons to access the screen of the item you want to set.
- Press the [] knob to confirm.
- Press the [–] [+] buttons to select the value.
- Press the [] button to exit keyboard mode.
The [] button goes dark.
| Indication | Value | Explanation | ||
| Keyboard-related settings | ||||
| Keyboard Mode | Whole | The same keyboard setting as a conventional acoustic piano. | ||
| Split | Playing Different Tones with the Left and Right Hand (Split Play) You can perform using different tones in the left and right regions of the keyboard, divided at a specific note. This function is called “Split Play” (p. 9). | |||
| Point | Select the location (key) where the sound changes as you go from lower notes to higher notes. * The key (split point) that you choose is included in the left-side key range. | |||
| Balance | Selects the volume balance between the left-side and right-side tones. | |||
| Left Shift | Shifts the pitch of the notes you play in the left hand, up or down in octaves. | |||
| Right Shift | Shifts the pitch of the notes you play in the right hand, up or down in octaves. | |||
| Dual | Layering Two Tones (Dual Play) You can play two tones simultaneously from a single key. This function is called “Dual Play” (p. 10). | |||
| Balance | Changing the volume balance of the two tones | |||
| Tone1 Shift | Shifts the pitch of tone 1, up or down in octaves. | |||
| Tone2 Shift | Shifts the pitch of tone 2, up or down in octaves. | |||
| Twin Piano | Dividing the Keyboard for Two People (Twin Piano) You can divide the keyboard into left and right areas so that two people can play the same range of pitches. One person can play a model performance, and the other person can practice along with that model performance. You can also change the way (Mode) in which notes are sounded in Twin Piano. * If you select a tone from the “Grand” group, it sounds different than usual. | |||
| Dividing the Keyboard for Two People (Twin Piano) You can divide the keyboard into left and right areas so that two people can play the same range of pitches. One person can play a model performance, and the other person can practice along with that model performance. You can also change the way (Mode) in which notes are sounded in Twin Piano. * If you select a tone from the “Grand” group, it sounds different than usual. | ||||
| Twin Piano Mode | Pair (default setting) | Notes played in the right zone are louder in the right speaker; notes played in the left zone are louder in the left speaker. | ||
| Individual | Notes played in the right area are heard only from the right speaker; notes played in the left area are heard only from the left speaker. When using headphones, you won’t be able to hear the other person’s playing. | |||
| Kbd Transpose | The keyboard can be transposed in semitone steps. When accompanying a vocal, or when performing as a singer-instrumentalist, you can transpose the pitch to match the singer’s pitch range without changing the fingering of your keyboard playing. | |||
| Key Touch | You can change the playing feel (touch) of the keyboard. The default value of 50 provides a key touch that is closest to that of an acoustic piano. Higher settings make the keyboard feel heavier. With the “Fix”, notes sound at a fixed volume regardless of how strongly you play the keyboard. | |||
| Fix, 1–100 (default value: 50) | ||||
| Hammer Response | Adjusts the time from when you play the key until the piano sound is heard. Higher values produce a greater delay. | |||
| Off, 1–10 (default value: 1) | ||||
Troubleshooting
Problems with the piano’s sound
| Problem | Items to check | Cause/Action | Page |
| No sound | Is the volume turned down? | Raise the volume. | p. 8 |
| Could headphones or an adaptor plug be inserted in the Phones jack? | If headphones or an adaptor plug are inserted in the headphones jack, sound is not output from the speakers. | _ | |
| If you want sound to be produced from headphones or external speakers, is the device connected correctly? | P. 5 | ||
| Could the “Local Contror setting be turned “Off”? | In function mode, turn the “Local Control” setting “On”. | p. 27 | |
| Pitch of the keyboard or song Is Incorrect | Could you have made Transpose settings? | Disable the transpose features in the”Kbd Transposeand “Song Transpose” settings of Function mode. | p. 11, p. 25 |
| Is the Master Tune setting appropriate? | When shipped from the factory, the reference pitch is set to “442.0 Hz”. Check the “Master Tuning” setting of the Piano Designer function. | p. 18 | |
| Is the setting for the Temperament correct? | When shipped from the factory, the tuning is set to “Equal temperament”. Check the “Temperament” setting of the Piano Designer function. | p. 18 | |
| Is the Single Note Tuning setting appropriate? | Check the Piano Designer function’s “Single Note settings”. | p. 19 | |
| Sounds are heard twice (doubled) when the keyboard Is played | Could “Dual Play” be specified, so that two tones are layered? | Select “Keyboard Mode” in Function mode, and change “Dual” to”Whole”. | p. 29 |
| Could the piano be connected to an external sequencer? | If you don’t want the piano to be played from another sound module, set your music production software’s-soft thru” setting to”Off”. | _ | |
| If the function mode”Local Control” setting is “On”, turn the “Local Contror setting “Off”. | p. 27 | ||
| Reverberation remains even If you defeat the Ambience effect | This simulates the depth and ambience of the acoustic piano’s sound, and is not a malfunction. Even if the Ambience effect is off, the acoustic piano’s own resonance remains. | You can also reduce the resonance by lowering the “Cabinet Resonance” value of the Piano Designer function. | p. 19 |
| The sound of the higher notes suddenly changes from a certain key | This simulates the characteristics of an acoustic piano, and is not a malfunction. The sound will change where there is a change in the number of strings per key or a transition from wound strings to unwound strings. | — | |
| When you press a key, the sound of a note you didn’t press is also faintly heard | In some cases, a note you play might cause a different note (whose frequency is an integer multiple of the first note) to resonate, producing the sensation that the sound has changed; this is not a malfunction. | Lower the Piano Designer’s “Full Scale String Res.”value, or turn it off. | p. 19 |
| A buzz or vibration occurs when you play the keyboard | This feature simulates the vibration that occurs when you play the keyboard of an acoustic piano; it is not a malfunction. | You can eliminate the keyboard vibration by turning thel-laptic Key Vibration” setting off in function mode. | p. 27 |
| High-pitched ringing Is heard | If you don’t hear It through headphones: It may be that the piano has malfunctioned. Contact either the dealer where you purchased your instrument, or Roland Support. If you also hear it through headphones: To decrease the metallic ringing, adjust the following settings. • Ambience Depth (p. 9) • Piano Designer “Full Scale String Res.”(p. 19) | – | |
| Low notes sound wrong, or are buzzy | Could the volume be set to maximum? | If the volume is at the maximum, the sound might be distorted depending on how you play the piano. If this occurs, lower the volume. | p. 8 |
| If you also hear it through headphones: It may be that the piano has malfunctioned. Contact either the dealer where you purchased your instrument, or Roland Support. If you don’t hear It through headphones: Objects near the piano are resonating because of the high volume of sound coming from the speakers. You can take the following measures to minimize resonances. • Keep the volume down. • Locate the speakers 10-15 cm (4-6 inch) away from walls or other surfaces. • Move away from the objects that are resonating. | _ | ||
| Noise Is sometimes heard when you change the master tuning or temperament while piano sound Is being produced | Due to how the sound engine is structured, you might hear noise with grand piano tones if you change the master tuning or temperament while sound is being produced. This is not a malfunction. | – | |
| The sound Is heard differently depending on the tone settings | When using “Dual play” which layers two tones, or “Split play” which produces different tones in the left-hand and right-hand, the sound might be heard differently depending on the specific combination. For some combinations, the effect is not applied to the left-hand tone or to tone 2, but this is not a malfunction. | – | |
Problems with the pedals
| Problem | Items to check | Cause/Action | Page |
| Pedal does not work, or Is “stuck” | Is the pedal connected correctly? | Check the pedal jack located on the back of the piano. | p. 5 |
| Could you have disconnected or connected the pedal cord while the power was on? | If you disconnect the pedal cord while the piano is powered-on, the pedal effect might remain applied. Connect or disconnect the pedal cord while the piano is powered off. | — | |
| Could you have changed the way in which the pedal effect is applied? | If the right pedal part is set to”Right” it applies only to the right-hand tone; if set to “Left”, it applies only to the left-hand tone. | p. 26 | |
| Could Twin Piano be turned on? | If Twin Piano is on, the right pedal will affect only the right-hand keyboard zone and the left pedal will affect only the left-hand keyboard zone. | p. 29 | |
| Could you have changed the function of the pedal? | If the function of the sostenuto pedal (center pedal) or the soft pedal (left pedal) have been changed, they will not operate as the sostenuto pedal or the soft pedal. Restore the settings of the “Center Pedal” and “Left Pedal”. | p. 26 | |
| Are you operating the pedals correctly? | Check whether the operations are correct. | P. 8 |
Problems with song playback
| Problem | Items to check | Cause/Action | Page |
| Only the sound of a particular Instrument In a song does not play | When you press the [ | Parts that are not shown in the screen do not sound. Select an unlit part to highlight it so that it produces sound. | p. 13 |
| Song volume Is Inaudible or too low | Could the song volume be set too low? | Depending on the data format of the song, raise the “Song Volume SMF “or” Song Volume Audio° value. | p . 25 |
| Changing the “Song Volume” does not change the volume. | Could the SMF Play Mode be set to “Internal”? | Set the SMF Play Mode to “External”. | p. 26 |
| The selected sound changes when you play back a song | Could the SMF Play Mode be set to “Internal”? | Set the SMF Play Mode to s Externall | p. 26 |
| Can’t play back a song saved In USB Dash drive | Is the file extension “NAV” or”.MP3″ or “.MID”? | This piano can play back three types of file: WAVE format or MP3 format audio files, and MIDI files. | p. 13 |
| Names of songs saved on the USD Dash drive do not appear In the screen | Is the file extension “.MID”? Could the song name information in the file be blank or consist only of spaces? ‘ | Song names can be shown in the screen only for files that have a “.MID” extension. If the song name information in the file is blank or consists only of spaces, the song name is not shown in the piano screen. | p. 13 |
Problems with recording
| Problem | Items to check | Cause/Action | Page |
| Can’t record | When you press the [ | Select the part in the screen that you want to record, so that it blinks. | p. 16 |
| Can’t record audio | Is a USB flash drive connected to the USB Memory port? | Audio recording cannot be performed unless a USB flash drive is connected. | p. 17 |
| Volume differs between recording and playback | Could the song volume be set too low? | Depending on the data format of the song, raise the “Song Volume SMF” or”Song Volume Audio” value. | p. 25 |
| The tonal character of the piano changes when you record | Could you be recording with a tone that you created in Piano Designer? a song. | Some of the Piano Designer settings might not be reproduced when you play back | _ |
| Could you be playing back a song that you audio-recorded to an USB flash drive? | If you want to record with the same tonal character as when you play the keyboard, record your performance as SMF. | _ |
Other problems
| Problem | Items to check | Cause/Action | Page |
| Even though you’re using headphones to mute the sound, a thumping sound is heard when you play the keyboard | The keyboard of this piano is designed to simulate the mechanism of an acoustic piano. Even on an acoustic piano, a thumping sound is actually being produced when you press a key. Such sounds do not indicate a malfunction. | _ | |
| Marks appear on the cloth portion of the piano | If your hands or feet, or other objects, touch the cloth portion located around the music rest or near your feet, the cloth might be wrinkled, causing it to appear marred or discolored, but this does not affect the performance of the unit. | — | |
| Power turns off on Its own | Could you have made settings so that the power automatically turns off when the piano has not been used for a time? | If you don’t need the power to turn off automatically, turn the Auto Off setting “Off’. | p. 28 |
| Power does not turn on | Is the power cord connected correctly? | P. 5 | |
| The buttons of the operating panel do not work | Could you have enabled the “Panel Lock” setting to prevent inadvertent operation? | Disengage the”Panel Lock” setting. | P. 3 |
| Is the panel wet? | Thoroughly wipe off any moisture on the panel before using this instrument. | P. 7 | |
| Did you come into contact with the touch switches when you turned on the power? | Try cumin the power off and then on again. | P. 7 | |
| The volume level of the unit connected to Input jack is too low | Could the volume of the connected device be turned down? | — | |
| Is the input volume too low? | p. 25 | ||
Error Messages
| Indication | Meaning |
| Error 2 | An error occurred during writing.The USB flash drive may be corrupted. Insert other USB flash drive and try again. Alternatively, you can initialize the USB flash drive (“Initializing the Memory (Format Media)” (p. 24)). |
| The internal memory might be damaged. Format the internal memory (“Initializing the Memory (Format Media)” (p. 24)). | |
| Error 10 | No USB flash drive is inserted. Insert the USB flash drive and try again. |
| The internal memory might be damaged. Format the internal memory (“Initializing the Memory (Format Media)” (p. 24)). | |
| Error 11 | There is not sufficient free memory in the save destination. Either insert other USB flash drive or delete unneeded files and try again (“Deleting a Saved Song° (p. 15)). |
| Error 14 | An error occurred during reading.The USB flash drive may be corrupted. Insert other USB flash drive and try again. Alternatively, you can initialize the USB flash drive (*Initializing the Memory (Format Media)” (p. 24)). |
| The internal memory might be damaged. Format the internal memory (“Initializing the Memory (Format Media)” (p. 24)). | |
| Error 15 | The file is unreadable. The data format is not compatible with the unit. |
| Error 18 | This audio format is not supported. Use an WAV format (44.1 kHz, 16-bit linear) or MP3 format audio file. |
| Error 30 | Internal memory capacity of the unit is full. |
| Error 40 | The unit cannot deal with the excessive MIDI data sent from the external MIDI device. Reduce the amount of MIDI data sent to the unit. |
| Error 43 | A MIDI transmission error has occurred. Check the connected MIDI device. |
| Error 51 | There may be a problem with the system. Repeat the procedure from the beginning. If this message still displays after you have tried several times, contact Roland as shown below. |
| Error 65 | The USB Memory port was subjected to excessive current Make sure that there is no problem with the USB flash drive, then turn the power off, then on again. |
Roland Service Centers and Distributors
When you need repair service, access this URL and find your nearest Roland Service Center or authorized Roland distributor in your country.
https://www.roland.com/products/roland_piano_app/
Tone List
Grand
| No. | Tone Name |
| 1 | Concert Piano |
| 2 | Stage Piano |
| 3 | Mellow Piano |
| 4 | Bright Piano |
MEMO
You can adjust the “Ambience Type” and the Piano Designer “Piano Tone settings” for only the tones in the “Grand” group.
Upright/Classical
| Upright | Classical | ||
| No. | Tone Name | No. | Tone Name |
| 1 | Concert Piano | 6 | Fortepiano |
| 2 | Stage Piano | 7 | Mellow Forte |
| 3 | Mellow Piano | 8 | Bright Forte |
| 4 | Bright Piano | 9 | Harpsichord |
| 5 | 10 | Harpsi 8’+4’ | |
E Piano/Organ
| E.Piano | Organ | ||
| No. | Tone Name | No. | Tone Name |
| 1 | 1976SuitCase | 13 | Pipe +B32:B43Organ |
| 2 | Tremolo EP | 14 | Nason Flt 8’ |
| 3 | Pop EP | 15 | ChurchOrgan1 |
| 4 | Vintage EP | 16 | ChurchOrgan2 |
| 5 | Stage Phaser | 17 | Combo Jz.Org |
| 6 | 60’s EP | 18 | Ballad Organ |
| 7 | FM E.Piano | 19 | Gospel Spin |
| 8 | EP Belle | 20 | Full Stops |
| 9 | 70’s EP | 21 | Mellow Bars |
| 10 | E.Grand | 22 | Light Organ |
| 11 | Magical Piano | 23 | Lower Organ |
| 12 | Clav. | 24 | 60’s Organ |
Others
| Strings | No. | Tone Name | No. | Tone Name | |
| No. | Tone Name | 100 | Chorus Gt 2 | 204 | Sine Pad |
| 1 | SymphonicStr1 | 101 | Overdrive Gt | 205 | Polysynth |
| 2 | Epic Strings | 102 | Guitar Pinch | 206 | Space Voice |
| 3 | Rich Strings | 103 | DistortionGt | 207 | Itopia |
| 4 | Velo Strings | 104 | Gt Feedback1 | 208 | Bowed Glass |
| 5 | SymphonicStr2 | 105 | Dist.Rhy Gt | 209 | Metallic Pad |
| 6 | Violin | 106 | Gt Harmonics | 210 | Halo Pad |
| 7 | Cello | 107 | Gt Feedback2 | 211 | Sweep Pad |
| 8 | Orchestra Str | 108 | AcousticBass | 212 | Ice Rain |
| 9 | Orchestra | 109 | FingeredBass | 213 | Soundtrack |
| 10 | OrchestraBrs | 110 | Finger Slap | 214 | Crystal |
| 11 | Soft Pad | 111 | Picked Bass | 215 | Synth Mallet |
| 12 | Chamber Winds | 112 | FretlessBass | 216 | Atmosphere |
| 13 | Flute | 113 | Slap Bass 1 | 217 | Brightness |
| 14 | Harp | 114 | Slap Bass 2 | 218 | Goblins |
| 15 | Pizzicato Str | 115 | Synth Bass 1 | 219 | Echo Drops |
| 16 | A.Bass+Cymbl | 116 | WarmSyn.Bass | 220 | Echo Bell |
| Voice | 117 | Synth Bass 3 | 221 | Echo Pan | |
| 17 | Jazz Scat | 118 | Clav.Bass | 222 | Star Theme |
| Do Re Mi | 119 | Hammer Bass | 223 | Sitar 1 | |
| 18 | Do Re Mi 2´ | 120 | Synth Bass 2 | 224 | Sitar 2 |
| 19 | Do Re Mi 2³ | 121 | Synth Bass 4 | 225 | Banjo |
| 20 | Do Re Mi 1´ | 122 | RubberSyn.Bs | 226 | Shamisen |
| 21 | Do Re Mi 1³ | 123 | Attack Pulse | 227 | Koto |
| Drums | 124 | Violin | 228 | Taisho Koto | |
| 22 | STANDARD Set | 125 | Slow Violin | 229 | Kalimba |
| 23 | ROOM Set | 126 | Viola | 230 | Bagpipe |
| 24 | POWER Set | 127 | Cello | 231 | Fiddle |
| 25 | ELEC.Set | 128 | Contrabass | 232 | Shanai |
| 26 | ANALOG Set | 129 | Tremolo Str. | 233 | Tinkle Bell |
| 27 | JAZZ Set | 130 | PizzicatoStr | 234 | Agogo |
| 28 | BRUSH Set | 131 | Harp | 235 | Steel Drums |
| 29 | ORCH.Set | 132 | Yang Qin | 236 | Woodblock |
| 30 | SFX Set | 133 | Timpani | 237 | Castanets |
| GM2 | 134 | Strings | 238 | Taiko | |
| 31 | Piano 1 | 135 | Orchestra | 239 | Concert BD |
| 32 | Piano 1w | 136 | 60’s Strings | 240 | Melodic Tom1 |
| 33 | Piano 1d | 137 | Slow Strings | 241 | Melodic Tom2 |
| 34 | Piano 2 | 138 | Syn.Strings1 | 242 | Synth Drum |
| 35 | Piano 2w | 139 | Syn.Strings3 | 243 | TR-808 Tom |
| 36 | Piano 3 | 140 | Syn.Strings2 | 244 | Elec.Perc. |
| 37 | Piano 3w | 141 | Choir 1 | 245 | Reverse Cym. |
| 38 | Honky-tonk | 142 | Choir 2 | 246 | Gt FretNoise |
| 39 | Honky-tonk w | 143 | Voice | 247 | Gt Cut Noise |
| 40 | E.Piano 1 | 144 | Humming | 248 | BsStringSlap |
| 41 | Detuned EP 1 | 145 | Synth Voice | 249 | Breath Noise |
| 42 | Vintage EP | 146 | Analog Voice | 250 | Fl.Key Click |
| 43 | 60’s E.Piano | 147 | OrchestraHit | 251 | Seashore |
| 44 | E.Piano 2 | 148 | Bass Hit | 252 | Rain |
| 45 | Detuned EP 2 | 149 | 6th Hit | 253 | Thunder |
| 46 | St.FM EP | 150 | Euro Hit | 254 | Wind |
| 47 | EP Legend | 151 | Trumpet | 255 | Stream |
| 48 | EP Phaser | 152 | Dark Trumpet | 256 | Bubble |
| 49 | Harpsi. | 153 | Trombone 1 | 257 | Bird 1 |
| 50 | Coupled Hps. | 154 | Trombone 2 | 258 | Dog |
| 51 | Harpsi.w | 155 | Bright Tb | 259 | Horse Gallop |
| 52 | Harpsi.o | 156 | Tuba | 260 | Bird 2 |
| 53 | Clav. | 157 | MuteTrumpet1 | 261 | Telephone 1 |
| 54 | Pulse Clav. | 158 | MuteTrumpet2 | 262 | Telephone 2 |
| 55 | Celesta | 159 | French Horn1 | 263 | DoorCreaking |
| 56 | Glockenspiel | 160 | French Horn2 | 264 | Door |
| 57 | Music Box | 161 | Brass 1 | 265 | Scratch |
| 58 | Vibraphone | 162 | Brass 2 | 266 | Wind Chimes |
| 59 | Vibraphone w | 163 | Synth Brass1 | 267 | Helicopter |
| 60 | Marimba | 164 | Synth Brass3 | 268 | Car Engine |
| 61 | Marimba w | 165 | AnalogBrass1 | 269 | Car Stop |
| 62 | Xylophone | 166 | Jump Brass | 270 | Car Pass |
| 63 | TubularBells | 167 | Synth Brass2 | 271 | Car Crash |
| 64 | Church Bell | 168 | Synth Brass4 | 272 | Siren |
| 65 | Carillon | 169 | AnalogBrass2 | 273 | Train |
| 66 | Santur | 170 | Soprano Sax | 274 | Jetplane |
| 67 | Organ 1 | 171 | Alto Sax | 275 | Starship |
| 68 | TremoloOrgan | 172 | Tenor Sax | 276 | Burst Noise |
| 69 | 60’s Organ | 173 | Baritone Sax | 277 | Applause |
| 70 | Organ 2 | 174 | Oboe | 278 | Laughing |
| 71 | Perc.Organ 1 | 175 | English Horn | 279 | Screaming |
| 72 | Chorus Organ | 176 | Bassoon | 280 | Punch |
| 73 | Perc.Organ 2 | 177 | Clarinet | 281 | Heart Beat |
| 74 | Rock Organ | 178 | Piccolo | 282 | Footsteps |
| 75 | Church Org.1 | 179 | Flute | 283 | Gun Shot |
| 76 | Church Org.2 | 180 | Recorder | 284 | Machine Gun |
| 77 | Church Org.3 | 181 | Pan Flute | 285 | Laser Gun |
| 78 | Reed Organ | 182 | Bottle Blow | 286 | Explosion |
| 79 | Puff Organ | 183 | Shakuhachi | ||
| 80 | Accordion 1 | 184 | Whistle | ||
| 81 | Accordion 2 | 185 | Ocarina | ||
| 82 | Harmonica | 186 | Square Lead1 | ||
| 83 | Bandoneon | 187 | Square Lead2 | ||
| 84 | Nylon-str.Gt | 188 | Sine Lead | ||
| 85 | Ukulele | 189 | Saw Lead 1 | ||
| 86 | Nylon Gt o | 190 | Saw Lead 2 | ||
| 87 | Nylon Gt 2 | 191 | Doctor Solo | ||
| 88 | Steel-str.Gt | 192 | Natural Lead | ||
| 89 | 12-str.Gt | 193 | SequencedSaw | ||
| 90 | Mandolin | 194 | Syn.Calliope | ||
| 91 | Steel+Body | 195 | Chiffer Lead | ||
| 92 | Jazz Guitar | 196 | Charang | ||
| 93 | Hawaiian Gt | 197 | Wire Lead | ||
| 94 | Clean Guitar | 198 | Solo Vox | ||
| 95 | Chorus Gt 1 | 199 | 5th Saw Lead | ||
| 96 | Mid Tone Gt | 200 | Bass+Lead | ||
| 97 | Muted Guitar | 201 | Delayed Lead | ||
| 98 | Funk Guitar1 | 202 | Fantasia | ||
| 99 | Funk Guitar2 | 203 | Warm Pad | ||
Internal Song List
| No. | Song Name | Composer | No. | Song Name | Composer |
| Listening | Ensemble *Songs corresponding to the included collection of scores, “Roland Piano Masterpieces”. | ||||
| 1 | Ballade No.1 | Fryderyk Franciszek Chopin | 1 | Piano Concerto No.1 | Peter Ilyich Tchaikovsky |
| 2 | Aufschwung | Robert Alexander Schumann | 2 | Piano Concerto No.2 | Sergei Rachmaninoff |
| 3 | “Ah, vous dirai-je, Maman” | Wolfgang Amadeus Mozart | 3 | Canon (Jazz Arrangement) | Johann Pachelbel |
| 4 | An die Freude (Jazz Arrangement) | Ludwig van Beethoven | 4 | Sicilienne (Jazz Arrangement) | Gabriel Fauré |
| 5 | Jupiter from The Planets (Jazz Arrangemen | Gustav Holst | 5 | Berceuse from Dolly Suite | Gabriel Fauré |
| 6 | Nocturne, op.9-2 | Fryderyk Franciszek Chopin | 6 | Le jardin féerique from Ma mère l’Oye | Maurice Ravel |
| 7 | Jeux d’eau | Maurice Ravel | 7 | Le Quattro Stagioni “La Primavera” | Antonio Vivaldi |
| 8 | Amazing Grace | Hymn | 8 | Marche Militaire Nr.1 | Franz Peter Schubert |
| 9 | Für Elise (Jazz Arrangement) | Ludwig van Beethoven | 9 | Waltz from the Sleeping Beauty | Peter Ilyich Tchaikovsky |
| 10 | Sonate für Klavier Nr.14 1 | Ludwig van Beethoven | 10 | L’Apprenti sorcier | Paul Dukas |
| 11 | Sonate für Klavier Nr.14 2 | Ludwig van Beethoven | 11 | Salut d’Amour | Edward Elgar |
| 12 | Sonate für Klavier Nr.14 3 | Ludwig van Beethoven | 12 | Pavane pour une infante défunte | Maurice Ravel |
| 13 | Love Is Here To Stay | George Gershwin | 13 | Menuett G Dur BWV Anh.114 | Johann Sebastian Bach |
| 14 | Widmung S.566 R.253 | “Robert Alexander Schumann Arranged by Franz Liszt” | 14 | Präludium C Dur BWV846 | Johann Sebastian Bach |
| 15 | Étude, op.10-12 | Fryderyk Franciszek Chopin | 15 | Türkischer Marsch | Wolfgang Amadeus Mozart |
| 16 | Barcarolle | Fryderyk Franciszek Chopin | 16 | Für Elise | Ludwig van Beethoven |
| 17 | Zhavoronok | Mikhail Ivanovich Glinka, Arranged by Mily Alexeyevich Balakirev | 17 | Türkischer Marsch | Ludwig van Beethoven |
| 18 | Sonate für Klavier Nr.23 1 | Ludwig van Beethoven | 18 | Auf Flügeln des Gesanges | Felix Mendelssohn |
| 19 | Sonate für Klavier Nr.23 2 | Ludwig van Beethoven | 19 | Étude, op.10-3 | Fryderyk Franciszek Chopin |
| 20 | Sonate für Klavier Nr.23 3 | Ludwig van Beethoven | 20 | Valse, op.64-1 | Fryderyk Franciszek Chopin |
| 21 | Valse, op.34-1 | Fryderyk Franciszek Chopin | 21 | Fantaisie-Impromptu | Fryderyk Franciszek Chopin |
| 22 | Polonaise op.53 | Fryderyk Franciszek Chopin | 22 | Träumerei | Robert Alexander Schumann |
| 23 | Nocturne No.20 | Fryderyk Franciszek Chopin | 23 | Dolly’s Dreaming Awakening | Theodor Oesten |
| 24 | Die Forelle | Franz Peter Schubert, Arranged by Franz Liszt | 24 | Brautchor | Wilhelm Richard Wagner |
| 25 | Reflets dans l’Eau | Claude Achille Debussy | 25 | Liebesträume Nr.3 | Franz Liszt |
| 26 | La Fille aux Cheveux de Lin | Claude Achille Debussy | 26 | Ungarische Tänze Nr.5 | Johannes Brahms |
| 27 | La Campanella | Franz Liszt | 27 | Clair de Lune | Claude Achille Debussy |
| 28 | Scherzo No.2 | Fryderyk Franciszek Chopin | 28 | 1ère Arabesque | Claude Achille Debussy |
| 29 | Golliwog’s Cakewalk | Claude Achille Debussy | |||
| 30 | Je te veux | Erik Satie | |||
| No. | Song Name | Composer | No. | Song Name | Composer |
| Entertainment *Songs corresponding to the included collection of scores, “Roland Piano Masterpieces”. | Do Re Mi Lesson *Songs corresponding to the included collection of scores, “Roland Piano Masterpieces”. | ||||
| 1 | Someday My Prince Will Come | Frank Churchill | 1-15 | Training No.1 – 15 | Roland Corporation |
| 2 | Heigh Ho | Frank Churchill | 16 | Twinkle Twinkle Little Star | French Folk Song |
| 3 | Mickey Mouse March | Jimmie Dodd | 17 | Summ,Summ,Summ | Traditional |
| 4 | Let It Go | Kristen Anderson-Lopez, Robert Lopez | 18 | Frog Song | German Folk Song |
| 5 | Under The Sea | Alan Menken | 19 | The Cuckoo | Traditional |
| 6 | ANPAN MAN NO March | Takashi Miki | 20 | Oh! Susanna | Stephen Foster |
| 7 | YUME WO KANAETE DORAEMON | Katsuhiko Kurosu | 21 | Let’s Clap Hands | Traditional |
| 8 | SANPO | Jo Hisaishi | 22 | Das klinget so herrlich | Wolfgang Amadeus Mozart |
| 9 | Polovtsian Dances | Alexander Borodin | 23 | Wiegenlied | Johannes Brahms |
| 10 | Ombra mai fù | George Frideric Handel | 24 | Les Patineurs | Émile Waldteufel |
| 11 | Lascia ch’io pianga | George Frideric Handel | 25 | Minuet | Johann Sebastian Bach |
| 12 | Twinkle Twinkle Little Star | French Folk Song | 26 | Old Folks At Home | Stephen Foster |
| 13 | Mary Had a Little Lamb | Traditional | 27 | Deck the Halls | Carol |
| 14 | Bear Song | American Folk Song | 28 | Danny Boy | Irish Song |
| 15 | Ich Bin Ein Musikante | German Folk Song | 29 | Korobeiniki | Russian Folk Song |
| 16 | Grand Father’s Clock | Henry Work | 30 | Sakura Sakura | Japanese Folk Song |
| 17 | HANA | Rentaro Taki | Scale *Songs corresponding to the included collection of scores, “Roland Piano Masterpieces”. | ||
| 18 | HAMABE NO UTA | Tamezo Narita | 1-36 | Major Scales, Minor Scales | – |
| 19 | MOMIJI | Teiichi Okano | Hanon | ||
| 20 | YUKI | Monbusho Shoka | 1-20 | 1–20 | Charles-Louis Hanon |
| 21 | Happy Birthday to You | Mildred Hill, Patty Hill | Beyer | ||
| 22 | Jingle Bells | James Pierpont | 1-106 | 1-106 | Ferdinand Beyer |
| 23 | We Wish You a Merry Christmas | Carol | Burgmüller | ||
| 24 | Silent Night | Franz Gruber | 1 | Openness | Johann Friedrich Franz Burgmüller |
| 25 | Auld Lang Syne | Traditional | 2 | Arabesque | |
| 26 | Lavender’s Blue | Traditional | 3 | Pastoral | |
| 27 | Aura Lee | George R. Poulton | 4 | A Small Gathering | |
| 28 | Amazing Grace | Hymn | 5 | Innocence | |
| 29 | Little Brown Jug | Joseph Winner | 6 | Progress | |
| 30 | When The Saints Go Marching In | Traditional | 7 | The Clear Stream | |
| 31 | Greensleeves | Traditional | 8 | Gracefulness | |
| 32 | When I Fall in Love | Victor Young | 9 | The Hunt | |
| 33 | Softly, as in a Morning Sunrise | Sigmund Romberg | 10 | Tender Flower | |
| 34 | As Time Goes By | Herman Hupfeld | 11 | The Young Shepherdess | |
| 35 | Summertime | George Gershwin | 12 | Farewell | |
| 36 | Moonlight Serenade | Glenn Miller | 13 | Consolation | |
| 37 | Maple Leaf Rag | Scott Joplin | 14 | Austrian Dance | |
| 38 | The Entertainer | Scott Joplin | 15 | Ballad | |
| 39 | Tico Tico no Fubá | Zequinha de Abreu | 16 | Sighing | |
| 40 | Tea for Two | Vincent Youmans | 17 | The Chatterbox | |
| Czerny 100 | 18 | Restlessness | |||
| 1-100 | 1-100 | Carl Czerny | 19 | Ave Maria | |
| 20 | Tarantella | ||||
| 21 | Angelic Harmony | ||||
| 22 | Gondola Song | ||||
| 23 | The Return | ||||
| 24 | The Swallow | ||||
| 25 | The Knight Errant | ||||
* All rights reserved. Unauthorized use of this material for purposes other than private, personal enjoyment is a violation of applicable laws.
* Songs marked by an asterisk (*) are arranged by Roland Corporation. The copyrights to these songs are owned by the Roland Corporation.
* Songs in Listening category are piano solos. They have no accompaniment.
* Please purchase commercially available scores for Hanon–Czerny no. 100.
* The performance data for the tone demos and the internal songs is not transmitted from the USB Computer port or via Bluetooth (MIDI).
* If the SMF Play Mode is set to “Internal”, there will be some parts whose volume does not change when you adjust the Song Volume SMF value. If the SMF Play Mode is set to “External”, the volume of all parts will change.
USING THE UNIT SAFELY
INSTRUCTIONS FOR THE PREVENTION OF FIRE, ELECTRIC SHOCK, OR INJURY TO PERSONS
About ![]() WARNING and
WARNING and ![]() CAUTION Notices
CAUTION Notices
| Used for instructions intended to alert the user to the risk of death or severe injury should the unit be used improperly. | |
| Used for instructions intended to alert the user to the risk of injury or material damage should the unit be used improperly. * Material damage refers to damage or other adverse effects caused with respect to the home and all its furnishings, as well to domestic animals or pets. |
About the Symbols
| The | |
| The | |
| The |
ALWAYS OBSERVE THE FOLLOWING
![]() WARNING
WARNING![]() Make sure that the power cord is grounded
Make sure that the power cord is grounded
Connect mains plug of this model to a mains socket outlet with a protective earthing connection.
Concerning the Auto Off function![]() The power to this unit will be turned off automatically after a predetermined amount of time has passed since it was last used for playing music, or its buttons or controls were operated (Auto Off function). If you do not want the power to be turned off automatically, disengage the Auto Off function (p. 28).
The power to this unit will be turned off automatically after a predetermined amount of time has passed since it was last used for playing music, or its buttons or controls were operated (Auto Off function). If you do not want the power to be turned off automatically, disengage the Auto Off function (p. 28). Lock the casters
When installing the piano, be sure to fasten the casters using the supplied caster cups.
Use only the supplied AC adaptor and the correct voltageBe sure to use only the AC adaptor supplied with the unit. Also, make sure the line voltage at the installation matches the input voltage specified on the AC adaptor’s body. Other AC adaptors may use a different polarity, or be designed for a different voltage, so their use could result in damage, malfunction, or electric shock.
Use only the supplied power cord
Use only the attached power cord. Also, the supplied power cord must not be used with any other device.
Use due care when handling the lid
 The lid should be opened and closed only by an adult.
 The lid must not be opened too far (we recommend that you do not open it by more than about 30 degrees). If opened to an extreme degree, you risk damaging the piano or having the lid fall unexpectedly. Also, when opening the lid, make sure that no one is in the way.
![]() CAUTION
CAUTION
Lock all casters if mobility presents dangerIn every situation where the unexpected movement of this unit could present a danger (such as when it’s set up on a stage, or when it’s being transported inside a vehicle), make sure to lock all the casters.
Cautions when moving this unitIf you need to move the instrument, take note of the precautions listed below. At least two persons are required to safely lift and move the unit. It should be handled carefully, all the while keeping it level. Make sure to have a firm grip, to protect yourself from injury and the instrument from damage.
- Close the lid.
- Fold down the music rest.
- Close the keyboard cover.
- Close the flap (p. 6)
- Check to make sure the screws securing the unit to the stand have not become loose. Fasten them again securely whenever you notice any loosening.
- Disconnect the power cord.
- Disconnect all cords coming from external devices.
Take care so as not to get fingers pinched![]() When handling the following moving parts, take care so as not to get fingers, etc., pinched. An adult should always be in charge of handling these items.
When handling the following moving parts, take care so as not to get fingers, etc., pinched. An adult should always be in charge of handling these items.
- Top lid (p. 6)
- Music rest (p. 6)
- Keyboard cover (p. 7)
- Top stick (p. 7)
- Pedals (p. 8)
- Flap (p. 6)
Keep small items out of the reach of childrenTo prevent accidental ingestion of the parts listed below, always keep them out of the reach of small children.
• Included Parts
Screws
![]() CAU
CAU![]() TION
TION
Use due care when handling the top lid and keyboard cover
- To prevent the lid from dropping, always make sure to lock the top stick in its receptacle. Also, make sure to keep supporting the top lid with your hands until the top stick is securely locked.

- When opening and closing the keyboard cover, use due caution so as not to get your fingers pinched. Whenever a child uses the unit, an adult should be on hand to provide guidance and supervision.
- Do not close the cover if there are any objects, such as sheet music, remaining on top of the keyboard.
- As a safety precaution, always make sure to lower the top lid and close the keyboard cover before moving the piano.
IMPORTANT NOTES
Placement
- Do not allow lighting devices that normally are used while their light source is very close to the unit (such as a piano light), or powerful spotlights to shine upon the same area of the unit for extended periods of time. Excessive heat can deform or discolor the unit.
- Do not allow objects to remain on top of the keyboard. This can be the cause of malfunction, such as keys ceasing to produce sound.
Care of the Keyboard
- Do not write on the keyboard with any pen or other implement, and do not stamp or place any marking on the instrument. Ink will seep into the surface lines and become unremovable.
- Do not affix stickers on the keyboard. You may be unable to remove stickers that use strong adhesives, and the adhesive may cause discoloration.
- To remove stubborn dirt, use a commercially available keyboard cleaner that does not contain abrasives. Start by wiping lightly. If the dirt does not come off, wipe using gradually increasing amounts of pressure while taking care not to scratch the keys.
Concerning the Care of the Unit (Mirror Finish)
- The surface of this unit has been polished so as to create a high-gloss, mirror-like finish. Since this beautiful finish is as delicate as that of the highest quality, wood-crafted furniture, it needs to be cared for at regular intervals. Please make sure to observe the following when caring for the unit.
- For routine care, gently clean the surface using a soft cloth or a piano-use feather duster. You must avoid applying any force, since even the tiniest particles of sand or grit can produce scratches if you wipe too hard.
- If the finish loses its luster, use a soft cloth dampened with some polishing liquid to evenly wipe the surface of the unit.
- Avoid using detergents or other cleaners, as they can cause the surface finish to deteriorate. This may lead to the formation of cracks or other imperfections.
Also, do not use chemically-enhanced cleaning cloths. - Precautions concerning the use of polishing agents
- Refer to the instructions that came with the polishing agent for instructions on its proper use.
- Use only polishing agents that are designed specifically for use on the mirror finishes of pianos.
By using any other product, you risk causing scratches, deformation, discoloration, etc. To purchase an appropriate product, please consult the
nearest musical instrument store. - Use the product only on the portions of this unit that have a mirror-like finish, and using an even touch, apply it equally over the entire surface. If you apply more force in one place over another, you risk losing some of the luster of the finish.
- Store in a location that is out of the reach of small children. If accidentally ingested, induce vomiting immediately. Then, see a doctor to obtain a diagnosis.
Repairs and Data
- Before sending the unit away for repairs, be sure to write down the needed information. Although we will do our utmost to preserve the data stored in your unit when we carry out repairs, in some cases, such as when the memory section is physically damaged, restoration of the stored content may be impossible. Roland assumes no liability concerning the restoration of any stored content that has been lost.
Additional Precautions
- Any data stored within the unit can be lost as the result of equipment failure, incorrect operation, etc. To protect yourself against the irretrievable loss of data, be sure to write down the needed information.
- Roland assumes no liability concerning the restoration of any stored content that has been lost.
- Never strike or apply strong pressure to the display.
- The sound of keys being struck and vibrations produced by playing an instrument can be transmitted through a floor or wall to an unexpected extent. Please take care not to cause annoyance to others nearby.
- Do not apply undue force to the music rest while it is in use.
- Do not use connection cables that contain a built-in resistor.
Using External Memories
- Please observe the following precautions when handling external memory devices. Also, make sure to carefully observe all the precautions that were supplied with the external memory device.
- Do not remove the device while reading/writing is in progress.
- To prevent damage from static electricity, discharge all static electricity from your person before handling the device.
Caution Regarding Radio Frequency Emissions
- The following actions may subject you to penalty of law.
- Disassembling or modifying this device.
- Removing the certification label affixed to the back of this device.
- Using this device in a country other than where it was purchased
Intellectual Property Right
- It is forbidden by law to make an audio recording, video recording, copy or revision of a third party’s copyrighted work (musical work, video work, broadcast, live performance, or other work), whether in whole or in part, and distribute, sell, lease, perform or broadcast it without the permission of the copyright owner.
- Do not use this product for purposes that could infringe on a copyright held by a third party. We assume no responsibility whatsoever with regard to any infringements of third-party copyrights arising through your use of this product.
- The copyright of content in this product (the sound waveform data, style data, accompaniment patterns, phrase data, audio loops and image data) is reserved by Roland Corporation.
- Purchasers of this product are permitted to utilize said content (except song data such as Demo Songs) for the creating, performing, recording and distributing original musical works.
- Purchasers of this product are NOT permitted to extract said content in original or modified form, for the purpose of distributing recorded medium of said content or making them available on a computer network.
- Roland is either registered trademarks or trademarks of Roland Corporation in the United States and/or other countries.
- Company names and product names appearing in this document are registered trademarks or trademarks of their respective owners.
- This product contains eParts integrated software platform of eSOL Co.,Ltd. eParts is a trademark of eSOL Co., Ltd. in Japan.
- The Bluetooth® word mark and logos are registered trademarks owned by Bluetooth SIG, Inc. and any use of such marks by Roland is under license.
- This Product uses the Source Code of μT-Kernel under T-License 2.0 granted by the T-Engine Forum (www.tron.org).
- The “Chinese language font MORISAWA SONG GB2313BMP12” used by this product is provided by Morisawa Corporation, and copyright to the font data is the property of that corporation.
- This product includes third party open source software. Copyright © 2009-2018 Arm Limited. All rights reserved. Copyright © 2018 STMicroelectronics. All rights reserved.
Licensed under the Apache License, Version 2.0 (the “License”);
You may obtain a copy of the License at http://www.apache.org/licenses/LICENSE-2.0
Copyright © 2018 STMicroelectronics. All rights reserved.
This software component is licensed by ST under BSD 3-Clause license, the “License”;
You may obtain a copy of the License at https://opensource.org/licenses/BSD-3-Clause - This product is using the Jansson (http://www.digip.org/jansson/) source code.
Copyright © 2009-2016 Petri Lehtinen <[email protected]> Released under the MIT license http://opensource.org/licenses/mit-license.php
![]()


