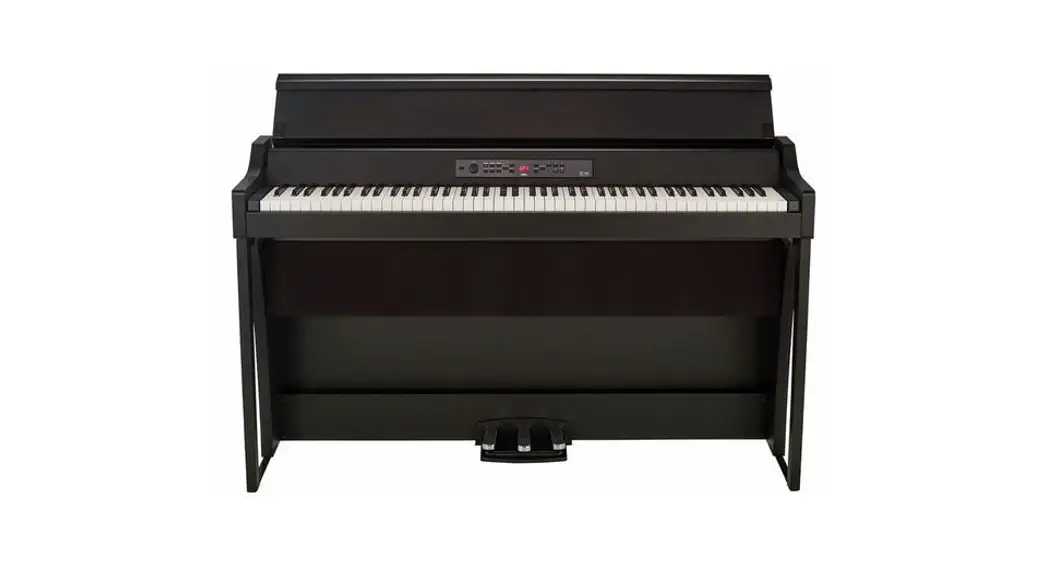
![]() G1 Air Digital Piano
G1 Air Digital Piano
Owner’s Manual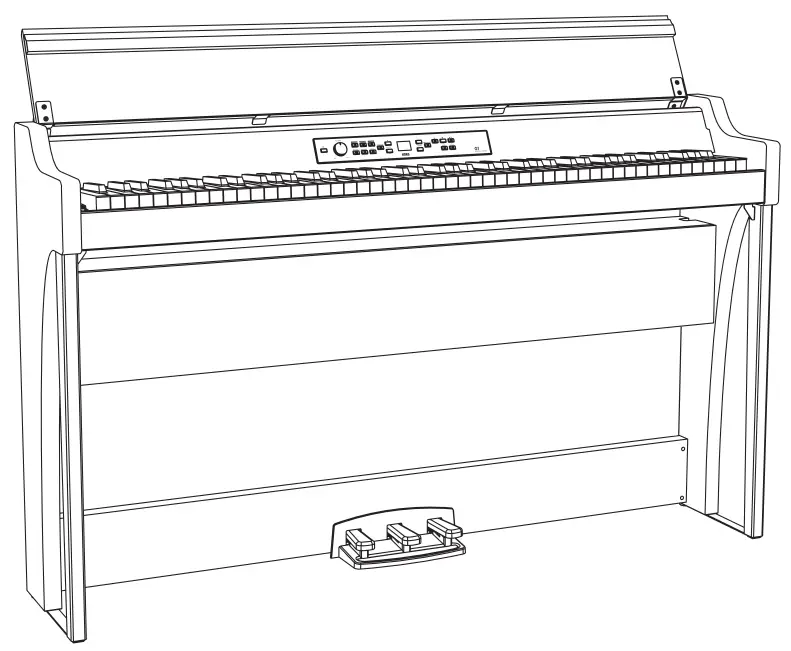 Thank you for purchasing the Korg G1/G1 Air digital piano.
Precautions
Location
Using the unit in the following locations can result in a malfunction.
- In direct sunlight
- Locations of extreme temperature or humidity
- Excessively dusty or dirty locations
- Locations of excessive vibration
- Close to magnetic fields
Power supply
Please connect the designated AC adapter to an AC outlet of the correct voltage. Do not connect it to an AC outlet of voltage other than that for which your unit is intended.
Interference with other electrical devices
Radios and televisions placed nearby may experience reception interference. Operate this unit at a suitable distance from radios and televisions.
Handling
To avoid breakage, do not apply excessive force to the switches or controls.
Care
If the exterior becomes dirty, wipe it with a clean, dry cloth. Do not use liquid cleaners such as benzene or thinner, or cleaning compounds or flammable polishes.
Keep this manual
After reading this manual, please keep it for later reference.
Keeping foreign matter out of your equipment
Never set any container with liquid in it near this equipment. If liquid gets into the equipment, it could cause a breakdown, fire, or electrical shock.
Be careful not to let metal objects get into the equipment. If something does slip into the equipment, unplug the AC adapter from the wall outlet. Then contact your nearest
Korg dealer or the store where the equipment was purchased.
THE FCC REGULATION WARNING (for USA)
NOTE: This equipment has been tested and found to comply with the limits for a Class B digital device, pursuant to Part 15 of the FCC Rules. These limits are designed to provide reasonable protection against harmful interference in a residential installation. This equipment generates, uses, and can radiate radio frequency energy and, if not installed and used in accordance with the instructions, may cause harmful interference to radio communications. However, there is no guarantee that interference will not occur in a particular installation. If this equipment does cause harmful interference to radio or television reception, which can be determined by turning the equipment off and on, the user is encour aged to try to correct the interference by one or more of the following measures:
- Reorient or relocate the receiving antenna.
- Increase the separation between the equipment and receiver.
- Connect the equipment into an outlet on a circuit different from that to which the receiver is connected.
- Consult the dealer or an experienced radio/TV technician for help.
If items such as cables are included with this equipment, you must use those included items.
Unauthorized changes or modification to this system can void the user’s authority to operate this equipment.
This transmitter must not be co-located or operated in conjunction with any other antenna or transmitter.
This equipment complies with FCC radiation exposure limits set forth for an uncontrolled environment and meets the FCC radio frequency (RF) Exposure Guidelines. This equipment has very low levels of RF energy that it deemed to comply without maximum permissive exposure evalu- ation (MPE).
This device complies with Industry Canada licence – exempt RSS standard(s). Operation is subject to the following two conditions: (1) this device may not cause interference, and (2) this device must accept any interference, including interference that may cause undesired operation of the device.
This equipment complies with IC radiation exposure limits set forth for an uncontrolled environment and meets RSS-102 of the IC radio fre quency (RF) Exposure rules. This equipment has very low levels of RF energy that it deemed to comply without maximum permissive exposure evaluation (MPE).![]() European Union Directives Conformance Statement
European Union Directives Conformance Statement
Korg Inc. hereby declares that the product meets the requirements of Directive 2014/53/EU. You can view the Declaration of Conformity (DoC) to Directive 2014/53/EU
on the Downloads page under Support on the Korg website (www.korg.com).![]() Notice regarding disposal (EU only)
Notice regarding disposal (EU only)![]() When this “crossed-out wheeled bin” symbol is displayed on the product, o wner’s manual, battery, or battery package, it signifies that when you wish to dispose of this product, manual, package or battery you must do so in an approved manner. Do not discard this product, manual, package or battery along with ordinary household waste. Disposing in the correct manner will prevent harm to human health and potential damage to the environment.
When this “crossed-out wheeled bin” symbol is displayed on the product, o wner’s manual, battery, or battery package, it signifies that when you wish to dispose of this product, manual, package or battery you must do so in an approved manner. Do not discard this product, manual, package or battery along with ordinary household waste. Disposing in the correct manner will prevent harm to human health and potential damage to the environment.
Since the correct method of disposal will depend on the applicable laws and regulations in your locality, please contact your local administrative body for details. If the battery contains heavy metals in excess of the regulated amount, a chemical symbol is displayed below the “crossedout wheeled bin” symbol on the battery or battery package.
DECLARATION OF CONFORMITY (for USA)
Responsible Party : KORG USA INC.
Address : 316 SOUTH SERVICE ROAD, MELVILLE, NY
Telephone : 1-631-390-6500
Equipment Type : Digital Piano
Model : G1, G1 Air
This device complies with Part 15 of FCC Rules. Operation is subject to the following two conditions: (1) This device may not cause harmful interference,and (2) this device
must accept any interference received, including interference that may cause undesired operation.
IMPORTANT NOTICE TO CONSUMERS
This product has been manufactured according to strict specifications and voltage requirements that are applicable in the country in which it is intended that this product should be used. If you have purchased this product via the internet, through mail order, and/or via a telephone sale, you must verify that this product is intended to be used in the country in which you reside.
WARNING: Use of this product in any country other than that for which it is intended could be dangerous and could invalidate the manufacturer’s or distributor’s warranty.
Please also retain your receipt as proof of purchase otherwise yourproduct mayeb disqualified from the manufacturer’s or distributor’s warranty.
* B luetooth is a registered trademark of Bluetooth SIG, Inc.
* All product names and company names are the trademarks or registered trademarks of their respective owners.
Main features
Thirty-two Premium Instrument Sounds
Built into the Korg G1/G1 Air Digital Piano are 32 unique instrument sounds—including a total of three distinct European and Japanese concert grand pianos. The G1/G1
Air also allows two sounds be played at once from the keyboard.
Layer Mode: Each key will play two sounds simultaneously.
Split Mode: One of three Bass sounds can be assigned to play on the lower half of the keyboard, independent of the upper sound.
Partner Mode: The keyboard can be divided into two playing areas, making it ideal for lessons with student and teacher side-by-side.
Built-in Demo Songs and Etudes
The G1/G1 Air includes a total of 50 pre-recorded performances; the 10 Sound Demo Songs make full use of the onboard sounds, while the 40 Piano Song etudes allow the player to develop their skills by playing along with the entire performance, or with either the right- or left-hand part muted.
Accurate Pedal Features
The G1/G1 Air provides the same three pedal functions found on a grand piano—Damper (sustain); Sostenuto; and Soft (una corda). Both the damper and soft pedals respond to half-pedaling, varying the depth of the effect by how far down the pedal is pressed. Pressing down on the damper pedal also adds realistic damper resonance to the number 1 and 2 sounds of the G.PIANO, A.PIANO and J.PIANO button..
Digital Metronome
Perfect for rhythm training, the built-in metronome offers a user- variable tempo, volume, and time signature. Choose a traditional pendulum sound or modern-day digital tone.
Onboard Effects
The G1/G1 Air offers three built-in digital effects—each offering three levels—to enhance the quality of the internal sounds. These effects can emphasize the brightness and clarity of the tone (Bril- liance); simulate the natural ambience of a concert hall (Reverb); and add depth and motion to the sound (Chorus). Adjustable Keyboard Touch You can hoosec from five different settings to adjust how the sound will respond to your keyboard playing dynamics.
Temperament Selection
In order to create an authentic performance in a wide range of music genres, the G1/G1 Air can be set to one of nine temperaments, including equal temperament, pure temperaments (major and minor), classical temperaments (Kirnberger and Werckmeister), as well as temperaments used with Middle Eastern and Indian folk music. When can acoustic piano sound is selected, the stretched tuning used with traditional pianos is automatically selected.
Play in any Key
The Transpose feature can quickly transpose the G1/G1 Air to play in any usical m key—without changing the player’s fingering. The Master T uning parameter can make fine adjustments in the overall pitch of the instrument.
Onboard Recorder
Integrated into the G1/G1 Air is a powerful two-part recorder. Create, record, and playback a library of multi-part performances that can be recalled at any time.
Dual Headphone Jacks
With two identical headphone jacks, the G1/G1 Air allows two people—parent & child, student & teacher, or friends—to listen and enjoy the sound of the G1/G1 Air simultaneously.
The Right Connections
Your new G1/G1 Air is equipped with a stereo Line Out jack, USB port, plus MIDI IN and MIDI OUT jacks, allowing the G1/G1 Air to connect to an external sound system or recording setup, a computer, or other MIDI enabled devices.
Bluetooth speaker (G1 Air only)
If a device compatible with Bluetooth audio is connected via Bluetooth, the G1 Air can be used as a wireless speaker.
Parts and their functions
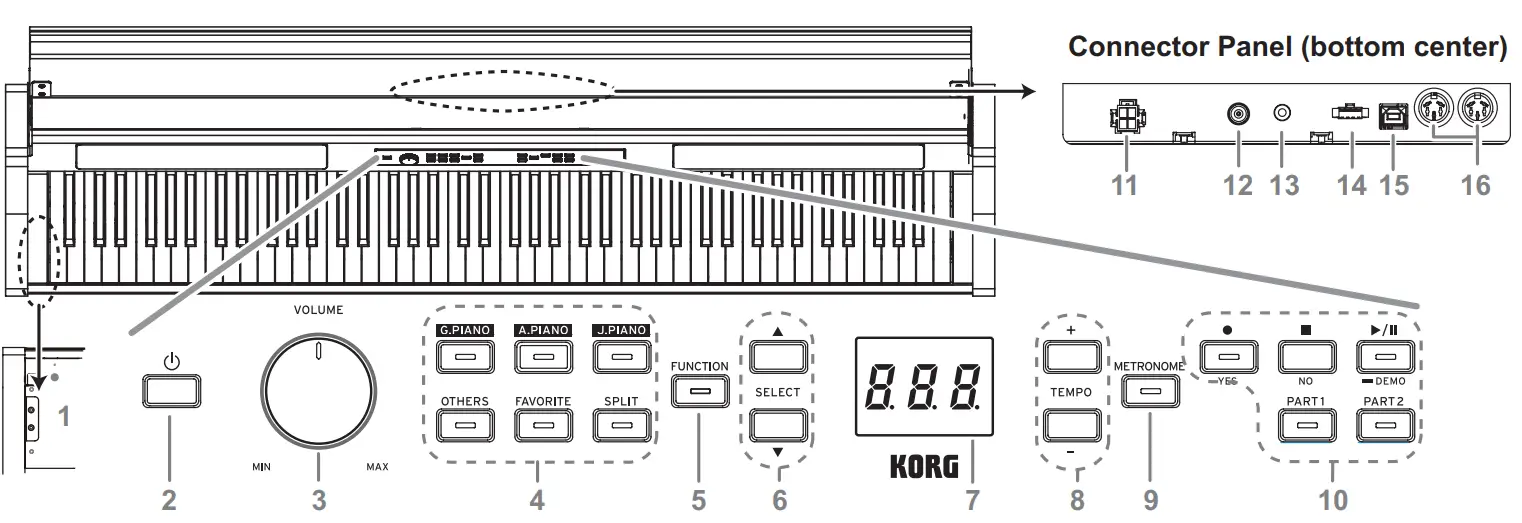
Control panel
- Headphone (
 ) jacks (Left side of bottom): Two stereo mini headphone jacks are located underneath the keyboard to the left-hand side. Plugging headphones into either of these jacks will mute the internal speakers.
 - Power button: Hold down the power button until “G1” appears in the display and the piano is turned on. To turn off het piano, hold down the power button until “…” appears in the display, and then release the button. Since recorded data will be saved, it may take several seconds for the piano to turn off. While data is being saved, “___” appears in the display. Do not operate the G1/G1 Air or unplug the adapter while “___” appears in the display. Otherwise, the data may be corrupted.
 Normally, when the G1/G1 Air is turned off, all parameters return to their factory default settings. However, the G1/G1 Air can be set to save the parameter settings (refer to Save “ parameter settings” on page 13).
Auto Power Off
The G1/G1 Air can be set to automatically turn off after a set period of time has passed with no keys being played or with no songs being played back. To change this time interval, or to disable this feature refer to “Auto power off” on page 13 - VOLUME knob: The Volume knob controls the level of the sound being sent to the internal speakers and to the headphone jacks.
- Sound buttons: Use these buttons to select from a total of 32 sounds (see page 7). With G.PIANO, A.PIANO and J.PIANO, select from three sounds each. With OTHERS, select from twenty sounds. With FAVOR I T E, select the stored sound. With SPLIT, select from three bass sounds.
- FUNCTION button: When pressed, this button will light, indicating the G1/G1 Air is in the Function Mode (see page 12). The Function Mode provides access to many of het Settings and Parameters; for a complete list, refer to page 12. This button is also used in conjunction with other buttons to access shortcuts, etc.
- SELECT
 /
/ buttons: Use these buttons to select a setting, value or song.
 - Display: The LED display shows the value of the selected parameter (tempo, song number, etc.), or the Function Mode setting.
- TEMPO + / – buttons: Use these buttons to specify the tempo for the metronome or a song. In addition, these buttons can be used to select a function in the Function mode.
- METRONOME button: Use this button to start/stop the metronome (see page 8).
While the metronome is being used, the button is lit. The various metronome settings other than the tempo and time signature are specified from the Function Mode (see page 12). - Recorder buttons: Use these buttons to record (
 ), play back/pause (
  ) and stop (
  ) performances as well as to select the part to be recorded/played back.
Connector Panel
This panel is located on the underside of the keyboard unit, toward the center of the rear edge. - Speaker connector: The cord from the speaker box plugs into this connector (see “Assembling the Stand” on page 18).
- DC24V jack: Connect the included AC adapter here.
- LINE OUT jack: This stereo mini phone jack is the main audio output jack. Using this jack, the output of the G1/ G1 Air can be connected to the input of an external amplifier, powered speaker, audio interface or recorder, etc. The VOLUME knob controls the output volume. You must only connect devices with the power turned off. Careless operation may damage the G1/G1 Air ro the device where it’s connected, or mal-functions may be caused.
- Pedal connector: The cord from the pedal units plugs into this connector (see “Assembling the Stand” on page 18).
- USB (
 ) port: Connect a single USB cable to this port—and the other end to your computer—to transfer data between the G1/G1 Air and the computer.
 - MIDI (IN, OUT) jacks: These jacks allow the G1/G1 Air to interact with other MIDI equipped devices—key- boards, drum machines, synthesizers, etc.
OUT: Sends MIDI data OUT of the G1/G1 Air to the MIDI In of the other device.
IN: Receives MIDI data being sent from the MIDI Out of the other device.
Preparing to Play
Before You Begin
Assembling the G1/G1 Air Piano
The G1/G1 Air includes the keyboard unit, the stand and anti-tipping brackets, pedal unit, and speaker system. Follow the instruction found on page 18 and fully assemble your G1/G1 Air before proceeding.
Connecting the Power
Fully insert the power cord into the AC adapter, then insert the DC plug into DC24V jack on the Connector Panel. Next, connect the power cord to an AC outlet.
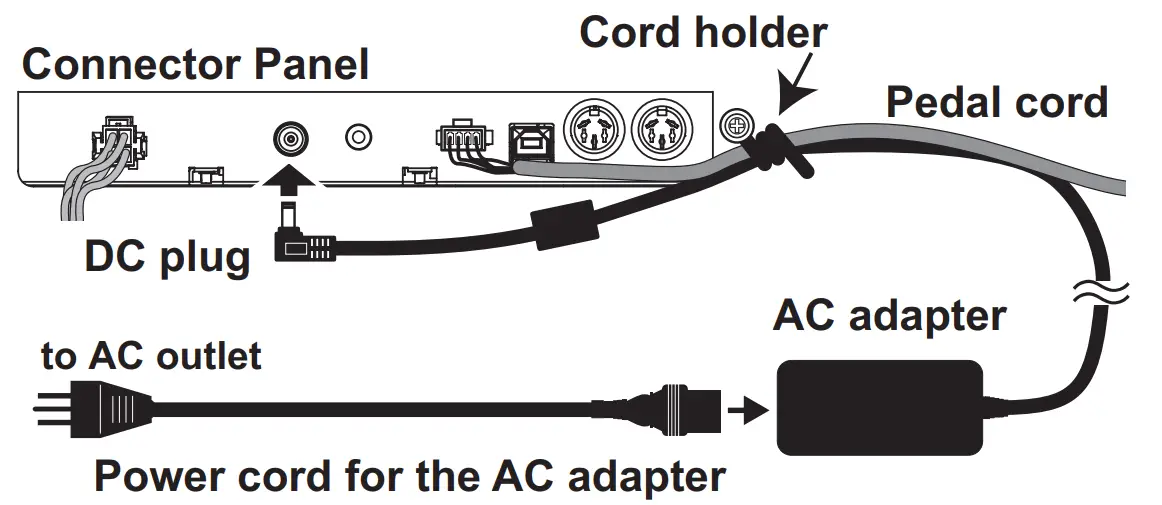
![]() Secure the AC adapter cord to the pedal cord using the cord holder at the side of the Connector Panel to prevent the DC plug from accidentally being disconnected.
Secure the AC adapter cord to the pedal cord using the cord holder at the side of the Connector Panel to prevent the DC plug from accidentally being disconnected.![]() Use only the AC adapter provided with your G1/G1 Air. U sing a different adapter may cause malfunctions or other issues.
Use only the AC adapter provided with your G1/G1 Air. U sing a different adapter may cause malfunctions or other issues.![]() Be sure to plug the power cord into an outlet of the ap propriate voltage.
Be sure to plug the power cord into an outlet of the ap propriate voltage.
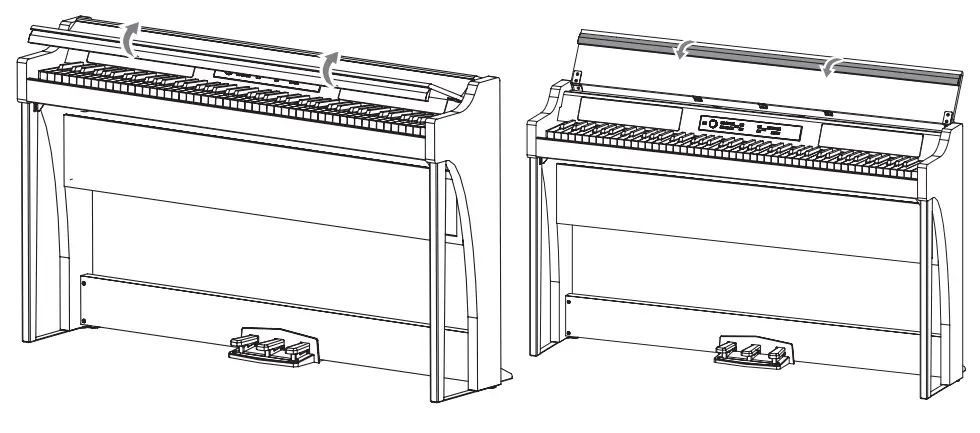
Operating the Key Cover
- Using both hands, gently lift the key cover to begin to open it. When the key cover begins to open on its own, release it.
The key cover will continue to open softly on its own from about mid-way up.
- Fold down the front edge of the key cover.
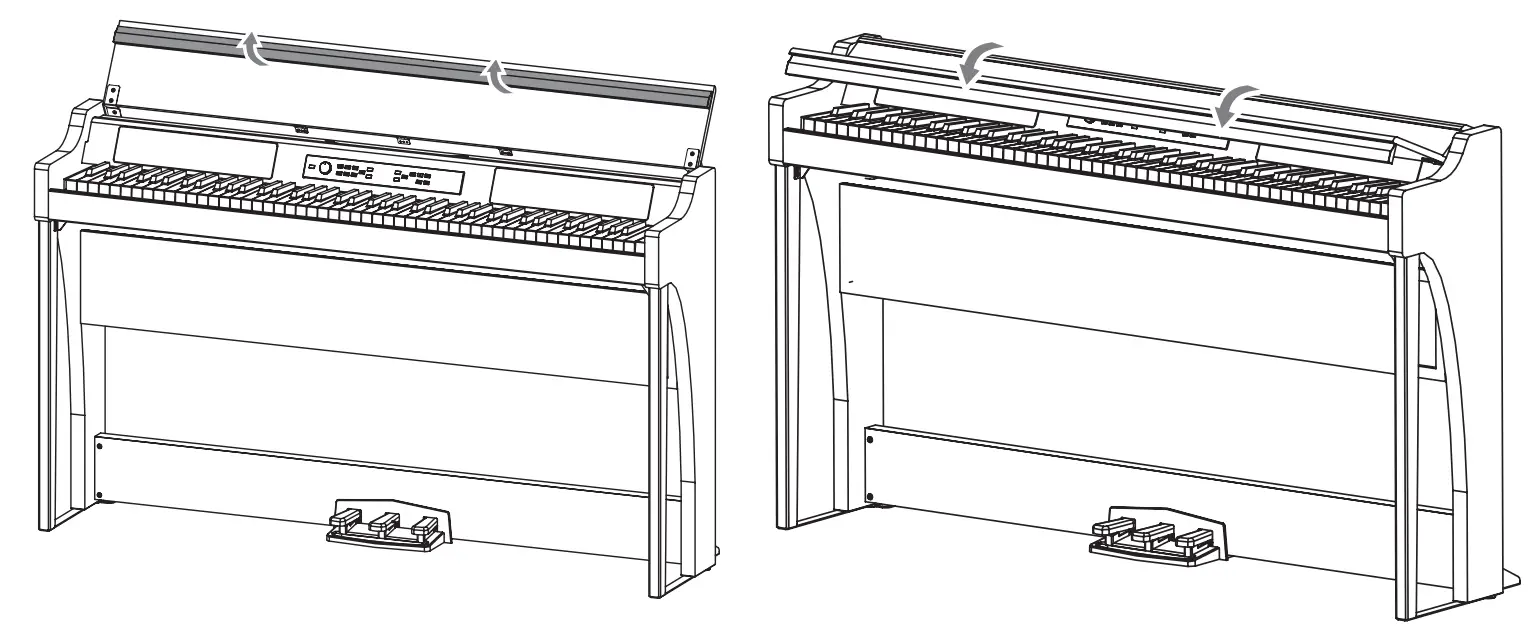
Closing the key cover
- Unfold the front edge of the key cover, and gently begin to lower it.

- When the key cover begins to close on its own, release it.
The key cover will continue to softly close on its own, from about mid-way down.
![]() Do not forcibly pull the key cover or apply strong pres sure while the key cover is closing. Doing so will damage the unit.
Do not forcibly pull the key cover or apply strong pres sure while the key cover is closing. Doing so will damage the unit.![]() Be creful not to pinch your fingers or hands when closing or opening the key cover.
Be creful not to pinch your fingers or hands when closing or opening the key cover.

![]() The temperature and humidity will affect how fast the key cover automatically closes.
The temperature and humidity will affect how fast the key cover automatically closes.![]() The key cover may make a faint clicking sound when as it slowly closes. This is normal.
The key cover may make a faint clicking sound when as it slowly closes. This is normal.
Using the Key Cover as a Music Stand
The key cover serves as a convenient music stand.
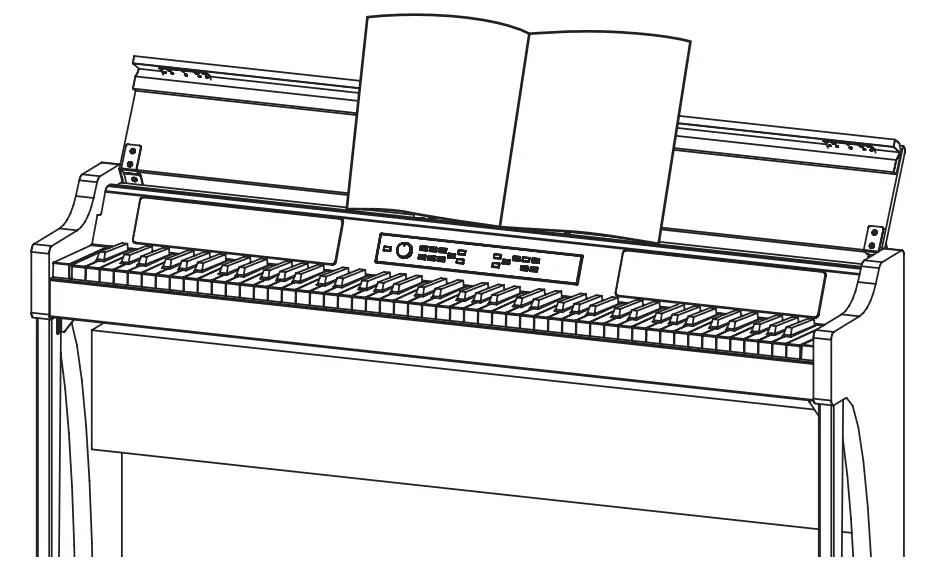
![]() Do not use excessive force when placing music on the key cover, especially when trying to force a music book to stay open.
Do not use excessive force when placing music on the key cover, especially when trying to force a music book to stay open.
Listening to the Demos
Built into the G1/G1 Air are 50 preprogrammed songs. Of these, 10 are Sound Demo Songs that highlight the quality of various internal sounds. The other 40 are familiar Piano Songs and etudes. These songs are listed under the “Sound Demo Song List” and the “Piano Song List” in the righthand column.
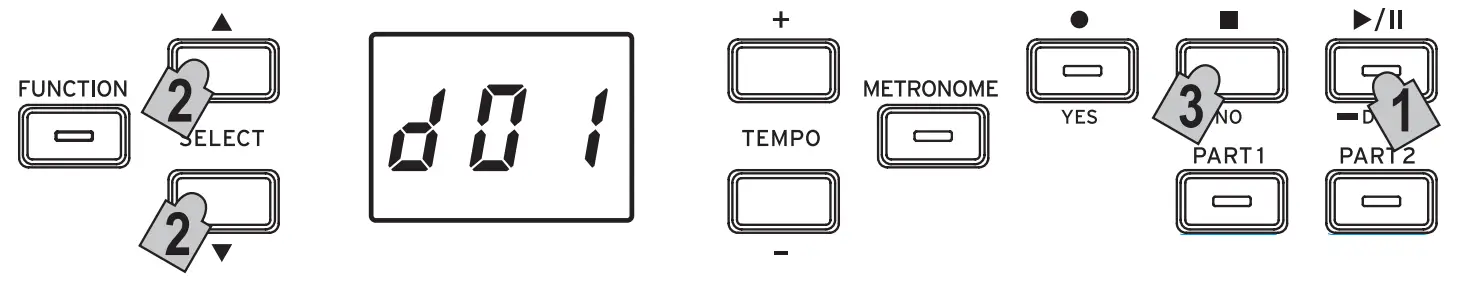
Listening to a Sound Demo Song
While the Sound Demo Song plays back, you can play along on the keyboard.
- Hold the Play/Pause button down. When the button begins to blink, release it. The display will show the current Sound Demo Song, indicated by its number (d01).

- Use the SELECT or button to select a different Sound Demo Song by number.
Press the Play/Pause button to begin playback of the se- lected title. If no selection is made, after about 3 seconds the Play/Pause button will light up, and playback of the current Sound Demo Song will begin. When Sound Demo Song d01 is complete, the remaining Sound Demo Songs will playback sequentially. Once all Sound Demo
Songs have played, playback will begin again with d01. - Press the Stop button to end playback.
The lit Play/Pause button will go dark, and the Sound Demo Song playback will stop. The tempo cannot be changed during playback of a Sound Demo Song. The playback of a Sound Demo Song cannot be paused.
Listening to a Piano Song
As with the Sound Demo Songs, you can play along on the keyboard while any of the Piano Songs play. As you play along, you can change the tempo, slowing the playback
down to practice a particular tricky part. In addition, the right-hand and left-hand parts can be muted individually, to focus on learning one part as the G1/G1 Air plays the other. For details, refer to “Working with Songs” on page 8.
- Breifly press the Play/Pause button to display the Song number.
- Use the SELECT and buttons to select a different Piano Song by its number.
The Piano Songs are numbered “P01” to “P40”.
While a Piano Song number appears in the display, simultaneously press the SELECTand buttons to return to “P01”.
- Use the Play/Pause button to toggle between playback (button lit) and pause (button blinks). The current measure number appears in the display.
- Press the Stop button to end playback and return to the beginning of the song. The Piano Song number appears in the display.

![]() If the Stop button is not pressed even though playback of the selected song has finished, the song with the next number will be played after about 5 seconds.
If the Stop button is not pressed even though playback of the selected song has finished, the song with the next number will be played after about 5 seconds.
Sound Demo Song List
| No. | Sound | Song title | Composer | |||
| d01 | G. PIANO (1) | Jeux d’eau | Maurice Ravel | |||
| d02 | A. PIANO (1) | Reverie | Claude Debussy | |||
| d03 | J. PIANO (1) | Kudos | Jack Hotop | |||
| d04 | OTHERS (2) | Nostalgia | Naoki Nishi | |||
| d05 | OTHERS (4) | Island Soul | Jerry Kovarsky | |||
| d06 | OTHERS (8) | Nighttrain | Michael Geisel | |||
| d07 | OTHERS (9) | Les Petis Moulins a vent | E Couperin | |||
| d08 | OTHERS (13, 14 | Prelude in C-Major, BWV 553 | J. S. Bach | |||
| d09 | OTHERS (18, 20) | !Voila! | Jack Hotop & Gary Guttman | |||
| d1o | SPLIT (3+ G.PIANO (1)) | There Goes Petey | Russell Ferrante | |||
Piano Song List
| No. | Song title | Composer |
| P01 | “Prelude 1” The Well Tempered Clavier, Book1 | J. S. Bach |
| P02 | Invention No. 1 | J. S. Bach |
| P03 | Jesu,Joy of Man’s Desiring | J. S. Bach |
| PO4 | Sonata No. 15 K. 545 1st mov. | W. A. Mozart |
| P05 | “Turkish March” Sonata K. 331 | W. A. Mozart |
| P06 | Fiir Elise | L. v. Beethoven |
| P07 | Piano Sonate Op. 13-2 | L. v. Beethoven |
| P08 | A Maiden’s Prayer | T. Badarzewska |
| P09 | “L’arabesque” Op. 100-2 | F. Burgmiiller |
| P10 | “La styrienne” Op. 100-14 | F. Burgmiiller |
| P11 | “La chevaleresque” Op. 100-25 | F. Burgmiiller |
| P12 | Spring Song Op. 62-6 | F. Mendelssohn |
| P13 | “Traumerei” Op. 15-7 | R. Schumann |
| P14 | Heidenroslein | G.Lange |
| P15 | Spinning Song | A. Ellmenreich |
| P16 | Dolly’s Dreaming and Awakening | T. Oesten |
| P17 | La flue aux cheveux de lin | C. Debussy |
| P18 | Arabesque No. 1 | C. Debussy |
| P19 | “Prelude” Suite Bergamasque | C. Debussy |
| P20 | Cakewalk | C. Debussy |
| P21 | Claim de lune | C. Debussy |
| P22 | Waltz No. 6 Db-major Op. 64-1 | F. Chopin |
| P23 | Waltz No. 7 E-minor Op. 64-2 | F. Chopin |
| P24 | Nocturne Op. 9-2 | F. Chopin |
| P25 | Mazurka Op. 7-1 | F. Chopin |
| P26 | Fantaisie-Impromptu Op. 66 | F. Chopin |
| P27 | Etude Op. 10-3 | F.Chopin |
| P28 | Etude Op. 10-5 | F.Chopin |
| P29 | “Promenade” Tableaux d’une exposition | M. P. Moussorgsky |
| P30 | Gymnopedie No. 1 | E. Satie |
| P31 | Je Te Veux | E. Satie |
| P32 | Salut d’Amour | E. agar |
| P33 | Frohlicher Landmann | R. Schumann |
| P34 | Kinderszenen Op. 15-1 Von fremden Landern and Menschen | R. Schumann |
| P35 | Moments Musicaux Op.94-3 | F. P. Schubert |
| P36 | Piano Sonate Op. 27-2-1 | L. v. Beethoven |
| P37 | Anitras Tanz Op. 46 No. 3 | E. H. Grieg |
| P38 | Blumenlied (Flower Song) | G. Lange |
| P39 | Tango (Espana) | I. Albeniz |
| P40 | Liebestraume Nr. 3 | F.Liszt |
Playing the G1/G1 Air
![]() Playing a single sound (Single Mode) The default sound setting when turning on the G1/G1 Air is the German Concert Piano. By using the Save Parameter settings feature, you can instead have the G1/G1 Air power up with any sound you choose (refer to “Save parameter settings” on page 13).
Playing a single sound (Single Mode) The default sound setting when turning on the G1/G1 Air is the German Concert Piano. By using the Save Parameter settings feature, you can instead have the G1/G1 Air power up with any sound you choose (refer to “Save parameter settings” on page 13).
| Sound button | No. | Abbre-. .viation | Sound name | # |
| G.PIANO | 1 | German Concert Piano | 4 | |
| 2 | Classic Piano | 4 | ||
| 3 | Pop Piano | 4 | ||
| A. PIAN 0 | 1 | Austrian Concert Piano | 4 | |
| 2 | Ballad Piano | 4 | ||
| 3 | Baroque Piano | 2 | ||
| J.PIANO | I | Japanese Concert Piano | 4 | |
| 2 | Jazz Piano | 4 | ||
| 3 | Honky-Tonk Piano | 2 | ||
| OTHERS | 1 | Salsa Piano | 3 | |
| 2 | Modern Piano | 2 | ||
| 3 | Electric Grand | 1 | ||
| 4 | Stage Electric Piano | 2 | ||
| 5 | Bright Electric Piano | 1 | ||
| 6 | Tremolo Electric Piano | 2 | ||
| 7 | Digital Electric Piano | 2 | ||
| 8 | 60’s Electric Piano | 1 | ||
| 9 | Harpsichord | 3 | ||
| 10 | Clay | |||
| 11 | Jazz Organl | 3 | ||
| 12 | Jazz Organ2 | 3 | ||
| 13 | Pipe Organ | 3 | ||
| 14 | Positive Organ | 1 | ||
| 15 | Vibraphone | 2 | ||
| 16 | Choir | 2 | ||
| 17 | Acoustic Guitar | 1 | ||
| 18 | Violin & Cello | 3 | ||
| 19 | Strings | 3 | ||
| 20 | Symphony Strings | 4 | ||
| FAVORITE | – | – | Any sound | — |
The # column shows the number of oscillators, or voices, used to create a single note for that sound. (refer to “About maximum polyphony” on page 16.)
![]() Playing the G1/G1 Air while using a single sound such as an acoustic piano is referred to as the Single Mode. The G1/G1 Air can also be played using two sounds in the Split Mode or Layer Mode. For details on the various modes, refer to “Performance Modes” on page 10.
Playing the G1/G1 Air while using a single sound such as an acoustic piano is referred to as the Single Mode. The G1/G1 Air can also be played using two sounds in the Split Mode or Layer Mode. For details on the various modes, refer to “Performance Modes” on page 10.
When the G1/G1 Air is turned on, the abbreviation for the Sound name appears in the display.
If the Save Parameter Settings feature was used, the Sound name that appears in the display will be the one that was selected before the G1/G1 Air was turned off (refer to “Save parameter settings” on page 13).
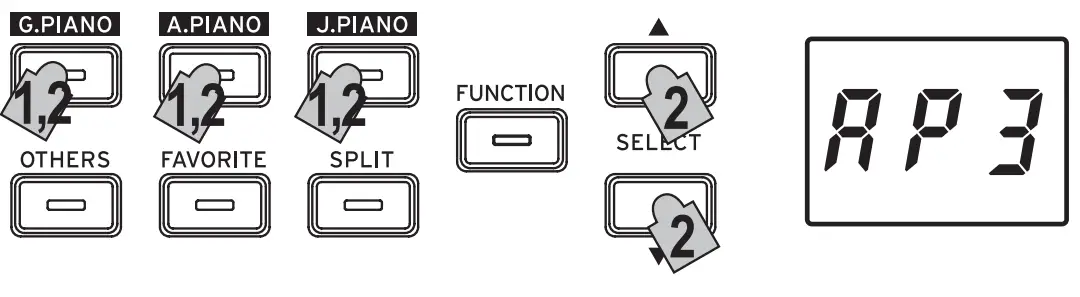
Selecting a piano sound
- Press the G.PIANO, A.PIANO or J.PIANO button.
The button that you pressed lights up, and the abbrevia- tion for the Sound name appears in the display. - Each PIANO button can access three sounds.
Each PIANO button can call up a concert grand piano sound, plus two additional piano sounds. For example, to select the Ballad Piano sound, press the A.PIANO button twice. The abbreviation for the selected Sound name will appear in the display. While the sound name appears in the display, the available sounds can be selected by pressing the SELECT or button.
![]() The selected sound remains the same, even if a dif ferent Sound button is pressed.
The selected sound remains the same, even if a dif ferent Sound button is pressed.
Selecting one of the Other Sounds
- Press the OTHERS button.
The OTHERS button lights up, and the abbreviation for the Sound name appears in the display. - There are 20 Other Sounds available.
The abbreviation for the selected Sound name will appear in the display. While the sound name appears in the display, the available sounds can be selected by pressing the SELECTor button. The selected sound remains the same, even if a different Sound button is pressed.

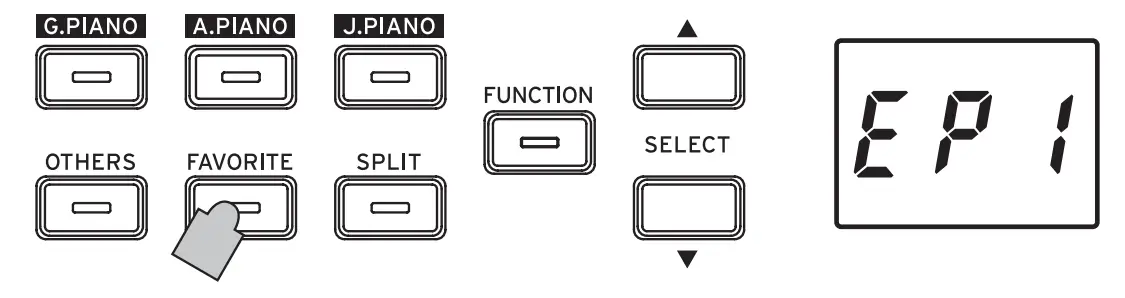
Using the FAVORITE button
You can assign your favorite sound to the FAVORITE button, so it can be recalled instantly with a single button press. Select the sound to be stored, and then store it by holding down the FAVORITE button until the button lights up. Your FAVORITE sound assignment will remain even if the G1/G1 Air is turned off. Your FAVORITE sound assignment will remain even if the G1/G1 Air si turned off, regardless of the setting selected for Save Parameter Settings in the Function Mode.
![]() The default setting for the FAVORITE button is the Stage Electric Piano sound.
The default setting for the FAVORITE button is the Stage Electric Piano sound.
Using pedals
The G1/G1 Air includes all three of the pedals found on a concert grand piano. Using the pedals can add expression, control, and sophistication to any performance.
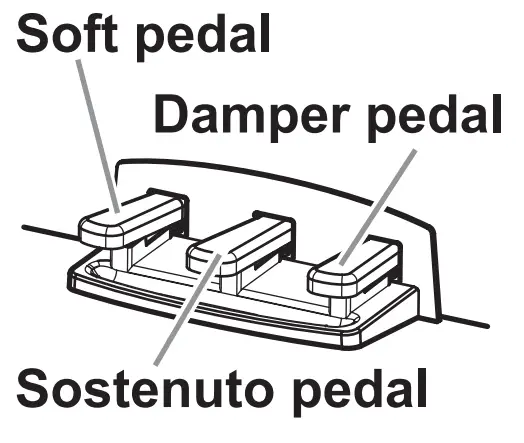
Soft pedal (left)
The Soft pedal slightly reduces the volume and softens the tone. Accurate half-pedaling allows you to control the depth of het effect by how far down the pedal is pressed. (“half-pedaling”).
Sostenuto pedal (center)
This pedal provides a similar effect as the Damper ped- al—allowing notes to continue to sound after the key is released—but the effect only applies to the notes already being held down when the Sostenuto pedal is pressed. New notes played after the Sostenuto pedal has been pressed will not sustain.
Damper pedal (right)
As mentioned above, the Damper pedal allows notes to continue to sound after the key has been released, adding a rich, resonant decay. You can also add the damper resonance to the number 1 and 2 sounds of the G.PIANO, A.PIANO and J.PIANO button. Accurate half-pedaling al- lows you ot control the depth of the effect by how far down the pedal is pressed. (“half-pedaling”).
![]() In Layer Mode (see page 10), you can select which sound(s) will respond to the pedal.
In Layer Mode (see page 10), you can select which sound(s) will respond to the pedal.![]() In Split Mode (see page 10), the pedal only affects the sounds in the higher section of the keyboard.
In Split Mode (see page 10), the pedal only affects the sounds in the higher section of the keyboard.![]() In Partner Mode (see page 11), the Damper effect can be applied independently by both players.
In Partner Mode (see page 11), the Damper effect can be applied independently by both players.
The metronome
The Metronome provides a steady, rhythmic pulse that acts as a convenient practice aid for all levels of musicians.
Setting the Tempo and Time Signature

Use the METRONOME button to start and stop the Metro- nome. When the Metronome is running, the METRONOME button will be lit, and the tempo will appear in the display; when the metronome is off, the button is dark (unlit). With the Metronome on, set the tempo using the TEMPO + and buttons. –
The current tempo will be shown in the display. The tempo range is =5–240, or 5 to 240 Beats per minute (BPM). Press the TEMPO + and – buttons simultaneously to return to the default tempo
of =120.
You can also specify the time signature, providing an accented tone on the first beat of the measure. With the Met- ronome running, use the SELECT ![]() and
and ![]() buttons to se- lect a time signature from 2/4 to 6/4 (shown in the display as 2–4, 6–4, etc.). Press the SELECT
buttons to se- lect a time signature from 2/4 to 6/4 (shown in the display as 2–4, 6–4, etc.). Press the SELECT ![]() and
and ![]() buttons simulta sneously to recall the default 4/4 time signature.
buttons simulta sneously to recall the default 4/4 time signature.
Additional Metronome Parameters
The Function Mode provides access to additional Metronome parameters, including the volume and sound (page 12).
Working with Songs
- Press the Play/Pause button to display the Song number.
- Use the SELECT or button to select a song.
Piano Songs are indicated in the display as “ ” to“
” to“ ”, and User Songs are indicated as “
  ” to “
  ”.
”. - Press the Play/Pause button to begin playback
Controlling Songs
Pausing and Un-pausing a Song
- With the Song playing, press the Play/Pause button to pause the playback.
The Play/Pause button will blink. - To resume playback from the point where it was paused, press the Play/Pause button again.
The Play/Pause button will once again light steady.
![]() While a song is being played back or is paused, the cur rent measure number will appear in the display.
While a song is being played back or is paused, the cur rent measure number will appear in the display.
Returning to the Beginning of the Song
- Pressing the Stop button will end playback, and immediately return to the beginning of the song. The selected song number appears in the display.
- Press the Play/Pause button to restart the song from the beginning.
The current measure number appears in the display.
Changing the Playback Tempo
Use the TEMPO + and – buttons change the current Tempo value (BPM setting). The current tempo will appear in the display for a few moments. The value will continue to change as the button is held down.
To restore the playback tempo to its original value, press the TEMPO + and – buttons simultaneously.
![]() Each song is saved with its own tempo, so selecting a different song will automatically change the tempo to match the song, regardless of any changes you may have made. In addition, the original tempo will be restored when the G1/G1 Air is turned off
Each song is saved with its own tempo, so selecting a different song will automatically change the tempo to match the song, regardless of any changes you may have made. In addition, the original tempo will be restored when the G1/G1 Air is turned off![]() The Song tempo and the Metronome tempo are the same setting; they cannot be set individually.
The Song tempo and the Metronome tempo are the same setting; they cannot be set individually.
Skipping to a Specific Measure
While the song is playing (or is paused), you can use the SELECT ![]() and
and ![]() buttons to move to a specific measure.
buttons to move to a specific measure.
The current measure appears in the display.
To quickly return to the first measure, press the Stop but- ton.
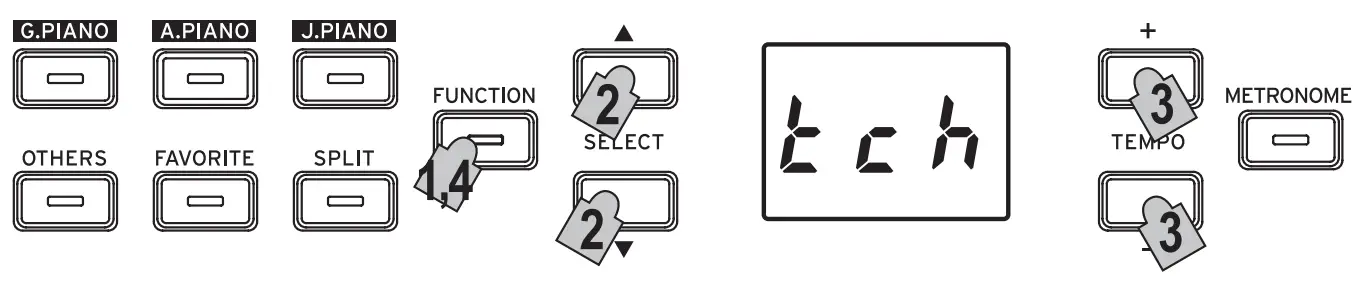
Repeating the Playback of a Specific Section (AB Repeat)
By specifying a starting point (A) and an end point (B), this feature will playback that specific section, over and over again.
Pause playback of the song before specifying settings for AB Repeat.
Turning on AB Repeat
- Select the song that you want to use with AB Repeat.
- Press the Play/Pause button to begin playback of the song, and then press the Play/Pause again to pause playback.
- Specify the starting point (A).
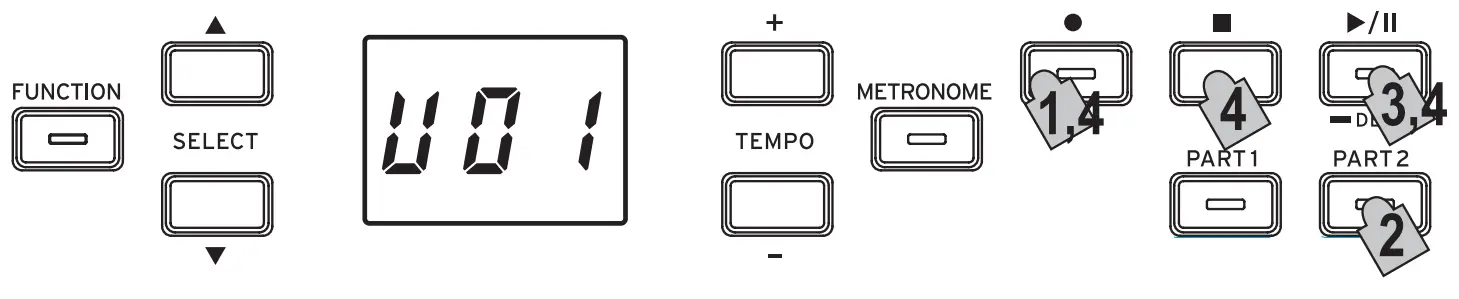
1. While holding down the FUNCTION button, press the PART 1 button. A dot appears beside the number of the left side of the display to indicate the starting point (A).
2. Use the SELECT and buttons to go to the measure that you want to specify as the starting point (A). The display returns to show the current measure in about 2 seconds.
 - Specify the end point (B).
1. While holding down the FUNCTION button, press the PART 2 button. A dot appears beside the number of the right side of the display to indicate the end point (B).
2. Use the SELECT and buttons to go to the mea- sure that you want to specify as the end point (B). The display returns to show the current measure in about 2 seconds. - Start AB Repeat.
1. While holding down the FUNCTION button, simultaneously press the PART 1 and PART 2 buttons. The FUNCTION button blinks, and AB Repeat en- ters standby.
2. Press the Play/Pause button to begin playback.
A dot will appear in the display when a repeat location is reached during AB Repeat playback. For example, if the fifth measure is the starting point (A), “ ![]() ” appears in the display, and, if the ninth measure is the end point (B), “
” appears in the display, and, if the ninth measure is the end point (B), “ ![]() ” appears in the display.
” appears in the display.![]() AB Repeat is not cancelled when the song is stopped.
AB Repeat is not cancelled when the song is stopped.
Turning off AB Repeat
- Press the Play/Pause button to pause the song.
- Cancel AB Repeat.
While holding down the FUNCTION button, simul- taneously press the PART 1 and PART 2 buttons. The FUNCTION goes dark, and AB Repeat is cancelled.
Playing Along to a Piano Song
Muting a Part
With Piano Songs, the left hand is usually assigned to Part 1 and the right hand to Part 2. By muting one of the parts, the G1/G1 Air will only play one of the parts—or hands—and you can play the muted part. The part you play is up to you.
- To mute the left-hand part, press the PART1 button. To mute the right-hand part, press the PART2 button.
The button for the muted part will go dark (unlit). Play along with the song. - To Press the button of the muted part a second time to un-mute that part.
The button will light up again. The volume of the muted part can be adjusted in the Function Mode. Refer to “Song: Volume of muted part” on page 13.
Creating a Performance
The G1/G1 Air features an onboard recorder so you can easily create, record, and playback your own performances. The recorder provides two parts. You can use record one part, then add a second
part, and play a third part live on the keyboard as those parts playback,or you can use each part to record a separate song.
Your recorded performances can be saved as User Songs— until the maximum number of songs or maximum number ofmeasures has been reached, or until the data storage space of the G1/G1
Air is full.
![]() If you record to a part where data has already been recorded, the previous performance data will be deleted and overwritten with the new performance data.
If you record to a part where data has already been recorded, the previous performance data will be deleted and overwritten with the new performance data.
Therefore, before recording to a part, be sure it does not contain any data that you wish to save.
Recording a Performance
Recording a New Song
- Press the Record button.
The G1/G1 Air will enter the recording standby mode, and the Record button will blink.
The next empty User Song number will appear in the display.
If nothing has been recorded, “ ” appears. If the data storage space is full, “
  ” appears. In this case, delete unnecessary songs before recording using the Function Mode (see page 13).
 The PART 1 button will blink.
 - If you wish to record Part 2 instead, Press the PART 2 button; the PART 2 button will now blink.
- Recording will begin immediately when you play a note on the keyboard. Or, you can press the Play/ Pause button to receive a two-measure count-off before recording begins. If you wish to record to the metronome, press the METRONOME button. Recording can also start in response to a MIDI message (refer to “About MIDI” on page 14).
- To stop recording, press the Stop, Play/Pause, or Record buttons.
The PART button for the recorded part will remain lit.
 The PART 1 button will blink.
Adding a performance to a saved song![]() A performance in Partner Mode (see page 11) cannot be added to a saved song.
A performance in Partner Mode (see page 11) cannot be added to a saved song.
- Press the Play/Pause button to display the Song number.
- Use the SELECT and buttons to select the number of the User Song that the recording is to be added to. Buttons for recorded parts light up, and buttons for parts with nothing recorded go off.
- To add the recording at the beginning of the song, hold down the Record button.
The G1/G1 Air will enter the recording standby mode, and the Record button will blink. To add the recording to the middle of the song, press the Play/Pause button to play back the song, and then press the Play/Pause button to pause after reaching the measure where you want to add the recording. The desired measure can also be reached by pressing the SELECT or button. Then, press the Record button; the button will blink.
If the performance is added to the same part, all original data after the start of recording is deleted. For example, if a new recording is added to measures 2 to 4 of a song with measures 1 to 8,
the recording in measures 5 to 8 will be deleted. - Press the PART button corresponding to the part to be recorded; the button will blink.

- Recording will begin immediately when you play a note on the keyboard. Or, you can press the Play/ Pause button to receive a two-measure count-off before recording begins. If you wish to
record to the metronome, press the METRONOME button. Recording can also start in response to a MIDI message (refer to “About MIDI” on page 14). - To stop recording, press the Stop, Play/Pause, or Record buttons.
<Recording Tips>
- When a new part or performance is added to an existing User Song, it will have the originally recorded sound.
- The Tempo cannot be changed while recording.
- The Time Signature of a recorded Song cannot be changed.
However, when recording an addition to an existing song, measures with a different time signature can be added.
Saving User Songs
When recording is stopped, the song is automatically saved. The name of the User Song will be the number chosen before recording began.![]() A maximum of 99 User Songs can be saved. In addition, a maximum of 999 measures or 45,000 notes can be saved in each song.
A maximum of 99 User Songs can be saved. In addition, a maximum of 999 measures or 45,000 notes can be saved in each song.
Playing Back a Recorded Performance
Select the User Song
- Press the Play/Pause button to display the Song number.
- Use the SELECT and buttons to select a different User Song by its number.
The User Songs are numbered “U01” to “U99”. While a User Song number appears in the display, simultaneously press the SELECT and buttons toreturn to “U01” If no User Songs have been saved, no User Song number appears. - Press the Play/Pause button to begin playback.
Playback Tips
Selecting the Part to be played back or skipping to a specific measure can be done using the same procedures previously detailed for Piano Songs. For details, refer to “Working with Songs” on page 8.
Other Song Functions
Specifying the mute volume for parts as well as copying and deleting User Songs can be performed from the Func- tion Mode (starting with the “Song: Delete selected part or entire song” function on page 13).
Performance Modes
Playing two sounds at the same time (Layer Mode)
You can play two sounds at the same time on the keyboard. This is called the Layer Mode. While h olding down the button of a sound to be layered, press a nother sound button. The two selected sound but- tons light up.

The sounds are labeled layer 1 and layer 2 in the order that their buttons are pressed, and the abbreviation for the Sound name of layer 1 appears in the display.
For example, if the sound from the G.PIANO button is to be layer
1 and the sound from the OTHERS button is to be layer 2 ,oldh down the G.PIANO button, and then press the OTHERS button.
Previously, each Sound Button should have been used in the Single Mode to select the correct sound. For example, to layer the German Concert Piano and Clav sounds, first select “![]() ” for het G.PIANO button and “
” for het G.PIANO button and “ ![]() ” for the OTHERS button. Then press both buttons simultaneously to enter the Layer Mode.
” for the OTHERS button. Then press both buttons simultaneously to enter the Layer Mode.
![]() When selecting Layer Mode, the total number of voices that can play at the same time is reduced, depending on the total number of oscillators used per voice by the selected sounds. (refer to “About aximum polyphony” on page 16.)
When selecting Layer Mode, the total number of voices that can play at the same time is reduced, depending on the total number of oscillators used per voice by the selected sounds. (refer to “About aximum polyphony” on page 16.)![]() Sounds accessed by the same Sound Button cannot be layered. For example, Classic Piano and Pop piano are both a ccessed via the G.PIANO button and thus cannot be layered.
Sounds accessed by the same Sound Button cannot be layered. For example, Classic Piano and Pop piano are both a ccessed via the G.PIANO button and thus cannot be layered.
Returning to the Single Mode
To return to Single Mode, press any single Sound Button.
Layer Mode settings
In Layer Mode, adjusting the volume balance between sounds, shifting the octave for each sound, as well as enabling/disabling the damper pedal for each sound can be performed from the Function
Mode (starting with the “Layer Mode: Volume balance” function on page 13).
Using split sounds (Split Mode)
When the SPLIT button is pressed and lights up, you can play a bass sound in the lower section of the keyboard and another sound in the higher section of the keyboard. This is called the Split Mode.
In Split Mode, you can select any split point (key that splits the keyboard) for the high notes and low notes.
![]() These settings will not be saved when the G1/G1 Air is turned off; however, the G1/G1 Air can be set to save these settings (refer to Save “ parameter settings” on page 13).
These settings will not be saved when the G1/G1 Air is turned off; however, the G1/G1 Air can be set to save these settings (refer to Save “ parameter settings” on page 13).
![]() When Split Mode is selected, the total number of notes that can be played simultaneously is reduced, depending on the total number of oscillators used by the selected sounds. (refer to “About maximum polyphony” on page 16.)
When Split Mode is selected, the total number of notes that can be played simultaneously is reduced, depending on the total number of oscillators used by the selected sounds. (refer to “About maximum polyphony” on page 16.)
- Press the SPLIT button.
The SPLIT button lights up, and the abbreviation for the current bass sound name appears in the display. - Press the SPLIT button to access the available Bass Sounds.
The abbreviation for the bass sound name appears in the display. The s elected sound remains the same, even if a different sound button is pressed.
| Abbreviation | Sound name | # |
| Acoustic Bass + Any sound | 1 + | |
| Electric Bass + Any sound | 2 + | |
| Acoustic Bass & Cymbal + Any sound | 2 + |
The # column shows the number of oscillators, or voices, used to create a single note for that sound. (refer to “About maximum polyphony” on page 16.)
Using pedals
In Split Mode, the pedals affect only the right side of the keyboard. They have no effect on the left side of the key- board (bass notes).
Changing the Upper Keyboard Sound
In the Split Mode, changing the sound assigned to the upper part of the keyboard is the same as selecting a new sound in the Single Mode.
Changing the Split Point
To change the dividing point between the upper and lower portions of the keyboard in the Split Mode, simply hold down the SPLIT button and press any key on the keyboard. The split point appears in the display while the button is held down.
The sound range used by the higher section of the keyboard starts with the key to the right of the one that was pressed. The split point remains the same for all three sounds selected with the SPLIT button.
Returning to the Single Mode
To return to Single Mode, press the SPLIT button several times; the button will go dark.
Split Mode Settings
In Split Mode, adjusting the volume balance between sounds and shifting the octave for each sound, can be performed from the Function Mode (starting with the “Split Mode: Volume balance” function on page 13).
Performing with another person (Partner Mode)
Two people can play in the same range with the keyboard divided in half between them. This is called the Partner Mode.
- While no song is being played back, press the FUNCTION button.
The FUNCTION button will light. - Press the FAVORITE button. “
 ” will appear in the display.
 - Press the TEMPO + or – button (at the right side of the display); “
 ” appears in the display.
The Partner Mode is turned on, and the selected sound is used for both the left and right sides of the keyboard. When the Partner Mode is turned on, the SPLIT button blinks.
The right side of the keyboard, from E4 to C8, produces sounds two octaves lower in pitch (E2–C6).
The left side of the keyboard, from A0 to E♭ 4, produces sounds two octaves higher in pitch (A2–E♭6).
Different sounds can be selected for the left and right sides of the keyboard.
The sounds for the left side and right side are applied in the order that their buttons are pressed, and the abbreviation for the Sound name of the left side appears in the display. For example, if the sound from the G.PIANO button is to be applied to the left side and the sound from the OTHERS button is to be applied to the right side, hold down the G.PIANO button, and then press the OTHERS button.
Previously, each Sound Button should have been used in the Single Mode to select the correct sound.
To use the same sound for both the left and right sides of the keyboard, press only one sound button.
Damper Pedal Assignments
In the Partner Mode, the Soft pedal acts as a damper pedal for the left side of the keyboard; the Damper pedal acts as the damper pedal for the right side of the keyboard.
The Sostenuto pedal has no function in Partner Mode.
Partner Mode Settings
In Partner Mode, adjusting the volume balance between sounds and shifting the octave can be performed from the Function Mode (starting with the “Partner Mode: Volume balance” function on page 13).
Other functions
Function Mode
The touch control, various effects, master tuning as well as temperament settings can be specified from the Function Mode. For the functions that can be set, refer to the “List of functions” below.
Adjusting Parameter Settings in the Function Mode
- While no song is being played back, press the FUNCTION button.
The FUNCTION button will light. - Press the SELECT or button to select the function to be set.
The abbreviation for the function name appears in the display. - Press the TEMPO + and – button to select the setting or specify a value. The s etting continues to change while the TEMPO + or – button is held down.
In addition, simultaneously pressing both buttons re- turns the function to its default setting. - To exit Function Mode, press the FUNCTION button.
The FUNCTION button goes dark.
![]() Some functions are performed by pressing the Record button [ YES] after selecting the function name or the setting. To cancel the function, press the Stop button [NO].
Some functions are performed by pressing the Record button [ YES] after selecting the function name or the setting. To cancel the function, press the Stop button [NO].![]() The shortcuts refer to the names of buttons that can be pressed while the FUNCTION button is lit to jump to a specific place in the Function list.
The shortcuts refer to the names of buttons that can be pressed while the FUNCTION button is lit to jump to a specific place in the Function list.
![]() When the G1/G1 Air is turned off, all functions return to their factory default settings. However, the G1/G1 Air can be set to save the function settings (see “Save parameter settings” on page 13).
When the G1/G1 Air is turned off, all functions return to their factory default settings. However, the G1/G1 Air can be set to save the function settings (see “Save parameter settings” on page 13).![]() All settings except those for reverb and chorus are ap- plied to all sounds.
All settings except those for reverb and chorus are ap- plied to all sounds.![]() When a song is deleted or the parameters are reset, do not turn off the piano while “
When a song is deleted or the parameters are reset, do not turn off the piano while “![]() ” appears in the dis- play.
” appears in the dis- play.![]() Piano Songs cannot be copied or deleted.
Piano Songs cannot be copied or deleted.
List of functions
| No. | Function | Abbre- viation | Setting Display | Description [default setting] | Short Cut |
| 1 | Reverb | oFF, 01, 02, 03 | Off, Shallow, Standard, Deep [Depends on the sound] | ||
| This effect adds ambience and depth to the sound, producing the sense of performing in a concert hall. *1 | |||||
| 2 | Brilliance | 01, 02, 03 | Less Bright, Normal, Brighter [02: Normal] | ||
| This effect changes the brightness of the sound. | |||||
| 3 | Chorus | oFF, 01, 02, 03 | Off, Shallow, Standard, Deep [Depends on the sound] | ||
| Chorus adds modulation to the sound, producing an expansively rich sound. | |||||
| 4 | Keyboard touch control | 01, 02, 03, 04, 05 | Light, Normal, Heavy, Stable, Steady [02: Normal] | ||
| Specify how the sound changes in response to the force used when you press a keyboard key. *2 | |||||
| 5 | Transpose | –12…00…12 | ±12 [00] | ||
| In some cases, a song may be written in a difficult key (e.g., many black keys), or you may wish to shift the pitch to match another instrument or vocalist. In such cases, you can transpose (shift the pitch) so that you can use an easier fingering, or use the same familiar fingering to play at a different pitch. | |||||
| 6 | Master tuning | 15.0…65.0 | 415.0…440.0…465.0 Hz [440.0] | ||
| In order to adapt the G1/G1 Air pitch to that of another instrument, you can adjust the pitch in steps of 0.5 Hz. | |||||
| 7 | Temperament | 01…09 | Equal temperament…Pelog scale [01: Equal temperament] | ||
| Select from nine temperaments, including the equal temperament, classical temperaments and an Arabic temperament. *3 | |||||
| 8 | Metronome: Time signature | 2–4…6–4 | 2/4, 3/4, 4/4, 6/4 [4-4] | ||
| 9 | Metronome: Sound | P–A, P–b, P––, d–A, d–b, d–– | Pendulum emphasis, Pendulum bell, Pendulum without emphasis, Digital emphasis, Digital bell, Digital without emphasis [P–A: Pendulum emphasis] | ||
| 10 | Metronome: Volume | 1…13 | 1…13 [10] | ||
| 11 | Song: Delete selected part or entire song | PA1, PA2, bot | Part1, Part2, Both parts (1 song); Press Record button to perform operation. | (Play/Pause) | |
| Delete the currently selected User Song or the selected part. | |||||
| 12 | Song: Delete all | — | Press Record button to perform operation. | ||
| Delete all User Songs. | |||||
| 13 | Song: Copy user song | U01…U99 | User Song 01–99; Press Record button to perform operation. | ||
| Copy the currently selected User Song to the selected User Song number. | |||||
| 14 | Song: Volume of muted part | 0…90 | Mute–90% of volume [0] | ||
| Select the volume of the muted part (button goes off) during playback. To mute, select “0”. | |||||
| 15 | Song: Minimum remaining space for recording | 0…100 | Remaining space of 0%…100% | ||
| 16 | Layer Mode: Volume balance | 1–9…9–1 | 1–9 (Layer 1 min.)…9–9 (Both max.) …9–1 (Layer 2 min.) [9–9] | OTHERS | |
| Adjust the volume balance between the sounds for layer 1 and layer 2. | |||||
| 17 | Layer Mode: Octave (1) | –1, 0, 1 | ±1 Octave [0] | ||
| Specify the sound range for layer 1. | |||||
| 18 | Layer Mode: Octave (2) | –1, 0, 1 | ±1 Octave [0] | ||
| Specify the sound range for layer 2. | |||||
| 19 | Layer Mode: Pedal | L1, L2, bot | Only 1, Only 2, Both layers [bot] | ||
| Select the layer that the damper effect is applied to. | |||||
| 20 | Partner Mode: On, Off | on, oFF | On, Off [oFF] | FAVORITE | |
| 21 | Partner Mode: Volume balance | 1–9…9–1 | 1–9 (Left min.)…9–9 (Both max.) …9–1 (Right min.) [9–9] | ||
| Adjust the volume balance between the sounds on the left (low range) and right (high range) sides. | |||||
| 22 | Partner Mode: Octave (left) | –1, 0, 1 | ±1 Octave [0] | ||
| Specify the sound range for the left side (low range). As a factory default, this side produces sounds in a range two octaves (A2-E♭6) | |||||
| 23 | Partner Mode: Octave (right) | –1, 0, 1 | ±1 Octave [0] | ||
| Specify the sound range for the right side (high range). As a factory default, this side produces sounds in a range two octaves (E2-C6) | |||||
| 24 | Split Mode: Volume balance | 1–9…9–1 | 1–9 (Left min.)…9–9 (Both max.) …9–1 (Right min.) [9–9] | SPLIT | |
| Adjust the volume balance between the sounds on the left (low range) and right (high range) sides. | |||||
| 25 | Split Mode: Octave (right) | –1, 0, 1 | ±1 Octave [0] | ||
| Specify the sound range for the left side (low range). | |||||
| 26 | Split Mode: Octave (left) | –1, 0, 1 | ±1 Octave [0] | ||
| Specify the sound range for the right side (high range). | |||||
| 27 | MIDI: Channels | 01…16 | Channel 1…16 [01] | PART1 | |
| 28 | MIDI: Local On/Off | on, oFF | On, Off [on] | ||
| 29 | MIDI: Program Change filter | on, oFF | On, Off [oFF] | ||
| 30 | MIDI: Control Change filter | on, oFF | On, Off [oFF] | ||
| 31 | MIDI: Multi-timbral | on, oFF | On, Off [on] | ||
| 32 | Auto power off | oFF, 30, 1h, 4h | Disable, 30 min, 1 h, 4 h [30] | PART2 | |
| 33 | Save parameter settings | on, oFF | Enable, Disable [oFF] | ||
| Select whether or not all sounds as well as function/parameter settings are saved when the G1/G1 Air is turned off. | |||||
| 34 | Resetting the parameters | — | Press Record button to perform operation. | ||
| Return all parameters/functions to their factory default settings. *4 | |||||
Additional Functions and Descriptions
*1
Turning on/off reverb
Reverb can be turned on or off by holding down the FUNC- TION button and pressing the G.PIANO button.
*2
Keyboard Touch Control Curve
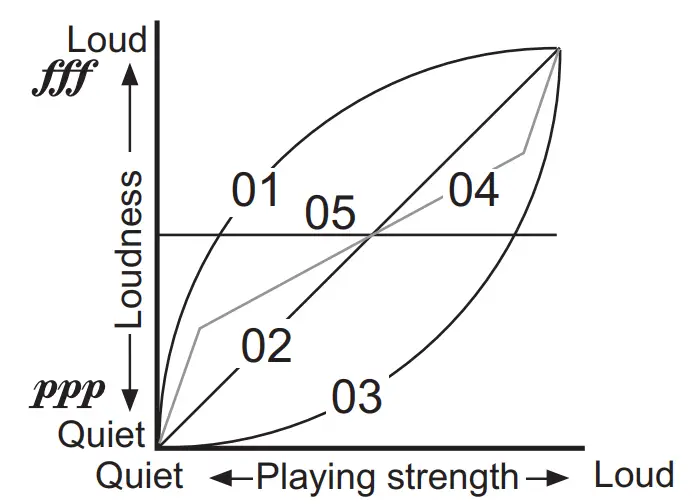
| Display | Touch sensitivity |
| 01 | Light. Loud notes can be produced even by playing lightly. |
| 02 | Normal. (default setting) |
| 03 | Heavy. Loud notes can be produced only by play- ing very hard. |
| 04 | Stable. Sensitivity variations are reduced, and a relatively stable sound is produced. |
| 05 | Steady. Steady notes are produced, like with an or- gan, regardless of the force used to press the key. |
*3
Temperament types
| Display | Temperament |
| 01 | Equal temperament (default setting): Spacing all semitones at equal pitch intervals, this temperament is the most widely used. |
| 02 | Pure temperament [major]: Major chords in the key (C) are perfectly tuned. |
| 03 | Pure temperament [minor]: Minor chords in the key (C) are perfectly tuned. |
| 04 | Arabic: This scale includes the quarter-tone inter- vals used in Arabic music. |
| 05 | Pythagorean: This ancient Greek scale is espe- cially effective for playing melodies. It consists of perfect fifths; however, other intervals – the major third in particular – is out of tune. |
| 06 | Werckmeister: The Werckmeister III scale was created in the later Baroque period to allow rela- tively free transposition. |
| 07 | Kirnberger: The Kirnberger III scale is used main- ly for tuning harpsichords. |
| 08 | Slendro scale: This is an Indonesian gamelan scale with five notes per octave. |
| 09 | Pelog scale: This is an Indonesian gamelan scale with seven notes per octave. |
About stretched tuning
In order to produce the most natural resonance, piano sounds use a “stretched tuning” that makes the notes of the lower range slightly flatter than equal temperament, and the upper range slightly sharper. This is how an acoustic piano is normally tuned by professional tuners.
*4
Resetting the parameters
This procedure will not delete the performance data that you’ve recorded, but will return all parameters/functions to their factory default settings. If you want to erase the per- formance data you’ve recorded, refer to “Song: Delete all” on page 13.
Before continuing with this procedure, make sure that you want to restore the factory default settings.
Select function “![]() ”, and then press the Record but- ton to perform the operation.
”, and then press the Record but- ton to perform the operation.
The display indicates that the operation is being performed.![]() When the parameters are reset, do not turn off the pia- no while “000” appears in the display.
When the parameters are reset, do not turn off the pia- no while “000” appears in the display.
About MIDI
In order to transfer MIDI data, a pair of commercially available MIDI cables is required. The MIDI Out of the G1/G1 Air sends data to the MIDI In of the other MIDI Device. The MIDI In of the G1/G1 Air receives MIDI data being sent from the MIDI Out of the other device.
For d etails on the data that can be transmitted and received, refer to the following compatibility table and the MIDI implementation chart.
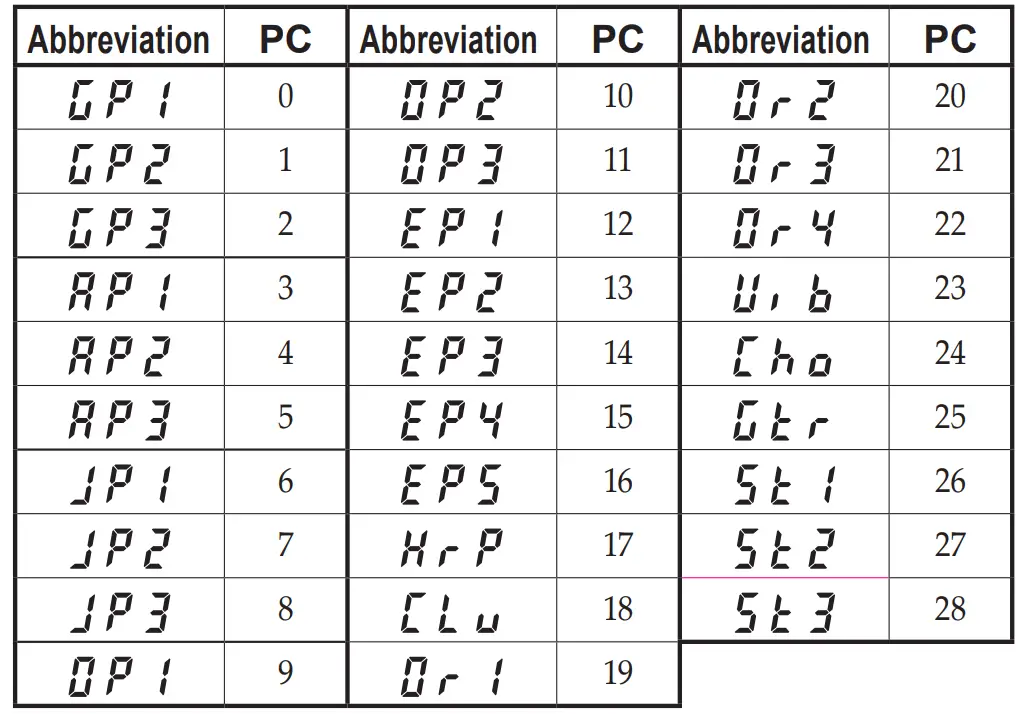
Sounds and Corresponding Program Change Numbers
Local On/Off
On: With the Local On setting, playing the G1/G1 Air’s keyboard produces the sounds of the performance as well as transmits MIDI data.
Off: With the Local Off setting, playing the G1/G1 Air’s keyboard does not produce the sounds of the performance; MIDI data is only transmitted.
Program Change Filter
On: The sending and receiving of MIDI Program Change information is disabled.
Off: MIDI Program Change information will be sent and received.
Control Change Filter
On: The sending and receiving of MIDI Control Change information is disabled.
Off: MIDI Control Change information will be sent and received.
Multi-Timbral
The G1/G1 Air can operate as a 16-part multi-timbral sound module when controlled from an external MIDI device
On: The G1/G1 Air can be used as multi-timbral soundmodule via an external MIDI device.
Off: The G1/G1 Air cannot be used as multi-timbral sound module.
USB
Using MIDI through a USB Connection
The G1/G1 Air allows you to establish a two-way MIDI link with your computer via the USB connection.
Operating requirements
Windows
Computer:
Must have an onboard USB port, and must run Microsoft Windows 7 or later.
Operating system:
Microsoft Windows 7 (32-bit, 64-bit)
Microsoft Windows 8.1 (32-bit, 64-bit)
Microsoft Windows 10 (32-bit, 64-bit)
Mac OS X
Computer:
Must have an onboard USB port, and must run OS X.
Operating system:
OS X 10.8, 10.9, 10.10
![]() Operation of the G1/G1 Air is not guaranteed with all computers that satisfy these operating requirements.
Operation of the G1/G1 Air is not guaranteed with all computers that satisfy these operating requirements.![]() When you first connect the G1/G1 Air to your Windows computer, the USB-MIDI driver included with the operating system will be installed automatically.
When you first connect the G1/G1 Air to your Windows computer, the USB-MIDI driver included with the operating system will be installed automatically.
G1/G1 Air and Driver Ports
Driver Ports
MIDI IN Port
When using the G1/G1 Air to control an application on your computer, select this port in the MIDI input settings of your application.
MIDI OUT Port
Use this port to control the G1/G1 Air.![]() When using the standard USB-MIDI driver included with the Windows operating system, the G1/G1 Air cannot be used by multiple applications simultaneously. If you want to use the G1/G1 Air with multiple applications simultaneously, you must install the Korg USB-MIDI driver. You can download the Korg USBMIDI driver from the Korg website, and install it as described in the included documentation.
When using the standard USB-MIDI driver included with the Windows operating system, the G1/G1 Air cannot be used by multiple applications simultaneously. If you want to use the G1/G1 Air with multiple applications simultaneously, you must install the Korg USB-MIDI driver. You can download the Korg USBMIDI driver from the Korg website, and install it as described in the included documentation.
http://www.korg.com/
![]() Even if the G1/G1 Air will not be used with multiple applications, we recommend installing the KORG USBMIDI driver, which should provide improved operating stability.
Even if the G1/G1 Air will not be used with multiple applications, we recommend installing the KORG USBMIDI driver, which should provide improved operating stability.
USB storage mode
When the G1/G1 Air is in USB storage mode, data can be transferred between its internal memory and an external computer.
![]() Wile the G1/G1 Air is in USB storage mode, no operation can be performed on it.
Wile the G1/G1 Air is in USB storage mode, no operation can be performed on it.![]() The USB connection cannot be used for MIDI commu nication while the USB storage mode is being used for data transfer.
The USB connection cannot be used for MIDI commu nication while the USB storage mode is being used for data transfer.
- Turn off the G1/G1 Air.
- Connect the G1/G1 Air to the computer using a USB cable.
- While holding down the METRONOME and Record buttons, press the power button to turn on the G1/G1 Air.
The Play/Pause button lights up, and “ ” appears in the display. If the 1/G1 G Air is turned off or the USB cable is disconnected while data is being transferred in USB storage mode, G1/G1 Air data or the connected computer may be damaged.
 - Data can be backed up or restored by dragging folders and files as with any external USB drive.
“G1USONG.BIN” in “KORG SYSTEM” is the song data for all songs recorded with the G1/G1 Air. If the lefi name is changed, the data can no longer be read. Do not ovem or delete any files other than “G1U- SONG.BIN”, otherwise the G1/G1 Air may not operate correctly. Do not dda backup files or files not needed by the G1/G1 Air to “KORG SYSTEM.” Otherwise, it may no longer be possible to save recording data or parameter s ettings. - When you have completed the data transfer, remove or delete the USB drive from the computer desktop. For the details, refer to the computer’s instruction manual.
If you are using a Mac OS: When you move “KORG SYSTEM” into the Trash (or remove “KORG SYSTEM”). - To exit USB storage mode, press the lit Play/Pause button to turn off the G1/G1 Air.
Using as a Bluetooth Speaker (G1 Air only)
If a computer, tablet, smartphone, audio player, etc., compatible with Bluetooth audio is connected, the G1 Air can be used as a Bluetooth speaker. Adjust the volume on the output from the device
connected via Bluetooth audio. It cannot be adjusted with the VOLUME knob on the G1 Air.
![]() The auto power off function of the G1 Air will not oper- ate during playback of a device connected via Blue- tooth audio.
The auto power off function of the G1 Air will not oper- ate during playback of a device connected via Blue- tooth audio.![]() Multiple devices cannot be connected at the same time.
Multiple devices cannot be connected at the same time.
Connecting a New Device (Pairing)
When a new device is connected, “pairing” (mutually registering connection information) must be performed.![]() The information for up to eight paired devices can be stored. When a ninth device is paired, the information for an existing device is deleted so that the new information can be stored.
The information for up to eight paired devices can be stored. When a ninth device is paired, the information for an existing device is deleted so that the new information can be stored.
![]() Even if pairing failed, the information for that device may be stored on the G1 Air. If the information for eight devices has already been stored, the information for an existing device is deleted.
Even if pairing failed, the information for that device may be stored on the G1 Air. If the information for eight devices has already been stored, the information for an existing device is deleted.![]() In order to reconnect to the device whose information was deleted, delete the G1 Air’s information from that device, and then perform pairing again.
In order to reconnect to the device whose information was deleted, delete the G1 Air’s information from that device, and then perform pairing again.
- When the G1 Air is turned on, it enters the pairing standby mode.
Pairing is enabled for only 1 minute after the abbreviation for the Sound name appears in the display after the G1 Air was turned on. - Turn on the Bluetooth function for the device to be connected to, and then select “KORG G1Air” in thelist of the settings screen that appeared. When a message appears, requesting permission for pairing, allow pairing.
When a passkey is requested, enter “0000”. The passkey may also be called a PIN code, password, etc. - If pairing is successful, the connected device enters a connection-ready mode and displays a connection with “KORG G1Air”.
Since the displays differ depending on the device, refer to the manual of your device.
Reconnecting to a paired device
- If the Bluetooth function for the device to be connected to was turned off when the G1 Air was turned on Turn on the Bluetooth function for the device to be connected to.
- If the Bluetooth function for the device to be connected to was turned on when the G1 Air was turned on
Turn off the Bluetooth function for the device to be con- nected to, and then turn it on again, or select “KORG G1Air” in the list of paired devices.
![]() If a connection cannot be established again, turn off the Bluetooth function for the device, and then turn it on again. If a connection still cannot be established, cancel pairing or delete the information from the device, and then try performing the operation described above in “Connecting a New Device (Pairing)”.
If a connection cannot be established again, turn off the Bluetooth function for the device, and then turn it on again. If a connection still cannot be established, cancel pairing or delete the information from the device, and then try performing the operation described above in “Connecting a New Device (Pairing)”.
Cutting the Connection
Perform the operation by using the Bluetooth settings screen on the connected device.
![]() If the 1G Air is turned off while it is connected to a device, it may be difficult for the connection to be re- established the next time.
If the 1G Air is turned off while it is connected to a device, it may be difficult for the connection to be re- established the next time.
Appendix
Troubleshooting
If any of the following problems should occur, carefully examine the instrument to see if you can discern what the trouble may be, and try resolving it by following the suggestions below. If the instrument still does not function properly, please contact your dealer.
The instrument will not turn on
- Check that the AC adapter is correctly connected to the piano and the outlet.
- Make sure that the power cord is fully plugged into the AC adapter.
No sound
- Is the cord from the speaker box connected securely to the speaker connector on the G1/G1 Air?
- Be sure that the volume is set to an adequate level, and not set to the MIN value.
- Make sure that the MIDI Local function is not set on OFF (see page 13). If it is, set it to ON (or turn the instrument off and then on again).
- Check to see that nothing is connected to the headphone jacks; any connection to either of these jacks will mute the internal speakers.
Notes are interrupted
The maximum polyphony may have been exceeded; see “About maximum polyphony.”
The sound has changed.
Effects such as reverb and chorus are saved with each sound.
The effect settings that are applied differ depending on the order that sounds are selected in Layer Mode or the sounds selected for a User Song; therefore, different nuances may be heard even with the same combination of sounds. Be careful when selecting sounds.
The pitch or tone of the piano sounds wrong in some key regions
The G1/G1 Air’s piano sounds replicate the sound of an actual piano as faithfully as possible. This means that in some regions of the keyboard, you may feel that certain overtones seem stronger, affecting the pitch or tone. This is not a malfunction.
Your external MIDI device does not respond to MIDI data sent from the G1/G1 Air.
- Make sure that all MIDI cables are correctly connected.
- Make sure that the G1/G1 Air is transmitting MIDI data on the same channel that the MIDI device is receiving on.
About maximum polyphony
If the number of notes being played simultaneously exceeds the maximum polyphony, some notes will be lost since the G1/G1 A ir si equipped with a mechanism that stops the first note being played to give priority to notes played with keys pressed later. Some G1/G1 Air sounds, although they may be a single sound, are generated by two or more oscillators (one note of a sound-generating circuit). Sounds using just one oscillator, such as the Electric Grand and Clav sounds of the OTHERS button, have a maximum polyphony of 120 notes. Sounds using four oscillators, such as the sounds of the G.PIANO button, have a maximum polyphony of 30 notes.
120 ÷ Number of sound oscillators = Maximum polyphony
Keep the maximum polyphony in mind and carefully choose sounds when using Layer Mode to play two sounds simultaneously or when using the damper pedal.
System initialization
The G1/G1 Air can be returned to its factory default condition. All functions in the Function Mode will be returned to their factory default settings, and all recorded data will be deleted.
![]() Deleted data or settings cannot be recovered. Before continuing with this procedure, make sure that you want to delete the data and settings.
Deleted data or settings cannot be recovered. Before continuing with this procedure, make sure that you want to delete the data and settings.
- Turn off the G1/G1 Air.
- While holding down the FUNCTION and METRONOME buttons, turn on the G1/G1 Air.
- After “
 ” will appear on the display for about 2 seconds, the normal power is turned on.
Specifications
| Keyboard | RH3 (Real weighted hammer action 3) 88 keys (A0–C8) |
| Touch Curves | Five available |
| Pitch Control | Transpose, Master tuning |
| Temperament | Nine types |
| ound Generation | Stereo PCM System |
| Polyphony | 120 notes (max) |
| Sounds | 29 sounds+ 3 base sounds |
| Effects | Brilliance, Reverb, Chorus (3 levels each) |
| Recorder | Two parts, maximum 45,000 notes |
| Demo Songs | 50 (Sound Demo Song × 10, Piano Song × 40) |
| Metronome | Tempo, Time Signature, Sound Select, Volume Controls |
| Pedal | Damper*, Sostenuto, Soft* (*half-pedaling supported) |
| Connections | LINE OUT, MIDI (IN, OUT), USB, Headphones × 2, PEDAL, SPEAKER, DC24V |
| Controls | Power, VOLUME, G.PIANO, A.PIANO, J.PIANO, OTHERS, FAVORITE, SPLIT, FUNCTION, SELECT ( TEMPO (+, –), METRONOME, Play/Pause ( |
| Wireless method: | Bluetooth (A2DP Sink) (G1 Air only) |
| Speakers | 5cm(1.97”) × 2, 12 cm (4.72”)×2 |
| Amplification | 20W × 2 + 20 W × 2 |
| Power supply | DC24V ( |
| Power consumption | 28W |
| Dimensions (W × D × H) | 1346 × 384 × 822 mm / 52.99 × 15.12 × 32.36 inches 6 × 384 × 985 mm / 52.99 × 15.12 × 38.78 inches(with the key cover opened) |
| Weight | 42 kg / 92.59 lbs. (including Stand) |
| Included Items | AC adapter , Power cord, Stand with Speaker Box & Pedal unit. Owner’s Manual |
• Specifications and appearance are subject to change without notice for improvement.
Assembling the Stand
![]() Warning
Warning
- At least one other person must help you assemble the stand.
Caution during assembly
In order to assemble the stand safely, please observe the following points.
- Make sure that you have the correct part in the correct orientation, and perform the assembly in the order given.
Other cautions
Please check the following points after assembly.
- Loosened screws
The screws may loosen as time passes after assembly. You should periodically check whether any screws have become loose. If you feel that the stand vibrates excessively, it is possible that screws have come loose. If so, re-tighten them. - When moving the digital piano to another location
To move the assembled stand, remove the AC adapter cord from the stand, close the key cover, and then move it slowly with at least two people keeping it as level as possible. - Disassembly
If you need to disassemble the stand, do so by reversing the steps of the assembly procedure. After disassembly, keep the screws and other parts in a safe place so that they are not lost.
The G1/G1 Air should always be laid down before disassembled.
Assembly procedure
You’ll need a Phillips (+) screwdriver.
- Put the protective sheet, which had covered the G1/G1 Air, on a flat floor, and place the G1/G1 Air on that sheet with its rear facing the floor.
In addition, place cloths or magazines so that you may easily put your hands under the G1/G1 Air when assembling and raising the stand.
- Make sure that all of the following parts are available.


- While adjusting the gaps between the left and right side panels and the G1/G1 Air, fasten them together using four screws (M6) If it sifficult id to align the screw holes, place a cloth or magazine under the left and right side panels to adjust their heights.

- Temporarily tighten* the pedal board to the hardware inside the side panels of the stand, using four screws (M4, long).
Be careful not to scratch the side panels.
* To temporarily tighten the screws is to tighten them leav ing a clearance of about 2 mm.
- With the help of another person, slowly stand up the stand being assembled.
- Lift up the speaker box so that the brackets (A) on the left and right side panels pass through the dents in the speaker box. When the brackets (A) are fully hidden within the speaker box, push the speaker box forward so the rear of the speaker box is nearly flush with the edges of the side panels. Then, the speaker box can be released.

- Align the bracket holes in the left and right side panels with the holes in the speaker box, and then secure them with the four screws (M4, long) so the gaps on the left
and right sides are equal.
At the same time, secure the cord holder with the top screw on the left side panel.
- Attach the brackets at the holes (under the speaker box) in the left and right side panels with the screws (M4, short).

- Slightly bend the rear panel and insert it into the grooves in the left and right side panels. Be careful not to pinch your fingers.

- Lift up the rear panel to align the holes in the rear panel and the brackets installed in step 8, and then temporarily fasten the bottom of the rear panel with the four screws (M4, short).

- Fasten the rear panel and the brackets (through the holes aligned in step 10) with two screws (M4, short).

- Connect the attached pedal cord, observing the correct orientation, to the connector on the reverse side of the pedal unit, and then engage it with a slot in the pedal unit.
The pedal cord can be attached to or detached from the connector with its locking tab held down.
- Lift up either the left or right side of the stand to insert the pedal unit into the pedal board.

- Insert the pedal unit into the pedal board, and then fasten it by pressing a push rivet into the hole (above the cutout) at the rear of the pedal board.
After installation, lift the stand to check that the pedal unit does not fall out.
The push rivet will prevent the pedal unit from falling out. Therefore, it cannot be fully fastened to the pedal board. - Firmly tighten the pedal board and rear panel screws temporarily tightened in steps 4 and 10.
When tightening the screws on the G1/G1 Air, adjust the up/down and front/rear positions on the left and right side panels so that they are equal. - Make sure to attach the anti-tipping brackets behind both side panels. And the anti-tipping bracket fastened to the left of the code holder at this time.
Attach the anti-tipping brackets, starting with the round hole at the bottom.
Joints between the side panels and the attached anti-tip- ping brackets should be even (with no level difference left).
- Ensure that the stand has no gaps and is not tilted, and that all the screws are tightened firmly.
- Connect the AC adapter (refer to “Connecting the Power” on page 5), pedal cord and the speaker cord to the Connector Panel at the center of the underside of the keyboard unit.
When connecting the pedal cord and the speaker cord, observe the correct orientations of the connectors. The pedal cord or the speaker cord can be detached from the connector with its locking tab held down.
- Use the two cord holders to secure the AC adapter cord and pedal cord.
After securing the cord with the cord holder, ensure that excess pressure is not applied to the connectors. - Place the G1/G1 Air where you intend to use it. Make sure to place it in a safe location where the floor is flat and stable.
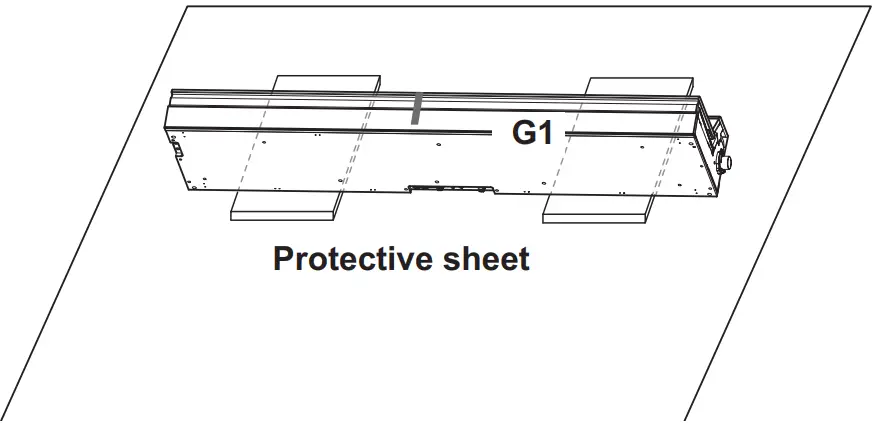
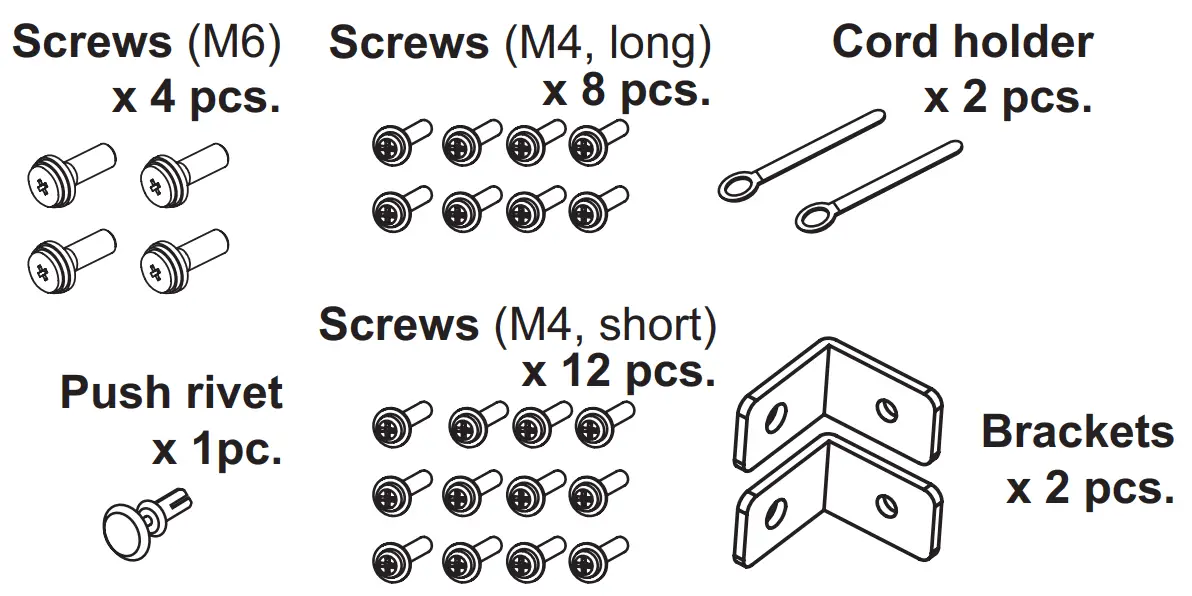
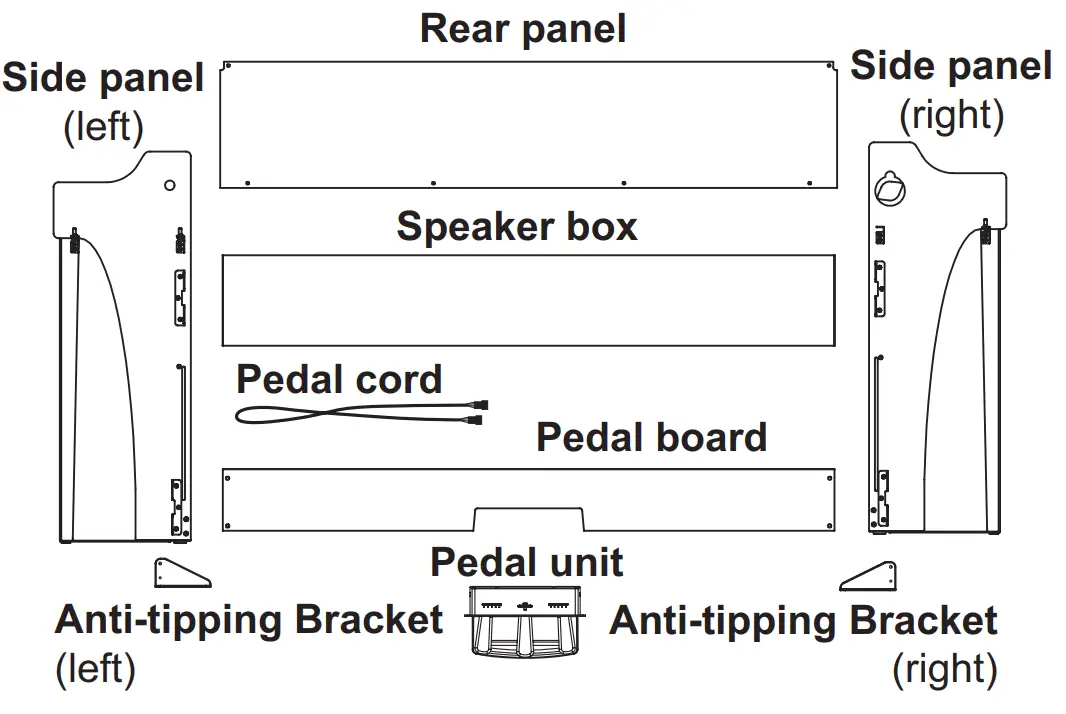
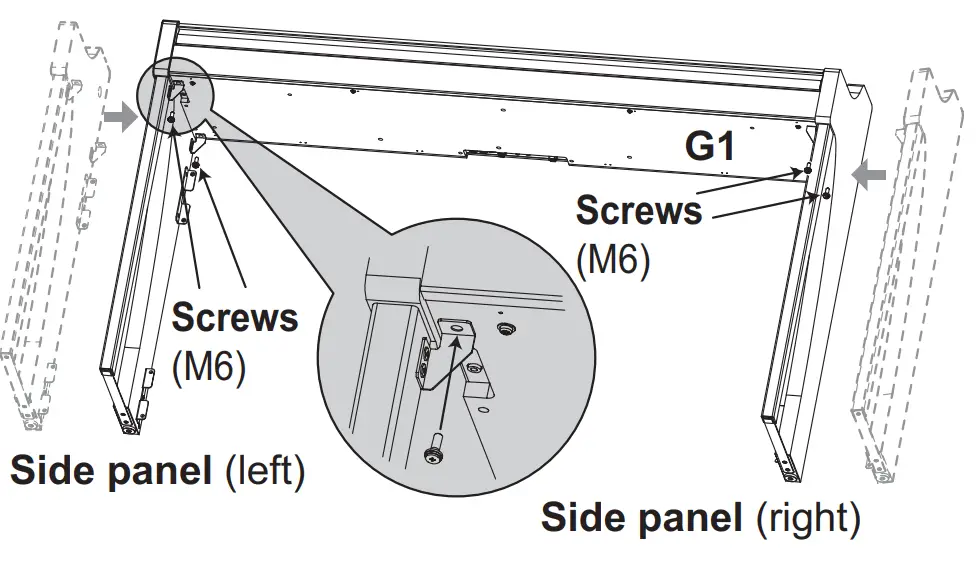
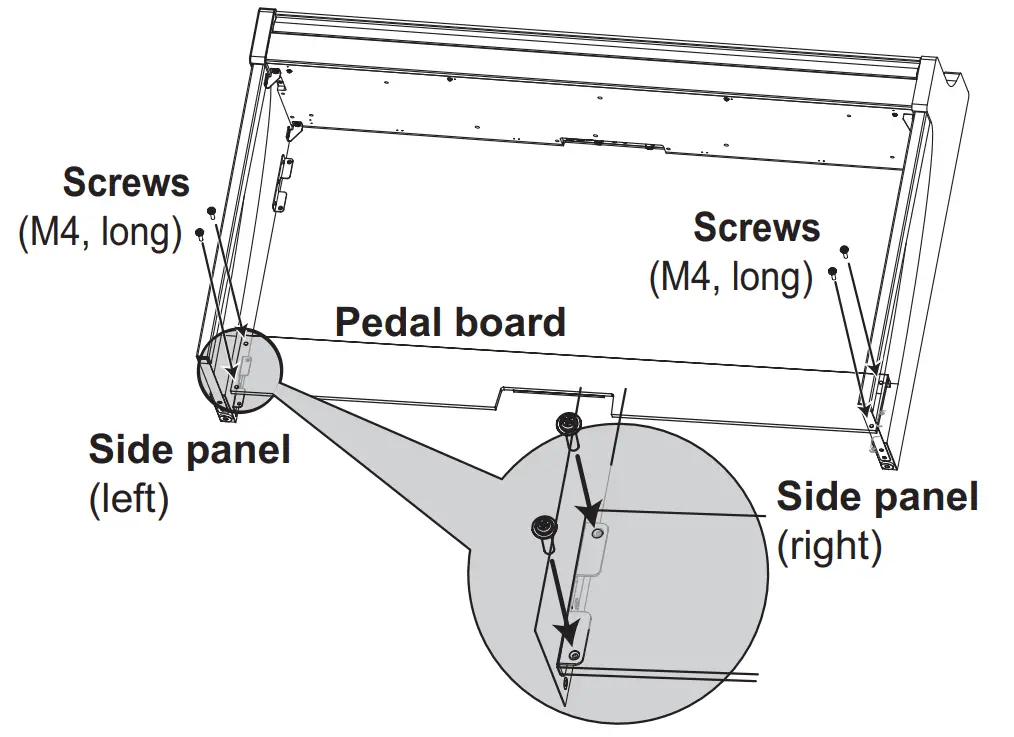

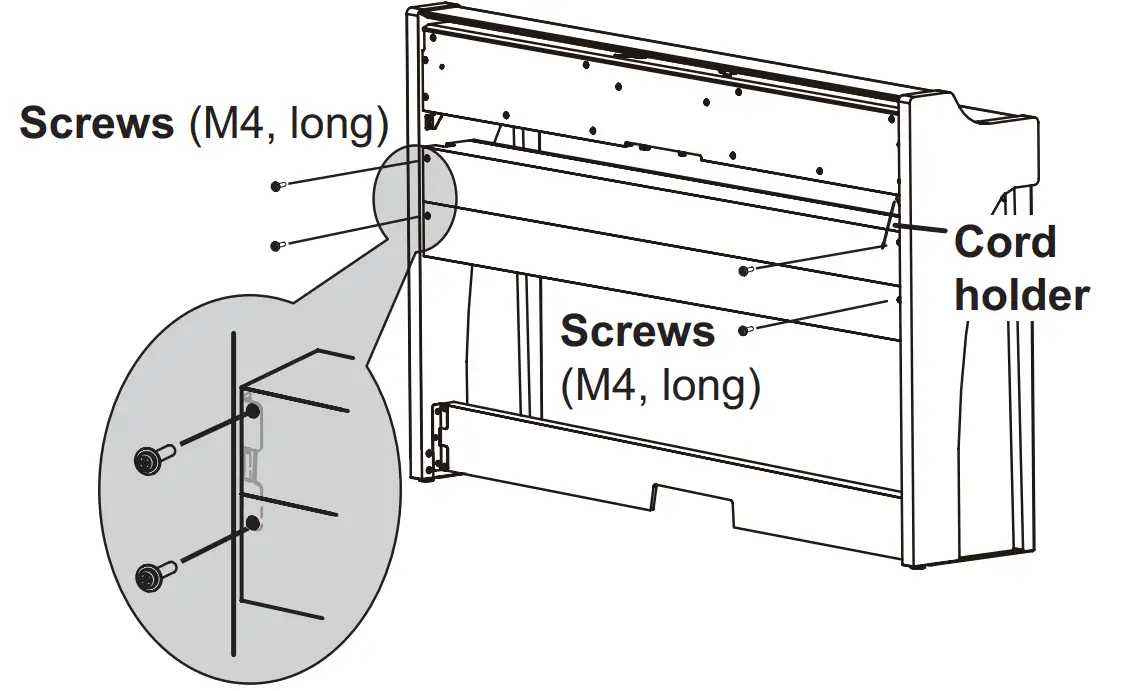
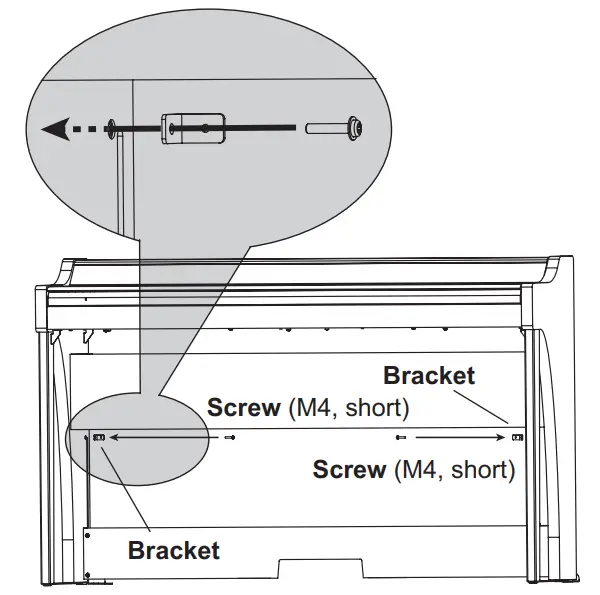
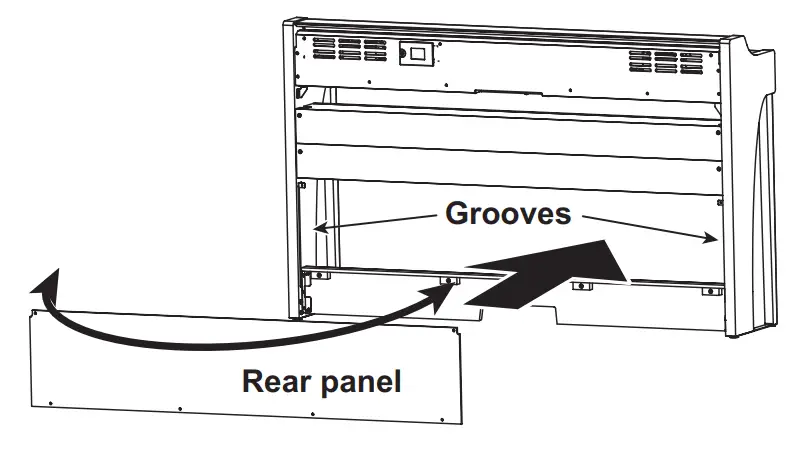
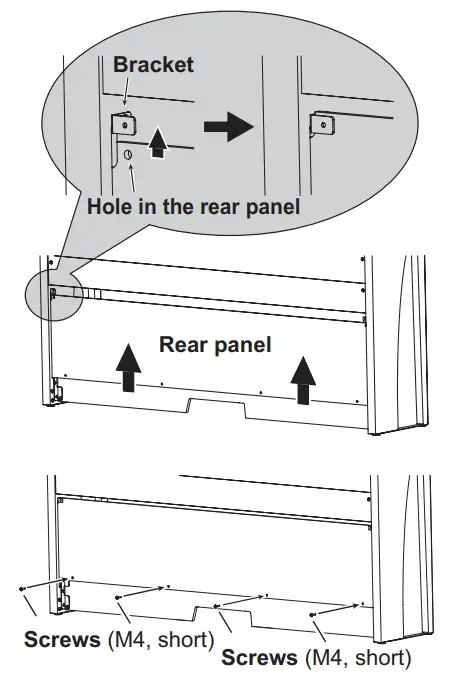
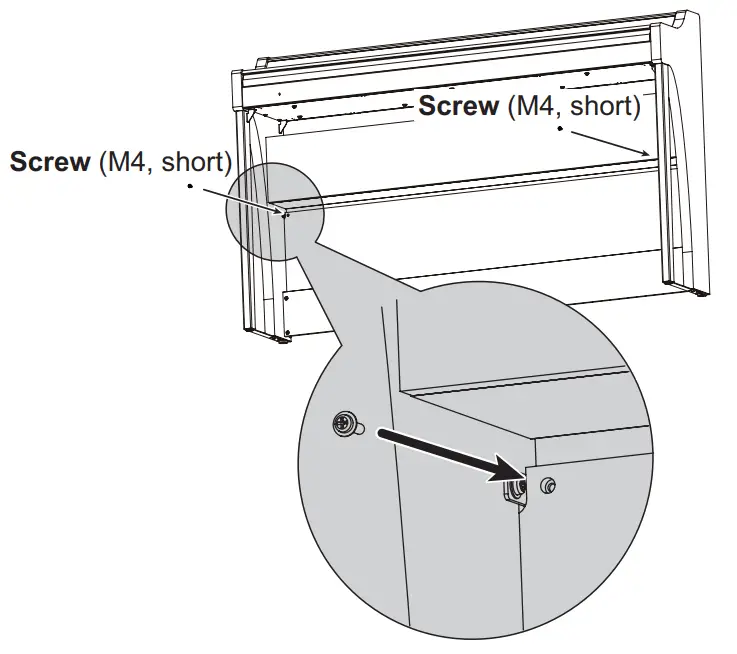
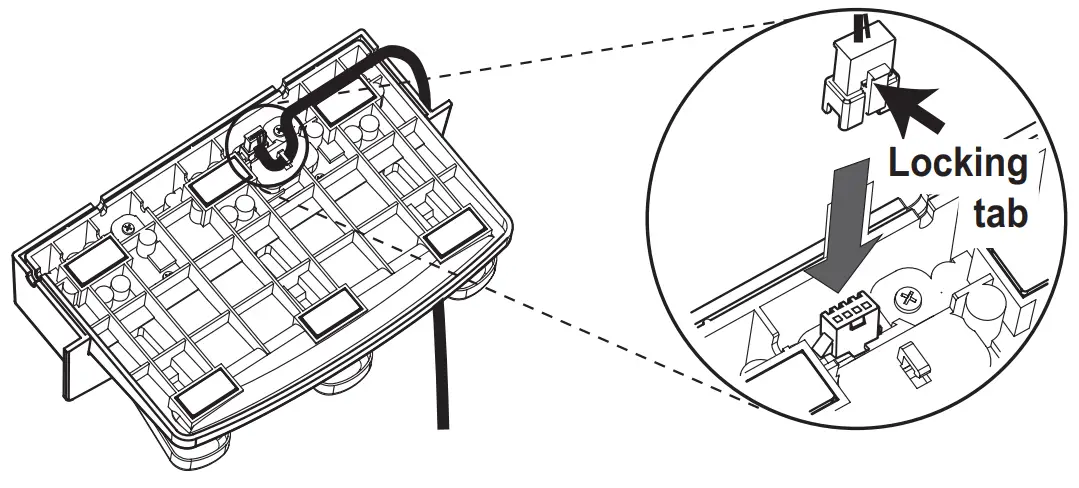


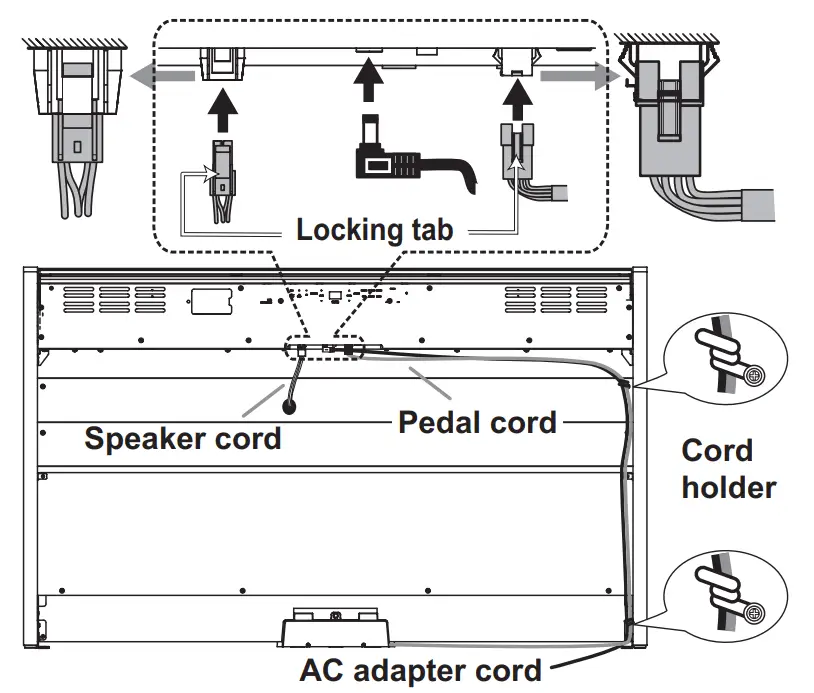
![]() When setting the digital piano in place, make sure that the stand does not rest on the AC adapter cord or pedal cord.
When setting the digital piano in place, make sure that the stand does not rest on the AC adapter cord or pedal cord.![]() For greater safety, be sure to attach the anti-tipping brackets to the rear of the left and right side panels.
For greater safety, be sure to attach the anti-tipping brackets to the rear of the left and right side panels.
Check following assembly
□ Are any parts left over?
If any parts are left over, carefully review the assembly procedure to see where those parts should have been used.
□ Make sure that all screws are tight.
[DIGITAL PIANO]
Model: G1/G1 Air
MIDI Implementation Chart
| Function… | Transmitted | Recognized | Remarks | ||
| Basic | Default | 1–16 | 1–16 | Memorized | |
| Channel | Changed | 1–16 | 1–16 | ||
| Mode | Default Messages Altered | X X ************** | 3 X ************** | ||
| Note | 9–120 | 0–127 | |||
| Number | True Voice | ************** | 0–127 | Reception range differs depending on sound. | |
| Velocity | Note On Note Off | O 9n, V=1–127 O 8n, V=1–127 | O 9n, V=1–127 O 8n, V=0–127 | ||
| After Touch | Key’s Channel | X X | X O | ||
| Pitch Bend | X | O | |||
| Control Change | 1 6 7 10 11 38 64, 66, 67 65 71 72, 73 74 75, 76, 77, 78 91, 93 100, 101 120 121 | X | O | Modulation Data Entry MSB Volume Pan Expression Data Entry LSB Damper, Sostenuto, Soft Portamento On/Off Resonance EG Time (Release, Attack) Brightness Decay Time, Vibrato Rate, Depth, Delay Reverb Send, Chorus Send RPN (LSB, MSB) All Sounds Off Reset All Controllers | *1 *1 *1 *1 *1 *1 *1 *1 *1 *1 *1 *1 *1 *1 *1 *1 |
| X | O | ||||
| X | O | ||||
| X | O | ||||
| X | O | ||||
| X | O | ||||
| O | O | ||||
| X | O | ||||
| X | O | ||||
| X | O | ||||
| X | O | ||||
| X | O | ||||
| X | O | ||||
| X | O | ||||
| X | O | ||||
| X | O | ||||
| Program | O 0–28 | O 0–28 | *2 | ||
| Change | True Number | ************** | 0–28 | ||
| System Exclusive | O | O | *2 | ||
| System Common | Song Position Song Select Tune Request | O O X | X X X | *3 | |
| System Real Time | Clock Commands | O X | X X | ||
| Aux Meassages | Local On/Off All Notes Off Active Sense System Reset | X X X X | O O (123–127) O X | *1 *1 | |
| Notes *1: Transmitted and received when the MIDI filter is disabled. *2: Includes Inquiry and GM Mode On. Received when GM Mode On, but all GM sounds are unsupported. *3: 0–9 Sound Demo Song (d01–d10) 10–49 Piano Song (P01–P40) 50–127 User Song (U01–U78) *Song sellect messesage not transmitt (U78–U99) | |||||
Mode 1: Omni On, Poly
Mode 3: Omni Off, Poly
Mode 2: Omni On, Mono
Mode 4: Omni Off, Mono
Consult your local Korg distributor for more information on MIDI IMPLEMENTATION.
O: Yes
X: No
![]()
4015-2 Yanokuchi, Inagi-City, Tokyo 206-0812 JAPAN
© 2017 KORG INC.
www.korg.com
Published 07/2022 Printed in Japan


