![]()
QUICK START GUIDE
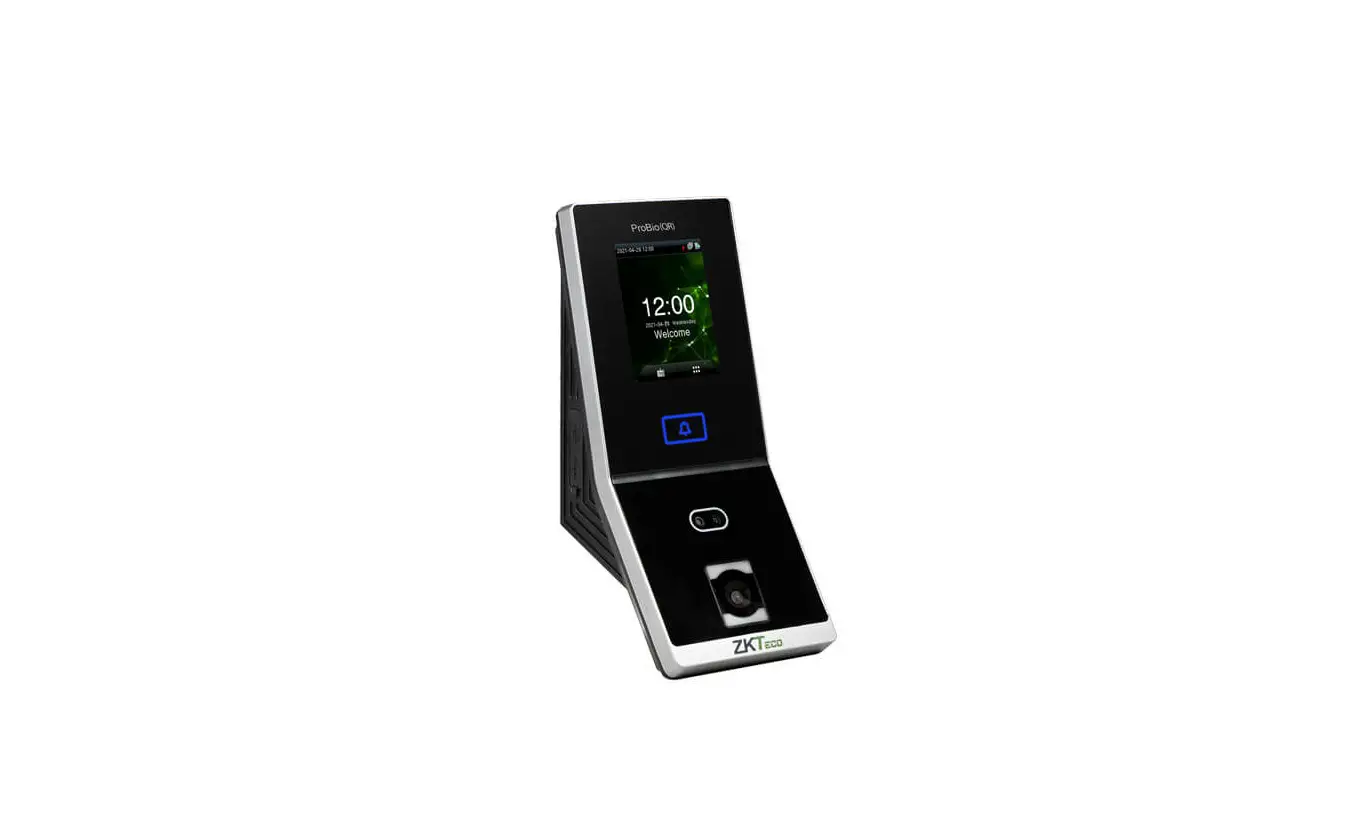
ProBio(QR)
Version: 1.0
Date: May 2021
![]()
Safety Precautions
Before installation, please read the following precautions carefully to prevent risks and dangers to this product, users and surroundings.
 Do not expose to direct sunlight, water, dust and soot.
 Do not place any magnetic object near the product. Magnetic objects such as Magnet, CRT, TV, Monitor or Speaker may damage the device.
 Do not place the device next to any heating equipment.
 Prevent water, drinks or chemicals leaking into the device.
 This product is not intended for use by children unless they are supervised.
 Do not drop or damage the device.
![]() Do not disassemble, repair or modify the device.
Do not disassemble, repair or modify the device.![]() Do not use the device for any purpose other than those specified.
Do not use the device for any purpose other than those specified.![]() Remove dusts or dirts regularly. While cleaning, wipe dust off with a smooth cloth or towel instead of water.
Remove dusts or dirts regularly. While cleaning, wipe dust off with a smooth cloth or towel instead of water.
Contact your supplier in case of any problem!
User Registration
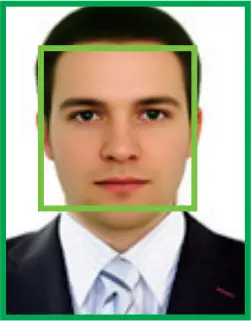
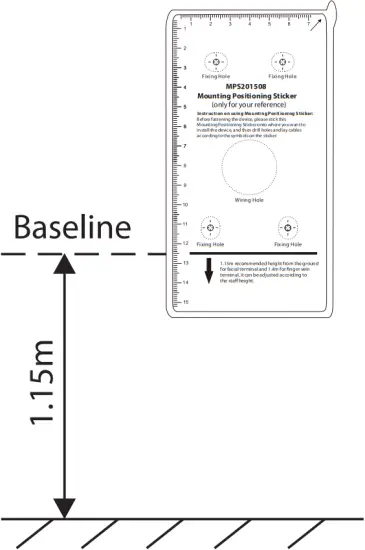
1) Recommended Standing Position

For user heights between 1.5m to 1.8m, it is recommended to install the device at 1.15m height above ground (can be modified according to the user’s average height).
Recommended Registration and Verification Position
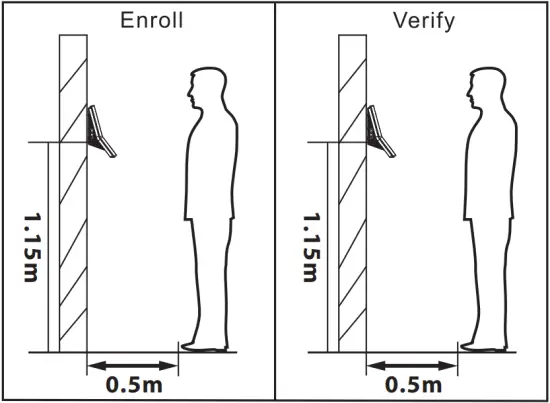
Recommended Procedures (as shown in the left image): During registration and verification procedures, the position of device should not be changed to ensure high verification preciseness. If it is necessary to move the device, its vertical height should not be changed.
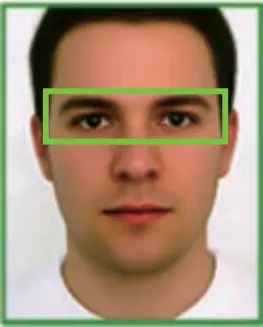
2) Registration
a. During registration, it is required to adjust your upper body to fit your eyes into the green frame on the screen.
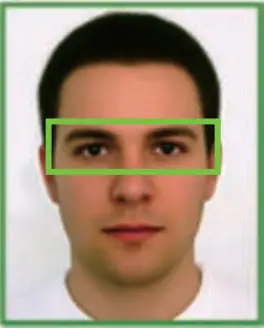
b. During verification, it is required to show your face in the center of the screen and fit your face into the green frame in the screen.

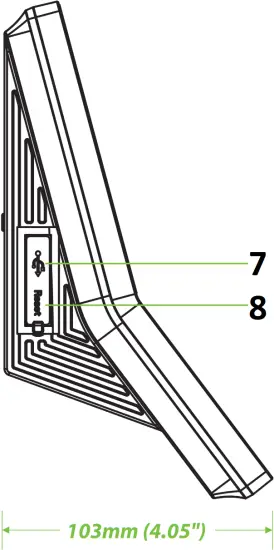
Device Overview
Front Back
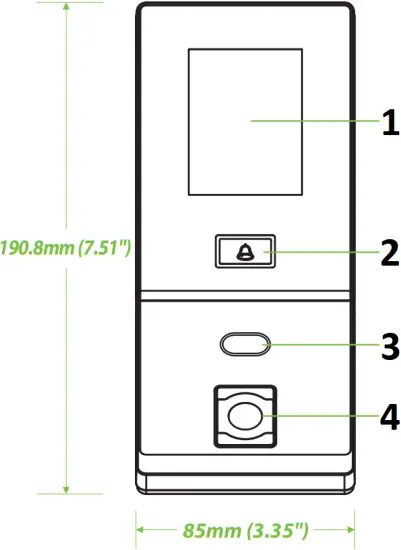
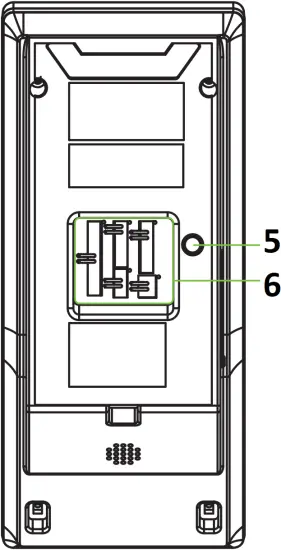
Left Side Bottom
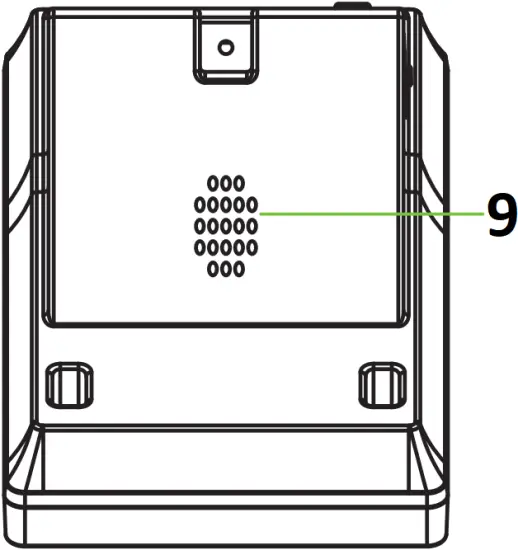
- 2.8″ Touch Screen
- Doorbell
- Camera
- Card Reading Area & QR Code Scanner
- Tamper Switch
- Terminal Block
- USB Port
- Reset Button
- Speaker
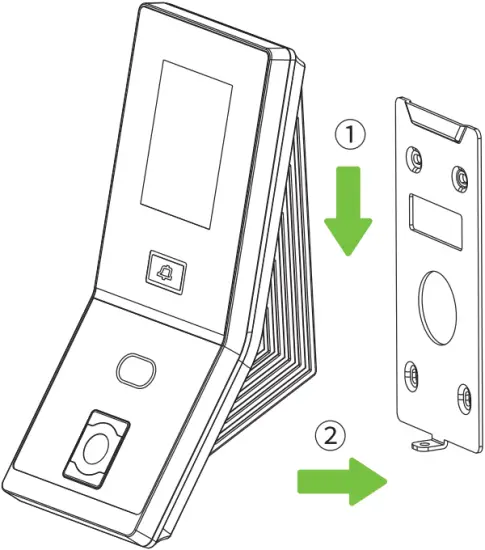
Device Installation
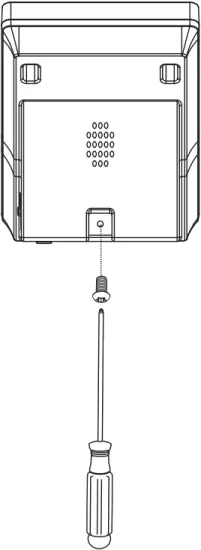
![]() Installation on the wall
Installation on the wall
- Attach the mounting template sticker to the wall, and drill holes according to the mounting paper.
- Fix the back plate on the wall using the wall mounting screws.
- Attach the device to the back plate.
- Fasten the device to the back plate with a security screw.
(1) (2)
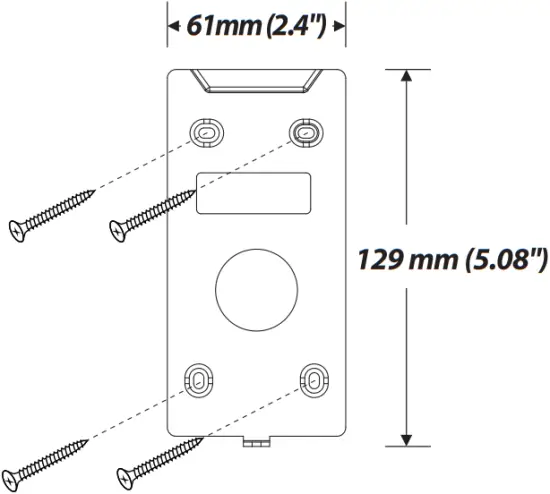
(3) (4)
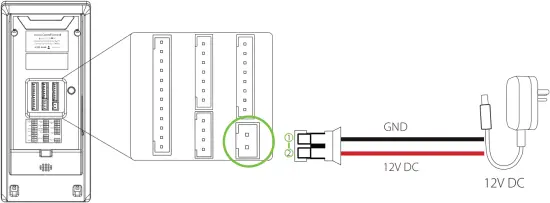
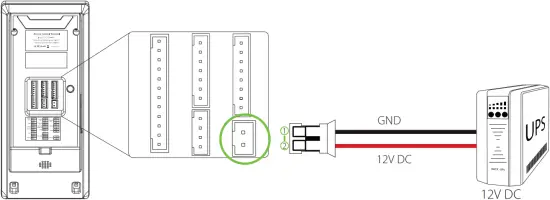
Power Connection
![]() Without UPS
Without UPS
![]() With UPS (Optional)
With UPS (Optional)
![]() Recommended AC Adapter
Recommended AC Adapter
![]() Recommended AC Adapter: 12V, 3A
Recommended AC Adapter: 12V, 3A![]() To share the power with other devices, use an AC Adapter with higher current ratings
To share the power with other devices, use an AC Adapter with higher current ratings
Ethernet Connection
![]() LAN Connection
LAN Connection
Connect the device and the software over an Ethernet cable. An example is shown below:
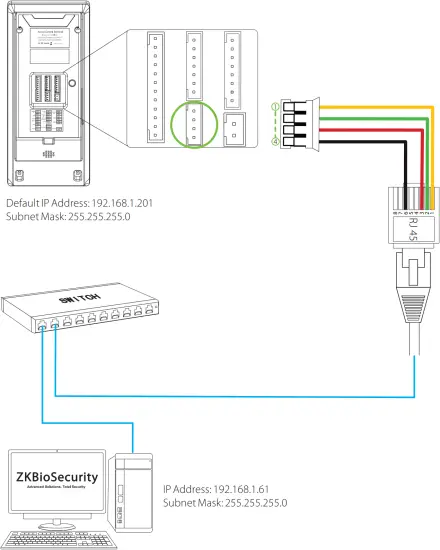
DESCRIPTION | WIRE | |
RJ45-1 | Yellow | |
| RJ45-2 | Green |
|
RJ45-3 | Red | |
| RJ45-6 | Black |
|
Note:
In LAN, the IP Addresses of the Server (PC) and the device must be in the same network segment when connecting to the ZKBioSecurity software.
Click [Comm.] > [Ethernet] > [IP Address], enter the IP address and click [OK].
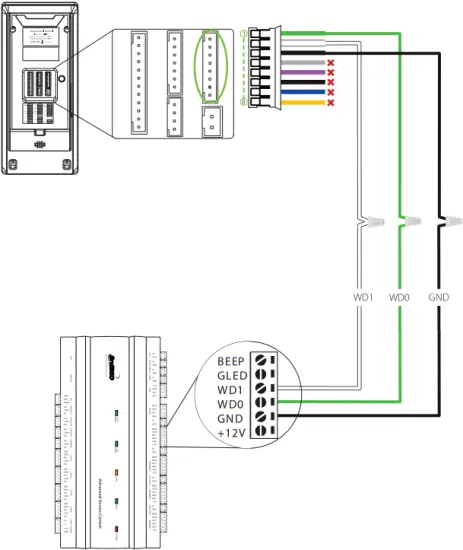
RS485 Connection
![]() Rs485 Slave Reader Connection
Rs485 Slave Reader Connection
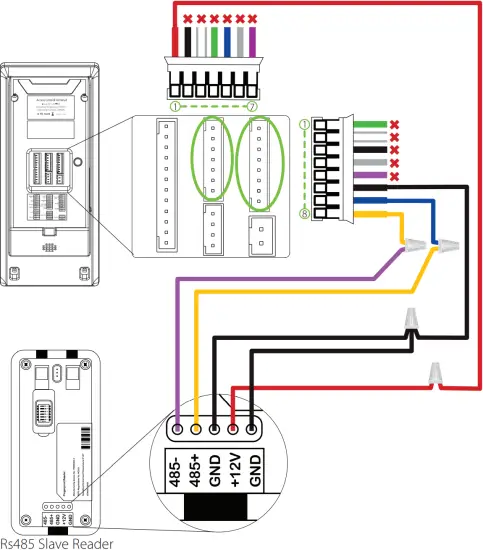
| DESCRIPTION | WIRE | |
| +12V | Red | |
| GND | Black | |
| IWD0 | White | |
| IWD1 | Green | |
| RLED | Blue | |
| GLED | Gray | |
| BEEP | Purple | |
| DESCRIPTION | WIRE | |
| WD0 | Green | |
| WD1 | White | |
| GND | Black | |
| RXD | Gray | |
| TXD | Purple | |
| GND | Black | |
| 485A | Blue | |
| 485B | Yellow | |
![]() Do not use
Do not use
![]() DIP Settings
DIP Settings
- There are six DIP switches on the back of RS485 slave reader, switches 1 to 4 are for RS485 address, switch 5 is reserved, and switch 6 is for reducing noise on a long RS485 cable.
- If the RS485 slave reader is powered from the terminal, the length of wire should be less than 100 meters or 330 ft.
- If the cable length is more than 200 meters or 600 ft., the number 6 switch should be turned ON as shown below.
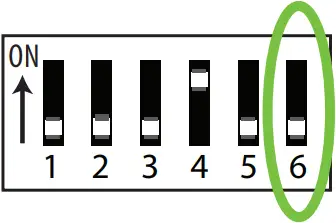


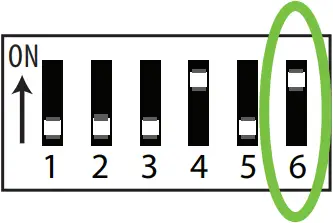
- Distance: Less 200 meters
- Distance: More than 200 meters
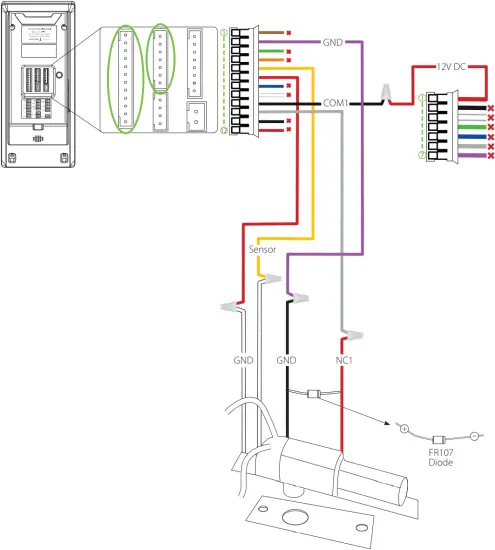
Lock Relay Connection
The system supports both Normally Opened Lock and Normally Closed Lock. The NO Lock (Normally Opened when powered) is connected with ‘NO’ and ‘COM’ terminals, and the NC Lock (Normally Closed when powered) is connected with ‘NC’ and ‘COM’ terminals. The power can be shared with the lock or can be used separately for the lock, as shown in the example with NC Lock below:
![]() Device Not Sharing Power with the Lock
Device Not Sharing Power with the Lock

Normally Closed Lock
| DESCRIPTION | WIRE | |
| AUX | Brown | |
| GND | Purple | |
| BELL- | Green | |
| BELL+ | Orange | |
| SEN | Yellow | |
| GND | Red | |
| BUT | Blue | |
| NO1 | White | |
| COM1 | Black | |
| NC1 | Gray | |
| AL- | Black | |
| AL+ | Red | |
![]() Do not use
Do not use
![]() Do not reverse the polarities.
Do not reverse the polarities.
![]() Device Sharing Power with the Lock
Device Sharing Power with the Lock
Normally Closed Lock
| DESCRIPTION | WIRE | |
| AUX | Brown | |
| GND | Purple | |
| BELL- | Green | |
| BELL+ | Orange | |
| SEN | Yellow | |
| GND | Red | |
| BUT | Blue | |
| NO1 | White | |
| COM1 | Black | |
| NC1 | Gray | |
| AL- | Black | |
| AL+ | Red | |
| DESCRIPTION | WIRE | |
| +12V | Red | |
| GND | Black | |
| IWD0 | White | |
| IWD1 | Green | |
| RLED | Blue | |
| GLED | Gray | |
| BEEP | Purple | |
![]() Do not use
Do not use
![]() Do not reverse the polarities.
Do not reverse the polarities.
Standalone Installation
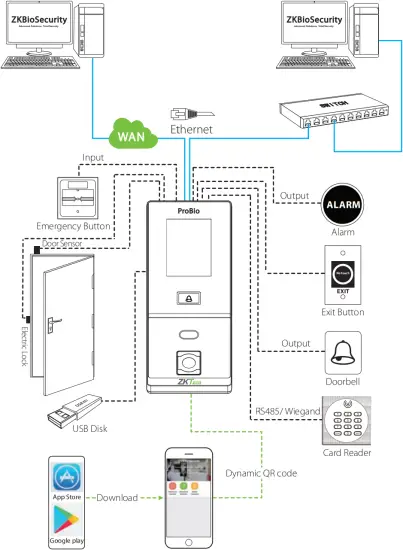
Wiegand Output Connection
| DESCRIPTION | WIRE | |
| WD0 | Green | |
| WD1 | White | |
| GND | Black | |
| RXD | Gray | |
| TXD | Purple | |
| GND | Black | |
| 485A | Blue | |
| 485B | Yellow | |
![]() Do not use
Do not use
Device Operation
![]() User Registration
User Registration
When there is no Super Administrator set in the device, click on ![]() to enter the menu. Add a new user and set the User Role to Super Admin. The system will request the Administrator’s verification before entering the menu. It is recommended to register a Super Administrator initially for security purposes.
to enter the menu. Add a new user and set the User Role to Super Admin. The system will request the Administrator’s verification before entering the menu. It is recommended to register a Super Administrator initially for security purposes.
Method 1: Register on the device
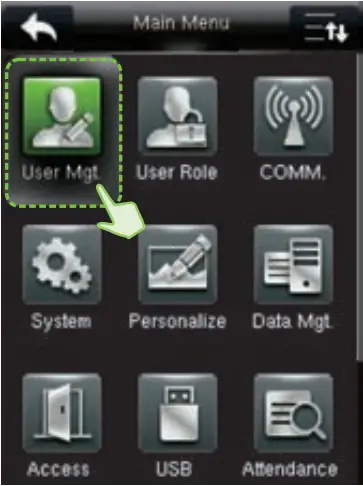
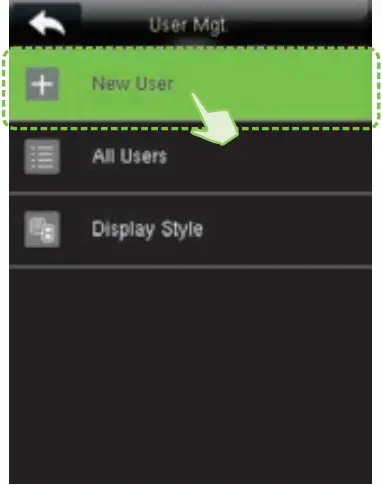
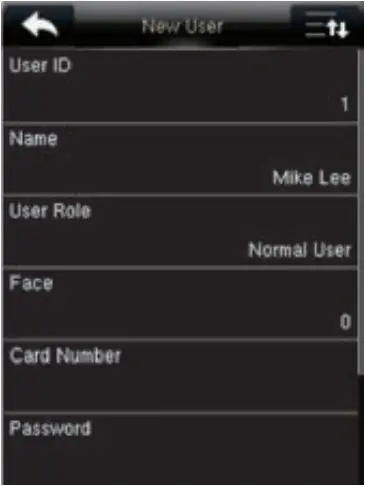
Tap on ![]() > [User Mgt.] > [New User] to register a new user. The options include entering the User ID and Name, setting User Role, registering Face, Card Number, Password, adding User Photo, and setting Access Control role.
> [User Mgt.] > [New User] to register a new user. The options include entering the User ID and Name, setting User Role, registering Face, Card Number, Password, adding User Photo, and setting Access Control role.
Method 2: Register on ZKBioSecurity software
Please set the IP Address and Cloud Service Server Address in the Comm. menu option on the device.
1. Click [Access]>[Device]>[Device]>[Search] to search the device on the software. When an appropriate Server Address and port is set on the device, the searched devices will be displayed automatically.
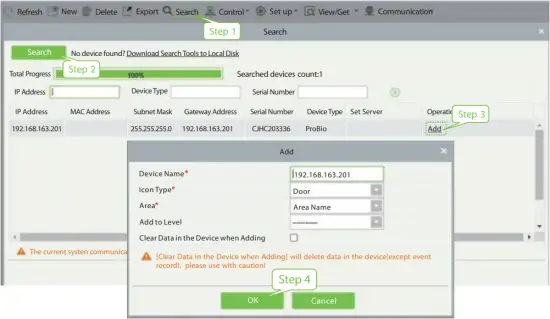
2. Click [Add] in the operation column, a new window will pop-up. Select the Icon type, Area, and Add to Level from each drop-down and click [OK] to add the device.
3. Click [Personnel] > [Person] > [New] and fill in all the required fields to register a new user in the software.
4. Click [Access] > [Device] > [Control] > [Synchronize All Data to Devices] to synchronize all the data to the device including the new users.
For more details, please refer the ZKBioSecurity User Manual.
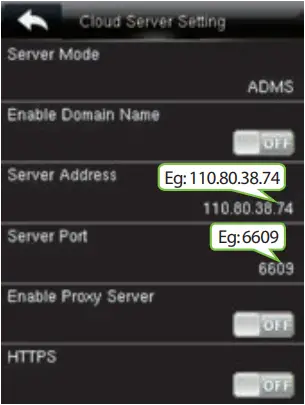
![]() Ethernet and Cloud Server Settings
Ethernet and Cloud Server Settings
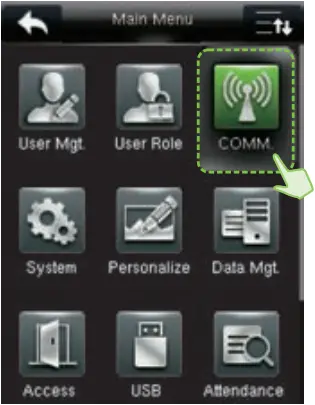
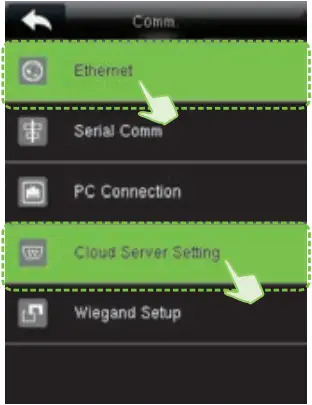
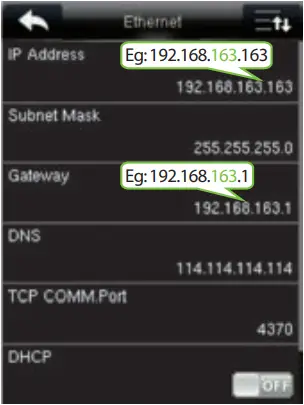
Click on ![]() > [COMM.] > [Ethernet] to set the network parameters. If the TCP/IP communication of the device is successful, the icon
> [COMM.] > [Ethernet] to set the network parameters. If the TCP/IP communication of the device is successful, the icon ![]() will be displayed in the upper right corner of the standby interface.
will be displayed in the upper right corner of the standby interface.
Click on ![]() > [COMM.] > [Cloud Server Setting] to set the Server Address and Server Port, the IP Address and Port Number of the server after the software is installed. If the device communicates with the Server successfully, the icon
> [COMM.] > [Cloud Server Setting] to set the Server Address and Server Port, the IP Address and Port Number of the server after the software is installed. If the device communicates with the Server successfully, the icon ![]() will be displayed in the upper right corner of the standby interface.
will be displayed in the upper right corner of the standby interface.
![]() Access Control Settings
Access Control Settings
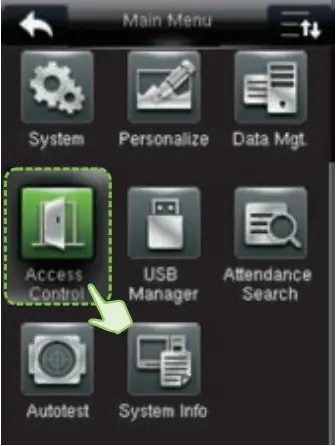
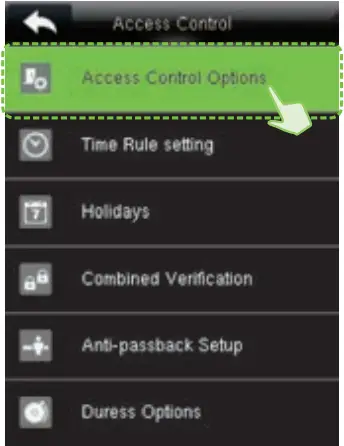
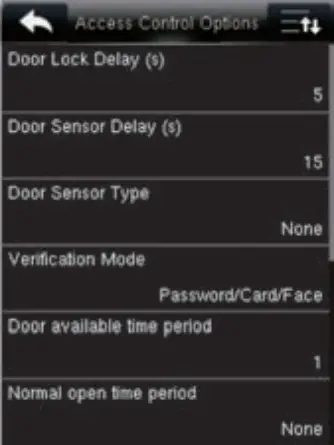
Click on ![]() > [Access Control] to enter the access control management interface and set the relevant parameters of the access control.
> [Access Control] to enter the access control management interface and set the relevant parameters of the access control.
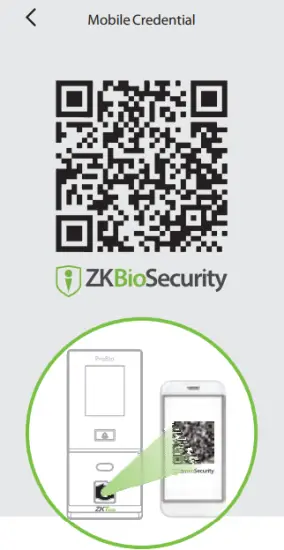
![]() QR Code as the Mobile Credential
QR Code as the Mobile Credential
The device can recognize the QR code image on the ZKBioSecurity Mobile APP captured by the QR code scanner, making it easy to access without contact.
Please set the IP Address and Cloud Service Server Address in the COMM. menu option on the device.
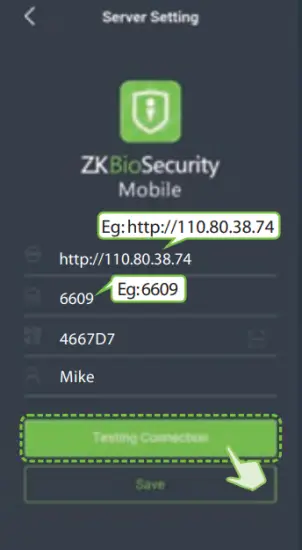
1. Mobile APP Configuration
After downloading and installing the , the user needs to set the Server before login.
a. On the Server, choose [System] > [Authority Management] > [Client Register] to add a registered App client.
b. Open the App on the Smartphone. On the login screen, tap [Server Setting] and type the IP Address or the Domain Name of the Server, and its Port Number.
c. Tap the QR Code icon to scan the QR code of the new App client. After the client is identified successfully, set the Client Name and tap [Testing Connection].
d. After the network is connected successfully, tap [Save].
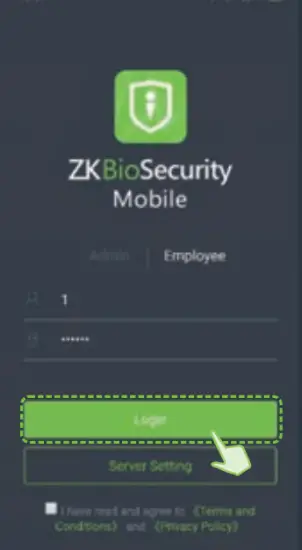
2. Employee Mobile Login
The Mobile Credential function is only valid when logging in as an employee. Tap on Employee to switch to Employee Login screen. Employees can login with the Personnel ID in [Personnel] > [Personnel] > [Person] and self-service password. The default self-service password is 123456.
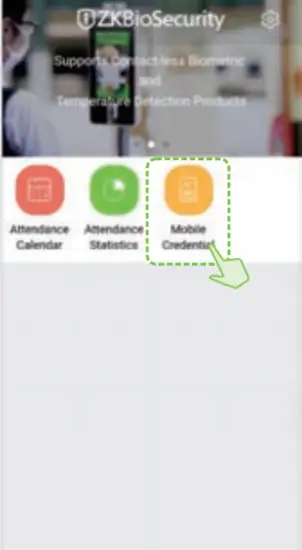
3. Scan the QR Code
Find the access control QR code on the ZKBioSecurity Mobile App. Show the QR code to the QR code scanner of the device. The device prompts that the verification is successful.
Note:
1. The user must have a card number registered in advance on the device or on the software.
2. When scanning, the QR code and the scanner must stay parallel at a distance of 15 to 30cm.
For more details, please refer the ZKBioSecurity Mobile APP User Manual.
![]()
 ZKTeco Industrial Park, No.32, Industrial Road,
Tangxia Town, Dongguan, China.
Tel: +86 769-82109991
Fax: +86 755-89602394
www.zkteco.com
Copyright©2021 ZKTECO CO., LTD. All rights reserved.


![Zkteco G4[qr] Android Multi-biometric Facial Recognition Terminal User Guide](https://static-data1.manualsee.com/1/img/172/2574452/2022/04/ZKTECO-G4QR-Android-Multi-Biometric-Facial-Recognition-Terminal-Featured-Image.png "Zkteco G4[qr] Android Multi-biometric Facial Recognition Terminal User Guide")


![Zkteco Speedface-v5l[qr] Series Visible Light Facial Recognition Terminal User Guide](https://static-data1.manualsee.com/1/img/411/2395082/2022/03/ZKTeco-SpeedFace-V5LQR-Series-Visible-Light-Facial-Recognition-Terminal-fea.png "Zkteco Speedface-v5l[qr] Series Visible Light Facial Recognition Terminal User Guide")


