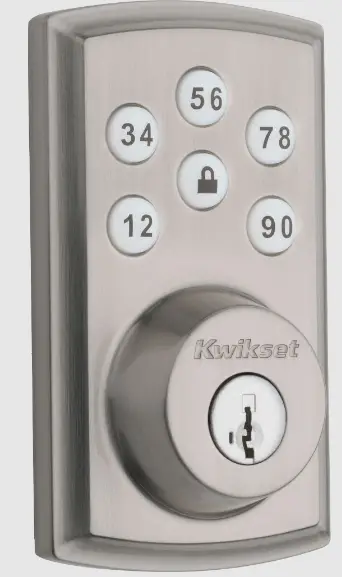
Kwikset powerbolt2
Important Safeguards
- Read all instructions in their entirety.
- Familiarize yourself with all warning and caution statements.
- Remind all family members of safety precautions.
- Restrict access to your lock’s interior assembly and routinely check your settings to ensure they have not been altered without your knowledge.
- Protect your user codes and master code.
- Dispose of used batteries according to local laws and regulations.
CAUTION: Prevent unauthorized entry. This lock has a pre-set user code and master code. Upon installation and set-up, replace both of these codes with your own. Since anyone with access to the interior assembly can reset the lock and change the user codes, you must restrict access to the interior assembly and routinely check the user codes to ensure they have not been altered without your knowledge.
WARNING: This Manufacturer advises that no lock can provide complete security by itself. This lock may be defeated by forcible or technical means, or evaded by entry elsewhere on the property. No lock can substitute for caution, awareness of your environment, and common sense. Builder’s hardware is available in multiple performance grades to suit the application. In order to enhance security and reduce risk, you should consult a qualified locksmith or other security professional.
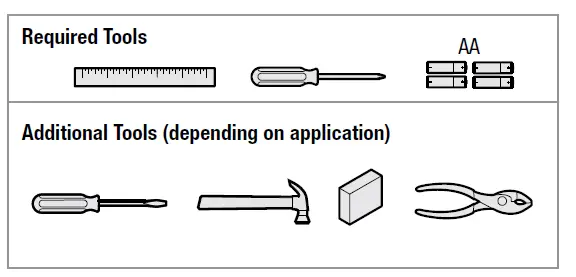
Required Tools
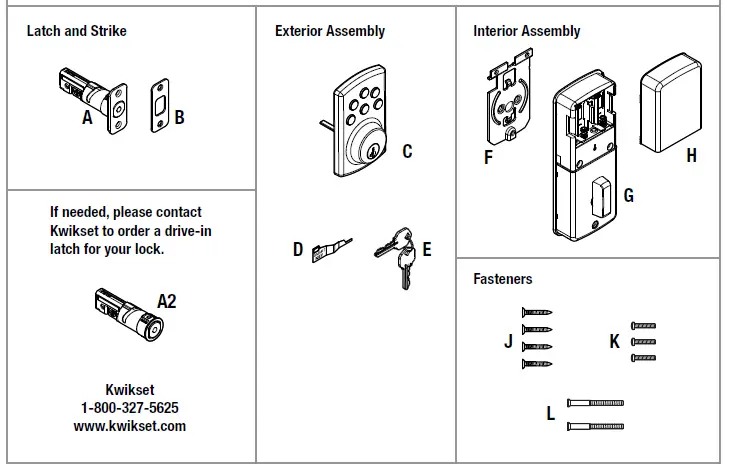
Parts in the Box
INSTALLATION
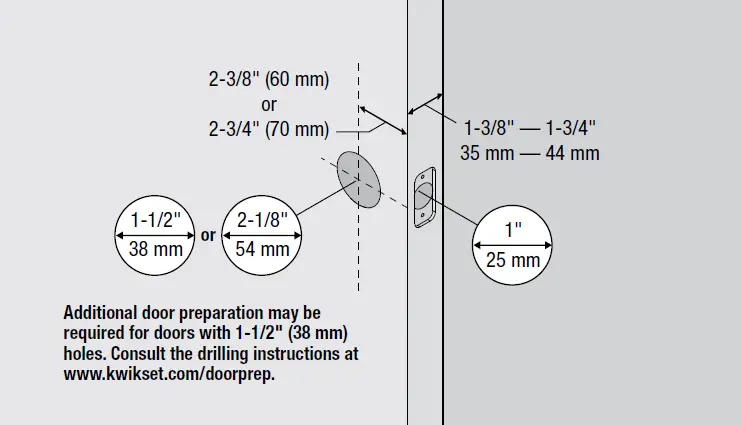
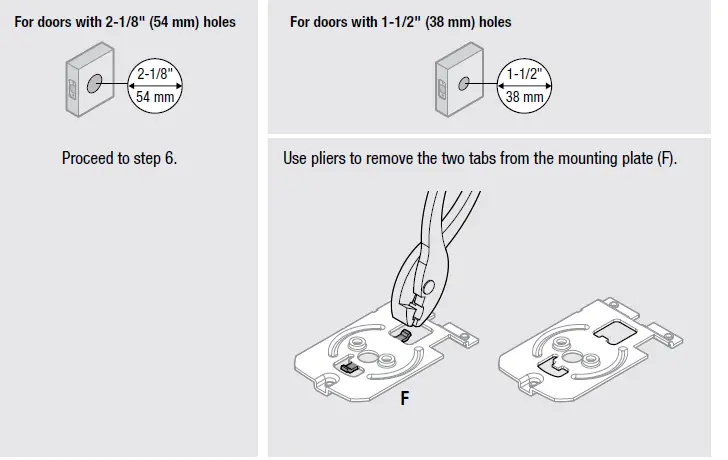
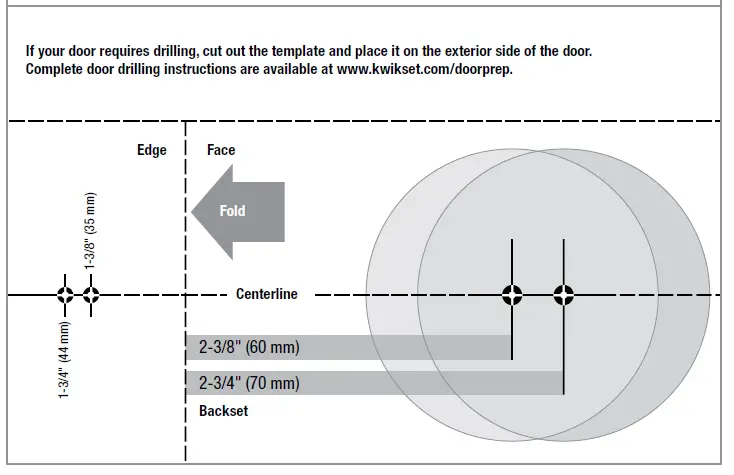
- Check dimensions

- Adjust the backset of latch (if needed)

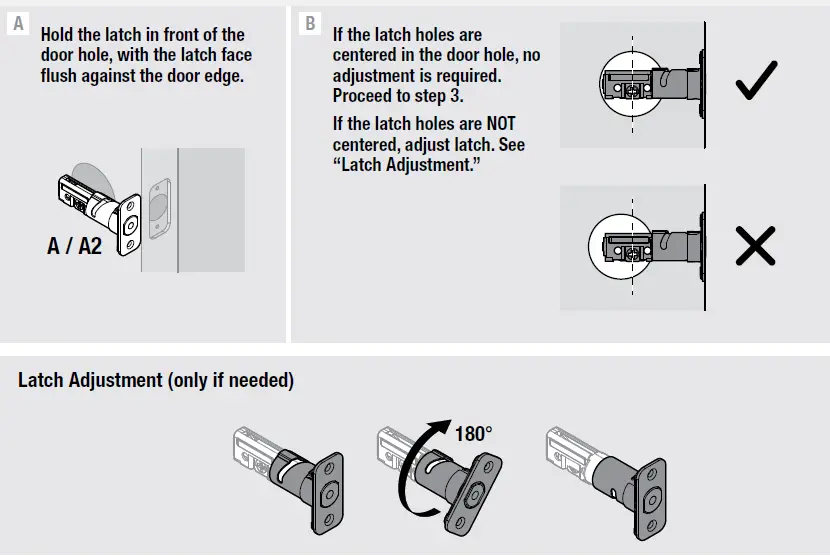
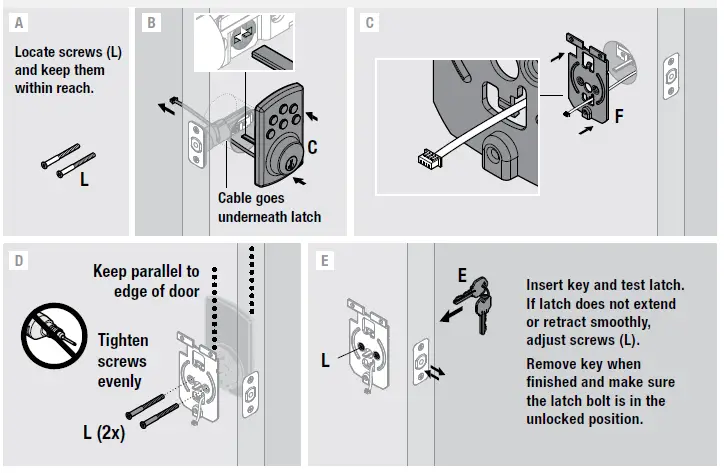
- Install latch

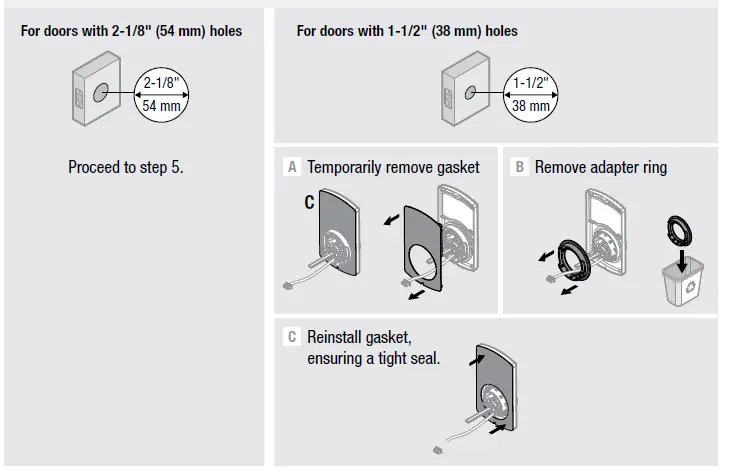
- Prepare exterior keypad (if needed)

- Prepare mounting plate (if needed)

- Install keypad and mounting plate

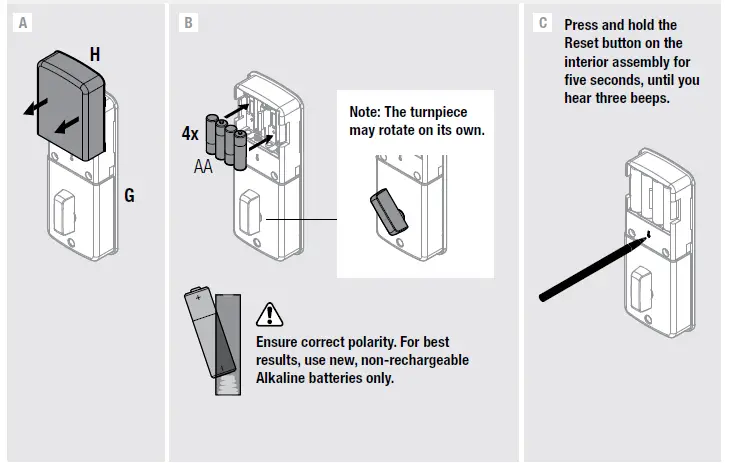
- Load batteries and reset the lock

- Install interior assembly

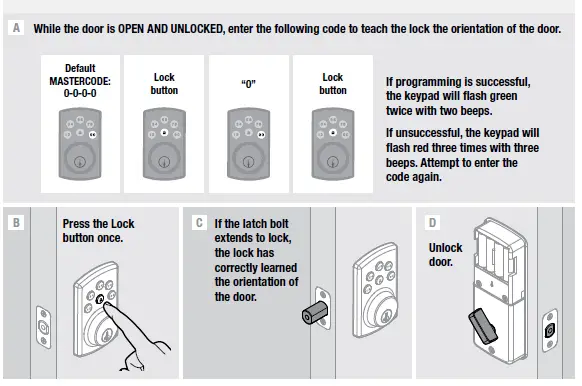
- IMPORTANT: Enter door handing code and test lock

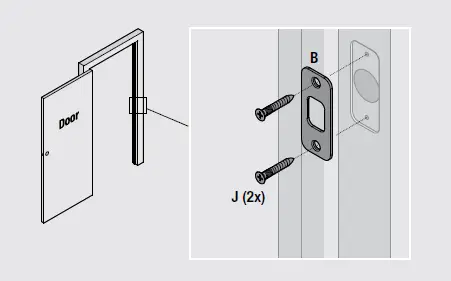
- Install strike

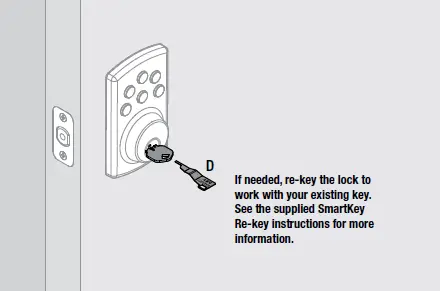
- Re-key the lock

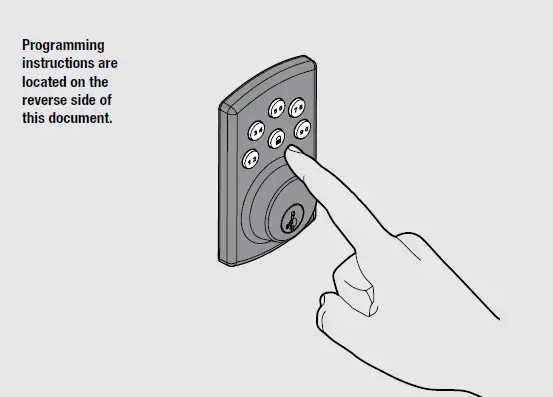
- Program the lock


Template 
- Pre-Set Codes
CAUTION: This lock contains a pre-set mastercode (0-0-0-0) and user code (1-2-3-4). Immediately change these to codes of your own.
To change the mastercode, follow the steps in “Changing the Mastercode” (Section D-b below).
To change the user code, first delete it by following the steps in
“Deleting a Single User Code”. Then, add a new code by following the steps in “Adding User Codes”.
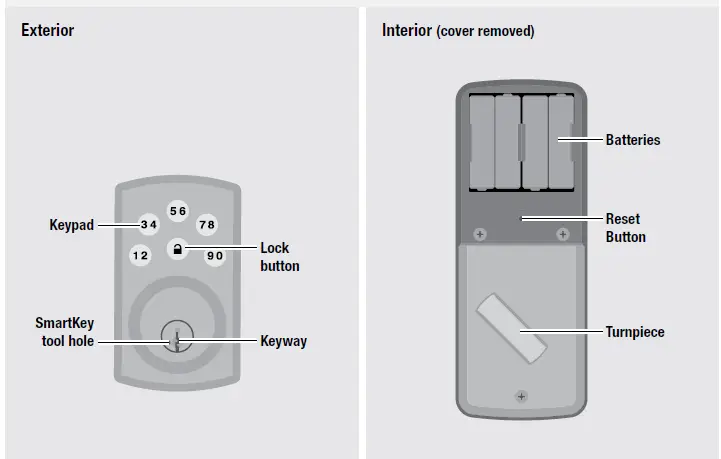
IMPORTANT: Please make sure that the door handing code was entered during installation. See step 9 on the reverse side of this document. - PowerBolt at a Glance

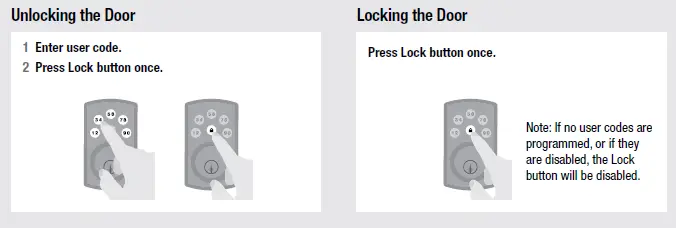
- Normal Operation

Incorrect Codes
- Programming Codes
- Programming Information
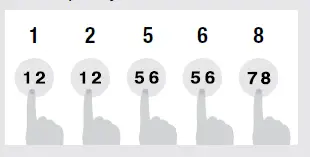
How the Keypad Works
Each button represents two numbers (i.e. 1 and 2 for the first button). You only need to push the button once to get either 1 or 2.
For example: If your code is 1-2-5-6-8,
Programming Behavior
Programming Mode Timeout
The keypad will flash amber slowly while the lock is in programming mode. If no button is pressed for 10 seconds, the system will time out and you will need to restart the procedure.
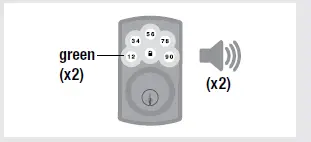
Successful Programming
The keypad will flash green twice, and you will hear two beeps*.
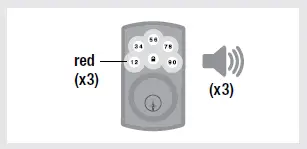
Unsuccessful Programming
The keypad will flash red three times, and you will hear three beeps*.
*Beeping sound will not be heard when the lock is muted. - Changing the Master code
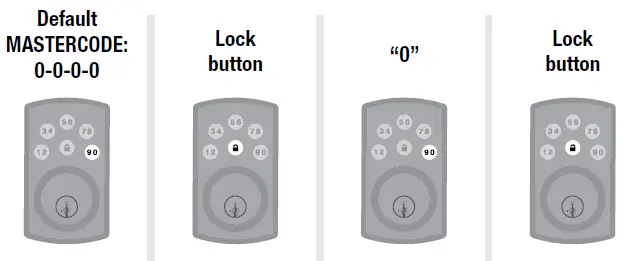
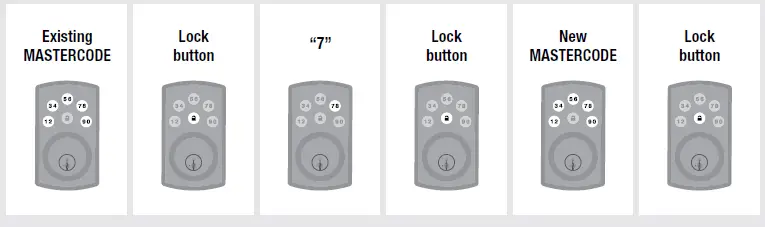
The master code is required to put the lock in programming mode, but it is not used to unlock the door. The lock is programmed with the default master code 0-0-0-0. Replace this with a code of your own. The master code must be 4-10 digits.- Keep door open and unlocked during programming.

IF UNSUCCESSFUL
Make sure to enter a valid existing master code.
Make sure the new master code is between 4 and 10 digits during your next attempt.
- Keep door open and unlocked during programming.
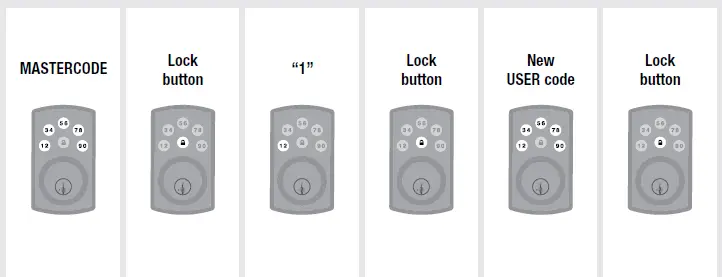
- Adding User Codes
Each user code must be a unique code between 4 and 10 digits. A total of 6 user codes may be programmed. Note: It is not recommended to program a user code that is the same as the master code.
Keep door open and unlocked during programming.
IF UNSUCCESSFUL
Make sure to enter a valid mastercode.
Make sure the user code is not a duplicate and that it is between 4 and 10 digits.
Make sure the lock has room for an additional code. If all user code positions are filled, delete a code to make room for the new one.
TEST CODE While the door is open and locked, test the user code to make sure it unlocks the door.
- Programming Information
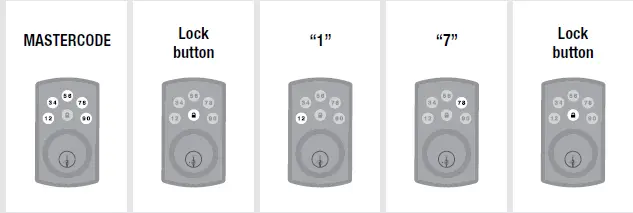
- Disabling/Enabling User Codes
Perform this procedure once to disable all user codes, and repeat the procedure to re-enable user codes. The lock button and auto-lock function will be disabled until user codes are re-enabled, and the lock can only be operated by the key and turnpiece.
Keep door open and unlocked during programming.
IF UNSUCCESSFUL
Make sure to enter a valid mastercode.
TEST While the door is open and unlocked, press the Lock button. If the latch bolt extends to lock, the user codes are enabled. If the latch bolt does not extend to lock, the user codes are disabled.
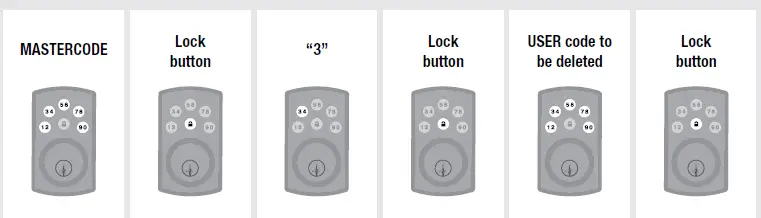
Deleting a Single User Code
The lock is programmed with the default user code 1-2-3-4. Delete this code. Add new codes of your own in section d.
Keep door open and unlocked during programming.
IF UNSUCCESSFUL
Make sure to enter a valid mastercode and existing user code.
TEST CODE While the door is open and locked, test the user code to make sure it no longer unlocks the door.
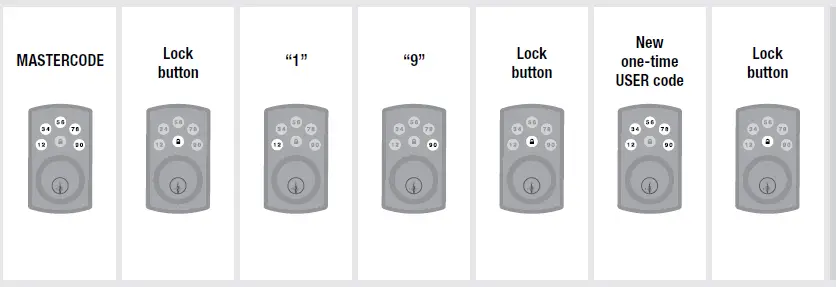
Adding a One-Time User Code
A one-time user code may be used only once and will be deleted from the lock immediately after use. The one-time user code should not be the same as an existing user code. Keep door open and unlocked during programming.
IF UNSUCCESSFUL
Make sure to enter a valid mastercode.
Make sure the one-time user code is between 4 and 10 digits.
Deleting All User Codes
The lock button and auto-lock function will be disabled until a new code is added, and the lock can only be operated by the key and turnpiece.
Keep door open and unlocked during programming.
- Auto-Lock and Mute Settings
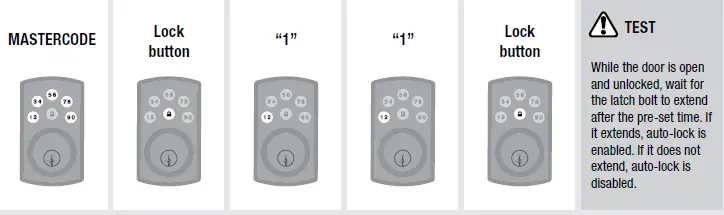
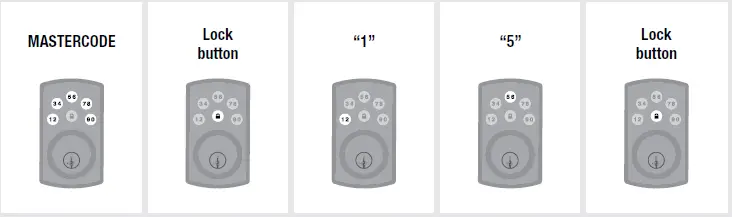
Enabling/Disabling Auto-Lock
This feature is not enabled by default. When enabled, the door will automatically lock after 30 seconds. This time can be adjusted in section b. After auto-lock is enabled, repeat this procedure to disable it as needed.
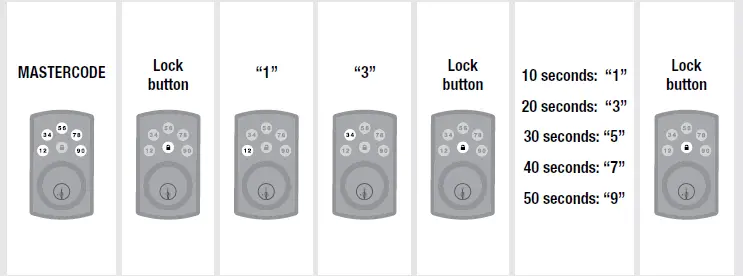
Setting Auto-Lock Time Delay
Perform this procedure to change the pre-set 30-second time delay of the auto-lock feature.
Keep door open and unlocked during programming.
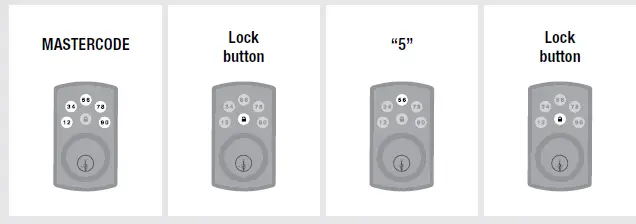
Mute
Perform this procedure to mute the beeping sound heard during programming and normal operation. Repeat the procedure to unmute the beeping sound.
CAUTION: Low battery indicators and system alerts will not be heard while the system is muted.
Keep door open and unlocked during programming.

Regulatory Compliance
This product complies with standards established by the following regulatory bodies:
- Federal Communications Commission (FCC)
- Industry Canada
FCC
This device complies with Part 15 of the FCC Rules. Operation is subject to the following two conditions:
- this device may not cause harmful interference, and
- this device must accept any interference received, including interference that may cause undesired operation.
This equipment has been tested and found to comply with the limits for a Class B digital device, pursuant to Part 15 of the FCC Rules. These limits are designed to provide reasonable protection against harmful interference in a residential installation. This equipment generates, uses, and can radiate radio frequency energy and, if not installed and used in accordance with the instructions, may cause harmful interference to radio communications. However, there is no guarantee that interference will not occur in a particular installation. If this equipment does cause harmful interference to radio or television reception, which can be determined by turning the equipment off and on, the user is encouraged to try to correct the interference by one or more of the following measures:
- Reorient or relocate the receiving antenna.
- Increase the separation between the equipment and receiver.
- Connect the equipment into an outlet on a circuit different from that to which the receiver is connected.
- Consult the dealer or an experienced radio/TV technician for help.
IMPORTANT! Changes or modifications not expressly approved by the manufacturer could void the userâauthority to operate the equipment.
Industry Canada
This device complies with Industry Canada licence-exempt RSS standard(s). Operation is subject to the following two conditions: ( 1 ) this device may not cause interference, and ( 2 ) this device must accept any interference, including interference that may cause undesired operation of the device.
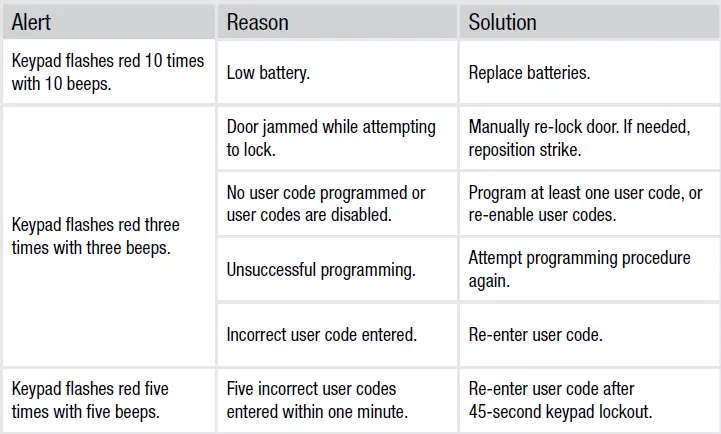
System Alerts
Troubleshooting
- The lock cannot be locked or unlocked by the keypad.
Make sure the lock is programmed with at least one code and that the user codes are not disabled. If needed, perform a factory reset and enter the door handing code (see “Factory Reset”). - The keypad doesn’t respond when touched (no lights are visible and no beeping is heard).
Make sure the cables are properly connected and make sure the batteries are new and installed correctly. - After the lock has been working normally, the latch bolt locks up and the turn piece will not rotate.
Re-enter the door handing code, using your master code. See “Factory Reset,” steps 2 and 3. - The door can be locked with the Lock button, but the user code will not unlock the door.
Make sure the user code is correct and that the Lock button is pushed after entering the user code. If the door still won’t unlock, use a key to unlock the door. Call technical support for further troubleshooting. - When the door is closed and the Lock button is pressed to lock the door, the lock emits a system alert. When the door is open and the Lock button is pressed to lock the door, there is no system alert.
Make sure that the hole in the door frame behind the strike is drilled at least 1″ (25 mm) deep. Also make sure the strike plate is aligned with the latch bolt. If needed, reposition the strike.
Factory Reset
A factory reset will delete all codes associated with the lock, and the default mastercode (0-0-0-0) and user code (1-2-3-4) will be restored.
CAUTION: Replace the pre-set codes with codes of your own.
Note: Auto-lock will be disabled after a factory reset.
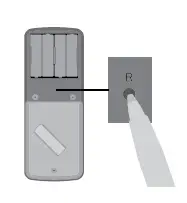
- Make sure the door is open and unlocked. Press and hold the Reset button on the interior assembly for five seconds, until you hear three beeps and see the keypad flash amber three times.

Note: If the lock is muted, beeps will not be heard. - Enter the door handing code:

- Press the Lock button once. Make sure the latch bolt extends to lock.