![]() DM-X6 Mini DMX PAR Controller
DM-X6 Mini DMX PAR Controller
User Manual
Introduction
Thank you for choosing the DM-X6 mini DMX PAR controller as part of your lighting control system.
This unit is designed to control DMX PAR fixtures with 3, 4, 5 or 6-colour (RGB+W+A+V) mixing.
Please read these instructions to gain the best results from this item and avoid damage through misuse.
Unpacking
Your DM-X6 should reach you in good condition and should be supplied with an appropriate mains adaptor.
If there are any signs of damage or items missing from the packaging, contact your dealer immediately.
Warning
To prevent the risk of fire or electric shock, do not expose any components to rain or moisture.
Avoid any impact or extreme pressure to the housing or control surface.
No user-serviceable parts inside – do not open the case. Refer all servicing to qualified service personnel.
Placement
The DM-X6 may be free-standing on a stable surface or wall-mounted by either hanging on screws with the rear punch-holes or flush-mounting with the 4 front mounting holes.
Safety
- Check for correct mains voltage before connecting the D.C. adaptor
- Ensure DMX leads are good condition with no short connections or damaged plugs
Cleaning
- Use a soft dry or slightly damp cloth to clean the casing. Do not use strong solvents
- Periodically clear any debris from fader slots with a soft brush
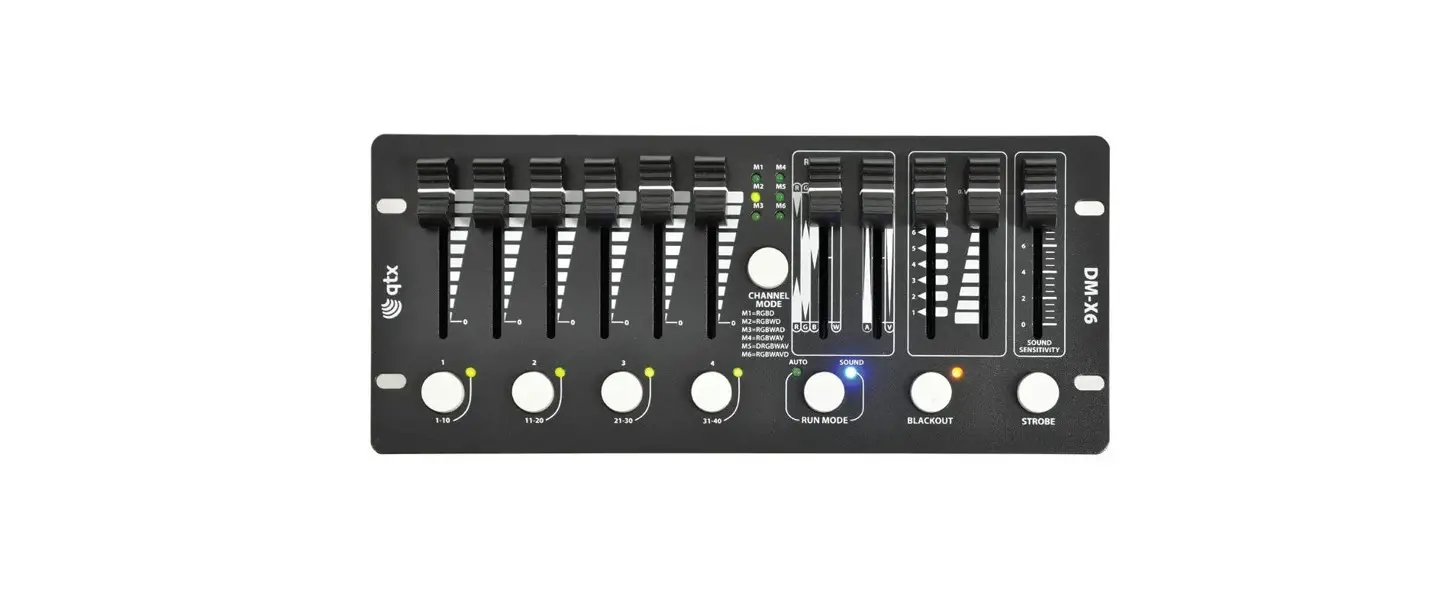
Panel Layouts
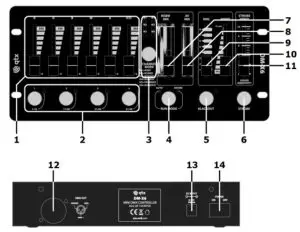
| 1. RGBWAV/D channel faders 2. DMX Group buttons 3. Channel Mode button & indicators 4. Run Mode Select (Auto or Sound) 5. Blackout 6. Strobe 7. RGBW Colour Mix | 8. Amber/Violet Mix 9. MAC Auto Programs 10. Speed control 11. Strobe Speed/Sound Sensitivity control 12. DMX out XLR 13. D.C. input jack 14. Power switch |
Setting up
Connect all PAR lights to be controlled in a chain from DMX outputs to DMX using a good quality DMX leads (XLRF-XLRM) and connect the DMX OUT connector (12) on the DM-X4 to the DMX input of the first PAR light in the chain. Various DMX PAR lights may have different channel allocations and the DM-X4 can be set to one of 6 modes to control these. The chart below shows the 6 modes with channel fader allocations.
| Mode | Fl | F2 | F3 | F4 | F5 | F6 | For cans with DMX allocation |
| RGBD | Red | Green | Blue | Master | RGB cans + CH4 Master Dim | ||
| RGBWD | Red | Green | Blue | White | Master | RGBW cans + CH5 Master Dim | |
| RGBWAD | Red | Green | Blue | White | Amber | Master | RGBWA cans + CH6 Master Dim |
| RGBWAV | Red | Green | Blue | Master | Amber | Violet | RGBWAV cans |
| DRGBWAV | Green | Blue | White | Amber | Violet | Red+M | RGBWAV cans CH1 UV/Master Dim |
| RGBWAVD | Red | Green | Blue | White | Amber | UV | RGBWAV cans with Master on CH7 |
Note: RGBWAVD mode transmits 100% on CH7 to hold master dimming open.
Select the correct mode to match the type of PAR cans to be controlled. The above table gives examples of fader 1-6 allocations and it is important to try each model to see which delivers the correct behavior from the lights that the DM-X6 is controlling. Remember that there may be a choice of DMX modes on each type of PAR can and it is best to set all cans to a similar DMX mode. Selecting a mode that does not match the DMX allocation of the fixture(s) may give unexpected and confusing results or may not work at all.
In addition, the DM-X6 can control 4 groups of lighting fixtures separately via the four Group buttons (2).
Each group of PAR lights should be set with the relevant start address as shown below.
| Group | DMX start address |
| 1 | 1 |
| 2 | 11 |
| 3 | 21 |
| 4 | 31 |
Pressing the “1-10” Group button, engages Group 1
Pressing the “11-20” Group button, engages Group 2
Pressing the “21-30” Group button, engages Group 3
Pressing the “31-40” Group button, engages Group 4
Multiple groups can be selected together to control simultaneously
Groups that are selected are indicated by a blue flashing LED and any controls from the DM-X6 will affect the group(s) selected. When a particular group is switched out, any further fader movements will not affect that group. This feature makes a multi-zone light show possible with selected groups operating from auto programs or sound-activated (see below) and others with manual control or static colour.
Operation
Connect the supplied mains adaptor to the DC input of the DM-X6 (13) and switch the power on (14) For the selected group(s), moving the channel faders controls the amount of red, green, blue, white, amber, and ultra-violet light output of DMX PAR fixtures.
In addition to the 4 channel faders, the DM-X6 has a MIX fader (7) which allows fast access to RGBW color mixes in a single movement. For warm colors and UV content, an additional AV MIX slider (8) controls the amount of amber and violet components in the output.
For strobe effects, pressing the Strobe button (6) will perform a white flashing sequence with a rate of between 1Hz and 20Hz governed by the Strobe Speed/Sound Sensitivity slider (11). Moving the slider to zero produces no strobe output. Releasing the Strobe button will return the lights back to their previous state.
Color-changing sequences are available by selecting “AUTO” on the Run Mode button (4) and moving the MAC slider (9) to one of the 8 internal programs (MAC1 – MAC8 shown below). The speed of the selected program is governed by the Speed Control slider (10) with step intervals from 0.1sec to 30sec.
| MAC 1 | Red / Green / Blue scroll |
| MAC 2 | Red / Green / Blue sequence |
| MAC 3 | RGBW scroll |
| MAC 4 | RGBW sequence |
| MAC 5 | Red / Green sequence |
| MAC 6 | Red / Blue sequence |
| MAC 7 | Blue / Green sequence |
| MAC 8 | RGBWAV sequence |
Alternatively, selecting “SOUND” on the Run Mode button will engage sound-activated mode, which makes color jumps to a music beat detected by the internal microphone. The sensitivity of the internal microphone is controlled via the Strobe Speed/Sound Sensitivity slider (11).
To switch off all lights, a latching Blackout button (5) sets all DMX channels to zero value, indicated by a flashing LED. Pressing this button
When not in use for long periods, switch off the power and disconnect the adaptor from the mains.
Specifications
| Power supply | 9-12Vdc, 800mA adaptor (supplied) |
| Controls | R, G, B, W, A, V/D, RGBW mix, AV mix, MAC, speed, strobe/sensitivity |
| Mode(s) | RGBD, RGBWD, RGBWAD, RGBWAV, DRGBAV, RGBWAVD |
| Output | DMX (XLRF) |
| Dimensions | 248 x 110 x 58mm |
| Weight | 1.31kg |
Troubleshooting
| No power | Check mains voltage is correct and outlet is switched on |
| Check mains adaptor is OK and connected properly | |
| No DMX control | Check DMX leads are OK and connected correctly |
| Check correct group button is selected (flashing LED) | |
| Check that light fixture is set to the correct DMX start address | |
| DMX control not working as expected | Check that the correct mode is selected for the type of fixture |
| Check that light fixture is set to the correct DMX mode | |
| Check that light fixture is set to the correct DMX start address |
This product is classed as Electrical or Electronic equipment and should not be disposed with other household or commercial waste at the end of its useful life. The goods must be disposed of according to your local council guidelines.
Errors and omissions excepted.
Copyright© 2021 AVSL Group Ltd, Unit 2 Bridgewater Park,
Taylor Road, Trafford Park, Manchester. M41 73Q.
AVSL (Europe) Ltd, Unit 3D North Point House,
North Point Bus. Park, New Mallow Road, Cork, Ireland.


