![]()
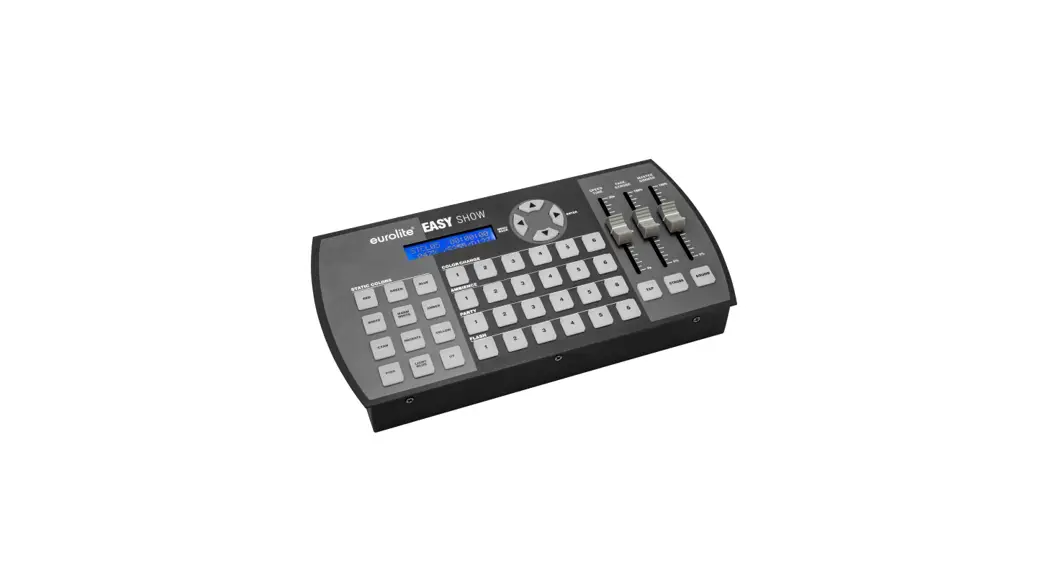
EASY SHOW
DMX Controller
User Manual
EASY Show
Programmed DMX controller for over 120 Eurolite spotlights
![]() No. 70064578
No. 70064578
www.eurolite.de
D00113864, version 1.0, publ. 09/08/2021
For product updates, documentation, software, and support please visit www.eurolite.de. You can find the latest version of this user manual in the product’s download section.
© 2021 Eurolite. All rights reserved.
No part of this document may be reproduced in any form without the written permission of the copyright owner. The contents of this document are subject to revision without notice due to continued progress in methodology, design, and manufacturing. Eurolite shall have no liability for any error or damage of any kind resulting from the use of this document.
All trademarks mentioned herein are the property of their respective owners.
INTRODUCTION
Experience Eurolite. Product videos are suitable accessories, firmware, software updates, documentation and the latest news about the brand. You will find this and much more on our website. You are also welcome to visit our YouTube channel and find us on Facebook.
![]() www.youtube.com/eurolitevideo
www.youtube.com/eurolitevideo![]() www.facebook.com/ Eurolitefans
www.facebook.com/ Eurolitefans
Welcome to Eurolite! Easy Show is a flight controller designed to be as simple as possible, already programmed for a large number of fixtures. You can therefore simply connect your fixtures to the DMX output, set the start addresses, and immediately call up 12 different colors and 24 show programs. If you want to use this basic function, follow the explanations in the main part of this manual.
Easy Show can also be used as a DMX recorder. This allows you to create your own moods and programs with any DMX controller and transfer them to Easy Show. The unit provides a DMX input for this purpose. This function is ideal for experienced lighting technicians who prepare the device for inexperienced users. Read about this in the chapter Advanced functions.
Users of this product are recommended to carefully read all warnings in orderto protect themselves and others from damage. Please keep this manual for future needs and pass it on to further owners.
Product features
- Ideal for colored LED spotlights, KLS systems, moving lights, and lighting effects
- No programming is required, simply connect your spotlights and get started
- All spotlights can be freely combined for a show
- 12 color schemes and 24 chases are directly available
- Controls for overall brightness, running speed, fade time, and strobe effect
- Can also be used as a DMX recorder for your own projects
- Data storage on USB flash drives
- QuickDMX connector for wireless DMX connection
- Backlit LCD display
- Compact desktop console
- Includes USB flash drive, USB plug-in power adapter and mounting brackets

Package contents
- EASY Show
- Power adapter
- Mounting brackets
- Mini USB flash drive
- These instructions
IMPORTANT SAFETY INSTRUCTIONS
![]() CAUTION!
CAUTION!
Operating conditions
This device has been designed for indoor use only. Keep this device away from rain and moisture.
![]() DANGER!
DANGER!
Electric shock is caused by short-circuiting I am careful with your operations. With a dangerous voltage, you can suffer a dangerous electric shock when touching the wires!
- Please read these operating instructions carefully efore using the product. They contain important information for the correct use of your product. Please keep them for future reference.
- Only use the product according to the instructions given herein. Damages due to failure to follow these operating instructions will void the warranty! We do not assume any liability for any resulting damage.
- We do not assume any liability for material and personal damage caused by improper use or non-compliance with the safety instructions. In such cases, the warranty/guarantee will be null and void.
- Unauthorized rebuilds or modifications of the product are not permitted for reasons of safety and render the warranty invalid.
- Never open any part of the product to prevent a possible electric shock.
- IMPORTANT: This product is not an outdoor product! Only for indoor use! Do not use this device near water. The recommended temperature range is -5 to +45 °C.
- To clean the unit, disconnect it from the power source.
- Only use a soft cloth, never use any solvent.
- Do not touch the power cord and connectors with wet hands as it may cause electric shock.
- This product is not a toy. Keep it out of the reach of children and pets. Do not leave packaging material lying around carelessly.
- This unit corresponds to all required directives of the EU and is therefore marked with.
Intended use
EASY Show serves for easy and convenient operation of KLS systems, moving lights, lighting effects, and LED spotlights.
 When to be definitively put out of the operation, take the product to a local recycling plant for disposal that is not harmful to the environment. Devices marked with this symbol must not be disposed of as household waste. Contact your retailer or local authorities for more information. Remove any inserted batteries and dispose of them separately from the product.
 You as the end-user are required by law (Battery Ordinance) to return all used batteries/rechargeable batteries. Disposing of them in household waste is prohibited. You may return your used batteries free of charge to collection points in your municipality and anywhere where batteries/rechargeable batteries are sold. By disposing of used devices and batteries correctly, you contribute to the protection of the environment.
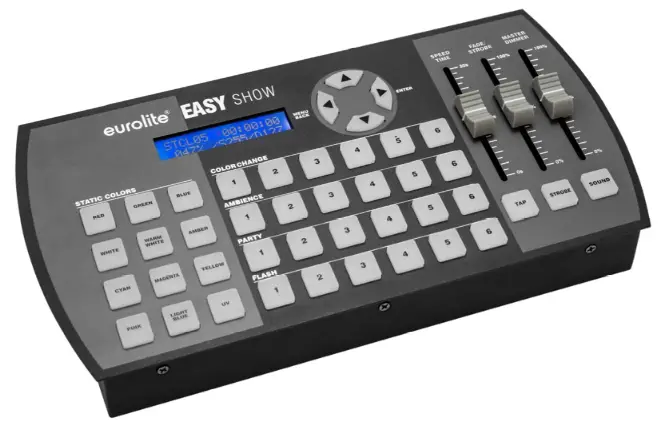
OPERATING ELEMENTS AND CONNECTIONS
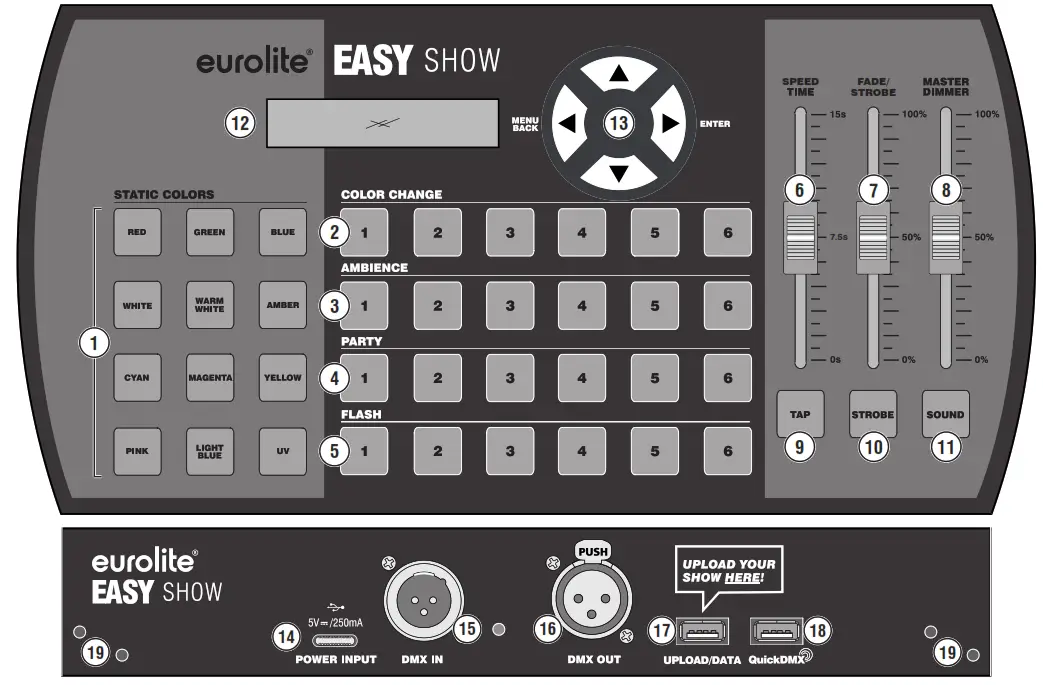
| No. | Element | Function |
| 1 | STATIC COLORS buttons | For selecting 12 static colors |
| 2 | COLOR CHANGE buttons | For selecting multi-color chaser programs |
| 3 | AMBIENCE buttons | For selecting two-color chaser programs |
| 4 | PARTY buttons | For selecting two-color chaser programs with alternating fixtures |
| 5 | FLASH buttons | For selecting fast flashing chaser programs |
| 6 | SPEED TIME fader | To adjust the running speed of the programs |
| 7 | FADE/STROBE fader | To adjust the fade time or the flash rate when the strobe effect is activated |
| 8 | MASTER DIMMER fader | To adjust the overall brightness |
| 9 | TAP button | Press twice to set the running speed of the programs |
| 10 | STROBE button | To activate the strobe effect |
| 11 | SOUND button | To activate sound control |
| 12 | Display | Shows the current setting and other important functions |
| 13 | Menu buttons | For settings in the system menu |
| 14 | Power input | Connect the power adapter provided here |
| 15 | DMX input with signal LED | Use this input for DMX recordings |
| 16 | DMX output | Connect the DMX chain here |
| 17 | UPLOAD/DATA connector | Plug in a USB flash drive here for storing and importing data |
| 18 | QuickDMX connector | Plug in a QuickDMX receiver here for a wireless DMX connection |
| 19 | Mounting points | For mounting the brackets provided |
GETTING STARTED
Step 1: Connect the USB flash drive
Easy Show is the easiest way imaginable to control your spotlights. In order for the device to work, first, plug the supplied USB flash drive into the UPLOAD/DATA USB port. All programs and settings are stored on the flash drive.
Note
We strongly recommend that you make a backup copy of the flash drive. If the drive is lost or files are accidentally deleted, you can continue working with the backup copy as usual.
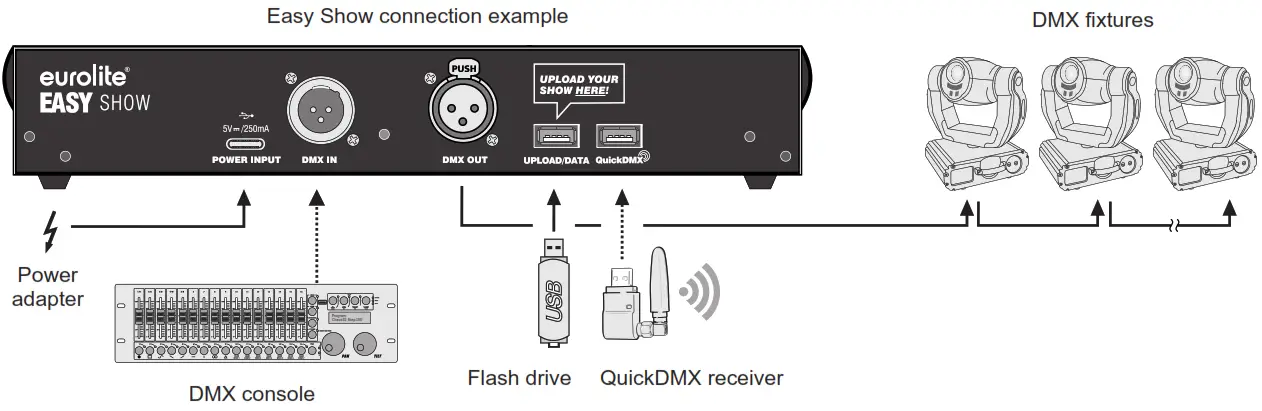
Step 2: Connect to the power supply
Connect the power adapter provided to the POWER INPUT jack and plug it into a power outlet. After use, disconnect the power plug again to avoid unnecessary power consumption.
Step 3: Connect your spotlights
Connect the DMX OUT socket to the DMX input of the first fixture using a 3-pin DMX cable. Then connect the DMX output of the first fixture in the chain to the DMX input of the next fixture. Always connect one output to the input of the next fixture until all fixtures are connected. For the last fixture, it is often recommended that a terminator be used. In most cases, this is not necessary. Only if you notice a random flickering or twitching in your fixtures, this can be a problem solver.
Step 4: Using a QuickDMX wireless receiver
Easy Show features a second USB port marked with QuickDMX. Here you can plug in an optional wireless transmitter or receiver for the QuickDMX system from Eurolite. You can use this connector for wireless transmission of DMX control signals to fixtures with a QuickDMX receiver. The receiver is already integrated into some fixtures, for other fixtures it can be retrofitted. For information on how to set up the transmitters and receivers, please refer to their instructions.
Step 5: DMX addressing
Finally, set the corresponding start address and, if necessary, the DMX mode for the spotlights. Which start address and which mode are required, will be explained in the next chapter.
DMX ADDRESSING
KLS systems
Address KLS systems according to the following table. To control several systems synchronously, they must be assigned the same start address and the same model.
| Fixture | Item no. | Mode | Start address |
| KLS 200 | 42109700 | 1 | |
| KLS 400 | 42109780 | 1 | |
| KLS 401 | 42109781 | 1 | |
| KLS 800 | 42109850 | 1 | |
| KLS 801 | 42109851 | 1 | |
| KLS 1001 | 42109875 | 1 | |
| KLS 30 | 42109603 | 16 channels | 16 |
| KLS 902 Next | 42109860 | 16 channels | 16 |
| KLS 120 | 42109606 | 16 channels | 16 |
| KLS 2001 | 42109890 | 23 channels | 33 |
| KLS 2500 | 42109892 | 23 channels | 33 |
| KLS 3002 Next | 42109895 | 24 channels | 56 |
| KLS PARty | 42110197 | 20 channels | 80 |
| KLS 170 | 42109620 | 16 channels | 100 |
| KLS 180 | 42109630 | 2lchannels | 116 |
| KLS 190 | 42109608 | 13 channels | 137 |
| KLS Laser Bar | 51741090 | 27 channels | 150 |
| KLS Laser Bar Pro | 51741091 | 28 channels | 150 |
RGB spotlights (3in1)
Basically, all RGB spotlights with 3 control channels can be used (channel 1: red, channel 2: green, channel 3:blue). There are 4 start addresses provided for these fixtures. If you operate a single spotlight, use the first start address, i.e. 4. If you operate two spotlights, use the first two start addresses, and so on. If you operate more than four spotlights, start again from the beginning with the fifth device, i.e. with 4.
| Type | Mode | Start address |
| RGB spotlight | 3 channels | 4 7 10 13 |
Compatible Eurolite RGB fixtures include:
| Fixture | Item no. | Fixture | Item no. |
| SLS 6 TCL | 51915361 | ML-56 COB RGB 100W bI | 41607301 |
| CBB 2 COB RGB | 51930274 | ML-56 COB RGB 100w sil | 41607321 |
| Par-30 COB RGB bl | 41607200 | Pro Slim Par-6 COB RGB | 51842564 |
| Par-30 COB RGB sil | 41607225 | IP Pad COB RGB 25W | 51914155 |
| Par 56 COB RGB 25W bl | 41607215 | Par-56 COB RGB 60W bI | 41607210 |
| Par 56 COB RGB 25W sil | 41607240 | Par-56 COB RGB 60W sil | 41607235 |
| CBB-4 RGB | 51930278 | CBB-6 RGB | 51930279 |
| IP-T1000 TCL | 51914123 | IP Pad COB RGB 60W | 51914165 |
| PML-80 COB RGB | 41602595 | PMB 8 COB RGB 30W | 51930286 |
| Pro Slim Par-12 MK2 | 51842562 | IP Pad COB RGB 180W | 51914167 |
| IP Par 12x3W TCL | 51914175 | SLS-180 RGB 18x1W | 51915375 |
| Par 56 COB RGB 100W bl | 41607220 | Par-65 RGB 10mm Short | 51913582 |
| Par 56 COB RGB 100W sil | 41607245 |
RGBW spotlights (4in1)
Basically, all RGBW spotlights with 4 control channels can be used (channel 1: red, channel 2: green, channel 3: blue, channel 4: white). There are 4 start addresses provided for these fixtures. If you operate a single spotlight, use the first start address, i.e. 16. If you operate two spotlights, use the first two start addresses and so on. If you operate more than four spotlights, start again from the beginning with the fifth device, i.e. with 16.
| Type | Mode | Start address |
| RGBW spotlight | 4 channels | 16 20 24 28 |
Compatible Eurolite RGBW fixtures include:
| Fixture | Item no. | Fixture | Item no. |
| Par-56 QCL Short sil | 51913592 | IP Pad 4x8W QCL | 51914156 |
| Par-56 QCL Short bl | 51913593 | IP Par 14x8W QCL | 51914178 |
| Bar-12 QCL RGBW | 51930398 | CLS-9 QCL RGBW 9x8W | 51913888 |
| LED 4c-7 Silent Slim Spot | 51915315 | Par 64 COB RGBW 120W | 41603605 |
| Par-64 QCL 12x8W Flo bl | 51914030 | CLS-18 QCL RGBW 18x8W | 51913889 |
| Par-64 QCL 12x8W Flo sil | 51914031 | Stage Pixel Bar 5 | 51841359 |
| 4c-12 Silent Slim Spot | 51915316 | IP Tourlight 120 QCL | 51914250 |
| Akku Flat Light 1 sil | 41700001 | THA-120 PC | 41602130 |
| Akku Flat Light 1 bl | 41700011 | IP Pad 24x8W QCL | 51914160 |
| Akku Flat Light 3 sit | 41700015 | Multiflood Pro IP RGBW | 51914136 |
| Akku Flat Light 3 bl | 41700016 | SLS-144 RGBW Floor | 51915280 |
| Pix-12 QCL | 51930426 | Akku IP Flat Light 1 cr | 41700050 |
RGB+UV spotlights (4in1)
Basically, all RGB+UV spotlights with 4 control channels can be used (channel 1: red, channel 2: green, channel 3: blue, channel 4: UV). There are 2 start addresses provided for these fixtures. Use 486 for the first fixture and 490 for the second. If you operate more than two spotlights, use the two start addresses alternately.
| Type | Mode | Start address |
| RGB+UVspotlight | 4 channels | 486 490 |
Compatible Eurolite RGB+UV fixtures include:
| Fixture | Item no. | FixtureItem no. | Item no. |
| SLS 603 TCL6UV | 51915358 | TL-4 QCL RGB&UV | 51915448 |
| TL-3 RGB&UV Trusslight | 51915445 | Bar-12 QCL RGB&UV | 51930393 |
| LED Bar-6 QCL RGB&UV | 51930394 |
RGBAW spotlights (5in1)
Basically, all RGBAW spotlights with 5 control channels can be used (channel 1: red, channel 2: green, channel 3: blue, channel 4: amber, channel 5: white). There are 4 start addresses provided for these fixtures. If you operate a single spotlight, use the first start address, i.e. 36. If you operate two spotlights, use the first two start addresses and so on. If you operate more than four spotlights, start again from the beginning with the fifth device, i.e. with 36.
| Type | Mode | Start address |
| RGBAW spotlight | 5 channels | 36 41 46 51 |
Compatible Eurolite RGBAW fixtures include:
| Fixture | Item no. |
| ML-56 COB RGBAW 100W | 41607331 |
| ML-56 COB RGBAW 100W | 41607310 |
RGBWA+UV spotlights (6in1)
Basically, all RGBWA+UV spotlights with 6 control channels can be used (channel 1: red, channel 2: green, channel 3: blue, channel 4: white, channel 5: amber, channel 6: UV). There are 4 start addresses provided for these fixtures. If you operate a single spotlight, use the first start address, i.e. 56. If you operate two spotlights, use the first two start addresses and so on. If you operate more than four spotlights, start again from the beginning with the fifth device, i.e. with 56.
| Type | Mode | Start address |
| RGBWA+UV spotlight | 6 channels | 56 62 68 74 |
Compatible Eurolite RGBWA+UV fixtures include:
| Fixture | Item no. | Fixture | Item no. |
| LED Bar-3 HCL | 51930395 | ML-56 HCL 12x1OW Floor | 51913678 |
| SLS-7 HCL Floor | 51915379 | PIX-12 HCL | 51930406 |
| Par-56 HCL Short sil | 51913590 | Stage Panel 16 HCL LED | 51913891 |
| Par-56 HCL short bl | 51913591 | IP Par 12x12W HCL | 51914187 |
| IP Par 3x12W HCL | 51914188 | IP T-1000 HCL | 51914121 |
| SLS 12-HCL MK2 | 51915381 | IP Pad 9x8w HCL | 51914159 |
| PIX-6 HCL | 51930401 | POS-8 LED HCL | 51841367 |
| Pro Slim Par-12 MK2 HCL | 51842561 | Stage Panel 32 HCL LED | 51913893 |
RGB/CW/WW/A/UV spotlights (7in1)
Basically, all RGB/CW/WW/A/UV spotlights with 7 control channels can be used (channel 1: red, channel 2: green, channel 3: blue, channel 4: cold white, channel 5: warm white, channel 6: amber, channel 7: UV). There are 2 start addresses provided for these fixtures. Use 178 for the first fixture and 185 for the second. If you operate more than two spotlights, use the two start addresses alternately.
| Type | Mode | Start address |
| RGB/CW/WW/A/UV spotlight | 7 channels | 178 185 |
Compatible Eurolite RGB/CW/WW/A/UV fixtures include:
| Fixture | Item no. | Fixture | Item no. |
| LED IP Par 12x9W SCL | 51914233 | LED 7C-7 Silent Slim | 51915320 |
| LED IP Par 7x9W SCL | 51914232 | LED 7C-12 Silent Slim | 51915321 |
| LED IP Par 3x9W SCL | 51914235 |
Lighting effects
Address these Eurolite fixtures according to the following table. To control several systems synchronously, they must have the same start address and the same model.
Compatible Eurolite fixtures include:
| Fixture | Item no. | Mode | Start address |
| LED B 40 HCL | 51918951 | 11 channels | 192 |
| LED B40 Laser | 51741087 | 10 channels | 203 |
| LED B40 Laser white | 51741088 | 10 channels | 203 |
| LED BR 60 | 51918320 | 7 channels | 213 |
| LED D-2000 | 51918317 | 5 channels | 220 |
| LED FE 2500 Hypno | 51741084 | 16 channels | 225 |
| LED FE 1750 | 51741083 | 13 channels | 241 |
| LED Laser Derby | 51741086 | 13 channels | 254 |
| LED WF-30 | 51918545 | 9 channels | 267 |
| LED WF-40 | 51918544 | 9 channels | 276 |
| LED FE-700 | 51918616 | 10 channels | 285 |
| LED Z-1000 | 51918221 | 10 channels | 295 |
| LED Mini D-20 Hybrid | 51918202 | 4 channels | 305 |
| LED Gobo Derby | 51918330 | 8 channels | 309 |
| LED Super Strobe ABL | 52200920 | 22 channels | 464 |
| LED CBT-6 | 51930281 | 21 channels | 433 |
Moving heads
Address these Eurolite fixtures according to the following table. Use the same start address when using multiple devices of the same type.
Tip
The fixtures should be set up with the display facing the direction in which the light is emitted. For a good effect, use an even number of moving heads and an inverted pan, and tilt with every second device. Make this adjustment directly on the fixtures. The fixtures will then work in opposite directions, creating a very nice image.
Compatible Eurolite moving heads include:
| Fixture | Item no. | Mode | Start address |
| TMH 75 Hybrid | 51785982 | 21 channels | 317 |
| TMH 75 Hybrid white | 51786090 | 21 channels | 317 |
| LED TMH 60 | 51785984 | 11 channels | 338 |
| LED TMH 60 MK2 | 51785983 | 11 channels | 338 |
| LED TMH 30 | 51785980 | 11 channels | 338 |
| LED TMH 30 MK2 | 51785981 | 11 channels | 338 |
| LED TMH 17 | 51786065 | 9 channels | 349 |
| LED TMH 13 | 51785972 | 9 channels | 349 |
| LED TMH 46 | 51785892 | 16 channels | 358 |
| LED TMH W36 | 51785880 | 15 channels | 374 |
| LED TMH W63 | 51785880 | 15 channels | 374 |
| LED TMH X4 | 51785915 | 16 channels | 399 |
| LED TMH S30 | 51786070 | 10 channels | 389 |
| LED TMH S90 | 51786075 | 15 channels | 494 |
Scanners
Scanners of the same type also use the same start address. Pan should be inverted at every second device so that the horizontal axis works in the opposite direction or the pan and tilt axis if both axes should run in the opposite direction.
Compatible Eurolite scanners include:
| Fixture | Item no. | Mode | Start address |
| LED TSL 150 | 51786119 | 9 channels | 415 |
| LED TSL 200 | 51786123 | 9 channels | 424 |
OPERATION
Once Easy Show is connected to the power, the flash drive is plugged in and you have wired and addressed the fixtures correctly, you can start controlling your spotlights. After switching on, the display briefly inserts the firmware version and the device starts with the last setting. This chapter explains the basic functions of the device for which you do not need the four menu buttons arranged in a circle. To avoid accidentally changing anything, you should simply not use the buttons.
Color mode
On the left side, you will find the STATIC COLORS buttons. If you press one of these buttons, the connected spotlights light up in the corresponding color. The display shows the color, e.g. “STCL01” for red. If a fixture can not display a color, either a similar color is displayed or, for some lighting effects, the split colors that make up that color are displayed. UV light, the popular black light effect, can only display by fixtures equipped with UV LEDs.
Color change programs
There are a total of 24 buttons in the center, which you can use to call up various automatic running lights. To start a program, press the program buttons. The LED of the button flashes and the display shows the program, e.g. “PART01 ►” for party program 1. Pressing the button again stops the program at the current position and the button lights up permanently.
| Button group | Function |
| COLOR CHANGE | 1-6: multi-color chaser programs using all fixtures |
| AMBIENCE | 1-6: two-color chaser programs using all fixtures |
| PARTY | 1-4: Programs with alternating fixtures, 5-6: programs using all fixtures |
| FLASH | 1-6: fast flashing chaser programs using all fixtures |
Brightness and speed adjustment
Use the 3 faders and function buttons on the right side to set programs and moods. The device saves the settings for SPEED TIME and FADE for each program button, which means that they will be retained the next time you call up the programs, even after switching off. To do this, wait 10 seconds after your setting before turning the power off. Also note that when switching programs, the faders may need to be moved again for them to take effect. The display shows all settings:
PART01 steps:002← Program / ►=play,![]() =stop / step
=stop / step
13.45s F079 D255 ← Speed time / Fade time or flash rate / Brightness
| Control element | Function |
| MASTER DIMMER | Controls the overall brightness with 0-100%. |
| FADE/STROBE | This fader has a double function. The further you pull it up, the further you increase the fade time and thus achieve a fade effect for the color change programs. If the strobe function is activated with the STROBE button below (button is lit), the fader controls the flash rate of the spotlights. Note: Not all spotlights support the fade function. Fading is also not possible with the FLASH 1-6 programs. |
| SPEED TIME | Controls the running speed of the programs, i.e. how long a step is displayed, between 0 and 15 seconds. |
| TAP | This button also defines the running speed of the programs. Simply press the button twice and the device adopts the time between the two actions for lighting control. |
| STROBE | This button activates the strobe function. Then the fader above the button controls the flash rate. |
| SOUND | This button activates the sound control. The color change programs are then synchronized with music impulses picked up via the internal microphone. The microphone sensitivity can be set in the system menu. |
Note
With scanners and moving heads, fast settings are not practical. The movement and the color wheels cannot keep up with high speeds and the light becomes very chaotic.
ADVANCED FUNCTIONS
In this chapter, you will learn how to change important system settings and how to use the device as a DMX recorder.
System settings
Press the MENU/BACK button to enter the system settings. Use the ▼/▲ buttons to navigate and set the options. Press the ENTER button to jump forward one menu level. Press BACK to jump backward and exit the system settings.
| Display | Function |
| New Firmware | This function can be used to upload new firmware versions. The password is 1234. Check the product page on www.eurolite.de for more information about this. |
| Sound Sens | For setting the microphone sensitivity from 0 (low) to 100 (high). |
| DMX Merge | The device can be used as a simple DMX merger. In this menu, you define up to which DMX address it generates the DMX signal itself and from which value it takes over the signal of an external light controller. |
| Channel Config | Here you can set for each of the 512 DMX channels whether it is a dimmer channel or a function channel. Dimmer channels are used for master dimming and fade, function channels always remain at their stored value. First select the DMX channel with ▼/▲, confirm with entering and then set the desired function with ▼/▲. Then jump back to the channel selection by entering or to the main level with BACK. |
| Memory Load | Here you can assign other programs to the memory locations. The function is included for future further developments and is currently not available. |
| Memory Type | DMX recordings can be made step by step or as time recording (REC over time). Here you can define the desired storage type for each memory location. First select the memory location with ▼/▲, confirm with entering and then set the desired memory type with ▼/▲. Then jump back to the memory location selection with entering or to the main level with BACK. |
| Enable Record | This function must be activated so that you can make DMX recordings. For this, select the YES setting with ▼/▲ and jump back to the main level with BACK. After recording programs, you should deactivate the function again so that unwanted recordings do not occur. |
| Factory Reset | This function is used to reset the device to the factory settings. The password for this is 1234. |
Operation as DMX recorder
Easy Show can be used as a DMX recorder to record your own moods and chases from another DMX controller. To do this, connect the controller to the DMX IN input. The DMX output is intended for your spotlights. There are 24 memory locations available via the four button groups 1-6 in the center. The recordings can be done step by step or as time recording. Use the step-by-step storage mode if you need the fade function. The REC over time storage mode, on the other hand, allows you to record complex sequences of a larger DMX console. The stored programs can be called up and controlled as described in the chapter Operation.
Step by step recordings
- Activate the recording function in the Enable Record menu item.
- In the Memory Type menu item, select the step-by-step memory type for the desired memory location.
- Exit the menu with BACK.
- Briefly press the button of the memory location for recording.
- Press the memory location button again for 3 seconds.
The display shows the memory location and steps:000.
CLCG01 steps:000
press 3s to save - Create the first mood on your DMX console and briefly press the memory location button to save the first step. The display now shows steps:001.
- Repeat step 6 to record further steps.
- Finally, press the memory location button for 3 seconds to save the recording.
- Recordings cannot be edited. Pressing a memory location button for a long time deletes the stored programming.
REC over time recordings
- Activate the recording function in the Enable Record menu item.
- In the Memory Type menu item, select the REC over time memory type for the desired memory location.
- Exit the menu with BACK.
- Briefly press the button of the memory location for recording.
- Press the memory location button again for 3 seconds.
The display shows the memory location and the duration of the recording.
CLCG03 00:00:00
press 3s to save - Briefly press the memory location button to start the recording. The display now shows ►.
- Briefly press the memory location key to end the recording. The display now shows
 .
. - Finally, press the memory location key for 3 seconds to save the recording.
- Recordings cannot be edited. Pressing a memory location button for a long time deletes the stored programming.
Note
Recordings are stored on the USB flash drive. You can easily duplicate the flash drive on a computer to create backup copies. This allows you to continue working with the backup copy after a defect or accidental deletion of programs. Rental companies can use this function to store special setups on a different flash drive for their customers.
CLEANING AND MAINTENANCE
The product is maintenance-free, except for occasional cleaning. You can use a lint-free, slightly dampened cloth for cleaning. Refer all servicing to qualified personnel.
TECHNICAL SPECIFICATIONS
| Power supply: | 100-240 V AC, 50/60 Hz via included power adapter (5 V/250 mA) |
| Power consumption: | 1.25 W |
| DMX512 connectors: | 3-pin XLR |
| QuickDMX connection: | USB-A |
| Storage connection: | USB-A |
| Sound-control: | via built-in microphone or RCA input |
| Dimensions (W x D x H): | 280 x 145 x 60 mm |
| Weight: | 1.3 kg |
Specifications are subject to change without notice due to product improvements.
Pin connection:
| DMX-output XLR mounting socket: | DMX-Input XLR mounting plug: | QuickDMX connection |
![]()
Eurolite is a brand of Steinigke Showtechnic GmbH Andreas- ![]()
Bauer-Str. 5 97297
D00113864 Version 1.0 Publ. 09/08/2021


