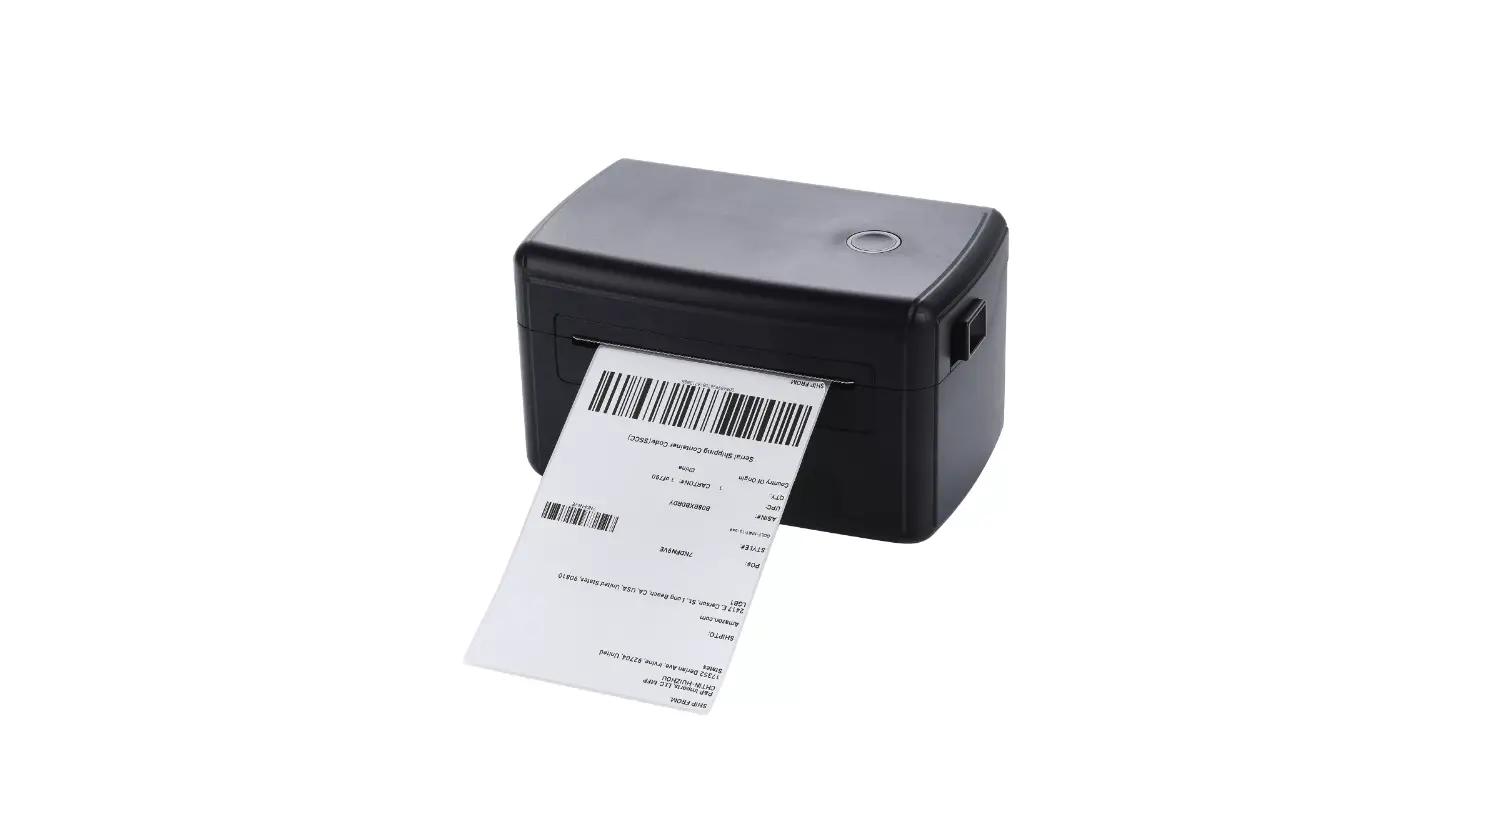
HOP-HQ450 Thermal Barcode Printer
User Manual Rev1.0
The contents of this manual cannot be changed at will without consent. Our company reserves the right to change the product on technology, parts, software and hardware. If users need further information about the product, they can contact the dealer. Without permission, no section of this manual can be copied or transmitted in any form or by any means.
1. Product Introduction
Thank you for your purchasing of the HOP-HQ450 series thermal bar code printer. This printer will provide you with safe, reliable and efficient printing quality. At the same time, this printer is in high qualityand easy to operate, it is your best choice.
1.1 Safety warning
![]() Warning: The print head is a heat-generating part. Do not touch the print head and surrounding parts during and just after printing.
Warning: The print head is a heat-generating part. Do not touch the print head and surrounding parts during and just after printing.
![]() Warning: Do not touch the surface of the printer head and the connecting part to avoid damage to the print head due to static electricity.
Warning: Do not touch the surface of the printer head and the connecting part to avoid damage to the print head due to static electricity.
![]() Warning: Do not touch the tearing blade to avoid injury.
Warning: Do not touch the tearing blade to avoid injury.
![]() Warning: The printer instructions must be strictly followed to configure and use the printer, so as not to harm the human and damage the device.
Warning: The printer instructions must be strictly followed to configure and use the printer, so as not to harm the human and damage the device.
![]() Warning: Before operating and using the printer, please read the following precautions carefully.
Warning: Before operating and using the printer, please read the following precautions carefully.
![]() Warning: This product is only suitable for use in areas altitude below 2000 meters, and is only suitable for use in areas with non-tropical climate conditions.
Warning: This product is only suitable for use in areas altitude below 2000 meters, and is only suitable for use in areas with non-tropical climate conditions.
1.2 Notes
- The printer should be installed in a flat and stable place;
- Leave enough space around the printer for operation and maintenance;
- The printer should be far away from water source and avoid direct sunlight, strong light and heat source;
- Do not use and store the printer in places with high temperature, high humidity and serious pollution;
- Avoid placing the printer where there is vibration and shock;
- Avoid Moist air forming dew on the surface of the printer. If it has formed, do not turn on the power of the printer before the dew disappears;
- Connect the power adapter of the printer to an appropriate grounded socket, avoid using the same socket with a large motor or other equipment that can cause power supply voltage fluctuations;
- If the printer will not be used for a long time, please disconnect the power supply of the printer;
- Avoid water or conductive substances (such as metal) from entering the printer. Once it occurs, turn off the power immediately;
- The printer must not print without paper, otherwise it will seriously damage the printer rubber roller and print head;
- When connecting or disconnecting each interface, you must turn off the power to avoid damage to the printer control circuit;
- When the printing effect meets the usage requirements, it is recommended that the user set the low-level printing density as much as possible to avoid affecting the service life of the print head;
- Users are not allowed to dismantle the printer for maintenance.
2. Overview
2.1 Introduction
This barcode printer can meet the needs of real-time, batch printing labels, and can be widely used in transportation, postal, commercial logistics and other fields. This barcode printer can be connected to related devices through a standard USB interface (Bluetooth/WIFI optional). It is direct thermal method printing. The following type label papers are all supported:Continuous, gap, black mark, fan-fold, punched hole,label paper, tag paper card.
HOP-HQ450 printer is direct thermal printing method. The printing speed can be adjusted to2.0, 3.0, 4.0, 5.0 inches per second. The printer support 1D and 2D barcodes. Support 4 different label printing directions. Through the zoom function, the font can be enlarged 1-10 times. Therefore,you can greatly improve the efficiency of label printing in a short time.
2.2 Main features
- Maximum printing speed 6 inch/sec;
- Support TSPL, ZPL, EPL, DPL multiple command sets;
- Support different sizes of thermal label paper;
- Meet the medium range from 37mm -115mm, easy to operate;
- Automatic paper detection and positioning function;
- Temperature self-adaption control;
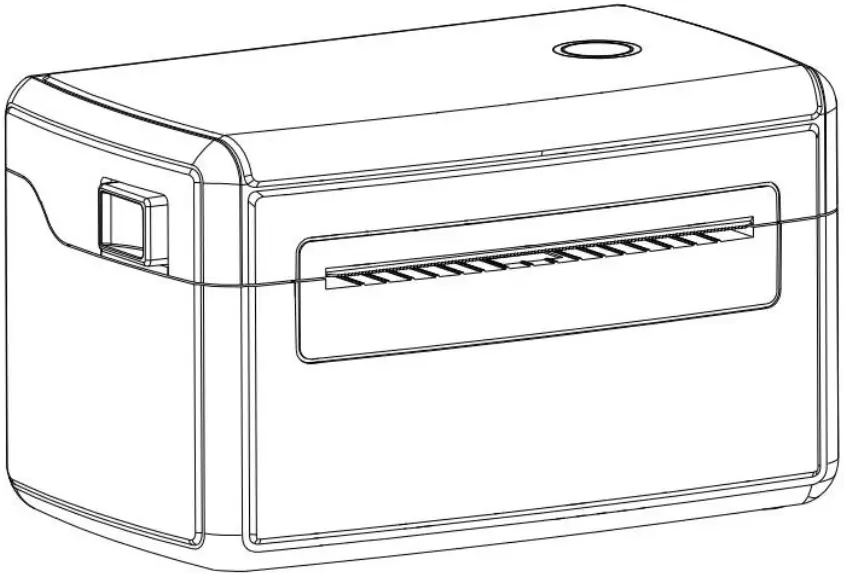
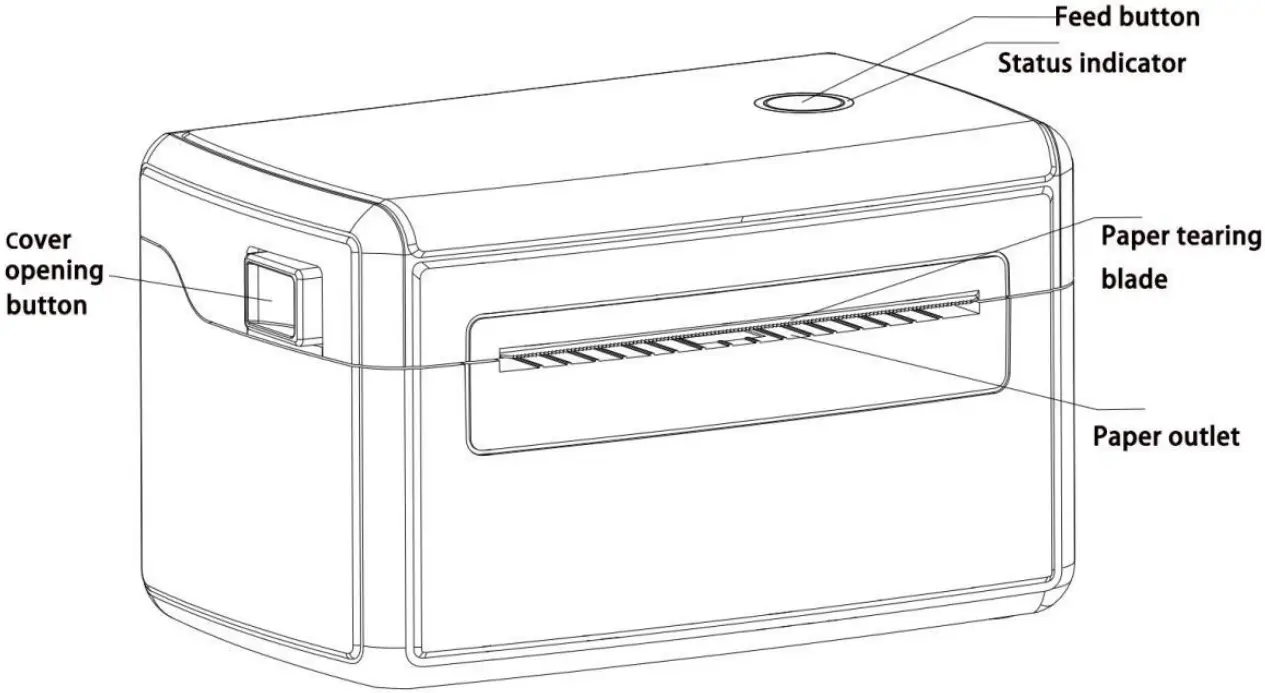
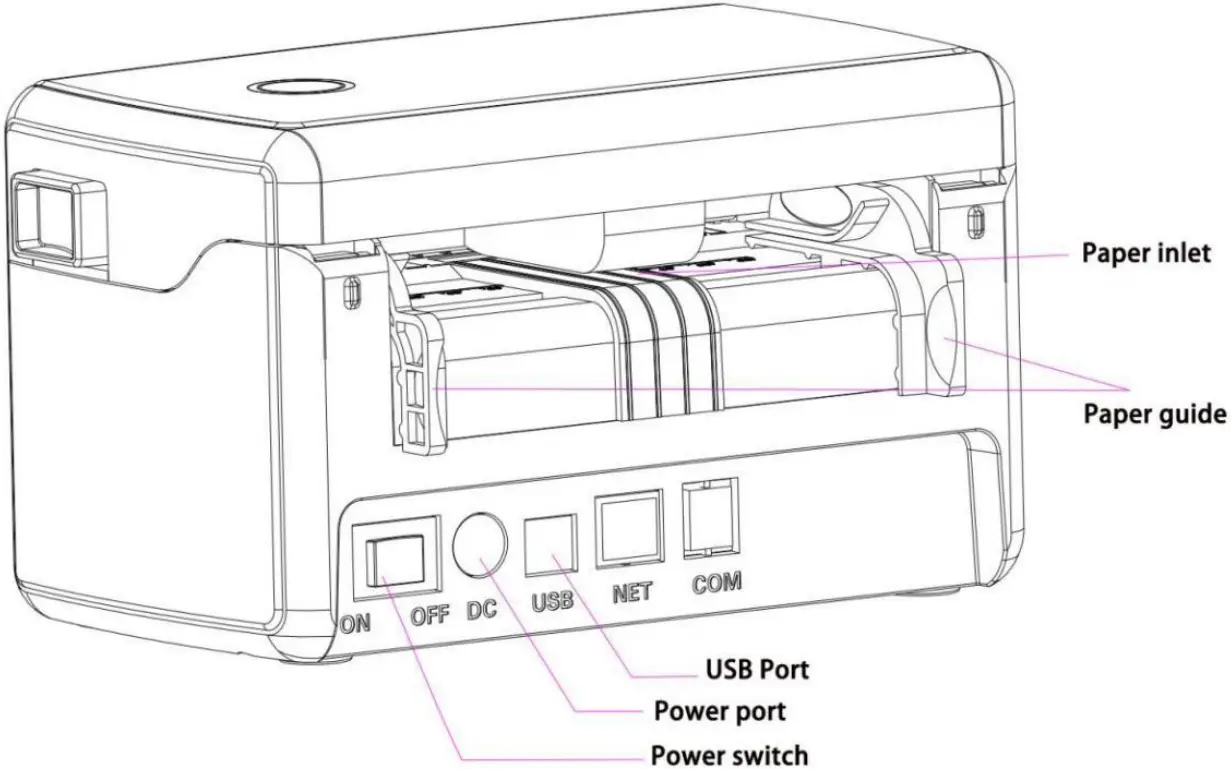
3. Appearance and Components
Picture 1
Picture 2
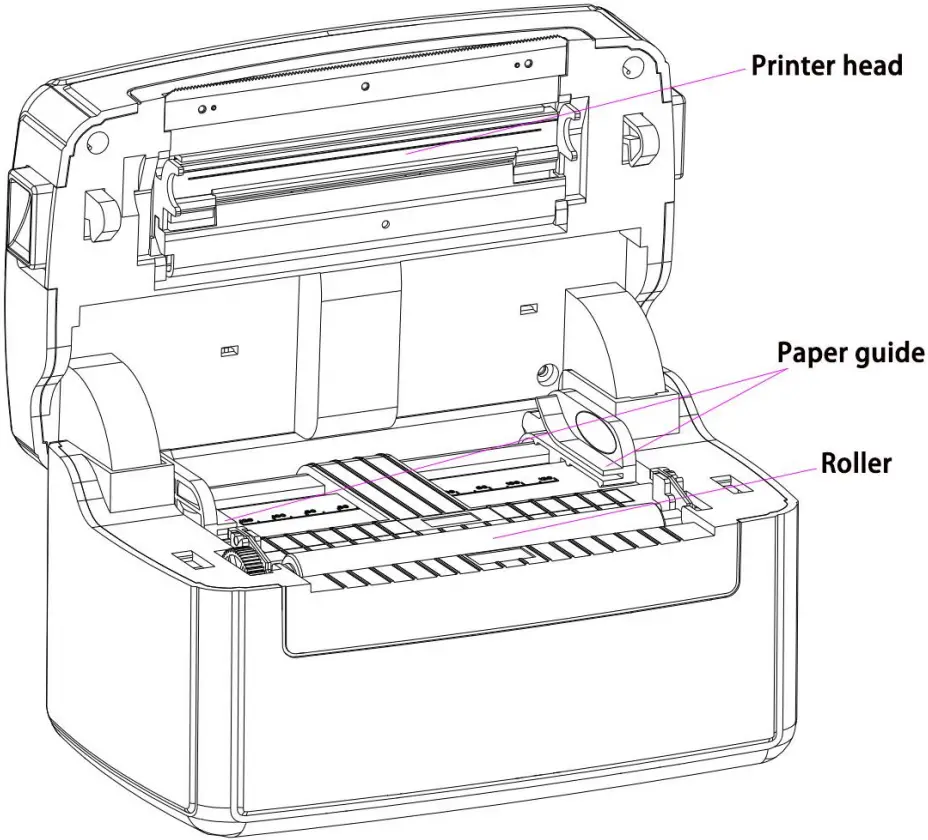
Picture 3
4. Installation and operation
4.1 Printer installation
- Put printer on a stable place and make sure the power is turned off.
- Insert the USB cable one side to the printer, and the other side to the computer.
- Insert the power cord one side with printer, and the other side to an AC socket
Note: When inserting the power cord into the printer, make sure that the printer power switch is turned off.
4.2 Label paper installation
- Push both side buttons forward, to open the top cover of the printer.
- Place the label roll on the roll holder. (printing side up).
- Pass the label through the groove in the middle of the lead and pull the label over the rubber rollers.
- Close the printer cover.
The printer has a feed button and an indicator light that will display three colors. Press the feed button or power switch according to the indicator lights of different colors, it can enable the printer to have multiple functions, such as: feeding paper, pausing action, calibrating label sensor, printing self-test values, initializing the printer, etc., see followings:
4.3.1, LED Indicators
- Power on: The blue light is on and the buzzer sounds once
- Open Cover: The red light is on and the buzzer sounds once
- Close cover and auto feed one paper by printer itself: The blue light is on
- When the cover is closed, the blue light turns on, the motor rotates. If no paper is detected, the motor stops, the pink and red light flashes alternately. After reloading the paper, press the paper feed button, feed out one paper, and the light turn to blue.
- When lack of the paper: the pink and red light flashes alternately. After reloading the paper, press the paper feed button, feed out one paper, and the light turn to blue.
- When printing is paused: the red light and the blue light flash alternately
4.3.2, Key functions
Feed: When the printer is ready (LED blue light), click the feed button and the label will cometo the front of the next label sheet.
Print Pause: While the printer is printing, clicking the button will pause the print. At this point, the power indicator flashes blue and pink alternately. And you click the button again, the print returns to normal.
4.4 Calibrate paper operation
In the power-off state, press the paper feed button and then turn on the power switch, keep press the feed button until you see the indicator light: pink flash–red light and pink light flash alternately, then you release the paper feed button. At this time the printer will automatically feed the paper to calibrate the paper, and when the automatic paper feeding stops,the calibration is completed. Now Printer can be used normally.
Note: Please use the diagnostic tool or the GAP / BLINE command to confirm the type of label to be detected before doing label paper sensor calibration; for more information on GAP and BLINE commands, please refer to the programming manual
4.5 Print a self-test page
In the power-off state, press the paper feed button and then turn on the power switch, keep press the feed button until you see the indicator light: pink flash–red light and pink light flash alternately—pink light flashes,then you release the paper feed button. At this time, the printer will print out a self-test page after calibrating the paper once. After the self-test printing is performed, the printer system will enter the debug mode. In debug mode all messages are printed in machine code. The ASCII string on the left is the data received by the system. The right part data is the hexadecimal code corresponding to the left ASCII string. This function is for users or engineers to debug the program. You only need to turn off the power to jump out of debug mode and return to normal printing mode
Note:
- All debug mode data need to use 4 inches wide label paper
- Turn off the power to exit the debug mode and return to the normal printing mode or press the FEED button to return to the standby state
The content and description of the self-test page are as follows:
| Self test page content PRINTER INFO. PHYSICAL DRAM: 2048 KBYTES | Content description Printer model and firmware version number
File list Max RAM size |
Debug Mode Data Description
| The data on the left is the command ASCII string received by the printer | 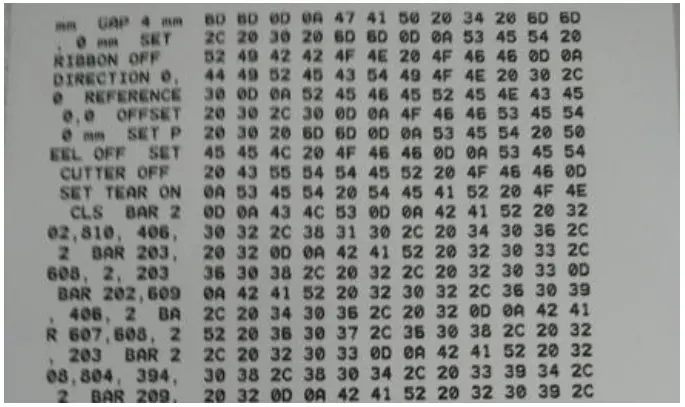 | The right part of the data is the hexadecimal code corresponding to the ASCII string of the received command |
4.6 Initialize the printer
The printer initialization function is to clear the downloaded files in the memory (DRAM), and restore the printing parameters to the factory settings. The way it works is: In the off state, press and hold the paper feed button and turn on the switch, the indicator light will flash pink at first, and then turn to blue light and pink indicator light to flash cyclically, wait until the pink indicator light flashes, and then continue to wait until pink and blue light Release the button when the indicator light flashes alternately, the printer will be restored to the factory state at this time, and all user-set parameters will be erased.
After initialization, the printer configuration is restored to the following default values:
| Parameter | Default Values |
| Speed | 127 mm/sec (5 ips) (203DPI) |
| Density | 10 |
| Label width | 4” (100 mm) |
| Label height | 5.91”(150mm) |
| Sensor type | Gap sensor |
| Gap setting | 0.12”(3mm) |
| Printing direction | 0 |
| Reference point | 0,0 (upper left corner) |
| offset | 0 |
| tear off mode | On |
| peel mode | Off |
| Serial port settings | 9600 bps, none parity, 8 data bits, 1 stop bit |
| character | 850 |
| country code | 001 |
| clear flash | No |
4.7 skip auto.bas procedure
The TSPL2 command language allows the user to load an automatic execution file (AUTO.BAS) into the flash memory. After the printer is turned on, it will automatically execute according to the file loaded by the user. When you want to skip the AUTO.BAS boot after booting, you can use this boot function to ignore this automatic execution file.
In the power-off state, press and hold the paper feed button and then turn on the switch, the indicator light will flash pink at first, then turn to blue light and the pink light will flash alternately, wait until the pink indicator light flashes and then turn to pink and blue lights flash alternately, continue to wait until the blue light flashes and release the button, now the printer will skip the auto.bas procedure.
5. Specifications
| Items | Parameters/Descriptions | |
| Control Panel | Power switch, Feed button, LED indicator (Red blue LED | |
| Sensor | Gap sensor, Black mark sensor (removable in full print format),Print head up sensor, Temperature Sensor (THP) | |
| Outside Paper Diameter | 8 inch roll-type thermal label paper or foldable thermal label paper | |
| Label | Paper Width | 37.5 ~ 123 mm (1.5inch ~ 4.84inch ) |
| Label Type | Continuous, gap, black mark, fan-fold, punched | |
| Paper Thickness | 0.05mm-0.26mm | |
| Paper Type | Stack or Roll type paper | |
| Open | Shell way |
| Print Method | Direct thermal |
| Print Location | Print centered |
| Resolution | 203 dpi(Speed=6.0inch) |
| Print Density | 1-15 density Level |
| Speed | 6.0inch/Sec |
| Min. height | 37.5mm |
| Max Media Size | 123mm |
| Max Printing Size | 108mm (4.25inch) |
| Max Height | 1770mm |
| Memory | 8MB Flash Memory /8MB SDRAM |
| Interface | USB2.0(Standard USB-B)/Bluetooth(Optional)/WIFI(Optional) |
| Built-in font library | Eight bitmap fonts/Windows fonts available for download via |
| 1D Barcode | 1D barcode: Code 39, Code 93, Code 128UCC, Code 128subsetsA, B, C, Codabar , Interleaved 2 of 5, EAN-8,EAN-13, EAN-128,UPC-A, UPC-E, EAN and UPC 2(5) digits add-on, MSI, PLESSEY,POSTNET, China POST, GS1 DataBar, Code 11 |
| 2D BarCode | 2D barcode:PDF-417, Maxicode, DataMatrix, QRcode, Aztec |
| Rotation | 0°, 90°, 180°, 270° |
| Emulaion | TSPL2, EPL, ZPL, DPL |
| Driver | (1) Windows:XP.7.8.10(32-bit and 64-bit systems included); (2) Mac: v10.6.8/v10.7.x/v10.8.x/v10.9.x/10.10.x 10.11.x etc; (3) Linux: centos 7.0 X64/ubuntu 12.04 X86 and X64 version; |
| Paper Diameter | 8.0 inch |
| TPH Working Life | Over 100,000,000 pulses or over 50 km |
| Gear Working life | More than 200 kilometers |
| Power Adapor | Input: AC 110V~260V/50Hz/60Hz Output: DC 24V—2.5A |
| Using Environment | working altitude | Only suitable for safe use in areas below 2000m above sea level |
| working environment | 5℃~50℃ (non-condensing) | |
| storage environment | -20℃~60℃ (non-condensing) | |
| Working humidity | 20%~85% RH (non-condensing) | |
| Storage humidity | 5%~95% RH (non-condensing) |
6. Maintenance
Take this simple printer maintenance procedure not only to ensure the printing quality,but also extend the life of the printer. The following are some of our recommended maintenance. Please use the tools listed below to clean and maintain your printer:
- Cotton swab
- Cotton
- Air spray gun or vacuum tool
- 100% alcohol (industrial alcohol)
Pls follow the below cleaning steps:
| Printer parts | Method |
| Print head |
|
| Rubber roller |
|
| Outside | Wipe the outside with a damp cloth |
| Inside | Use an air gun or vacuum cleaner to remove dust from the machine |
![]() Attention:
Attention:
- The daily maintenance of the printer must ensure that the power is turned off;
- It is not allowed to touch the surface of the print head with hands and metal objects, and do not use tools such as tweezers to scratch the surface of the print head, printing roller and sensor
- Do not use gasoline, acetone and other organic solvents to wipe the print head and rubber roller, medical alcohol may damage the print head;
- After the gap sensor is cleaned, the paper gap check should be re-checked;
- Wait for the alcohol to completely evaporate before turning on the power to continue printing.
7. Troubleshooting
The contents below are some common problems and their solutions for users. Usually it will be work, but if it still not work after the following suggestions, pls contact the customer service department of our dealer or manufacture to get more help.
| Problems | Possible Reasons | Solutions |
| Online indicator is off |
|
|
|
| |
|
| |
|
| |
| The printer cannot print |
|
|
| Storage is full (FLASH/DRAM) |
|
|
| Poor print quality |
|
|
| Paper skipping occurs when printing |
|
|
| Content on left and right sides to be printed are los |
|
|
| There are wrinkles in printing |
|
|
| Gray lines appears on black label paper |
|
|
| Unstable printing |
|
|


