SmartGen HT40MA Engine Water Heater User Manual

SmartGen — make your generator smart
SmartGen Technology Co., Ltd.
No.28 Jinsuo Road, Zhengzhou, Henan Province, China
All rights reserved. No part of this publication may be reproduced in any material form (including photocopying or storing in any medium by electronic means or other) without the written permission of the copyright holder.
Applications for the copyright holder’s written permission to reproduce any part of this publication should be addressed to Smartgen Technology at the address above.
Any reference to trademarked product names used within this publication is owned by their respective companies. SmartGen Technology reser
ves the right to change the contents of this document without prior notice.
Table 1 Software Version
| Date | Version | Note |
| 2021-12-22 | 1.0 | Original release. |
| 2022-04-24 | 1.1 | Change the holders and packing list; add maintenance instruction. |
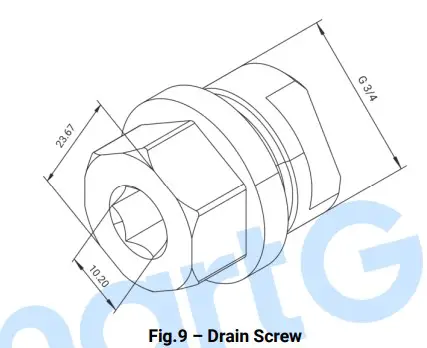
| 2022-07-20 | 1.2 | Modify the drain screw. |
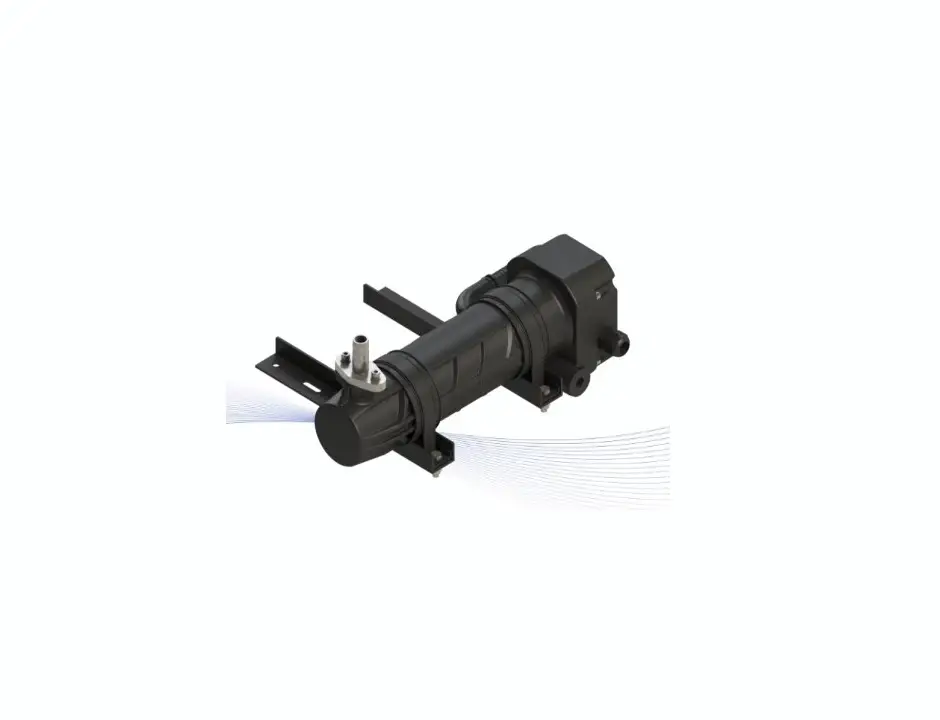
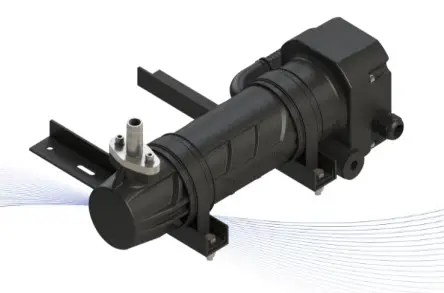
1 OVERVIEW
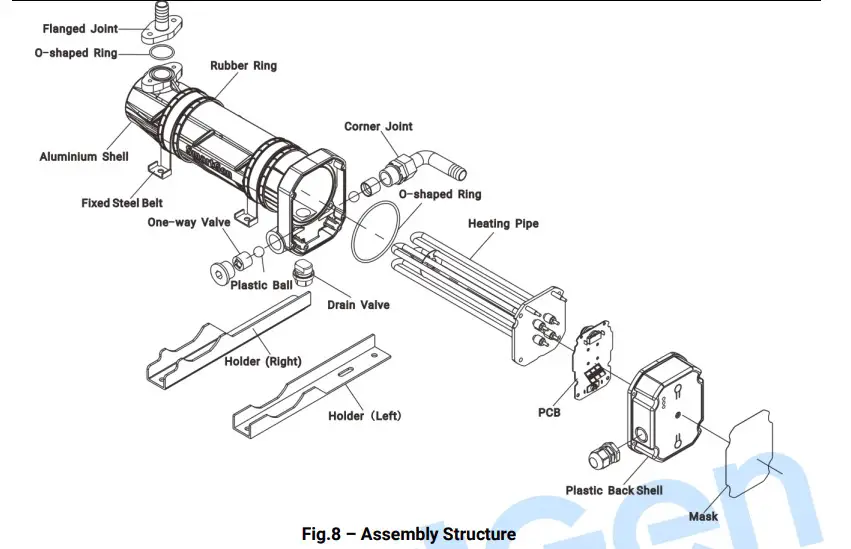
HT40MA Water Heater enables wide application on various engine coolant pre-heating. It has fine cast aluminum enclosure and self-extinguishing engineering plastics end closure, easy and convenient to use. If the ambient temperature is lower than 4ºC during cranking, engine coolant and lubricant may condense into solid state and lose their lubricating and cooling properties, which can damage the engine. Therefore, engine heater should be installed to ensure normal starting and running of the engine when the ambient temperature is lower than 4ºC.
The inner heating pipe and end cover both adopt stainless steel with high corrosion resistance. The heater has light indication function, which can indicate power and heating status. 3 kinds of heaters with different heating temperature are optional (Standard heater: 40ºC; 50ºC and 60ºC heaters are needed to be customized).
This product is suitable for various engines with (13~25) L displacement. Please login our company’s official website to select heaters.
2 PERFORMANCE AND CHARACTERISTICS
——Fine cast aluminum enclosure, stainless steel inner pipes and sealed end closure;
——Coolant temperature is controlled by thermostat which is installed within the heater. It has simple structure and high reliability;
——Power, heating and overheat protection light indicators make it easy to observe the heater status;
——Both of the two water inlets have one-way inlet valve and they sit on either side of the heater; Users can choose any one to use during installation;
——Both of the two power line inlets are knock-off design; Users can choose suitable one to use according to the installation way. Waterproof joints (stuffing box) are provided;
——There is a water drain valve with seal ring on the bottom of the heater so as to be used when needed;
——Overheating thermostat provides the protection of dry heating and overheating;
——Press Test key to test-run the unit when ambient temperature is over high;
——This product can work normally at -40ºC temperature.
3 TECHNICAL PARAMETERS
Table 2 – HT40MA Specification
| Item | Content |
| Model | HT40MA |
| Rated Power | 4000W |
| Rated Voltage | AC240V |
| Operating Voltage | AC190V~AC277V |
| Rated Current | 16.7A |
| Engine Displacement | (13~25)L |
| Thermostat Switch Range | HT40MA: Off: (40±3)ºC Reset: (25±5)ºC |
| HT40MA-1: Off: (50±3)ºC Reset: (35±5)ºC | |
| HT40MA-2: Off: (60±3)ºC Reset: (45±5)ºC | |
| Overheating Switch Range | Off: (95±4)ºC Manual Reset: (temperature below 80ºC) |
| Insulating Resistance | ≥50MΩ |
| Electrical Strength | AC 1.5kV 1min, ≤2.5mA |
| Inlet/Outlet Size | 3/4″(φ19mm) |
| Max. Water Pressure | 0.5MPa |
| Protection Level | IP54 |
| Vibration Resistance | (5~8)Hz; Amplitude±7.5mm; Triaxial (8~500)Hz; a=2g; Triaxial |
| Shock Resistance | Half-sine wave; apeak=50g; Triaxial |
| Working Temperature | -40ºC~+70ºC |
| Storage Temperature | -40ºC~+70ºC |
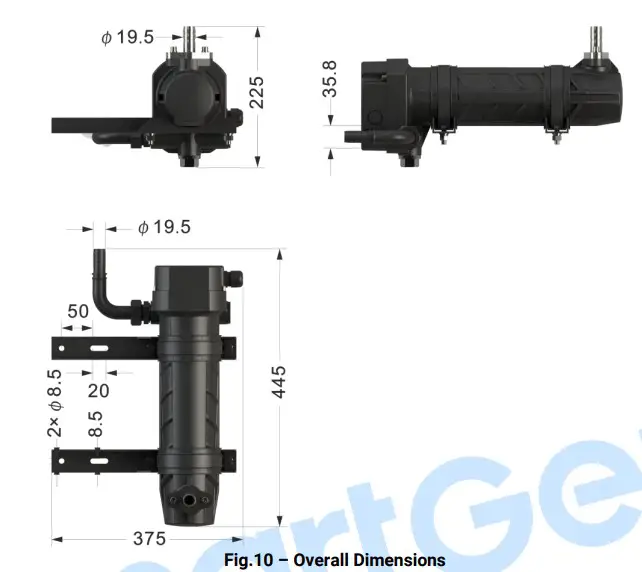
| Case Dimensions | 445mm×375mm×210mm |
| Weight (include accessories) | 5.6kg |
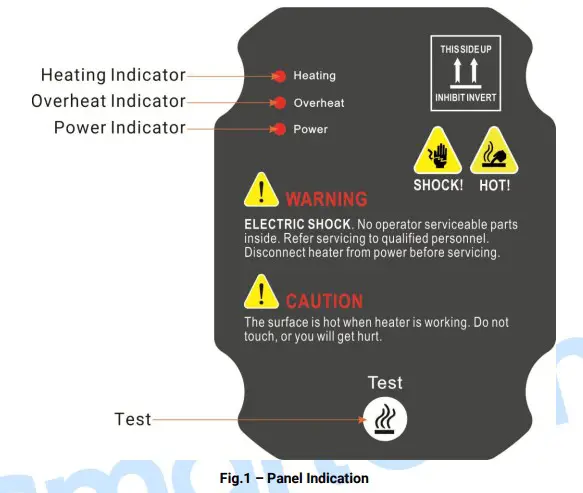
4 PANEL INDICATION
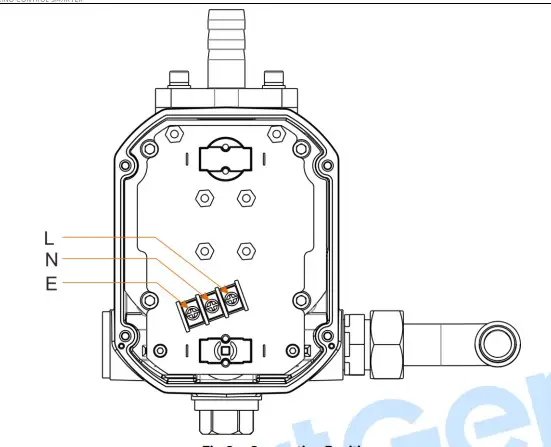
5 CONNECTIONS

Install the water-proof connection joint after knock on the knock-off hole which on the rear plastic shell. Pass the 4mm2 power line through the thread hole of rear shell to connect to L, N, E terminals respectively.
6 INSTALLATION I NSTRUCTION
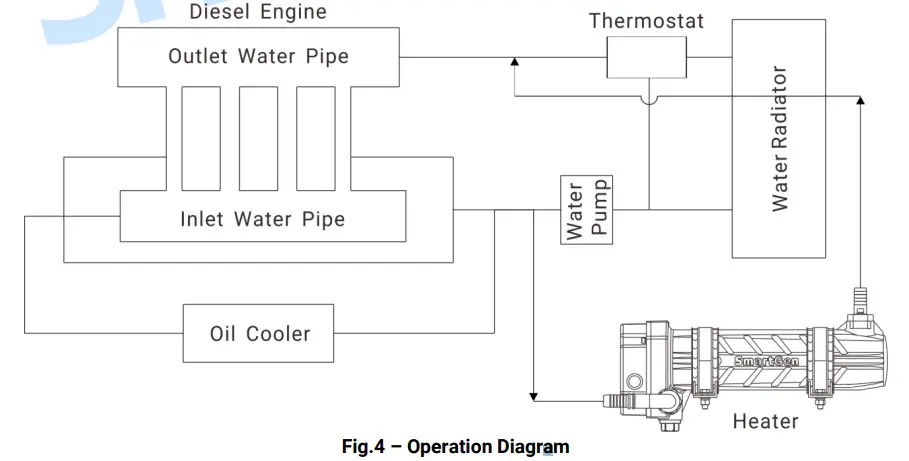
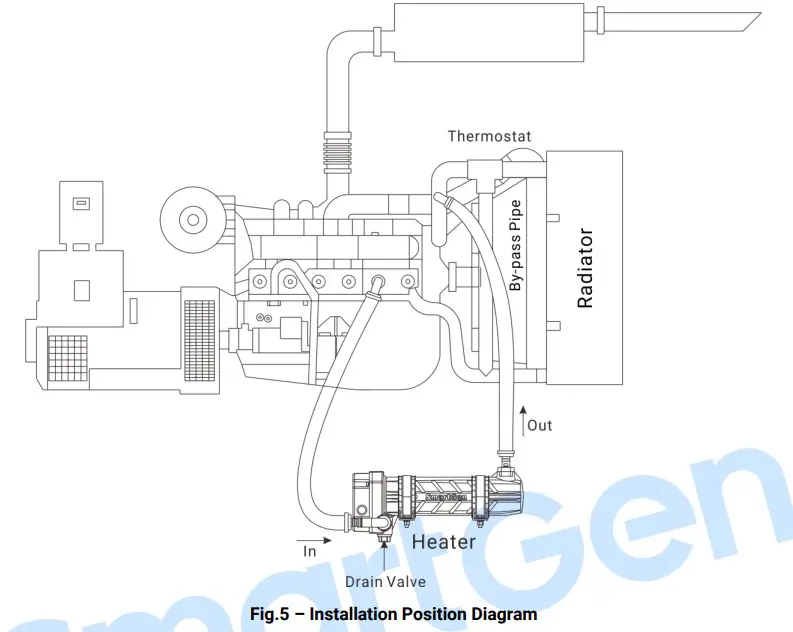
Please install the heater vertically according to the diagram before use. Paying attention to direction of heater inlet and outlet, and ensure that the heater position is below the lowest water level of the engine and that all the air is exhaust ed out of the heater and it is topped off with coolant.
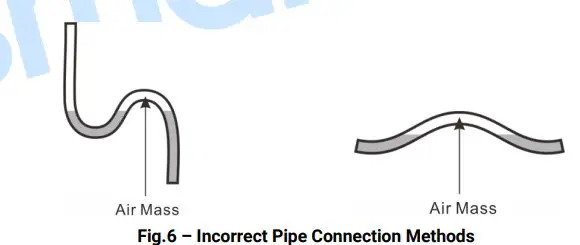
NOTE If there is a W shaped bend or reverse U shaped bend during pipe connection, the air accumulated in the pipe cannot be discharged normally , result ing in th e liquid cannot be circulate d
properly The air dissolved in the liquid will be precipitated during heating and retained in the bend, so on the condition of unsm oothed pipeline, even if by the manual exhaust, it will repeat in the next
heating process of air collection. To ensure that the smooth liquid circulation, the hosepipe with an inner diameter of more than 20mm and pipe joints with an inner diameter of more than 15mm should
be selected.
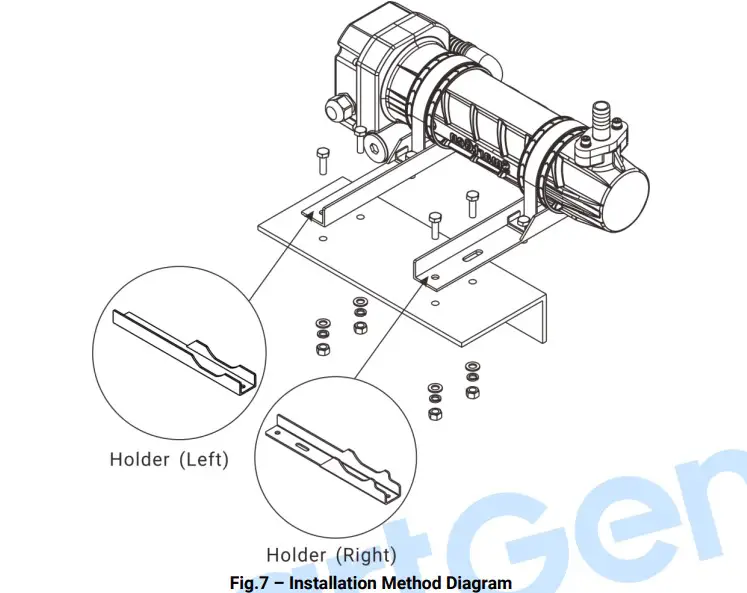
As shown in Fig.7, the holder(Right) must be installed at the water outlet end of the heater, and the installation plane should be kept as level as possible.
7 OPERATION
7.1 COMMISSIONING
If heater doesn’t work and overheat indicator doesn’t light on , users can force heater to work by pressing test key .
7.2 OVERHEAT PROTECTION RESET
When overheat alarm indicator lights on , heater will enter into overheat protect ion status and stop heating. If heater temperature falls below the reset temperature limit of overheat protection
thermostat ( 80 ºC )), heater enters into auto mode again
8 CAUTION S AND FAULT SOLUTIONS
Before starting the machine, ensure that all the air is exhausted out of the heater and it is topped off with coolant. If water is used, please drain it off when ambient temperature is lower than 0ºC .
Otherwise, the remaining water will freeze, resulting in heater break. Using tap water or river water will scale the surface of heating pipe and shorten the using life of the heater. Corresponding antifreeze is recommended. Heat resisting power line is recommended.
Earth line must be soundly connected to earth earth. Drain valve: Can be opened or closed using hexagonal tools.
Common Fault s and Solutions:
- Overheat protection:
a Check the valve to assure whether it is opened and whether the heater is full of water;
b Check whether the hose pipe has an obvious W shaped or re verse U shaped trend, and whether there is an obvious hot and cold alternating area; Solutions: Shorten the hosepipe length and optimize the hosepipe trend; - H igh water outlet temperature: under normal circumstance s , the outlet temperature is about 70 ℃℃.
It occurs when the hose pipe is too long, both the inner diameter of the hose pipe and the inner diameter of the fitting joints are too small, as well as the water flow is not smooth so that the heat
cannot be transferred properly. Solutions: Shorten the hos e pipe length, using the hose with an inner diameter of more than 20mm, and the connectors with an inner diameter of more than 15mm. - Unable to reach the preheating temperature:
a . The heater power is not enough;
b The cable of the power supply is too long and result in dividing resistance of the cable; Solution - Replace the heater whose power matches the engin
- Shorten the power cable as possible and increase the cable diameter.
9 CASE AND INSTALLATION DIMENSIONS
10 PACKING LIST
Table 3 Packing List
| No. | Name & Model | Quantity |
| 1 | Heater | 1 |
| 2 | Holder (left) | 1 |
| 3 | Holder (right) | 1 |
| 4 | U-shape steel belt | 2 |
| 5 | Seal ring | 2 |
| 6 | Flat gasket ( stainless steel) GB/T 95 8 | 8 |
| 7 | Spring washer GB/T 93 8 | 8 |
| 8 | Hexagon nut (stainless steel) GB/T 6170 M8 | 8 |
| 9 | Hexagon bolt (full thread stainless steel) GB/T 5783 M8×25 | 6 |
| 10 | Hexagon bolt (stainless steel) GB/T 5783 M8x40 | 2 |
| 11 | Rotary joint (Inlet) | 1 |
| 12 | Pagoda joint (Outlet) | 1 |
| 13 | Water-proof cable joint | 1 |
| 14 | User manual | 1 |


