EZ HEAT TW02-WIFI Underfloor Heating Thermostat Instruction Manual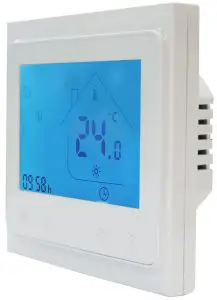
AC603H-WIFI Intelligent Heating Temperature Controller with weekly programming function, it can be set six period times & the corresponding setting temperature per day. You also can choose manual control or temporary control mode of operation. With the unique far-way control function, simple operation, energy saving and environmental protection, this thermostat can be suitable for electric heating equipment control and water system heating electric drive valve control.
Parameter
Voltage:220VAC,
50/60HZ Current:Imax:
16A Accuracy:±0.5℃
Sensor:NTC
Power consumption:<1W
Control range:5℃~45℃(35-95℃ adjustable)
Environmental temp.:-5-50℃ IP
Grade:IP20
Limitation setting:5~60℃
Default temp.Deviation: 1℃(1-5℃ adjustable)
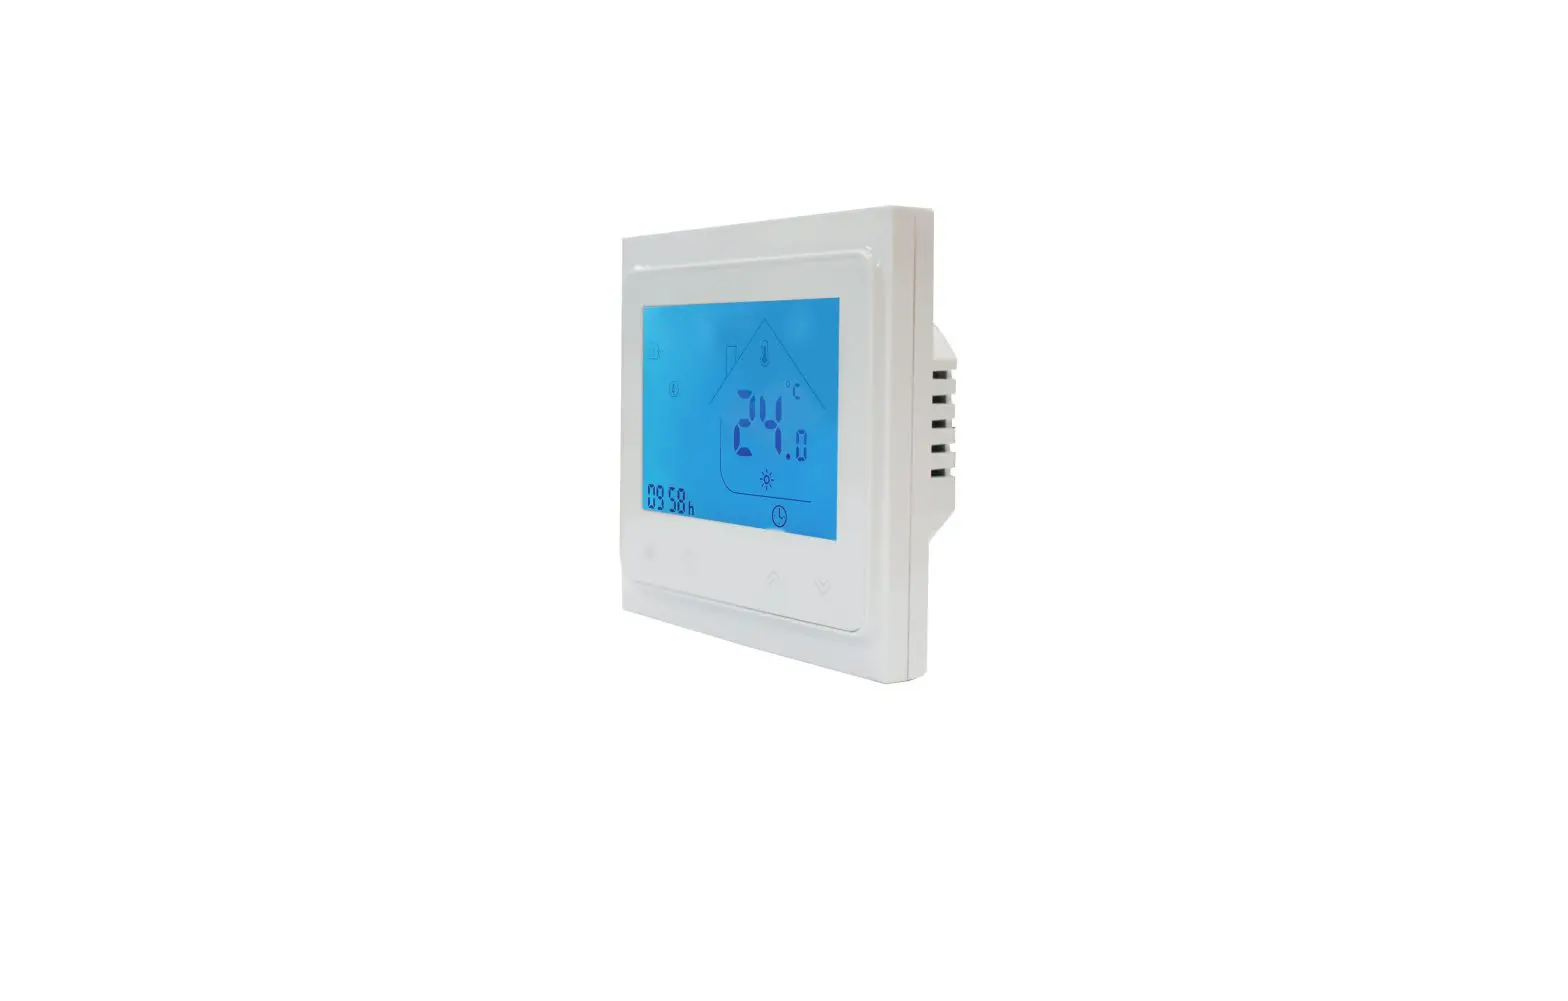
Panel display
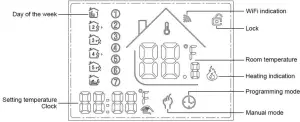
Function
![]() :Manual mode: Control the device by manual.
:Manual mode: Control the device by manual.![]() ,
, ![]() :Programming mode: It can be controlled automatically by the set time& temperatures (with six different time & related temperature),see below: ,simultaneous display:For temporary control mode, press“
:Programming mode: It can be controlled automatically by the set time& temperatures (with six different time & related temperature),see below: ,simultaneous display:For temporary control mode, press“ ![]() ”or“
”or“ ![]() ” will change to this mode, the device will comes out of the temporarily current period time control, and come into the control of the manual mode, which also will automatically return to the programming mode when the next period time comes.
” will change to this mode, the device will comes out of the temporarily current period time control, and come into the control of the manual mode, which also will automatically return to the programming mode when the next period time comes.![]() :Lock, Press the key“
:Lock, Press the key“ ![]() ”&“
”&“ ![]() ”together for more than 5 seconds, the device locked, and press them for another 5 seconds, it will unlock again.
”together for more than 5 seconds, the device locked, and press them for another 5 seconds, it will unlock again.![]() :Heating : Means for heating now.。
:Heating : Means for heating now.。![]() :Antifreezing,(See the details of advance setting 5), start the antifreezing function.
:Antifreezing,(See the details of advance setting 5), start the antifreezing function.
![]() :Power, ON/OFF by short press.
:Power, ON/OFF by short press.![]() :Mode, Short press for manual mode& programmable mode change.
:Mode, Short press for manual mode& programmable mode change.![]() :Clock, Short press for time setting.:minute setting→ hour setting→ week setting. Press“
:Clock, Short press for time setting.:minute setting→ hour setting→ week setting. Press“ ![]() ”for next parameter setting, the twinkled data means to be set, press“
”for next parameter setting, the twinkled data means to be set, press“ ![]() ”or“
”or“ ![]() ”to setting and 10 seconds can be recorded after everything to be recorded.
”to setting and 10 seconds can be recorded after everything to be recorded.![]() :Up, for increase the related parameters or adjust working mode.
:Up, for increase the related parameters or adjust working mode.![]() :Down, do decrease the related parameters or adjust the working mode.
:Down, do decrease the related parameters or adjust the working mode.
Under the power on mode, press“ ![]() ” and “
” and “ ![]() ” for last 5 seconds comes into weekly programmable setting mode, press“
” for last 5 seconds comes into weekly programmable setting mode, press“ ![]() ”or“
”or“ ![]() ”for data change, then press “
”for data change, then press “ ![]() ”to come to the next setting with the related sequenceas below:
”to come to the next setting with the related sequenceas below:
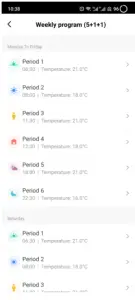
Time(Event 1) setting from Monday to Sunday →Temperature(Event 1)→…→Time(Event 6)
Press “ ![]() ” after finish setting each parameter for coming into the next data setting, press“
” after finish setting each parameter for coming into the next data setting, press“ ![]() ” or “
” or “ ![]() ” to set the twinkled data, each twinkle duration keeps for 1 minute, the data can be kept in record in 10 seconds after finish setting.( see below attachment, each previous event setting time can’t over the next event time)
” to set the twinkled data, each twinkle duration keeps for 1 minute, the data can be kept in record in 10 seconds after finish setting.( see below attachment, each previous event setting time can’t over the next event time)
| OPTION | Setting | Setting | From Monday to Friday | ||||||
|
|
| Period |
|
|
|  |  |
|
| DEFAUL TIME | 6:30 | 8:00 | 11:30 | 12:30 | 18:00 | 22:30 | |||
| DEFAUL TEMPERATURE | 21℃ | 18℃ | 21℃ | 18℃ | 21℃ | 16℃ | |||
| Saturday | |||||||||
| Period |  |  |
| | |
| |||
| DEFAUL TIME | 6:30 | 8:00 | 11:30 | 12:30 | 18:00 | 22:30 | |||
| DEFAUL TEMPERATURE | 21℃ | 18℃ | 21℃ | 18℃ | 21℃ | 16℃ | |||
| Sunday | |||||||||
| Period | |||||||||
| DEFAUL TIME | 6:30 | 8:00 | 11:30 | 12:30 | 18:00 | 22:30 | |||
| DEFAUL TEMPERATURE | 21℃ | 18℃ | 21℃ | 18℃ | 21℃ | 16℃ | |||

Advanced setting
Under the power off status, press“ ![]() ”&“
”&“ ![]() ”simultaneously for 5 seconds for coming into the advance setting mode, the screen will display all the related No. & dates, then press“
”simultaneously for 5 seconds for coming into the advance setting mode, the screen will display all the related No. & dates, then press“ ![]() ”or“
”or“ ![]() ”for dates, change, then press“ ”to come to the next setting, All of the parameters will be kept in record after press “
”for dates, change, then press“ ”to come to the next setting, All of the parameters will be kept in record after press “ ![]() ” after finish setting.
” after finish setting.
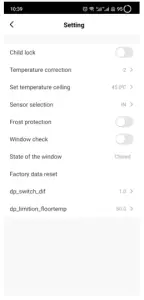
| Code | Option | Default parameters | Details |
| 1Adj | Room Temperature compensation | -2 | -9℃~+9℃ |
| 2Sen | Sensor type | In | I n:internal sensor(to control and protect the temperature) OU:external sensor(to control and protect the temperature) AL:internal/external sensor (internal sensor is for room temperature controlling, external sensor is for temperature protection) |
| 3Lit | Temperature limitation | 50.0 | 5~60℃, the sensor should choose AL,when it detect the temperature is higher than this limitation,it will close the output and only the temperature lower the limitation, the output will resume. |
| 4dif | Switching Deviation | 1 | 1~5℃ |
| 5Ltp | Anti-freezing function | Off | On:start the Anti-freezing function Off:closed the Anti-freezing function |
| 6Hit | temperature upper limit setting | 45 | 35~95℃ |
| 7OEN | Open window detect function (OWD) | OFF | On:start the OWD function Off:closed the OWD function |
| 8Otl | OWD Detect Time | 15 | Range:2~30min |
| 9Otp | OWD Drop temp. select (within detect time) | 2 | Range:2~4℃ |
| 0Pdt | OWD Delay time select (Return to previous working status) | 30 | Range:10~60min |
| AFAC | Factory Reset | – | when show“-”and keep press “ |
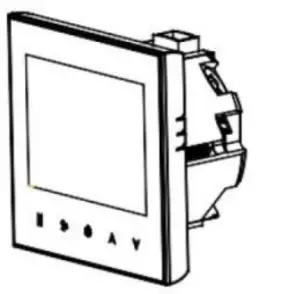
Installing your thermostat
This product is suitable for standard 86mm wall box or european 60mm round box.
- Connect the wire of power and other equipment into the terminals.

- Fix the wall plate into the wall box by a screwdriver

- Connect the LCD board into the wall plate.


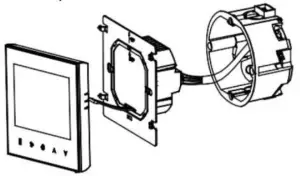
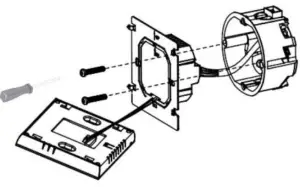
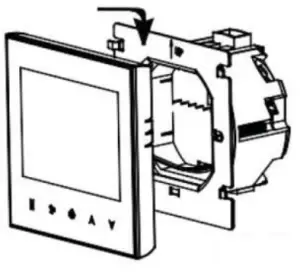
 WARNING: Please arrange the professional technician to install this product according to installation drawing and instruction.
RISK OF ELECTRICAL SHOCK. Disconnect power supply before making electrical connection. Contact with components carrying hazardous voltage can cause electrical shock and may result in severe personal injury or death instruction.
Connecting Diagram

H (for electric floor heating)
RH (for water radiant floor heating without external sensor)
GH (for Gas boiler and water radiant floor heating without external sensor)
RH-NC (for water radiant floor heating with external sensor but only for Normally closed actuator)
WIFI connection & operation
PROPOSAL: BELOW PART ARE ONLY FOR WIFI FUNCTION THERMOSTATS ONLY
- Scan the above QR Code by cellphone or sourcing the Apps “Smart Life” OR “Tuya Smart” at the App-store.

- After completing the account registration, click”add device” or “+” in the upper right corner of the APP main interface to add the device.

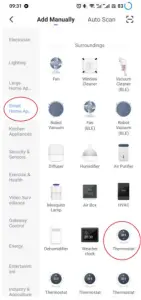
- Please select “Thermostat” in “Small Home Application”

- Please long press the thermostat “
 ” & “
” & “  ” key, until it show“
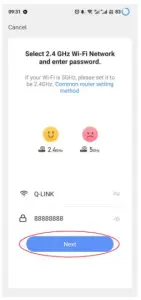
  ”flashed, then click “Confirm indicator rapidly blink”, Then Enter Wi-Fi password and click “Next”, then click “Continue” to pair the devices.
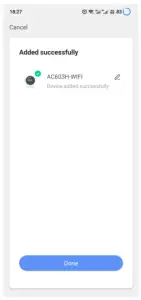
 - Waiting a few second until the device added successfully, click “Completed” to device main interface.
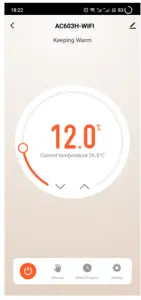
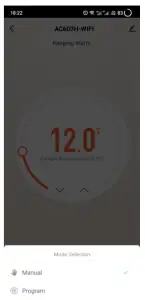
- Click on different icons to set different items for the thermostats
- Set the model

- Set your favorite time and temperature

- Set the advance setting