WiFi Heating Room Thermostat
TP528 User Guide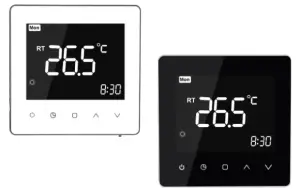
Application
This thermostat range has been developed to control electric underfloor or water heating or water/gas boiler system. These units are designed for use in commercial, industrial, civil, and domestic properties.
Thermostat all passed CE and Rohs standard
Thermostat box you will find
| Application | water heating | Gas boiler heating | Electric heating |
| Thermostat | |||
| Manual | |||
| Screws | |||
| QC pass certificate | |||
| External sensor |
Features
|
|
Technical Data
| Sensor: | NTC |
| Accuracy: | ±1℃ |
| Power Consumption: | < 1.5W |
| Timing Error: | <1% |
| Power Supply: | 95 ~ 240VAC, 50 ~60Hz |
| Current Load: | 5A(water heating, water/gas boiler), 16A(electric heating) |
| Shell material: | PC+ABS (flame retardant) |
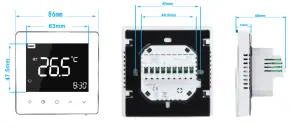
| Dimension: | 86x86x13.3mm |
| Ambient Temp.: | 0-45℃,5-95%RH (Non-condensing) |
| Storage Temp.: | -5-55℃ |
| Installation Hole distance: | 60mm |
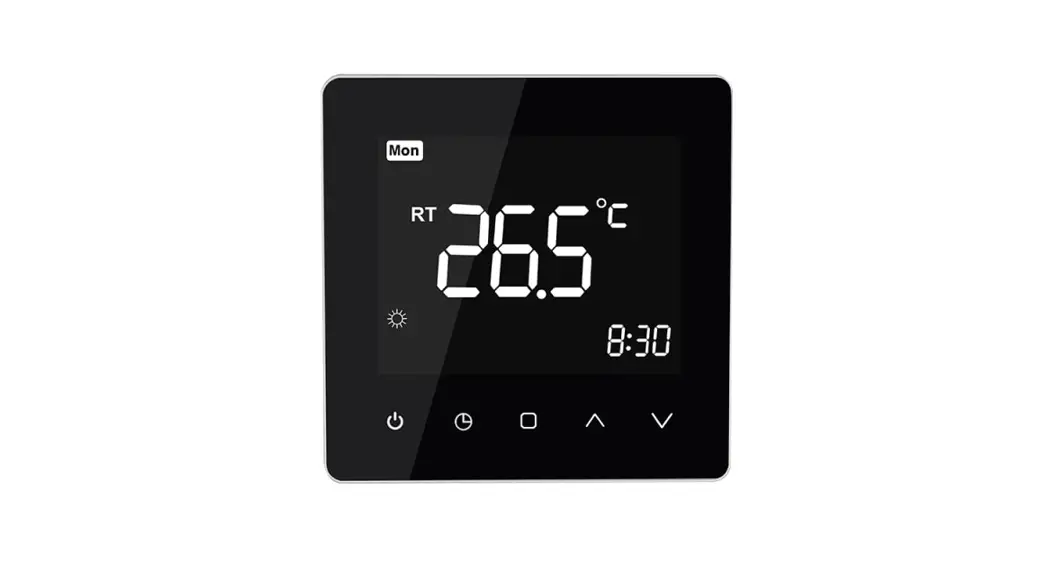
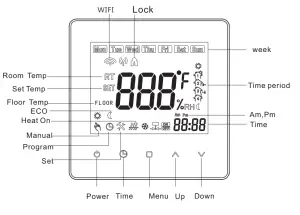
LCD Display Reference
Operation
 You could press this button to power on/off your thermostat
 Time setting: Press the button to set min/hour/week
 Manual/program setting:
a. manual mode: Press thebutton to select  manual mode.When you choose the manual mode. The symbol will show the left corner of the LCD, Press
 to set the desired temperature.
b.Program Mode: Press thebutton to select program mode.When you choose this model. The symbol will show on LCD, press button above 5seconds to
set the desired (5+1+1)six periods time and temp
c.Temporary mode: During program mode.If you need to change temp. The buttonwill show on the LCD. The pre-program setting will return in the next period Child lockset: Press and hold the button above 5seconds to lock/unlock your thermostat
- Programm goes back factory setting: Press button above 5 seconds to enter program mode. Press and hold the button above 5seconds when the “def” flash in the LCD. It goes back to factory settings successful
Dimension
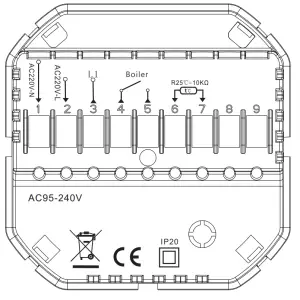
Wiring Diagram
Long press the button ![]() above 5sec to enter this menu when power off. During this menu, short press
above 5sec to enter this menu when power off. During this menu, short press ![]() to change parameters
to change parameters
Press ![]() to confirm the setting
to confirm the setting
| No. | Function | Press | Default |
| 1 | Calibration | -9°C to 9°C | OC |
| 2 | Dead Zone | 1°C to 5°C | 1`C |
| 3 | Lock | 0:Unlock 1:All buttons will lock except the Power button | I |
| 4 | Sensor Selection | IN: = control temperature using the internal sensor OU:=control temperature using external senor ALL:= Both inner and external sensor | Al.!. |
| 5 | Minimum temperature setting | 5°C to 15°C | |
| 6 | Maximum temperature setting | 15°C to 45°C | |
| 7 | Display Mode | 00:Display room temp and set temp 01:Display set temp only | |
| 8 | Standby Backlight | 0-100 | [1 |
| 9 | High-temperature protection setting | 25`C-70°C | 15″C |
| A | Anti-freeze temperature range | 2-10t | 5°C |
| B | Anti- Freez protection | 0:Off 1:0N | 0 |
| C | ECO mode | 0:Off 1:0N | 0 |
| D | ECO Temp set range | 5°C to 30°C | 16*C |
| E | Backlight selection | 1-100 | 80 |
Note: Water heating&Gas boiler heating Item4 select IN Electric heating item4 select ALL
Program Setting
When powering on, Long press ![]() into programmable.
into programmable.
Press ![]() to change the different items.
to change the different items.
Press or to set the relative values.
The order is Minute adjusting→ Hour adjusting → Temperature adjusting → Minute timing-on → Hour timing-on→ Minute timing-off→ Hour timing-off→ Temperature adjusting (“Mon-Fri”,” Sat”,” Sun”, is “5+1+1” programmable mode, every mode has two times zones and a time-temperature setting)
Time display | Weekday(MON-FRI) | Weekend(Saturday) | Weekend(Sunday) | |||
| Time | Set Temp | Time | Set Temp | Time | Set Temp | |
| Period 1 | 6:00 | 22°C | 6:00 | 22°C | 6:00 | 22°c |
| Period 2 | 8:00 | 16°c | 8:00 | 16°C | 8:00 | 16`c |
| Period 3 | 12:00 | 22°c | 12:00 | 22V | 12:00 | 22 `c |
| Period 4 | 14:00 | 16°c | 14:00 | 16°C | 14:00 | 16°c |
| Period 5 | 18:00 | 22°c | 18:00 | 22°c | 18:00 | 22°c |
| Period 6 | 22:00 | 16c | 22:00 | 16°C | 22:00 | 16°c |
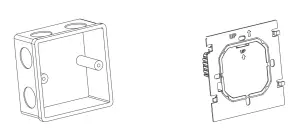
Installation
Your thermostat is suitable for installation within a standard 86mm pattress box or European 60mm round pattress box.
- Keep power off. Remove the mounting plate.

- Connect power supply, load, and external (floor) sensor into the appropriate terminals if there is an external sensor.
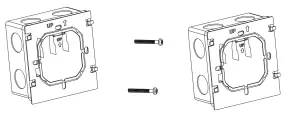
(see “Wiring your thermostat” for details and Fix the mounting plate into the wall with screws in the box.
- Fasten body of thermostat and the mounting plate through the groove.Installation complete.
RISK OF ELECTRICAL SHOCK.
Disconnect/isolate power supply prior to making electrical connections.
Contact with high voltage components can cause electrical shock, severe injury, or death.
WIFI Connection and app use explanation
Please try to make sure the router or modern closely with your mobile phone when first time to connect WIFI with your smart thermostat.
This will help you connect WIFI successfully more fastly.
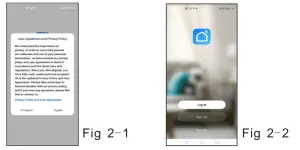
Step 1.Please download the App (Fig1-1,Fig2-2)


For IOS devices could search” Tuya Smart”or “Smart Life” app in the app store. Or scan the QR code above(Fig1-1, Fig2-2)
For Android devices could search the”Tuya Smart”or ”Smart life” app in google play store. Or scan the QR code above(Fig1-1, Fig2-2)
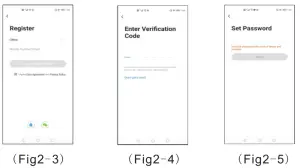
Step 2. Register your account
Open the “Smart Life” app. You will get a notification (Fig 2-1), Click Agree to go into your page of register (Fig 2-2). Press register and enter your phone no. or email (Fig 2-3) then you can get a verification code (Fig2-4). Set your password and confirm (Fig 2-5) to complete your registration. If you have an account, please log in.
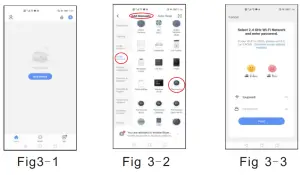
Step 3 Connect WIFI signal with thermostat
Note: There are two WIFI signal connection ways to your thermostat, EZ mode, and AP mode Default is EZ mode(AP mode is slowly connection way, do not suggest use)
EZ MODE WIFI connection
- Please make sure your thermostat is powered on.
Press the button for more than 5seconds.The icon will flash one time per 0.5 seconds.
Then go to the app page to see the picture(Fig3-1) below press “Add device” or”+” in the upper right to add your device. Choose- small appliance device-add manually -Thermostat (Fig3-2). Then enter your wireless router and password(Fig3-3) confirm next. Click Confirm indicator rapidly blink confirm next button (Fig 3-4). The app will connect automatically (Fig3-5). This will take 12seconds to connect successfully (Fig3-6)

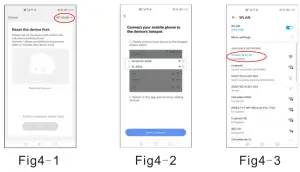
AP MODE wifi connection
- On your thermostat
Please make sure your thermostat power is on.
Press the button the wifi symbol flash one time per second.
Click Confirm indicator slowly blink (Fig 4-1) then select your network and back to your app to enter the password of your wireless router (Fig 3-3) and confirm. The app will go into the page in (Fig 4-2).
Press Go to connect to select the wif signal Smartlife-XXXX of your thermostat (Fig 4-3).
Then Go back to your app the app will connect automatically(Fig3-5). This will take 12seconds to connect successfully (Fig3-6)
When your thermostat connects successfully. The page will same as (Fig 5-1).
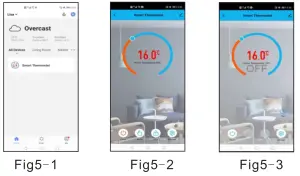
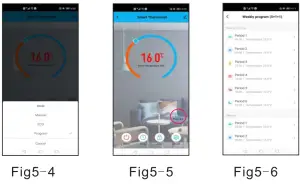
![]() : Power On/Off button. See page(fig5-2)When the button red is power on(fig5-2). The button blue is powered off(Fig5-3).
: Power On/Off button. See page(fig5-2)When the button red is power on(fig5-2). The button blue is powered off(Fig5-3).![]() : Select manual/program/eco mode here.
: Select manual/program/eco mode here.
Manual mode: ![]() In this mode, you could change the setting manually Program mode:
In this mode, you could change the setting manually Program mode: ![]() In this mode, you could programmable your thermostat click the button in the left side circle in red.see page(fig5-5).You can change the weekdays and weekends’ temp and time.6events each day(fig5-6), click on SAVE, and the app will send the programming to your thermostat and confirm the schedule has been saved Thermostat will run as your pre-setting schedule.
In this mode, you could programmable your thermostat click the button in the left side circle in red.see page(fig5-5).You can change the weekdays and weekends’ temp and time.6events each day(fig5-6), click on SAVE, and the app will send the programming to your thermostat and confirm the schedule has been saved Thermostat will run as your pre-setting schedule.
Eco-mode: ![]() In this mode. The thermostat will run in a 16degree factory setting. This temp can’t change on your app.(Thermostat configuration could change temp)
In this mode. The thermostat will run in a 16degree factory setting. This temp can’t change on your app.(Thermostat configuration could change temp)![]() : Select lock/unlock your thermostat.When the button is red it means a lock. Unlock status The button will be blue.
: Select lock/unlock your thermostat.When the button is red it means a lock. Unlock status The button will be blue.![]() : This is the setting button. You could select emperature compensation, Forest protection function, and back to factory setting. see page ( fig5-7).
: This is the setting button. You could select emperature compensation, Forest protection function, and back to factory setting. see page ( fig5-7).
Where to connect with third-party access service-Voice control?
On this page(Fig6-1), You could click ![]() on the upper right side button. Go into the page(Fig 6-2) Or on the page (Fig6-3)click “me” to enter more services (Fig6-4) select voice control, Alexa.Google.TFTTT, Smart things, etc. l
on the upper right side button. Go into the page(Fig 6-2) Or on the page (Fig6-3)click “me” to enter more services (Fig6-4) select voice control, Alexa.Google.TFTTT, Smart things, etc. l
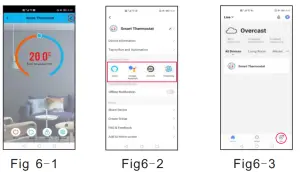

You could also choose” share devices” and “create group” with your family. See page(Fig6-2)Choose the “smart” button( Fig6-3)Customize your own personal scenes to suit your needs. (Fig6-5)
Thermostats Trouble Shooting
NO. | Phenomenon | Handling method |
| 1. | Room temp is little different from the actual temp | You could use thermostat temperature compensation to change the temp to be the same |
| 2. | When the thermostats show ERR | This means you need to connect your external sensor |
| 3. | Power-on but not display | Please check whether you connect the correct wires or your thermostat is connected well. |
Thermostat Warranty
We will provide 2 years warranty for our dear customers. During this period, if the products Have quality issues. We will replace or fix it for you.
If the problem is not a quality issue or override The warranty time. You may need to charge for it.


