
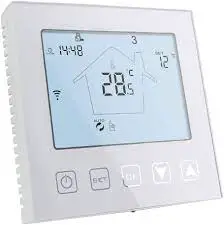
KETOTEK LL0269 WiFi Digital Heating Thermostat
Features
- Including built in sensor and external sensor
- 0.5°C accuracy keeps temperature within the level you set.
- Children lock to prevent microoperation by children
- Data memory when power is off.
- Holiday mode make you enjoy more comfortable temperature in holiday
- The temperature of external sensor can be checked
Product Specifications
- Power: 90 240Vac 50/60Hz
- Range of temperature 1~70°C
- Display 0.5°C
- Insulating condition: Normal environment
- Probe NTC(10k)1%
- Running program: Set per 1 week as a cycle
- Contact 3A/(WW);16A/(WE)
- Output: Switch relay
- Limit temperature 1~70°C
- Installation: recessed type (in the wall)
- Range of temperature 5~35°C
Wiring Diagram
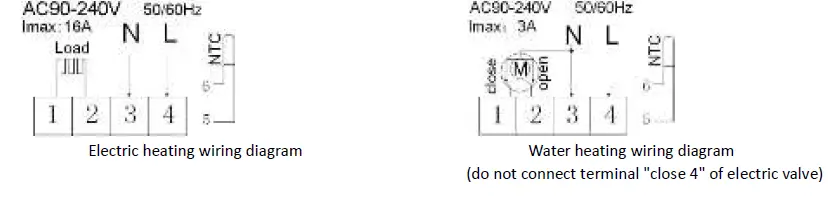
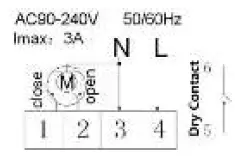
Water heating and gas wall hung boiler heating, no contact wiring diagram, (disconnection when electric valve close)
Note: 5&6 connect with gas boiler ,3&4 connect with N and L line . If normally closed thermal actuator ,then connect with 1&3,if normally open thermal actuator ,then connect with 2&3
Displays
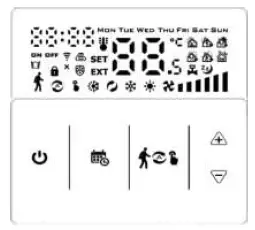
Description of icon
- Auto mode; run preset program Manual mode
- Programming mode Temporary manual mode
- Holiday mode, Holiday days and temperature can be set to run in countdown mode
- Heating, icon disappears to stop heating External NTC sensor
- WIFI connection, flashing EZ distribution mode Child lock
- Wifi status: Disconnection Cloud icon: flashing AP distribution network mode
- Activate window function Room temp Setting temp
Operation key
| NO | symbols | represent |
| A | Turn ON/OFF: Short press to turn on/ turn off | |
| B | 1 Short press to switch automatic mode and manual mode 2 Turn on thermostat, long press for 3-5 seconds to enter into programmable setting 3. Turn off thermostat, long press for 3-5 seconds to enter into advanced option A | |
| C | 1 Confirm key: use it with key 2 Only short press it to set time 3 Turn on thermostat, long press it for 3-5seconds to holiday mode setting. Appear OFF, press or change to ON, then press to confirm opening holiday mode 4 Turn off thermostat ,long press it for 3-5s to enter into advanced option B | |
| D | 1 Decrease key 2 Long press to lock /unlock | |
| E | 1 Increase key ; 2 Long press to inquire external sensor temperature ( only available for BN item select N3 in the advance option B) 3 In the program model, press or enter to temporary manual mode | |
| F |
| Press them together to enter matching wifi mode |
Programmable
5+2 (factory default),6+1 and 7 models 6 times period setting for user choose. In the advanced options choose model of you need, under power on state, long press for 3 5 seconds enter into programming mode setting, then short press choose: hour, minute, time period, and press and to adjust data, finished setting, about 10 seconds will automatic save and exist.
| Wake up | Leave home | Back home | Leave home | Back home | Sleep | ||||||
| 6:00 | 20℃ | 8:00 | 15℃ | 11:30 | 15℃ | 13:30 | 15℃ | 17:00 | 15℃ | 22:00 | 15℃ |
Advanced option A
Power off state, long press for 3 5 seconds to access advanced option A.
From A1 to AF, short press to choose the option, and adjust data by or, short press to switch next option. Remain about 5 seconds after finish setting will quit setting.
| NO | Setting Options | Data Setting Function | Factory Default |
| A1 | Measure Temperature Calibration | -9-+9℃(Displayed as the corrected room temperature value) | -1 |
| A2 | Start/stop working temperature difference setting | 0.5-2.5℃ | 1℃ |
| A3 | Children lock setting | 0:half lock 1:full lock | 0 |
| A4 | Power on/off state memory after electricity cut | 0:Thermostat on/off with memory when electrify 1:Thermostat off when electrify 2:Thermostat on when electrify | 0 |
| A5 | Standby bright | 0: Off 1: Weakly bright 2: Brighter | 10 |
| A6 | Logo display on standby | 0: No display 1: Display | |
| A7 | Weekly programming selection | 0: 5+2 1: 6+1 2: 7 | 0 |
| A8 | Setting temperature minimum limit | 1-10°C | 5°C |
| A9 | Setting temperature maximum limit | 20-70°C | 35°C |
| AA | Low temperature protection | 1-10°C When setting temp = 10℃, if press will display 【–】, cancel low temperature protection | 5°C |
|
AB | High temperature protection for external sensor | 20°C-70°C When setting temp = 20°C, , if press will display 【 — 】 , cancel high temperature protection | 45°C |
| AC | High temperature protection temperature difference setting | 1-9°C | 2°C |
| AD | Window function triggers temperature | 10-20°C,setting temperature is 10°C,decrease it ,will display【–】,then canceled this function | — |
| AE | Window function running time | 10-20min | 10 |
| AF | Restore factory defaults | Display Ao , long press key to whole show |
Advanced option B
Power off state, long press for 3 5 seconds to access advanced option B.
short press to choose the option, and adjust data by or , short press to switch next option. Remain about 5 seconds after finish setting will quit setting.
| NO | Setting Options | Data Setting Function | Factory Default |
| BN | Options of sensor control | N1:Internal sensor (high temperature protection close) N2:External sensor (high temperature protection close) N3:Internal sensor control temperature ,external sensor limit temperature (external sensor detect the temperature is higher than highest temperature of external sensor, thermostat will Close relay,turn off load) | N1 |
| BC | Descaling function | 0: Disable descaling function 1: Enable descaling function | 0 |
| Bo | product information | Can’t be changed |
Return difference : limit valve of external sensor is 45℃ for factory default (A6),value of external sensor control return difference (A3) is 2. when temperature rise to 45℃,then relay stop working and will remind high temperature production alarm. If temperature decline to 43℃relay continue to work and heating alarm will be relieved. (it can be operated ,only when room temperature is lower than setting temperature )
Sensor fault display: please choose correct working way of built in and external sensor, if choose wrongly or sensor fault (breakdown), “E1” or “E2” will be displayed on the screen. Thermostat will stop heating until the fault is eliminated
Warranty: We offer the warranty of 24 months, from the sales day. The products of our company can have lifetime warranty ,if it is not the quality problems, or beyond the warranty period, we will charge for the after-sale service.


