![]()
QUICK START GUIDE
INDOOR CAMERA
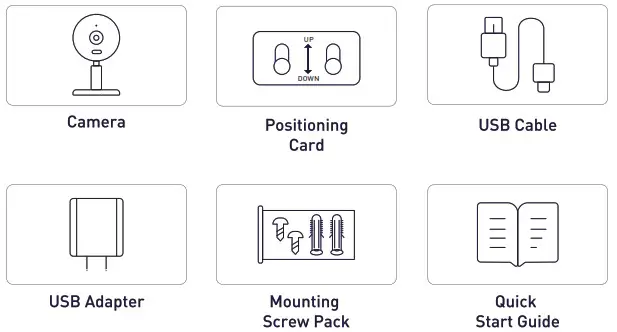
In the box
After opening the box, please check the following picture to see if the accessories are complete.
![]() The indoor camera’s power adapter is not weatherproof and should only be plugged into an indoor outlet.
The indoor camera’s power adapter is not weatherproof and should only be plugged into an indoor outlet.
Introduction
- Excellent clarity:
Real 3M pixels provide you with an unrivaled visual experience. - Color night vision:
Device has the built-in IR LEDs and spotlights that allow you to capture a color image even at the night. - Enhanced Al:
Support Human and Pet Detection. - Clear Two-way audio:
Built-in microphone and speaker allow you to carry on a conversation from anywhere with your phone.
Storage:
Support Local storage and cloud storage which work in a mode of 24/7 constant video recording or event-triggered video recording.
Product Overview
Appearance
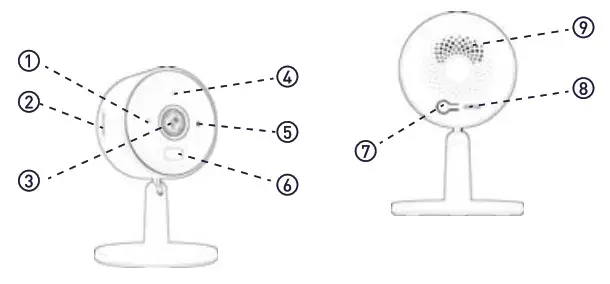
| 1. Status LED 2. Photosensitive 3. Sensors Speaker | 4. Micro SD Card Slot 5. Microphone 6. SYNC Button | 7. Lens 8. Spotlights 9. Power input |
Status LED
| LED Status | Description |
| Slow blinking Red | Ready to connect |
| Fast blinking Red | Disconnected from the internet |
| Slow blinking Blue | Connected to the router successfully |
| Solid Blue | The camera has been added successfully and working normally |
| Flashing blue and red alternately | A firmware update is in progress |
Basic Parameters
| Active pixels | 2304*1296 | Storage | SD Card (MAX128G) |
| Clarity Resolution | 3Mp | Wi-Fi | Only 2.4GHz Wi-Fi |
| FOV | 100° | Network Security | WPA-PSK/WPA2-PSK |
| Lens | 3.6mm F2.0 | Operating Temp | -10 – +50 C |
| IR LED | 26 ft | Power Source | DC5V/1A |
| Spotlights | 16 ft | Item Weight | 2.50 ounces |
| Audio | MIC/Speaker | Product Dimensions | 2.24 x 1.39 x 3.94 inches |
Set Up Your Camera
Step 1: Download
Download the Tuya Smart or Smart Life App from the Apple AppStore or Google Play, or by scanning the QR code below.
 |  |  |
| https://smartapp.tuya.com/tuyasmart | https://smartapp.tuya.com/smartlife |
Step 2: Connect it to the APP
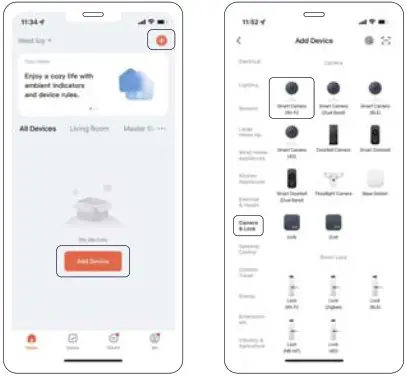
- Sign up a App account, go to the app homepage, tap Add Device, and select the smart cameralWi-Fi).

 Please follow the prompts of the App to allow relevant permissions, otherwise it will affect the addition and use of the device.
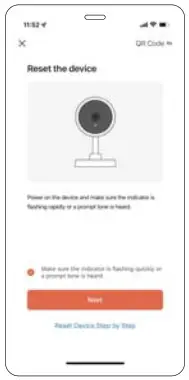
 - Power on the device and make sure the Status LED is Slow blinking Red or Heard “Waiting to receive the wireless configuration”
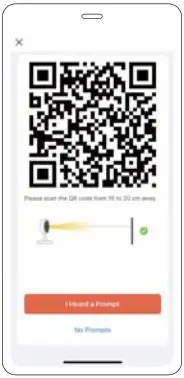
 Please choose a 2.4GHz Wi-Fi, the camera does not support the SGHz Wi-Fi.
 - Please click Next, select a stable network and enter a password. The camera of the device scans the QR code generated by the mobile phone, keep a distance of 15 to 20cm and do not move until the sound of “ Di” is heard, and finally follow the steps on the App to complete the addition.
 When adding devices, please make the camera and mobile phone connect to a same Wi-Fi router.
Mount Your Camera
Choose a good spot for Mounting
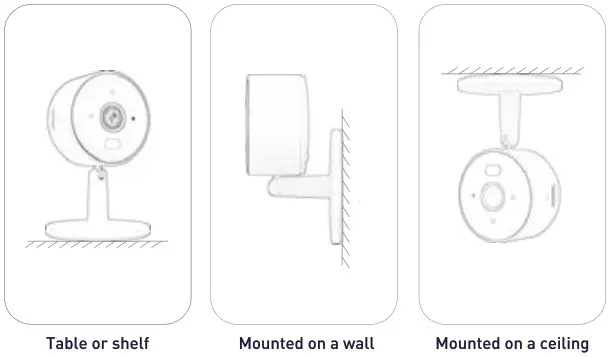
The camera can be placed on a table, shelf, or can be mounted on a wall or ceiling. Choose a spot where you can get the desired view, and can reach a power outlet easily.
Placement Guidelines
Consider the surroundings
Is a walls, light or anything blocking the view? It might throw off exposure, focus or Night Vision. Please Keep the Indoor Cam at least 0.7 ft / 20 cm away from walls or anything.
Keep Camera in range of router
Make sure to choose a place within the signal range of your home WiFi.
Please finish the Adding device steps before you mount your camera.
Near the outlet
An electrical outlet is required near the installation spot to power the camera.
Safe
To avoid risk of overheating and burns:
Use only in temperatures between 14° and 122°F [-10° to 50°C). Do not block airflow to Indoor Cam.
To avoid risk of fire and shock:
Use only provided power cable and power adapter. install in accordance with building and installation codes where you live.
To avoid risk of other serious injury:
Keep camera and all components out of the reach of children and pets.
Mount the Indoor Camera
Place your camera on a flat surface, or install it on a wall or ceiling with the provided mounting screws.
To mount the Camera on the wall:
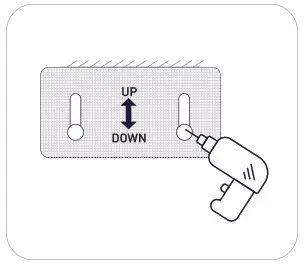 | 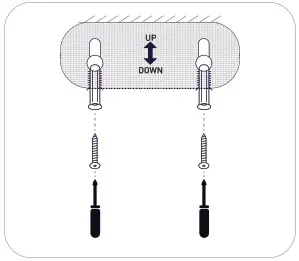 |
| Step 1: Place the Positioning Card where you want the camera. For wall mounting, drill two holes through twocircles. | Step 2: Affix two mounting screws with the help of Positioning Card. Insert two anchors into holes and screw the screws into the anchors. |
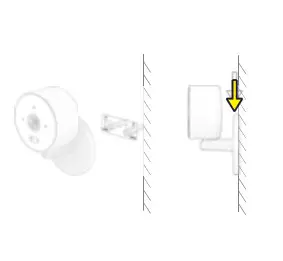 | 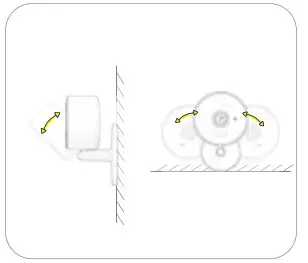 |
| Step 3: Hang your camera on the screws. Slide the camera base down until the camera is firmly mounted on the wall. | Step 4: Tilt and swivel to adjust the camera angle. |
To mount the Camera on the ceiling:
Please follow the steps 1-3 to secure the camera onto the ceiling, then swivel to adjust the camera angle.
![]() To unmount your Essential Indoor Camera, slide the camera up, then pull the camera away from the wall.
To unmount your Essential Indoor Camera, slide the camera up, then pull the camera away from the wall.
Customer Service
Warranty
12-month Limited Warranty
Customer Support
yonggang.xieace-link.com
RRF exposure statement
This equipment complies with the FCC RF radiation exposure limits set forth for an uncontrolled environment. This equipment should be installed and operated with a minimum distance of 20cm between the radiator and any part of your body.
This equipment meets the exemption from the routine evaluation limits in section 2.5 of RSS-102. It should be installed and operated with a minimum distance of 20cm between the radiator and any part of your body.
FCC Warning
This device complies with Part 15 of the FCC Rules. Operation is subject to the following two conditions:
(1) This device may not cause harmful interference, and (2) this device must accept any interference received, including interference that may cause undesired operation.
NOTE 1: This equipment has been tested and found to comply with the limits for a Class B digital device, pursuant to part 15 of the FCC Rules. These limits are designed to provide reasonable protection against harmful interference in a residential installation. This equipment generates uses and can radiate radio frequency energy and, if not installed and used in accordance with the instructions, may cause harmful interference to radio communications. However, there is no guarantee that interference will not occur in a particular installation. If this equipment does cause harmful interference to radio or television reception, which can be determined by turning the equipment off and on, the user is encouraged to try to correct the interference by one or more of the following measures:
- Reorient or relocate the receiving antenna.
- Increase the separation between the equipment and receiver.
- Connect the equipment into an outlet on a circuit different from that to which the receiver is connected.
- Consult the dealer or an experienced radio/TV technician for help.
NOTE 2: Any changes or modifications to this unit not expressly approved by the party responsible for compliance could void the user’s authority to operate the equipment.
IC WARNING
This device contains license-exempt transmitter(s) that comply with Innovation, Science and Economic Development Canada’s licence-exempt RSS(s). Operation is subject to the following two conditions:
- This device may not cause interference.
- This device must accept any interference, including interference that maycause undesired operation of the device.


