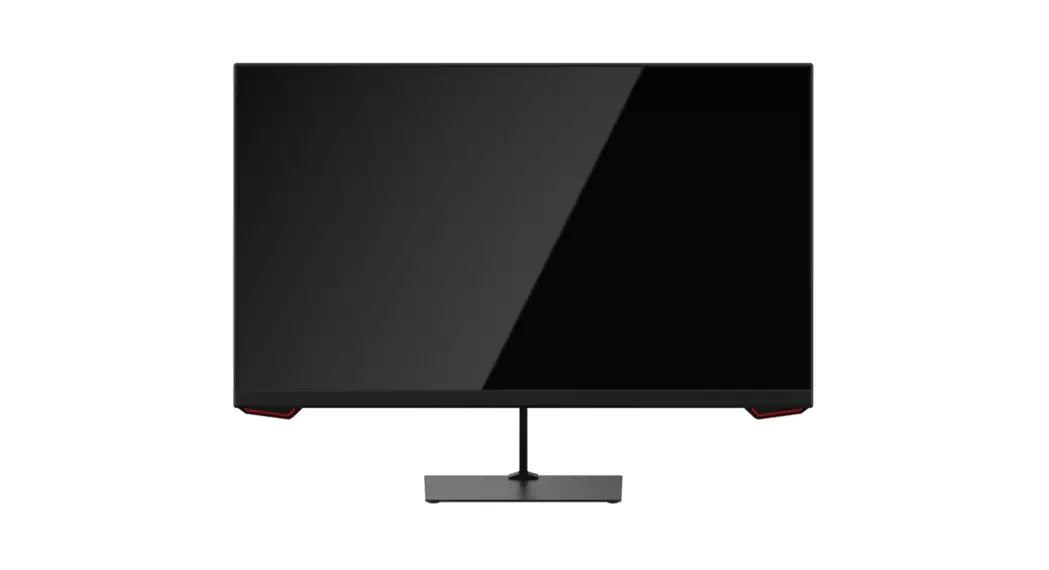
![]() KAMN24FG6LA 24 Inch FHD Gaming Monitor
KAMN24FG6LA 24 Inch FHD Gaming Monitor
User Guide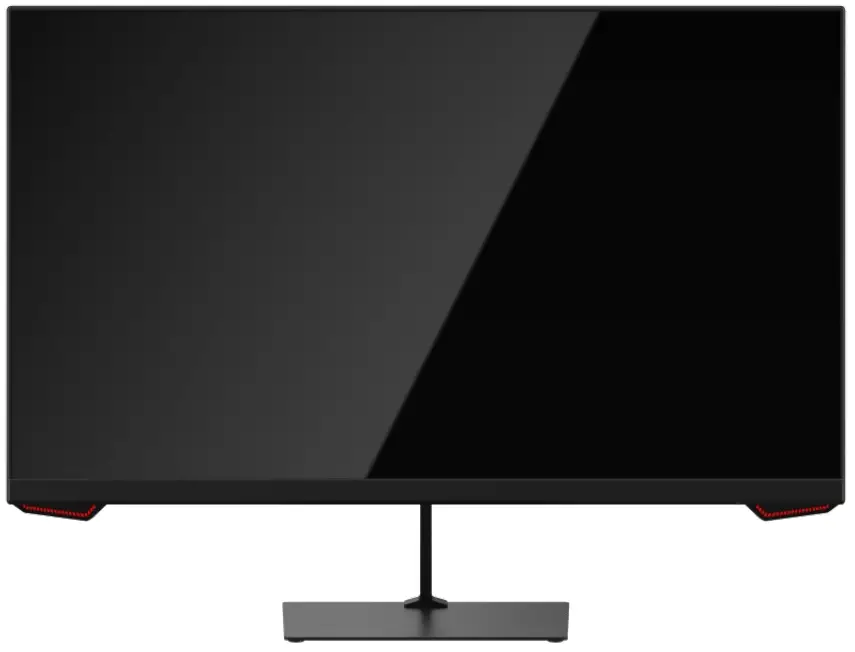 24″ FHD GAMING MONITOR
1920 x 1080, 165Hz
KAMN24FG6LA
SAFETY & WARNINGS
Ensure to read all instructions and warnings in this user guide prior to first use. Retain this user for future reference.
- Do not position the monitor on unstable surfaces. If the monitor falls, it may lead to damage and injuries to people around its vicinity.
- Do not place the monitor near heat sources (for example, heaters, stoves, fireplaces).
- Do not use the monitor in areas lacking adequate ventilation.
- Do not open the back panel of the monitor as it contains a high-voltage current even when unplugged.
- Do not place heavy objects on the monitor, its power cord, or any other connected cable.
- The back of this monitor is designed with ventilation holes. Do not cover or block them as this may cause overheating and damage.
- Do not insert or spray anything into the vents of this monitor.
- Unplug the monitor if it will not be used for an extended period.
- Ensure the monitor is unplugged before cleaning.
- Do not use cleaning alcohol, ammonia-based liquids, or other harsh cleaners when cleaning the monitor.
![]() The terms HDMI and HDMI High-Definition Multimedia Interface, and the HDMI Logo are trademarks or registered trademarks of HDMI Licensing Administrator, Inc. in the United States, and other countries.
The terms HDMI and HDMI High-Definition Multimedia Interface, and the HDMI Logo are trademarks or registered trademarks of HDMI Licensing Administrator, Inc. in the United States, and other countries.
COMPONENTS
OVERVIEW
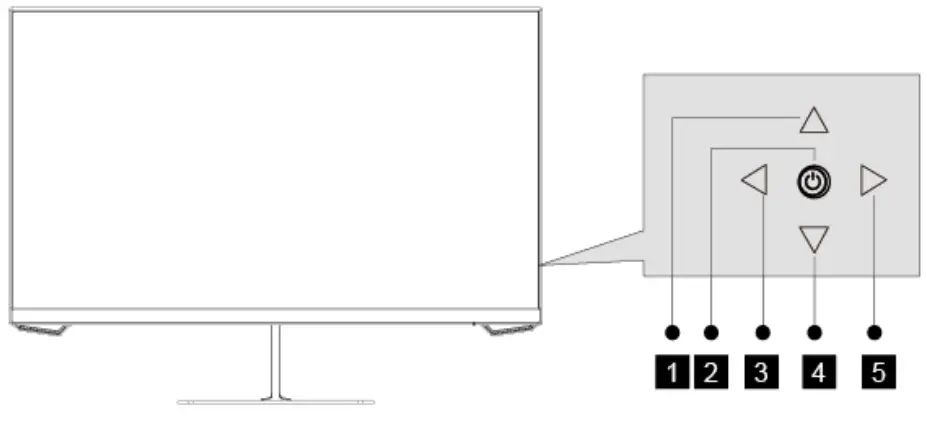
- Up button
- Power button
- Left button
- Down button
- Right button
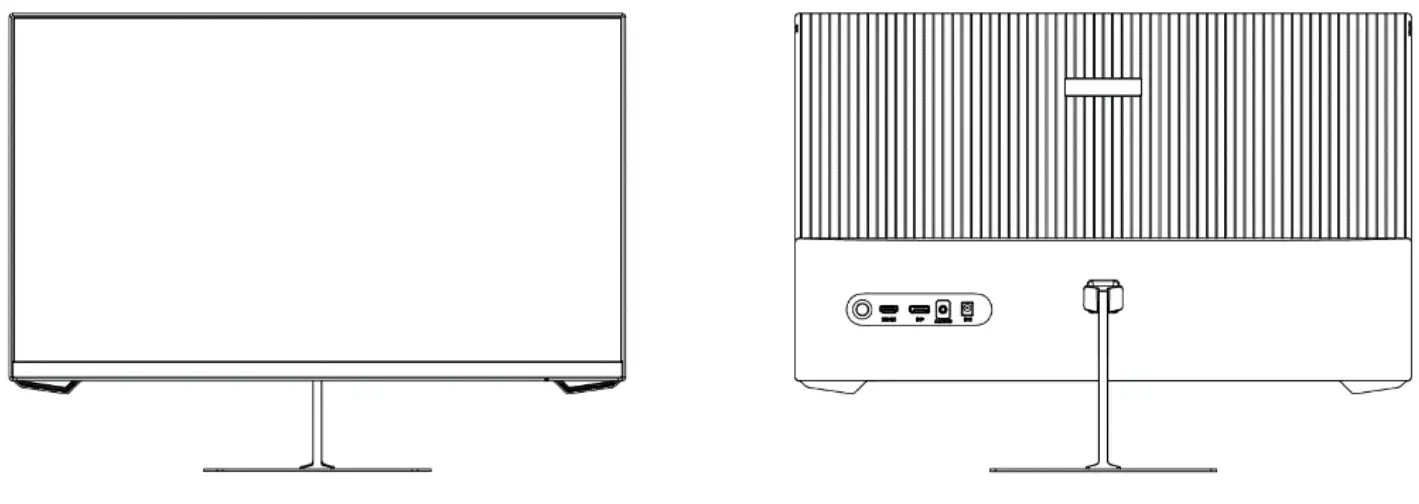
Ports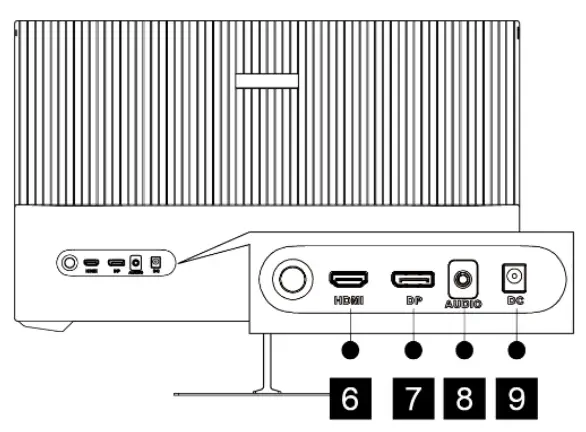
- HDMI port
- DisplayPort port
- Audio output
- Power port
STAND ASSEMBLY
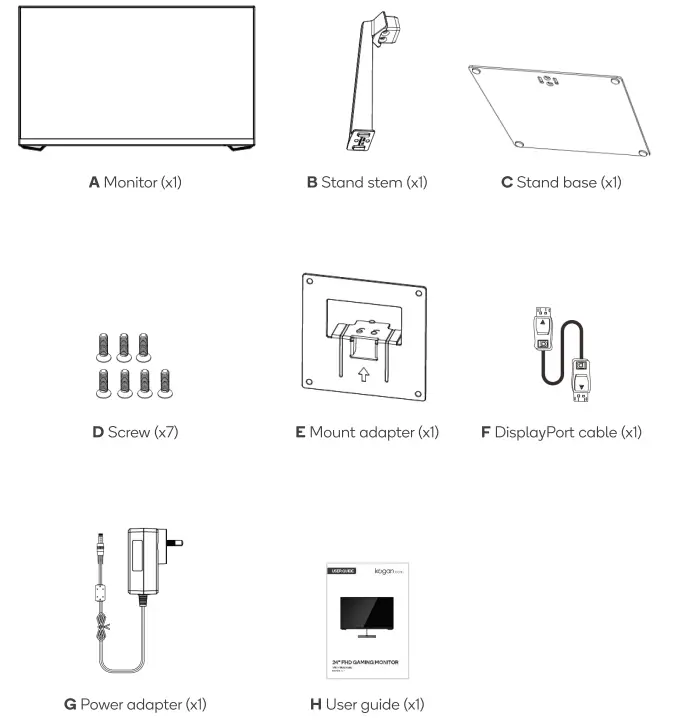
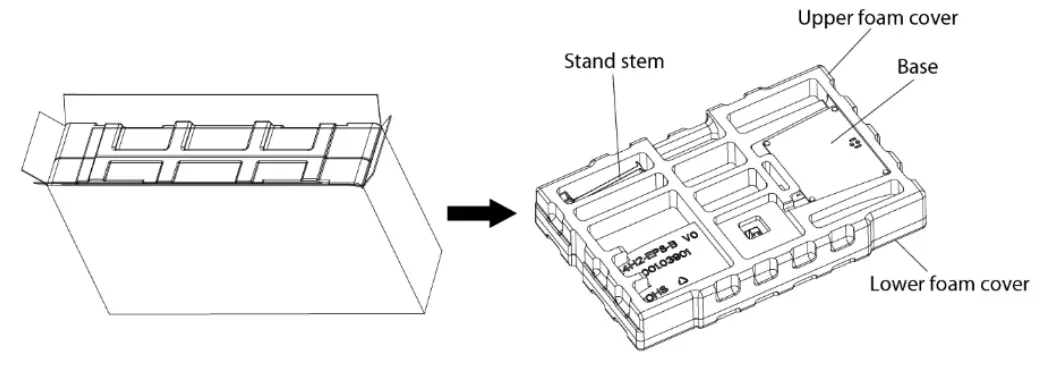
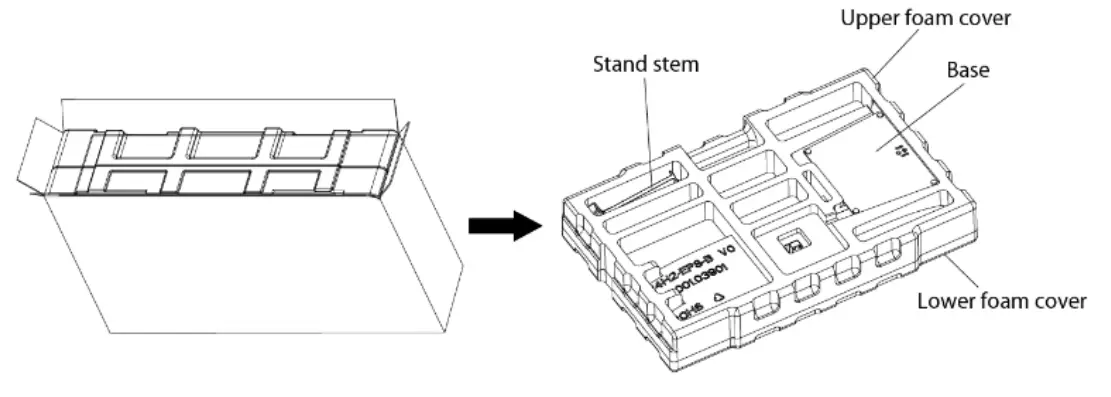
- Open the package and remove the foam to take out the stand stem (B) and stand base (C). Place the components (B, C) on a flat surface. Ensure all components are present before disposing o f any packaging.
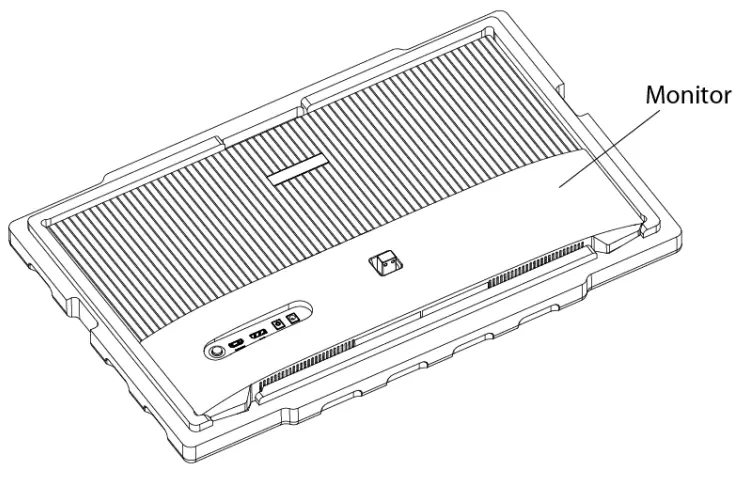
- Carefully remove the monitor (A) and place it into the lower foam cover.
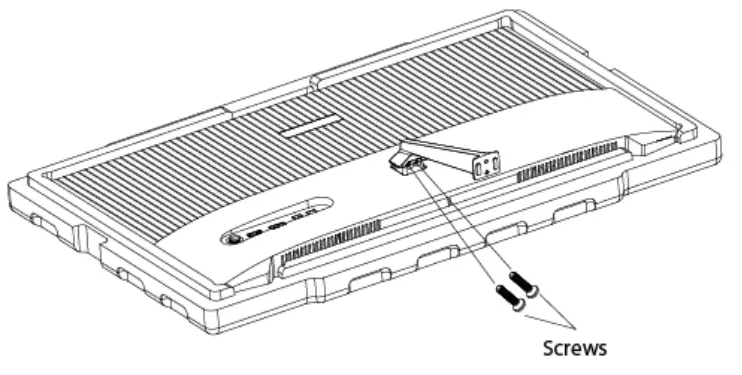
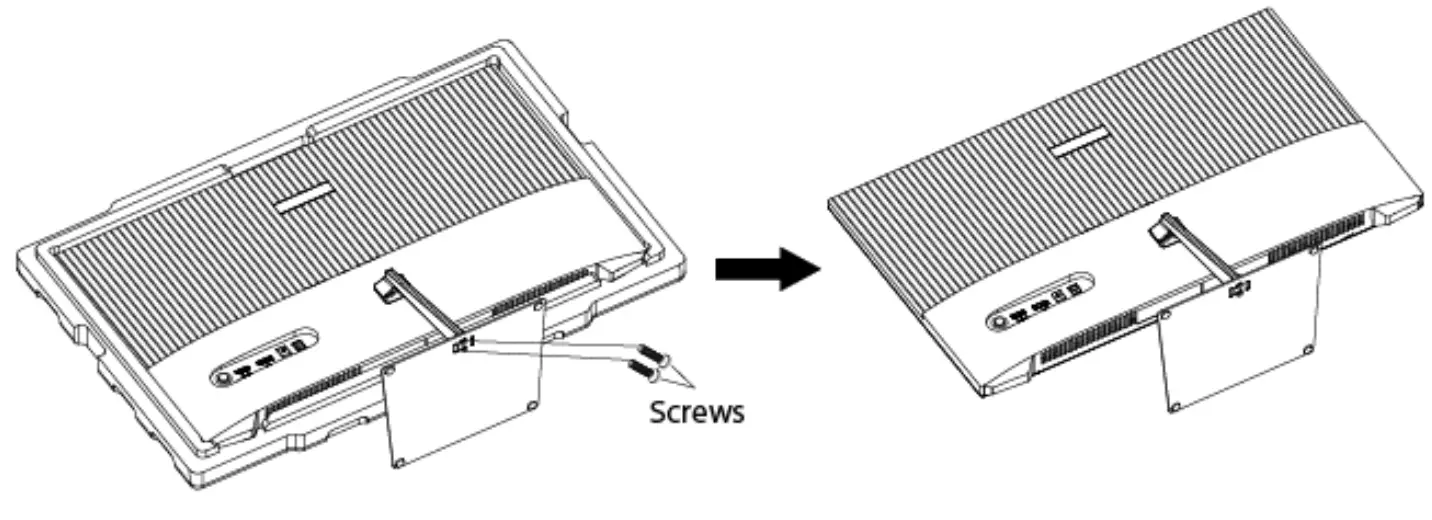
- Use a screwdriver (not supplied) to install the stand stem (B) onto the back of the monitor (A) with two screws (D).
- Align the stand base (C) with the bottom of the stand stem (B). Use a screwdriver to secure the stand base (C) with two screws (D).
- Use both hands to place the monitor (A) upright.
Notes:
- There are x7 screws provided in this package – x4 are required if using the stand, x2 are required if using a VESA mount, xl is a spare.
- If you would like to switch from using the stand to using a VESA mount to hold the monitor in the future, there are sufficient spare screws to use.
VESA MOUNT
- Open the package and remove the foam to take out the stand stem (B) and stand base (C). Place the components (B, C) on a flat surface.
- Carefully remove the monitor (A) and place it into the lower foam cover. Take out the mount adapter (E) and using a screwdriver, secure the mount adapter (E) to the back of the monitor (A) with two screws (D).
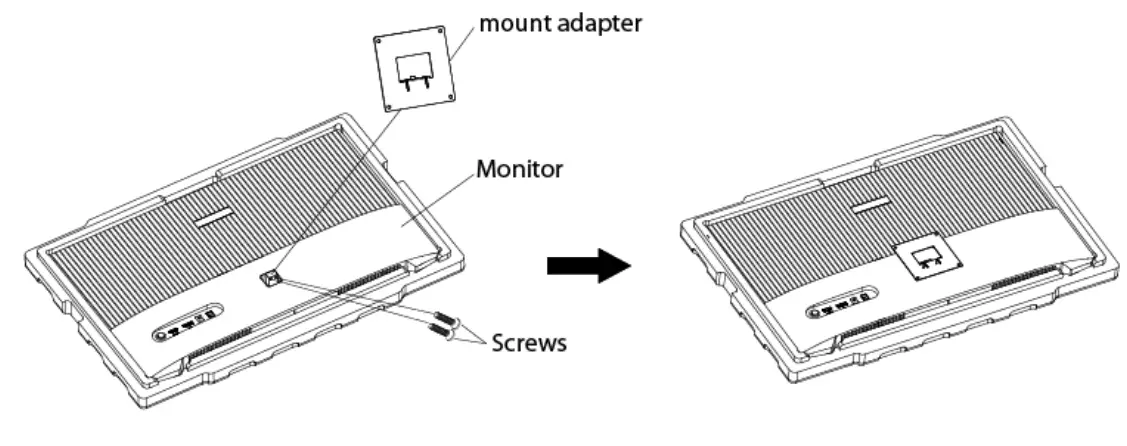
- The monitor is now ready for mounting. Assemble the mount as detailed by the instructions provided.
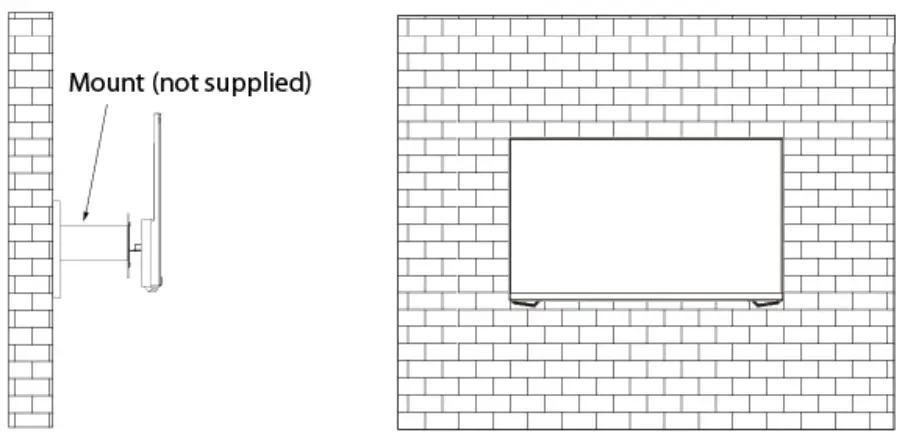
Notes:
- The mounting hole distance for this monitor is 75 x 75mm.
- VESA mount and mounting accessories are not included.
CONNECTIVITY
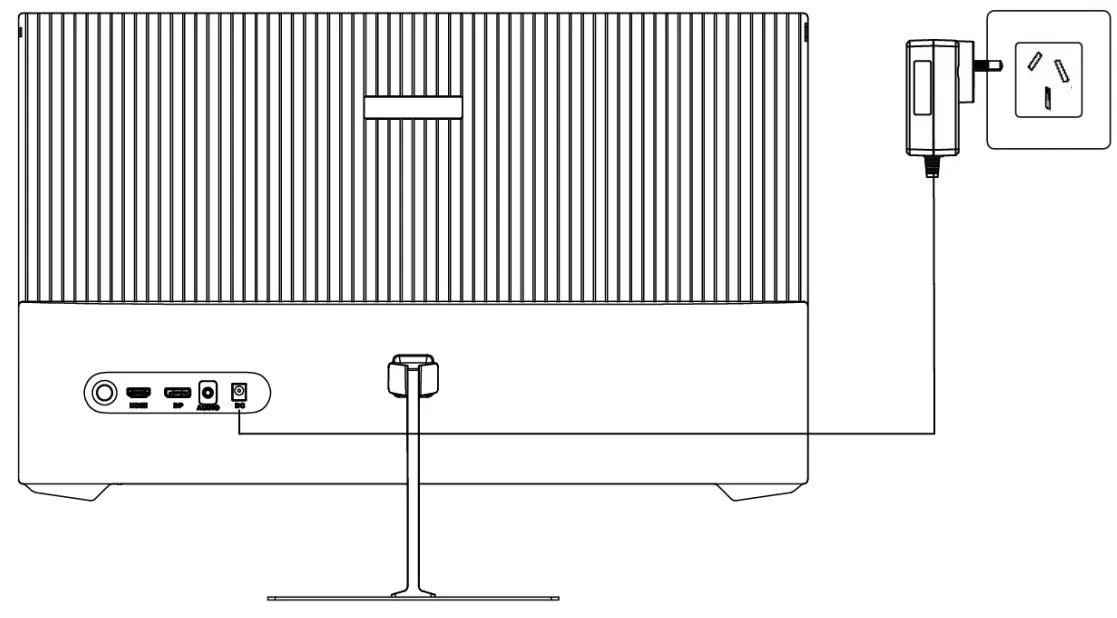
Power adapter
Connect one end of the power adapter into the power port on the monitor, then connect the other end into a power socket
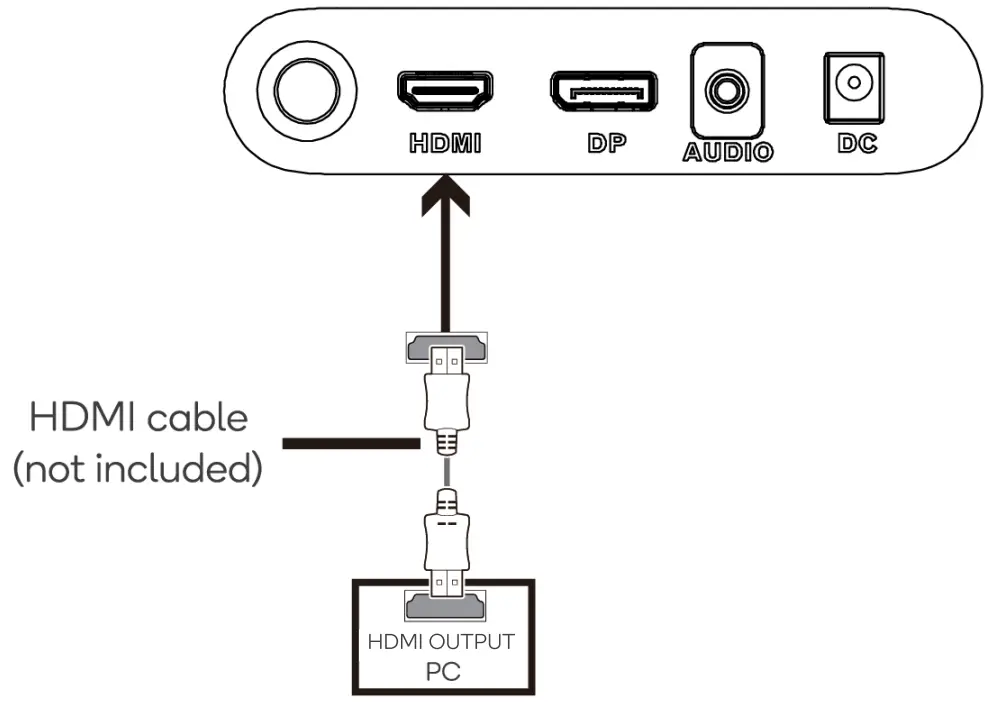
 HDMI
HDMI
For the monitor to receive HDMI signals from the computer, plug one end of an HDMI cable (not included) into the HDMI port on the monitor. Connect the other end into a computer’s HDMI output.
 DisplayPort
For the monitor to receive DisplayPort signals from the computer, connect one end of the DisplayPort cable into the DisplayPort port on the monitor. Connect the other end into the DisplayPort output on the computer. 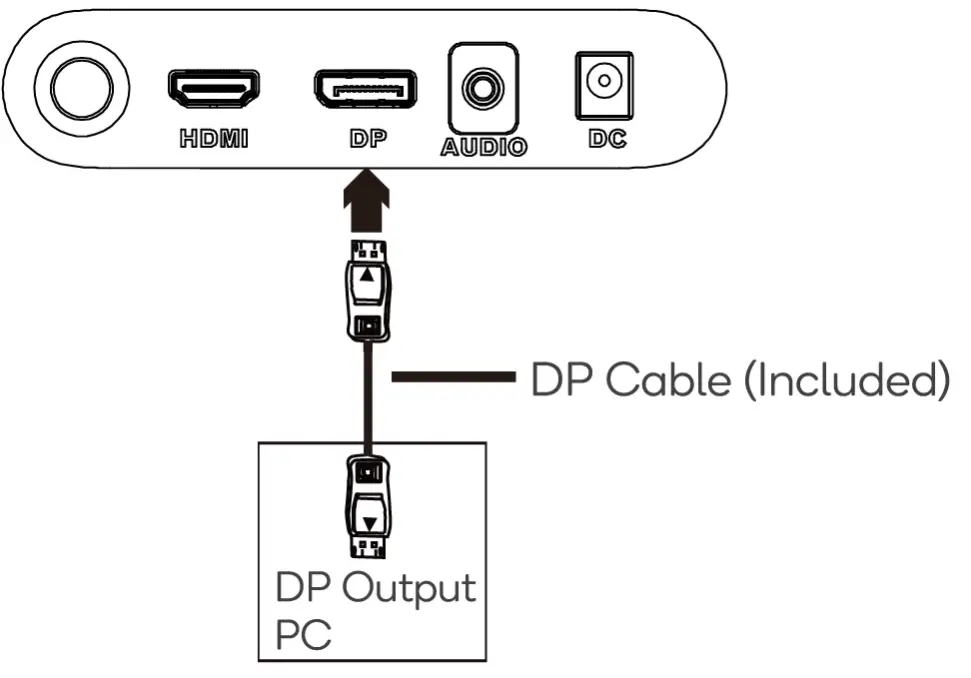 Earphones
Connect earphones ( not included) into the audio output port on the monitor.
If your earphones are connected to the monitor and there are other audio devices plugged into the computer, the audio devices will produce no sound.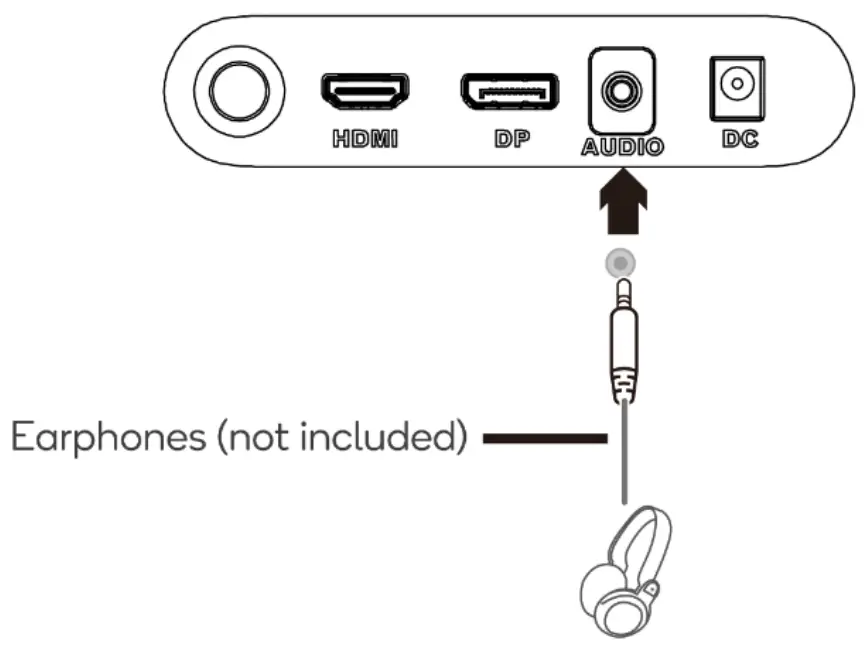
OPERATION
- Connect the monitor via HDMI/DisplayPort.
- Connect the power adapter into the power port on the monitor and power socket. Switch on the power at the socket.
Note: It is recommended to use a surge protector with adequate voltage if a socket cannot be reached directly. - Press the power button on the monitor to turn it on. The indicator light on the bottom of the monitor will illuminate a steady blue.
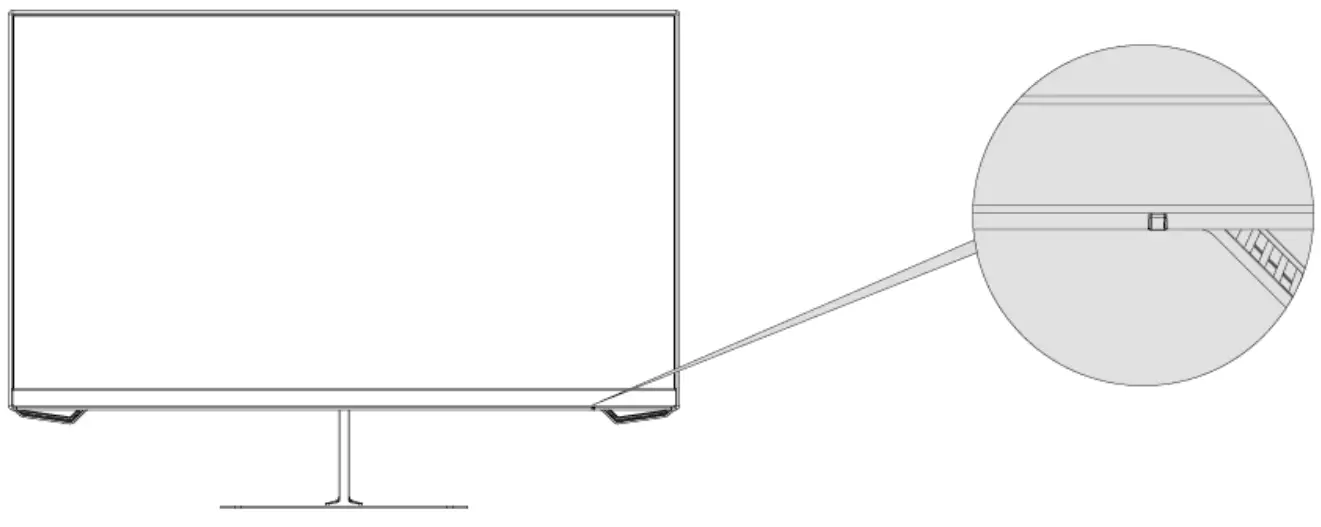 Note: If the indicator light illuminates red, this shows there is either too low of a voltage used, no video source, or no signal detected. Ensure all cables used are fully plugged in.
 - After use, press the power button to turn off the monitor. Switch the power off at the socket.
On-screen display
The on-screen display (OSD) menu is used to adjust the settings of the monitor.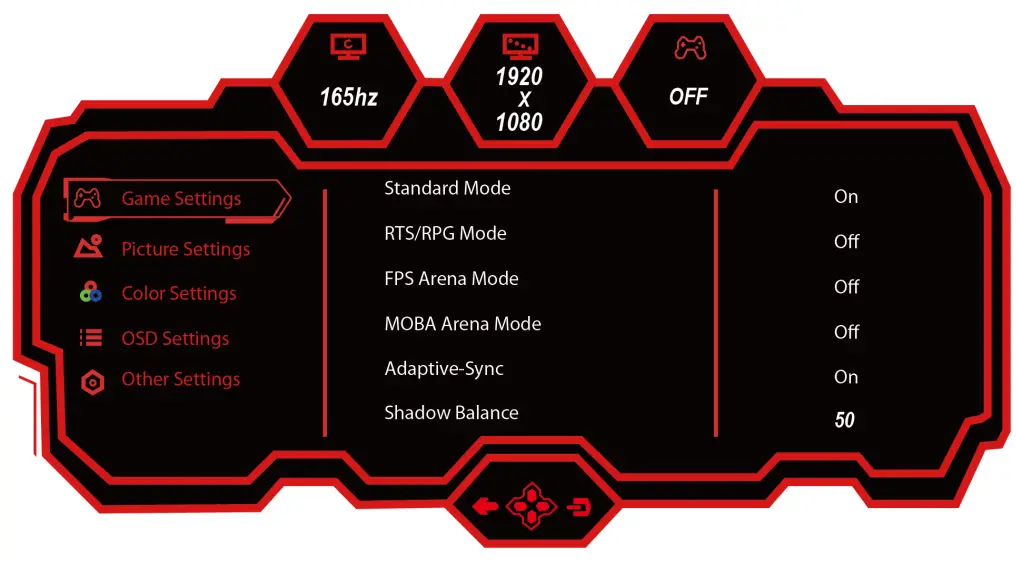
- Press the right button to activate the OSD menu.
- Press the up and down buttons to browse through the categories of settings. Press the right button to select the desired category and to enter the sub-menu.
- Press the up and down buttons to browse through the settings sub-menu. Press the right button to select the desired setting.
- Press the up and down buttons to adjust the setting. Once adjusted, press the right button to confirm and return to the sub-menu.
- Press the left button to exit the OSD menu.
Notes:
- Images used in this user guide are for reference only.
- Settings available through the OSD menu may change due to improvements over time.
Shortcuts to sub-menus
Besides the main OSD menu, smaller sub-menus can be directly accessed when on the display using the buttons on the monitor.
- Press the up button to enter the contextual modes menu.
- Press the left button to enter the input signal menu.
- Press the down button to enter the game crosshair menu.
OSD menu options
Below is a table that displays the various settings options available in the OSD menu.
| Category | Sub-Menu | Options | Description |
| Game Settings | Standard Mode | On, Off | Turns standard mode on/off |
| RTS/RPG Mode | On, Off | Turns RTS/RPG mode on/off | |
| FPS Arena Mode | On, Off | Turns FPS arena mode on/off | |
| MOBA Arena Mode | On , Off | Turns MOBA arena mode on/off | |
| Adaptive-Sync | On, Off | Turns Adoptive-Sync on/off | |
| Shadow Balance | 0-100 | Adjusts the shadow balance of the monitor | |
| Response Time | Off, Normal. Fast Ultrafost | Adjusts the response time | |
| Refresh Rate | On, Off,Position (Top Right. Top Left, Bottom Right, Bottom Left) | Adjusts the appearance (on, off) and position of the refresh rate on the monitor | |
| Game Crosshair | Off, Crosshair 1, Crosshair 2, Crosshoir 3, Crosshair 4, Crosshair 5, Crosshair 6 | Adjusts the appearance of game crosshairs | |
| Game Time | Off,15:00, 30:00, 45:00, 60:00, Position (Top Right, Top Left, Bottom Right. Bottom Left) | Sets the appearance, timing and position of the game time on the monitor | |
| Dynamic Brightness | Off, Normal. Expert, Elaboration | Adjusts the dynamic brightness of the monitor | |
| MPRT | On, Off | Toggles moving picture response time | |
| Ambient Lighting | On, Off | Toggles ambient lighting on/off |
| Picture Settings | Brightness | 0-100 | Adjusts the display brightness |
| Contrast | 0-100 | Adjusts the display contrast | |
| DCR | On, Off | Turns the dynamic contrast ratio mode on/off | |
| Contextual Modes | Off, Movie Mode, Reading Mode, Night Mode, Care Eyes Mode | Sets the contextual mode | |
| Low Blue Light | 0-100 | Adjusts the level of blue light | |
| Sharpness | 0-5 | Adjusts the display sharpness | |
| Gamma | 1.8, 2.0, 2.2, 2.4, 2.6, S.curve | Sets the gamma level of the display | |
| Aspect Ratio | Wide Screen, 4:3,1:1, Auto | Sets the display aspect ratio | |
| Colour Settings | Warm | On, Off | Turns a wormer colour temperature mode on/off |
| Natural | On, Off | Turns a natural colour temperature mode on/off | |
| Cool | On, Off | Turns a cooler colour temperature on/off | |
| User 1 | On, Off | Turns user l’s colour temperature on/off | |
| User 2 | On, Off | Turns user 2’s colour temperature on/off | |
| User 3 | On, Off | Turns user 3’s colour temperature on/off | |
| Hue | 0-100 (R/G/B) | Adjusts the hue levels | |
| Saturation | 0-100 (R/G/B) | Adjusts the saturation levels |
| OSD Settings | Language | English, | Sets the OSD language |
| OSD Time Out | 5-60 | Sets how long the OSD menu stays on without input (in seconds) | |
| OSD H-Position | 0-100 | Adjusts the OSD menu horizontal position | |
| OSD V-Position | 0-100 | Adjusts the OSD menu vertical position | |
| OSD | 0-5 | Sets the transparency of the OSD menu | |
| OSD Rotation | Normal, 90,180, 270 | Rotates the orientation of the OSD menu | |
| OSD Lock | On, Off | Turns the OSD lock on/off | |
| Hotkeyl Setting | Brightness, Contrast, Volume, Mute, Shadow Balance, Game Crosshair, Refresh Rate, Game Time, Adaptive-Sync, Contextual Model, Input, Source, Splicing Screen, Dynamic Brightness, Ambient Lighting | Adjusts the function of hotkeys | |
| Hotkey2 Setting | |||
| Hotkey3 Setting |
| Other Settings | Input Signal | Auto, DR HDMI | Selects the display input signal |
| Audio | Volume, Mute | Adjusts the volume of audio | |
| Splicing Screen | On, Off | Turns the splicing screen function on/off | |
| Auto Power | On, Off | Turns auto power on/off | |
| Eyeshield Remind | On, Off | Turns eyeshield remind on/off | |
| Reset | Yes, No | Resets the monitor to factory default settings | |
| Information | Input Source, Resolution, Mode | Displays information about the monitor |
CLEANING & CARE
- Ensure the monitor is turned off, unplugged, and cooled before cleaning.
- Clean the screen by wiping it with a dry microfibre cloth.
- Clean the monitor body with a slightly damp cloth with water.
SPECIFICATIONS
| Model | KAMN24FG6LA |
| Screen size | 24• |
| Aspect ratio | 16:09 |
| Backlight | E-LED |
| Brightness | 250 cd/m2 (Min.) 280 cd/m2(Typ.) |
| Panel | VA |
| Resolution | 1920 x 1080 |
| Refresh rate | 165 Hz |
| Response time | MPRT lms |
| Viewing angle | 178° (H) / 178° (V) (Typ.) |
| Contrast ratio | 3000:1 |
| VESA mounting | 75 x 75mm |
| Colours | 16.7M |
| Adaptive-Sync | Yes |
| Signal input | x1 DP1.2, x1 HDMI 1.4 |
| Power | DC 12V, 2.5A |
| Audio | |
| Audio out | Yes |
| Speakers | No |
| Accessories | |
| Power adapter | Yes |
| DisplayPort cable | Yes |
| Additional functions | |
| Low blue light | Yes |
| Physical dimensions | |
| Dimensions (with stand) | 542.4 x 402.8 x 160.9mm |
| Dimensions (without stand) | 542.4 x 334.5 x 38.5mm |
| Net weight | 3.23kg |
| Gross weight | 4.53kg |
![]() Need more information?
Need more information?
We hope that this user guide has given you
the assistance needed for a simple set-up.
For the most up-to-date guide for your product,
as well as any additional assistance you may require,
head online to help.kogan.com


