![]() Dwg #: 104900
Dwg #: 104900
Owner’s Copy
INSTALLATION INSTRUCTIONS FOR EAX-3500 ALARM
Installation Guide
Should you have a Question/Problem with your Detex device please call Detex Technical Support from the job site at 1-800-729-3839 and choose option 2 on our menu. Please do not return the product to the distributor.
| For WARRANTY information, scan the code below or go to www.detex.corn/warranty | For device installation videos, scan the code below or go to www.detex.com/videos |
 |  |
PARTS BREAKDOWN
| Item | Order Part # | Description |
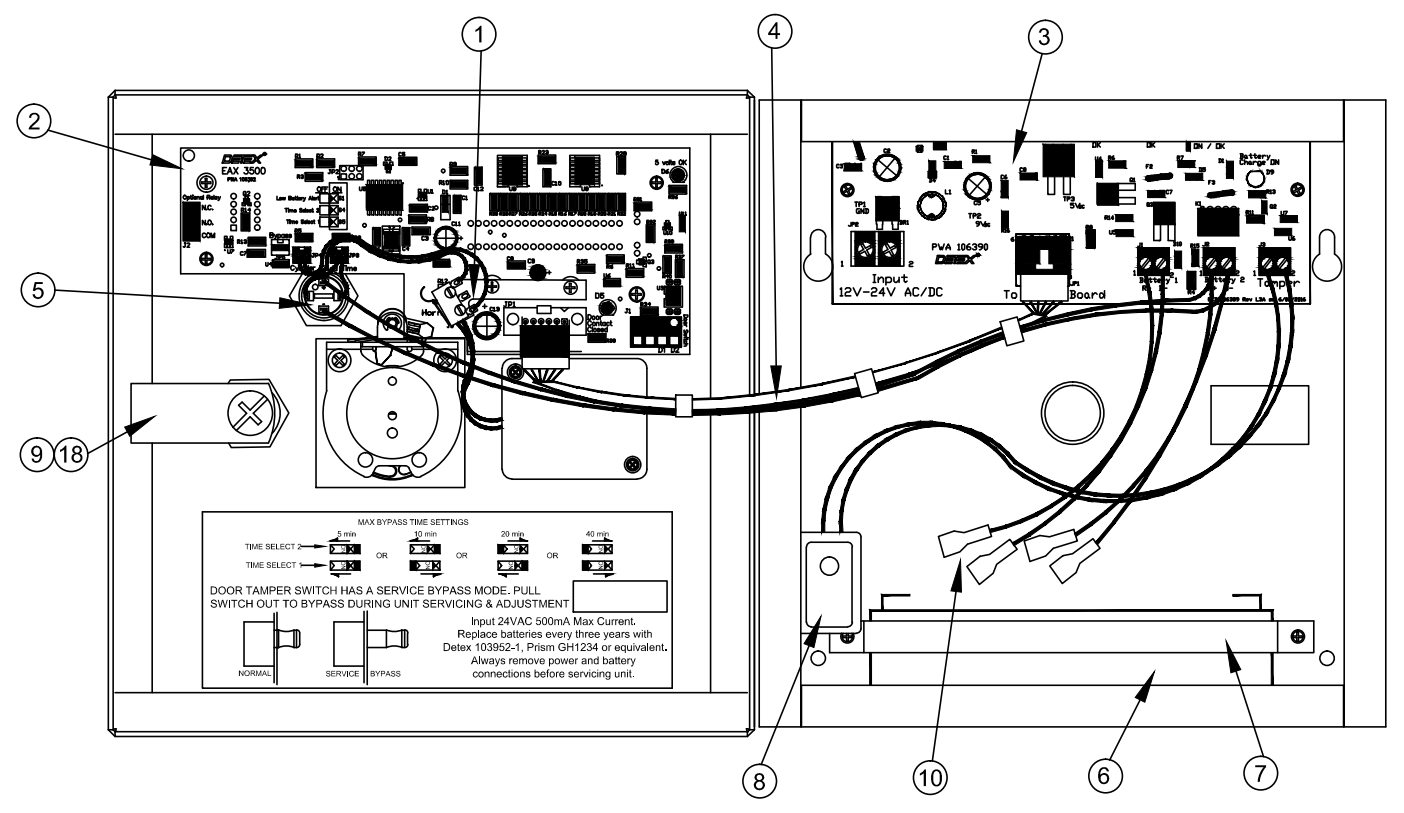
| 1 | 103990 | Switch assembly, reset, EAX-3500 |
| 2 | 106392 | PWA, logic board, EAX-3500 |
| 3 | 106390 | PWA, power board, EAX-3500 |
| 4 | 106385 | Wiring harness, logic board to power board |
| 5 | 106740 | Switch assembly, add time, EAX-3500 |
| 6 | 103952-1 | Battery, 6V 3.4ah (2 required) |
| 7 | 103963 | Battery strap |
| 8 | 103965 | Tamper Switch Assembly, EAX-3500 |
| 9 | 102966 | Cover lock and key |
| 10 | 103958 | Cable, Battery, EAX-3500 (2 required) |
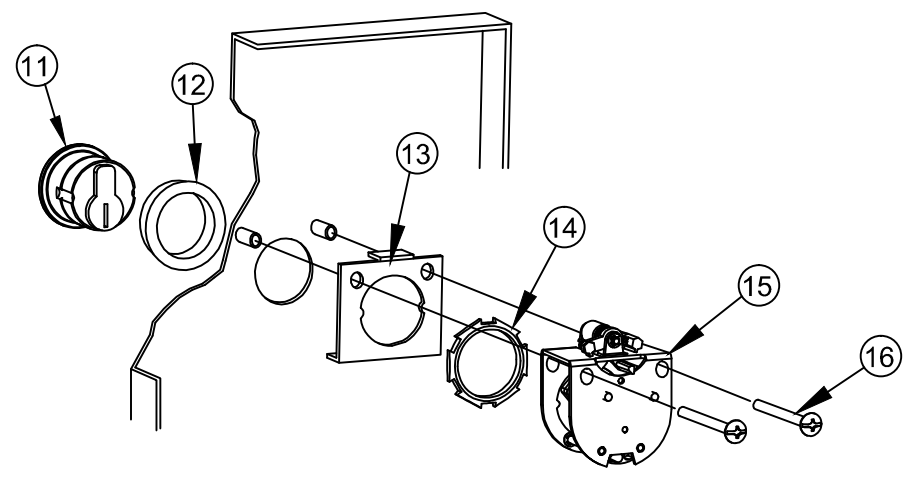
| 11 | 102281-7 | Lock cylinder MC-65 |
| 103800-626 | Lock cylinder IC7 | |
| 12 | 103303 | Cylinder collar |
| 13 | 103970 | Bracket, cylinder, EAX-3500 |
| 14 | 100783 | Cylinder nut |
| 15 | 102680 | Cam assembly |
| 16 | 102627-15 | Screw, mach, #8-32 x 1-1/2″ truss head |
| 17 | 103951 | Transformer, Plug-in, 120/24VAC/20V-amp |
| 18 | CL-1 | Cover lock keys (replacement) |
| 19 | 106383 | S&R EAX-3500 Board replacement kit |
Fastener Table
| Fastener Type | Fastener P/N | Drill Bit | Comments |
 | P/N: 103276-41 #10 x 1″ PPH | NOT REQUIRED | Metal Applications |
 | P/N: PP-5183-68 #10 x 1″ PPH | 1/4″ | All other Applications |
Mortise Cylinder with standard Yale cam required (not supplied)
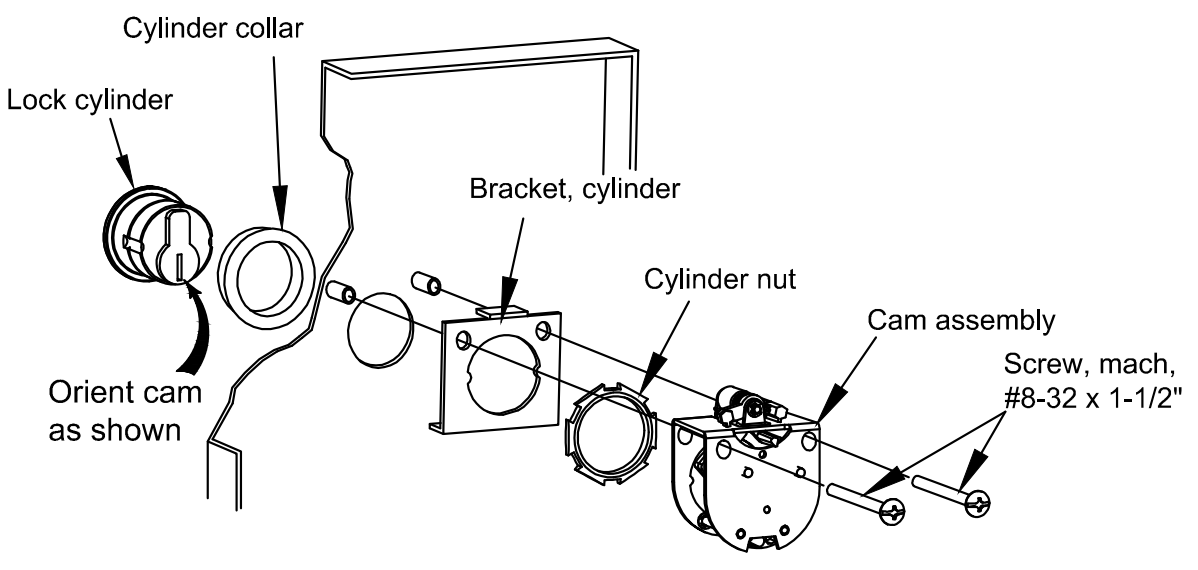
CYLINDER INSTALLATION:
Unlock the enclosure and open the hinged panel. To install cylinder (if not already provided) remove cam assembly. Reassemble cylinder into cam assembly as shown above.

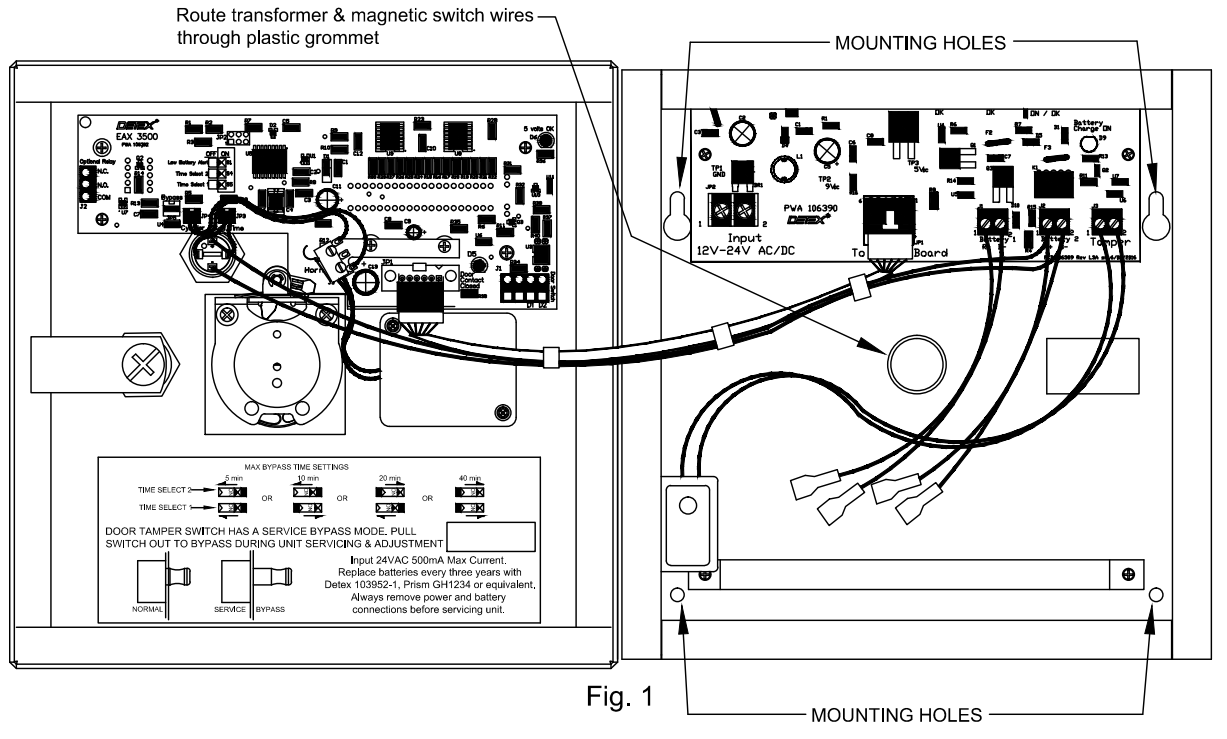
STEP 1. ENCLOSURE MOUNTING: Fig 1
Prep surface of the wall for mounting Exit Alarm enclosure. The enclosure is designed for all wires to be routed through the grommet in the rear hole. Route wires from the transformer and magnetic switch through the rear hole BEFORE mounting the enclosure.
Mount enclosure using mounting screws supplied in the hardware kit.
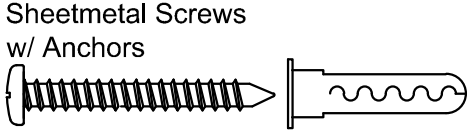
Mounting kit options: Option 1 – #10 sheet metal screws & #10 plastic anchors.
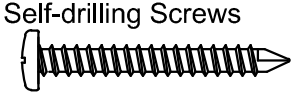
Option 2 – #10 self-drilling screws
NOTE: Enclosure must be earth grounded per NEC requirements.

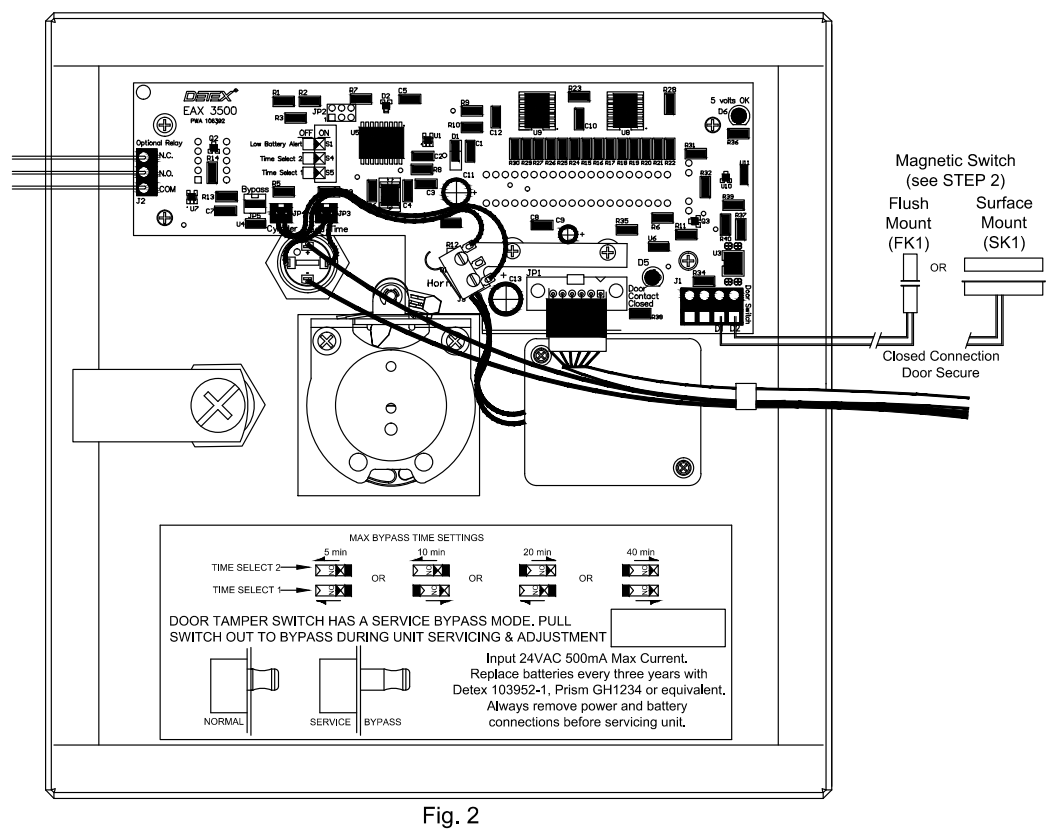
STEP 2. MAGNETIC SWITCH INSTALLATION: Fig. 2
Install magnetic contact switch onto the door using magnetic switch instructions. For wire requirements, see Manufacturer’s Recommendation Chart. Route wires to Exit Alarm location:
Magnetic Contact Switch: Within 6 feet: 2 conductor cables, 22AWG minimum
20 feet or less: Twisted wire pair, 20AWG minimum
50 feet or less: Twisted wire pair, 18AWG minimum
Connect magnetic switch wires to LOGIC DISPLAY pc board located on enclosure door. See Fig 2. Examples shown are for Detex magnetic switches. Magnetic switches are required and can be purchased separately.
STEP 3. TRANSFORMER WIRING: Fig. 3 (DO NOT PLUG IN TRANSFORMER AT THIS TIME)
Connect power wires to the two terminals on the 12V or 24V AC/DC transformer (500mA minimum). Wires are not polarity sensitive. Route wires to Exit Alarm location per applicable building code(s).
Power Leads from Transformer to Exit Alarm: 20 feet or less: 20AWG minimum
50 feet or less: 18AWG minimum
Connect power wires to the two-place terminal block located on the lower left corner of the POWER SUPPLY pc board. Wires are not polarity sensitive.
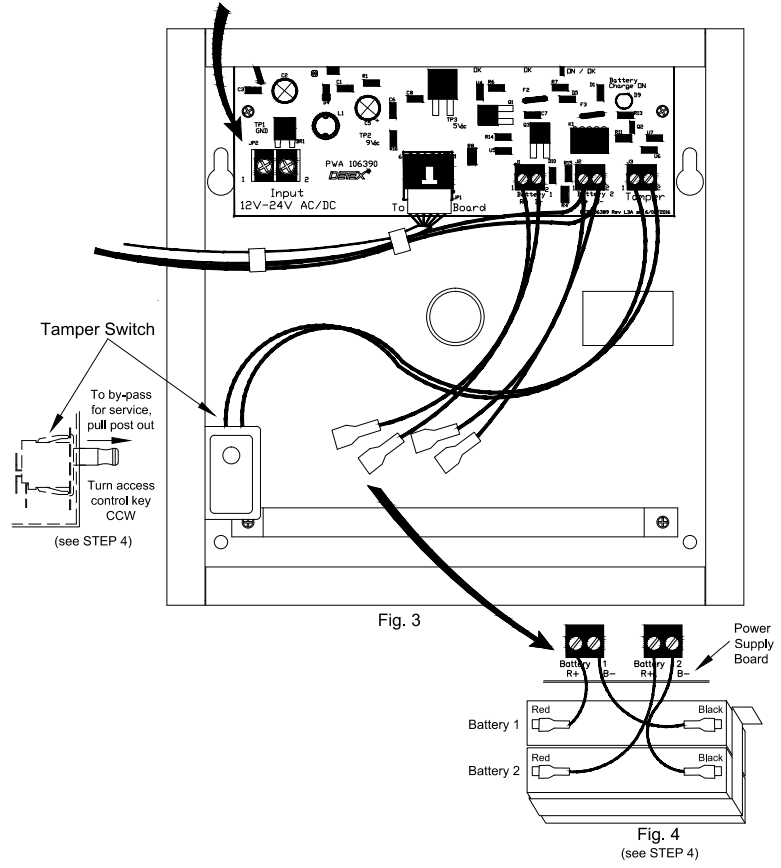
STEP 4. INSTALL BATTERIES: Fig. 4
Before installing batteries, pull out the post of the tamper switch. Once batteries are installed & connected, the alarm will sound if the magnetic switch is not closed & tamper switch plunger is not extended.
Install batteries (supplied with unit). Remove plastic protectors from the polarity-sensitive battery terminals.
Plug the wall-mounted transformer into a wall outlet and secure it.
| LED CHART FOR LOGIC BOARD | ||
| LED color | BOARD LOCATION | LED ON INDICATES: |
| RED | D5 | DOOR CONTACT CLOSED |
| GREEN | D6 | 5 VOLTS OK |
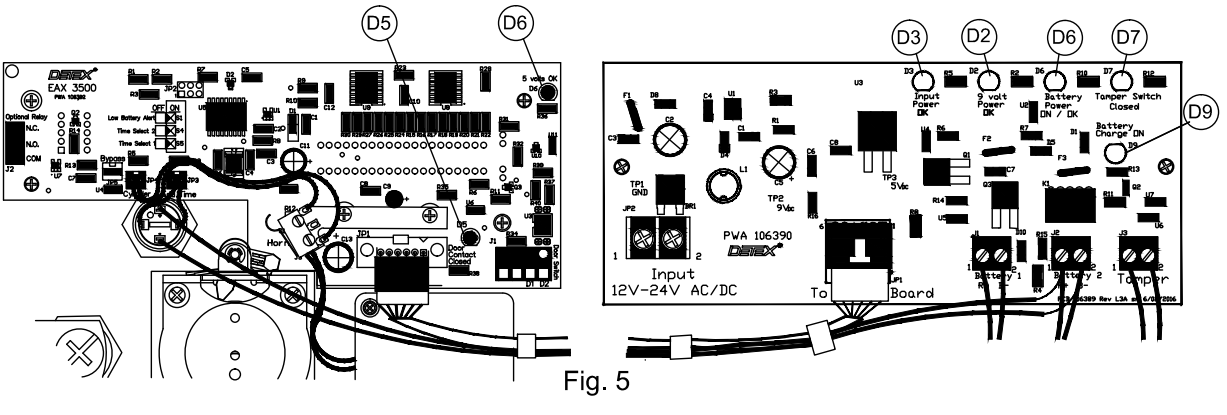
| LED CHART FOR POWER SUPPLY BOARD | ||
| LED color | BOARD LOCATION | LED ON INDICATES: |
| GREEN | D2 | 9 VOLT POWER SUPPLY OK |
| RED | D3 | POWER INPUT OK |
| ORANGE | D6 | BATTERY BACKUP ON, VOLTAGE OK |
| YELLOW | D7 | TAMPER SWITCH CLOSED |
| ORANGE | D9 | BATTERY CHARGING CIRCUIT OK |
DEVICE OPERATION: (Reference Fig. 5 for the following) Pull the plunger on the tamper switch. Confirm that LED D7 (Yellow) is on before continuing, or the alarm will sound.
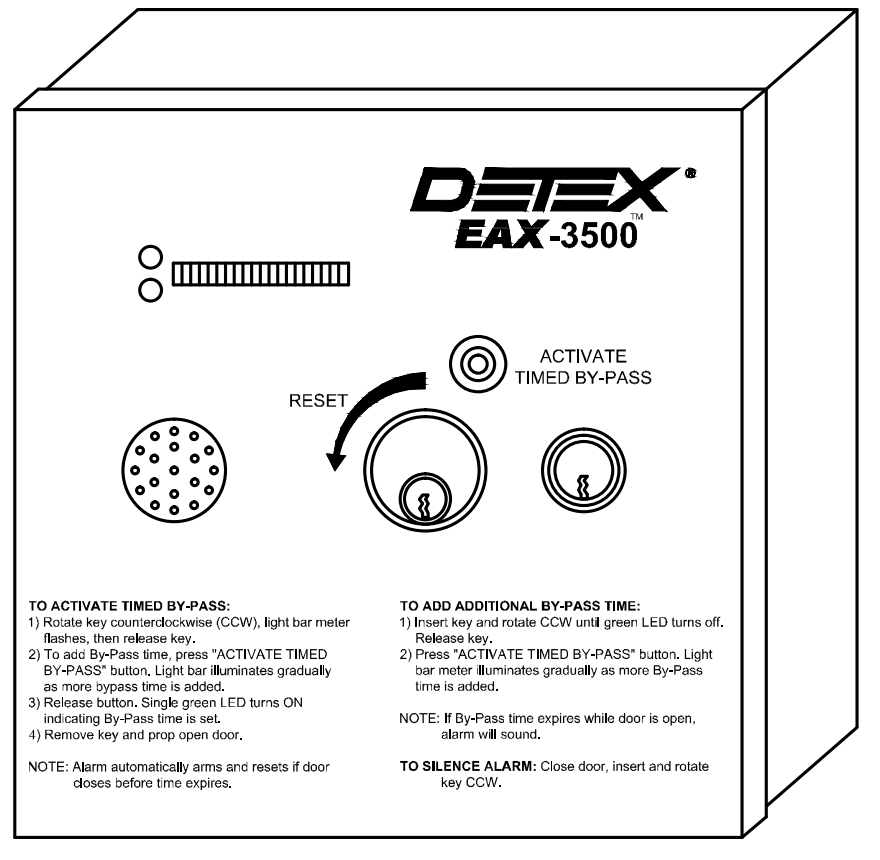
(Reference Fig. 6 for the following) Turn the access control key counterclockwise (CCW) 1/4 turn and HOLD for 5 seconds. LIGHT BAR METER will turn OFF and the ALARM is reset. Close the hinged panel and secure the cover lock. The alarm will sound. To silence the alarm, rotate the access control key CCW.
The single red LED located next to the light meter bar will turn ON indicating the device is powered and in the armed mode. An alarm will sound if the magnetic contact switch on the door is opened. To silence the alarm close the magnetic contact switch on the door and turn the control key CCW.
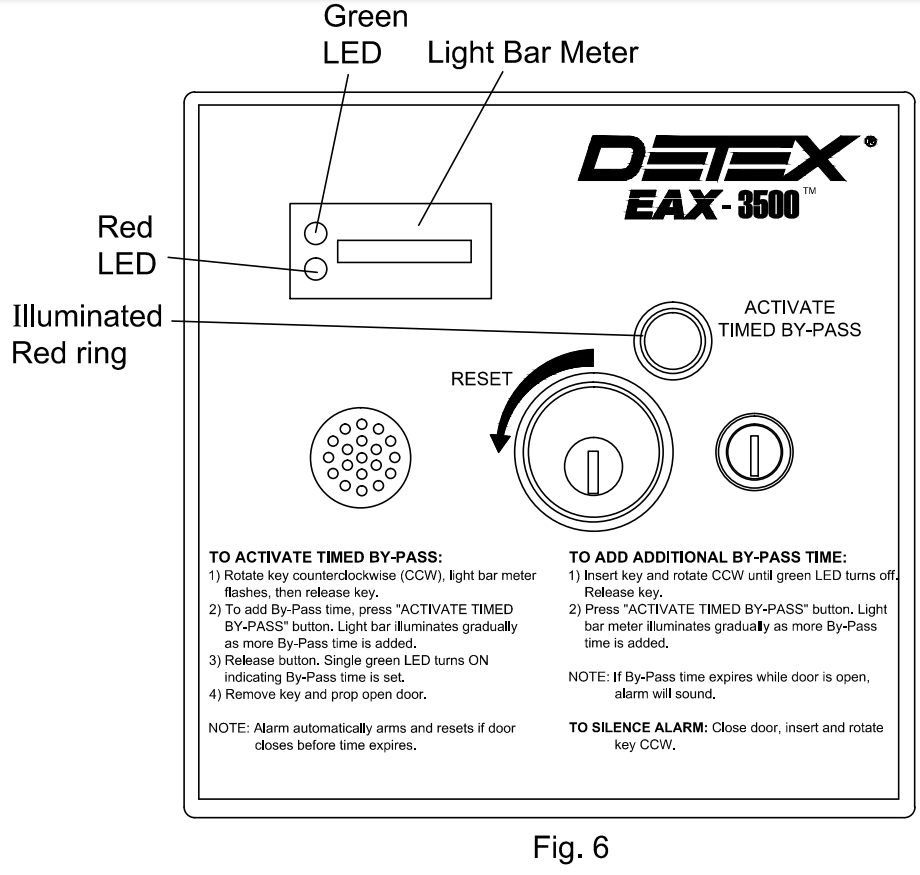
TO ACTIVATE TIMED BYPASS: Rotate the key counterclockwise (CCW) until the light bar meter flashes, and release the key.
To add By-Pass time press and hold the ‘ACTIVATE TIMED BY-PASS button. The light bar illuminates gradually as more By-Pass time is added.
Release button. A single green LED turns ON indicating By-Pass time is set.
Remove key and prop door open.
NOTE: Alarm automatically arms and resets if the door closes before time expires.
ADD ADDITIONAL TIMED BYPASS: Insert key and rotate CCW single green LED turns off. Release key.
Press and hold the ‘ACTIVATE TIMED BY-PASS’ button. The light bar illuminates gradually as more By-Pass time is added.
Note: If By-Pass time expires while the door is open, the alarm will sound.
TO SILENCE ALARM: Close door, insert, and rotate key CCW. To service the device, pull the plunger on the tamper switch as shown in Fig 3. Rotate access control key CCW.
Troubleshooting
| Symptom: | Probable cause/Fix |
| The key cylinder is loose or sticks out. | Tapered collar not installed. The hex nut is not secure. 103970 cylinder bracket not installed or installed backward (Flange goes towards the cover). |
| Does not arm, key requires high effort to rotate. | Incorrect cam on mortise cylinder. Should be Yale type cam. Self-adjusting switch cam mounting screws overly tight. |
| Unit in constant alarm mode. Turning key CCW does not reset the alarm. (LED D5 is NOT on, see chart) | Magnetic switch misaligned or connected to the wrong terminals on the PWA. The wrong type of switch contact. Must be closed contact with the door closed and the magnet in the correct position. |
| The unit goes into alarm when service requires opening the front cover. (LED D7 is NOT on, see chart) | Pull tamper switch plunger fully out, turn-key CCW. Make sure the door is closed during the initial opening of the cover. |
| Not enough bypass time when set at max. | Change switch positions as needed. See the label on the inside front cover for options. |
| Goes into alarm when trying to set a time. | Turn key CCW and release. Then press the ‘Activate Timed By-Pass’ button. |
| The unit does not reset once in alarm mode. (LED D5 is NOT on, see chart) | Make sure the door is fully closed. Make sure the wiring to the magnetic switch is not damaged or cut. |
| Unit chirps approximately every 45 seconds. (LED D3 is NOT on, see chart) This is a low battery indication. | Check AC power to the device, and that building power is present at the outlet. Make sure the optional plug-in transformer is plugged in and the holding screw installed. Check for damaged wiring between the transformer and the EAX-3500. The battery should be replaced every three years |
Detex Corporation, 302 Detex Drive, New Braunfels, Texas 78130-3045
830-629-2900 / 800-729-3839
Fax 800-653-3839
Text photos only: 830-481-6433
INTERNET: www.detex.com


