
JULA 003152 Home Gym

SAFETY INSTRUCTIONS
- Follow the assembly instructions carefully.
- Check all screws, nuts and other connections before using the machine for the first time, and check that it is in safe condition.
- Place the machine on a level surface, away from water and moisture.
- Use a protective covering (e.g. rubber mat, wooden board) when assembling the machine.
- Remove all objects within a radius of 2 metres from the machine before starting to exercise.
- Do not use strong detergents to clean the machine. Use the supplied tools, or your own suitable tools to assemble or repair the machine. Wipe off moisture and sweat after each session.
- Incorrect or excessive exercise can be harmful. Consult your doctor before starting a training programme. You can be advised about suitable levels for pulse, exertion, duration etc. The machine is not suitable for physiotherapy.
- Check that the machine is in good condition before using it. Only use original spare parts.
- Wear suitable training clothing and shoes.
- Stop training immediately and consult a doctor if you are affected by dizziness, nausea, or other symptoms.
- Children and handicapped persons must only use the machine under the supervision of a person who can provide assistance and advice.
NOTE: After some time, check that the wires are correctly tensioned and that they run in the pulleys.
DESCRIPTION
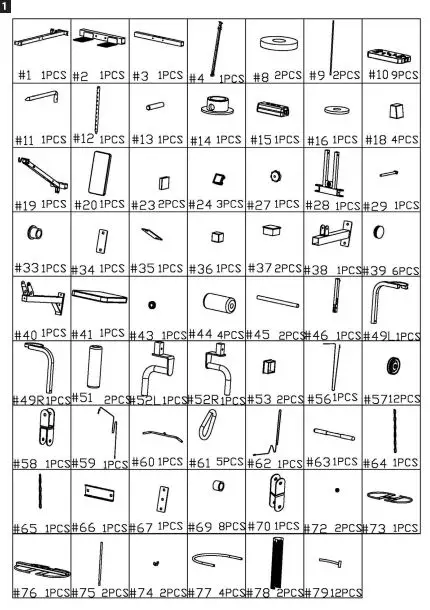
Assembly parts
| No. | Designation | Qty |
| 1 | Seat support | 1 |
| 2 | Front crossbar | 1 |
| 3 | Rear crossbar | 1 |
| 4 | Main frame | 1 |
| 5 | Hex screw M70x70 | 12 |
| 6 | Flat washer | 58 |
| 7 | Nyloc nut M70 | 29 |
| 8 | Rubber shock absorber | 2 |
| 9 | Weights bar | 2 |
| 10 | Weight pad | 9 |
| 11 | Cotter | 1 |
| 12 | Weight selector | 1 |
| 13 | Block | 1 |
| 14 | Plastic stop | 1 |
| 15 | Holder | 1 |
| 16 | Plastic washer | 1 |
| 17 | Hex screw M70x25 | 4 |
| 18 | End piece | 4 |
| 19 | Top frame | 1 |
| 20 | Backrest | 1 |
| 21 | Hex screw M6x60 | 4 |
| 22 | Flat washer | 4 |
| 23 | End piece | 2 |
| 24 | End piece | 3 |
| 25 | Hex screw M8x45 | 1 |
| 26 | Flat washer | 6 |
| 27 | Knob | 1 |
| 28 | Base for forward press | 1 |
| 29 | Eye screw | 1 |
| 30 | Nyloc nut | 3 |
| Hex screw | 1 |
| Nyloc nut | 3 |
| Metal bushing | 6 |
| Square mounting plate | 1 |
| Square mounting plate | 1 |
| End piece | 1 |
| End piece | 2 |
| Support | 1 |
| End piece | 6 |
| Seat bracket | 1 |
| Seat | 1 |
| Hex screw | 1 |
| Upright damper | 1 |
| Foam roller | 4 |
| Rod for foam roller | 2 |
| Upright | 1 |
| Hex screw M12x80 | 2 |
| Flat washer | 6 |
| Hand support | 1 |
| Hex screw | 2 |
| Foam roller | 2 |
| Front press handle | 1 |
| End piece | 2 |
| Hex screw | 2 |
| Hex screw | 8 |
| Wire L=3232mm | 1 |
| Pulley | 12 |
| Pulley block | 1 |
| Wire L=2720 mm | 1 |
| Lat bar | 1 |
| Snap hook | 5 |
| Wire L=3430 mm | 1 |
| Straight bar | 1 |
ASSEMBLY
Step1
- Fasten the rear crossbar (3) in the seat support (1). Fasten them with hex screw
(5), flat washer (6), holder for rear crossbar 2(66) and nyloc nuts (7). Fasten the front crossbar (2) in the seat support (1). Screw on with hex screw (5), flat washer (6) and nyloc nuts (7). - Fasten the main frame (4) in the seat support (1). Screw on with hex screw (5), flat washer (6) and nyloc nuts (7).
- Fasten the weights bars (9) in the rear crossbar (3). Screw on with hex screws
(17). Put the weights bar holder (73) on the weights bars. Put the rubber shock absorber (8) over the weights bar holder. Put the weight pads (10), weight selector (72), plastic stop (74), block (73), holder
(75), plastic washer (76) on the weights bar (9). Insert the cotter (77).
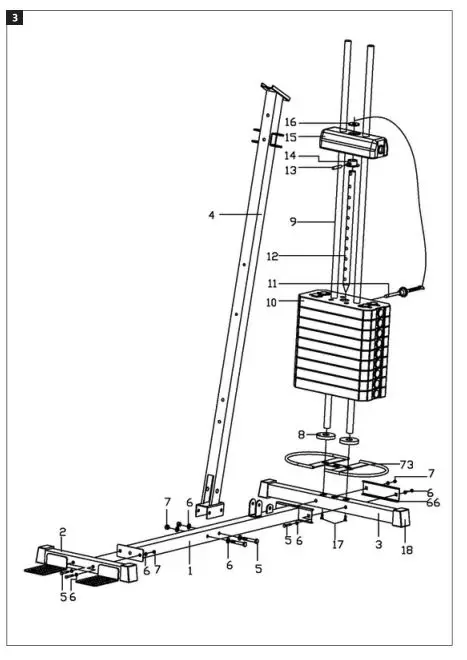
NOTE: Before fitting the weight selector (12) put on the plastic stop (14) to align the holes and then put the block (13) in the hole in the weight selector (12) and the plastic stop (14).
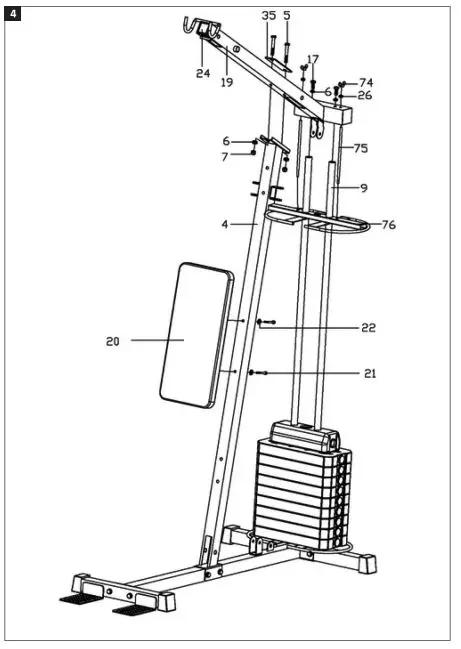
Step2
- Put the weights bar holder (76) on the bars of the weight (9).
- Fasten the top frame (79) in the main frame (4) with hex screws (5), square mounting plate (35), flat washers (6), and nyl oc nuts (7).
- Fasten the top frame (79) in the bars of the weight (9). Screw on with hex screws (17) and flat washers (6).
- Fasten the weight guard holder (76) in the top frame (79) with the screws (75), washers (26) and nuts (74).
- Fasten the backrest (20) in the main frame (4). Screw on with hex screws (27) and flat washers (22).

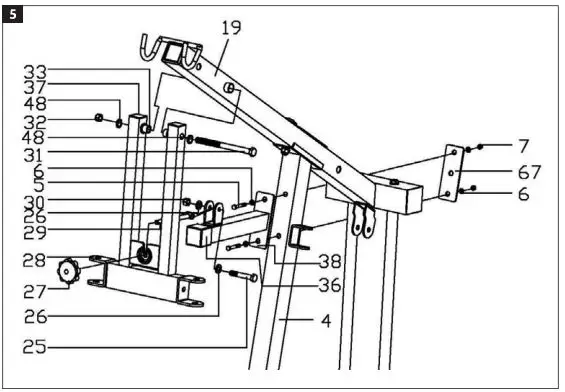
Step3
- Fasten the forward press base (28) in the top frame (79) with hex screw (37), flat washer (48), metal bushing (33) and nyloc nut (32).
- Connect the support (38) to the main frame (4) with hex screws (5), flat washers (6), nyloc nuts (7) and the holder for the rear crossbar (67).
- Fasten the eye screw (29) in the support (38) with hex screw (25), flat washer (26) and nyloc nut (30).
- Fasten the eye screw (29) in the forward press base (28) with the knob (27).

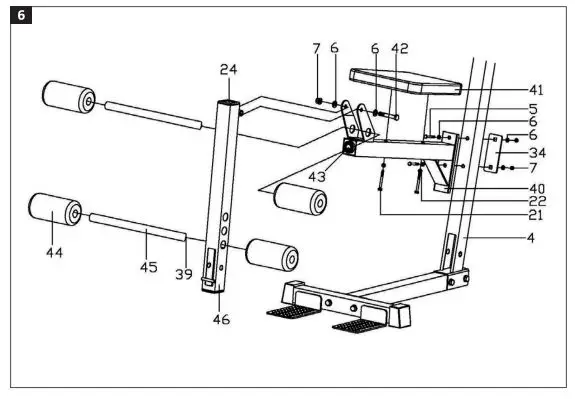
Step4
- Fasten the seat bracket (40) in the main frame (4) with hex screws (5), flat washers (6), square mounting plate (34), and nyloc nuts (7).
- Fasten the seat (47) in the seat bracket (40) with hex screws (27) and flat washers (22).
- Fasten the upright (46) in the U-shaped base on the seat bracket (40) with hex screw (42), flat washers (6) and nyloc nut (7).
- Fasten the rod for the foam roller (45) on the seat bracket (40). Put on the foam rollers (44).
- Fasten the rod for the foam roller (45) in the upright (46). Put on the foam rollers (44).

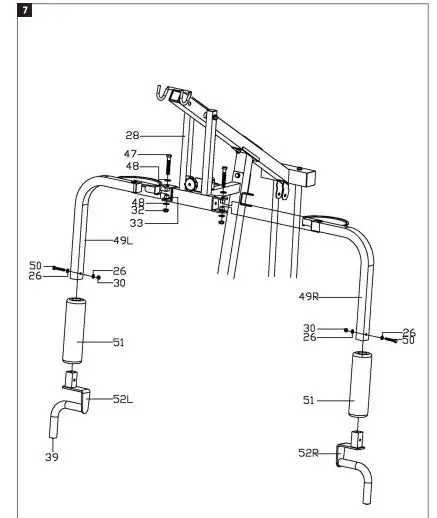
Step 5
- Fasten the hand support (49L/R) in the forward press base (28) with hex screws (47), flat washers (48), metal bushings (33) and nyloc nuts (32).
- Cover the hand support (49L/R) with the foam rollers (57).
- Fasten the front press bar (52L/R) in the hand support (49L/R) with hex screws (50), flat washers (26) and nyloc nuts (30).

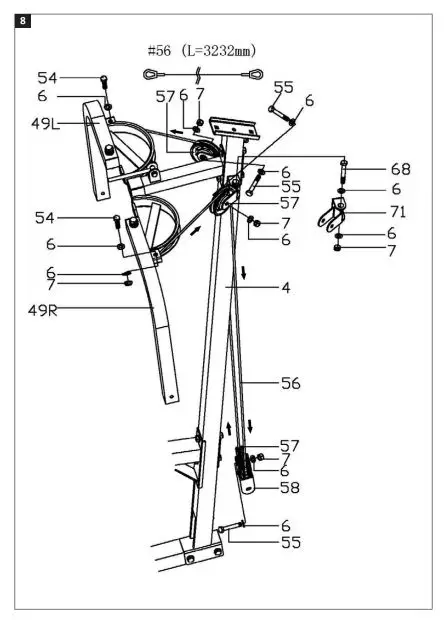
Step 6
- Fasten one side of the wire (56) in the right hand support (49R) with hex screw (54), flat washer (6) and nyloc nut (7).
- Fasten the pivoting pulley block (77) in the main frame (4) with hex screw (68), flat washer (6) and nyloc nut (7).
- Pull the wire (56) through the pulley (57). Fasten the pulley (41) in the main frame (4) and the pulley block 2 (58) with hex screw (55), flat washer (6) and nyloc nut (7).
- Fasten one end of the wire (56) in the left hand support (49L) with hex screw (54), flat washer (6) and nyloc nut (7).
NOTE: Before fastening the pulleys, first pull through the wire (56) otherwise the wire (56) will not go through the pulleys (57). - Fit the wire (56) as shown by the arrow.

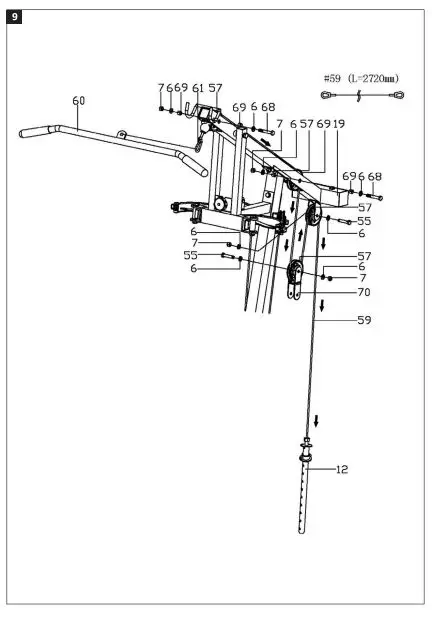
Step7
- Pull the wire (59) through the pulley (57). Fasten the pulley (41) in the top frame
(19) with hex screw (68), flat washer (6), bushing (69) and nyloc nut (7). Pull the wire (59) through the pulley (57). Fasten the pulley (41) in the pulley block 1 (70) and the top frame (19) with hex screw (68), flat washer (6) and nyloc nut (7).
NOTE: Before fastening the pulleys, first pull through the wire (59) otherwise the wire (59) will not go through the pulleys (57). - Fit the wire (59) as shown by the arrow.
- Fasten the lat bar (60) in the snap hook (61) on the wire (59).

Step 8
- Pull the wire (62) through the pulley (57). Fasten the pulley (57) in the upright (46) and the top frame (4) with hex screw (68), flat washer (6), bushing (69) and nyloc nut (7). Pull the wire (62) through the pulley (57). Fasten the pulley (57) in the pulley block 58 (58) and the seat support (1) with hex screw (55), flat washer (6) and nyloc nut (7).
NOTE: Before fastening the pulleys, first pull through the wire (62) otherwise the wire (62) will not go through the pulleys (57). - Fit the wire (62) as shown by the arrow. Check that the key (11) is fitted in the edge of the weights pad (10), tighten the three wires by adjusting the wire (59) and the short chain (65). Fasten the straight bar (63), the long chain (64) and the short chain (65) together.

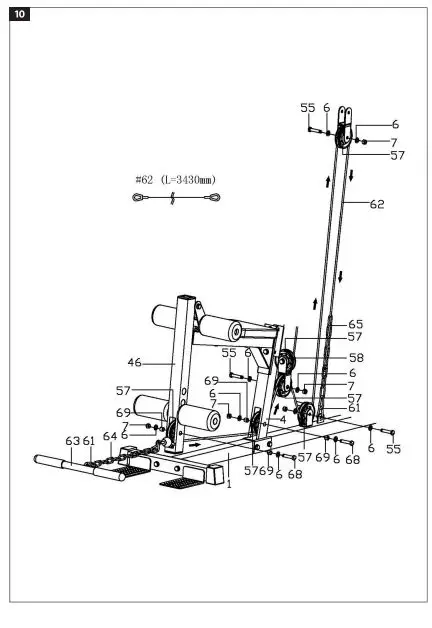
Step 9
Check that wire (62), wire (59) and wire (56) are fastened in the direction shown by the arrows. 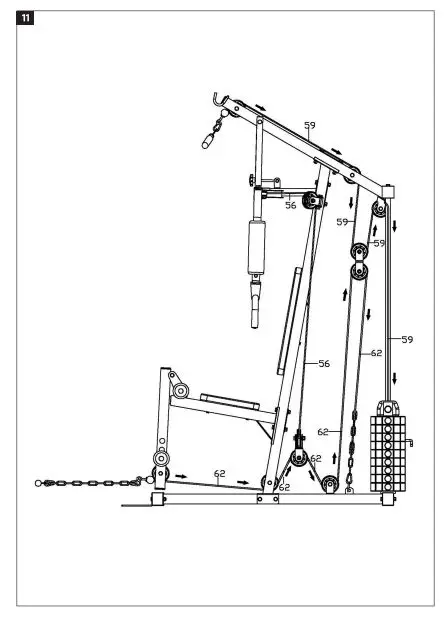
Step 10
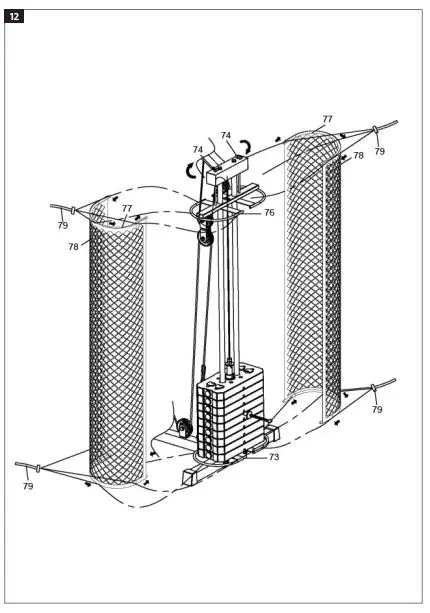
- Put the weight guard (78) on the weight guard bracket (77) and fasten the weight guard (78) and weight guard bracket (77) on the weight guard holders (73 8 76) with the nylon cord (79).
- Turn the nuts (74) as shown by the arrow to adjust the tension of the weight guard (78).