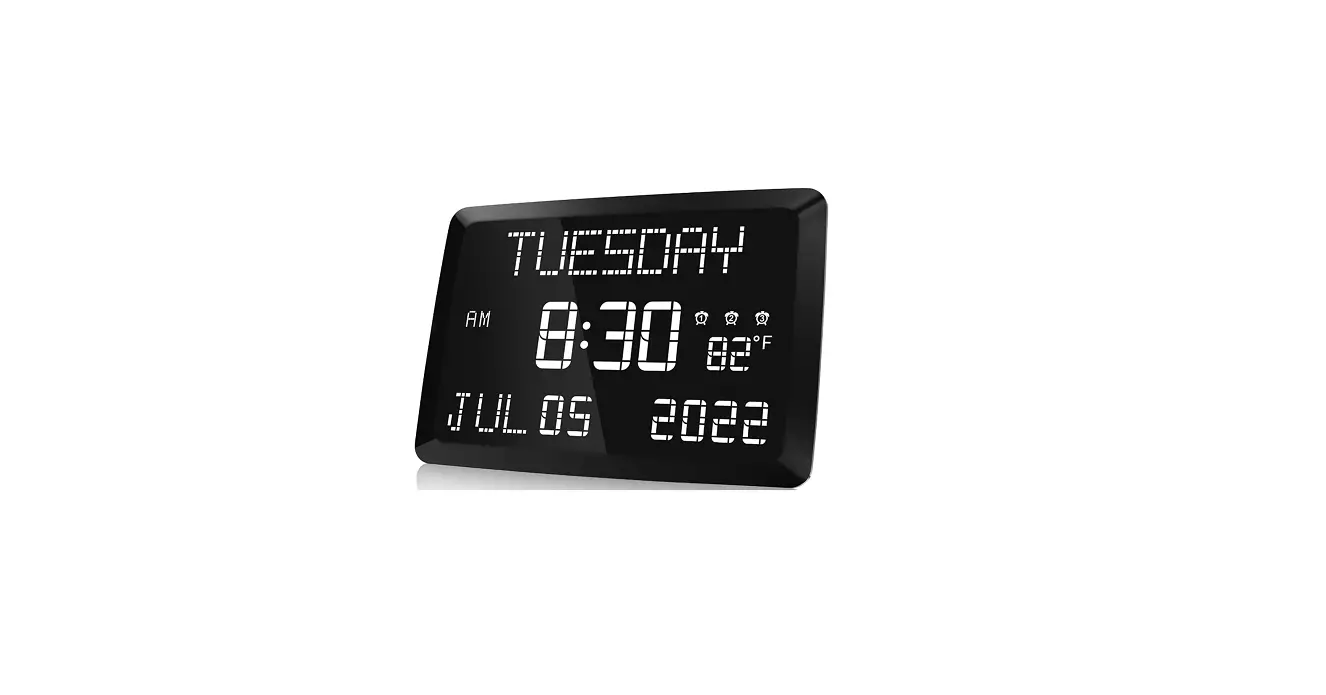
Raynic CR1005-US 11.5-Inch Large LED Digital Clock

LOCATION OF CONTROLS
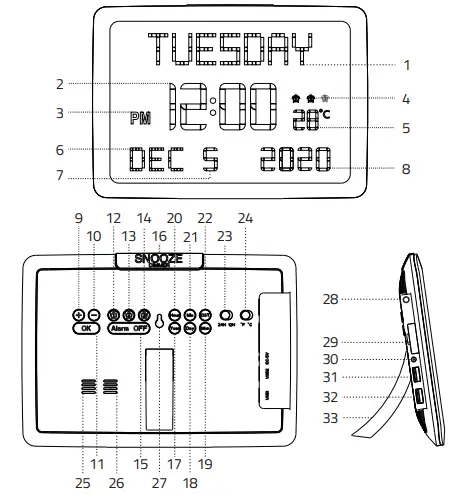
- WEEK DISPLAY
- TIME DISPLAY
- AM/PM INDICATOR
- ALARM 1 / ALARM 2 / ALARM 3 INDICATOR
- TEMPERATURE DISPLAY
- MONTH DISPLAY
- DATE DISPLAY
- YEAR DISPLAY
- NEXT BUTTON
- PREV BUTTON
- SAVE BUTTON
- ALARM 1 BUTTON
- ALARM 2 BUTTON
- ALARM 3 BUTTON
- ALARM OFF BUTTON
- SNOOZE / DIMMER BUTTON
- YEAR BUTTON
- DAY BUTTON
- MONTH BUTTON
- HOUR BUTTON
- MINUTE BUTTON
- DST BUTTON
- 24-HOUR / 12 HUOR SWITCH BUTTON
- FAHRENHEIT / CELSIUS SWITCH BUTTON
- SPEAKER
- HEAT EMISSION HOLE
- HANGING HOLE
- TEMPERATURE INDUCTOR
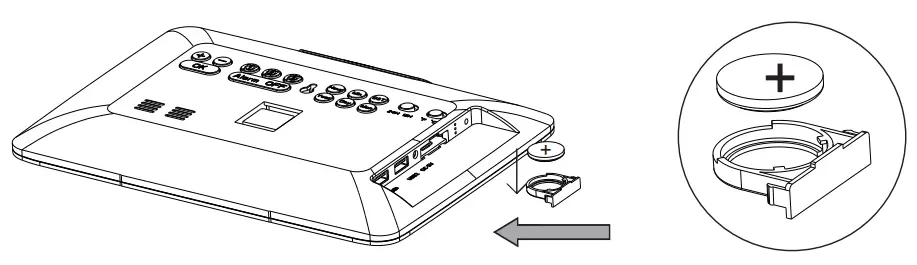
- BACKUP BATTERY COMPARTMENT
- DC POWER INPUT INTERFACE
- USB OUTPUT CHARGER
- USB OUTPUT CHARGER
- BRACKET
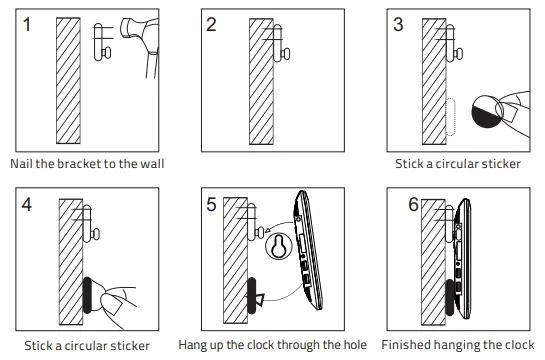
INSTALLATION
How to Install Clock on wall with mounting rackets
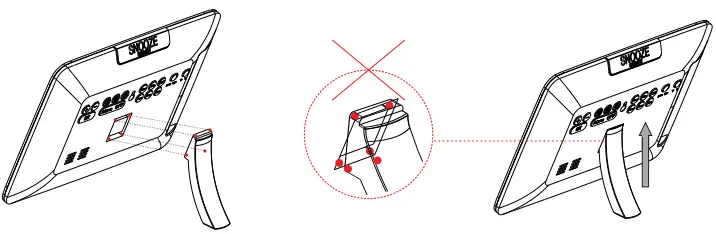
How to Install Clock with Support Brackets
Just follow these two steps to make your clock stand firmly:
- Step 1: The top, bottom, left and right points of the bracket should be pressed into the groove completely(see picture 1 below).
Please note: Be sure to press all four points into the groove. - Step 2: After the four points are pressed into the groove, then slide the bracket up(see picture 2 below).
 When you can hear the “Ka” sound, it means the installation is successful! Otherwise, please reinstall.
 When you can hear the “Ka” sound, it means the installation is successful! Otherwise, please reinstall.
POWERING ON
- Install the CR2032 battery into the backup battery compartment. The battery only saves time and settings in case of a power outage.
- Plug in the power adapter. The device will turn on and the display will show as below.
TIME SETTING
- Press once
 to maintain
  hour-time flashing.
 - Press
 to increase the hour. Press
 to reduce the hour.
 - When you finish the hour adjustment. Press to confirm the hour setting.
 Minute time starts flashing.
- Press to increase the minute. Press to reduce minute.
- When you finish the minute adjustment. Press to save all of the above settings.
Note:
- If you want to set minutes directly. Just press.
- Hold press
 to adjust automatically.
TIME FORMAT SWITCH
If you want to switch to 24-hour/12hour. Just slide![]() .
.
YEAR/MONTH/DAY SETTING
- Press
 once to maintain
  year flashing.
 - Press to increase year. Press to reduce year.
- When you finish the year adjustment. Press to save the setting.
- Press
 once to maintain month
  flashing. Another set is the same as <2><3>.
 - Press
 to maintain
  date flashing. Another set is the same as <2><3>.
ALARM SETTING
- Press
 and The display show the default time
 .
. - Press to set alarm hour.
 hour time starts flashing. Press to adjust the hour. Press to confirm.
  White minute start flashing. Press to adjust the minute. Press to confirm.
- The display shows
 , Press to adjust the alarm volume. Press to confirm.
 - The display shows
 , Press to adjust alarm period range. MON – SUN / MON- FRI / SAT – SUN. Press to save all of the above settings.
TURN OFF ALARM
Temporarily turn off the alarm
When the Alarm sounds, you can do either way:
- Press
 to temporarily turn the alarm off for 9 minutes, then it will alarm again for each next 9 minutes.
 - Press
 to turn the alarm off for 24 hours. You will see the alarm indicator is still on, indicating the alarm setting is still active and will sound again after 24 hours.
Cancel the alarms - To cancel all three alarms, hold press All of the alarms will be canceled.
 The alarm indicator don’t show on the display.
 - To separately cancel any of the alarms, Press or Then press. The indicator light of your selected alarm ( ) will be turned off. means the alarm has been canceled successfully.
DIMMER
Repeatedly press![]() to adjust the brightness of the display. Adjust from the dimmest level to the brightest level as below: DIMMER 1 DIMMER 2 DIMMER 3 DIMMER 4 DIMMER 5.
to adjust the brightness of the display. Adjust from the dimmest level to the brightest level as below: DIMMER 1 DIMMER 2 DIMMER 3 DIMMER 4 DIMMER 5.
TEMPERATURE
TEMPERATURE FORMAT SWITCH
If you want to switch Fahrenheit / Celsius. Just slide![]()
IMPORTANT REMINDER
- It may take 1 minute for the temperature sensor to complete the initialization.
- Accuracy of the thermometer is 1 degree Celsius.
- There might be a 1-3 degrees Celsius deviation within normal limits due to unstable airflow and room heating.
USB CHARGING
- Plug the USB charging cable into the device and phone or tablet. The device can charge both phones and tablets at the same time. The maximum charge current is 1 Ampere.

- For Temporary Time Storage Only, Cannot replace AC POWER. Install 1 piece of CR2032 coin cell to the proper terminals in the battery compartment.
DST SWITCH
Press once![]() . An hour will be added to the current time. Press again to turn off DST.
. An hour will be added to the current time. Press again to turn off DST.
FAQs
An alternative to the conventional analogue clock is a digital clock. On a watch, phone, or alarm clock, this kind of clock uses digits to display the time in a digital format. Both a 12- and 24-hour format is possible.
Analog alarm clocks are less precise than digital ones. Additionally, they include a snooze feature, which is perfect for people who need to wake up early but don’t want to continually be awakened by an alarm clock.
Direct time display is provided by digital clocks. It displays the time using symbols or digits. Either 12 or 24 hours may be displayed on it. Modern clocks display information like the date, day, month, year, temperature, etc. Electronic clocks are another name for digital clocks.
Every clock requires a power supply to run. Digital clocks are powered electronically, either by a battery or by the AC electricity that comes from a wall outlet. Digital wristwatches utilize batteries because they are portable, unlike digital wall clocks, which often use an electrical outlet.
The internal mechanics and gears are constructed in such a way that as they move, they produce sound in order to advance the hands. Some digital clocks might even generate the same sounds due to familiarity with the ticking sound of the first pendulum clocks.
Digital clocks often use a 32,768 hertz crystal oscillator similar to a quartz clock or the 50 or 60 hertz oscillation of AC electricity to keep time.
Many people find it easier to determine how much time is left when using a digital clock, “Ms. Walker notes. “One method to lessen the mental workload on pupils is to use a digital clock in the exam room.
The foundation of this system serves as an electric clock. When the square wave’s 60 Hz input frequency is divided by 60, one pulse per second is produced (1 Hz). This counts down the seconds. The main component of a digital clock system is a variety of counters.
Clocks with a digital display have more functionality than analogue ones. Digital clocks are easier to read in stressful, time-sensitive situations, and some of them have countdown timers that can be used to keep track of the time. They can assist in getting pupils to their subsequent classroom in good time.
There is some form of electronic “gearing mechanism”; typically, a digital clock uses a “counter” component to handle gearing. And there is a display, which is often either an LCD or an LED (light emiting diode) (liquid crystal display).
The letters are defined by ten. You can choose from red, amber, green, blue, or white in the majority of sizes. Most people believe that red is the hue that is most noticeable in everyday settings. Amber and green are typically more calming and less disturbing in low light.
An alternative to the conventional analogue clock is a digital clock. On a watch, phone, or alarm clock, this kind of clock uses digits to display the time in a digital format. Both a 12- and 24-hour format is possible.
Video
Download PDF Link; Raynic CR1005-US 11.5-Inch Large LED Digital Clock pdf


