EPOMAKER EP84 80% Hot Swap Wired Mechanical Keyboard
This Quick Guide is an introduction to the use and functionality of the Epomaker EPB4. For in-depth guide of functionality of the customization software please refer to the manual that you can find in the official epomaker website at https://epomaker.com/pages/software-downloads
Should you require more assistance please email us at [email protected]
- MODEL: EPOMAKER EP84
- SIZE: 315 x 120.5 x 27mm
- NKRO: Yes
- LAYOUT: 84 Keys
- SYSTEM: Windows/ Mac/ Linux
- CONNECTION: Type-C USB at SV 500mA
- WEIGHT: 725g ❗ 20g
- HOTSWAP: YES
- KEYCAPS: PBT Double Shot
Made in China
Manufacturer: Shenzhen Changyun Technology Co., Ltd. Address: Seventh Floor, Kai Daer Building, No.168 Tongsha Road, Xii Street, Nanshan Disctrict, Shenzhen,Guangdong, CN
Email: [email protected]
Web: www.epomaker.com
APEX CE SPECIALISTS LIMITED
Addreas: UNIT 3D NORTH POINT HOUSE, NORTH POINT BUSINESS PARK, NEW MALLOW ROAD CORK, T23 AT2P, IRELAND
Contact: Wells
Tel: +353212066339
Email: [email protected]
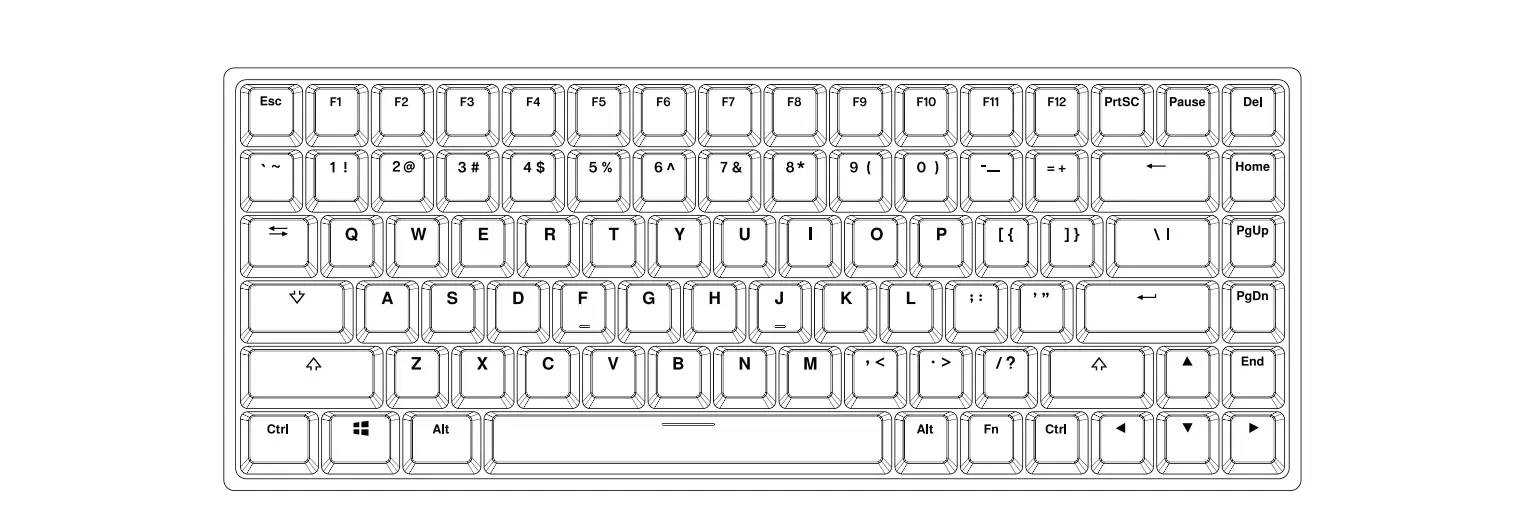
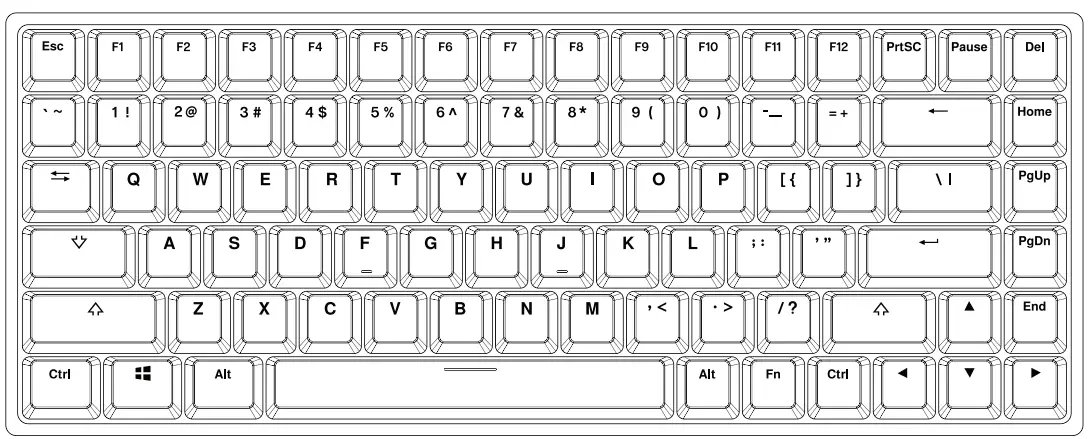
ACCESSI NG BASI C FUNCTI ONS
By pressing the FN key in combination with a different key you can access a set of special functions and change between Windows and MacOS Layouts to benefit from a seamless upgrade experience with your EP84 Keyboard.
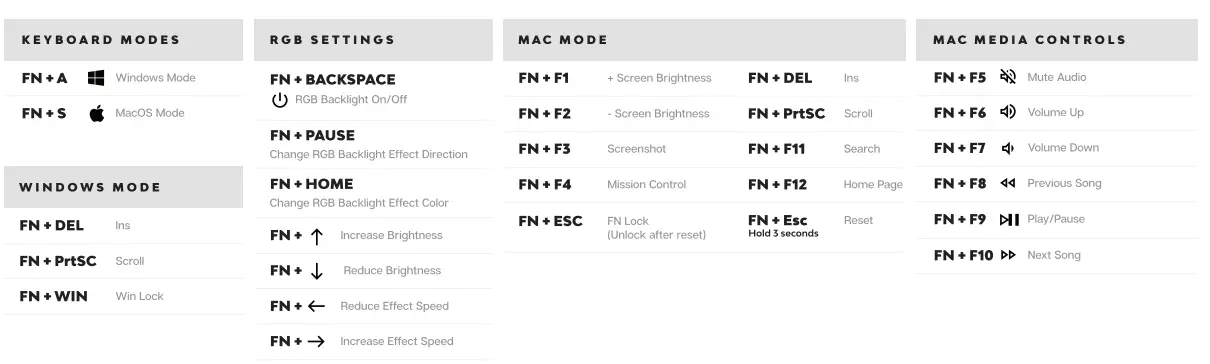
CHANGE RGB EFFECTS
Pressing FN+ Pause at the same time allows you to switch the RGB effect of your EP84 Keyboard.
The presets are as follows:
- Wave (Default)
- Ripple
- Laser
- Rainbow
- Snake
- Follow
- Aggregation
- Sine Wave
- Flower
- Fountain
- LOL
- Mountain
- Cross
- Normal
- Breathe
- Neon
CHANGE RGB COLOR
By default your EP84 comes configured with 9 different color choices. Press FN+Home at the same time to switch the color effect of your keyboard.
The presets are as follows:
- Rainbow
- Ice Blue
- Red
- Green
- Blue
- Orange
- Purple
- Yellow
SO F T W AR E DO WNLO A D
To change the RGB programming and music rhythm functions of the keyboard you need to install the software/driver in your computer.
Please contact customer service at [email protected] or in facebook/discord for download and installation of the driver.
Download the software at
https://epomaker.com/pages/software-downloads.
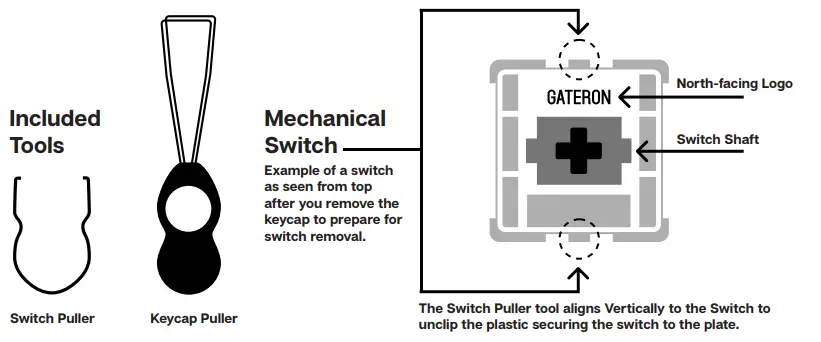
REPLACING KEYCAPS AND SWITCHES
For a full guide on how to remove keycaps and switches scan the QR Code or type in your browser:
https://epomaker.com/blogs/guides/diy-guide-how-to-remove-and-replace-your-mechanical-keyboard-switches
Remove Keycaps
- Grab your Keycap Puller Tool and place it above the keycap you want to remove at a 90 degree angle.
- Push your Keycap Puller down until the metal hooks to open themselves and grab the keycap from underneath.
- Grab your Keyboard firmly and pull the keycap in a vertical motion.
Install Keycaps
- Make sure the Keycap is properly oriented in your keyboard and place it above the switch.
- Push the keycap into the switch shaft firmly.
Remove Switches
- Grab your Switch Removal Tool and align the gripping teeth vertically (on the Y-Axis) at the center of the switch, as shown in the example graphic above.
- Grab the switch with the Switch Puller and apply pressure until the switch releases itself from the plate.
- Using firm but gentle force pull the switch away from the keyboard using a vertical motion.
Install Switches
- Check that all the switch metallic pins are perfectly straight and clean.
- Align the switch vertically to have the Gateron logo facing north. The pins should align themselves to the keyboard PBC.
- Press the switch down until you hear a click. This means your switch clips have attached themselves to the keyboard plate.
- Inspect the switch to ensure it’s properly attached to your keyboard, and test it.
Note: If the key doesn’t work its possible you may have bent one of the switches while installing it. Pull the switch out and repeat the process. Pins may be damaged beyond repair and need replacement if this process is not done correctly. Never apply excessive force when replacing keycaps or switches. If you cannot remove or install keycaps or switches please contact customer service as soon as possible to avoid damage to the keyboard due to operating errors.
TECHNICAL ASSISTANCE
For technical assistance, please email to k [email protected] with your purchase order number and a detailed description of your issue. We normally respond to enquiries within 24 hours.
COMMUNITY FORUMS
Join our community and learn together with other keyboard enthusiasts.
WARRANTY
EPOMAKER’s Warranty covers any factory defects that might affect the proper functionality of your purchase. It doesn’t cover any damage that may occur from normal wear and tear. If your product is defective we will send you a replacement unit. Replacement units might require you to send the defective unit back to Epomaker.
We provide a 1 year warranty for our products when bought from our website (EPOMAKER.com). Your item will not be covered by your 1 year warranty if the inspection shows any sign of modification or changes unsupported by the original product, these include: Changing internal components, Assembling and reassembling the product, Replacing Batteries, etc. We will ONLY cover the item if it is bought from our official stores. You do not have a warranty with us if you bought the item from another reseller or likewise. Please contact the store that you bought your product from to resolve issues.


