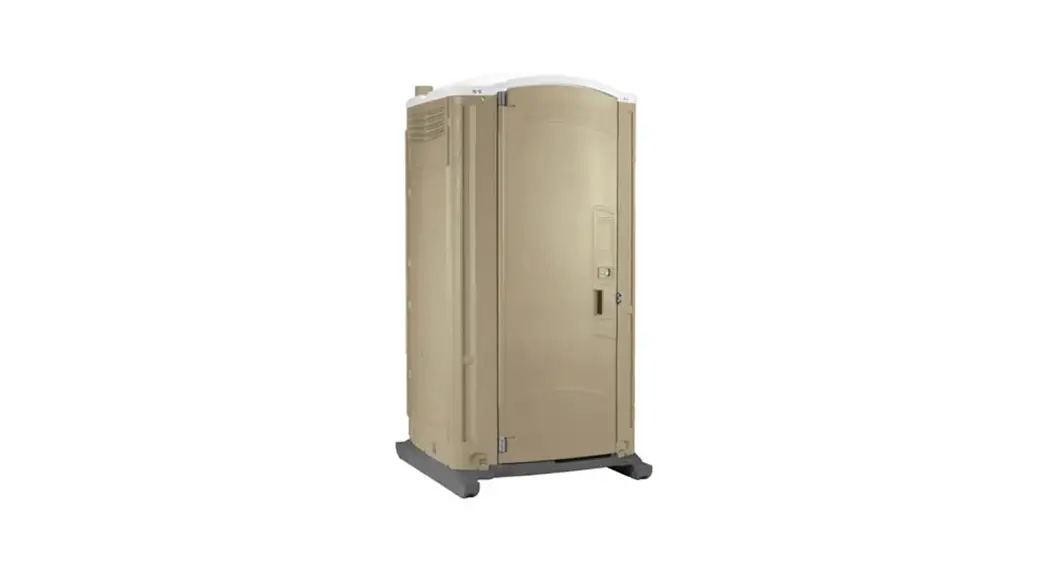
![]() MAXIM 3000 II
MAXIM 3000 II
Round Vent Pipe and Shelf
Unit Assembly Instructions

4/22 REV A
INTRODUCTION
Satellite portable restrooms must be assembled according to approved assembly procedures.
Avoid variations in assembly procedures that could adversely affect product life and warranty.
PREASSEMBLY: INSPECT ALL ITEMS FOR DAMAGE, VERIFY QUANTITIES ARE CORRECT (page 4) READ THROUGH THE ENTIRE INSTRUCTION BOOKLET
IMPORTANT:
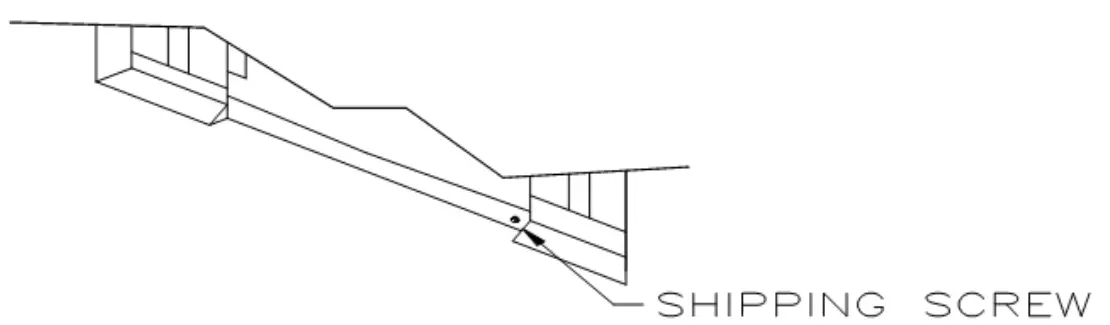
Do not remove shipping screw from door until instructed.
TOOLS:
- CORDLESS DRILL
- 3/8” HEX DRIVER
- #10 (3/16”) DRILL BIT
- POP RIVET GUN
- #2 PHILLIPS SCREWDRIVER
- RUBBER HAMMER
OPTIONAL TOOLS:
- SIDE CUTTER
- 5/16 X 12” DRILL BIT
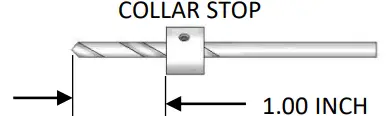
- COLLAR STOP #10 DRILL BIT ( 1” DEPTH )
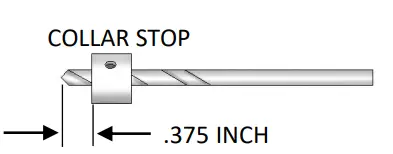
- COLLAR STOP #10 DRILL BIT ( 3/8” DEPTH )
- 1-9/16” HOLE SAW
- 4-1/8” HOLE SAW
HELPFUL HINTS:
- KEEP WORK AREA ORGANIZED.
- Do not open all of the kit boxes, only enough to assemble the toilets you are currently working on.
- Use toilet paper holders for parts bins on multiple unit assemblies.
- The assembly procedure is written for the assembly of a single unit. If assembling multiple units, considerable efficiency can be gained by having a crew work in an assembly-line fashion.
- An apron with large pockets is handy for holding parts and tools.
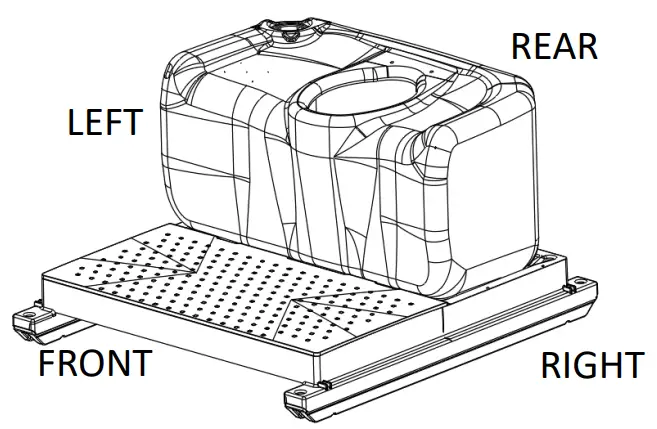
All references to left, right, front and rear correspond to this illustration.
EXPLODED DRAWING
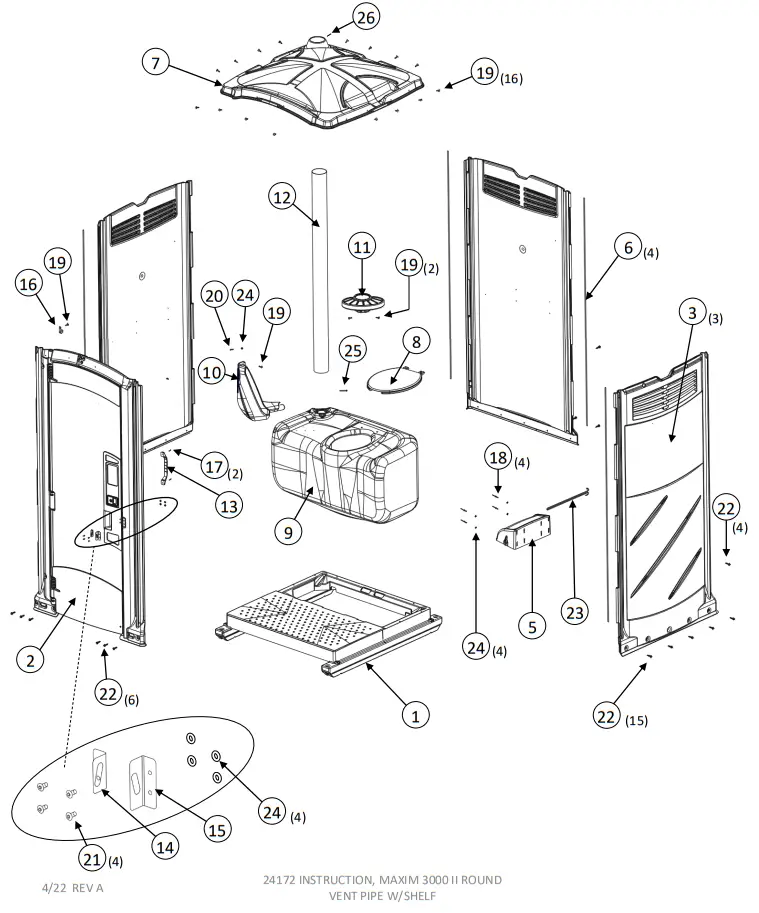
| 26 | 22476 | 1 | SCREW- #10 X 1 PHPN TAP PLTD |
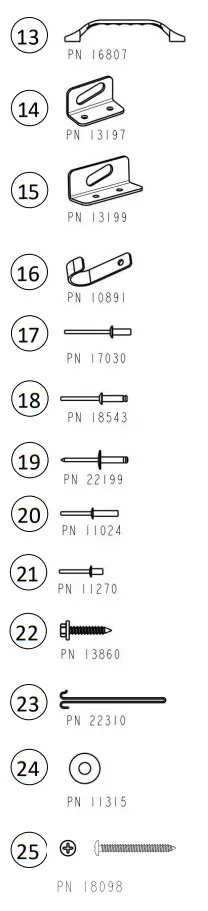
| 25 | 18098 | 1 | SCREW- #10 X 2 PH PH TAP | |
| 24 | 11315 | 9 | WASHER, 3/16 RIVET STNLS | HDWE- MX3 II ORUND VENT PIPE 24171 |
| 23 | 22310 | 1 | SPINDLE- PRGRD II 3 ROLL METAL | |
| 22 | 13860 | 25 | SCREW, #14 X 1-1/2 W/WSH GOLD | |
| 21 | 11270 | 4 | RIVET- #68 STNLS | |
| 20 | 11024 | 1 | RIVET- #610 AAP | |
| 19 | 22199 | 20 | RIVET- 3/16 TRIFIX ALUM LF | |
| 18 | 18543 | 6 | RIVET- 3/16 T PEEL | |
| 17 | 17030 | 2 | RIVET- AVDEL BLACK | |
| 16 | 10891 | 1 | HOOK, FLAT COAT STNLS | |
| 15 | 13199 | 1 | HASP- 3/16 RIVET HOLE FACING | |
| 14 | 13197 | 1 | HASP- 3/16 RIVET HOLE DOOR | |
| 13 | 16807 | 1 | HANDLE, PLASTIC HOVER |
| 12 | 14133 | 1 | VENT PIPE- 4 X 63 DGRY | MAXIM 3000 II RESTROOM |
| 11 | 23832 | 1 | SHELF- FOR 4″ VENT PIPE DGRY | |
| 10 | 22193 | 1 | URINAL- MAXIM 3000 II DGRY | |
| 9 | 24173 | 1 | TANK- MX3 II DGRY ROUND VP | |
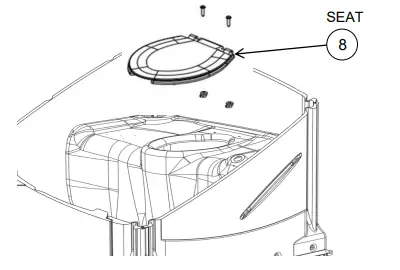
| 8 | 14959 | 1 | SEAT, ELONG MX2/MX3/TRS/HT BLK | |
| 7 | 22191 | 1 | ROOF- MAXIM 3000 II NATURAL | |
| 6 | 18681 | 4 | ROD- FIBERGLASS 72 | |
| 5 | 22209 | 1 | HOOD- PAPERGRD 3 ROLL DGRY | |
| 24171 | 1 | HDWE- MX3 II ROUND VP | ||
| 3 | 22186 | 3 | DESIGN- MAXIM 3000 II PANEL | |
| 2 | 22195 | 1 | DESIGN- MAXIM 3000 II FRT ASSY | |
| 1 | 10034 | 1 | BASE ASSY- IMPACT SOLID FLOOR | |
| ITEM | PART# | QTY | DESCRIPTION |
NOTES: * ITEM #26 is used as a shipping screw in the Front Assembly.
** Items may be shipped in tank, Tank Package PN 24174
ASSEMBLE PANELS & FRONT
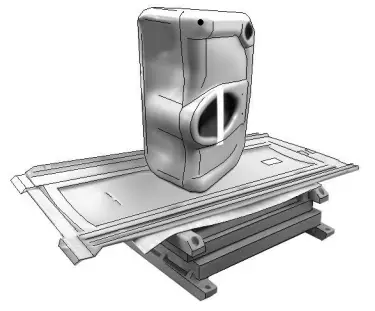
- READY WORK SURFACE
• Create raised work surface by stacking bases or pallets, and place cardboard on top to prevent damage.
• Place Front Assembly on top of work surface, with cardboard in place.
• Place Tank on Front Assembly, with seat opening to the left or right side.
NOTE: TANK WILL REMAIN INSIDE RESTROOM see page (9).
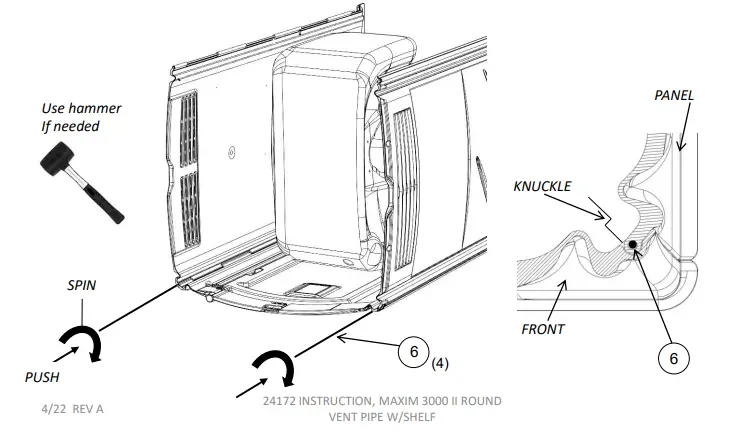
- INSTALL PANELS
• Place Panels on Front Assembly leaning against Tank.
• Align Panel and Front Assembly knuckles, knuckles must be fully nested together.
• Insert Fiberglass Rod ( 18681 ) , angled end first, through all knuckles. Rod must be fully seated in the bottom knuckle.
• Repeat process for remaining (2) panels, side & rear. NOTE: DRILL THE TOP KNUCKLE OF THE PANEL & FRONT ASSEMBLY IF ROD WILL NOT INSERT WITH THE 5/16 DRILL. DO NOT DRILL THROUGH PANEL OR FRONT ASSEMBLY WALLS.
 INSTALL BASE
 - FASTEN PANELS TO BASE
NOTE: If Unit includes a Handwash see Handwash Installation Instructions ( 22419 ) before proceeding further.
A. IMPACT BASE ( 10034 ) OPTION
NOTE: USE SAME PROCESS FOR ( 10033 ) GRID BASE
• Start with Rear Panel. Place the bottom edge of the Panel against the top of spacer ribs, located at each corner. Center panel using the centering bump as a reference.
• Install (5) Screws ( 13860 ).
• With Side Panels remaining against top of spacer ribs, install (5) screws ( 13860 ).
Note center panel using the centering bump.
• Repeat process for the remaining panel.
** NOTE: SIDE PANELS MUST BE FLUSH WITH SPACING RIBS AT EACH CORNER.
DO NOT OVER-TIGHTEN SCREWS INSTALL BASE
 - FASTEN FRONT TO BASE
A. IMPACT BASE ( 10034 ) OPTION
NOTE: USE SAME PROCESS FOR 10033 GRID BASE
• Install (5) Screws ( 13860 )
• Remove shipping screw. SAVE FOR LATER see page (11).
• Open door and install final Screw ( 13860 )
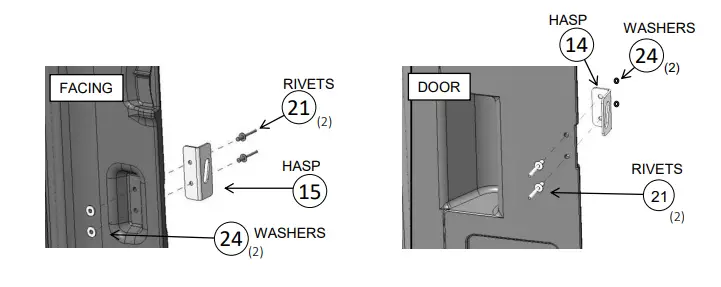
INSTALL HASPS - INSTALL HASPS ON FACING & DOOR
• Align holes in Hasp ( 13199 ) with Facing holes and insert (2) Rivets ( 11270 ) through holes.
• Place (2) Washers ( 11315 ) on Rivets and secure.
• Align holes in Hasp ( 13197 ) with Door holes.
• Insert (2) Rivets ( 11270 ) through holes.
• Place (2) Washers (11315) on Rivets and secure. INSTALL TANK & TOILET SEAT
 - INSTALL TANK ( THIS STEP REQUIRES 2 PEOPLE )

• Place Tank into cradle opening in Base.
• Push and hold tank down or sit on tank. ( person 1)
• Install (4) Screws ( 13860 ) from outside. ( person 2 )
- INSTALL SEAT
• Install Toilet Seat onto Tank, using plastic bolts and nuts provided with a seat. DO NOT OVER-TIGHTEN. INSTALL URINAL
 - INSTALL URINAL
• Locate the drill point in a side panel, about 36” above Floor.
• Drill using # 10 with Stop Collar set at 3/8” ( Caution drill through the first layer only ).
• Insert Urinal drain tube into 1-9/16” hole in Tank & align with drilled panel hole.
• Rivet using Rivet ( 22199 ). • Transfer drill hole through Front Facing with #10 drill bit, drill at angle ( see below ).
• Rivet in place using Rivet ( 11024 ) and washer ( 11315 ). INSTALL PAPER GUARD
NOTE: For Restrooms with optional Handwash see Option B. below. - OPTION A: Standard installation.
• Locate (4) drill points on the right-hand panel ( see diagram below ).
• Drill with #10 drill bit & Stop Collar set to 3/8”
• Rivet Paperguard ( 22209 )using (4) Rivets ( 18543 ) and (4) Washers ( 11315 )
Place washers under rivet heads.
• Install Spindle ( 22310 ). 9. OPTION B: Installation with Handwash.
• Locate Paperguard ( 22209 ) on the left-hand panel ( see diagram below ).
• Mark (4) hole locations.
• Drill with #10 drill bit & Stop Collar set to 3/8”
• Rivet Paperguard using (4) Rivets ( 18543 ) and (4) Washers ( 11315 )
Place washers under the heads of the rivets.
• Install Spindle ( 22310 ). INSTALL HOVER HANDLE
 - INSTALL HANDLE ON DOOR
• Drill holes with #10 bit & Stop Collar set at 3/8, holes may be predrilled from factory.
• Align holes in Handle ( 16807 ) with Door holes and rivet with (2) black Rivets ( 17030 ). INSTALL COAT HOOK
 - INSTALL HOOK ABOVE DOOR
• Drill hole with #10 bit & Stop Collar set at 3/8.
• Align holes in Coat Hook ( 10891 ) with hole.
• Rivet with Rivet ( 22199 ). INSTALL ROOF
 - INSTALL ROOF ON UNIT
• Place Roof ( 22191 ) on Restroom, push firmly over Vent pipe.
• While pushing rivet, roof and panel tightly together; Rivet with (16) Rivets ( 22199 ). INSTALL SHELF
 - INSTALL SHELF ON VENT PIPE
• Install shelf ( 23832 ) onto vent pipe ( 14133 )
• Place 40” from bottom of pipe to top of shelf. INSTALL VENT PIPE
 - INSTALL VENT PIPE AND ALIGN SHELF
• Install vent pipe ( 14133 ) in the left rear corner through the roof.
• Place vent pipe into vent pipe hole of the tank. Make sure the vent pipe is seated completely in the tank.
• Install screw ( 18098 ) in recess shown on the tank, using Phillips driver bit. Make sure screw is level with tank and installed through the tank to vent pipe.
• Center shelf in corner of left and rear, the shelf is placed 40” above tank top.
• Transfer drill with #10 drill and rivet in place with (2) rivet ( 22199 ) at left and right recesses. Note center recess is for the optional coat hook.
• Use shipping screw ( 22476 ) to secure vent pipe to roof exterior.
 INSTALL BASE
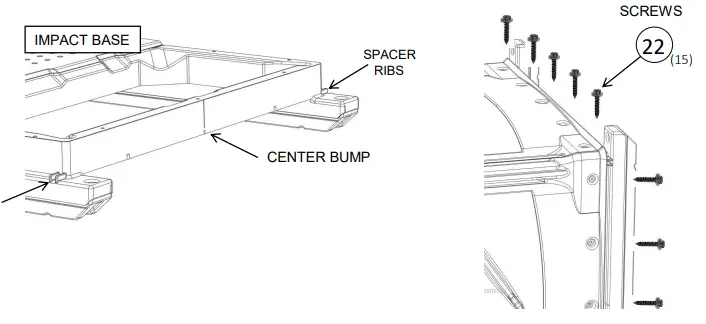 INSTALL BASE
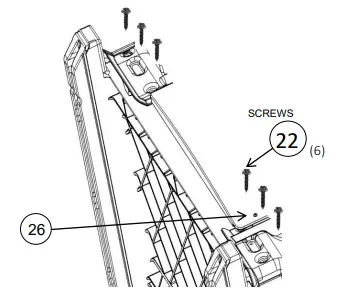
 INSTALL TANK & TOILET SEAT
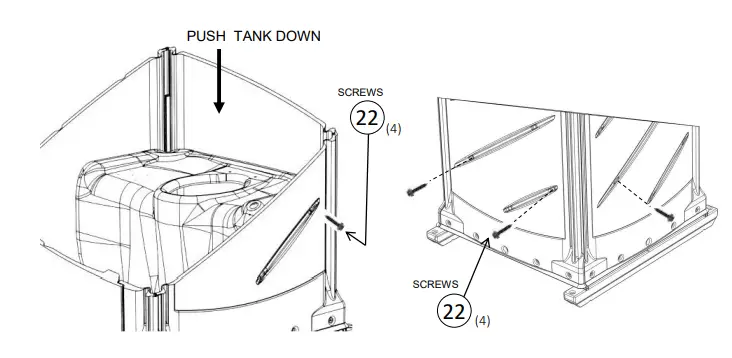
 INSTALL URINAL
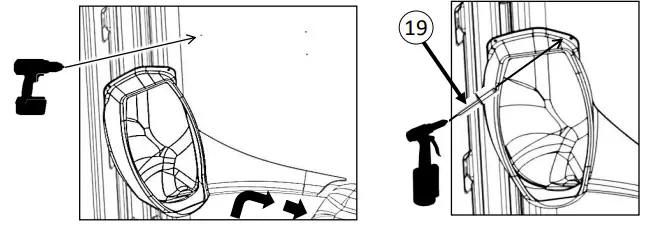 • Transfer drill hole through Front Facing with #10 drill bit, drill at angle ( see below ).
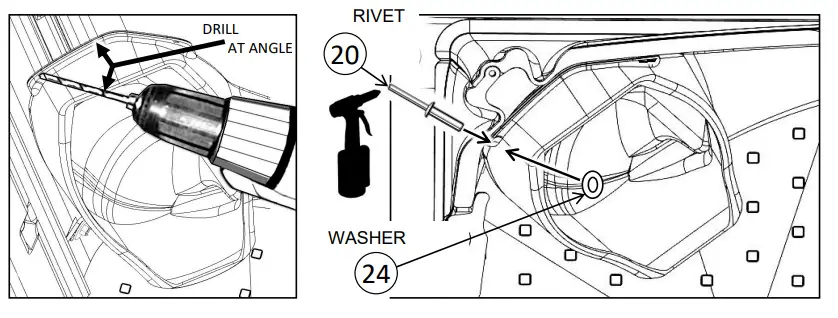 INSTALL PAPER GUARD
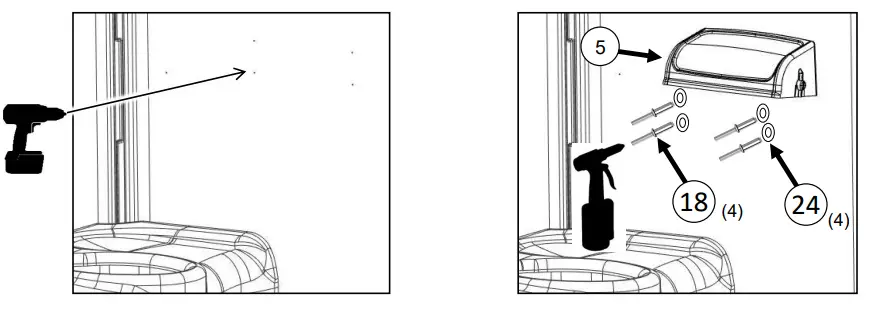 9. OPTION B: Installation with Handwash.
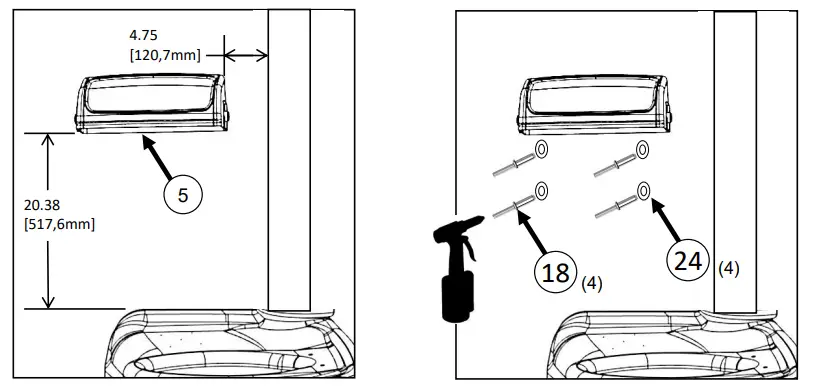 INSTALL HOVER HANDLE
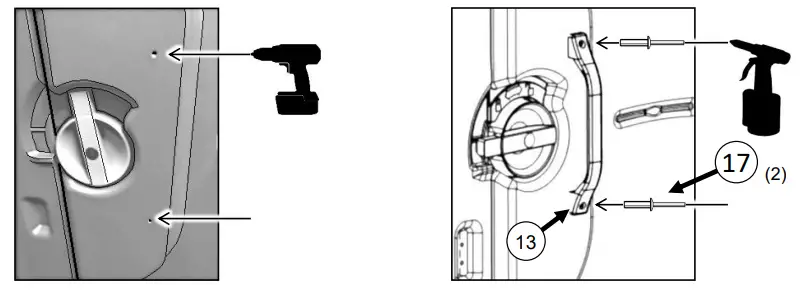 INSTALL COAT HOOK
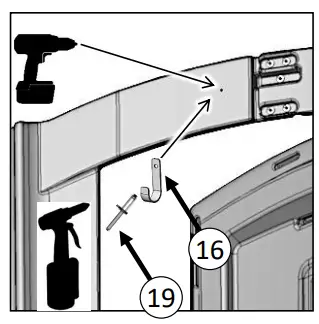 INSTALL ROOF
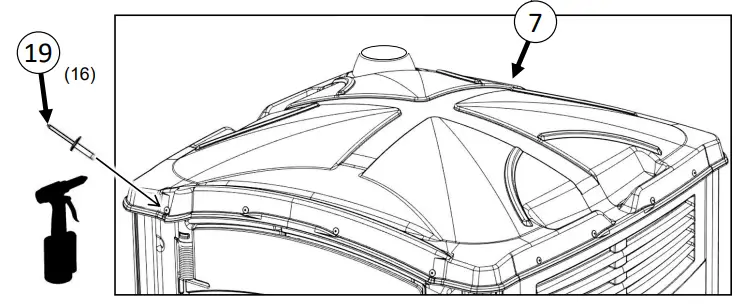 INSTALL SHELF
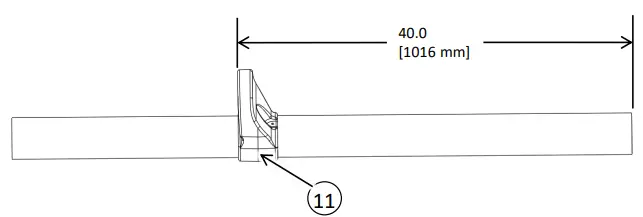 INSTALL VENT PIPE
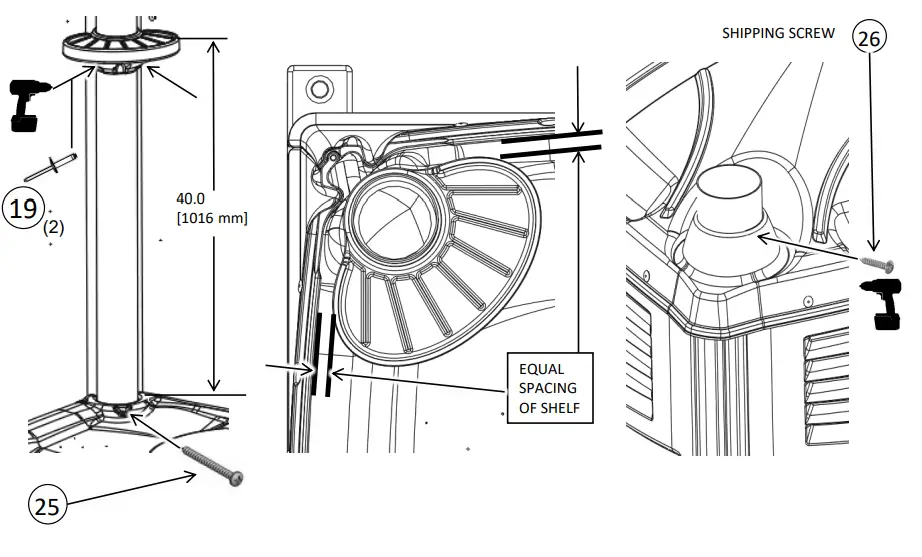
![]() 2530 Xenium Lane North, Minneapolis, MN 55441
2530 Xenium Lane North, Minneapolis, MN 55441
Telephone: 763-553-1900 Fax: 763-553-1905
800-328-3332 / www.satelliteindustries.com
24172 INSTRUCTION, MAXIM 3000 II ROUND
VENT PIPE W/SHELF


 Type B Gas Vent Instruction Manual")


