
deco gear DGPM20 15.6 Inch Touchscreen Full HD IPS LED Portable USB-C Monitor
Important safety instructions
Please read the following instructions carefully.
- To clean the LCD monitor screen:
- Turn off the LCD monitor and unplug the power cord.
- Spray a non-solvent cleaning sloution onto a rag and clean the screen gently.
- Never spray or pour any liquid directly onto the screen or case.
- Please do not use any ammonia or alcohol-based cleaners on the LCD display screen or case.
- Do not place the LCD monitor near a window. Exposing the monitor to rain,moisture or sunlight can severely damage it.
- Do not apply pressure to the LCD screen. Excessive pressure may cause permanent damage to the display.
- Do not remove the cover or attempt to service this unit yourself. Only authorized technicians should perform servicing of any kind.
- Store the LCD monitor in a room with temperatures of -4° to 140°F (-20°to 60°C) Storing the LCD monitor outside this range may result in permanent damage.
- Immediately unplug your monitor and call an authorized technician for any of the previous circumstances.
Package contents
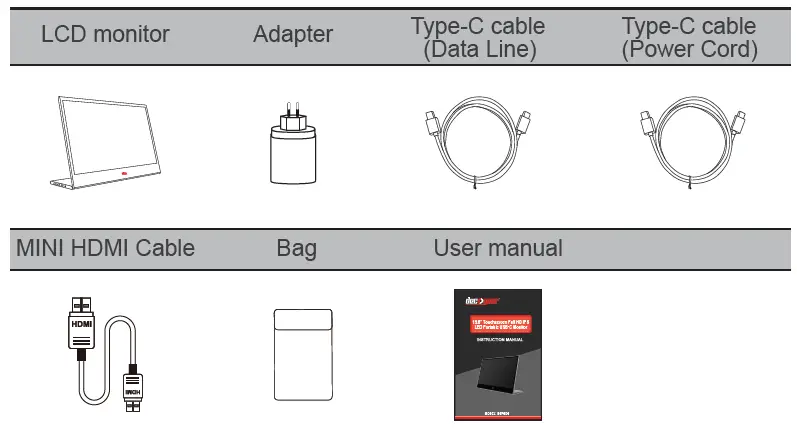
Please make sure to use the original DECOGEAR accessories in order to preserve the quality-aspects.
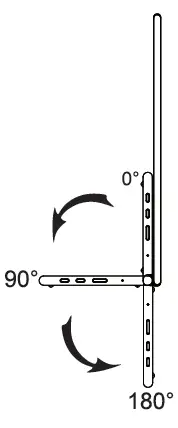
Adjustable base (0° ~ 180 °)
- Take out the monitor from the packaging and place it on a stable and level workspace.
- Open or close the base. The viewing angle of the monitor can be adjusted using the stand. (As shown below, Adjustable Angle 0° ~ 180 °)
Connect the monitor to your computer
- Plug the adaptor of you monitor into a nearby electrical outlet.
- Use the adaptor to connect to the monitor’s Port 2.
- Connect Type-C Cable(Only Type-C-input model)
- Connect the Type-C Cable to the computer.
- Connect Mini HDMI Cable (Only HDMI-input model)
- Connect the Mini HDMI cable to the computer.
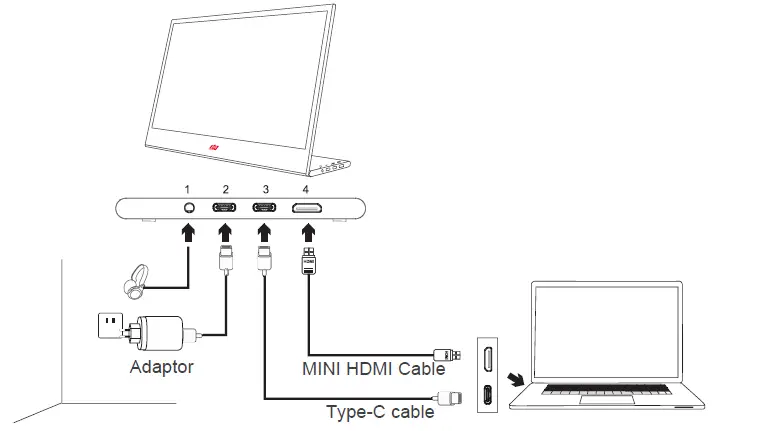
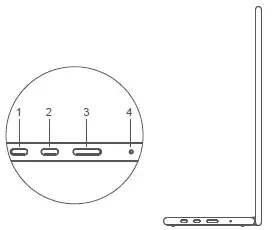
| Port | ICON | Description |
| 1 | Connect to headphone | |
| 2 | DC IN,Plug in the adapter (Accessory) | |
| 3 | Type C IN,Connect to Notebook Type C | |
| 4 | Connect to PC or other device HDMI |
Please make sure to use the original DECOGEAR accessories in order to preserve the quality-aspects.
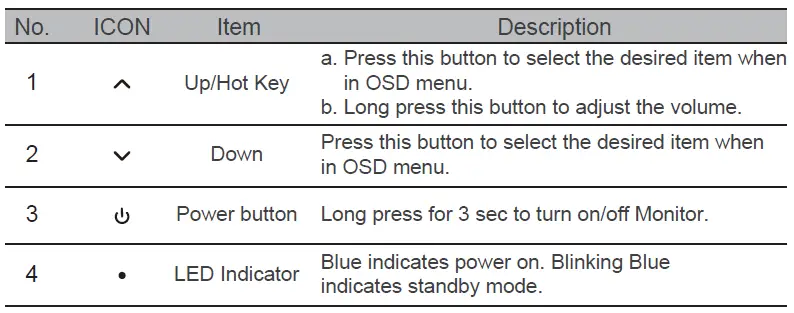
External controls
The terms HDMI and HDMI High-Definition Multimedia Interface,and the HDMI Logo are trademarks or registered trademarks of HDMI Licensing Administrator,Inc. in the United States and other countries.
OPERATION
Powering On / Off
Press and hold the power button for 3 seconds to turn the monitor ON and off. The monitor will enter power saving mode when turned on unless a suitable device is connected.
Volume Up / Down
Press and hold the up button to enter Volume Adjustment. Then adjust the volume with the Up button (volume increase) and Down button (volume decrease).
Brightness
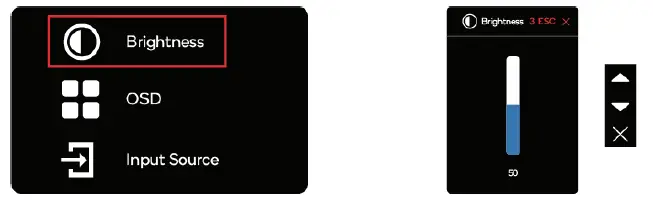
- Press any key to enter the quick menu.
- Using the Up button, select Brightness from the menu.
- Use the Up and Down buttons to adjust the brightness between 0-100.
- Press Power button to confirm and exit the menu, or wait 3 seconds without pressing any buttons.
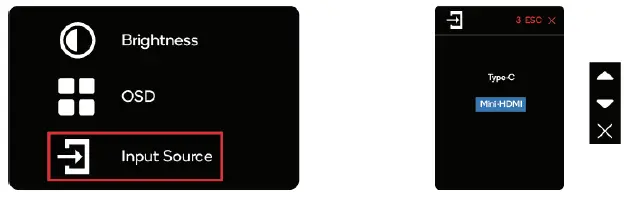
Input source
- Press any key to enter the quick menu.
- Pressing the power button, open Input Source from quick menu to select a USB-C or Mini-HDMI input source.
- When you are done, press the Power button to confirm and exit.
OSD
The following content is for general reference only. The actual product specifications may vary. The on-screen display (OSD) can be used for adjusting the settings of your monitor. Press any button to open the Navigation OSD. You can use the OSD to adjust the picture quality, OSD setting, and general settings. Please Up and Down buttons to navigate the OSD menus and the power button to confirm selection.
Scene Setting

Select the appropriate preset for your usage and use power button to confirm.
Picture Setting
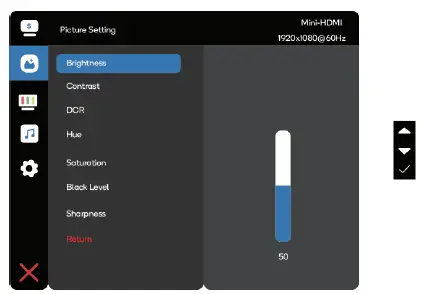
The Picture setting menu includes many options to adjust the color and picture quality..
Color Temperature Setting
The color temperature adjustment Warm-Normal-Cool corresponds to the color temperature of 6500K, 7500K, 9300K and the User mode has a three-level menu.

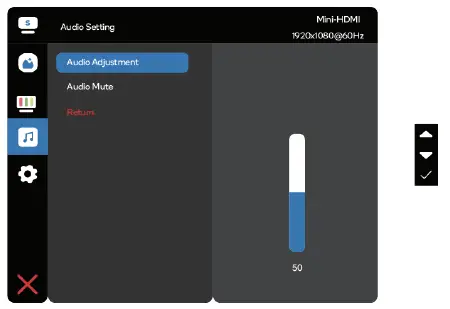
Audio Setting
OSD Setting
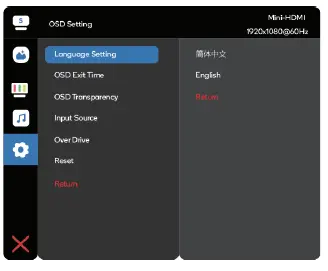
- Langusge Setting: Set the OSD menu language.
- OSD Exit Time: Adjust the delay before turning the off the OSD menu.
- OSD Transparency: Select the transparency when using gaming mode,The transparency can be 20%,40%,60%,80% or Off
- Input source: select USB C or Mini-HDMI input source.
- Reset: Reset all setting to the factory defaults.
SPECIFICATIONS
- Audio Speaker 1W*2
- Dimensions Size 362(W)x240(H)x15.6(D)mm
- Net Weight 1.1kg
- Display Brightness 470(typ) Colours 16.7M Contrast Ratio 1500:1 Native Aspect Ratio 16:9
- Panel Manufacturer SHARP
- Panel Type IPS
- Refresh Rate 60Hz
- Resolution FHD (1920×1080) Size 15.6″
- Viewing Angle 170°(H)x170°(V)
- Features Low Blue Light Yes
- Inputs HDMI(1.4) 1 USB Type-C 2
- Outputs Headphone Jack Yes
- Power Power Consumption Typ. 8W Standby Consumption 0.5W
TROUBLESHOOTING
|
No video/ picture |
Blue LED | Using the OSD, adjust brightness and contrast to maximum or reset to their default. Make sure the correct input source is selected through the input source menu. When connected via USB-C to USB-C cable, the blue light flashing indicates the output power of the external device is too low to power the monitor. Please connect the external power to the monitor. |
|
No LED | Make sure the video cable between the monitor and computer is connected properly and securely. Use other electrical equipment to confirm that the power outlet is working properly. Make sure the correct input source is selected through the input source menu. Check the power switch. Long press 5 seconds to start the monitor. Check if the power cord is properly connected to the monitor. | |
|
Red LED | Check if the video signal cable is properly connected at the back of the monitor. Check if the video cable connector pins are bent or broken. Check if the computer system is switched on. | |
|
Missing pixels/ spots and light leaks on the screen | Turn off and on again. Restore the monitor to factory settings. Use OSD to adjust brightness and contrast. Pixels that are permanently off are an inherent defect in LED technology. Contact help.kogan.com about monitor quality and pixel issues. | |
| Display fails when switching | Make sure that the video cables of the monitor and HDMI output device are properly connected . Reset the monitor to factory settings. | |
| Problem | Troubleshooting advice |
|
Picture is missing colours | Make sure the video cable connecting the monitor and the computer is properly connected. Adjust custom R/G/B values. Colour in the colour menu of OSD. |
| Screen image is too small | Restore the monitor to factory settings. |
| 05D does not appear on the screen | Turn off the monitor, disconnect and reconnect the power cord, and turn on the monitor. |
|
No picture, indicator light is blue | Check the signal source. Make sure the computer or phone is not in sleep mode. Check that the signal cable is properly inserted . Reconnect the signal cable if necessary. Restart your computer or phone . |
|
The picture does not fill the entire screen. | Since the resolution of the same screen of the mobile phone can be re-scaled (aspect ratio), the display can be displayed in full screen. Computer equipment can be set to 16:9 resolution, the display can be full screen display Play a video source with a 16:9 video sources, and the monitor can display full screen. |
Supported Timing List
Standard timing
| Resolution | Refresh Rate | Resolution | Refresh Rate |
| 720 x 400 | 70hz | 1024 x 768 | 75hz |
| 640 x 480 | 60hz | 1280 x 1024 | 75hz |
| 640 x 480 | 67hz | 1152 x 870 | 75hz |
| 640 x 480 | 72hz | 1280 x 720 | 60hz |
| 640 x 480 | 75hz | 1280 x 960 | 60hz |
| 800 x 600 | 56hz | 1280 x 1024 | 60hz |
| 800 x 600 | 60hz | 1152 x 864 | 75hz |
| 800 x 600 | 72hz | 1440 x 900 | 60hz |
| 800 x 600 | 75hz | 1600 x 1200 | 60hz |
| 832 x 624 | 75hz | 1680 x 1050 | 60hz |
| 1024 x 768 | 60hz | 1920 x 1080 | 60hz |
| 1024 x 768 | 70hz |
Video timing
| Resolution | Refresh Rate | Resolution | Refresh Rate |
| 640 x 480p | 60hz | 1280 x 720p | 50hz |
| 720 x 480p | 60hz | 1920 x 1080i | 50hz |
| 1280 x 720p | 60hz | 1920 x 1080p | 50hz |
| 1920 x 1080i | 60hz | 1920 x 1080p | 23hz/24hz |
| 1920 x 1080p | 60hz | 1920 x 1080p | 25hz |
| 720 x 576p | 50hz | 1920 x 1080p | 29hz/30hz |
Detailed timing
| Resolution | Refresh Rate |
| 1920 x 1080 | 60hz |
| 960 x 1080 | 61hz |
Notice for FCC
This device complies with Part of 15 of the FCC rules. Operation is subject to the following two conditions: (1) this device may not cause harmful interference. (2) this device must accept any interference that may cause undesired operation.
This equipment has been tested and found to comply with the limits for Class B digital device, pursuant to Part 15 of FCC Rules. These limits are designed to provide reasonable protection against harmful interference in a residential installation. This equipment generates, uses and can radiate radio frequency energy and, if not installed and used in accordance with the instructions, may cause harmful interference to radio communications. However, there is no guarantee that interference will not occur in a particular installation. If this equipment does cause harmful interference to radio or television reception, which can be determined by turning the equipment off and on, the user is encouraged to try to correct the interference by one or more of the following measures:
- Reorient or relocate the receiving antenna.
- Increase the separation between the equipment and receiver.
- Connect the equipment into an outlet on a circuit different from that to which the receivers is connected.
- Consult the dealer or an experienced radio/TV technician for help.


