deco gear DGVIEW250F Gaming Monitor Instruction Manual

SAFETY WARNINGS AND GUIDELINES
Please read this entire manual before using this device, paying extra attention to these safety warnings and guidelines. Please keep this manual in a safe place forfuture reference. This device is intended for indoor use only. Do not expose this device to wateror moisture of any kind. Do not place drinks or other containers with moisture on or near the device. If moisture does get in or on the device, immediately unplug it from the power outlet and allow it to fully dry before reapplying power. Do not touch the device, the power cord, or any other connected cables with wet hands.
Do not place the monitor on an unstable surface where it could fall and cause either personal injury or damage to the monitor and/or other equipment. Do not expose this device to excessive vibration. Do not subject the product to extreme force, shock, or fluctuations in temperature or humidity. Do not expose this device to excessively high temperatures. Do not place it in, on, or near a heat source, such as a fireplace, stove, radiator,etc. Do not leave it in direct sunlight. This device ventilates excessive heat through the slots and openings in the case. Do not block or cover these openings. Ensure that the device is in an open area where it can get sufficient airflow to keep from over heating.
Prior to operation, check the unit and power cord for physical damage. Do not use if physical damage has occurred.
Before plugging the unit into a power outlet, ensure that the outlet provides the same type and level of power required by the device. Unplug this device from the power source when not in use. Take care to prevent damage to the power cord. Do not allow it to become crimped, pinched, walked on, or become tangled with other cords. Ensure that the power cord does not present a tripphg hazard. Never unplug the unit by pulling on the power cord. Always grasp the connector head or adapter body. Clean using a soft, dry cloth only. Do not use chemical cleaners, solvents, or detergents. For stubborn deposits, moisten the cloth with warm water.
This monitor has no user serviceable parts. Do not open the case or otherwise attempt to modify this monitor. Do not leave a single image on the display for a long period of time. Doing so could cause “burn-in” of the image. It is recommended to usea variable desktop background and to use a screen saver to prevent “burn-in”. Alternatively, ensure that the monitor is powered off for at least 2 hours out of every 12.
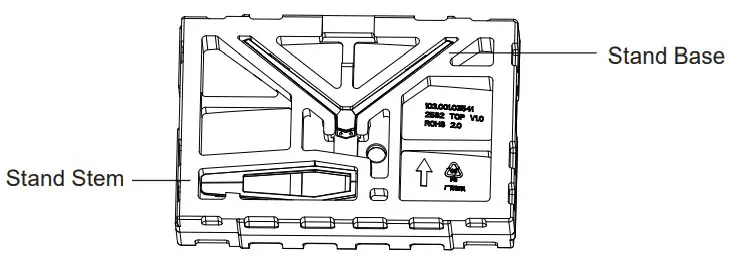
Keep the original foam packaging material for use when installing or removing the included stand.
PACKAGE CONTENTS
Please take an inventory of the package contents to ensure you have all of the items listed below. If anything is missing or damaged, please contact customer service for replacement options.
lx 25″ Monitor lx DP Cable lx Al Stand Base lx A2 Stand Stem lx Base Screw lx Type-C Cable 4x AS Wall Mount Screws 1x Power Adapter 1x Users Manual lx Power Cable
PRODUCT OVERVIEW
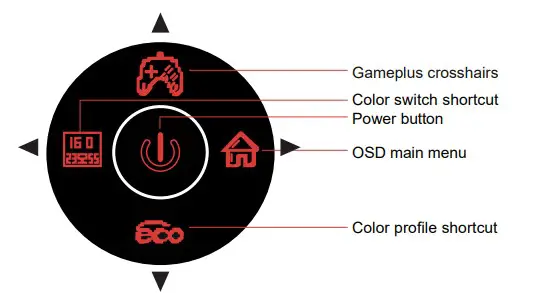
Controls
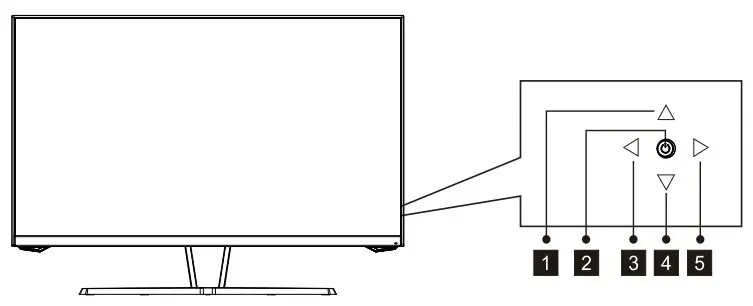
 Press Rocker up: Crosshairs shortcut; OSD menu navigation.
 Power Button: Turn off monitor (longpress); put monitor to sleep (quick-press)
 Press Rocker to the left: RGB Range shortcut. (When connecting a Type-C device (phone, laptop, etc.) and using the monitor in portrait mode (vertical position), open the Port Selection menu by
press-and-holding the Rocker to the left device. navigation
. Then select the appropriate Press Rocker down: display scene mode shortcut; OSD menu
 Press Rocker to the right: OSD shortcut; menu input selection.
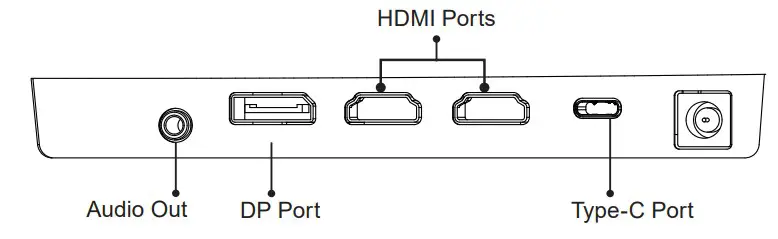
Connections

- Audio Output
- DisplayPort
- HDMI Ports
- Type-C Port
- Power
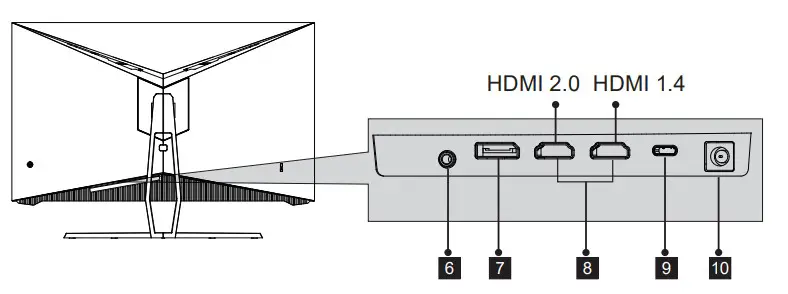
![]() Monitor resolution and refresh rates are largely dependent on the type of connecting cable used. For optimal refresh rates, we recommend using
Monitor resolution and refresh rates are largely dependent on the type of connecting cable used. For optimal refresh rates, we recommend using
DisplayPort connectors whenever possible.
INSTALLING THE STAND
 Keep the foam underneath the monitor while attaching the stand.
- Open the package, take out the product with foam still attached, and gently place it on a desktop or tabl

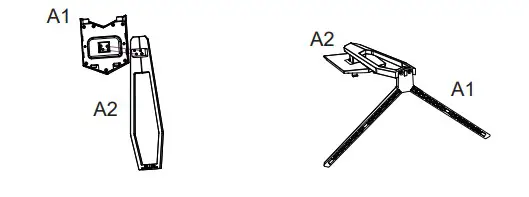
- Take out the two main parts of the stand and remove the foam covering the top of the monitor. Release the screw attached on the base (A1), then attach the stand base (A2) to the stand stem. Tighten the screw back to the base (A1).

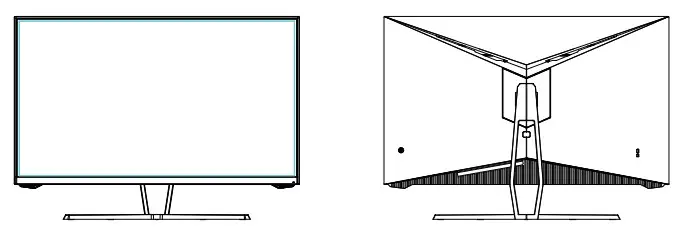
- Buckle the assembled bracket chassis on the whole monitor (insert the upper part and press down). If you want to remove the bracket chassis, pull down the button on the rear shell to remove the bracket chassis.

- Place the monitor on your desktop or table after completing installation.


![]() To avoid damage, do not touch the screen when moving the monitor.
To avoid damage, do not touch the screen when moving the monitor.
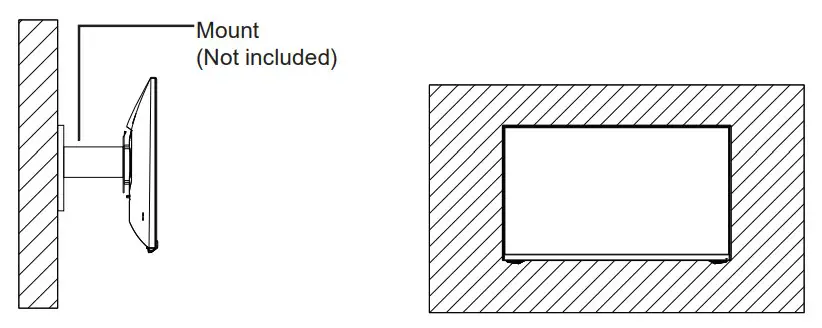
MOUNT INSTALLATION.
 This monitor includes screws that may only be used when attaching the monitor to a mount. No mount or mounting accessory is included
- Open the package, take out the product with foam still attached, and gently place it on a desktop or table. Remove the extra parts and the foam covering the monitor. If the monitor was already attached to the stand, remove the stand.

- Remove the original screws ( 1 ) from the opening in the back of the monitor.
Then use the included 4x A1 screws to attach the adapters inside the opening Do not discard the original screws. – Use only the Screws ( 2 ) provided
 - Follow the directions received with your mount, stand, or accessory and install the monitor on the wall or fixture as desired.


Adaptive Sync
Adaptive sync eliminates image tearing, stuttering and ghosting by adjusting of a monitor’s vertical refresh rate to the frame rate of the graphics card. It is compatible with GPUs that use popular sync features. The feature is off on Deco Gear monitors by default and must be manually enabled in the monitor’s OSD (see Section 8: OSD).
To use this feature, the connecting device must be compatible with adaptive sync; have the latest graphic drivers; and be connected to the monitor using a DP cable.
Basic Ope ration
- Insert one end of the DP cable (included) into your PC’s graphics card. An HDMI cable (not included) or, in some cases, a Type-C cable, can also be used.Monitor resolution can be limited based on the input/cable used (i.e., DP vs HDMI).
- Connect the other end of the cable to the corresponding port on your monitor

- Connect the power cable to your monitor, then connect the other end to your power source. It is recommended that you use a surge protector with adequate voltage if a wall outlet cannot be reached directly.
- Locate the power button on the monitor and press and hold it for ~6s to turn the monitor on.
![]() If you cannot locate the power button, please refer to Section 3.1.
If you cannot locate the power button, please refer to Section 3.1.
lndicator Light
Solid blue light indicates power is on and the monitor is operating normally. Flashing blue light indicates been detected or voltage is low. Please ensure
your computer is on and all video cables are fully connected.

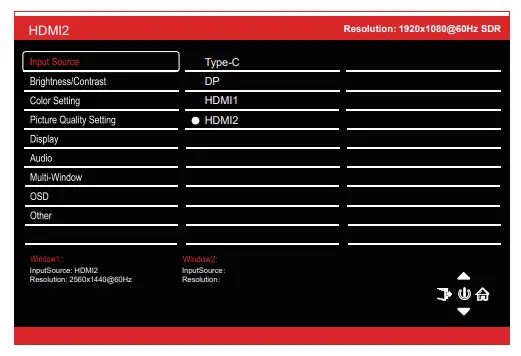
OSD
The On-Screen Display (OSD) Menu may be used to adjust your monitor’s settings and appears on screen after turning on the monitor and pressing Rocker to the right.When using the monitor for the first time, settings will automatically adjust to optimal settings according to your computer’s configuration.
- The shortcut keys of the Rocker button.

- Press rocker to the right to enter the OSD screen.

- Press rocker up or down to browse functions.
a. Highlight the functions you want to set and press rocker right to enter the submenu.
b. Press rocker up or down to browse the sub-menu and press the rocker right to highlight the functions you want to set.
c. Press rocker up or down to highlight the options and press the rocker right - Press rocker to the left to exit the current screen.
OSD: When the user flips the display, this function can also flip the OSD to achieve the best display angle
| Main Menu | Sub-Menu | Options | Description |
| Input Source | Type-C | NONE | Switch to Type-C signal input |
| DP | NONE | Switch to DP signal input | |
| HDMI 1 | NONE | Switch to HDMI 1 signal input | |
| HDMI 2 | NONE | Switch to HDMI 2 signal input | |
| Brightness/ Contrast | Brightness | 0~100 | Adjust display brightness |
| Contrast | 0~100 | Adjust display contrast | |
| DCR | On | Turn on DCR function | |
| Off | Turn off DCR function | ||
| Color Setting | Gamma | Gamma 1.8, Gamma 2.0, Gamma 2.2, Gamma 2.4, Gamma 2.6 | Set Gamma add-in |
| Picture Mode | Standard, Photo, Movie, Game, FPS, RTS, sRGB | Set visual mode according to activity and/or preference | |
| Color Temperature | Warm, Cool, User | Select color temperature | |
| Low Blue Light | 0~100 | ||
| Hue | 0~100 | Adjust hue levels | |
| Saturation | 0~100 | Adjust hue levels | |
| Picture Quality Setting | Sharpness | 0~100 | Set display sharpness |
| Response Time | Off, High, Middle, Low | Adjust response time | |
| Noise Reduction | Off, High, Middle, Low | Reduce the interference of image noise caused by signal source interference | |
| Dynamic Luminous Control | On, Off | Compensate for gray scale display screen and strengthen the expression of gray scale | |
| MPRT | On, Off | Moving Picture Response Time |
| Main Menu | Sub-Menu | Options | Description |
| Display | Aspect Ratio | Wide Screen, 4:3, 1:1, Auto | Select on-screen aspect ratio |
| LedMode | Normal, Off, Flicker | The lamp under the front frame and the lamp at the back are controlled synchronously | |
| Audio | Mute | On, Off | Turn mute mode on/off |
| Volume | 0-100 | Adjust audio volume | |
| Audio Source | Auto Source, Type-C, DP, HDMI 1, HDMI 2 | Select audio signal input via Type-C, HDMI or DP | |
| Multi- Window | Multi-Window | Off, PIP Mode, PBP 2Win, PBP Phone | Select PIP/PBP modes according to the number of input signals connected (PBP Phone mode specially set for mobile phones) |
| Sub Win2 Input | HDMI1.4, HDMI2.0, DP1.2, Type-C | Select according to input signal for PIP/PBP mode (When PBP phone mode in use, the second window signal cannot be selected) | |
| Small, Medium, Large | Adjust the PIP/PBP display window
| ||
| PIP Position | Top Right, Top Left, Bottom Right, Bottom Left | Adjust the PIP/PBP window position | |
| Swap | NONE | Swap between the PIP/PBP screens (PBP phone mode cannot be swapped) | |
| OSD | Language | English, | Set OSD language |
| 简体中文, | |||
| Español, 日本語, | |||
| Français | |||
| OSD | 0-100 | ||
| H-Position | |||
| OSD | 0-100 | Adjust the OSD’s vertical position | |
| V-Position | |||
| OSD | 0-100 | Set the OSD’s overall transparency | |
| Transparency | |||
| OSD Time | 5-100 | Set how long the OSD remains open | |
| Out | after non-use | ||
| OSD Rotation | Normal, 90, 180, | Adjust the OSD menu orientation | |
| 270 | based on the monitor’s orientation |
| Main Menu | Sub-Menu | Options | Description |
| Other | DP Version | DP1.2 | Display the current signal inputs version |
| Adaptive-Sync | On, Off | Turn the Adaptive-Sync function on/ off | |
| Gravity Induction* | On, Off | Turn the Gravity Induction function on/off | |
| Turn on Type-C Function | On, Off | Turn the Turn on Type-C Function on/off | |
| Reset | None |
*Gravity induction (or gravity sensing) works to detect the orientation of the connected TYPE-C device (PC, iPad, Tablet, etc.) and automatically adjusts the the display settings, select the display adapter properties of display 2, and select 1080×1920 in all modes.
Manufacturer’s 1-Year Limited Warranty
The manufacturer warrants that all parts and components are defect free in materials and workmanship for 1 year. This warranty is valid only in accordance with the conditions set forth below:
- The warranty extends only to the original consumer purchaser and is not transferable. In addition, proof of purchase must be demonstrated.
- This limited warranty is the only written or express warranty given by the manufacturer. Any implied warranty of merchantability or fitness for a particular purpose on this product is limited in duration to the duration of this warranty. Some states do not allow limitations on how long an implied warranty lasts, so the above limitation may not apply to you.
- This warranty gives you specific legal rights. You may also have other rights which vary by state
ProcedureforReplacementorReturnwithinthe1 Year:
To return the product for replacement or refund within the 1 year, the original purchaser
must pack the product securely and send it postage paid with a description of the reason
for replacement or refund, proof of purchase, and include your order number on the
package, to the following address:
Deco Gear
80 Carter Drive
Edison, NJ 08817
Other contact info
Phone: 844-413-2646
Customer Service Email: [email protected]


![Philips Gaming Monitor [272e1] User Manual](https://static-data1.manualsee.com/1/img/407/16107/2020/12/Philips-Gaming-Monitor-272E1.jpg "Philips Gaming Monitor [272e1] User Manual")


