![]() FIRESIGHT
FIRESIGHT
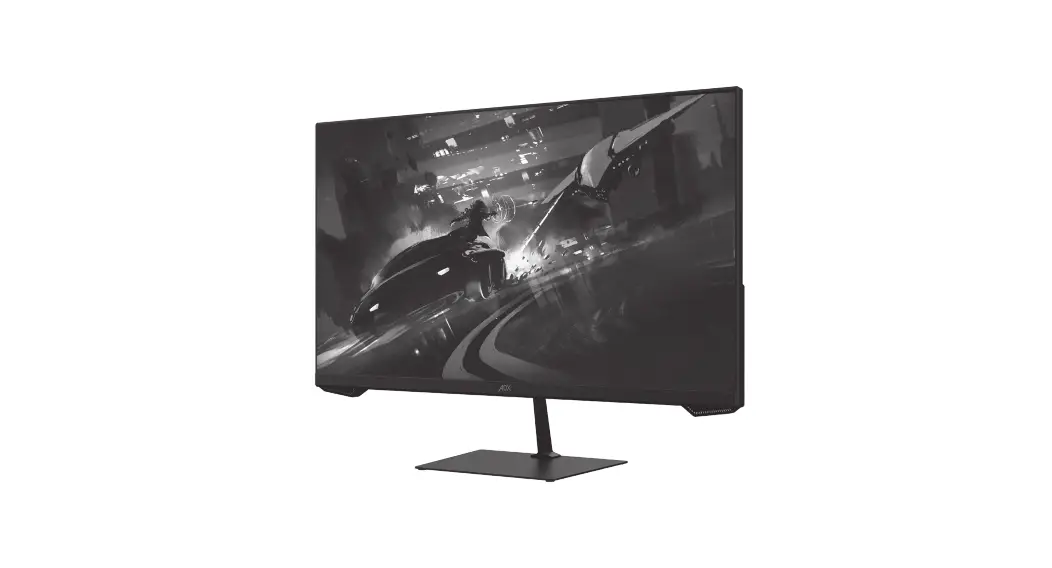
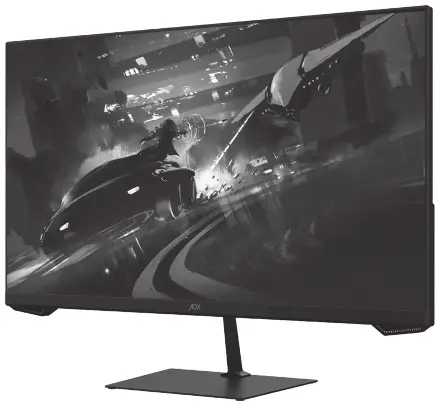
HF165
24″ 165Hz Gaming Monitor
INSTRUCTION MANUAL
A24GMF22
Safety Warnings
- Read all the instructions carefully before using the unit and keep them for future reference.
- Retain the manual. If you pass the unit onto a third party make sure to include this manual.
- Check that the voltage marked on the rating label matches your mains voltage.
- WARNING: Never let people (including children) with reduced physical, sensory or mental capabilities or lack of experience and / or knowledge use electrical devices unsupervised.
- To avoid danger of suffocation, keep plastic bags out of reach of babies, children and domestic animals.
- Carefully attach the stand to the monitor. If the stand is provided with screws, tighten the screws firmly to prevent the Monitor from tilting. Do not over tighten the screws and mount the stand rubbers properly.
Damage
- Please inspect the unit for damage after unpacking.
- Do not continue to operate the unit if you are in any doubt about it working normally, or if it is damaged in any way – switch off, unplug from the mains socket and consult your dealer.
Location of Unit
- The unit must be placed on a flat stable surface and should not be subjected to vibrations.
- Do not place the unit on sloped or unstable surfaces as the unit may fall off or tip over.
- The mains socket must be located near the unit and should be easily accessible.
- This unit is designed for indoor, domestic use only.
- Use this monitor set at an altitude of less than 2000 meters above sea level, in dry locations and in regions with moderate or tropical climates.
Wall Mounting
- Read the monitor and wall mount instructions before mounting your monitor on the wall.
- The wall mount bracket is not supplied, they can be purchased from your dealer.
- Do not install the monitor on a ceiling or an inclined wall.
- Only use the screws supplied with the wall mount bracket when attaching the monitor to the bracket. See your monitor instructions for screw type.
- Tighten the wall mount screw firmly to prevent the monitor from falling. Do not over tighten the screws.
- If you are in any doubt how to mount your monitor, contact a professional.
Maintenance
- Ensure to unplug the unit from the power supply before cleaning.
- Do not use any type of abrasive pad or abrasive cleaning solutions as these may damage the unit’s surface.
- Do not use liquids to clean the unit.
Temperature
- Avoid extreme degrees of temperature, either hot or cold. Place the unit well away from heat sources such as radiators or gas / electric fires
- Avoid exposure to direct sunlight and other sources of heat.
- Naked Flames
- Never place any type of candle or naked flame on the top of or near the unit.
Moisture
- To reduce the risk of fire, electric shock or product damage, do not expose this unit to rain, moisture, dripping or splashing. No objects filled with liquids, such as vases, should be placed on the unit.
- If you spill any liquid into the unit, it can cause serious damage. Switch it off at the mains immediately. Withdraw the mains plug and consult your dealer.
Ventilation
- To prevent the risk of electric shock or fire hazard due to overheating, ensure that curtains and other materials do not obstruct the ventilation vents.
- A minimum distance of 5 cm around the unit should be maintained to allow for sufficient ventilation.
- Do not install or place this unit in a bookcase, built-in cabinet or in another confined space. Ensure the unit is well ventilated.
Safety
- Always disconnect the unit from the mains supply before connecting / disconnecting other devices or moving the unit.
- Unplug the unit from the mains socket during a lightning storm and long inactivity periods (going on holiday).
- In the interests of safety and to avoid unnecessary energy consumption, never leave the unit switched on while unattended for long periods of time, e.g. overnight, while on holiday or while out of the house. Switch it off and disconnect the mains plug from the mains socket.
Mains Adapter Cable
- Make sure the unit or unit stand is not resting on top of the mains cable, as the weight of the unit may damage the mains cable and create a safety hazard.
- A damaged power cord/plug can cause fire or give you an electric shock. Handle the power cord by the plug, do not unplug the monitor by pulling the power cord.
- Never touch the power cord/plug with wet hands as this could cause a short circuit or electric shock.
- Never make a knot in the power cord or tie it with other cords.
- If the mains cable is damaged it must be replaced by the manufacturer, its service agent, or similarly qualified persons in order to avoid a hazard.
- The mains adapter will continue to draw electricity from the mains supply when plugged in the mains socket. In the interests of safety and to avoid unnecessary energy consumption, never leave the adapter plugged in the mains socket while unattended for long periods of time. Disconnect the adapter from the power supply.
 Use only power supplies listed in the user instructions.
Interference
- Do not place the unit on or near appliances which may cause electromagnetic interference. If you do, it may adversely affect the operating performance of the unit, and cause a distorted picture or sound.
Optimum viewing
- View the unit in moderate light to prevent eye strain. It is recommended to watch the unit from a distance 3-7 times that of the screen height.
LCD screen
- The LCD screen is manufactured using highprecision technology. However, some tiny black points and / or bright points (red, blue or green in colour) may constantly appear on the LCD screen. These points are generated in the manufacturing process and are normal.
Screen Burn
- A characteristic of Plasma and Monitor Panels is that displaying the same image for a long time may cause a permanent after-image to remain on the screen. This is called screen burn. Most pictures shown on the unit will be constantly moving and fill the screen.
- To prevent screen burn if viewing any of the above for long periods of time, reduce contrast and brightness when viewing. Once burn-in occurs it will never disappear completely.
Standby
- The button on the unit does not switch off the unit completely. The unit will continue to draw electricity from the mains supply while in standby. In the interests of safety and to avoid unnecessary energy consumption, never leave the unit in standby while unattended for long periods of time, e.g. overnight, while on holiday or while out of the house. Disconnect the mains plug from the mains socket.
Supervision
- Children should be supervised to ensure that they do not play with the unit.
- Never let anyone especially children push anything into the holes, slots or any other openings in the case – this could result in a fatal electric shock.
Earthing
- Apparatus connected to the protective earthing of the building installation through the MAINS connection or through other apparatus with a connection to protective earthing – and to a monitor distribution system using coaxial cable, may in some circumstances create a fire hazard. Connection to a monitor distribution system has therefore to be provided through a device providing electrical isolation below a certain frequency range (galvanic isolator, see EN 60728-11).
Thank you for purchasing your new product.
We recommend that you spend some time reading this instruction manual in order that you fully understand all the operational features it offers. You will also find some hints and tips to help you resolve any issues.
Read all the safety instructions carefully before use and keep this instruction manual for future reference.
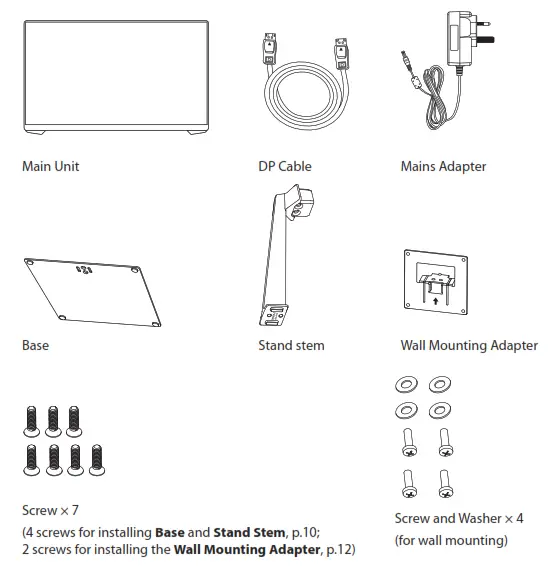
Unpacking
Remove all items from the packaging. Retain the packaging. If you dispose of it please do so according to local regulations.
The following items are included:
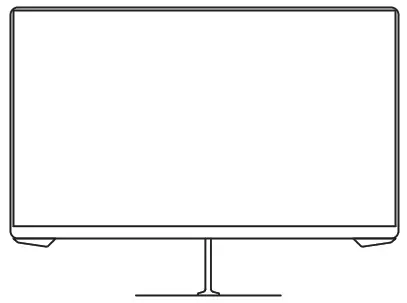
Product Overview
Front View
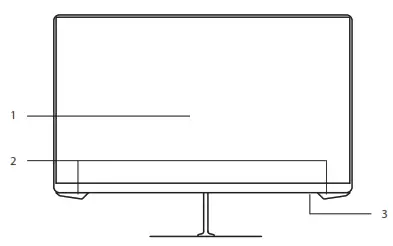
- Screen Display
- Indicator
Light up orange while power on. - Indicator
• Light up blue while power on.
• Light up red if no signal is detected.
Rear View
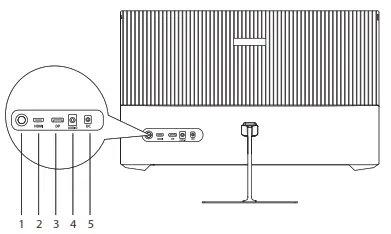
- Control Stick
- HDMI Socket
- DP Socket
- AUDIO Socket
- DC Socket
Connections
HDMI Connection
Use the HDMI cable (not included) to connect the HDMI socket of the unit to the HDMI OUT socket of your PC (not included).

DP Cable Connection
Use the DP cable to connect the DP socket of the unit to the DP OUT socket of your PC (not included).

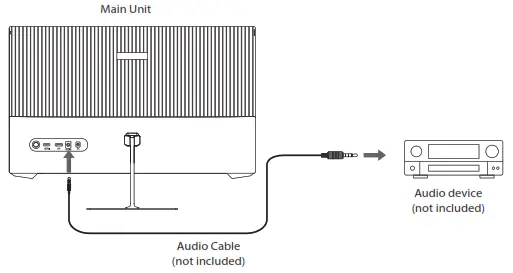
Using AUDIO Connection
Use an audio cable (not included) to connect the AUDIO socket of the main unit and an AUDIO IN socket of an audio device (e.g. speaker; not included).
Using Earphones
Turn down the volume from the source input before using the earphones (not included).
Slowly raise the volume with the earphones on until you reach your desired volume.
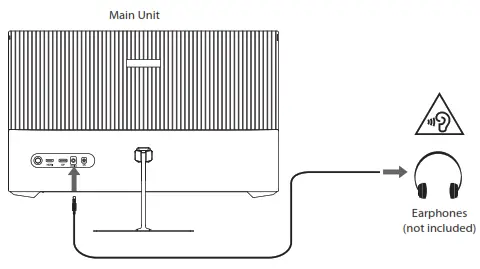
![]() Long-term exposure to loud music may cause hearing damage. It is best to avoid extreme volume when using earphones, especially for extended periods.
Long-term exposure to loud music may cause hearing damage. It is best to avoid extreme volume when using earphones, especially for extended periods.![]() If you select the main unit (A24GMF22) for audio output in your computer, make sure that you have a valid AUDIO connection.
If you select the main unit (A24GMF22) for audio output in your computer, make sure that you have a valid AUDIO connection.
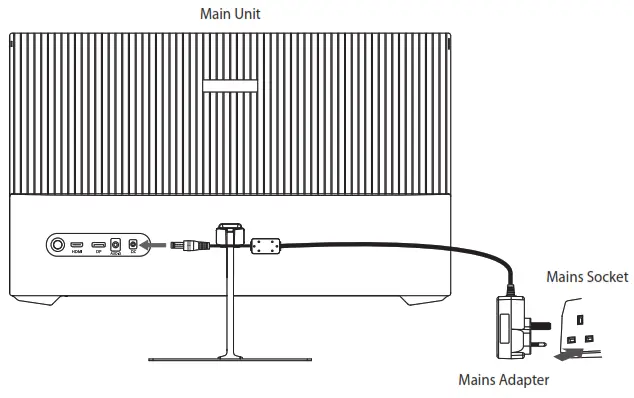
Connecting to the Mains Supply
- This unit operates with a mains adapter (included).
- Connecting the unit to any other power source may damage to the unit. Unwind the mains adapter to its full length. Connect the end of the cable to the DC socket of the unit and then connect the mains adapter to the mains socket.
- Make sure the mains adapter is fully inserted into the mains socket. The unit is now connected and ready to use.
- To switch the unit off completely, unplug the mains adapter from the mains socket.
![]() Ensure all connections are completed before connecting to the mains power socket.
Ensure all connections are completed before connecting to the mains power socket.
Installation
Assembling with the Base Stand
- Install the stand stem onto the rear of the unit
- Tighten it with 2 screws.

- Install the base to the stem with 2 screws.

- Stand the main unit in upright position.


![]() During standing of the whole monitor, do not press the liquid crystal screen with hand to avoid damage to the screen.
During standing of the whole monitor, do not press the liquid crystal screen with hand to avoid damage to the screen.
Adjusting the angle
Adjust the angle of the screen. The angle of the screen can be adjusted forwards or backwards from -5° to 15° for a comfortable viewing experience.
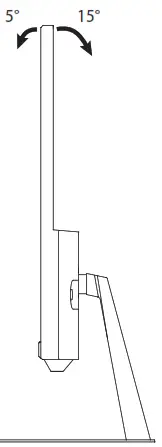
![]() Do not touch or press the screen area when adjusting the angle of the monitor.
Do not touch or press the screen area when adjusting the angle of the monitor.
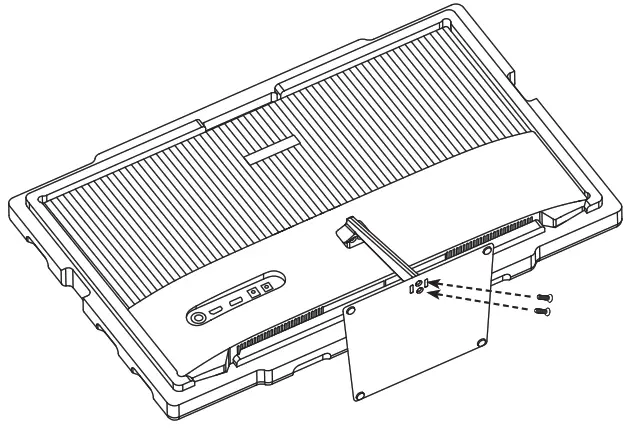
Wall Mounting
- Tighten the wall mounting adapter onto the rear of the main unit with the 2 screws.

- Install the unit onto the wall with the mount stud (not included), and then mount it onto the wall.

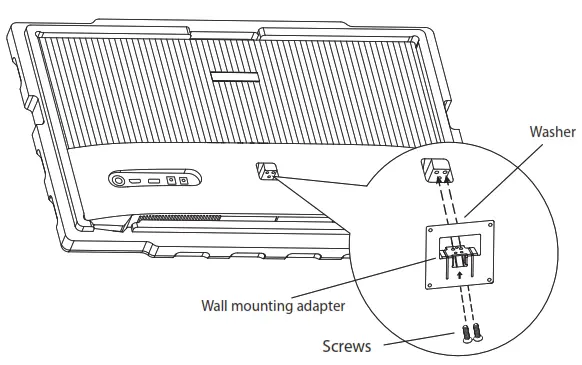
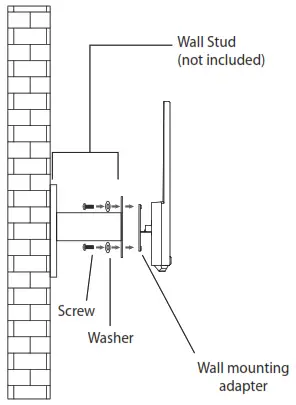
![]() The mounting hole distance of the mount for the unit is 75 × 75 mm
The mounting hole distance of the mount for the unit is 75 × 75 mm
 Make sure that all the screws and studs are firmly installed.
- Do not place or hang any object on the mounted unit.
- Do not hang the unit over 2 meters from the ground.
Operation
Switching On/Off
- Press and hold the control stick to switch on the unit. The display will show the ADX logo.
- Press and hold the control stick again to switch off the unit.
- Unplug the mains adapter from the mains socket to switch off the unit completely.
Input Source Selection
- Slide the control stick to the left enter the input signal source menu.
- Slide the control stick upwards/downwards to select Auto, DP or HDMI input.
- Slide the control stick to the right to confirm.
![]() The unit will show No Signal Connected, and then Enter Sleep Mode if no input source is detected. Then the unit will enter Sleep mode.
The unit will show No Signal Connected, and then Enter Sleep Mode if no input source is detected. Then the unit will enter Sleep mode.
Customizing Settings
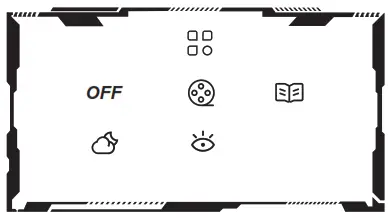
Contextual Mode Settings
- Slide upward the control stick to enter the Contextual menu.
- Slide the control stick upward/downward to select OFF / Movie / Reading / Night / Care Eyes Mode.
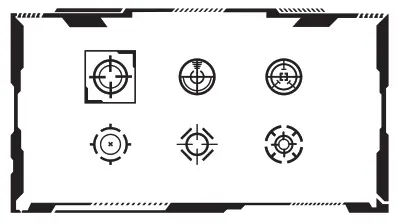
Game Crosshair Mode Settings
- Slide downward the control stick to enter the Contextual menu.
- Slide the control stick upward/downward to select your desired setting, and then slide the control stick to the right to confirm.
You may reconfigure the Hotkey1-3 Setting in the OSD Settings menu.
The default setting of the Hotkeys are as below:
- Hotkey1 (left): Enter the Input Source menu.
- Hotkey2 (up): Enter the Contextual Mode menu.
- Hotkey3 (down): Enter the Game Crosshair Mode menu.
General Settings
- Slide the control stick to the right to enter the General Settings menu.
- Slide the control stick to select the following options
- Slide it to right to confirm your settings.
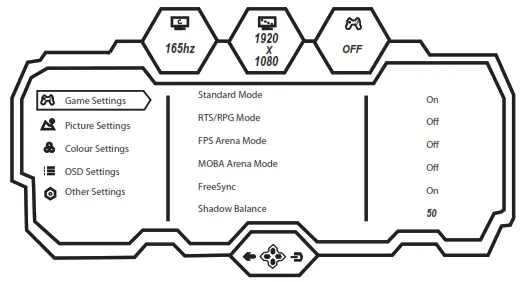
![]() To enter the General Settings menu, make sure that your unit is connected with a device with input signal. Otherwise, the unit will Enter Sleep Mode.
To enter the General Settings menu, make sure that your unit is connected with a device with input signal. Otherwise, the unit will Enter Sleep Mode.
| Game Settings | Standard Mode | Off/On |
| RTS/RPG Mode | Off/On | |
| FPS Arena Mode | Off/On | |
| MOBA Arena Mode | Off/On | |
| Free Sync Premium | Off/On | |
| Shadow Balance | 0-100 | |
| Response Time | Off/Normal/Fast/Ultrafast | |
| Refresh Rate | Off/On/Position | |
| Game Crosshair | Off/Crosshair 1/Crosshair 2/Crosshair 3/Crosshair 4/ Crosshair 5/Crosshair 6 | |
| Game Time | Off/15:00/30:00/45:00/60:00/ Position | |
| Dynamic Brightness | Off/Normal/Expert/Elaboration | |
| Virtual Response Time | Off/On | |
| Ambient Lighting | Off/On | |
| Picture Settings | Brightness | 0-100 |
| Contrast | 0-100 | |
| DCR | Off/On | |
| Contextual Model | Off/Movie Mode/Reading Mode/Night Mode/Care Eyes Mode | |
| Low Blue Light | 0-100 | |
| Sharpness | 0-5 | |
| Gamma | 1.8/2.0/2.2/2.4/2.6/5.curve | |
| Aspect Ratio | Wide Screen/4:3/1:1/Auto |
| Colour Settings | Warm | Off/On |
| Natural | Off/On | |
| Colour | Off/On | |
| User1 | Off/On | |
| User2 | Off/On | |
| User3 | Off/On | |
| Hue | 0-100 (R/G/B) | |
| Saturation | 0-100 (R/G/B) | |
| OSD Settings | Language (N/A) | English |
| OSD Time Out | 5-60 | |
| OSD H-Position | 0-100 | |
| OSD V-Position | 0-100 | |
| OSD Transparency | 0-5 | |
| OSD Rotation | Normal/90/180/270 | |
| OSD Lock | Off/On | |
| Hotkeyl Setting | Brightness/ContrastNolume/ Mute/Shadow Balance/ Game Crosshair/Refresh Rate/Game Time/FreeSync Premium/Contextual Model/ Input Source/Splicing Screen/ Dynamic Brightness/Ambient Lighting | |
| Hotkey2 Setting | ||
| Hotkey3 Setting | ||
| Other Settings | Input Source | Auto/DP/HDMI |
| Audio | Volume/Mute | |
| Splicing Screen | Off/On | |
| Auto Power | Off/On | |
| Eyeshield Remind | Off/On | |
| Reset | No/Yes | |
| Information | Input Source/Resolution/Mode |
Virtual Response Time
The unit supports Virtual Response Time. It provides a better display on fast moving images.
You may adjust the “Virtual Response Time“ setting in OSD menu.

Maintenance
Cleaning the Unit![]() Ensure the unit is fully unplugged from the mains socket before cleaning.
Ensure the unit is fully unplugged from the mains socket before cleaning.
Ensure the unit is fully unplugged from the mains socket before cleaning.
- Use a soft dry cloth to wipe away the dust from the screen and surfaces.
- If the surfaces are extremely dirty, clean the monitor with a cloth which has been dipped in a slightly soapy water. Wring the cloth until it is almost dry, then use it to wipe the monitor.
- Ensure there is no excess water on the screen. Allow any water or dampness to evaporate before switching the monitor on.
- Never use alcohol, benzine, paint-thinner, cleaning fluid or other chemicals.
- Do not use compressed air to remove dust.
Hints and Tips
The following table contains various hints and tips to get the best performance from your monitor. If you require additional assistance:
- For UK, please call our UK Call Centre on 0344 561 1234.
- For Ireland, please call our Ireland Call Center on 1 890 818 575.
| Problem | Solution |
| No image on screen | • Make sure that the unit is switched on. • Make sure that the unit is connected with a mains socket with power supply. • Make sure that the correct input is selected. |
| Out of Focus or poor image | Check if the image signal cable is inserted properly. |
| No audio output | Connect the main unit with a audio equipment, speaker or earphones, and then increase the volume of the connected device. |
If problem(s) persists, contact a qualified service agent for assistance.
Specifications
| Brand | ADX |
| Model | A24GMF22 |
| Energy Efficiency Class | F |
| Screen Size (measured | 24 inches (60.5 cm) |
| diagonally) | 21 W |
| Power Consumption | 18 kWh / 1000h |
| Average Annual Energy | 0.2 W |
| Consumption | 280 cd/m |
| Standby Power Consumption Brightness | 2 |
| Display Resolution | 1920 pixels (horizontal) × 1080 pixels (vertical) |
| Panel System | 24 inch LED Backlit LCD Panel |
| Viewing Angle | ≥178°(H) / ≥178°(V) |
| Contrast Ratio | 3000:1 (TYP) |
| Mercury Content (mg) | <2.0 mg |
| Colors | 16.7 M |
| Maximum refresh rate | 165 Hz (DP) |
| Aspect Ratio | 16:09 |
| Dimension (L × W × H) | approx. 542.4 × 334.5 × 36.5 mm (monitor unit only) approx. 542.4 × 402.8 × 160.9 mm (with stand base installed) |
| Net Weight | 2.55 kg (monitor unit only) 3.55 kg (with stand base installed, include wall mounting and DP cable and power adapter) |
| Power Adapter (Use only adapter listed below) | |
| Power Adapter Manufacturer | Dong Guan City Ganglia Electronic Co., Ltd |
| Power Adapter Model | GQ24-120250-AB |
| Input | 100-240V~ 50/60 Hz 1.0 A Max |
| Output | 12 V |
| Input / Output Sockets | |
| HDMI | 1 |
| DP | 1 |
| AUDIO OUT | 1 |
Features and specifications are subject to change without prior notice.
Currys.co.uk
All the support you need.
Whether it’s a tech emergency or
you need plain good advice, we’re
always on hand to help.
UK: 0344 5611234
IRE: 1 890 818 575![]()
Visit Partmaster.co.uk today for the easiest way to buy electrical spares and accessories.
With over 1 million spares and accessories available we can deliver direct to your door the very next day. Visit www.partmaster.co.uk or call 0344 800 3456 (UK customers only).
Calls charged at National Rate.
![]() Currys Group Limited (co. no. 504877)
Currys Group Limited (co. no. 504877)
1 Portal Way, London, W3 6RS, UK
EU Representative
Currys Ireland Limited (259460)
3rd Floor Office Suite, Omni Park SC
Sentry, Dublin 9, Republic of Ireland
IB-UK-A24GMF22-220711V3


![Philips Gaming Monitor [272e1] User Manual](https://static-data1.manualsee.com/1/img/407/16107/2020/12/Philips-Gaming-Monitor-272E1.jpg "Philips Gaming Monitor [272e1] User Manual")


