
CORSAIR XENEON 32UHD144 32 Inch Gaming Monitor
Scan QR code for Quick Start Guide and Setup Videos
Product Setup, User Information, and Warranty/Dead Pixel policy can be found at https://www.corsair.com/xeneon-quickstart Landing Page
PRECAUTIONS
- Only use the accessories that are provided with the monitor or that are recommended by the manufacturer.
- Keep the plastic packaging bag for the product in a place that cannot be reached by children.
- Before connecting the monitor to the power outlet, make sure that the voltage rating of the power cable is compatible with the power specification in the country where you are located.
- The power cord plug must be connected to a properly wired and grounded power outlet.
- Do not touch the plug with wet hands, otherwise can easily cause electric shock.
- Place the monitor in a stable and well-ventilated place.
- Do not place the monitor near any heat sources such as electric radiators or direct sunlight.
- The holes or openings on the monitor are for ventilation. Do not cover or block the ventilation holes with any objects.
- Do not use the monitor near water, drinks, or any type of liquids. Failure to do so may result in electric shock or damage to the monitor.
- Make sure to unplug the monitor from the power outlet before cleaning.
- As the screen surface can be easily scratched, avoid touching the surface with any hard or sharp object. Use a soft lint-free cloth instead of a tissue to wipe the screen. You may use a glass cleaner to clean the equipment if required. However, never spray the cleaner directly onto the screen.
- Disconnect the power cable if the equipment is not being used for a long period of time.
- Do not attempt to disassemble or repair the monitor yourself.
XENEON 32UHD144 DISPLAY CONTENTS
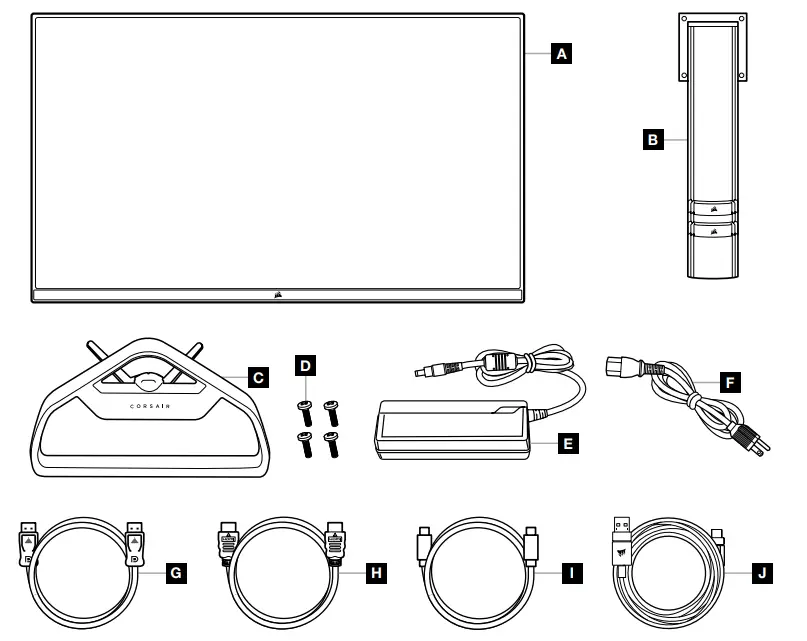
- A XENEON 32UHD144 DISPLAY PANEL
- B MOUNTING POST
- C STAND (For CM-9020003 Only)
- D MOUNTING SCREWS (x4)
- E AC ADAPTER
- F AC POWER CABLE
- G DISPLAYPORT CABLE (1.5M)
- H HDMI CABLE (1.5M)
- I USB-C CABLE (1.5M)
- J USB-A TO USB-C CABLE (1.8M)
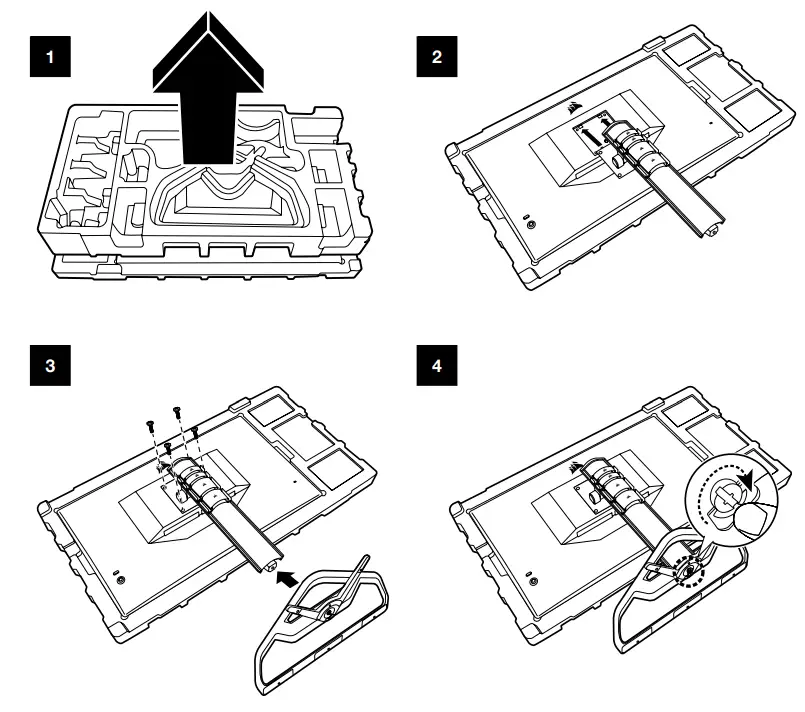
ASSEMBLY (For CM-9020003 Only)
Before you begin, you will need a Phillips head screwdriver.
- Remove the top layer of foam that includes accessories and stand to expose the rear of the panel.
- Carefully open the foam bag covering the panel (see image 1) to expose the mounting area. Do not remove the panel from the bag.
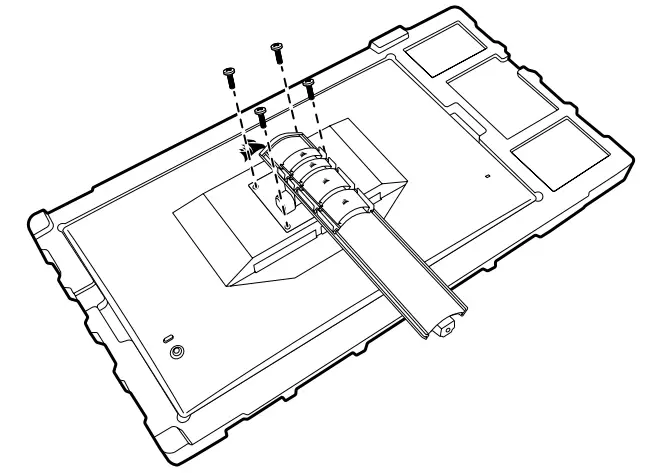
- Align the monitor post with the mounting slots on the back of the panel (see image 2). Slide the upper hooks into the mounting slots on the rear of the panel. Using a Phillips screwdriver, secure the post to the panel with the 4 screws (see image 3).
- Attach the stand base to the monitor post (see image 3) and tighten the captive thumbscrew into the bottom of the post (see image 4).
- Slowly remove the monitor from the packaging and sit upright on your desk. Do not touch the front of the panel while lifting the monitor.

TILT, SWIVEL AND HEIGHT ADJUSTMENT
(For CM-9020003 Only)
Your Xeneon display features a sturdy and stylish stand that offers tilt, swivel, and height adjustment.
- Tilt -5 / +20 degrees
- Swivel ± 30 degrees
- Height Adjust Range 110mm (497mm ~ 607mm)
TILT
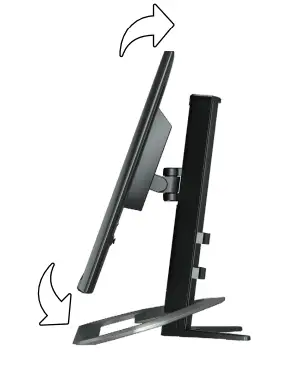
SWIVEL & HEIGHT ADJUSTMENT

CABLE MANAGEMENT, CAMERA MOUNT (OPTIONAL) & OTHER MOUNTING OPTIONS
(For CM-9020003 Only)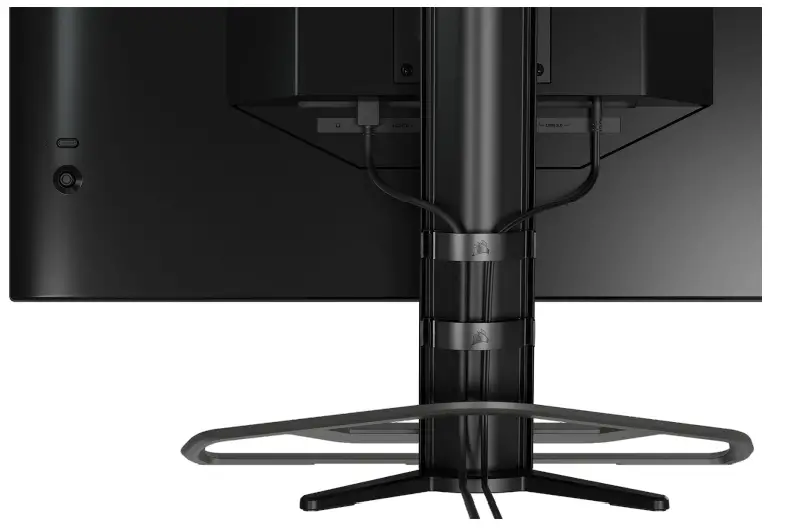
Your Xeneon display has built-in RapidRoute cable management to keep your desktop tidy. There are 4 adjustable cable clips that slide up and down the monitor post to allow for customizing your cable management needs. Open each cable clip by pressing the thumb clasp to the left and pulling out on the cable clip.
If you need to remove the cable clips, remove the base from the post by sliding the cable clips down and out of the channel guides.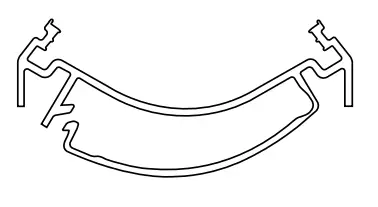
ELGATO FLEX ARM COMPATIBILITY
The top of the Xeneon display post features a ¼” connector to allow for the addition of the Elgato Flex Arm and Camera Mounting Adapter Kit (sold separately) to attach a camera to the top of your Xeneon display. These accessories are available to be purchased directly from CORSAIR.
- Xeneon Camera Adapter & Ball Mount Kit (CM-8900001)
- Elgato Flex Arm-S (10AAH9901) or Flex Arm-L (10AAC9901)
Setup video and instructions for Camera Mount is available at https://www.corsair.com/xeneon-quickstart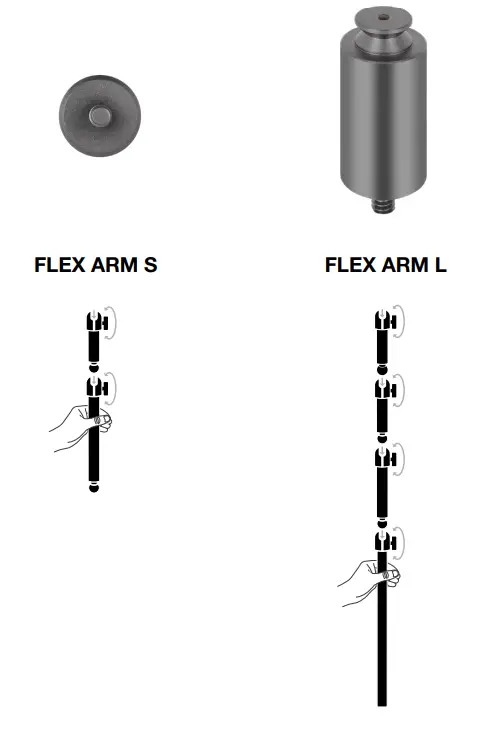
WALL MOUNT COMPATIBILITY
Before mounting your display with compatible wall mount (VESA 100mm x 100mm), make sure that:
- You have removed the stand from the display with a Phillips screwdriver
- The wall mount bracket that you purchased supports the weight of this display

Review the instructions that came with your wall mount for more information about how to correctly mount your display.
WARNING: Your display has four VESA mounting holes on the back. You must secure a wall mount bracket to all four holes. If you do not use all four holes, your display may fall and cause property damage or personal injury.
Note: Wall-mount screws are not included. Screws: type M4, 14mm to 16mm length depending on wall mount.
CONNECTIVITY

- A. 3.5mm Audio Jack
Audio output from connected HDMI, DisplayPort, and USB-C Alt Mode devices. - B. HDMI 2.1 Ports
Dual HDMI inputs correspond to “HDMI-1” and “HDMI-2” inputs. - C. DisplayPort 1.4 Port
DisplayPort input corresponds to “DisplayPort” input. - D. USB Type-C Port
Supports DisplayPort Alt Mode and upstream USB input (connects to USB 3.0 ports). Corresponds to “TYPE-C” input. This port or the USB Upstream Port must be connected to a USB-capable port on your host device to support CORSAIR iCUE functionality and downstream USB 3.0 ports. - E. USB-IN Port
Upstream USB input port. This port or the USB Type-C Port must be connected to a USB-capable port on your host device to support CORSAIR iCUE functionality and downstream USB 3.0 ports. - F. USB 3.0 Ports
Dual Type-A 5Gbps USB ports. - G. DC In
Connects to included AC adapter.
OPERATION
Controls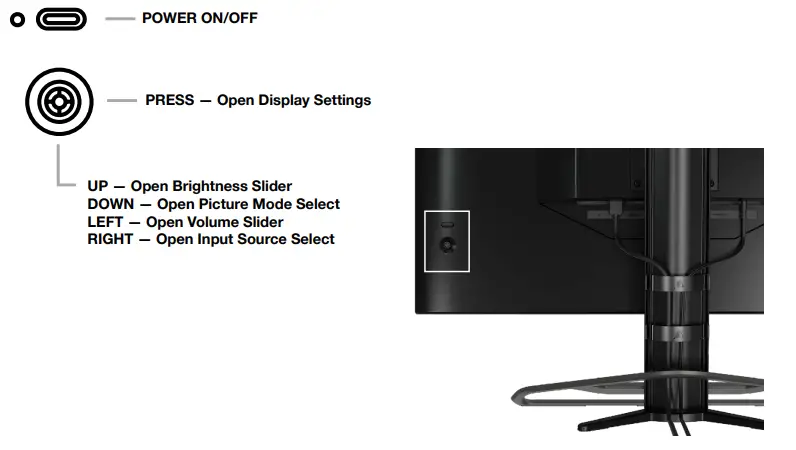 Your monitor includes a joystick on the rear, right facing side for opening shortcuts and navigating display settings. Note that many of these settings can also be controlled in CORSAIR iCUE software if you have the USB hub connected to your computer via USB IN port.
Please install the latest version of iCUE (4.24 or later) available at https://www.corsair.com/us/en/icue.
On-Screen Display (OSD)
By pressing the joystick inward, you can access your monitor’s display settings. You can use the joystick to navigate the settings and pressing the joystick inward will confirm your selection.
OSD – Picture Settings
The first menu, labeled “Picture”, contains the following settings for adjusting the overall picture quality.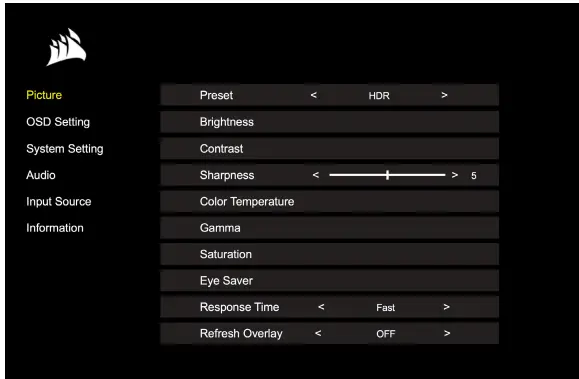
| SETTING | OPTIONS | DESCRIPTION |
|
Picture Mode | Standard | Selects a display preset factory calibrated for general use and best power savings |
| Movie | Selects a display preset optimized for watching movies | |
| Text | Selects a display preset optimized for reading text | |
| sRGB | Selects a display preset factory calibrated to the sRGB color space | |
| Creative | Selects a display preset factory calibrated for content creation tasks | |
| Game | Selects a display preset optimized for playing fast moving games | |
| DCI-P3 | Selects a display preset optimized for HDR content in DCI-P3 color space | |
| AdobeRGB | Selects a display preset optimized for HDR content in AdobeRGB color space | |
| HDR | Selects a display preset that is VESA DisplayHRD600 Certified | |
| Brightness | 0-100 | Adjusts the intensity of the display backlight |
| Contrast | 0-100 | Adjusts the display’s contrast |
| Sharpness | 0-10 | Adjusts the display’s sharpening filter, increasing edge detail |
|
Color Temperature | Cool | Sets the display’s color temperature to 9300K |
| Normal | Sets the display’s color temperature to standard 6500K | |
| Warm | Sets the display’s color temperature to 5000K | |
| Custom | Allows you to manually set the display’s color temperature with sliders controlling the red, blue, and green levels | |
| Gamma | 2.0, 2.2, 2.4 | Adjusts the relationship between color and brightness; default is 2.2 |
| Saturation | 0-10 | Adjusts the intensity of the display’s colors |
| Eye Saver | ON or OFF | Reduces blue light emissions of display when enabled |
| Response Time | Normal, Fast, Faster, Fastest, Dynamic OD | Let you increase how fast pixels can transition between colors, which can reduce the blurring of fast-moving objects |
| Refresh Overlay | ON or OFF | Toggles an overlay in the top right corner which displays the monitor’s current refresh rate, useful for tracking frames per second when Adaptive Sync is enabled |
| MPRT | ON or OFF | Toggles the “Moving Picture Response Time” setting, which can reduce blurring of moving objects when set to “On” |
| Local Dimming | ON or OFF | To turn off specific portions of the backlight for deeper black and better contrast ratio |
| Crosshair | OFF, Dot, Cross, Angle | Enable Crosshair function |
OSD – OSD Setting
The second menu, labeled “OSD Setting”, contains the following settings for adjusting the on-screen display.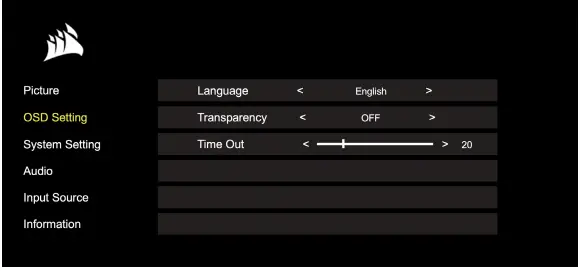
| SETTING | OPTIONS | DESCRIPTION |
|
Language | English Français Deutsch Italiano Español Português Русский 繁日한국本어中语文 |
Selects the OSD’s language |
| Transparency | ON or OFF | Sets the OSD to be transparent or opaque |
| Time Out | 10-60 | Adjusts how long (in seconds) the OSD stays on screen before disappearing |
OSD – System Setting
The third menu, labeled “System Setting”, contains the following settings for adjusting the display’s internal settings.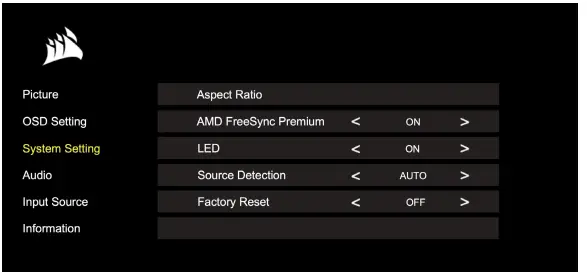
| SETTING | OPTIONS | DESCRIPTION |
| Aspect Ratio | Auto, 4:3, 16:9 | Selects the display’s aspect ratio. “Auto” will try to match the display’s aspect ratio to the incoming video signal. Not available with Adaptive Sync enabled |
|
AMD FreeSync Premium |
ON or OFF | Enables or disables the adaptive sync functionality when connected to a compatible GPU. Select ON to enable Adaptive Sync for AMD FreeSync via HDMI
NVIDIA G-Sync compatibility is available when connected via DP cable or USB Type-C Alt Mode cable to compatible GPU. For NVIDIA G-Sync functionality:
• Install/Open NVIDIA Control Panel • Select “Set up G-Sync” • Select Enable G-Sync Compatible checkbox • Select the 32UHD144/RDD0021 • Select the “Enable settings for the selected display model” checkbox
May require a system reboot to access NVIDIA settings |
| LED | ON or OFF | Selects front Power LED indicator ON or OFF |
| Source Detection | AUTO or MANUAL | Determines whether the display will automatically switch to a different input if it detects a signal, or if you will need to manually switch between inputs |
|
USB-C Alt Mode (only present when the display is connected through USB-C video port) |
4-lane 2-lane | Toggles the number of USB lanes to use on the USB-C port for video
• 4-Lane Mode allows up to 3840×2160@144Hz resolution but creduces the speed of the USB Type-A ports to USB 2.0 • 2-Lane Mode allows for up to 3840×2160@60Hz but enables USB Type-A at USB 3.0 speed |
| Factory Reset | – | Resets all monitor settings to their factory defaults |
OSD – Audio
The fourth menu, labeled “Audio”, lets you control the display’s audio.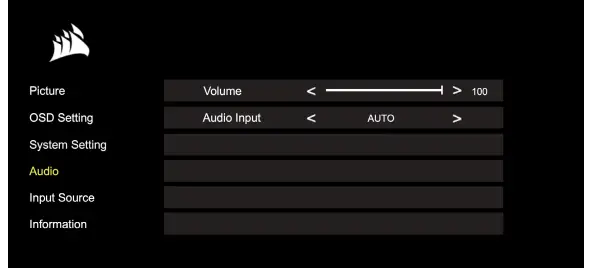
| SETTING | OPTIONS | DESCRIPTION |
| Volume | 0-100 | Adjusts the volume of the audio output from the headphone jack |
|
Audio Input | Auto, HDMI-1, HDMI-2, DisplayPort, USB Type-C | Selects which input the display passes audio to the headphone jack from. “Auto” will use the current input |
OSD – Input Select
The fifth menu, labeled “Input Select”, lets you switch between the display’s different inputs.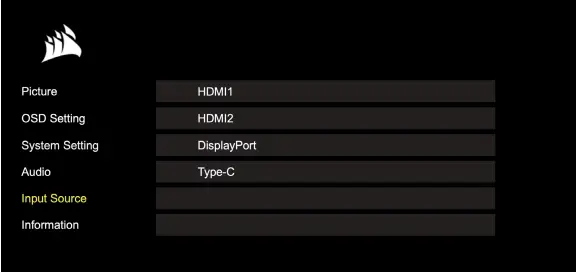
| SETTING | DESCRIPTION |
| HDMI-1 | Switches to the device connected to the HDMI-1 port |
| HDMI-2 | Switches to the device connected to the HDMI-2 port |
| DisplayPort | Switches to the device connected to the “DP” DisplayPort port |
| TYPE-C | Switches to the device connected to the TYPE-C port |
OSD – Information
Provides current settings status for key features.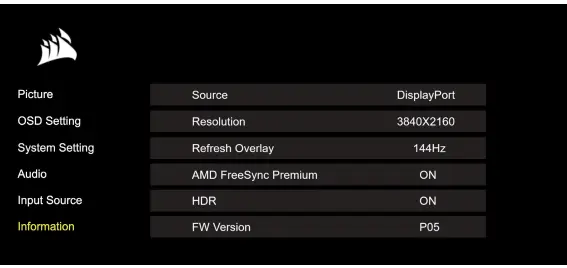
| SETTING | DESCRIPTION |
| Source | Display the current input source |
| Resolution | Display the current display resolution |
| Refresh Overlay | Display the current refresh rate |
| AMD FreeSync Premium | AMD FreeSync Premium Status |
| HDR | HDR Status |
| FW Version | Shows the current FW version |
CORSAIR XENEON 32UHD144 Gaming Monitor FAQ
| QUESTION | ANSWER | |||||||||||||||||||||
|
Power LED not on | Press the power button on the back of your monitor to check if it is set to ON. | |||||||||||||||||||||
| Check to see if the power cable is fully plugged into the monitor as well as the power adapter. | ||||||||||||||||||||||
| Check Power LED toggle in OSD System Setting Menu is toggled on. | ||||||||||||||||||||||
|
No image on screen | Check to see if your monitor is on. | |||||||||||||||||||||
| Check to see if the video cable is properly connected to the monitor as well as the source device. | ||||||||||||||||||||||
| Check the quality of the video cable and ensure that it isn’t damaged. Avoid low quality video cables and extensions. | ||||||||||||||||||||||
| Check which video source input your monitor is set to (if the Auto Source feature is disabled in OSD). | ||||||||||||||||||||||
| Connect another source device to test monitor video input. | ||||||||||||||||||||||
| Connect the source device to another available monitor to test video output. | ||||||||||||||||||||||
| Avoid hot-plugging the monitor. Have the monitor connected to the source prior to powering up the source device. | ||||||||||||||||||||||
| Image too light/dark | Adjust the brightness/gamma/contrast settings via the OSD. | |||||||||||||||||||||
| Reset the monitor to factory settings. | ||||||||||||||||||||||
| Video signal not supported | Check the video output settings of the source device. Supported input resolutions for the CORSAIR XENEON 32UHD144 Gaming Monitor are:
|
CORSAIR XENEON 32UHD144 Gaming Monitor FAQ
| QUESTION | ANSWER |
| Does the CORSAIR XENEON 32UHD144 support video over USB-C? | Yes, the CORSAIR XENEON 32UHD144 supports DisplayPort over USB-C through the dedicated TYPE-C DP ALT input. Use the included 1.5m Type-C cable or a quality USB Type-C cable that supports USB 3.2 Gen 2 for best results. |
|
I’m unable to use devices connected to the USB-A ports on my monitor when connected to my device that supports USB-C Alt Mode using a single USB-C cable | USB-C Alt Mode, by default will operate in “4 lane” mode which allows for full DisplayPort resolution over USB-C, however this disables the use of the USB Type-A ports. To re-enable the USB Type-A ports when connected solely via the TYPE-C DP ALT input, switch to “2 lane” mode which will limit the supported video output resolution in order to re-enable the USB Type-A ports for peripherals connected to the monitor’s USB Type-A ports. Alternatively, you may connect the source device to the USB downstream port as well as the TYPE-C DP ALT port for full video resolution and USB port functionality. Ensure that you’re using a quality USB Type-C cable that supports USB 3.2 Gen 2 for best results. |
|
Image is stretched/squished | Check the “Aspect Ratio” setting under “System Setting”. By default this is set to “Auto”, however in certain instances, you may need to manually set an aspect ratio (ex: certain combinations of adapters and retro game consoles). |
|
Image has color issues | Check the quality of the video cable and ensure that it isn’t damaged. Avoid low quality video cables and extensions. |
| Reset the monitor to factory settings. | |
| Adjust the picture settings via OSD. | |
|
Artifacts in onscreen image | Check the quality of the video cable and ensure that it isn’t damaged. |
| Check your source device, a faulty graphics card or game console may require contacting the manufacturer for assistance. | |
|
Monitor has a dead pixel | CORSAIR provides a “Zero Dead Pixel” policy for monitor products, if 1 or more bright pixels or 6 or more dark subpixels are found, the monitor will be exchanged during the 3-year warranty period. |
|
What kind of VESA mount is compatible? | CORSAIR XENEON 32UHD144 supports a standard 100mm x 100mm mount, the monitor head must be removed from the stand. Use the mounting screws supplied with your VESA mount. |
| QUESTION | ANSWER |
| Can I mount a webcam or DSLR/mirrorless camera? | CORSAIR XENEON 32UHD144 supports standard webcams that sit on the top bezel of the display as well as larger DSLR/ mirrorless cameras when used with the Elgato Multi-Mount Adapter Kit for XENEON and Elgato Flex Arm L/S kit (Both adapter kit and Flex Arm kits sold separately). |
|
My CORSAIR XENEON monitor isn’t detected by CORSAIR iCUE | Check to ensure that your PC has the latest version of CORSAIR iCUE installed. The CORSAIR XENEON 32UHD144 is supported in iCUE version 4.24 or newer. |
| Check to ensure that the cable connected to the USB-C upstream on the monitor and your PC’s USB 3.0 port is properly connected. Avoid connecting the monitor through a USB hub or extension if possible. We strongly recommend using the USB-C cable provided with the CORSAIR XENEON monitor for best results. | |
| What adaptive refresh rate options are available to CORSAIR XENEON? | The CORSAIR XENEON 32UHD144 is certified for AMD FreeSync Premium and is also NVIDIA G-SYNC compatible. |
|
AMD FreeSync / G-SYNC aren’t enabled | Check that AMD FreeSync is enabled via OSD. |
| Check your graphics card settings and ensure that AMD FreeSync / NVIDIA G-SYNC are enabled. AMD FreeSync functions over any of the video ports. NVIDIA G-Sync compatibility only works over DP or USB Type-C Alt-Mode DP. | |
|
I’m not getting the monitor’s rated 144Hz refresh rate | Check your graphics card/system display settings and ensure that the 144Hz refresh rate has been enabled. See Supported Display Mode Table in Appendix for available options. |
| Check the quality of the video cable and ensure that it isn’t damaged. Avoid low quality video cables and extensions. |
Technical Specifications
| Product Name | XENEON 32UHD144 |
| Part Number | With Stand CM-9020003-XX Without Stand CM-9020005-XX |
| Device | RDD0021 |
| USB Hub ID | CORSAIR USB 3.0 Hub |
| Panel Size | 32″ Diagonal |
| Display Surface | Non-Glare |
| Pixels per inch | 138 |
| Aspect Ratio | 16:9 |
| Native Resolution | 3840 x 2160 @ 144Hz |
| Response Time (MPRT) | 1ms |
| Response Time (GtG) | 12ms |
| Display Colors | 1.07B colors (10bit RGB) |
| Panel Technology | IPS with Quantum Dot Technology |
| Flicker Free | Yes |
| Viewing Angles | 178° (H) / 178° (V) |
| Peak Brightness | 350 nit (SDR) / 600 nit (HDR) |
| Static Contrast Ratio | 1000:1 |
| HDR Certification | VESA DisplayHDR 600 |
| Color Gamut (CIE 1976) | 98% (DCI-P3), 100% (AdobeRGB), 100% (sRGB) |
| Variable Refresh Rate | AMD FreeSync Premium Certified, NVIDIA G-Sync compatible |
| HDMI Input | 2x HDMI 2.1 |
| DisplayPort Input | 1x DisplayPort 1.4 |
| USB-C Input | 1x DisplayPort 1.4 (USB-C Alt Mode), 15W Power Delivery, USB 5Gbps Data Upstream |
| USB-C Upstream Input | 1x 5Gbps USB-C |
| USB-A Output | 2x 5Gbps Type-A USB (5V/0.9A *2) |
| 3.5mm Audio | Yes, passthrough from video input |
| Power Consumption (On) | 43W |
| Power Consumption (Sleep) | <0.5W |
| Power Consumption (Off) | <0.3W |
| VESA Compatibility | 100mm x 100mm |
| Dimensions | 732mm x 607mm x 316mm (W x H x D) |
| Weight | 9.5kg |
| Stand Tilt | -5° / +20° |
| Stand Swivel | -30° / +30° |
| Stand Height Adjustment Range | 110mm |
| AC Adapter | 150W |
| Note: your device uses the following power supply: Asian Power Devices Inc. / DA-150E19 |
Supported Display Modes
| RESOLUTION | REFRESH RATE | HDMI | DP/TYPE-C | |
|
640×480 |
VGA | 60Hz | V | V |
| 67Hz | V | V | ||
| 72Hz | V | V | ||
| 75Hz | V | V | ||
| 720×400 | Dos-Mode | 70hz | V | V |
|
800×600 |
SVGA | 56Hz | V | V |
| 60Hz | V | V | ||
| 72Hz | V | V | ||
| 75Hz | V | V | ||
| 1024×768 | XGA | 60Hz | V | V |
| 70Hz | V | V | ||
| 75Hz | V | V | ||
| RESOLUTION | REFRESH RATE | HDMI | DP/TYPE-C | |
| 1152×864 | XGA+ | 75Hz | V | V |
| 1280×720 | WXGA | 60Hz | V | V |
| 1280×960 | WXGA | 60Hz | V | V |
| 1280×1024 | SXGA | 60Hz | V | V |
| 75Hz | V | V | ||
| 1440×900 | WXGA+ | 60Hz | V | V |
| 1680×1050 | WSXGA+ | 60Hz | V | V |
| 1920×1080 | FHD | 60Hz | V | V |
| 144Hz | V | |||
| 2560×1440 | QHD | 60Hz | V | V |
| 120Hz | V | V | ||
| 144Hz | V | V | ||
| 3840×2160 | UHD | 60Hz | V | V |
| 120Hz | V | V | ||
| 144Hz | V | V | ||
| 480P | 60Hz | V | V | |
| 576P | 50Hz | V | V | |
| 720P | 50Hz | V | V | |
| 60Hz | V | V | ||
| 120Hz | V | V | ||
| 1080P | 60Hz | V | V | |
| 120Hz | V | V | ||
|
2160P | 30Hz | V | V | |
| 50Hz | V | V | ||
| 60Hz | V | V | ||
| 120Hz | V | V | ||
HDMI LEGAL DISCLOSURE
HDMI
The adopted trademarks HDMI, HDMI High-Definition Multimedia Interface, and the HDMI logo are trademarks or registered trademarks of HDMI Licensing Administrator, Inc. in the United States and other countries.
The terms HDMI, HDMI High-Definition Multimedia Interface, and the HDMI logo are trademarks or registered trademarks of HDMI Licensing Administrator, Inc.
- Web: corsair.com
- Phone: (888) 222-4346
- Warranty: corsair.com/support/warranty
- Support: support.corsair.com
- Blog: corsair.com/blog
- Forum: forum.corsair.com
- YouTube: youtube.com/corsairhowto
© 2022 CORSAIR MEMORY, Inc. All rights reserved. CORSAIR and the sails logo are registered trademarks of CORSAIR in the United States and/or other countries. All other trademarks are the property of their respective owners. Product may vary slightly from those pictured. 49-002622 AA


