![]()
Wired digital thermostat – programmable
Model: HTRP230(50)
User manual
Ver. 1
Date of issue: 22 VI 2020
Power supply: 230V
SALUS CONTROLS DISTRIBUTOR:
QL CONTROLS Sp. z o.o., Sp. k.
Rolna 4,
43-262 Kobielice,
Poland
Importer:
SALUS Controls Plc
Units 8-10 Northfield Business Park
Forge Way, Parkgate, Rotherham
S60 1SD, United Kingdom
![]()

www.salus-controls.eu
SALUS Controls is a member of the Computime Group.
In accordance with the product development policy, SALUS Controls plc reserves the right to change specifications, design, and materials used in production, presented in this manual, without prior notice.
Introduction
The HTRP230V(50) from SALUS Controls is a stylish and accurate 5/2 or 24h programmable electronic thermostat with a large, easy-to-read Liquid Crystal Display (LCD). It is a surface-mounted temperature controller dedicated to surface heating/cooling, characterized by high thermal inertia. It is connected to the wired wiring center KL08NSB. Thermostat has the function of creating your own schedules. It can control group(SLAVE) thermostats – via wiring center it sends them an NSB (nighttime temperature reduction) signal and switches them to economic temperature. The time schedule is common to all thermostats (according to weekly (MASTER) thermostat), but temperatures are set individually on each thermostat. Thanks to the built-in algorithms, it offers much better temperature control accuracy than traditional mechanical thermostats. The thermostat is characterized by silent operation. The controller is characterized by silent operation.
Product compliance
The product complies with the following EU directives: 2014/30/EU, 2014/35/EU, 2011/65/EU. Full information is available at www.saluslegal.com
![]() Please note!
Please note!
This document is a quick guide to the installation and operation of the product and indicates its main features and functions. Detailed information is in the full manual, which is available at www.saluscontrols.eu and which must be used for proper installation and operation of the product.
Safety information:
Use in accordance with national and EU regulations. Use the device as intended and keep it dry. Product for indoor use only. Please read the entire manual before starting the installation and using the product.
Installation:
Installation must be carried out by a qualified person, with appropriate electrical authorizations, in accordance with national and EU standards and regulations. The manufacturer shall not be liable for failure to comply with the manual.
NOTE:
There may be additional protection requirements for the entire installation. The installer shall be res possible for com s license with such re requirements.
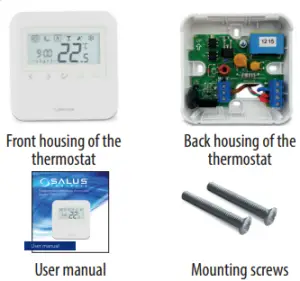
Package content
Proper thermostat location
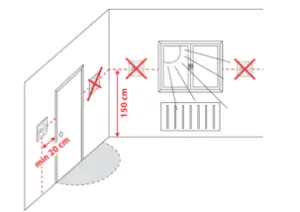
The ideal position for thermostat mounting is about 1,5m under floor level far from heating or cooling sources. In addition, the thermostat should not be installed behind curtains or other obstacles or in places with high humidity, as this will prevent accurate measurements of room temperature. The thermostat must not be exposed to sunlight. Do not place the thermostat on an outer wall.
Connection description
![]() Note: The thermostat is compatible with the following Salus wiring center models: KL06 230V, KL08NSB 230V, KL04NSB 230V, or directly to the actuator.
Note: The thermostat is compatible with the following Salus wiring center models: KL06 230V, KL08NSB 230V, KL04NSB 230V, or directly to the actuator.
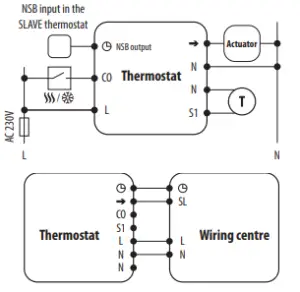
Symbols explanation
| Terminal | Description |
| L, N | Power supply (230V AC) |
| ◷NSB | Night setback (input temperature reduction (230V AC output) |
| ⇛SL | 230 V AC output signal |
| S1, N | Additional temperature sensors eg. FS300 |
| CO | Switching jumper between heating and cooling (input 230V AC) |
![]() Note: The following designations are used interchangeably for products:
Note: The following designations are used interchangeably for products:
⇛= SL
◷= NSB
Montage
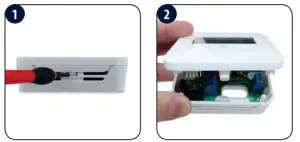
Make sure that the thermostat is not connected to the 230V AC. Then open the front housing using a screwdriver as shown above.
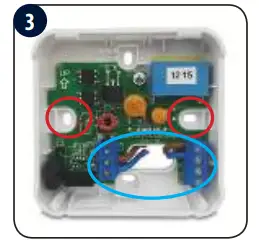
Connect the thermostat properly. Please refer to the “Connection Description” section. Mount the thermostat using the designed screw holes.
Slide the front of the controller over the thermostat on the back of the controller cover. The thermostat is configured. Use or buttons to set the temperature setpoint.
∧ | Increase or decrease setpoint temperature |
∨ | |
< | Mode selection |
> | |
| Short press to confirm the selection Press and hold — enter/exit the menu |
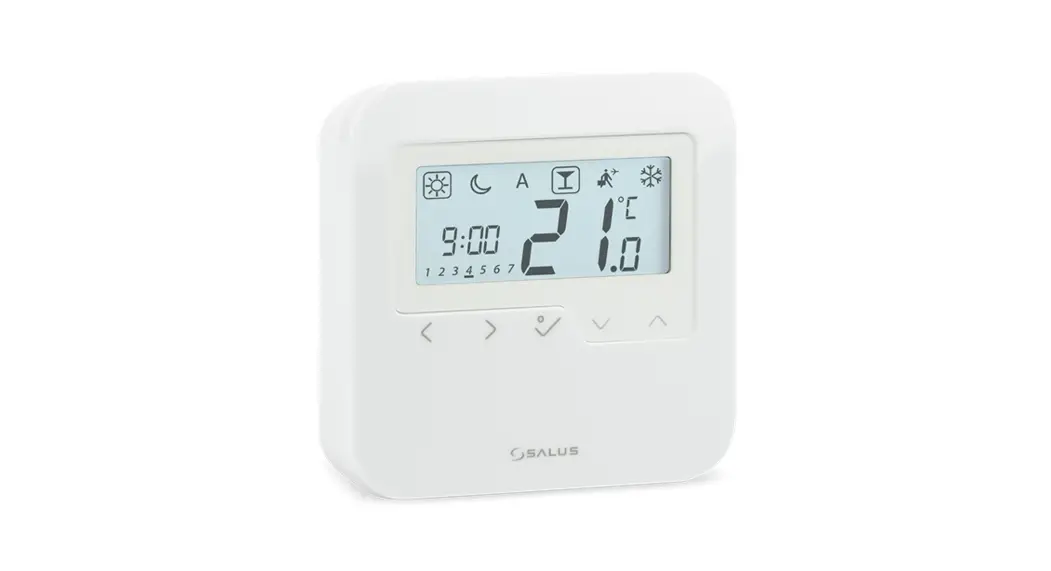
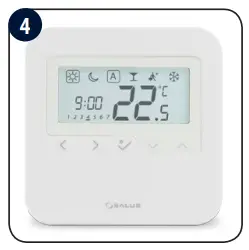
LCD icon description
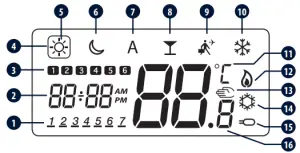
- Day of the week
- Hour
- Program number
 Active work mode
- Economic mode
- Economy mode
- AUTO mode
- PARTY mode
- Holiday mode
- Frost protection mode
- Temperature unit
- Heating mode
- Manual mode/temp. override
- Cooling mode
- Additional temp. sensor
- Current / set temp.
Time and date setting
Set time and date during the first thermostat’s power-up.

![]() Date and time can be set at any moment during thermostat use. Press any button to highlight the screen, then press and hold
Date and time can be set at any moment during thermostat use. Press any button to highlight the screen, then press and hold ![]() for 3 seconds, then follow steps from 3 to 9.
for 3 seconds, then follow steps from 3 to 9.
Manual mode – temperature setpoints
3 temperature levels are available. In manual mode, only one temperature level is maintained for the entire day. An icon in the frame ![]() indicates which mode is currently active.
indicates which mode is currently active.
A different temperature can be set for each level.
 | – Comfort temperature mode |
 | – Economic temperature mode |
 | – Frost protection mode is Usually used during the period of absence or during the holidays (only available in HEATING mode). |
| The thermostat also has 2 additional modes: | |
| – The PARTY mode sets the comfort | |
 | – The HOLIDAY mode sets the frost |
![]() Press any button to highlight the screen, then follow the steps below:
Press any button to highlight the screen, then follow the steps below:
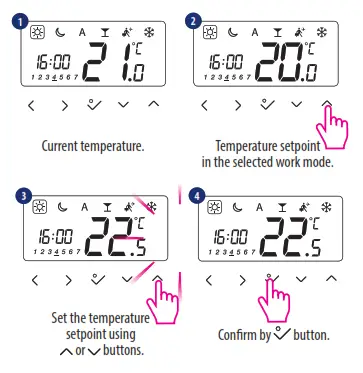
Temperature setpoint
![]() Press any button to highlight the screen, then follow the steps below:
Press any button to highlight the screen, then follow the steps below:
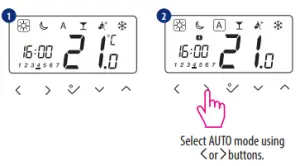
AUTO mode – NSB function
The ◷NSB (Night Setback) function enables automatic reduction of the temperature setpoint on the HTRS230(30) SLAVE thermostat, via the HTRP230(50) programmable MASTER thermostat connected to the wiring center (or another external clock). The temperature change takes place between the comfort temperature mode and ![]() economic
economic![]() temperature mode.
temperature mode.
To activate AUTO mode, select the A icon. Together with the A icon, the thermostat shows the active temperature mode on the display: ![]() or
or![]()
![]() Press any button to highlight the screen, then follow the steps below:
Press any button to highlight the screen, then follow the steps below:
![]() Note: For the proper NSB function work, an appropriate cable connection is required. The connection description is on the previous page.
Note: For the proper NSB function work, an appropriate cable connection is required. The connection description is on the previous page.
Schedule programming
![]() Press any button to highlight the screen, then follow the steps below:
Press any button to highlight the screen, then follow the steps below:
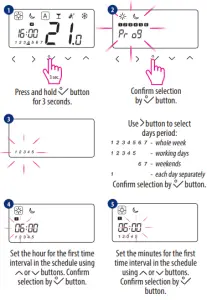
![]() Repeat steps 4 to 6 to set the time and temperature for further points of the schedule. No time (–:–) on the display means that the thermostat will skip the time interval. 6 points are available for the schedule.
Repeat steps 4 to 6 to set the time and temperature for further points of the schedule. No time (–:–) on the display means that the thermostat will skip the time interval. 6 points are available for the schedule.
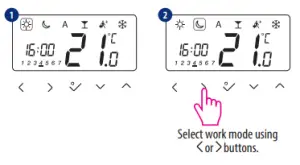
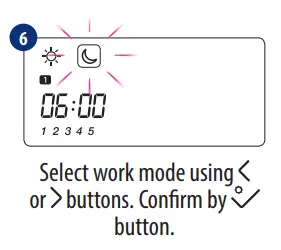
Heating / Cooling mode
Manual change:
Modes are indicated by  symbols. Press and hold the
 ![]() button to enter the menu, then use the> button to select the Heating / Cooling mode change setting. Confirm changes using
button to enter the menu, then use the> button to select the Heating / Cooling mode change setting. Confirm changes using ![]() the button. Now use ∨or ∧buttons to set the heating or cooling mode. Confirm by
the button. Now use ∨or ∧buttons to set the heating or cooling mode. Confirm by ![]() button.
button.
Automatic change (via CO terminal):
The heating/cooling mode can be changed automatically via the CO terminal in the thermostat. If a 230 V AC power supply is connected to the CO terminal – then the thermostat automatically switches to cooling mode. If you want to use this function, then you have to change the value of the D18 parameter to “1”.
Cooling blocking:
When the D19 thermostat parameter is set to “1”, then cooling is blocked for a single room. When the cooling function is blocked, no message is displayed.
Installer mode
![]() Press any button to highlight the screen, then follow the steps below:
Press any button to highlight the screen, then follow the steps below:

![]() Note: To restore default settings – set the P47 code during 2 steps and then confirm your choice using or
Note: To restore default settings – set the P47 code during 2 steps and then confirm your choice using or ![]() buttons.
buttons.
Installer parameters
| dxx | Function | Parameter Values | Description | Default Values |
| d01 | Heating Control | 0 | According to the PIM algorithm | 0 |
| 1 | Hysteresis 0.5°C (±0.25°C) | |||
| 2 | Hysteresis 1.0°C (±0.5°C) | |||
| D02 | Displayed temperature correction | -3.0°C to + 3.0°C | If the thermostat indicates an incorrect temperature, then it can be corrected ±3.0°C | 0°C |
| D03 | External sensor connection (51/52) | 0 | External sensor not connected | 0 |
| 1 | External sensor connected | |||
| d04 | External sensor used as Air sensor or Floor sensor | 0 | The D03 parameter must be set to “1” —then, if the D04 parameter is set to “0”, the thermostat only measures the temperature at the external sensor | 0 |
| 1 | The D03 parameter must be set to “1” — then, if the DO4 parameter is set to “1”, the sensor is used as floor overheating protection. | |||
| DO5 | Cooling Control | 1 | Hysteresis 0.5°C (±0.25°C) | 2 |
| 2 | Hysteresis 1.0°C (±0.5°C) | |||
| D07 | Valve Protection | 0 | Disabled | 1 |
| 1 | Enabled | |||
| D08 | Frost Setpoint | 5°C — 17°C | The frost protection temperature is maintained for example during active holiday mode. | 5°C |
| DO9 | 12/24 Hour Format | 0 | 12 hours | 1 |
| 1 | 24 hours | |||
| D10 | Time zone (reserved for intern et wireless) | from 13 to | It gives you the possibility to fit the thermostat time zone to yours (every 1-hour step). | 0 |
| D11 | Daylight Saving Time (DST) | 0 | Off | 1 |
| 1 | On | |||
| D12 | Heating setpoint limits | 5°C _ 35.c | Maximum temperature which can be set for heating | 35°C |
| D13 | Cooling setpoint limits | 5°C — 40°C | Minimum temperature which can be set for cooling | 5°C |
| D14 | Floor sensor protection limit (heating high limit-HL) | 11°C — 45°C | In order to protect floor against overheating — heating will be turned off when floor sensing temp is higher than the protection limit | 27°C |
| D15 | Floor sensor protection limit (heating low limit-LL) | 6°C — 40°C | In order to protect floor against overcooling — heating will be turned on when floor sensing temp is lower than the protection limit | 10°C |
| D16 | Floor sensor protection limit (cooling) | 6°C — 45°C | In order to protect the floor against overcooling—heating will be turned on when floor sensing temp is lower than the protection limit | 6°C |
| D17 | Preset program selection | 1-5 | Select one of these 5 default programs. Once selected, the default program will overwrite the present program. Selected default program can be edited by the user in the User Setting Mode. | 1 |
| D18 | Heat/Cool Mode Selection | 0 or 1 | 0: Manual with buttons use 1: Automatic by the CO terminal | 0 |
| D19 | Cooling Blocking function heating/cooling | 0 or 1 | 0: Cooling disabled 1: Cooling allowed | 0 |
| D20 | Actuators loading selection for different temperature compensation | 1 to 5 | Numbers 1 to 5 are the numbers of actuators connected to the thermostat. | 1 |


 Wireless Digital Thermostat User Manual")


 Wireless Digital Thermostat User Manual")
