![]() www.giadatech.com
www.giadatech.com
IBC-386 User Manual 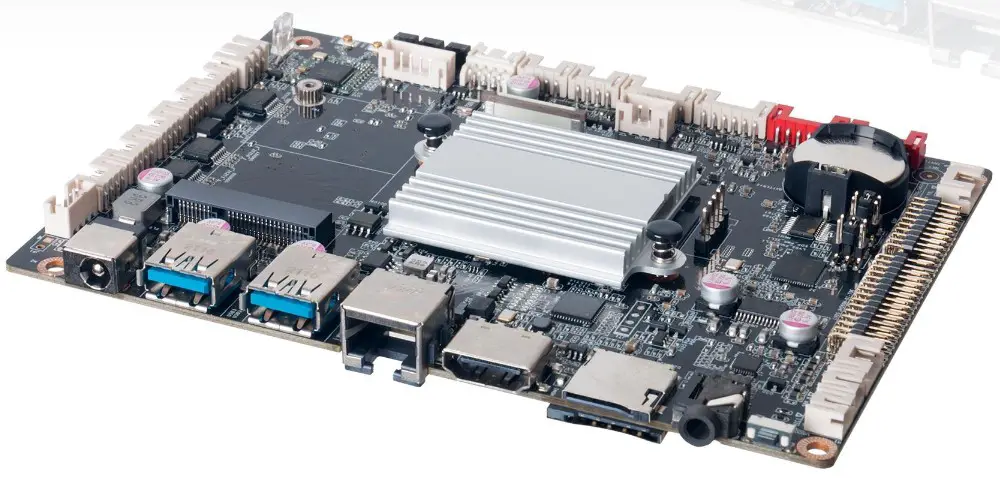 Shenzhen JIEHE Technology Development Co., Ltd.
Statement
The copyright of this manual belongs to Shenzhen JIEHE Technology Development Co., Ltd. (Giada, JIEHE’s global brand) and all rights are reserved. The company reserves the right to change this manual at any time without notification. Specifications here are for reference only, please take the real product as standard.
Without official authorization of Giada, other company or individual may not copy, plagiarize, translate or disseminate this manual for commercial purpose.
The information provided in this manual is accurate and reliable. The company does not take any legal responsibility for the consequences of infringement use of this manual.
Safety Notice
- Read the user manual carefully before setting up the Giada product.
- Disconnect the power cord before installing the internal components.
- Most electronic components are sensitive to static electrical charge, please wear a wrist-grounding strap when installing the internal components.
- Don’t disconnect the power cord when the system is running to avoid damage to the sensitive components by instantaneous surge voltage.
Contact Information
Shenzhen JIEHE Technology Development Co., Ltd.
Website: www.giadatech.com
Phone: + 86 – 755 – 3330 0336
Email: [email protected]
Address: 1~2/F, Block A, Tsinghua Information Harbor, North Section, Shenzhen Hi-tech Park, Nanshan District, Shenzhen, China
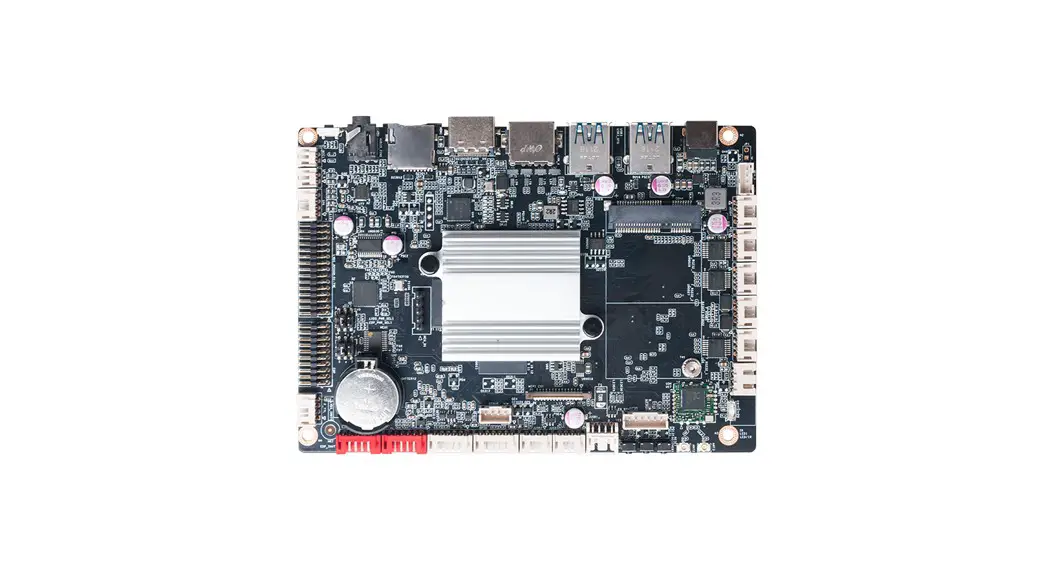
Product Introduction
Embedded motherboard IBC-386 adopts RK3399 Dual-core Cortex-A72 and Quad-core Cortex-A53 CPU. With one LVDS, one HDMI display output, it supports 4K resolution. The board is suitable to be applied in all-in-one digital signage solution, kiosk and smart control applications.
Hardware Specifications
| IBC-386 | IBC -386-RK339941E4G | |
| Processor | CPU | Rockchip RK3399 Dual-core Cortex-A72 8 Quad-core Cortex-A53 |
| Chipset | SOC | |
| Memory | Type | LPDDR4-2133MHz |
| Socket | Onboard | |
| Capacity | 2GB(4GB Optional) | |
| Graphics | GPU | Mali-T860MP4 |
| Graphic Engine | OpenGL ES1.1/2.0/3.0/3.1, OpenCL Support AFBC (ARM Frame Buffer Compression | |
| Multi-Media | 4K VP9 Decoders 4K 10bits H.265 Video Decoders 1080P VC-1, MPEG-1/2/4. VP8 Video Decoders | |
| Network | Controller | 1 x Pef7071 PHY |
| wiFuBT | Onboard WIFI8BT Module | |
| Storage | eMMC | 16 GB. Onboard eMMC (Optional: 32 GB/64 GB) 1 x TF Card Reader |
| Rear 1/0 | USB | 1 x USB3.2 Gen1(0TG), 1xUSB3.2 Gen1 |
| Display | 1 x HDMI(Max. 4096 x 2160@60Hz) | |
| Audio | 1 x 2-in-1 Headset(Audio-out8MIC-IN) | |
| Ethernet Interface | 1 x RJ45 | |
| Button | 1 x Power On, 1 x Recovery, 1 x Reset | |
| Internal 110 | USB | 3 x USB2.0 Signal by 3 x 4 pin USB Header 2 x USB2.0 Signal by 1 x 8 pin USB Header |
| Display | 1 x 20 pin esp. 1 x 30pin dual channel 24bit LVDS (Max.1920×1200@24 Hz) | |
| Camera | 1 x MIPI-CSI Jack | |
| Serial Port | 3 x 4 pin RS232 Header, 1 x 4 pin RS485 Header, 1×4 pin TTL | |
| GPIO | 1 x 6 pin GPIO | |
| Audio | 1 x 2 pin MIC-IN 1 x 4 pin SPK(5W), 1 x 2 pin SPK(10W) | |
| Others | 1 x 6 pin TP_I2C 1 x 6 pin EX_BUTTON 1 x 6 pin LVDS_BL, 1×6 pin eDP_BL | |
| JAHC | Watchdog Timer | N/A |
| Auto Power On | Power Activated Automatically Start | |
| RTC | Set Up Independently Every day, A Week as a Cycle | |
| Operation System | OS | Android 7.1/Android 11 |
| Power | Power Type | DC-IN |
| Input Voltage | 12V/2.08A | |
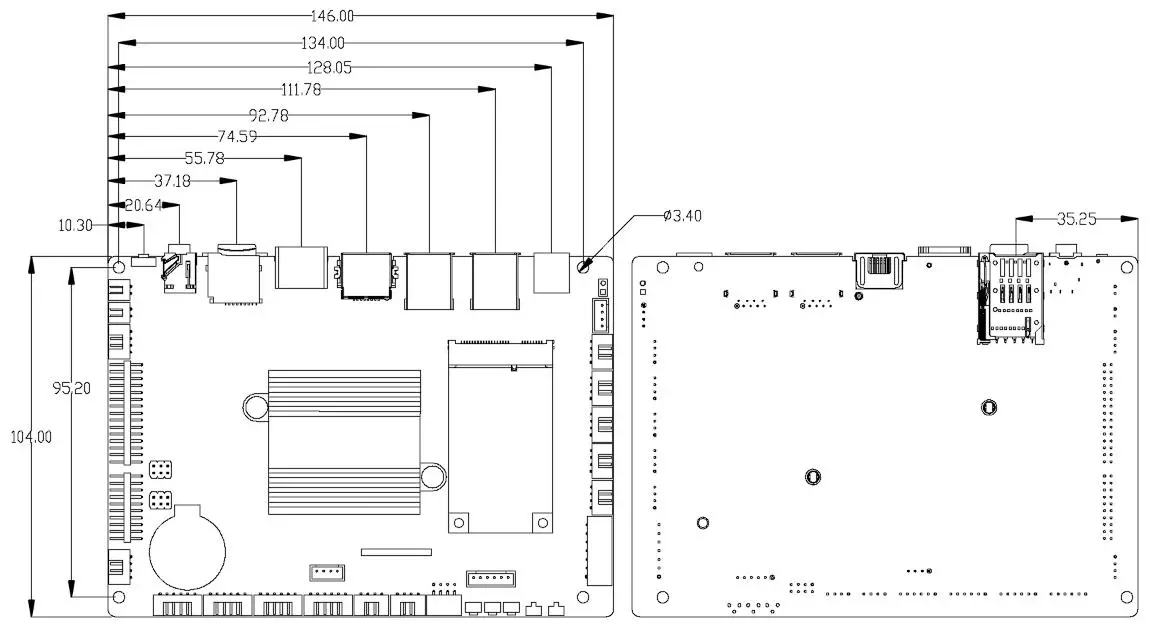
| PCB | Dimension(W x D) | 146mm x 102mm (5.75″ x 4.02″) |
| Environment | Operating Temperature | 0°C – 60°C (32°F – 140°F) at 0.7m/s Air Flow |
| Relative Humidity | 95% @ 60°C (non-condensing) | |
| Storage Temperature | – 40°C – 85°C (- 40 – 185°F) | |
Hardware Usage Instruction
Dimensions Chart
Interface Definition
Jumper, Header and Interface Diagram
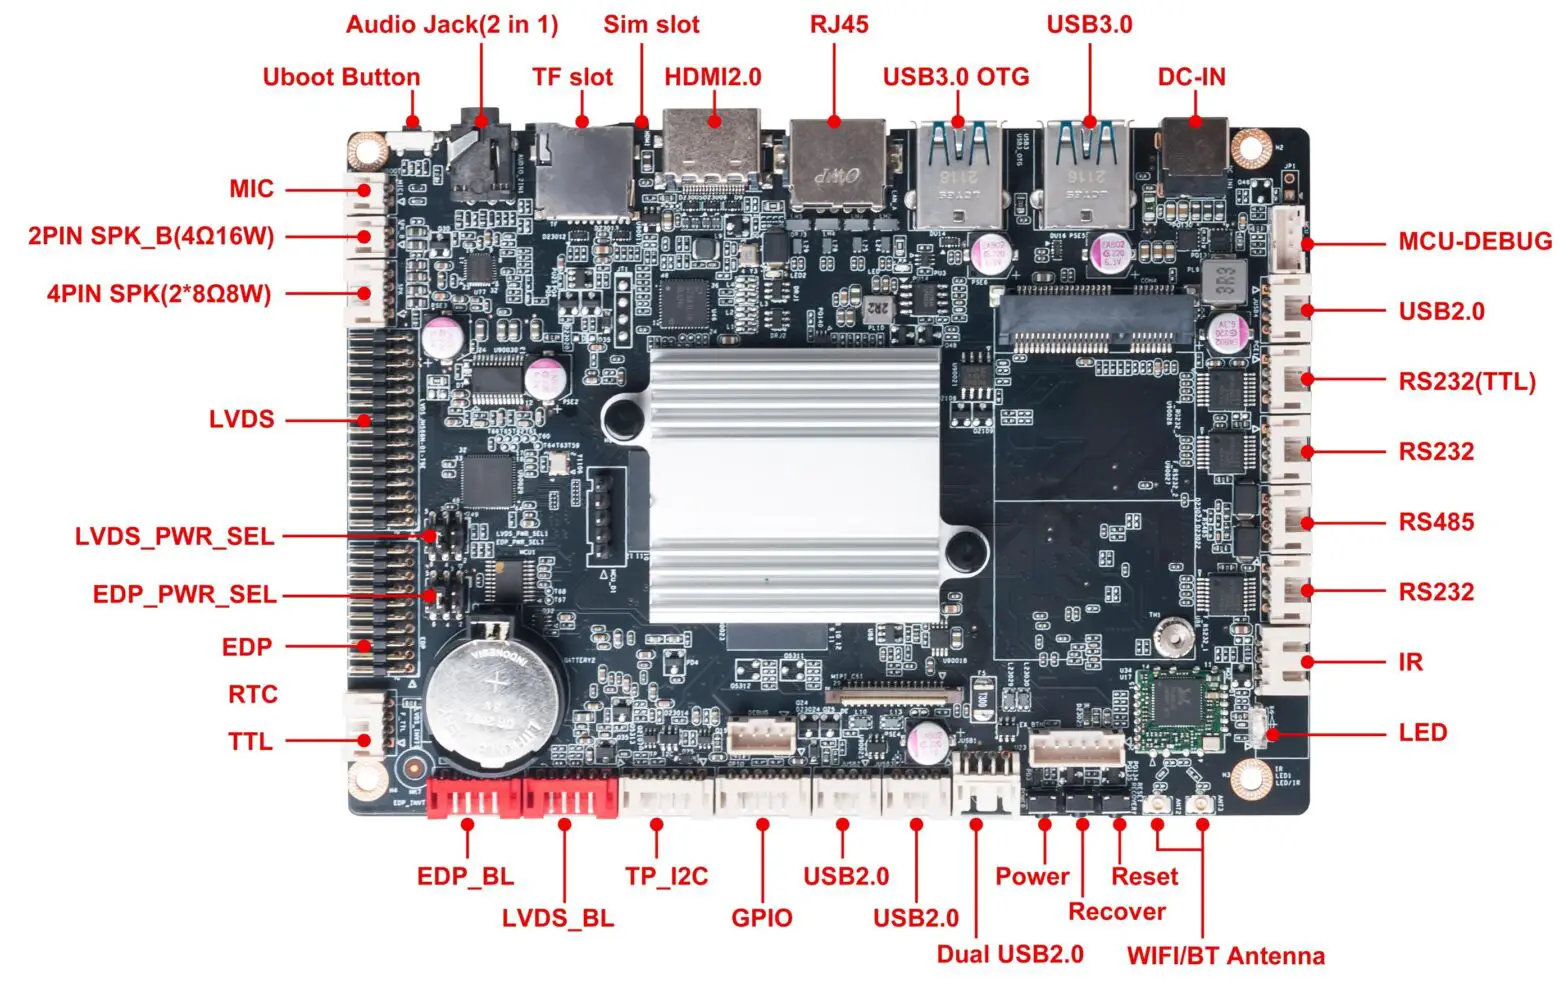
Jumper and Header Definition
| No. | Jumper /Header | Function | PIN Definition |
| 1 | MCU-DEBUG | MCU DEBUG | 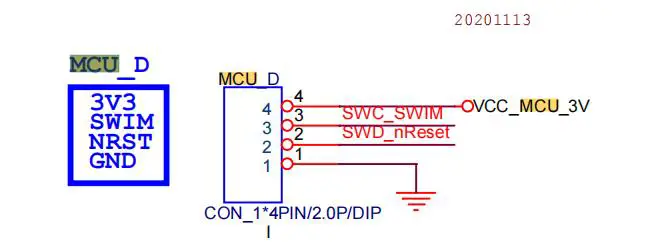 |
| 2 | JUSB4 | USB2.0 pin | 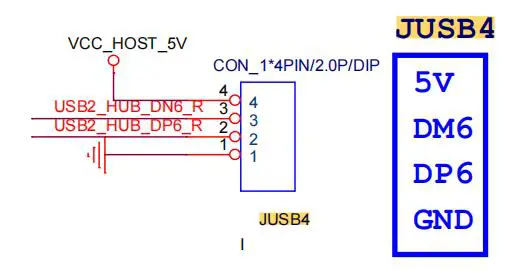 |
| 3 | RS232(TTL) ttyXRUSB0 | RS232 pin | 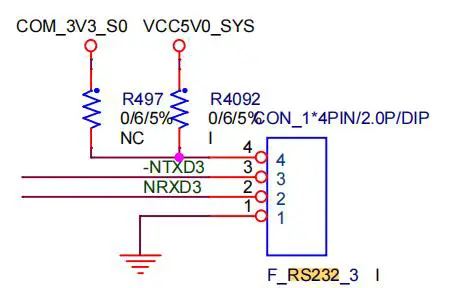 |
| 4 | RS232 ttyXRUSB1 | RS232 pin | 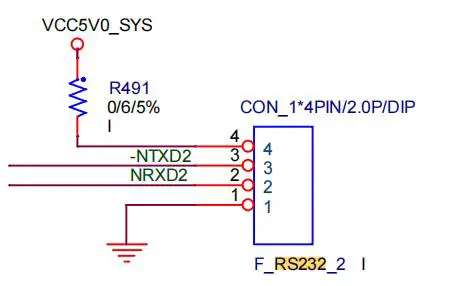 |
| 5 | RS485 ttyXRUSB3 | RS485 pin | 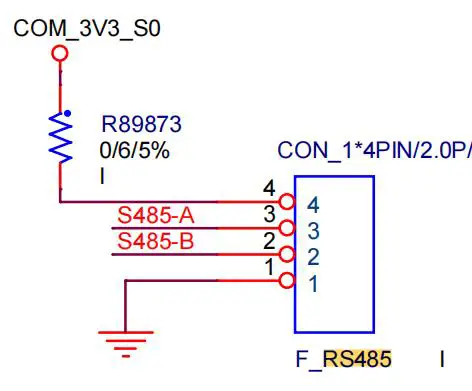 |
| 6 | RS232 | RS232 pin | 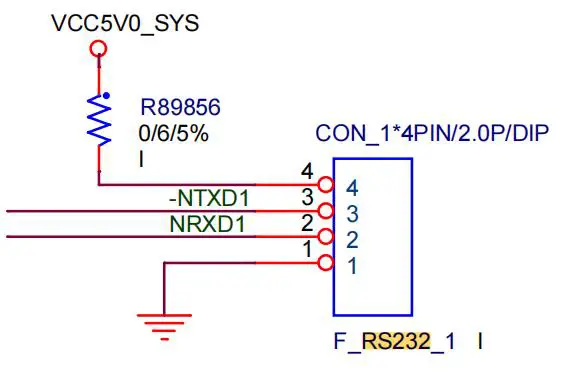 |
| 7 | LED/IR | LED/IR pin | 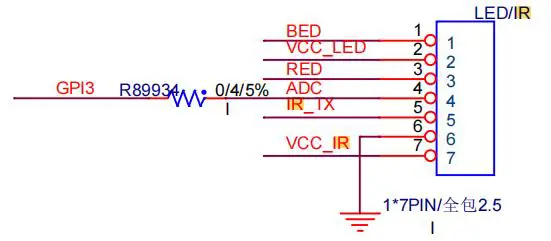 |
| 8 | MIC | MIC pin | 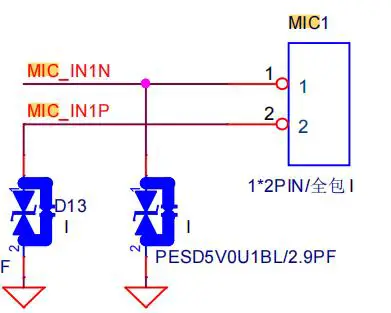 |
| 9 | 2PIN SPK_B(4Ω 10W) | Speaker pin | 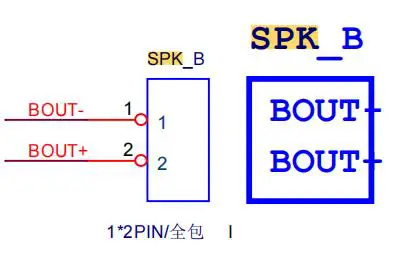 |
| 10 | 4PINSPK (8Ω 10W) | Speaker pin |  |
| 11 | LVDS | LVDS pin | 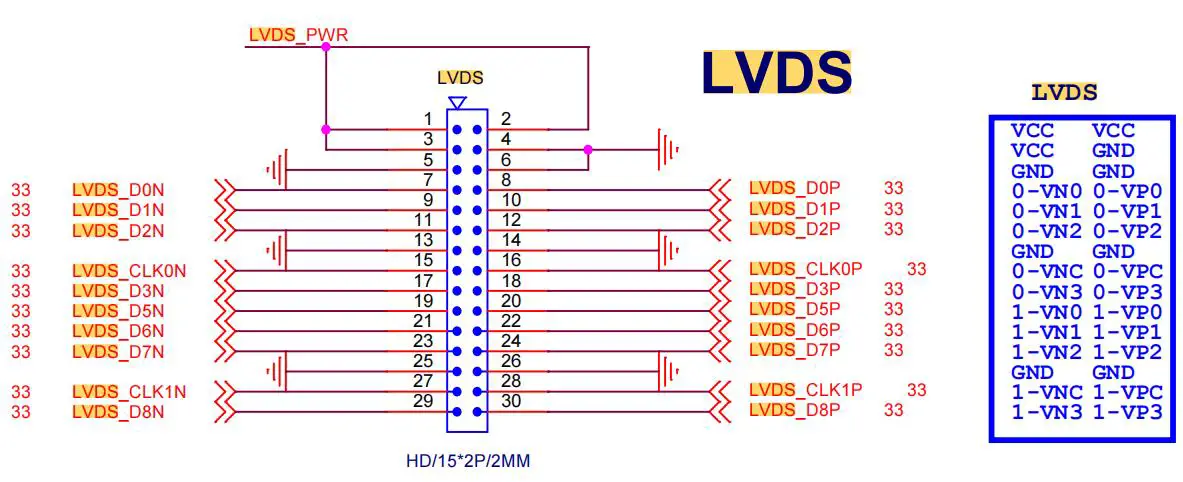 |
| 12 | LVDS_PWR_SEL | LVDS Power Select | 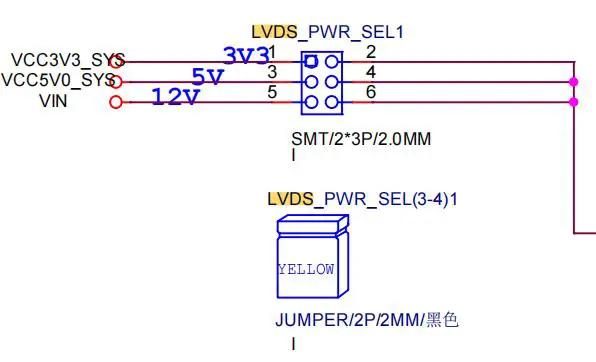 |
| 13 | EDP | EDP pin | 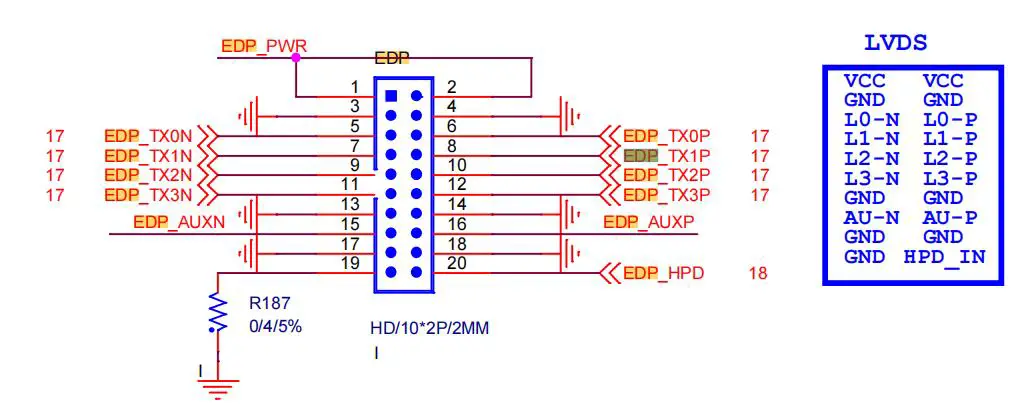 |
| 14 | EDP_PWR_SEL | EDP Power Select | 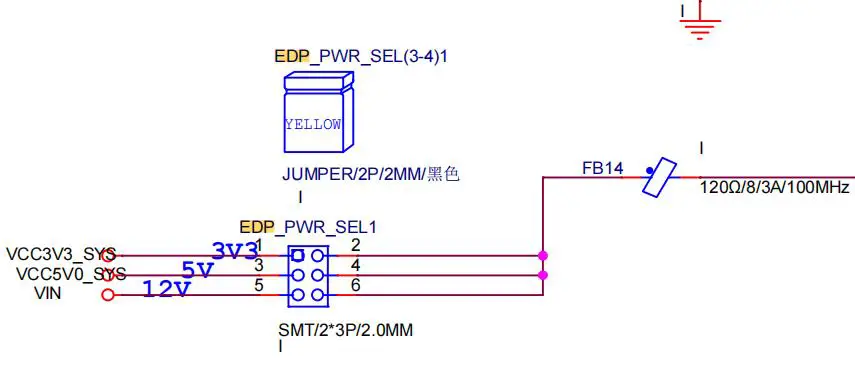 |
| 15 | F_TTL | F_TTL pin | 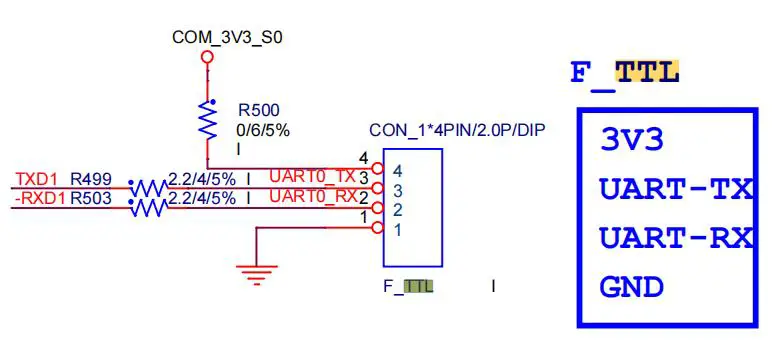 |
| 16 | EDP_BL | EDP Invt1 |  |
| 17 | LVDS_BL | LVDS Invt1 | 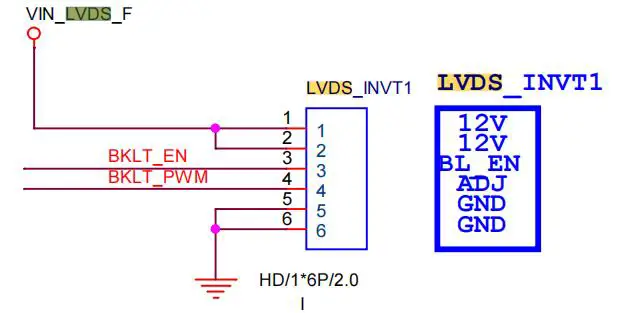 |
| 18 | TP_I2C | I2C touch pin | 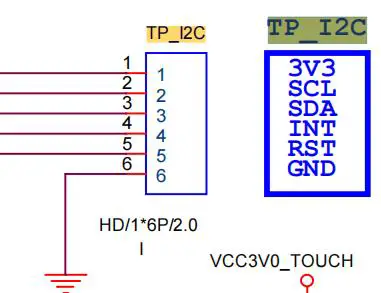 |
| 19 | JUSB2 | USB2.0 pin | 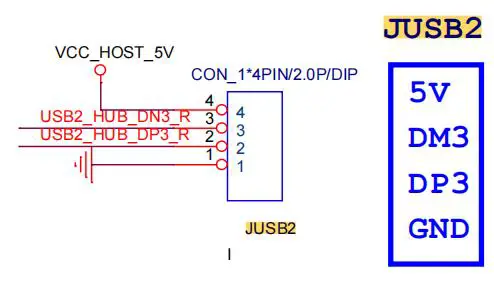 |
| 20 | JUSB3 | USB2.0 pin | 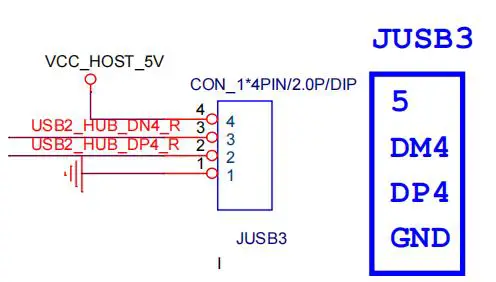 |
| 21 | JUSB1 | Dual USB2.0 pin | 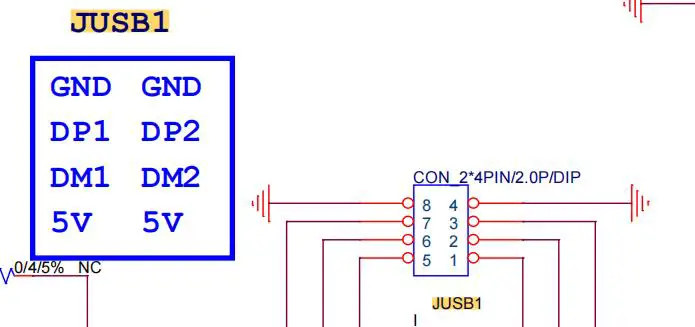 |
| 22 | GPIO | GPIO pin | 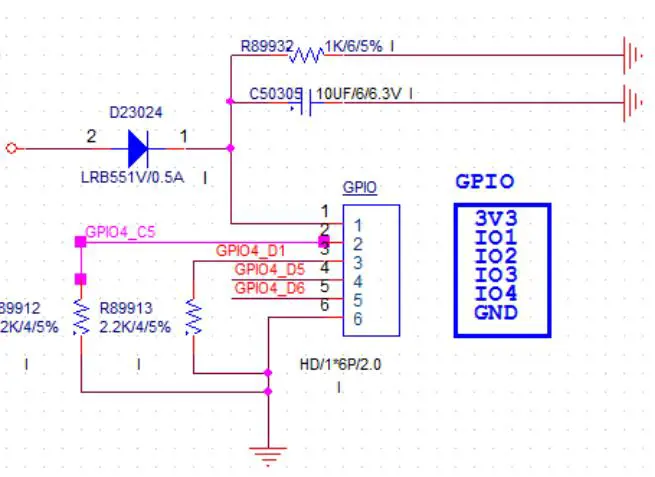 |
Accessories Installation Steps
![]() For safety reasons, please ensure that the board is disconnected with power before installation.
For safety reasons, please ensure that the board is disconnected with power before installation.
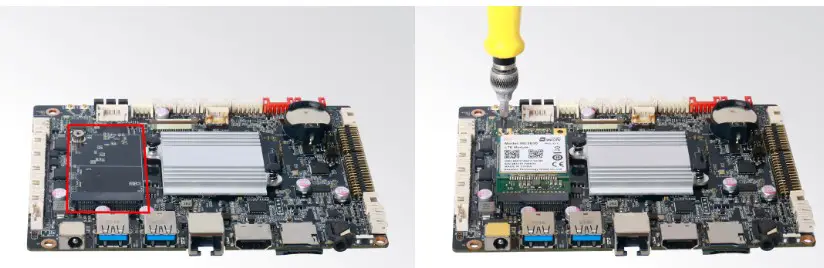
3G/4G Installation
- Plug the 3G/4G module into the mini PCIE slot.
- Secure the module to the carrier by tightening up the screw.
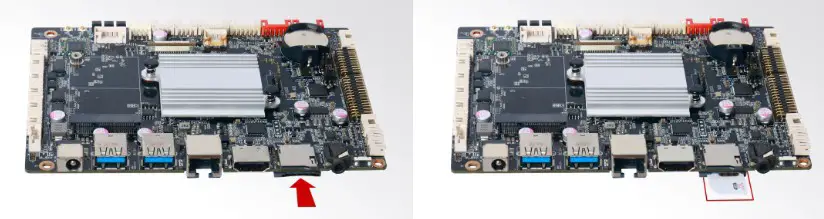
SIM Card Installation![]() This product supports standard SIM card with the size of 25mm × 15mm.
This product supports standard SIM card with the size of 25mm × 15mm.
1. [Insert] the SIM card.
Firmware Upgrade Guide
Preparation:
- IBC-386 motherboard.
- Archive of motherboard firmware provided by Giada technical support.
- Host PC with screen and installed the Windows operation system.
- USB OTG Cable (RP-SMA Male↔RP-SMA Male).

After you get the Archive from Giada technical support, copy the Archive to your host PC, you will find below files inside:
- Android Tool – tool for updating.
- Driver Assitant – tool to install drivers and firmware image file.
- Firmware image.

Upgrade the firmware
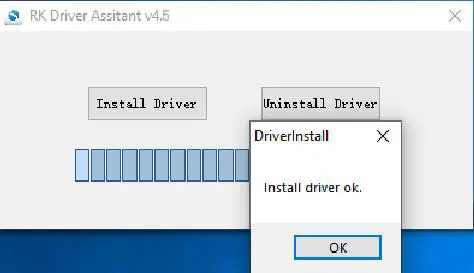
Install the driver in your host PC by following steps:
a. Click the DriverAssitant file. Launch RK DriverAssitant and press “Install Driver”.
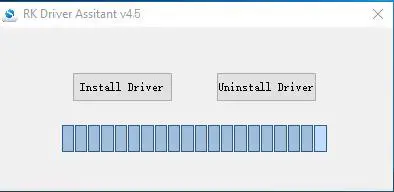
b. Apply all changes and warnings during the installation.
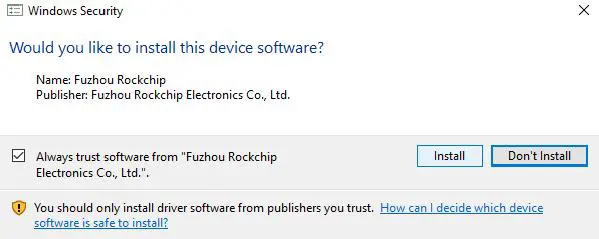
c. Click “ok” after the installation finish
Connect the motherboard with host PC
In order to connect the motherboard with Host PC and run bootloader mode, you should perform following steps:
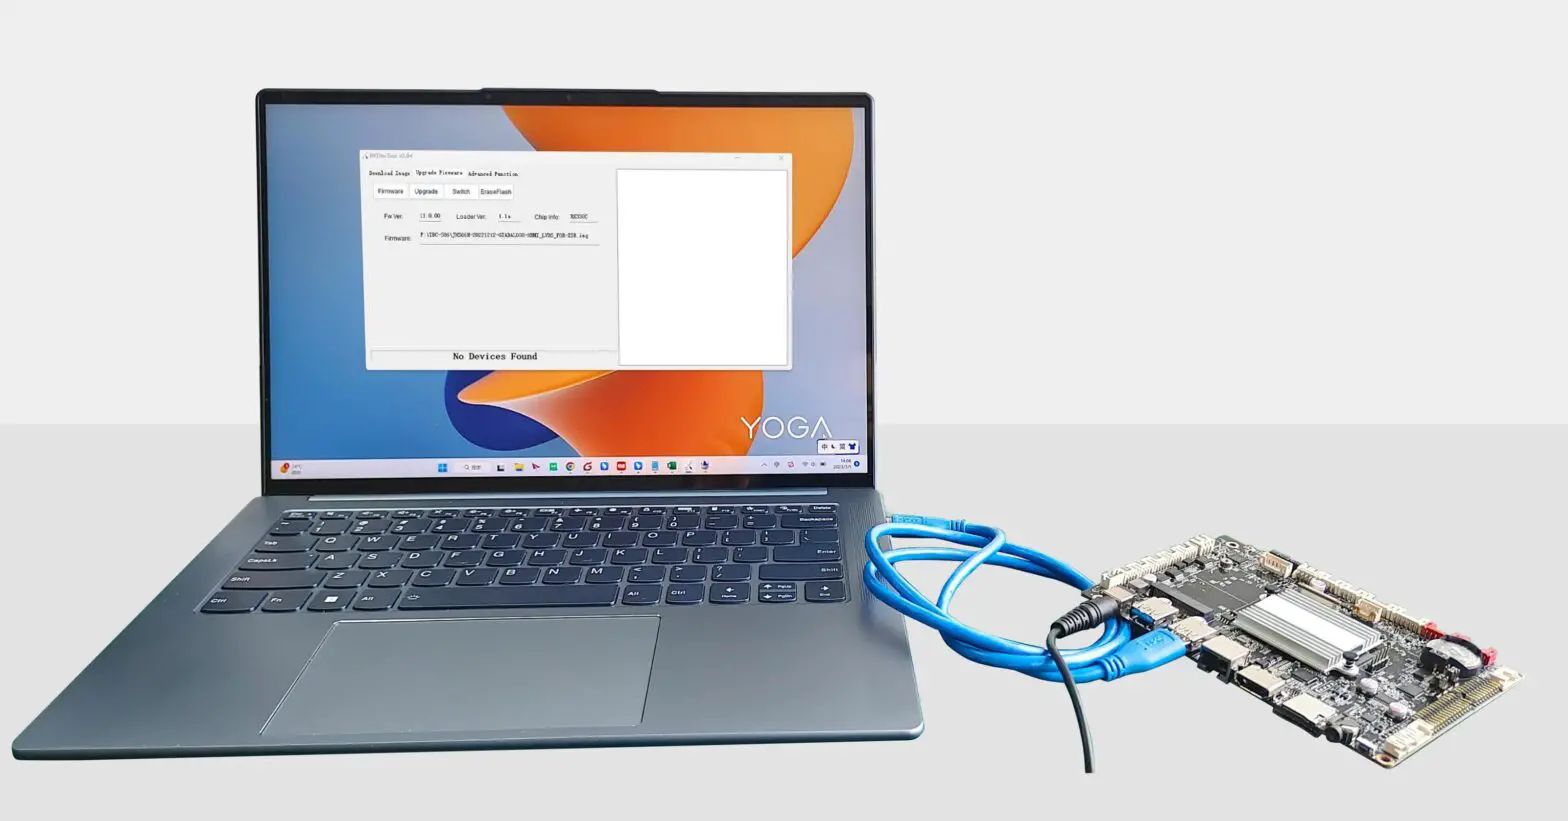
a. Please ensure that the power of the motherboard is disconnected.
b. Run Android tool V2.84 under the windows of the host PC.
c. Connect motherboard to the host PC via usb OTG port.
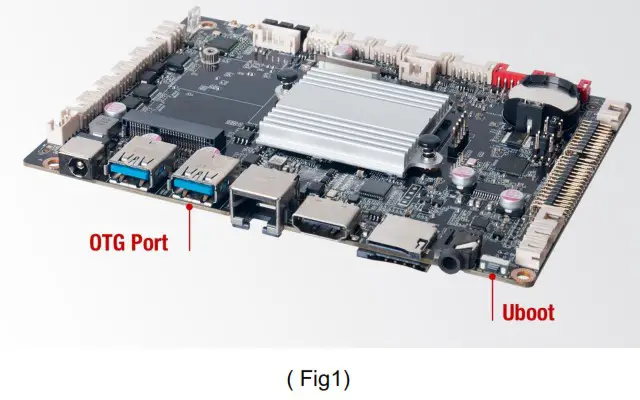
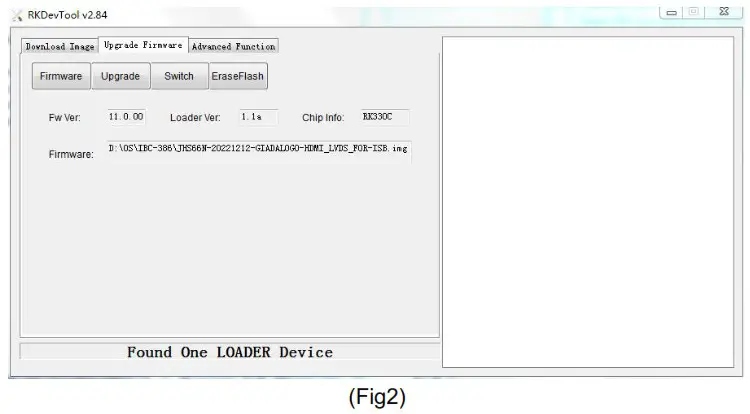
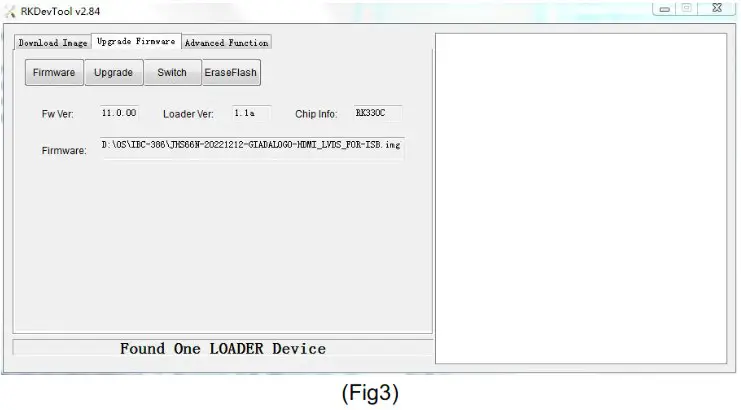
Firstly, hold the motherboard Uboot button (please refer to fig1 for the location of the button), then connect the power adaptor to the motherboard, you will see “Found a MSC Device” or “Found One Loader Device”. (Please refer to Fig2).![]() Please don’t loosen the button and don’t press twice until you see the ‘Found a MSC Device’ or ‘Found One loader device’
Please don’t loosen the button and don’t press twice until you see the ‘Found a MSC Device’ or ‘Found One loader device’
Start the firmware updating
a. Click “Firmware” button and specify the path to the firmware file which is stored in the host PC (Please refer to Fig2).
b. Wait around 5 seconds to upload the program, FW information will display on the screen.
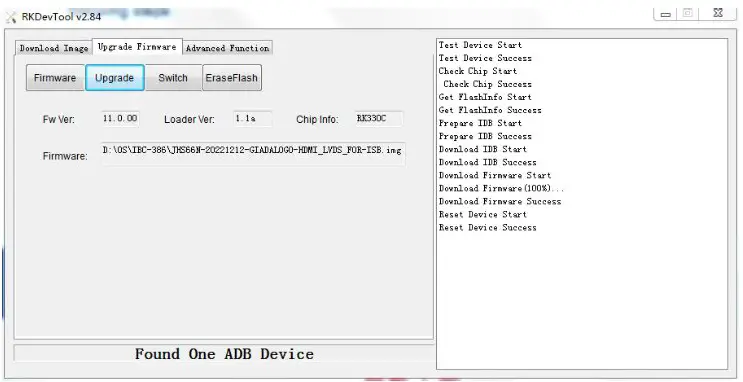
After the “Upgrade” button turns to black, you can click “Upgrade” to update the firmware (please refer to Fig3 and Fig4).

c. In the end, you will see a report indicating a successful operation.
JAHC APP
JAHC APP functions
The user can set up automatic startup and shutdown, one week as a circle.
Startup(open) & shutdown(close) time setup
System Requirements:
- Giada player with JAHC APP function.
- Android OS includes JAHC APP(please refer to Fig1).
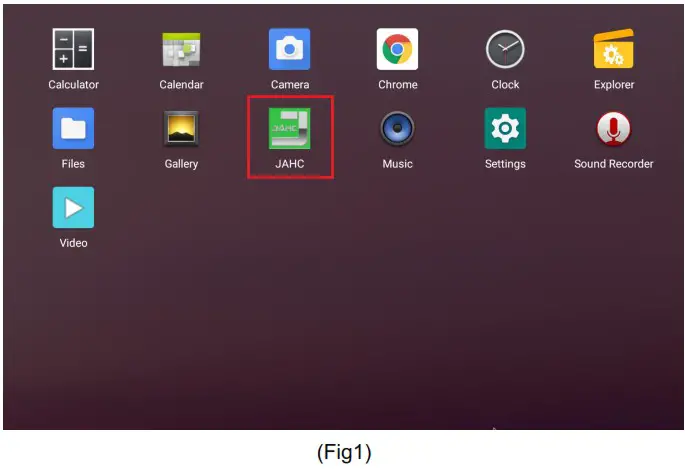
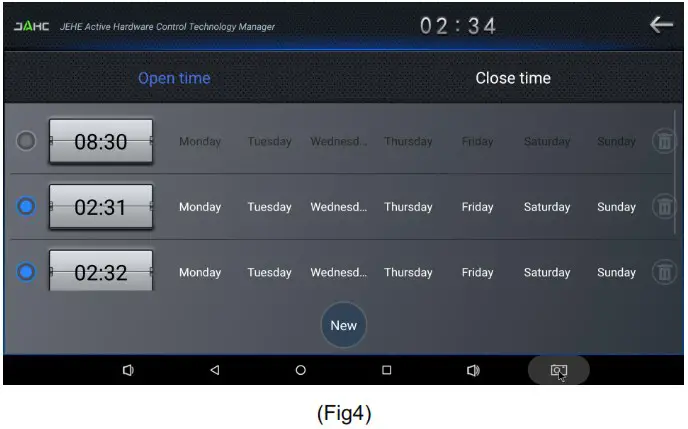
a. After enter the android desktop, click the JAHC APP icon and the JAHC interface will pop up (please refer to Fig2)
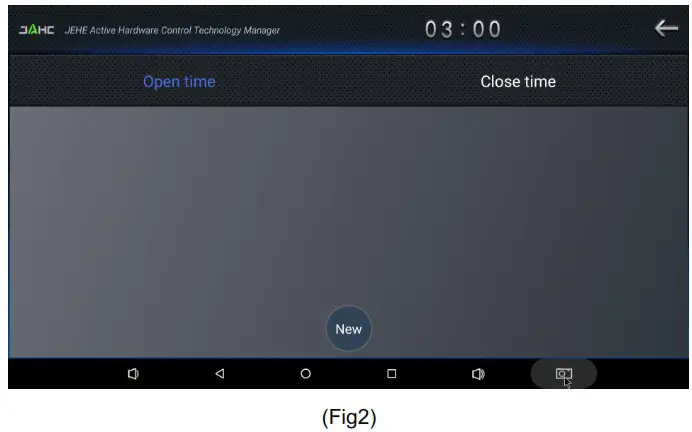
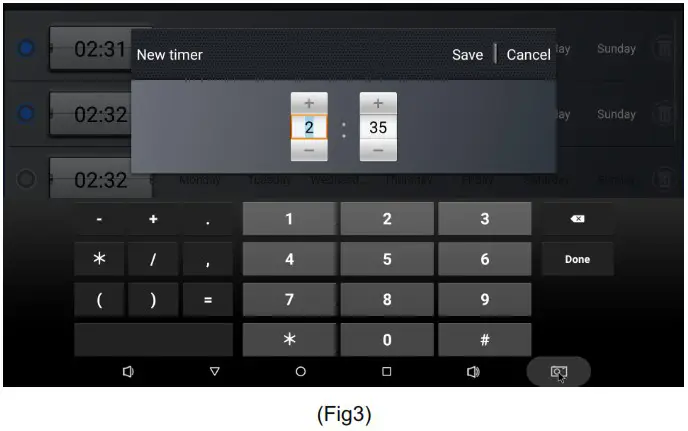
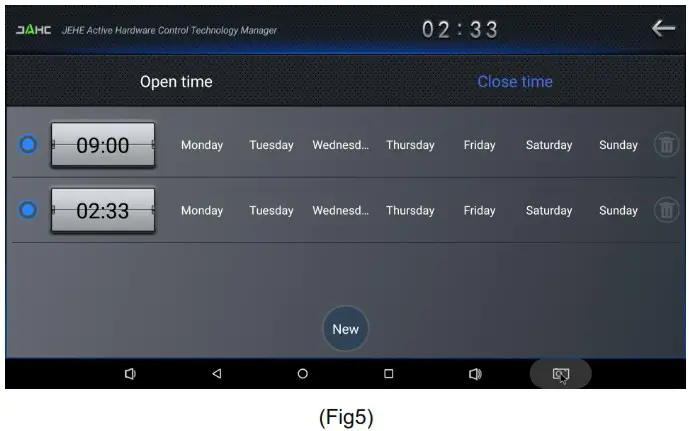
b. Click “New” button to set open time (Fig3) and then click Close time button to set close time. One week as a circle, maximum 3 schedules per day. Select each schedule to set up the Open time and Close time.
c. After finishing the setup, click circles to launch the schedule.
User can click delete to remove the schedule.
![]() Caution: If the interval from shutdown time to next resume time is less than 3 minutes, the system will not shut down.
Caution: If the interval from shutdown time to next resume time is less than 3 minutes, the system will not shut down.
![]()
Shenzhen JIEHE Technology Development Co., Ltd.
Website: www.giadatech.com
Phone: +86-755-33300336
Email: [email protected]
Address: 1~2/F, Block A, Tsinghua Information Harbor, North Section, Shenzhen Hi-tech Park, Nanshan District, Shenzhen, China
![]()
The terms HDMI, HDMI High-Definition Multimedia Interface, and the HDMI Logo
are trademarks or registered trademarks of HDMI Licensing Administrator, Inc.


