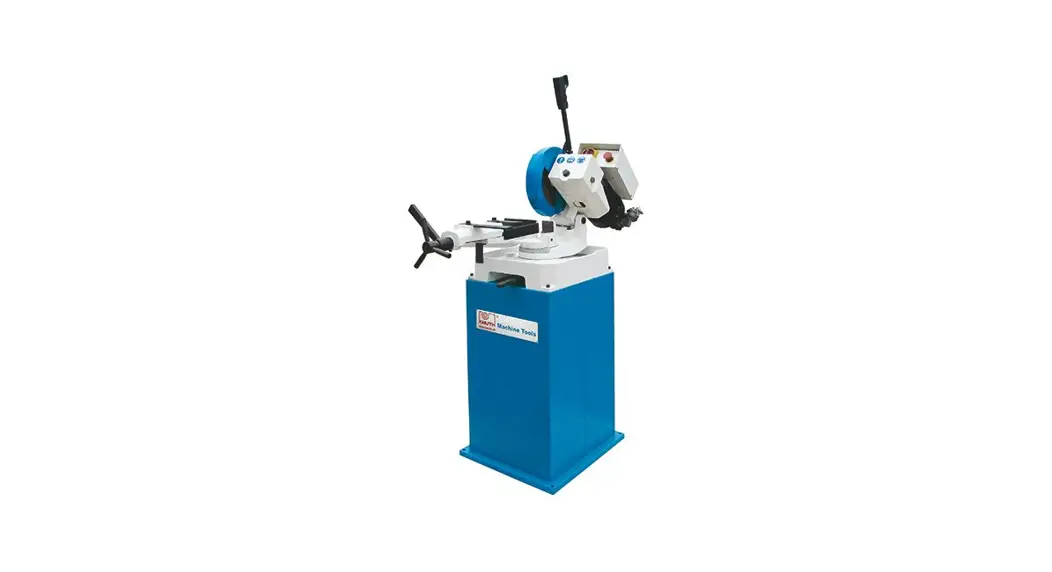
![]() 12 Inch Industrial Circular Saw
12 Inch Industrial Circular Saw
User Manual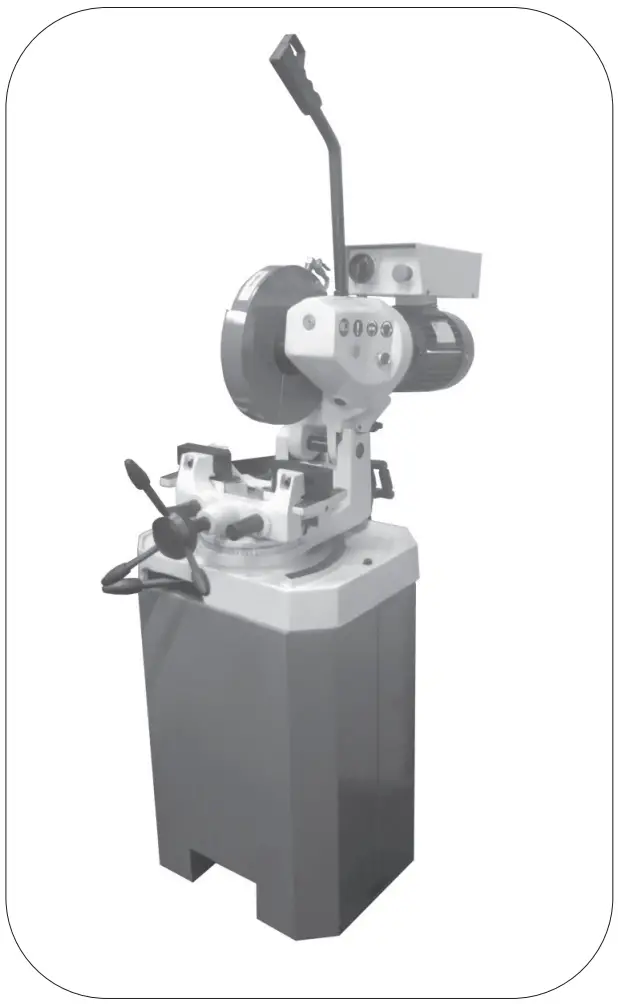 01565
01565
Please read and fully understand the instructions in this manual before operation. Keep this manual safe for future reference.
SAFETY SYMBOLS USED THROUGHOUT THIS MANUAL
 Danger / Caution: Indicates risk of personal injury and/or the possibility of damage.
![]() Warning: Risk of electrical injury or damage!
Warning: Risk of electrical injury or damage!![]() Note: Supplementary information.
Note: Supplementary information.
SAFETY INSTRUCTIONS
![]() MPORTANT: Please read the following instructions carefully, failure to do so could lead to serious personal injury and / or damage to the circular saw.
MPORTANT: Please read the following instructions carefully, failure to do so could lead to serious personal injury and / or damage to the circular saw.
When using the circular saw, basic safety precautions should always be followed to reduce the risk of fire, electric shock and personal injury. Read all these instructions before operating the circular saw and save this user manual for future reference. The circular saw should not be modified or used for any application other than that for which it was designed.
It was designed for metal cutting work in engineering workshops, garages, metal fabricators, etc.
If you are unsure of its relative applications do not hesitate to contact us and we will be more than happy to advise you.
KNOW YOUR CIRCULAR SAW: Read and understand the owner’s manual and labels affixed to the circular saw. Learn its applications and limitations, as well as the potential hazards specific to it.
KEEP WORK AREA CLEAN AND WELL LIT: Cluttered work benches and dark areas invite accidents. Floors must not be slippery due to oil, water or sawdust etc. DO NOT USE THE CIRCULAR SAW IN DANGEROUS ENVIRONMENTS: Do not use the circular saw in damp or wet locations, or expose it to rain. Provide adequate space sur- rounding the work area. Do not use in environments with a potentially explosive atmosphere.
KEEP CHILDREN AND UNTRAINED PERSONNEL AWAY FROM THE WORK AREA: All visitors should be kept at a safe distance from the work area. STORE THE CIRCULAR SAW SAFELY WHEN NOT IN USE: the circular saw should be stored in a dry location and disconnected from the mains supply, and out of the reach of children.
WEAR THE CORRECT CLOTHING: Do not wear loose clothing, neckties, rings, bracelets, or other jewellery, which may get caught in moving parts. Non-slip footwear is recommended. Wear protective hair covering to contain long hair. Roll long sleeves up above the elbow.
USE SAFETY CLOTHING / EQUIPMENT: Wear CE approved safety goggles at all times, normal spectacles only have impact resistant lenses, they are NOT safety glasses. A face or dust mask should be worn if the operation is dusty and ear protectors (plugs or muffs) should be worn, particularly during extended periods of operation. PROTECT YOURSELF FROM ELECTRIC SHOCK: When working with the circular saw, avoid contact with any earthed items (e.g. pipes, radiators, hobs and refrigerators, etc.). It is advisable wherever possible to use an RCD (residual current device) at the mains socket.
STAY ALERT: Always watch what you are doing and use common sense. Do not operate the circular saw when you are tired or under the influence of alcohol or drugs.
DISCONNECT THE CIRCULAR SAW FROM THE MAINS SUPPLY: When not in use, before servicing and when changing accessories such as circular saw blade, etc. AVOID UNINTENTIONAL STARTING: Make sure the switch is in the OFF position before connecting the circular saw to the mains supply.
NEVER LEAVE THE CIRCULAR SAW RUNNING / CONNECTED WHILST UNATTENDED: Turn the circular saw off and disconnect it from the mains supply between jobs. Do not leave the circular saw until it comes to a complete stop.
DO NOT ABUSE THE MAINS LEAD: Never attempt to move the circular saw by the mains lead or pull it to remove the plug from the mains socket. Keep the mains lead away from heat, oil and sharp edges. If the mains lead is damaged, it must be replaced by the manufacturer or its service agent or a similarly qualified person in order to avoid unwanted hazards.
CHECK FOR DAMAGED PARTS: Before every use of the circular saw, a guard or other part that is damaged should be carefully checked to determine that it will operate correctly and perform its intended function. Check for alignment of moving parts, free running of moving parts, breakage of parts, and any other conditions that may affect its operation. A guard or other part that is damaged should be correctly repaired or replaced by an authorised service centre unless otherwise indicated in this instruction manual. Have defective switches replaced by an authorized service agent. Do not use the circular saw if the switch does not turn the saw on and off. KEEP ALL GUARDS IN PLACE: And in full working order. MAINTAIN THE CIRCULAR SAW WITH CARE: Keep blades sharp and clean for the best and safest performance. Follow instructions for lubricating and changing accessories. All extension cables must be checked at regular intervals and replaced if damaged. Always keep the vice hand-wheel grip/s on the circular saw clean, dry and free of oil and grease.
USE ONLY RECOMMENDED ACCESSORIES: Consult this user manual, your distributor or SIP directly for recommended accessories. Follow the instructions that accompany the accessories. The use of improper accessories may cause hazards and will invalidate any warranty you may have.
REMOVE ADJUSTING KEYS AND WRENCHES: Form a habit of checking to see that keys and adjusting wrenches are removed from the circular saw before every use.
SECURE THE WORK-PIECE: Always use the vice to hold the work-piece. This frees up both hands to operate the circular saw.
DO NOT OVERREACH: Keep proper footing and balance at all times.
USE THE RIGHT TOOL: Do not use the circular saw to do a job for which it was not designed.
DO NOT FORCE THE CIRCULAR SAW: It will do the job better and more safely at the rate which it was designed.
DO NOT OPERATE THE CIRCULAR SAW IN EXPLOSIVE ATMOSPHERES: Do not use the circular saw in the presence of flammable liquids, gases, dust or other combustible sources. Circular sawing operations may create sparks which can ignite the dust or fumes.
DO NOT EXPOSE THE CIRCULAR SAW TO RAIN OR USE IT IN WET CONDITIONS: Water entering circular saw will greatly increase the risk of electric shock.
HAVE YOUR CIRCULAR SAW REPAIRED BY A QUALIFIED PERSON: The tool is in accord- ance with the relevant safety requirements. Repairs should only be carried out by qualified persons using original spare parts, otherwise this may result in considerable danger to the user.
DO NOT dismantle, tamper with or use the circular saw without all guards fitted as this may be dangerous and will invalidate the warranty.
- Keep hands out of the path of the circular saw blade, never reach around circular saw blade.
- Make sure the circular saw blade is clear of the work-piece before the handle trigger is pressed in.
- Stop operation immediately if you notice anything abnormal.
- Wait for the circular saw blade to stop completely and remove the plug from mains supply before servicing or adjusting the circular saw or changing the blade.
- Be alert at all times, especially during repetitive, monotonous operations. Don’t be lulled into a false sense of security. Circular saw blades can be extremely unforgiving.
- Use of improper accessories may cause damage to the circular saw and surrounding area as well as increasing the risk of injury.
- Do not modify the circular saw to do tasks other than those intended.
- When sawing always use the vice to hold the material; To avoid injury, the workpiece should never be held with the bare hands.
- Secure the stand to the circular saw before using the circular saw. If the work is heavy or large and likely to cause the circular saw to tip over, use additional supports as appropriate under and around the material.
- Remove all tools from the machine base after adjustment is made.
- Appropriate personal protective equipment MUST be worn and MUST be designed to protect against all hazards created. Severe permanent injury can result from using inappropriate or insufficient protective equipment – Eyes in particular are at risk.
- Do not overload the blade. Allow the blade to operate at its optimum speed for maximum efficiency.
- Always ensure that the accessories such as blades are rated / designed for use with this circular saw as well as the required application, and are correctly and securely fastened before connecting the circular saw to the mains supply.
- The work must be clamped firmly whilst sawing, If its loose it could result in personal injury or damage to the blade/machine.
- Using the correct tpi blade for cutting the material will make your job easier, and the blade last longer, using the wrong tpi blade will make a rough cut and will decrease the life of the blade.
- Keep hands away from the blade.
- Never use this circular saw with the blade guard or electrical box cover removed.
- Round bar and tubing can have a tendency to roll whilst being cut and can cause the blade to slip, DO NOT cut such items without clamping the material with the vice.
- Never have the blade touching the material before you press the handle trigger, this is dangerous and will make the blade bounce or even shatter, any damage will not be covered by warranty.
- Do not start the circular saw until the material is secure and the blade has been lowered to just above the material.
- Never use damaged or deformed circular saw blades, this is extremely dangerous and if the blade shatters pieces will fly out, and could injury you or any one in the vicinity.
If the circular saw is used in a place of work all rules and laws etc. relating to the use of portable electrical appliances should be followed.
![]() When using the circular saw for certain operations, particularly during extended periods; ensure the operator as well as those in the area wear ear protection.
When using the circular saw for certain operations, particularly during extended periods; ensure the operator as well as those in the area wear ear protection. When using the circular saw always ensure the operator as well as those in the area wear eye protection.
![]() Some materials have the potential to be highly toxic; always wear a face mask when operating circular saw.
Some materials have the potential to be highly toxic; always wear a face mask when operating circular saw.
CAUTION: The warnings and cautions mentioned in this user manual can not cover all possible conditions and situations that may occur. It must be understood by the operator that common sense and caution are factors which cannot be built into this product, but must be applied.
ELECTRICAL CONNECTION
WARNING! It is the responsibility of the owner and the operator to read, understand and comply with the following:
You must check all electrical products, before use, to ensure that they are safe. You must inspect power cables, plugs, sockets and any other connectors for wear or damage. You must ensure that the risk of electric shock is minimised by the installation of appropriate safety devices; A residual current circuit Breaker (RCCB) should be incorporated in the main distribution board. We also recommend that a residual current device (RCD) is used. It is particularly important to use an RCD with portable products that are plugged into a supply which is not protected by an RCCB. If in any doubt consult a qualified electrician.
Connecting to the power supply:
This SIP circular saw requires 400v 50hz supply. Before using the circular saw, inspect the mains lead and plug (where applicable) to ensure that neither are damaged. If any damage is visible have the circular saw inspected / repaired by a suitably qualified person. If it is necessary to replace the plug a heavy duty impact resistant plug would be preferable.
The wires for the plug are coloured in the following way:
| Yellow / green | Earth |
| Black | Phase |
| Black | Phase |
| Black | Phase |
Always secure the wires in the plug terminal carefully and tightly. Secure the cable in the cord grip carefully.
![]() Warning: Never connect live or neutral wires to the earth terminal of the plug.
Warning: Never connect live or neutral wires to the earth terminal of the plug.
Only fit an approved plug with the correct rated fuse. If in doubt consult a qualified electrician.![]() Note: Always make sure the mains supply is of the correct voltage and the correct fuse protection is used. In the event of replacing the fuse always replace the fuse with the same value as the original.
Note: Always make sure the mains supply is of the correct voltage and the correct fuse protection is used. In the event of replacing the fuse always replace the fuse with the same value as the original.![]() Note: Always make sure the mains supply is of the correct voltage and the correct fuse protection is used. In the event of replacing the fuse always replace the fuse with the same value as the original.
Note: Always make sure the mains supply is of the correct voltage and the correct fuse protection is used. In the event of replacing the fuse always replace the fuse with the same value as the original.![]() Note: If an extension lead is necessary in order to reach the mains supply; The cross section should be checked so that it is of sufficient size so as to reduce the chances of voltage drops. Always fully unwind the lead during use.
Note: If an extension lead is necessary in order to reach the mains supply; The cross section should be checked so that it is of sufficient size so as to reduce the chances of voltage drops. Always fully unwind the lead during use.
GUARANTEE
This SIP circular saw is covered by a 12 month parts and labour warranty covering failure due to manufacturers defects. This does not cover failure due to misuse or operating the circular saw outside the scope of this manual – any claims deemed to be outside the scope of the warranty may be subject to charges Including, but not limited to parts, labour and carriage costs. This guarantee does not cover consumables such as oil & blades etc. In the unlikely event of warranty claims, contact your distributor as soon as possible.
![]() Note: Proof of purchase will be required before any warranty can be honoured.
Note: Proof of purchase will be required before any warranty can be honoured.
TECHNICAL SPECIFICATION
| Name | 12” Industrial Circular Saw |
| Part number | 01565 |
| Circular 45˚ | 90mm |
| Circular 90˚ | 100mm |
| Rectangle 45˚ | 100 x 90mm |
| Rectangle 90˚ | 140 x 90mm |
| Blade size | 315mm |
| Maximum vice width | 145mm |
| Blade speed | 18 & 36 rpm |
| Motor | 1HP (0.75kw) – 1.7HP (1.3kw) |
| Net weight | 185kg |
| Gross weight | 207kg |
For the sawing capacity of different shaped material and mitre angles, refer to the below diagram.
| 90 ˚ | 100 | 90×90 | 100×90 | 100×90 | 140×90 | 55 | 50×50 |
| 60 ˚ | 100 | 90×90 | 90×90 | 90×90 | 100×90 | 45 | 40×40 |
| 45 ˚ | 100 | 90×90 | 90×90 | 90×90 | 100×90 | 45 | 40×40 |
BLADE SECTION
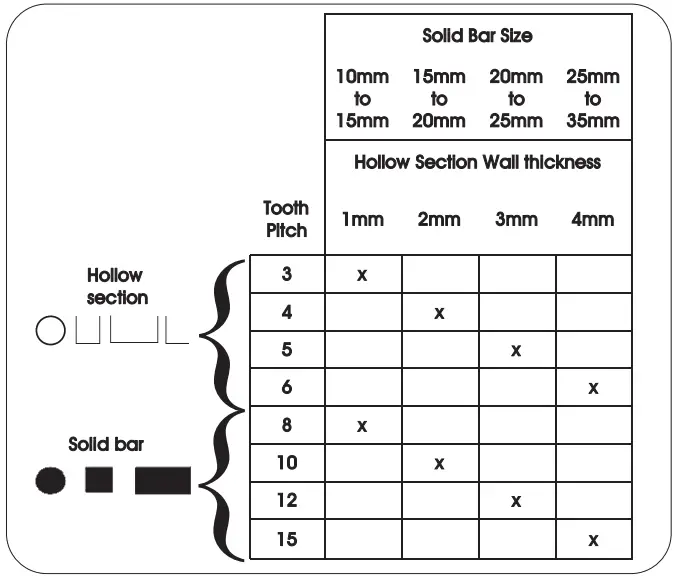
![]() Note: The above table is a reference to what size blade should be used on different thickness materials.
Note: The above table is a reference to what size blade should be used on different thickness materials.
CONTENTS & ACCESSORIES
| A | Manual |
| B | Handle |
| C | Handle micro switch |
| D | Handle lever |

![]() Note: If any of the above are missing or damaged, contact your distributor immediately.
Note: If any of the above are missing or damaged, contact your distributor immediately.
GETTING TO KNOW YOUR CIRCULAR SAW
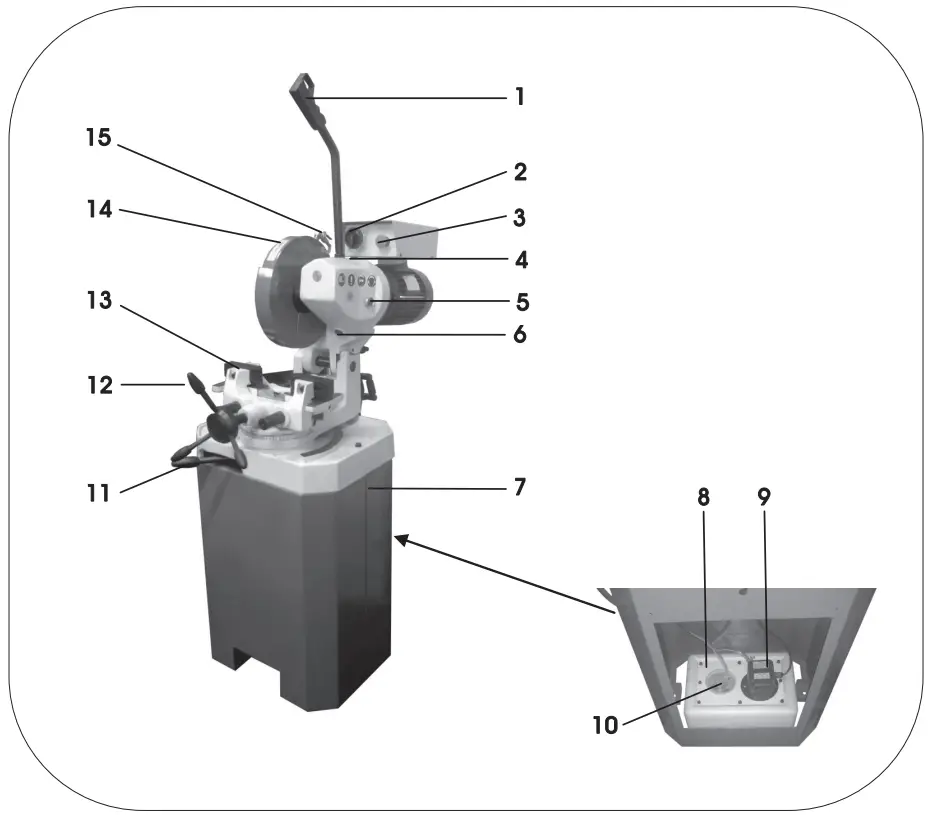
| Ref. | Description | Ref. | Description |
| 1. | Handle | 9. | Coolant pump |
| 2. | Speed selector switch | 10. | Coolant tank filter |
| 3. | Emergency stop button | 11. | Bench lever |
| 4. | Oil fill bolt | 12. | Vice hand-wheel |
| 5. | Oil sight glass | 13. | Vice |
| 6. | Oil drain bolt | 14. | Blade guard |
| 7. | Stand | 15. | Coolant tap |
| 8. | Coolant tank | ||
ASSEMBLY INSTRUCTIONS
FITTING THE CIRCULAR SAW TO THE STAND![]() Danger / Caution: This is a minimum of a 2 man operation to remove this circular saw from its packaging as its extremely heavy, failing to do this can have serious consequences and could lead to personal injury and/or the possibility of damage.
Danger / Caution: This is a minimum of a 2 man operation to remove this circular saw from its packaging as its extremely heavy, failing to do this can have serious consequences and could lead to personal injury and/or the possibility of damage.![]() Note: If any items are missing or damaged, DO NOT use the machine and contact your distributor immediately.
Note: If any items are missing or damaged, DO NOT use the machine and contact your distributor immediately.
- Place the stand into the location where the circular saw is to be used.
- Bolt the stand to the floor (bolts not supplied).
- Remove the circular saw from its packaging.
- Using proper lifting equipment and lifting straps, raise the circular saw up so that it is slightly higher than the stand.
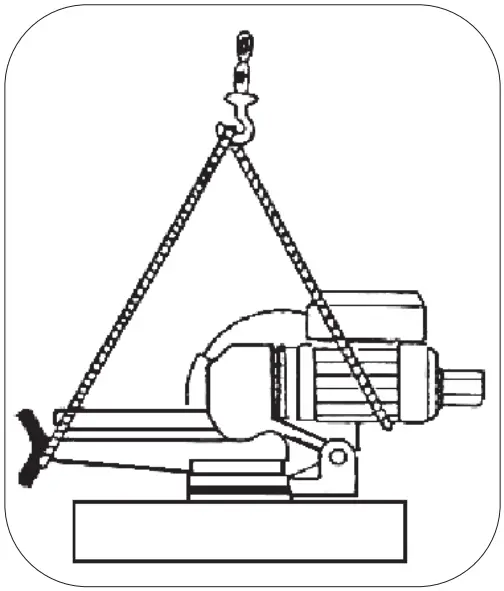
Danger / Caution: Always using proper lifting equipment to move the circular saw onto the stand, NEVER attempt to lift the circular saw without lifting equipment as this is extremely dangerous.
- Slowly move the saw over stand then slowly lower the saw onto the stand, ensuring the four holes match up on the stand and saw.
- Secure the circular saw to the stand using the four hex bolts supplied.
- Remove the straps from the circular saw.
FITTING THE HANDLE LEVER
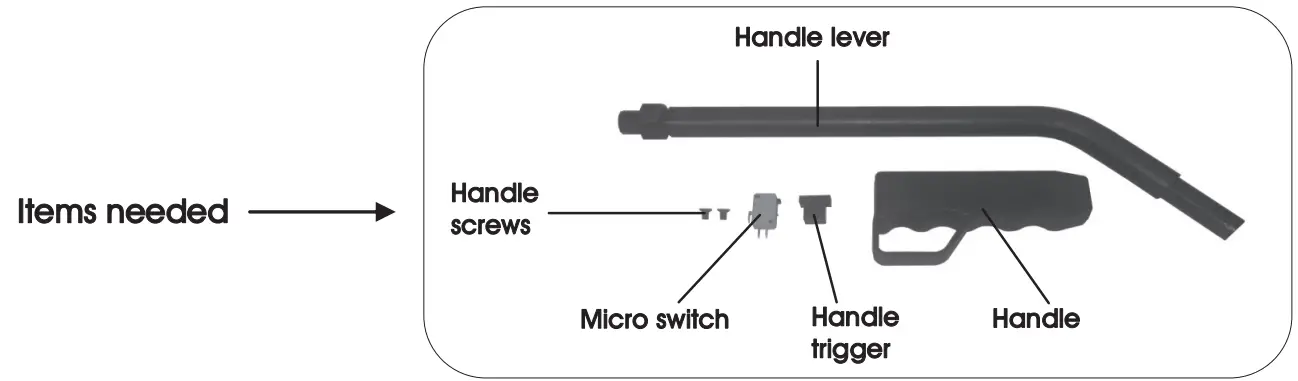
- Remove the transit bung from the head.
- Screw the handle lever into the head and tighten the nut, so the handle lever can`t move.
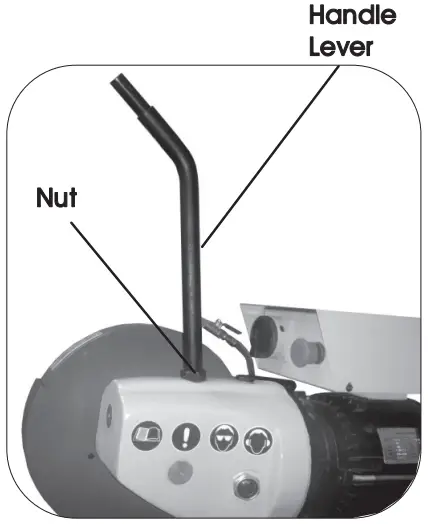

- Locate the micro switch wire on the back of the electrical box and connect the two wires onto the micro switch; one wire to the C (common) connection and the other to the NO (normally open) connection.
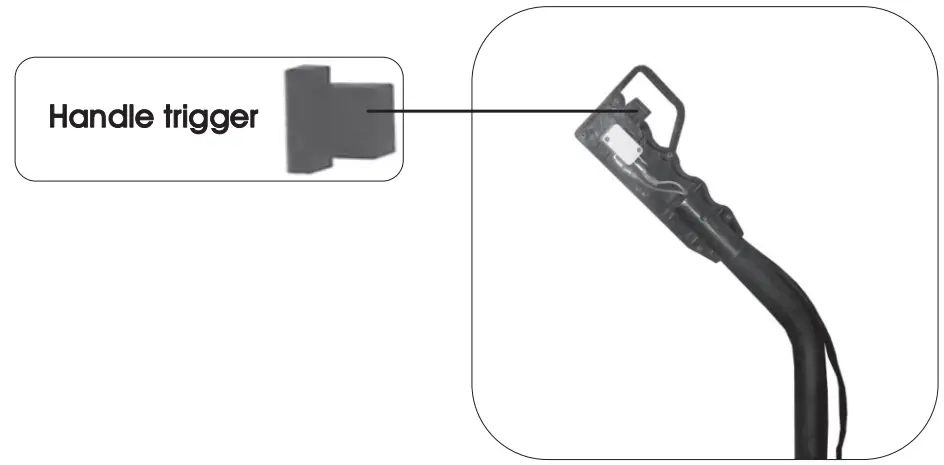
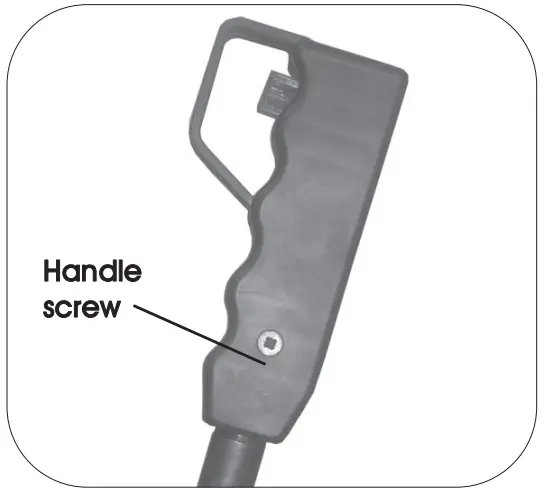
- Screw one half of the plastic handle onto the head lever using the handle screw, push the micro switch into the handle making sure it pushes into both pins, then fit the handle trigger onto the handle.


- Push the other half of the handle onto the handle that’s already fixed to the head lever, use the remaining handle screw to secure.
- Tighten the remaining six screws on the plastic handle.
- Cable tie the micro switch wire onto the head lever.
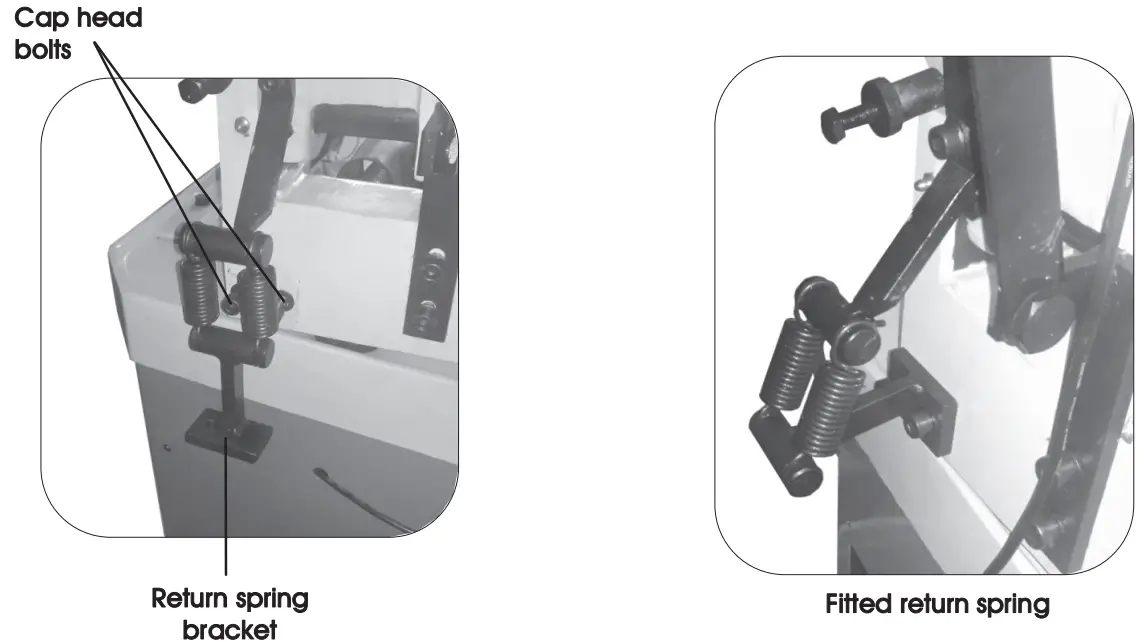
FITTING THE RETURN SPRING
The return spring will need to be fitted prior to operating the circular saw, to fit it do the following.
- Remove the 2 cap head bolts and washers from the circular saw (pic below left).
- Put a cap head bolt through the return spring bracket hole and screw into the base of the machine.
- Screw the other cap head bolt into the opposite side.
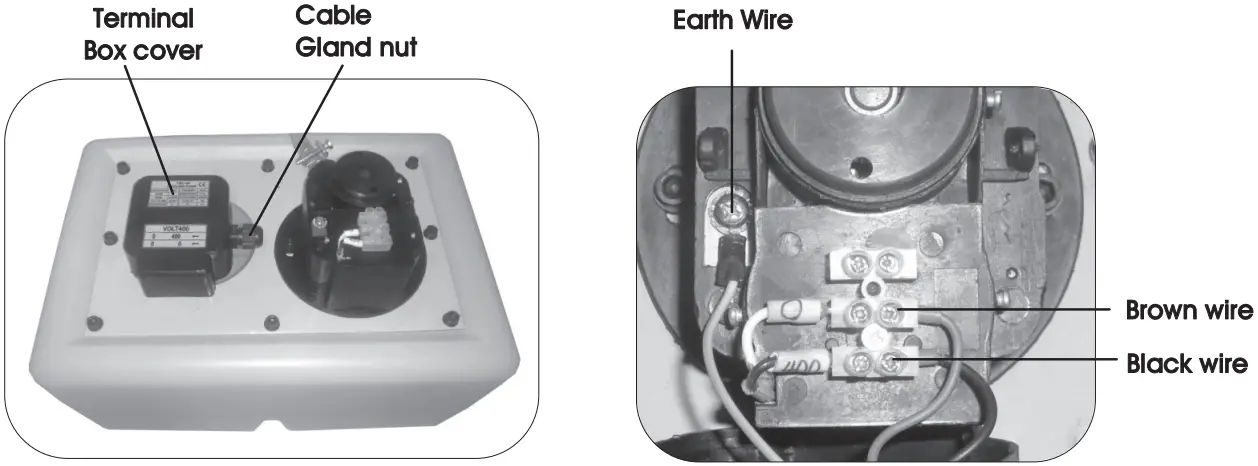
WIRING THE COOLANT PUMP
Warning: Disconnect from the mains supply before wiring the coolant pump, this is potentially dangerous and could lead to personal injury.
To wire the coolant pump do the following.
- Ensure the mains lead is disconnected from the mains supply.
- Push the coolant pump wire through the pre-drilled hole on the back of the stand.
- Remove the 2 screws holding the coolant pump terminal cover in place, and remove the terminal cover.
- Loosen the cable gland nut.
- Push the coolant pump wire through the cable gland.
- Connect the brown and black wire to the terminal block (see right picture below).
- Connect the earth wire to the earth terminal screw (see right picture below) Re-tighten the cable gland nut.
- Refit the terminal cover using the 2 screws.
CONNECTING THE COOLANT PIPES
The coolant pipe on the coolant tank filter should be connected to the nipple inside the stand (this is located underneath the machine base filter, see pg24), secure using the supplied pipe clip.
Push the coolant pump pipe through the hole on the left hand side of the stand, pull it through and connect to the coolant tap on the blade guard, secure using the supplied pipe clip.
OPERATING INSTRUCTIONS
![]() FILLING THE COOLANT TANK
FILLING THE COOLANT TANK
Note: Before any cuts are made it is best to get into a routine of turning the coolant tap to the open position, this will prolong the life of the blade.
- Remove the four hex bolts (A) and remove the cover.
- Slide the coolant tank out.
- Fill the coolant tank through the coolant tank filter.
- Slide the tank back in.
- Refit the four hex bolts.
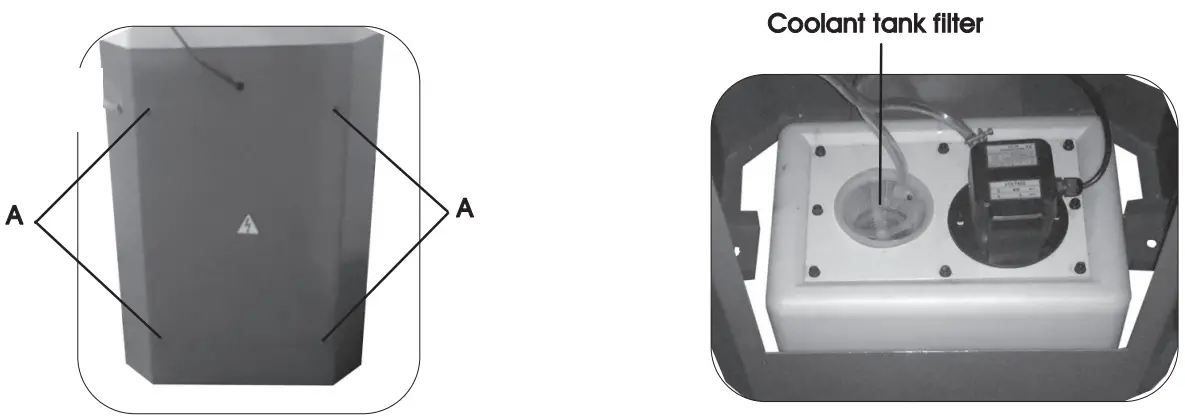
Note: Never run the coolant pump without the coolant tank filter fitted, swarf will get into the cooling system and void any warranty you may have.
STARTING THE CIRCULAR SAW
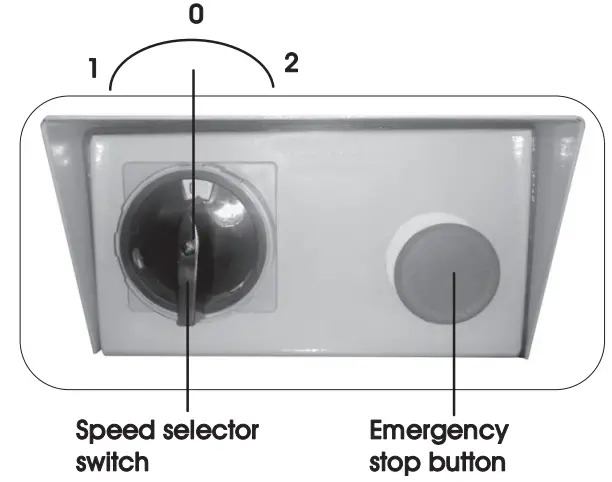
- To start the circular saw, turn the speed selector switch left for position ‘1’ (18rpm) or to the right for position ‘2’ (36rpm) depending on the speed required, (the blade will not turn until the handle trigger is pressed in).
- To stop the circular saw, turn the speed selector switch back to the centre ‘0’ position, or push the emergency stop button.
- The emergency stop button, when pressed in will cut the power to the motor, to reset the emergency stop button twist it clockwise and it will pop back out.
CUTTING AT 90˚ DEGREE![]() Danger / Caution: Never force the blade down whilst cutting, this will damage the teeth on the blade and or shatter the blade, always let the blade do the cutting.
Danger / Caution: Never force the blade down whilst cutting, this will damage the teeth on the blade and or shatter the blade, always let the blade do the cutting.
- Turn the coolant tap to the ‘Open’ position.
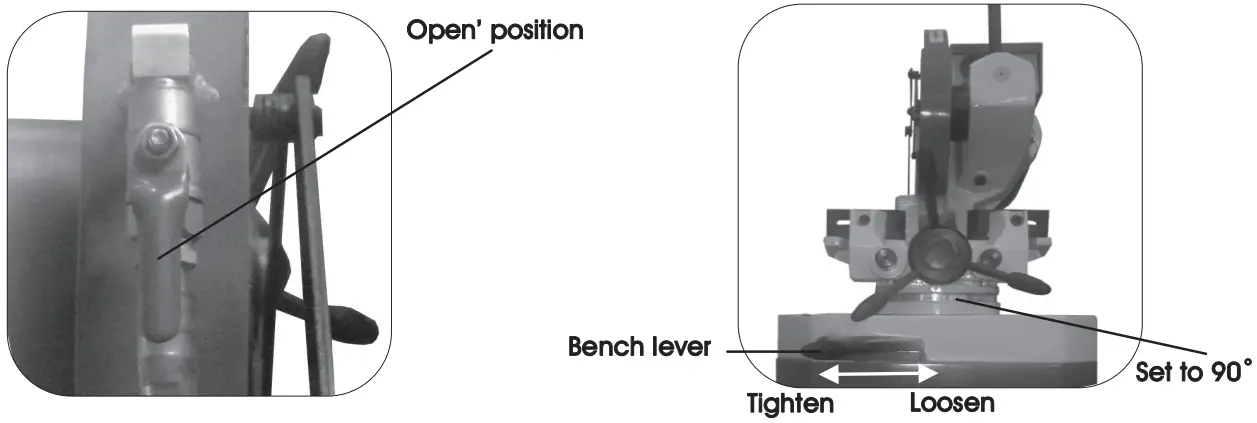
- Loosen the bench lever, and turn the head to 90˚ on the scale.
- Re-tighten the bench lever, so the head can`t move as you’re cutting.
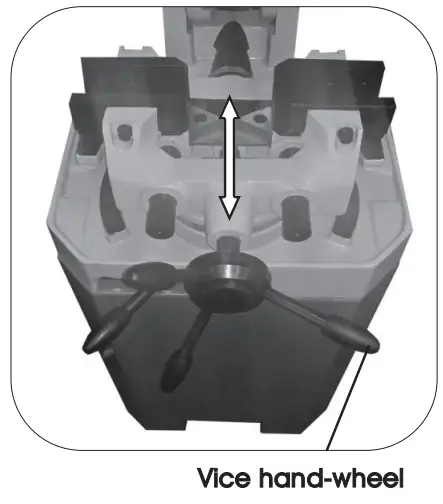
- Move the vice hand-wheel so you have enoughclearance to fit your material.
- Place your material between the vice jaws.
- Re-tighten the vice hand-wheel so the materialcan’t move.
 Select the speed required on the speed selector switch.
Danger / Caution: Never have the blade touching the material before you press the trigger, this is dangerous and will make the blade bounce or even shatter the blade, any damage will not be covered by warranty.
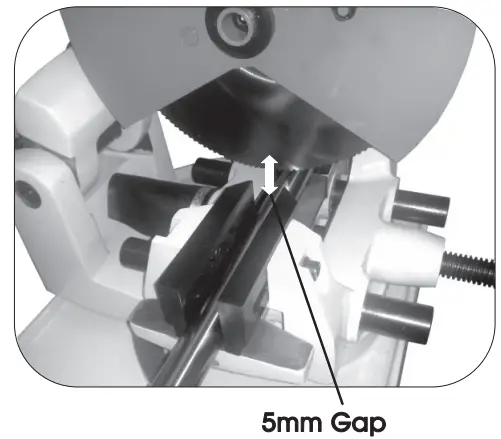
- Lower the head about 5mm above the material, but do not make contact with the material.
- Press the trigger on the head lever to start the machine and coolant pump.
- Once the material is cut, release the trigger to stop the machine and coolant pump and raise the head up.
- Remove the material by undoing the vice hand-wheel.
- Repeat these steps if more material is to be cut.
SETTING UP FOR AN ANGLED CUT
The vice is fixed and the angle can only be set by rotating the head, up to 45˚right or 45˚ left, to adjust to a specific angle the do the following.
- Loosen the bench lever by moving it to the right.
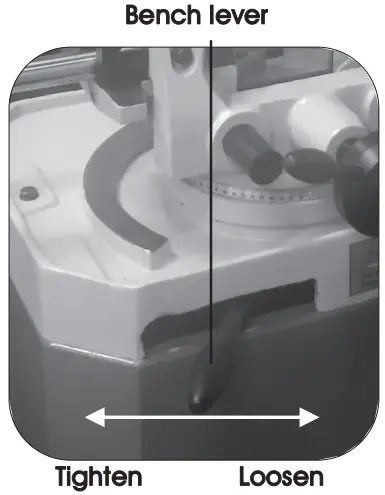
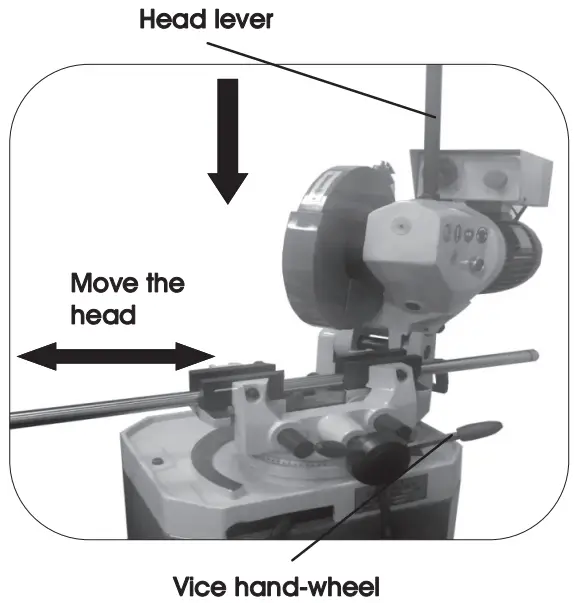
- Pull the head lever down and move the head left or right, depending on what angled cut is to be made.
- Use the scale on the swivel base to set your desired angle.
- Once the angle is set correctly, retighten the bench lever.
- Place the material between the vice jaws, then turn the vice hand-wheel clockwise to tighten the vice jaws against material so it can’t move.
- The material is now ready to be cut.
![]() Note: Never attempt cut an angle beyond 45˚, this could possibly lead to damage to the machine, or personal injury to you or others in the area.
Note: Never attempt cut an angle beyond 45˚, this could possibly lead to damage to the machine, or personal injury to you or others in the area.
MAINTENANCE
CHANGING THE BLADE
- Turn the circular saw to the `OFF` position.
- Isolate the saw from the mains spply.
- Raise the head upwards.
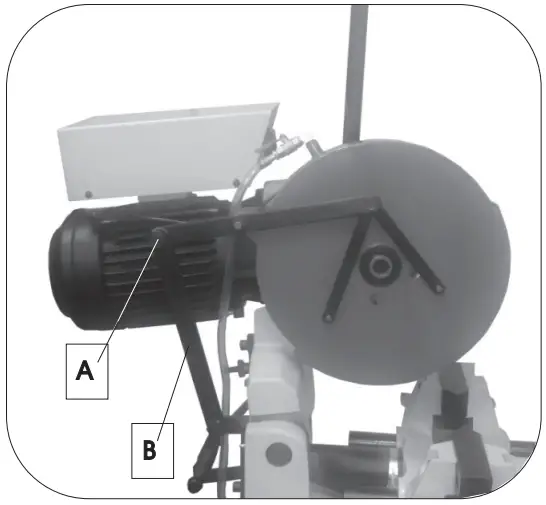
- Remove hex. bolt (A).
- Slide arm (B) out of the way.
![]() Caution: The blade bolt is a left handed thread, meaning to undo it you must turn the bolt clockwise, failing to do this will strip the threads on the blade shaft and will void your warranty.
Caution: The blade bolt is a left handed thread, meaning to undo it you must turn the bolt clockwise, failing to do this will strip the threads on the blade shaft and will void your warranty.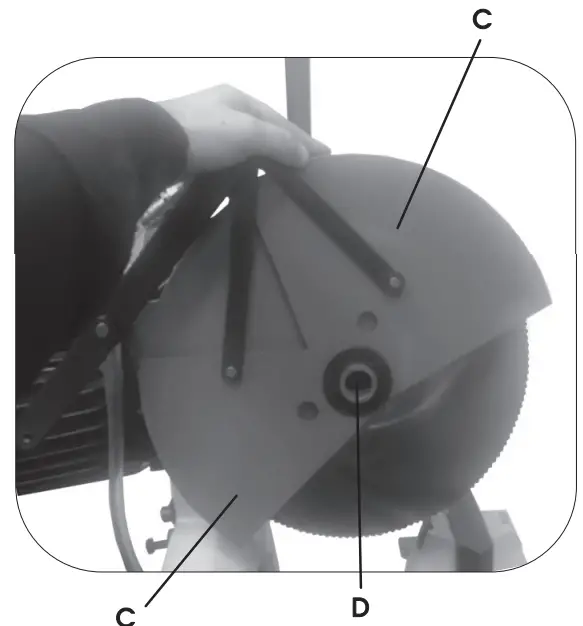
- Slide both movable guards (C) out of the way.
- Remove the blade bolt (D) by turning it clockwise to undo it, a soft mallet may be required just to loosen the bolt as it will be tight, but do not hit it too hard.
- Once the blade bolt is out, remove the blade flange then the blade.
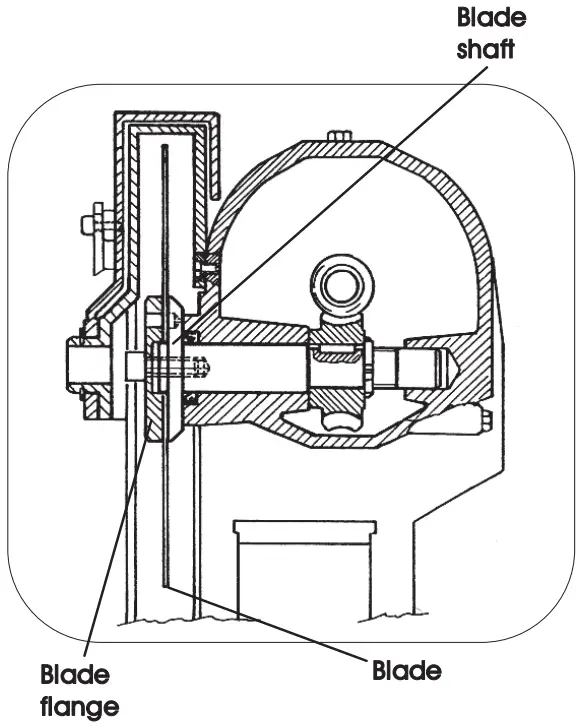
- Place the new blade over the blade shaft lip.
- Fit the blade flange over the blade, turn the blade until the two pins on the blade flange slot into the two blade holes.
- Now turn the blade again until the two pins on the blade flange slot into the two blade shaft holes.
- Refit the blade bolt by turning it anticlockwise to tighten it up.
- Slide both guards (C) back down and refit the arm (B) with bolt (A).
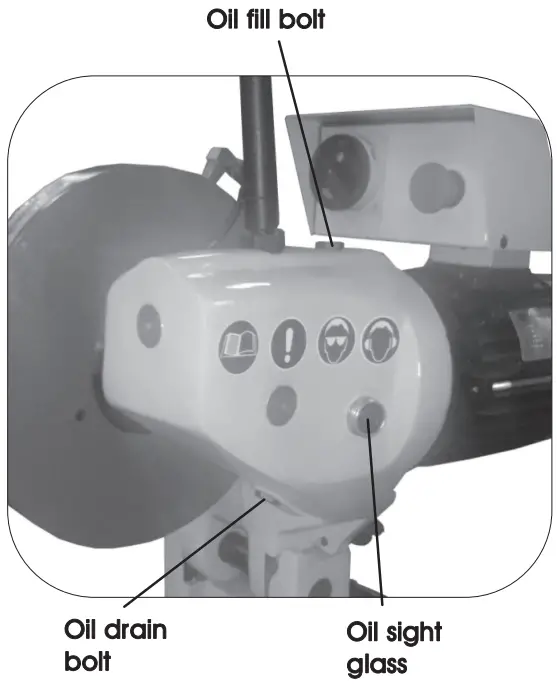
CHANGING THE GEAR BOX OIL
- Turn the machine to the `OFF` position.
- Raise the head upwards.
- Place a container on the base of the circular saw and inline with the oil drain bolt.
- Remove the oil drain bolt to let the oil flow into the container, you may need to pull the head slightly forward to get rid of the remaining oil.
- Once all the oil is out refit the oil drain bolt.
- Remove the oil fill bolt. Pour oil into the oil fill hole with EP90 gear oil until it reaches around the red dot on the oil sight glass. Refit the oil drain bolt.
![]() Note: Contact your local authority on how / where to dispose of the waste oil.
Note: Contact your local authority on how / where to dispose of the waste oil.
CHANGING THE INLINE FILTER
Note: Its best to change the filter at least once a year, or sooner if used more often in a working environment. SIP replacement filter code WK03-00095
- The filter is located at the rear of the machine between the coolant pump and coolant tap.
- Pull the two coolant pipes off either side of the filter.
- Push the two coolant pipes back onto the new filter.
CLEANING THE MACHINE![]() Note: Never use compressed air to blow away the swarf, this is dangerous and could lead to eye damage if safety glasses are not worn, always use a soft brush (paint brush or similar) to remove the swarf at the end of each working day.
Note: Never use compressed air to blow away the swarf, this is dangerous and could lead to eye damage if safety glasses are not worn, always use a soft brush (paint brush or similar) to remove the swarf at the end of each working day. Over the course of the day the machine will get clogged with swarf and could possibly stop the coolant from running back into the coolant tray. Its best to get into a routine at the end of each working day, or more if its used more frequently to clean any swarf from the machine base casting, filter and vice jaws. Use a soft brush (paint brush or similar) to remove the swarf from the machine at the end of each working day, NEVER use compressed air to remove the swarf.
![]() Note: Never run the machine without the machine base filter fitted, without it fitted swarf will get into the coolant system and clog the coolant pump, this will stop the coolant circulating and cooling the blade, if a coolant pump is found with swarf inside of it then this will void any warranty you may have.
Note: Never run the machine without the machine base filter fitted, without it fitted swarf will get into the coolant system and clog the coolant pump, this will stop the coolant circulating and cooling the blade, if a coolant pump is found with swarf inside of it then this will void any warranty you may have.
LUBRICATING THE CIRCULAR SAW
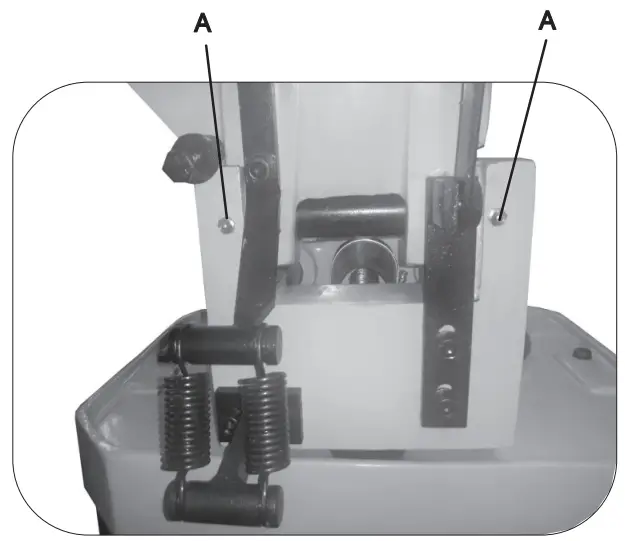
The pivots of the saw head must be greased at least every three months, on the rear of the machine. There are two grease nipples (A), apply grease to these points.
The vice shaft, guide shafts and machine base guide must be oiled regularly, this will make the vice move more smoothly and easier to adjust.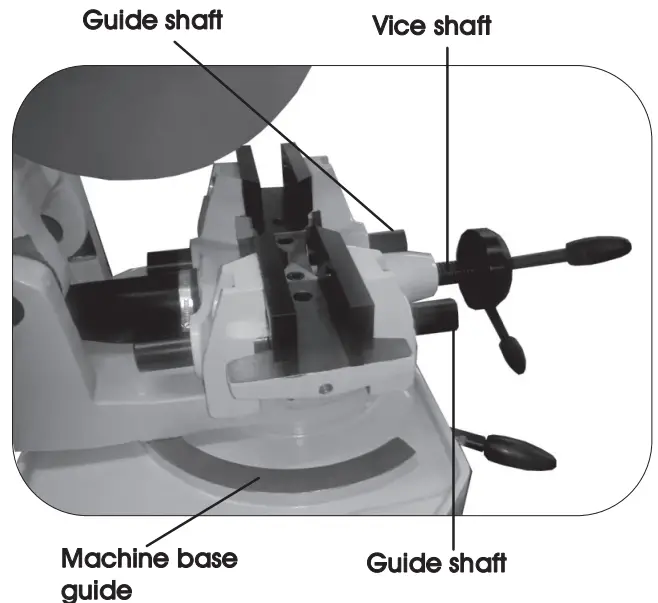
Note: Before oiling the shafts and guides, make sure they are cleared of any debris or swarf.
TROUBLESHOOTING
| Symptom | Possible problem | Solution |
| Excessive bouncing or blade breaking. | 1. Speed too high. 2. Teeth blunt on blade. 3. Wrong coolant. 4. Blade turns in the wrong di- rection. 5. Worm and worm wheel de- fective. | 1. Change speed on speed se lector switch. 2. Replace blade. 3. Use correct coolant. 4. Wired incorrectly, change phase 1 & 2 around. 5. Replace or contact distribu- tor for repair. |
| Motor doesn’t turn. | 1. Motor wired incorrectly. 2. Speed selector switch is in the ‘OFF’ position. 3. Breaker popped out. 4. Emergency stop button acti- vated. | 1. Check wiring at mains board or plug. 2. Select the correct speed and turn ‘ON’. 3. Reset breaker in electrical box or mains board. 4. Reset emergency stop but- ton. |
| Coolant system not working. | 1. Coolant tap in the ‘CLOSED’ position. 2. Coolant pump faulty. 3. Coolant tank empty. 4. Coolant pipe obstructed. 5. Coolant filter blocked. | 1. Put to the ‘OPEN’ position. 2. Replace coolant pump. 3. Fill coolant tank. 4. Check and clear/replace pipe if necessary. 5. Clean/replace coolant filter. |
Note: If none of the above solutions work then contact your local distributor for repair, or contact SIP technical for more advise.
![]() 01509 500400
01509 500400![]() [email protected]
[email protected]
WIRING DIAGRAM
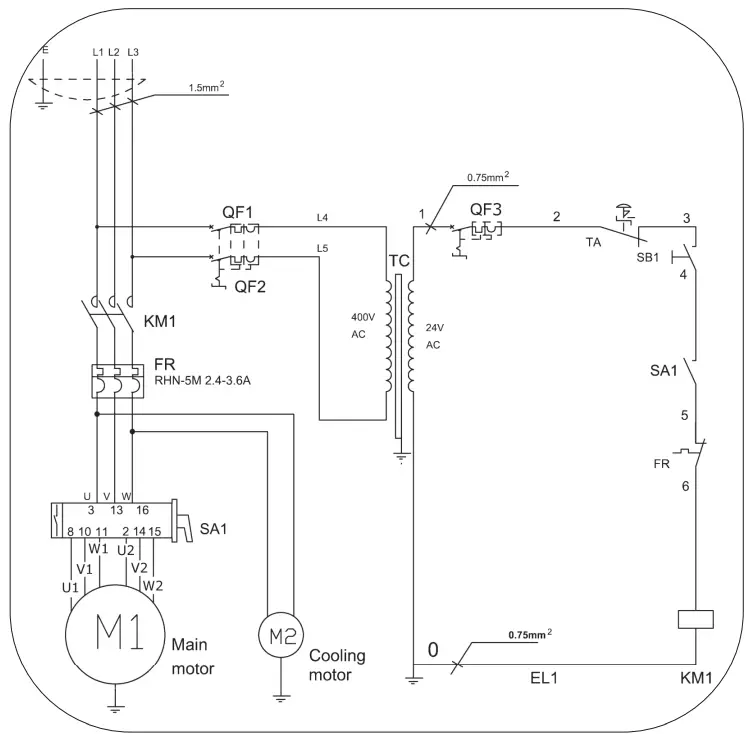
| Ref. | Description | Ref. | Description |
| TA | Emergency stop | TC | Transformer |
| SB1 | Trigger switch | QF1,2,3 | Breaker |
| FR | Overload relay | SA1 | Speed selector switch |
| KM1 | Contactor | EL1 | Earth lead |
EXPLODED DRAWING
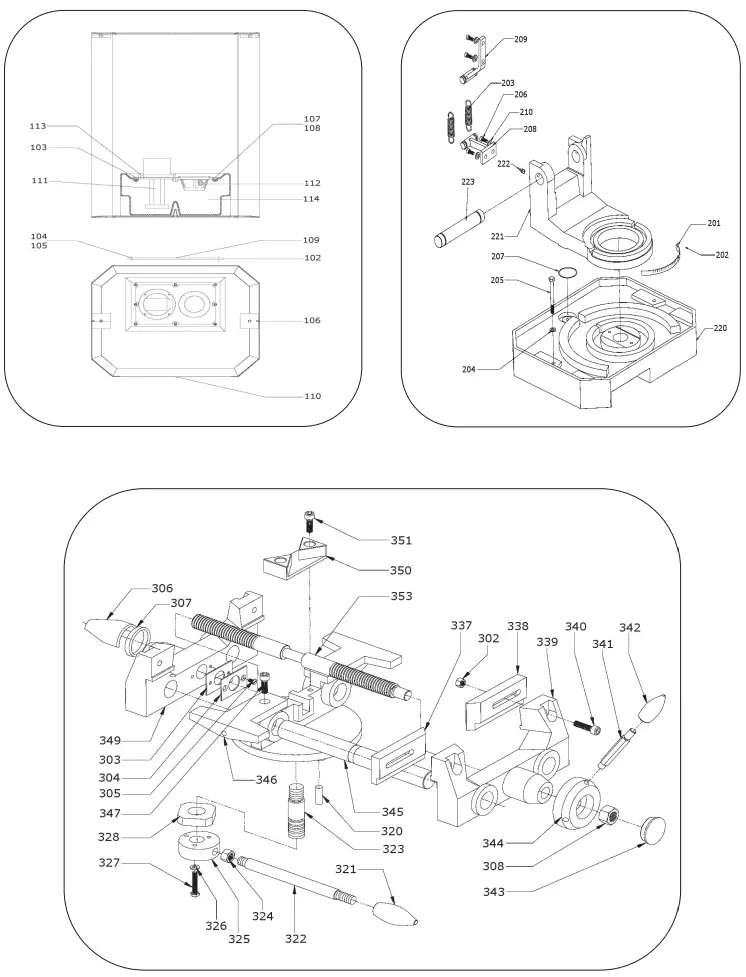
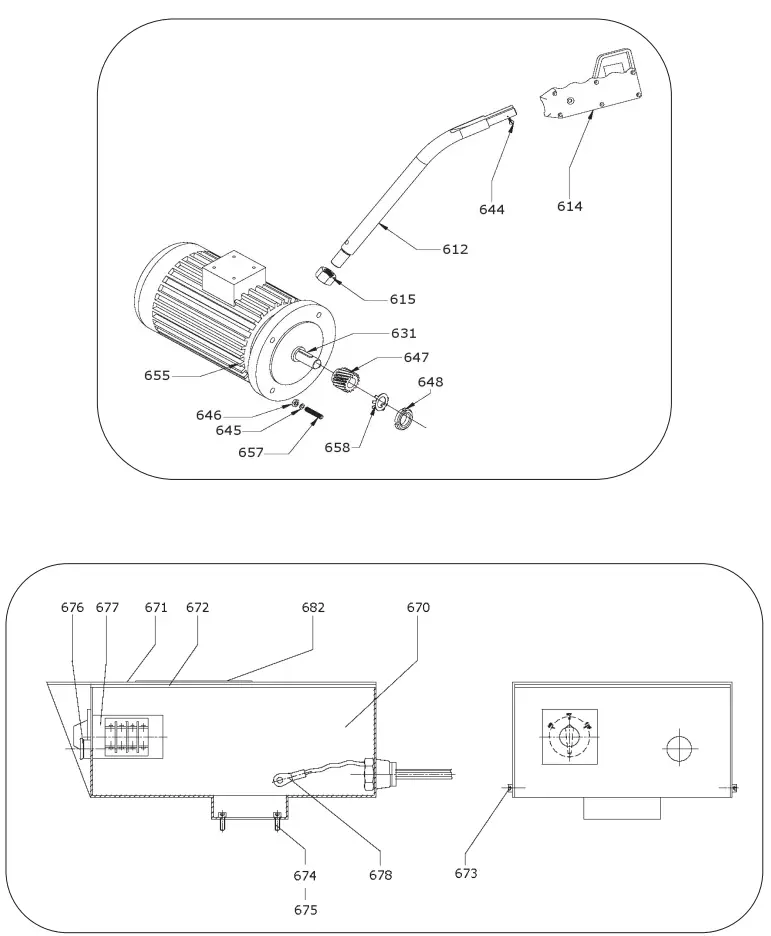
PARTS LIST
| Ref. No. | Description | SIP Part No. | Ref. No. | Description | SIP Part No. |
| 102. | Cover | WK03-00100 | 305. | Bolt | WK03-00120 |
| 103. | Pump support | WK03-00101 | 306. | Rubber cover | WK03-00121 |
| 104. | Bolt M6x12 | WK04-00038 | 307. | Pipe clamp | WK03-00122 |
| 105. | Spring washer M6 | WK03-00102 | 308. | Nut | WK03-00123 |
| 106. | Bolt M10x100 | WK03-00103 | 320. | Pin | WK03-00124 |
| 107. | Bolt M6x12 | WK04-00038 | 321. | Mitre handle knob | WK03-00125 |
| 108. | Spring washer M6 | WK03-00102 | 322. | Mitre handle | WK03-00126 |
| 109. | Electrical label | WK03-00104 | 323. | Shaft | WK03-00127 |
| 110. | General label | WK03-00105 | 324. | Nut | WK03-00128 |
| 111. | Coolant pump | WK04-00313 | 325. | Tensioning nut | WK03-00129 |
| 112. | Coolant tank filter | WK03-00106 | 326. | Nut | WK03-00130 |
| 113. | Bolt M6x12 | WK04-00038 | 327. | Bolt | WK03-00131 |
| 114. | Coolant tank | WK04-00020 | 328. | Pressure plate | WK03-00132 |
| 201. | Angle scale | WK03-00107 | 337. | Front vice jaw left | WK03-00133 |
| 202. | Rivet | WK03-00108 | N/A | Rear vice jaw right | WK03-00133 |
| 203. | Spring | WK03-00109 | 338. | Front vice jaw right | WK03-00134 |
| 204. | Washer M10 | WK04-00046 | N/A. | Rear vice jaw left | WK03-00134 |
| 205. | Bolt M10x100 | WK03-00103 | 339. | Front vice jaw holder | WK03-00135 |
| 206. | Nut M10 | WK04-00052 | 340. | Cap head bolt | WK03-00136 |
| 207. | Base mesh filter | WK03-00110 | 341. | Vice handle | WK03-00137 |
| 208. | Spring fixed plate | WK03-00111 | 342. | Vice handle knob | WK03-00138 |
| 209. | Spring fixed plate | WK03-00112 | 343. | Plastic cover | WK03-00139 |
| 210. | Washer | WK03-00113 | 344. | Handle boss | WK03-00140 |
| 220. | Base | WK03-00114 | 345. | Guide shaft | WK03-00141 |
| 221. | Swivel base | WK03-00115 | 346. | Vice base | WK03-00142 |
| 222. | Grease nipple | WK03-00116 | 347. | Cap head bolt | WK03-00143 |
| 223. | Swivel base shaft | WK03-00117 | 349. | Rear vice jaw holder | WK03-00144 |
| 302. | Nut M10 | WK04-00052 | 350. | Support block | WK03-00145 |
| 303. | Ring | WK03-00118 | 351. | Cap head bolt | WK03-00146 |
| 304. | Plate | WK03-00119 | 353. | Vice shaft | WK03-00147 |
| 305. | Bolt | WK03-00120 | 401. | Ring | WK03-00148 |
| Ref. No. | Description | SIP Part No. | Ref. No. | Description | SIP Part No. |
| 402. | Bolt | WK03-00149 | 441. | Blade shaft | WK03-00180 |
| 403. | Bolt | WK03-00150 | 442. | Blade flange | WK03-00181 |
| 404. | Nut | WK03-00151 | 443. | Blade bolt | WK03-00182 |
| 405. | Oil sight glass | WK03-00152 | 450. | Stopper | WK03-00183 |
| 406. | Needle bearing | WK03-00153 | 451. | Ring | WK03-00184 |
| 407. | Circlip | WK03-00154 | 471. | Gasket | WK03-00185 |
| 409. | Stopper | WK03-00155 | 473. | Screw | WK03-00186 |
| 410. | Bearing | WK03-00156 | 501. | Fixed blade guard | WK03-00187 |
| 416. | Key for worm shaft | WK03-00157 | 502. | Large movable blade guard | WK03-00188 |
| 418. | Ring | WK03-00158 | 503. | Small moveable blade guard | WK03-00189 |
| 419. | Dowel pin | WK03-00159 | 504. | Ring | WK03-00190 |
| 421. | Drain bolt | WK03-00160 | 505. | Guard rod | WK03-00191 |
| 422. | Oil seal | WK03-00161 | 506. | Washer | WK03-00192 |
| 423. | Nut | WK03-00162 | 507. | Coolant tap | WK03-00193 |
| 424. | Gear | WK03-00163 | 508. | Pivot pin | WK03-00194 |
| 425. | Spacer ring | WK03-00164 | 510. | Bush | WK03-00195 |
| 426. | Cap head bolt | WK03-00165 | 511. | Circlip | WK03-00196 |
| 427. | Stop ring | WK03-00166 | 512. | Guard rod | WK03-00197 |
| 428. | Lock ring | WK03-00167 | 513. | Bracket | WK03-00198 |
| 429. | Bearing | WK03-00168 | 514. | Washer | WK03-00199 |
| 430. | Ring | WK03-00169 | 515. | Cap head bolt | WK03-00200 |
| 431. | Bearing | WK03-00170 | 518. | Lever rod | WK03-00201 |
| 432. | Worm shaft | WK03-00171 | 519. | Bolt | WK03-00202 |
| 433. | Head | WK03-00172 | 521. | Ring | WK03-00203 |
| 434. | Worm wheel | WK03-00173 | 522. | Coupling rod | WK03-00204 |
| 435. | Bush | WK03-00174 | 525. | Coolant hose | WK03-00205 |
| 436. | Circlip | WK03-00175 | 612. | Head handle | WK03-00206 |
| 437. | O-ring | WK03-00176 | 614. | Micro switch c/w handle | WK03-00037 |
| 438. | Cap head bolt | WK03-00177 | 615. | Head handle nut | WK03-00207 |
| 439. | Bearing block | WK03-00178 | 631. | Motor shaft key | WK03-00208 |
| Ref. No. | Description | SIP Part No. | Ref. No. | Description | SIP Part No. |
| 645. | Washer | WK03-00210 | 674. | Bolt M5x12 | WK04-00093 |
| 646. | Nut | WK03-00211 | 675. | Spring washer | WK03-00218 |
| 647. | Pinion | WK03-00212 | 676. | Emergency stop button | WK03-00089 |
| 648. | Lock nut | WK03-00213 | 677. | Switch | WK03-00219 |
| 655. | Motor | WK03-00214 | 678. | Earth connector | WK03-00220 |
| 657. | Motor bolt | WK03-00215 | 682 | Label | WK03-00221 |
| 658. | Stop ring | WK03-00216 | N/A | Inline filter | WK03-00095 |
| 670. | Electrical box | WK03-00090 | N/A | QF1, 2, 3 Breaker | WK04-00149 |
| 671. | Electrical box cover | WK03-00091 | N/A | Contactor CN6 | WK04-00150 |
| 672. | Electrical box cover gasket | WK03-00092 | N/A | Relay | WK04-00152 |
| 673. | Screw M4x10 | WK03-00217 | N/A | Transformer | WK04-00153 |
Declaration of Conformity
Declaration of Conformity
We
SIP (Industrial Products) Ltd
Gelders Hall Road
Shepshed
Loughborough Leicestershire
LE12 9NH England
As the manufacturer within the UK, England, Scotland & Wales, declare that the
SIP 12″ Industrial Circular Saw 3ph – SIP Part No. 01565
Conforms to the requirements of the following regulation(s), as indicated.
Electrical Equipment (Safety) Regulations 2016
Electromagnetic Compatibility Regulations 2016
Supply of Machinery (Safety) Regulations 2008
Restriction of the Use of certain Hazardous Substances in Electrical and
Electronic Equipment (RoHS) – Directive 2002/95/EC
And the relevant attributed standard(s), including
BS EN 55014-1:2006+A1+A2
BS EN 55014-2:1997+A1+A2
BS EN 61000-3-2:2006+A1+A2
BS EN 61000-3-3:2008
![]() Signed:
Signed:
Mr P. Ippaso Managing DirectorSIP (Industrial Products) Ltd
Date: 07MAY2022
Declaration of Conformity
Declaration of Conformity
We
SIP (Machinery Europe) Ltd
ASM Chartered Accountants
First Floor Block One
Quayside Business Park
Dundalk
County Louth
Republic of Ireland
As the manufacturer’s authorised representative within the EC declare that the
12” Industrial Circular Saw 3PH – SIP Part. No. 01565
Conforms to the requirements of the following directive(s), as indicated.
| 2014/35/EU | Low Voltage Directive |
| 2006/42/EC | Machinery Directive |
| 2014/30/EU | EMC Directive RoHS |
| 2002/95/EC & 2011/65/EU | Directive |
And the relevant harmonised standard(s), including:
EN 55014-1:2006+A1+A2
EN 55014-2:1997+A1+A2
EN 61000-3-2:2006+A1+A2
EN 61000-3-3:2008
![]() Signed:
Signed:
Mr P. Ippaso – Managing Director
SIP (Industrial Products) Ltd
Date: 07MAY2022
![]() Please dispose of packaging for the product in a responsible manner. It is suitable for recycling. Help to protect the environment, take the packaging to the local amenity tip and place into the appropriate recycling bin.
Please dispose of packaging for the product in a responsible manner. It is suitable for recycling. Help to protect the environment, take the packaging to the local amenity tip and place into the appropriate recycling bin.![]() Never dispose of electrical equipment or batteries in with your domestic waste. If your supplier offers a disposal facility please use it or alternatively use a recognised re- cycling agent. This will allow the recycling of raw materials and help protect the environment.
Never dispose of electrical equipment or batteries in with your domestic waste. If your supplier offers a disposal facility please use it or alternatively use a recognised re- cycling agent. This will allow the recycling of raw materials and help protect the environment.
FOR HELP OR ADVISE ON THIS PRODUCT PLEASE CONTACT YOUR DISTRIBUTOR,
OR SIP DIRECTLY ON:
TEL: 01509500400
EMAIL: [email protected] or [email protected]
www.sip-group.com
Ref: 07MAY2022 version 2


