
![]() NQ623BDT
NQ623BDT
User Manual 
DIGITAL MEDIA RECEIVER
WARNINGS & PRECAUTIONS
To avoid risk of serious injury or possble violation of laws, please read the following thoroughly before installation or connecting.
- This product is designed specifically for use with 12 volt, negative ground electrical systems only.
- Having the wiring and installation done by an expert.
Be sure to diconnect the cable from the negative battery terminal while installation. - This apparatus shall not be exposed to dripping or splashing, and no object filled with liquids shall be placed on the apparatus.
- Fuses shall be replaced only with the correct type and fuse value, and only when the apparatus is powered off.
- To prevent a short circuit, never put or leave any metallic objects (such as coins or metallic tools) inside the unit.
- Never set the volume of this product so high that you cannot hear outside traffic and emergency vehicles.
PRODUCT FEATURES
| Panel LCD Key Light Bluetooth Bluetooth Music DSP EQ Pre—Output Max Power DRC Xbass Xover 3D Surround Time alignment Q Value Subwoofer Control Playback Interface Phase Listening bit setting Slope PAC™ —SWI Remote Microphone Radio APP Control Charge Audio Format | Fixed 2-Line VA-LCD Multi Color Version 5.0 Support Built-in 40 band,8 Preset 6CH x 4V 4 x 50W Support Support Support Support 0-20 ms 1-20 Support TF&USB 0° —180° Support 0dB—24dB Support Support Built-in and External Preset 18FM,12AM, RDS iOS and Android Phone Front USB 1A MP3,WMA,AAC,FLAC,APE |
ACCESSORY LIST
Please check the following accessories after opening the package: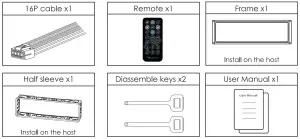
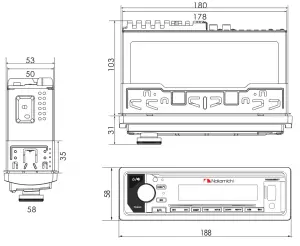
DIMENSION (UNIT: MM)
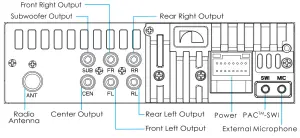
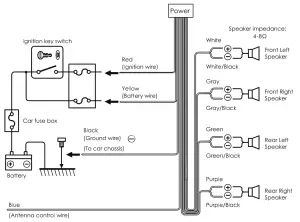
WIRING DIAGRAM
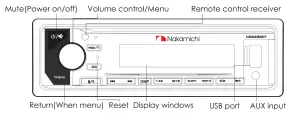
BASIC FUNCTIONS OF PANEL KEYS
To | Radio status | USB/TF/BT MUSIC Status |
| Seek a station manually | Previous/Next track |
1 | Prestel | Playback/Pause |
INT 2 | Preset2 | Intro Playback |
3 RET | Preset3 | Repeat Playback |
ROM 4 | Preset4 | Random Playback |
| 5 | Preset5/Preset6 | Previous/Next folder |
| Band select | ||
| Press to mute, press and hold to power off | ||
| Press to turn on voice, Press an hold to auto memory | ||
| Press to select a source/Answer call Press an hold to last call | ||
| EQ | Press to EQ settings | |
| DISP | Press to meter 8 shows the time | |
REMOTE OPERATION
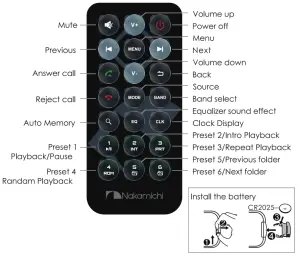
Basic Operołion
| To | Operation (panel) |
| Power on | Press any button |
| Power off | Press and hold |
| Mute | Press |
| Volume up and down | Turn the knob |
| Source select | Press |
| Menu | Press the knob |
| Return | Press |
| Turn on voice | Press |
RADIO OPERATION
Stort Listening
| To | Operation (panel) | Remark |
| Auto memory | Press and hold 6 | 18 FM / 12AM |
| Band selection | Press | FM1/FM2/FM3/AM1/AM2 |
| Seeka station manually | Press | |
| Search the next or previous frequency step by step | Press and hold | |
| Store a station | Press and hold 1-6 |
TUNER SETTINGS
1. Press the knob to enter the [MENU].
2. Turn the knob to select [TUNER], then press the knob.
Turner Settings List
| Menu | Adjustment | |
| TUNER | STEREO/MONO | NEWS/AFFAIRS/INFO/SPORT EDUCATE/DRAMA/CULTURE SCIENCE/VARIED/POP M/ROCK MEASY M/LIGHT M/CLASSICS OTHER M/WEATHER/FINANCE CHILDREN/SOCIAL/RELIGION PHONE IN/TRAVEL/LEISURE JAZZ/COUNTRY/NATION M OLDIES/FOLK M/DOCUMENT |
| DX/LOCAL | ||
| REGIONAL EUROPE/USA/ASIA/RUSSIzr | ||
| RDS OFF/ON | ||
| TA OFF/ON AF ON/OFF EON OFF/ON PTY OFF/ON | ||
Stereo/Mono Select
Turn the knob to select [STEREO or MONO], then turn the knob select [STEREO/MONO].
DX/Local Select
Turn the knob to select [LOC or DX], then turn the knob select [DX /LOCAL].
Remark: DX: Distant exchange
Tuner Area Select
Turn the knob to select [REGIONAL], then turn the knob to select [ASIA/OIRT/EUR/USA].
RDS ON/OFF
Turn the knob to select [RDS OFF], then turn the knob to select [RDS OFF, ON].
USB&SD PLAYBACK
| To | Operation (panel) |
| Track selection Fast playback | Press Press and hold |
| Playback/Pause | Press 1/ |
| Track pre-play | Press INT 2 |
| Repeat playback | Press 3 RPT • REPEAT ONE. REPEAT DIR. REPEAT ALL |
| Random playback | Press RDM 4 • ON/OFF |
| Folder selection | Press 5 |
SUPPORTED AUDIO PLAYBACK LIST
| Audio | Stream | Sampling Rote | Remark |
| MP3 | 32kbps-384kbps | 8/11.025/12/16/22.05 24/32/44.1/48KHz | MPEG1/2/2.5 Layer II&III |
| WMA | 0kbps—320kbps | 8/11.025/12/16/22.05 24/32/44.1/48KHz | WMA standard 4/4/1/7/8/9.1 |
| APE | all bitrates allowed | 8/16/22.05/24/32 44.1/48KHz | PCM Bit width 8/12/16/24bits |
| FLAC | all bitrates allowed | 8/16/22.05/24/32 44.1/48/96KHz | PCM Bit width 8/12/16/24bits |
| AAc | all bitrates allowed | 8/11.025/12/16/22.05 24/32/44.1/48KHz | MPEG2/4 AAC LC profile |
| M4A | all bitrates allowed | 8/11.025/12/16/22.05 24/32/44.1/48KHz | BO/EC 144913 Amd1:2003 |
| wAv | 32kbps-384kbps | 8/11.025/12/16/22.05 24/32/44.1/48KHz | 4 bit ADPCM only |
SUPPORTED DEVICES
| Device | Maximum capacity | Device format |
| USB | 256GB | FAT16/FAT32/exFAT |
| Micro SD/TF | 256GB | FAT16/FAT32/exFAT |
BLUETOOTH OPERATION
Bluetooth Pairing
The first time pair mobile phone with receiver, please follow below steps:
- When there is no pairing, in any mode, the BT1 on the LCD will flash, and the pairing can be performed at this time.
- Turn on the phone’s Bluetooth to Search NQ623BDT.
- Click on the NQ623BDT on the phone to connect. After the connection is successful, the BT1 will stop flashing.
- When pairing is complete, the mobile phone audio will automatically transfer to the car audio system whenever a call is made or received, or when the mobile phone plays music.
Note:
For more details of Bluetooth pairing, please refer to the owner’s manual for your mobile phone.
Bluetooth Basic Operation
| To | Operation (panel) |
| Make a call | Bluetooth mobile phone connected |
| Answera call | Press |
| Reject an incoming call | Press an hold |
| Switch between the current caller and a caller on hold | Press |
| End a call | Press an hold |
| Adjust call volume | Turn on the knob |
Bluetooth Music Operation
| To | Operation (panel) |
| Previous track | Press |
| Next track | Press |
| Playback/Pause | Press 1/ |
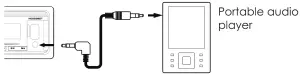
AUX INPUT
- Connecta portable audio player (commercially available)
Auxiliary input jack Auxiliary input jack
3.5mm stereo mini-plug with “L” shaped connector.
(commercially available). - Press [
 /MOD]buttons to select AUX IN.
 - Turn on the portable audio player and start playback.
 Auxiliary input jack
EXTERNAL MICROPHONE
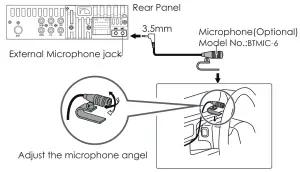
Note:
Since the panel microphone is far from the driver’s position, when using an external microphone, you can get better voice calls.
AUDIO SETTINGS
- Press the knob to enter the [MENU].
- Turn the knob to select [AUDIO], then press the knob.
Audio Settings List
| Menu | Adjustment |
| SW LEVEL | SVOL-8∼+8 |
| PRESET EQ | USER/NATURAL/POP/CLASSIC/ROCK/JAZZ/FLAT/SUPER BASS |
| 30Hz/60Hz/80Hz/100Hz/120Hz/160Hz/250Hz/400Hz 600Hz/ 800Hz/1 KHz/1.5KHz/2KHz/ 2.5KHz/3KHz/3.5K/4K 4.5K/5K/5.5K/ 6K/6.5K/7K/7.5K/8K/8.5K/9K/9.5K/10K/11K /12K/ 13K/14K/15K/15.5K/16K/17K/18K/19K/20K | |
| XBASS | FREQ OFF/60Hz/80Hz/120Hz/160Hz/200HZ/300HZ |
| GAIN 0∼10 | |
| SURROUND | OFF/ON (3D SURROUND) |
| DRC | GAIN 0∼5 |
| SLOPE 0/6dB/12dB/18dB/24dB | |
| LOUD | OFF/ON |
| BASS | BASS -7 ∼+7 |
| TREBLE | TREBLE -7 ∼+7 |
| BALAN | BALAN L7-L0,0, R1-R7 (BALANCE) |
| FADER | FADER R7-R0,0,F1-F7 |
| AUDIO RESET | NO/YES |
Subwoofer Volume Adjustment
- Turn the knob to select [SW LEVEL],then press the knob.
- Turn the knob to adjustment SVOL [ -8 to +8].
Preset EQ Select
- Turn the knob to select [PRESET EQ ],then press the knob.
- Turn the knob to select [USER/NATURAL/POP/CLASSIC/ROCK/ JAZZ/FLAT/SUPER BASS].
User EQ Setup
- Turn the knob to select [PRESET EQ ],then press the knob.
- Turn the knob to select [USER],then press the knob.
- Turn the knob to select the frequency for adjustment.
X-BASS Adjustment
- Turn the knob to select [XBASS],then press the knob.
- Turn the knob to adjustment [0-20].
AUDIO SETTINGS
- Press the knob to enter the [MENU].
- Turn the knob to select [AUDIO],then press the knob.
3D Surround Setup
- Turn the knob to select [SURROUND], then press the knob.
- Turn the knob to select [OFF/ON].
DRC Gain adjustment
- Turn the knob to select [DRC], then press the knob.
- Turn the knob to select [GAIN],then press the knob.
- Turn the knob to adjustment[0-5].
Remark:
DRC: Dynamic range compression.
Can make small signals louder and stronger, and make high-amplitude signals undistorted.
DRC Slope Select
- Turn the knob to select [DRC],then press the knob.
- Turn the knob to select [SLOP],then press the knob.
- Turn the knob to select [0DB/6DB/12DB/24DB].
Loudness Setup
- Turn the knob to select [LOUND],then press the knob.
- Tum the knob to select [OFF/ON].
Bass Adjustment
- Turn the knob to select [BASS],then press the knob.
- Turn the knob to adjustment [-7 to +7].
Treble Adjustment
- Tum the knob to select [TREBLE],then press the knob.
- Turn the knob to select [ -7 to +7].
Balance Adjustment
- Turn the knob to select [BALAN],then press the knob.
- Turn the knob to select [ L7-L0 toRl-R7].
Fader Adjustment
- Turn the knob to select [FADER],then press the knob.
- Turn the knob to select [ R7-R0 toFl-F7].
Audio Setup Reset
- Turn the knob to select [AUDIO RESET,then press the knob.
- Turn the knob to select [NO/YES].
SUBWOOFER XOVER SETUP
- Press the knob to enter the [MENU].
- Turn the knob to select [X/OVER],then press the knob.
- Turn the knob to select [SUB SET],then press the knob.
Subwoofer Xover List
| Menu | Adjustment | |
| SUBSET | SW FREQ | OFF/30Hz/60Hz/80Hz/100Hz/120Hz, 150Hz/180Hz/200Hz/250Hz/300Hz |
| SW PHASE | NORMAL/REVERSE | |
| SW GAIN | 0-5 | |
| SW SLOPE | 0dB/6dB/12dB/18dB/24dB | |
Subwoofer Frequency Setup
- Turn the knob to select [SW FREQ ], then press the knob.
- Turn the knob to select frequency[OFF/30Hz/60Hz/80Hz/100Hz/120Hz 150HZ/180HZ/200H/250HZ/300HZ ].
Subwoofer Phose Setup
- Turn the knob to select [SW PHASE], then press the knob.
- Turn the knob to select [NORMAL/REVERSE].
Subwoofer Goin Setup
- Turn the knob to select [SW GAIN], then press the knob.
- Turn the knob to select [0-5].
Subwoofer Slope Setup
- Turn the knob to select [SW LPF SLOPE], then press the knob.
- Turn the knob to select [0dB/6dB/12dB/18dB/24dB].
DTA SETTINGS
- Press the knob to enter the [MENU].
- Turn the knob to select [DTA SET], then press the knob.
DTA Settings List
| Menu | Adjustment | |
| CAR TYPE | SMALL/MEDIUM /LARGE | |
| POSITION | USER/FRONT R/FRONT L/CENTER | |
| UNIT | CM/MS/INCH | |
| DISTANCE | F LEFT | FL 0-680CM |
| F RIGHT | FR 0-680CM | |
| R LEFT | RL 0-680CM | |
| R RIGHT | RR 0-680CM | |
| SUBWOOFER | SUB 0-680CM | |
| DTA RST | NO/YES | |
Cor Type Things
- Turn the knob to select [CAR TYPE], then press the knob.
- Turn the knob to select [SMALL /MEDIUM /LARGE].
Listening Position Settings
- Turn the knob to select [POSITION], then press the knob.
- Turn the knob to select [USER/FRONT R/FRONT L/CENTER].
Delay Unit Settings
- Turn the knob to select [UNIT], then press the knob.
- Turn the knob to select [CM/MS/INCH].
DSP Reset
- Turn the knob to select [DTA RST], then press the knob.
- Turn the knob to select [NO/YES].
TIME ALIGNMENT(DISTANCE)
- Press the knob to enter the [MENU].
- Turn the knob to select [DTA SET], then press the knob.
- Turn the knob to select [DISTANCE], then press the knob.
- Turn the knob to select[F LEFT/F RIGHT/R LEFT/R RIGHT/SUBWOOFER] to adjustment.
Determining the value for<Position> adjustment.
- Determine the center of the currently set listening position as the reference point.
- The adjustable speaker has five directions: front left, front right, back left, back right, and back.
- The time for the speakers in the five directions to reach the center is the same by default.
- Set the value for each speaker, the delay ranpe: 0-20ms
- Adjust the increase or decrease of each speaker, 0.2ms each time.
Example: When <back> is selected as the listening position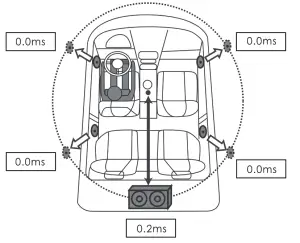
CLOCK ANDDATE SETTINGS
- Press the knob to enter the [MENU].
- Turn the knob to select [CLOCK], then press the knob.
Clock And Dote Settings List
| Menu | Adjustment |
| CLK FROM | 12H/24H |
| CLK ADJ | 00:00 |
| DATE FRMT | DD—MM—YY/MM—DD—YY |
| DATE SET | 17/07/21 |
Clock Format Settings
- Turn the knob to select [CLK FRMT], then press the knob. 2. Turn the knob to select [12H/24H].
Clock Adjust
- Turn the knob to select [CLK ADJ], then press the knob.
- Turn the knob to adjustment. 3. Press the knob to switch the clock/minute adjustment.
Date Format Settings
- Turn the knob to select [DATE FORMAT], then press the knob.
- Turn the knob to select [DD-MM-YY/MM-DD-YY].
Date Settings
- Turn the knob to select [DATE SET], then press the knob.
- Turn the knob to adjustment.
- Press the knob to switch day/month/year adjustment.
DISPLAY SETTINGS
Display Settings List
| Menu | Adjustment |
| COLOR SEL | AUTO/RED/GREEN/BLUE/YELLOW/ CYAN/PURPLE/WHITE |
| SPECTRUM | OFF/ON |
| ID3 TAG | OFF/ON |
| VERSION | VER 2.0 |
DISPLAY SETTINGS
- Press the knob to enter the [MENU].
- Turn the knob to select [DISPLAY], then press the knob.
Key Light Select
- Turn the knob to select [COLOR SEL], then press the knob.
- Turn the knob to select a key light color: AUTO/RED/GREEN /BLUE/YELLOW/CYAN/PURPLE/WHITE(Knob Select).
Spectrum ON/OFF
- Turn the knob to select [SPECTRUM], then press the knob.
- Turn the knob to select [OFF/ON].
ID3 ON/OFF
- Turn the knob to select [lD3 TAG], then press the knob.
- Turn the knob to select [OFF/ON].
System Version
Turn the knob to select [VERSION], then press the button to query the system version information.
ANIMATION SETTINGS
- Press the knob to enter the [MENU].
- Turn the knob to select [ANIMATION], then press the knob.
- Turn the knob to select [OFF/PER 15SEC/30SEC/1MIN/2MIN/4MIN].
| Menu | Adjustment |
| ANIMATION | OFF/PER 15SEC/30SEC/1 MIN/2MIN/4MIN |
DEMO MODE SELECT
- Press the knob to enter the [MENU].
- Turn the knob to select [DEMO MODE], then press the knob.
- Turn the knob to select [OFF/ON].
| Menu | Adjustment |
| DEMO MODE | OFF/ON |
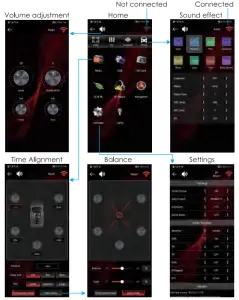
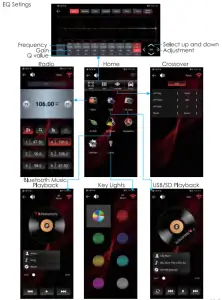
APP OPERATION
APP Download
Please go to the APPALE APP Store or Google Play Store and search [Nakamichi AMC] app, after downloading the APP, install it on your AppaIe&Android devices.
APP Connection
- Open the [Nakamichi AMC] APP, click [
 ] to search for NQ623BDT.
 - Click NQ623BDT to connect, the [
 ] will be red after the connect is successful.
APP OPERATION
TROUBLESHOOTING
| Not work Fuse blown Loose panel contact Not responding System problem No bass Subwoofer setting level is too small Can’t turn on voice Bluetooth is not connected Phone does not support voice Not playing Incorrect device format Device error Unsupported audio file Radio reception is poor Poor contact of radio antenna Poor signal at location Remote control is invalid Remote control battery is low Bluetooth call is poor Microphone is too far away | Remedy Replace the fuse: small 10A(Red) Take out the panel and reinstallReset the unit Enter AUDIO to set SVOL Connect Bluetooth Reformat Reconnect the radio antenna Replace CR2025 battery Speak into the microphone |
SPEAKER CONNECTION
Do not connect the speaker leads of the power cord to the car battery: otherwise, the unit wil be seriously damaged.
Before connecting the speak leads of the power cord to the speakers, check the speaker wiring in your car.
SPECIFICATION
| GENERAL | Operating Voltage | 14.4V(10.8V allowable) |
| Maximum Current | 10A | |
| Operational Temperature | -10° ∼+60 ° | |
| Installation Size(WxHxD) | 182mm×53mm×115mm | |
| Net Weight | 0.5kg | |
| Fuse | Small fuse 10A (Red) |
| AUDIO | Maximum Output Power | 50W×4 |
| Speaker Impedance | 4-8ohm | |
| Pre-output Level | 4V |
| RADIO | FM Frequency Range | 87.5MHz-108.0MHz |
| AM Frequency Range | 522KHz-1710KHz | |
| Preset | 18 FM,12 AM |
| USB | USB Standard | USB1.1,USB2.0 Full Speed |
| Audio Format | MP3/WMA/APE/FLAC/ AAC/M4A/WAV | |
| Front USB | Read/charge DC 5V |
| BLUETOOTH | Version | Bluetooth 5.0 |
| Frequency Range | 2.402GHz-2.480GHz | |
| Communication Range | Line of sight approx.10m | |
| Profile | HPF1.6/A2DP/AVR/SPP |
CONNECT WITH US ONLINE TO EXPLORE NAKAMICHI’S COMPLETE RANGE, INSTRUCTIONS & SOFTWARE DOWNLOADS AND WARRANTY REGISTRATION.
 http://www.nakamichicaraudio.com http://www.nakamichicaraudio.com | WWW.NAKAMICHICARAUDIO.COM
Made in China |


