
![]()
NRMS200-R7
User Manual

7″ AV RECEIVER![]() nakamichicaraudio.com
nakamichicaraudio.com ![]() Nakamichi.global
Nakamichi.global ![]() nakamichi.caraudio
nakamichi.caraudio
WARNING & PRECAUTION
To avoid the risk of serious injury or possible violation of laws, please read the following thoroughly before installation or connecting.
 | This symbol means an import ban. Failure to heed them can result in serious injury or death. |  | This symbol means important instructions. Failure to heed them can result in injury or material property damage. |
| Having the wiring and installation done by an expert. The wiring and installation of this unit require special technical skills and experience. To ensure safety, always connect the dealer where you purchased this product to have the work done. | ||
| Do not watch the video or operate the unit while driving. | | Be sure to use specified accessory parts and install them securely. |
| Do not install in the location which may hide vehicle operation, such as steering wheel or gearshift or cover of the airbag. | | Be sure to use the correct ampere rating when replacing fuses. Failure to do so may result in a fire or electric shorts. |
| Do not touch the antenna or any plugs while in a thunderstorm to avoid electric shock. | | Be sure to disconnect the cable from the negative battery terminal while installation. Failure to do so may result In electric shock or injury due to electrical shorts. |
| Do not damage wiring. Failure to do so may result in electric shock or fire due to electrical shorts. | | Be sure to connect the ‘Parking Break’ lead so that the driver can not watch the video unless the vehicle is stopped. Failure to do so may result in a traffic accident or violation of laws. |
| Do not install in locations IS)within high moisture or dusty. Moisture or dusty that penetrates into this unit may result in product failure. | | Be sure to check the Installation of the antenna regularly. Antenna dropping may result in an accident while the vehicle is running. |
PRODUCT FEATURES
|
|
FRONT PANEL
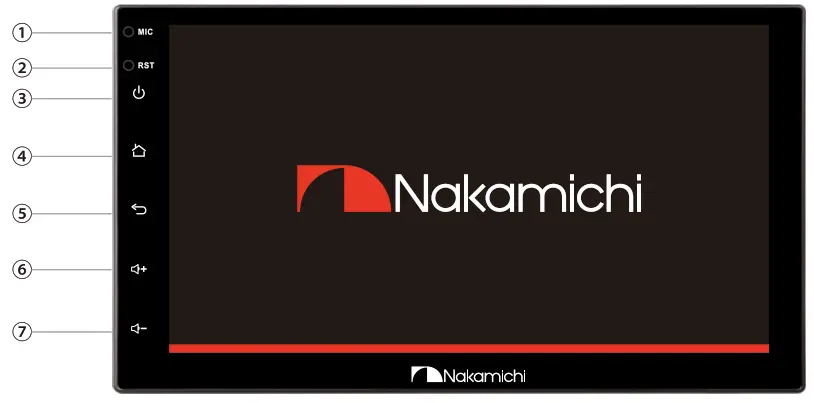
| Function | Operations &Controls |
| I. MIC 2. RST 3. Power 4. Home 5. Return 6. Volume 7. Volume | Microphone: Voice receiving position Press with a pointed object (such as a ballpoint) to reset the unit to its initial setting by the factory (default stage) In the power-on state: Press to Mute. Press and hold for more than S seconds to turn off the screen. Press to enter the main menu. Press to back to previous. Short press to increase volume. Short press to decrease volume. |
WIRING CONNECTION
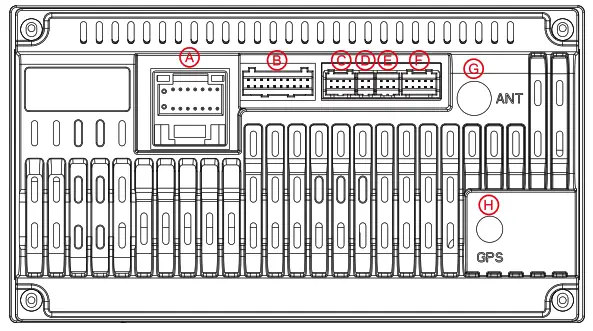 Interface A: Power Supply B: RCA Cable C: Can Interface D: 4P USB E: 6P USB F: Camera Input G: Radio Antenna H: GPS Antenna
A-Power Supply
| Cola Block Yellow Red Orange Brown while Green/Write Bile Gray/Block Grey Green/Blook Green While/Nook While Purple/Black Purple | Name Ground Wire Battery Wire Location Wire Lamp Control Wire Reverse Wire Statement Wheel Control We I Steen-in Wheel Control Wire 2 Automatic Antenna Front Right Speaker – Front Right Speaker+ Rev Left Speaker- Rea Lett Specker+ Front Lett Speaker- Front Lett Speaker+ Rear Right Speaker- Roof Right Speaker* |
B-RCA Cable
| Label VIDEO OUT VIDEO-IN-I AUXIN AUX L IN ROUT SUBWOOFER AMP CONT | Color Yellow Yellow Red white Red write Green Blue | Nome Video Output video Input Audio Left Input Audio Right Input Audio Right Output Audio Left Output Subwoofer Output Amplifier Control |
F-Camera Input
| Lobel CAMERA BRAKE | Color Yellow Yellow | Name Reversing Camera input Broke Wire |
ACCESSORY LIST
- 16P to ISO Cable I pc
- GPS Antenna I pc
- Camera Cable I pc
- RCA Cable I pc
- 4P USB Cable I pc
- 6P USB Cable I pc
- User Manual I pc
- Mounting brackets 2 cs
- Screws 5×8 4 pcs
FUNCTIONS APPLICATION
Home Page Operation
Press [![]() ] on the panel to enter the homepage, the homepage is displayed as follows:
] on the panel to enter the homepage, the homepage is displayed as follows:
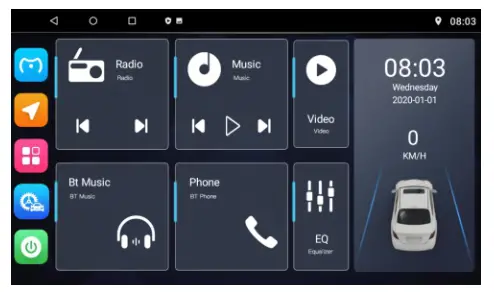
![]() Click to Phonelink
Click to Phonelink![]() Click to GPS
Click to GPS![]() Click to the secondary interface
Click to the secondary interface![]() Click to Car Setting
Click to Car Setting![]() Click to a black screen
Click to a black screen![]() Click to return
Click to return![]() Click to home
Click to home![]() Click to close applications
Click to close applications
Language selection

- Press (
 ) to enter the homepage.
 - Click [
 ]to enter the secondary interface.
 - Click
 to enter system settings.
 - Click to [Language And Input].
- Click to [Language).
- Select the corresponding language.
WIFI Connection
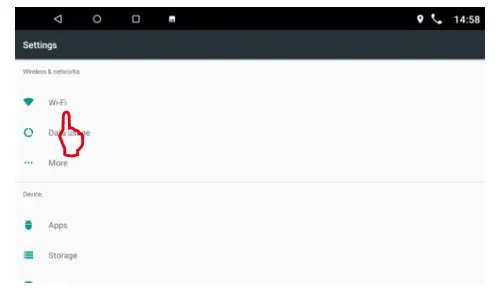
- Press [ to enter the homepage.
- Click [] to enter the secondary interface.
- Click to enter system settings.
- Click [ Wi-Fi ] to Select WLAN.
- Select the desired network to connect.
- Enter the password.
Remarks:
After the WiFi connection is successful, will be displayed in the upper right corner
FUNCTIONS APPLICATION
Radio area selection

- Press [] to enter the homepage.
- Click [
 ] to enter the car settings.
 - Press [Radio Area] to enter the corresponding radio area.
Radio Interface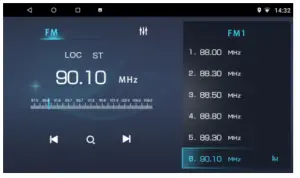
FM FMI /FM2/FM3 band switch
LOC DX/LOC Switch
ST Stereo switch ▪![]() The previous station
The previous station![]() Automatically Search
Automatically Search![]() Next station
Next station
Automatically Search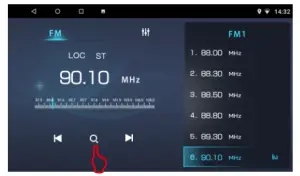
- Press [] to enter the homepage.
- Click [Radio] to enter the radio interface.
- Click [
 ]to enter the automatic search.
Remarks:
The radio stations that have been searched will be automatically saved to the number list below.
Manual Search And Storage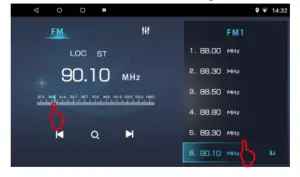
- Press [ ] to enter the homepage.
- Click [Radio] to enter the radio interface.
- Drag the progress bar to select the desired station
- After searching for your favorite radio station, press the number list on the right to store it.
FUNCTIONS APPLICATION
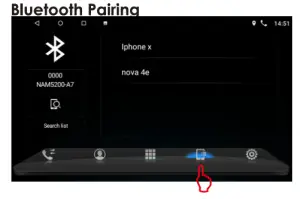
The first time pair mobile phone with AV receiver, please follow below steps:
- Press [] to enter the homepage.
- Click [ Phone] to enter the Bluetooth.
- Click [
 ] enter the Bluetooth pair interface.
Turn on the phone’s Bluetooth to search: Bluetooth is device is: NAM5200-A7. The pairing password is: 0000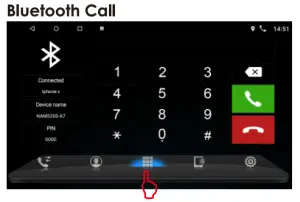
- Press [] to enter the homepage.
- Click [ Phone] to enter the Bluetooth.
- Click [
 ] to enter the Bluetooth call interface.
 Backspace
 Answer
 Hang up
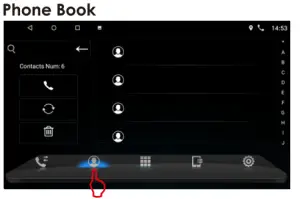
- Press [] to enter the homepage.
- Click [ Phone] to enter the Bluetooth.
- Click [
 ] to enter the phone book interface.
 Call
Call Update phone book
 Delete

- Press [] to enter the homepage.
- Click [ Phone] to enter the Bluetooth.
- Click [
 to enter the history call record interface.Call
 Call\Incoming \ MissedDelete

- Press [] to enter the homepage.
- Click [ Bt Music] to enter the blue tooth music playback interface.
 Previous track
 CII Play/Pause
 Next track

- Press [] to enter the homepage.
- Click [Music] to enter the music playback,
 Repeat playback
 EQ settings
 Update track Previous track
 Play/Pause Next track
 Playlist

- Press [] to enter the homepage.
- lick [Video] to enter the video playback.
![]() Back to playlist
Back to playlist![]() Previous video
Previous video![]() Play/Pause
Play/Pause![]() Next video
Next video![]() EQ settings
EQ settings
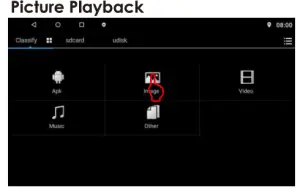
- Press [] to enter the homepage.
- Click [] to enter the secondary interface.
- Click [ File Explorer ] to enter the file management.
- Click [ Image ] to enter the picture playback,

- Press [] to enter the homepage.
- Click [ ] to enter the EQ interface.
- Select the audio gain that needs to be set.

- Press [] to enter the homepage.
- Click [] to enter the EQ interface.
- Select the sound effect you want.
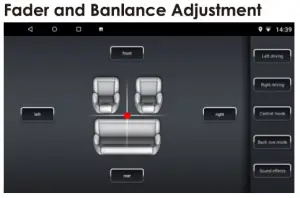
- Press [ ] to enter the homepage.
- Click [] to enter the EQ interface.
- Click [ Field ] to enter the fader and balance adjustment settings.
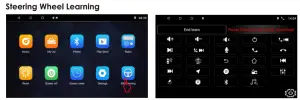
- Press [] to enter the homepage.
- Click [ ] to enter the Secondary interface.
- Click [SW Learning ] ta enter the steering wheelset.
- Press the button of the steering wheel that needs to be learned (press and hold]
- Click the required button function on the screen. (Cyan is displayed on the left after successful learning).
- Click I End learn I to save.
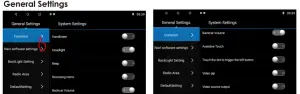
- Press [] to enter the homepage.
- Press [] to enter the car settings
- Click [Common] to the common settings
 include Handbrake, He an ad Ii g ht, Beep, Reversing mirror, Backcare Volume, Assistive Touch Video pip settings.
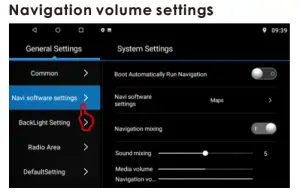
- Press [] to enter the homepage.
- Press [ ] to enter the car settings
- Click [ Novi software settings] to enter the navigation software settings.

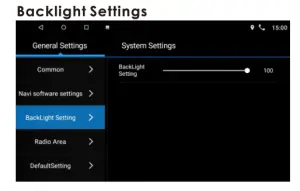
- Press [] to enter the homepage.
- Click [] to enter the car settings
- Click [Backlight Setting] to enter the backlight settings.

- Press [] to enter the homepage.
- Click [] to enter the Secondary interface.
- Click [Wallpaper] to enter the wallpaper settings.
- Select wallpaper, click to set [wallpaper].
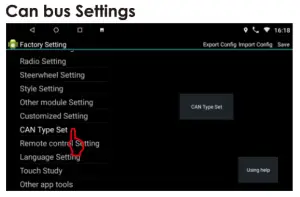
- Press [] to enter the homepage.
- Click [] to enter the car settings
- Click[System Settings] to enter the system settings.
- Click [ Factory Setting ]to enter the fact or mode setting. Password is: 16176699
- Click I CAN Type Set I to enter the car model selection.
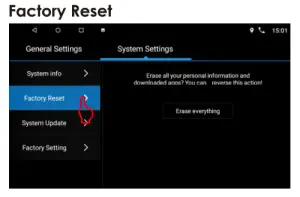
- Press [] to enter the homepage.
- Click [] to enter the car settings
- Click [System Settings] to enter the system settings.
- Click [ Factory Reset ]to enter the factory reset. Password is: 1234
Remarks: All data will be cleared after reset.
TROUBLESHOOTING
| Problem | Cause | Correct action |
| Can not power on | Check fuse | Change fuse same as the old one |
| Some factors cause MPU wrong operation | Press RET button on the panel by penpoint, then, power on | |
| Radio reception is not good | Weak signal | Move the car to another place, then research |
| GPS signal is weak | ||
| Can not watch images during driving | It’s not allowed to watch images during driving | Park the car in a safe place, put P the car stall in “P” position, pull up the hand brake, parking brake the wire must be grounded. |
| Slow response | Not enough storage space | Uninstall APK or clear FLASH space |
| Open too many APP | Click [0] in the upper left corner to close some apps |
PRECAUTIONS ON POWER SUPPLY AND SPEAKER CONNECTIONS:
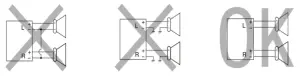
- Do not connect the speaker leads of the power cord to the cor buttery otherwise, the unit will be seriously damaged.
- BEFORE connecting the speaker leads of the power cord to the speakers, check the speaker wiring in your car.
SPECIFICATION
General
Operation Voltage: l 4.4V( l0.5- l 6V)
Installation Size: Thickness: 42mm
Operating Temperature: -10C- +60C
Storage Temperature: -20°C – +70°C
Net Weight:500g
System
Operating system: Android Nk 9. 0
DOR: l GB or 2GB
Flash : l 6GB or 32GB
Radio
FM Frequency Range: 87.5-108.0MHZ
Bluetooth
Communication System: BT4.0+EDR
Output: BT Standard Power 2 Class
Max Communication Range: 5m
Frequency Band: 2.4GHz
USB Interface
USB: Readable/ Chargeable
(5±0.25V/1A)
Audio
Max Power: 4X50W
Front Output(V): 4V / 10KQ
Pre-output impedance: <600Q
Speakers impedance: 4-802
TFT Screen Item
Size: 7″
Display Resolution: l024x600
Contrast ratio: 500
Brightness:500nit
Video
External Video Input System:
NTSC/PAL/SECAM
External Video Input: l VP-P /750
Video Format
H264/ MP4/ AVI/ MKV / FLV
Audio Format
MP3/ APE/AAC/FLAC
Note:
Specification and design; functions and features; unit illumination; color and display segment are subject to change without prior notice. Photos and drawings on the gift box or operation manual might be varied from the exact unit. Depending on the input devices operation might be varied from the operation manual described.

SCAN OUR QR CODE OR VISIT WWW.NAKAMICHICARAUDIO.COM
FOR COMPLETE AUDIO SETTINGS INSTRUCTIONS
![]() Nakamichi.global
Nakamichi.global![]() nakamichi.car audio
nakamichi.car audio
Made in China


