![]() Luvox Viewer 2 v1.0
Luvox Viewer 2 v1.0
User Manual 2022.07
![]() Searching for Keywords
Searching for Keywords
Search for keywords such as “cloud” and “firmware” to find a topic. If you are using Adobe Acrobat Reader to read this document, press Ctrl+F on Windows or Command+F on Mac to begin a search.
Navigating to a Topic
View a complete list of topics in the table of contents. Click on a topic to navigate to that section.![]() Printing this Document
Printing this Document
This document supports high-resolution printing.
Using this Manual
Legend![]() Prohibited
Prohibited![]() Important
Important![]() Hints and Tips
Hints and Tips
Reference
Purpose
This user manual describes the functions and operating environments of Livox Viewer 2, to provide users with information on the scope and methods of use as well as updates of the software. Luvox updates this user manual from time to time. Visit the Livox official website to download the latest user manual.
Term Definition
Direct connection: Connecting one end of a network cable to the Livox device and the other end to the network port.
Extrinsic parameters: They describe the conversion of data captured by a Livox device from its own coordinate system to the world coordinate system, and include six variables namely roll, pitch, yaw, x, y, and z. For the definitions of and how to calculate the parameters, see the “Calibrating Extrinsic Parameters” section.
Introduction
Luvox Viewer 2
Luvox Viewer 2 is software designed specially to display all point cloud data transmitted to a computer in real-time. Users can view, record, and store point cloud data with ease for future use.
Supported Systems
Luvox Viewer 2 is compatible with Windows 10 (64-bit) and Ubuntu 18.04 (64-bit).
System Requirements
No special configurations are required for using Livox Viewer 2, except for the graphics card of the computer due to the point cloud display function of the software. If you will be running a real-time display of point cloud data from multiple Livox LiDARs, make sure your computer is using an independent graphics card of higher specifications. The display quality of Livox Viewer 2 is positively correlated to the graphics card performance of the computer.
Getting Ready
Connecting Livox LiDAR to PC
Make sure the Livox device is plugged into a 12V power source. If you are using a Livox HAP, connect the device directly to the network port on the PC with a network cable.
- The above connection method only works with Livox devices whose IP address type has not been changed.
- Network cables can also be connected to a network switch or router, but make sure to differentiate between a switch and a router. If connecting to a router, plug the cable into the LAN port and not the WAN port of the router. Plugging into the wrong network port may cause the Livox device to malfunction.
- The topology of physical connections for Livox devices can be found in the user manual of the respective product.
Disabling Firewall on Computer
Due its use of a higher network port number for communication, your Livox device may be blocked by the firewall of the operating system.
Before using Livox Viewer 2, make sure to disable the firewall on your PC so that data can be transmitted smoothly from the Livox device.
Configuring IP Address on PC
When connecting your PC to a router, you need to set a dynamic IP address on your PC (“Obtain an IP address automatically” for Windows users). For connecting your PC with a Livox device, set a static IP in the IP settings of your PC, with an IP address of 192.168.1.2, subnet mask of 255.255.255.0, and default gateway of 192.168.1.1.
Checking Graphics Card Driver on PC
Before using Livox Viewer 2, make sure your PC has been installed with a compatible driver for its display adapter. If the driver malfunctions, Livox Viewer 2 may not be able to start up or may crash upon activation. Make sure that the CPU of your PC supports the AVX2 (Advanced Vector Extensions 2) instruction set (Intel users are advised to use CPUs with 8th Generation Intel® Core™ i5 or higher processors).
Using the Software
Downloading the Livox Viewer 2
Visit the Livox official website www.livoxtech.com and download the latest version of Livox Viewer 2.
For Windows users: Download and unzip the file, and open the program LivoxViewer2.exe in the root directory of the unzipped folder.
Ubuntu users: Download and unzip the file, and run the following command in the root directory of the unzipped folder: ./livox_viewer_2.sh.
Interface Introduction
Open Livox Viewer 2, and the software interface will appear. The interface consists of three parts: the toolbar, device manager, and point cloud display interface.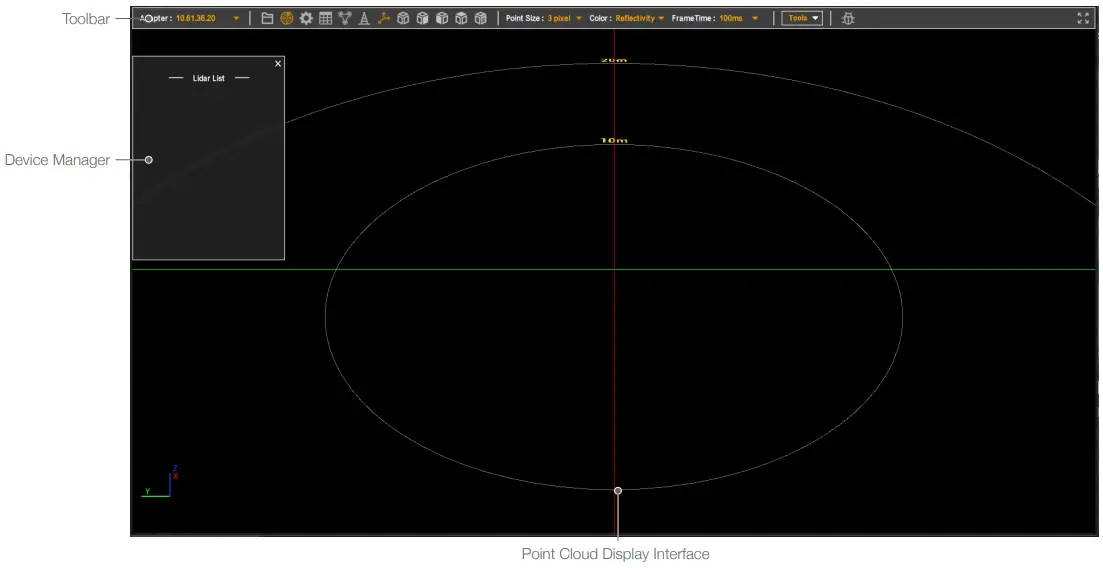
Toolbar Buttons
![]()
The functions of the toolbar buttons are as follows:
Adapter: 192.168.21.1![]() : the IP address of the adapter, which must be configured to be in the same network segment as the Livox device, in order to detect and connect to the device. After the IP address is changed, click and expand the menu, then click “Refresh” to refresh the network adapter.
: the IP address of the adapter, which must be configured to be in the same network segment as the Livox device, in order to detect and connect to the device. After the IP address is changed, click and expand the menu, then click “Refresh” to refresh the network adapter.![]() : open saved point cloud data files in lvx2 or cxv format.
: open saved point cloud data files in lvx2 or cxv format.![]() : show/hide Livox device manager.
: show/hide Livox device manager.![]() : set attribute and parameter settings for the Livox device.
: set attribute and parameter settings for the Livox device.![]() : show/hide electronic table to frame and select point clouds on the interface.
: show/hide electronic table to frame and select point clouds on the interface.![]() : show/hide extrinsic parameter calibration tools.
: show/hide extrinsic parameter calibration tools.![]() : show/hide grid coordinates.
: show/hide grid coordinates.![]() : reset the point cloud interface and display all point clouds in the center.
: reset the point cloud interface and display all point clouds in the center.![]() : Select the angle for viewing point cloud data, from right, front, top, or rear view.
: Select the angle for viewing point cloud data, from right, front, top, or rear view.
Besides clicking the icon to switch viewing angles, users can also adjust the point cloud view in the following manner:
a. Roll the scroll wheel on the mouse to zoom in/out;
b. Right-click and drag the mouse to pan across the point cloud;
c. Left-click and drag the mouse to adjust the viewing angle.![]() : set the size of the central point of the point cloud, between: 1px, 2px, 3px, 4px, or 5px.
: set the size of the central point of the point cloud, between: 1px, 2px, 3px, 4px, or 5px.![]() : set a color scheme for the point cloud, including fixed colors, or based on reflectivity, LiDAR ID, depth, or altitude (by default, point cloud will be colored according to reflectivity).
: set a color scheme for the point cloud, including fixed colors, or based on reflectivity, LiDAR ID, depth, or altitude (by default, point cloud will be colored according to reflectivity).![]() : frame integration time, which can be set as 100, 200, 500, 1000, or 3000 ms; the longer the frame integration time, the denser the point cloud image.
: frame integration time, which can be set as 100, 200, 500, 1000, or 3000 ms; the longer the frame integration time, the denser the point cloud image.![]() : point cloud file conversion and firmware upgrading tools.
: point cloud file conversion and firmware upgrading tools.![]() : debugging tools, for emailing the local operation and debugging logs to the developer of Livox Viewer 2.
: debugging tools, for emailing the local operation and debugging logs to the developer of Livox Viewer 2.![]() : full screen/window mode.
: full screen/window mode.
Livox Device Manager
In the menu bar, click![]() to open the device manager. The device manager interface is as follows:
to open the device manager. The device manager interface is as follows: 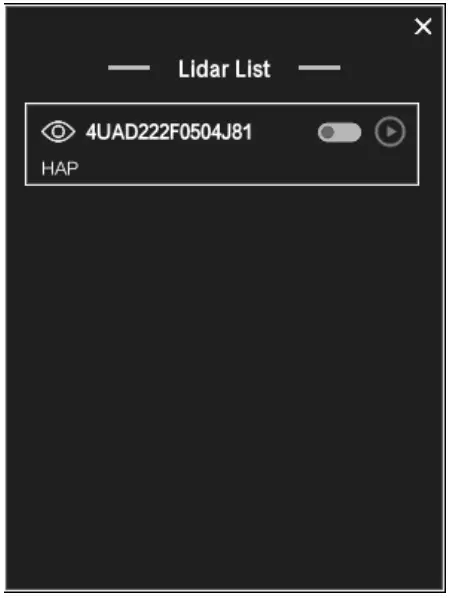
If Luvox Viewer 2 detects a linked device, the information of the device (including its serial number, device type, current status, and error code) and the relevant control buttons will appear in the window of the device manager.![]() : connect or disconnect the selected device.
: connect or disconnect the selected device.![]() : show or hide the point cloud data of the current linked device.
: show or hide the point cloud data of the current linked device.![]() : start or stop capturing data with the current linked device.
: start or stop capturing data with the current linked device.
Point Cloud Display Interface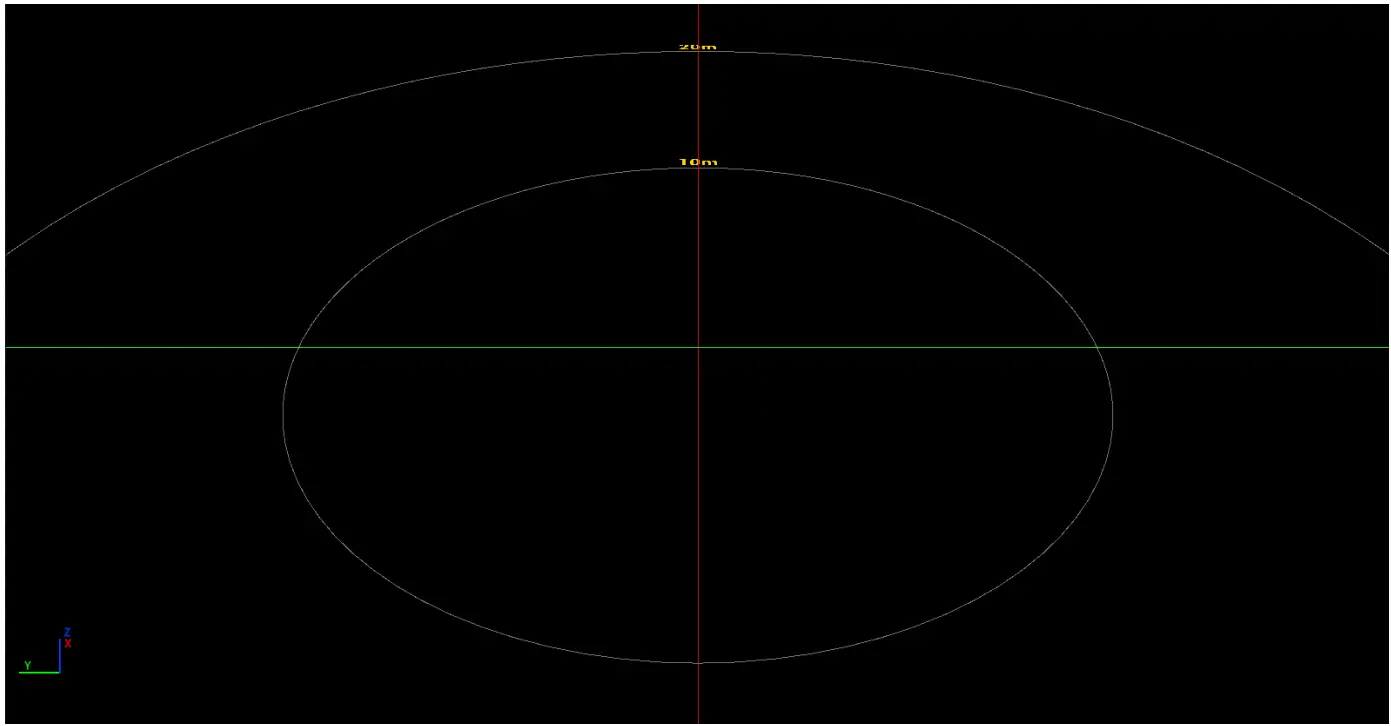
Luvox Viewer 2 will connect to a device and start capturing data, or users may open a saved point cloud recording file and the interface will display the point cloud image. In the bottom left of the point cloud interface are reference coordinates, while at the center is a distance grid that runs from 10 to 250 m.
Frequently Used Functions
The following are the frequently used functions of Livox Viewer 2.
Viewing Real-time Point Cloud Images After connecting to a Livox device, select the device whose point cloud images you would like to view from the device list in the manager.
- Click
 to connect to a device.
 - After connecting to the device, click
 to begin capturing data. The point clouds captured will be drawn on the point cloud interface
 - During the data capturing, click the record button
 to start or stop recording the point cloud data.
Playing Back Point Cloud Images
Click in the toolbar to open an lvx2 or csv point cloud file. After the file is read, the Device List interface will display information of the recording device for the lvx2 file.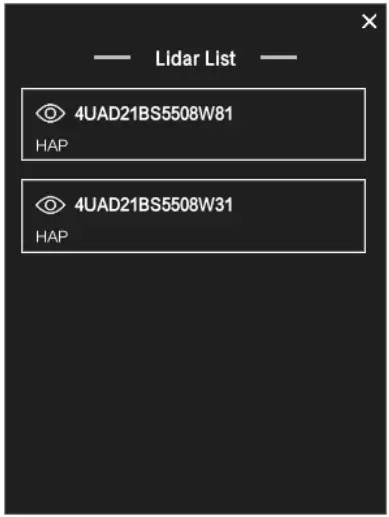
Below the toolbar is the player control bar:![]()
The functions of the player control bar are as follows:![]() : set playback speed at 0.5, 1.0, 2.0, 4.0, or 8.0 times.
: set playback speed at 0.5, 1.0, 2.0, 4.0, or 8.0 times.![]() : playback progress bar and time. Users can drag the progress bar to start playing at any point.
: playback progress bar and time. Users can drag the progress bar to start playing at any point.![]() : return to the starting point.
: return to the starting point. : go back to the previous frame.
![]() : play/stop
: play/stop![]() : move to the next frame.
: move to the next frame.![]() : jump to the end.
: jump to the end.![]() : start recording. Click again to end the recording.
: start recording. Click again to end the recording.
• When playing an lvx2 point cloud file, you can use the recording function to convert any part of the current file into a new lvx2 file.
: stop playing![]() : show/hide point cloud images of the selected Livox device.
: show/hide point cloud images of the selected Livox device.
Adjusting Device Parameters
After connecting to the![]() Livox device, click the button in the toolbar to open the parameter setting interface for the device as shown below:
Livox device, click the button in the toolbar to open the parameter setting interface for the device as shown below: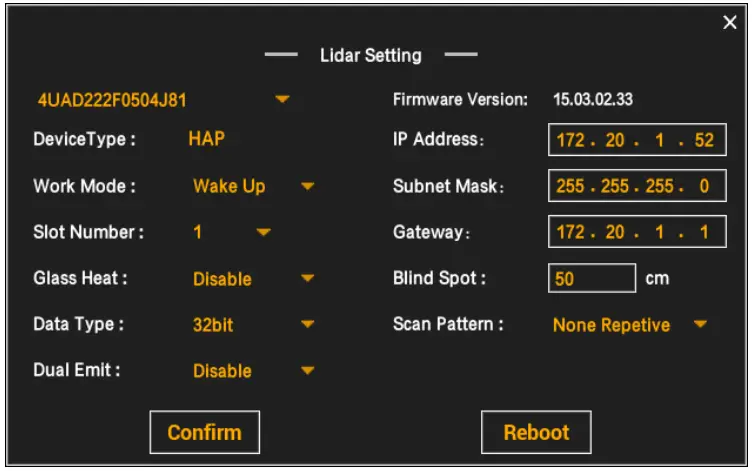
On the interface, you can view and modify the parameters of the Livox device.
Calibrating Extrinsic Parameters
Click the button in the toolbar to open the calibration tools for extrinsic parameters. The tool interface is as follows: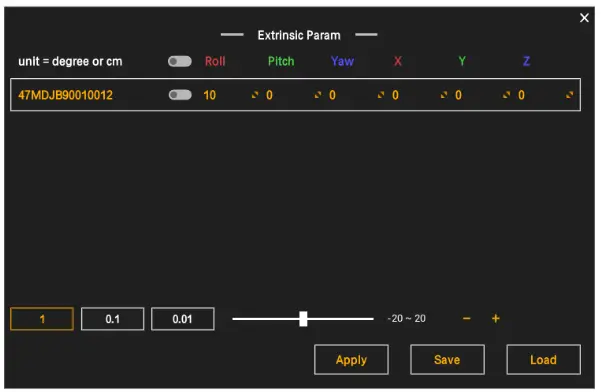
![]() : group multiple devices. The change of any extrinsic parameter will apply to all selected devices.
: group multiple devices. The change of any extrinsic parameter will apply to all selected devices.![]() : set the degree of precision for parameter adjustment, between 1, 0.1, and 0.01.
: set the degree of precision for parameter adjustment, between 1, 0.1, and 0.01.![]() : drag the bar to set the selected parameter.
: drag the bar to set the selected parameter.![]() : increase or decrease the parameter value. Each click will change the value at the current degree of the precision set.
: increase or decrease the parameter value. Each click will change the value at the current degree of the precision set.![]() : save the current set parameters into an XML file.
: save the current set parameters into an XML file.![]() : read parameters from an XML file.
: read parameters from an XML file.![]() : After adjusting the point cloud data for all devices, click Apply at the bottom of the interface, and the set parameters will be written into the Livox devices and applied to Livox Viewer 2 (only the industrial versions of Livox devices are currently supported).
: After adjusting the point cloud data for all devices, click Apply at the bottom of the interface, and the set parameters will be written into the Livox devices and applied to Livox Viewer 2 (only the industrial versions of Livox devices are currently supported).
![]() • If the user does not click Apply after completing an adjustment, Livox Viewer 2 will revert the extrinsic parameters for the devices to their pre-calibration status.
• If the user does not click Apply after completing an adjustment, Livox Viewer 2 will revert the extrinsic parameters for the devices to their pre-calibration status.
Manual Calibration of Extrinsic Parameters
- Connect the Livox device, enable data capture, and obtain point cloud data. Then click
 to open the manual calibration tools for extrinsic parameters.
 - A table will appear on the calibration interface showing the Livox device broadcast codes for all the point clouds and their corresponding extrinsic parameters. The selected point clouds and those of the same device group will turn red, while other point clouds will be white.
- Move the cursor to the parameter you wish to change (such as roll, pitch, yaw, x, y, z), and adjust the parameter by rolling the scroll wheel, left-clicking and dragging the mouse left and right, or simply entering the value you wish to set. The modified parameters will be applied in real-time on the point cloud images.
 • The degree of precision can be set at the bottom of the interface.
 - Click again to close the calibration interface. You may continue capturing point cloud data or execute other functions.
Calculating Extrinsic Parameters
The point clouds of Livox rotate in the x-y-z sequence of the Tait-Bryan angles. In this sequence, the point clouds will first rotate in the direction of the x-axis (roll) of the world coordinate system, followed by its y-axis (pitch), and finally its z-axis (yaw).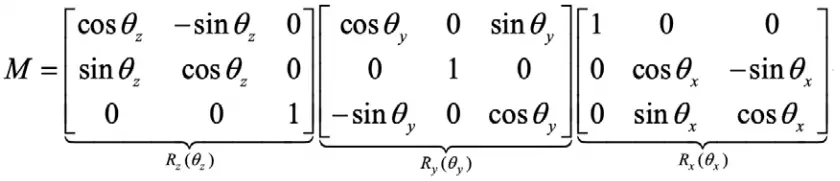
Framing and Viewing Point Cloud Data
Click![]() on the toolbar to open the electronic data table. The interface will appear as follows:
on the toolbar to open the electronic data table. The interface will appear as follows:
: enable point cloud framing. Clicking will light up the button. Left-click and drag the mouse to frame and select data, which will be displayed in a table in the lower blank space of the interface.The selected point cloud data will be displayed in red.
The statistical data for the framed and selected point clouds will be shown at the top of the table.
Save: save the framed and selected data in a csv file;
Selected points num: calculate the number of cloud points framed and selected;
Mean: calculate the mean value of the parameter;
Std: calculate the standard deviation of the parameter (1σ);
Max: calculate the maximum value of the parameter;
Min: calculate the minimum value of the parameter;
Upgrading Firmware
In the menu bar, select ![]() which will open a firmware upgrade interface as shown below:
which will open a firmware upgrade interface as shown below: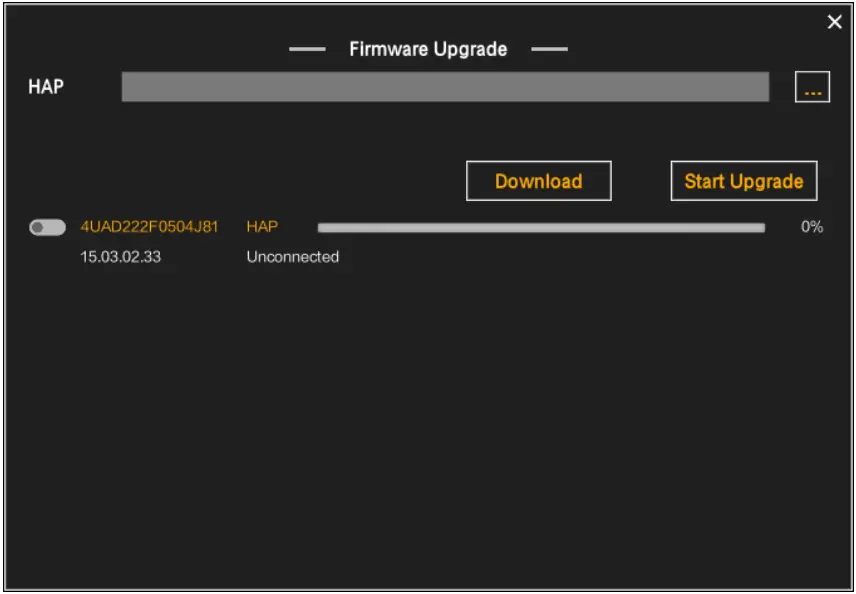
This is the firmware address option field for the specific device.
![]()
From right to left below: upgrade progress bar, device type and connection status, and device serial number.![]()
Follow the steps below to upgrade the firmware:
- Click the in the
 corresponding device bar and select a new firmware. Then click Download in the lower right corner to download the latest firmware from the official website.
 - Click the button to the left of the serial number, select the device to upgrade, and connect to the device in Lidar List.
- After connecting to the device, click Start Upgrade. The upgrade completes when the progress bar reaches 100%.
Converting
Click, ![]() and select
and select![]() File Converter to open the file converter window:
File Converter to open the file converter window: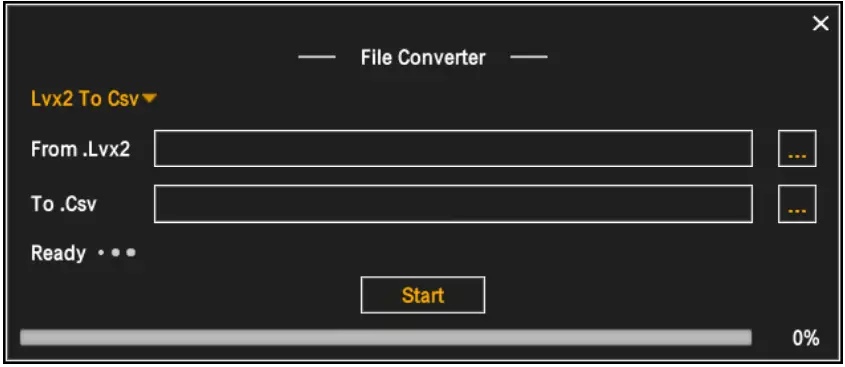
The file conversion process is as follows:
- Click
 and select your desired file types for conversion from the list (the default choice is Lvx2 To Csv).
 - Click at the top to select the source file. A target file of the same name will be created automatically in the folder of the source file. Then enter the target file address below. You may also enter the source file address manually. This will not automatically create a target file.
- Click below to select the target file to override/create, or enter a target file address manually.
- Click “Start” to start file conversion. A notification will pop up once the conversion is complete.
Reporting an Issue
Click in the toolbar to open the Debug Setting window:
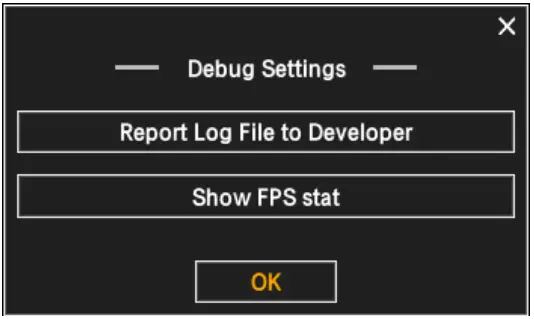
The functions of the window are as follows:
- Click Report Log File to Developer, and the Bug Report Content window will appear:
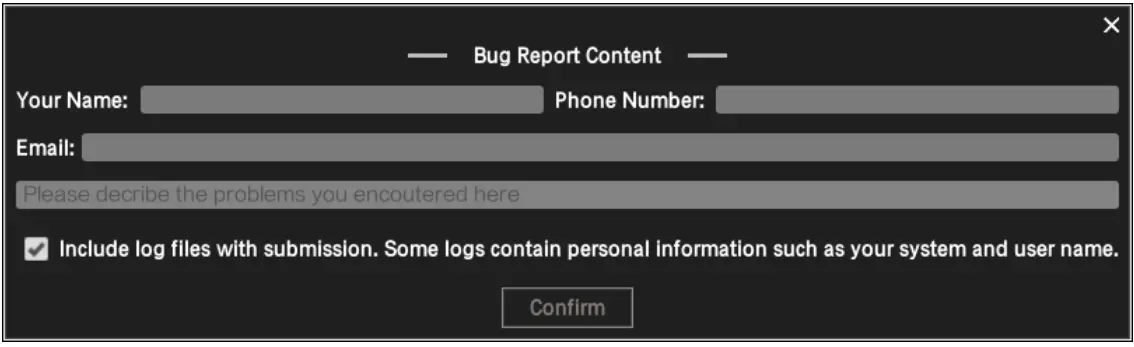
Enter your personal information and a description of the error, select whether to include log files, then click Confirm to report the issue to the developer. You will receive a notification once the report is successfully sent.
• If the software crashes, a crash log will be created. When you open the file the next time, you will be asked whether to report the issue and send the crash log file.
2. Click “Show FPS stat” to show/hide FPS data in the top right corner of the screen. The higher the FPS, the smoother the playback.
Livox and HAP are the trademarks of Livox Technology Company Limited.
Windows is the registered trademark of Microsoft Corporation and its subsidiaries.


