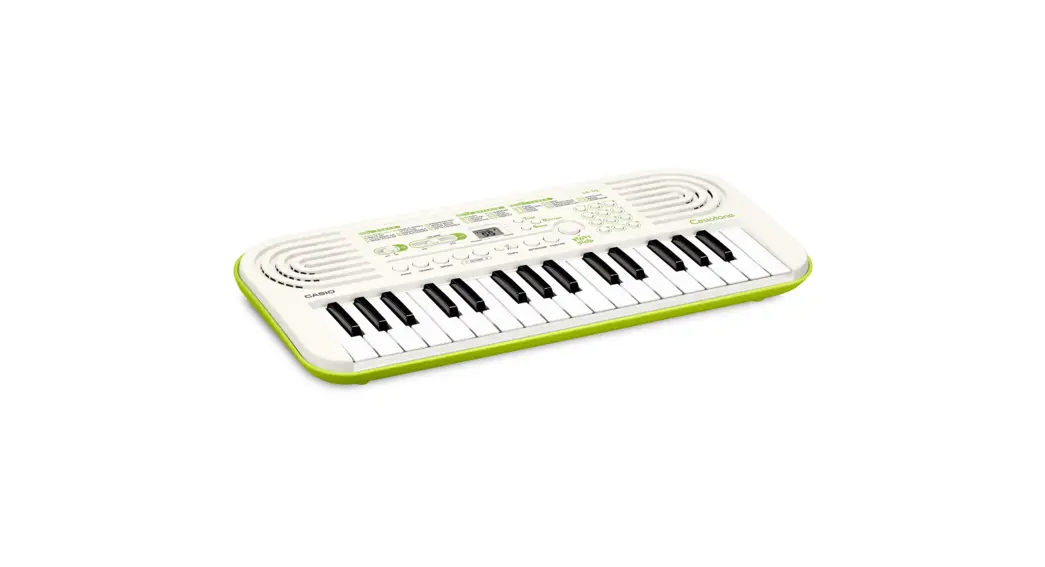
![]() SA- 50
SA- 50
SA- 51
USER’S GUIDE
Please keep all information for future reference.
 Getting Ready
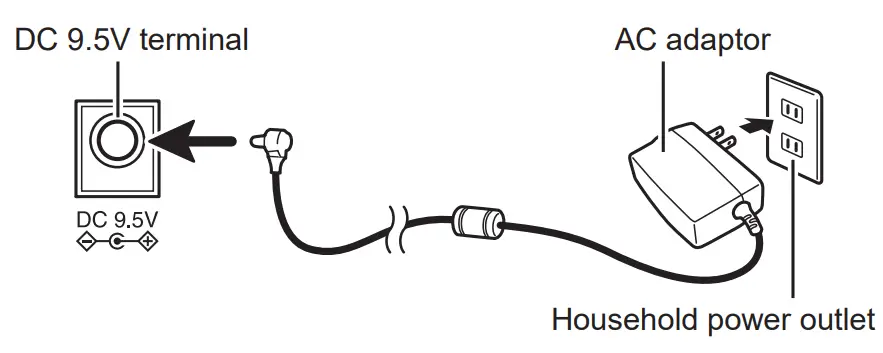
Power Supply
Prepare a household power outlet or batteries.
![]() IMPORTANT
IMPORTANT
- Be sure to comply with the “Safety Precautions” provided in the separate “READ THIS!” sheet. Incorrect use of this product creates the risk of electric shock and fire.
- Always make sure that the Digital Keyboard is turned off before plugging in or unplugging the AC adaptor, or before loading or removing batteries.
Using a Household Power Outlet
Make sure that you use only the AC adaptor specified for this keyboard. Use of a different type of AC adaptor can cause malfunction.
CASIO![]() Specified AC Adaptor:
Specified AC Adaptor:
AD-E95100LE/LG/LJ/LU/LW* (JEITA Standard plug)
* Check with your dealer for the name of the AC adaptor to be used
![]() IMPORTANT
IMPORTANT
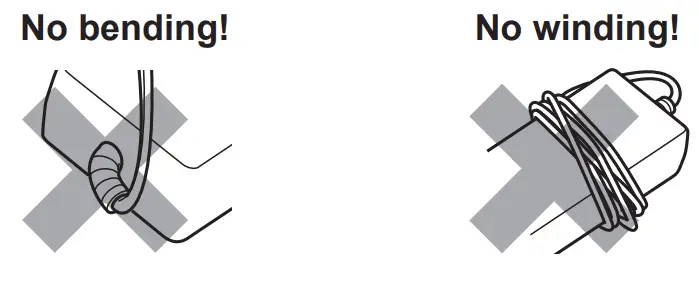
- The AC adaptor will become warm to the touch after very long use. This is normal and does not indicate malfunction.
- To prevent breaking of the wire, take care to avoid putting any type of load on the power cord.
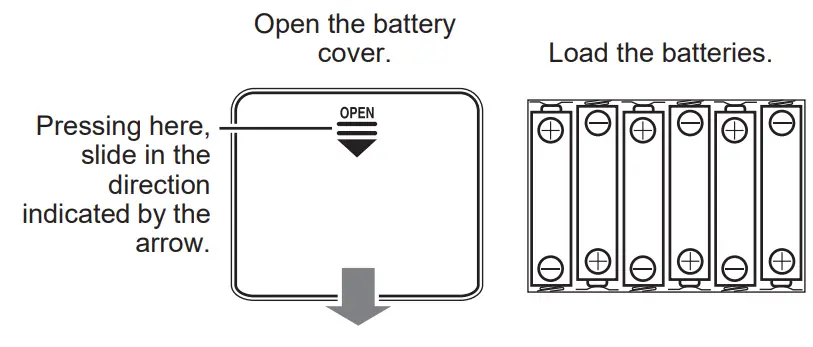
Using Batteries
Use 6 commercially available size AA alkaline batteries or NiMH rechargeable batteries.
- Commercially available size AA manganese batteries can also be used, but because some types of usage may require high power consumption, the use of alkaline batteries or NiMH rechargeable batteries is recommended.
![]() Note the precautions below when using rechargeable batteries.
Note the precautions below when using rechargeable batteries.
- Use Panasonic Group AA-size eneloop rechargeable batteries. Do not use any other type of batteries.
- Use only the specified charger to charge batteries.
- Rechargeable batteries must be removed from the product for charging.
- For information about using eneloop batteries or their specified charger, be sure to read the user documentation and precautions that come with each item, and use them only as directed. Open the battery cover on the bottom of the Digital Keyboard, load the batteries, and then close the cover.
- Take care to ensure that the positive
 and negative
  ends of the batteries are facing correctly.
![]() IMPORTANT
IMPORTANT
- Battery life is approximately 12 hours of continuous use (based on alkaline batteries, normal play). Any of the symptoms below may indicate batteries are low and need to be replaced as soon as possible.
- Distorted sound
- Sudden loss of power
- Power immediately cuts out after being restored
- Failure to start up
- Failure to operate correc
![]()
- The Digital Keyboard will turn off automatically to preserve battery power if you do not perform any operation for about six minutes (Auto Power Off). Hold down the TONE button while turning on the keyboard to disable Auto Power Off.
Reference
Troubleshooting
- There is no sound when I press keyboard keys.
- Check to make sure batteries are loaded or that the AC adaptor is connected correctly. (See “Power Supply”.)
- Unplug the plug from the 19 (PHONES/OUTPUT) jack if one is connected.
- The sound is distorted. The power suddenly cuts out.
• Battery power may be low. See “Power Supply”.
Specifications
| Model Name | : SA-50, SA-51 |
| Keyboard | : 32 mini-size keys, 2.5 octaves |
| Polyphony | : 32 notes maximum |
| Tones | : 100 |
| Preset Rhythms | : 50 |
| Preset Songs | : 10 tunes; melody off |
| Tuning | : A4 = 416 to 440 to 465 Hz |
| Speakers | : φ 8 cm × 2 (output: 0.5 W + 0.5 W) |
| Power Jack | : DC 9.5V |
| Phones/Output jack: | Stereo mini jack Output Impedance: 120 Ω Output Voltage: 500 mV (RMS) MAX |
| Power Supply | : 2-way |
• Batteries: 6 AA-size alkaline batteries or AA-size rechargeable nickel-metal hydride batteries
• Battery Life: Approximately 12 hours (alkaline tteries), approximately 10 hours (rechargeable nickel-metal hydride batteries)*
• AC Adaptor: AD-E95100LE/LG/LJ/LU/LW
• Auto Power Off: Approximately 6 minutes after last
key operation
Power Consumption: 9.5 V = 3.2 W
Dimensions : 44.6 × 20.8 × 5.1 cm
(17 9/16 × 8 3/16 × 2 inch)
Weight : Approximately 1.0 kg (2.2 lbs) (without batteries)
* Measured values while using eneloop batteries. eneloop is a registered trademark of Panasonic Group.
![]()
- Design and specifications are subject to change without notice.
- You can get information about accessories that are separately for this product from the CASIO keyboard catalog available from your retailer, and from the CASIO website at the following URL. https://world.casio.com/
For information about the product and its music scores, visit the CASIO website.
https://support.casio.com/global/en/emi/manual/SA-50/

Built-in Music Data Lists
Tone List
| PIANO | |
| 00 | GRAND PIANO |
| 01 | BRIGHT PIANO |
| 02 | STRINGS PIANO |
| 03 | ELEC.GRAND PIANO |
| 04 | ELEC.PIANO 1 |
| 05 | ELEC.PIANO 2 |
| 06 | HARPSICHORD |
| 07 | CLAVI |
| 08 | THUMB PIANO |
| MELODIC PERC. | |
| 09 | VIBRAPHONE |
| 10 | MARIMBA |
| 11 | XYLOPHONE |
| 12 | CELESTA |
| 13 | GLOCKENSPIEL |
| 14 | TUBULAR BELL |
| 15 | STEEL DRUMS |
| ORGAN | |
| 16 | ELEC.ORGAN |
| 17 | PERC.ORGAN |
| 18 | ROCK ORGAN |
| 19 | PIPE ORGAN |
| 20 | REED ORGAN |
| 21 | ACCORDION |
| 22 | HARMONICA |
| 23 | BANDONEON |
| GUITAR | |
| 24 | NYLON STR.GUITAR |
| 25 | STEEL STR.GUITAR |
| 26 | JAZZ GUITAR |
| 27 | CLEAN GUITAR |
| 28 | MUTE GUITAR |
| 29 | OVERDRIVE GT |
| 30 | DISTORTION GT |
| 31 | GT HARMONICS |
| 32 | BANJO |
| BASS | |
| 33 | ACOUSTIC BASS |
| 34 | FINGERED BASS |
| 35 | PICKED BASS |
| 36 | FRETLESS BASS |
| 37 | SLAP BASS |
| 38 | SYNTH-BASS 1 |
| 39 | SYNTH-BASS 2 |
| STRINGS | |
| 40 | VIOLIN |
| 41 | CELLO |
| 42 | CONTRABASS |
| 43 | PIZZICATO |
| 44 | HARP |
| 45 | KOTO |
| 46 | STRINGS |
| 47 | SLOW STRINGS |
| 48 | SYNTH-STRINGS |
| 49 | ORCHESTRA HIT |
| BRASS | |
| 50 | TRUMPET |
| 51 | TROMBONE |
| 52 | TUBA |
| 53 | MUTE TRUMPET |
| 54 | FRENCH HORN |
| 55 | BRASS |
| 56 | SYNTH-BRASS 1 |
| 57 | SYNTH-BRASS 2 |
| WOOD WIND | |
| 58 | ALTO SAX |
| 59 | TENOR SAX |
| 60 | SOPRANO SAX |
| 61 | BARITONE SAX |
| 62 | OBOE |
| 63 | ENGLISH HORN |
| 64 | BASSOON |
| 65 | CLARINET |
| 66 | FLUTE |
| 67 | PICCOLO |
| 68 | RECORDER |
| 69 | PAN FLUTE |
| 70 | WHISTLE |
| 71 | OCARINA |
| SYNTH/PAD | |
| 72 | SQUARE LEAD |
| 73 | SAW LEAD |
| 74 | CALLIOPE |
| 75 | VOICE LEAD |
| 76 | BASS+LEAD |
| 77 | CHOIR AAHS |
| 78 | VOICE DOO |
| 79 | SYNTH-VOICE |
| 80 | WARM PAD |
| 81 | SPACE CHOIR |
| 82 | METAL PAD |
| 83 | RAIN DROP |
| 84 | SOUND TRACK |
| 85 | ATMOSPHERE |
| 86 | BRIGHTNESS |
| INDIAN | |
| 87 | SITAR |
| 88 | HARMONIUM 1 |
| 89 | HARMONIUM 2 |
| 90 | SANTUR |
| 91 | TABLA |
| 92 | PIPE ORGAN (INDIAN) |
| 93 | HARMONICA (INDIAN) |
| 94 | TRUMPET (INDIAN) |
| SE/PERCUSSION | |
| 95 | SEASHORE/BIRD |
| 96 | HELICOPTER/GUNSHOT |
| 97 | WOOD BLOCK/TAIKO |
| 98 | MELODIC TOM/ SYNTH-DRUM |
| 99 | DRUM SET |
Rhythm List
| POPS | |
| 00 | STRAIGHT 8 BEAT |
| 01 | 8 BEAT POP |
| 02 | MELLOW 8 BEAT |
| 03 | 60’s 8 BEAT |
| 04 | 16 BEAT 1 |
| 05 | 16 BEAT 2 |
| 06 | 16 BEAT SHUFFLE |
| BALLAD | |
| 07 | POP BALLAD |
| 08 | MODERN BALLAD |
| 09 | 16 BEAT BALLAD |
| 10 | 6/8 BALLAD |
| DANCE | |
| 11 | EDM |
| 12 | TECHNO POP |
| 13 | TRANCE |
| 14 | MODERN DANCE |
| 15 | DISCO SOUL |
| ROCK/JAZZ | |
| 16 | STRAIGHT ROCK |
| 17 | BLUES |
| 18 | SLOW ROCK |
| 19 | MIDDLE BIG BAND |
| 20 | JAZZ WALTZ |
| EUROPEAN | |
| 21 | POLKA |
| 22 | WALTZ |
| 23 | TANGO |
| 24 | MARCH 1 |
| 25 | MARCH 2 |
| LATIN | |
| 26 | BOSSA NOVA |
| 27 | BEGUINE |
| 28 | SAMBA |
| 29 | CHA-CHA-CHA |
| 30 | MERENGUE |
| 31 | SALSA |
| 32 | REGGAE |
| 33 | CUMBIA |
| 34 | REGGAETON |
| WORLD I | |
| 35 | BLUEGRASS |
| 36 | DIXIE |
| 37 | FAST GOSPEL |
| 38 | PASODOBLE |
| 39 | ADANI |
| 40 | BALADI |
| 41 | MUS |
| 42 | KRONCONG |
| 43 | DANGDUT |
| WORLD II | |
| 44 | BHANGRA |
| 45 | DADRA |
| 46 | KEHARWA |
| 47 | TEEN TAAL |
| 48 | BHAJAN |
| 49 | INDIAN POP |
Drum Map
| Key | 99:DRUM SET |
| F2 | Synth Kick |
| F{2 | Synth Snare 1 |
| G2 | Synth Snare 2 |
| G{2 | Dance Kick 2 |
| A2 | Dance Kick 1 |
| B}2 | Dance Snare 1 |
| B2 | Dance Snare 2 |
| C3 | Dance Clap |
| C{3 | Snare 3 |
| D3 | Brush Snare Slap |
| E}3 | Brush Snare Sweep |
| E3 | Kick 2 |
| F3 | Kick 1 |
| F{3 | Side Stick |
| G3 | Snare 1 |
| G{3 | Closed Hi-Hat |
| A3 | Snare 2 |
| B}3 | Open Hi-Hat |
| B3 | Low Tom |
| C4 | Mid Tom |
| C{4 | Crash Cymbal |
| D4 | High Tom |
| E}4 | Ride Cymbal |
| E4 | Xiao Luo |
| F4 | Vibraslap |
| F{4 | Tambourine |
| G4 | Maracas |
| G{4 | Triangle Close |
| A4 | Triangle Open |
| B}4 | Claves |
| B4 | Mute Cuica |
| C5 | Open Cuica |
| C{5 | Mute High Conga |
| D5 | Open High Conga |
| E}5 | Open Low Conga |
| E5 | High Agogo |
| F5 | Low Agogo |
| F{5 | High Whistle |
| G5 | Low Whistle |
| G{5 | Tabla Ge |
| A5 | Tabla Ka |
| B}5 | Tabla Te |
| B5 | Tabla Na |
| C6 | Tabla Tun |
| C{6 | High Timbale |
| D6 | Low Timbale |
| E}6 | High Bongo |
| E6 | Low Bongo |
| F6 | Long Guiro |
| F{6 | Short Guiro |
| G6 | Cowbell |
| G{6 | High Wood Block |
| A6 | Low Wood Block |
| B}6 | Cabasa |
| B6 | Shaker |
| C7 | Hand Clap |
General Guide
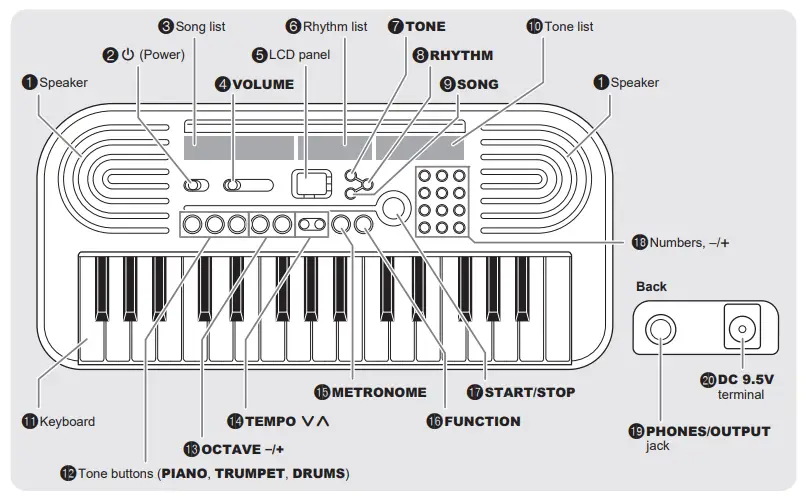
Playing Something on the Digital Keyboard
- Set 2 (P) to “ON”.
The Digital Keyboard switches on. - Use 11 (Keyboard) to make a sound.
- Use 4 (VOLUME) to adjust the volume.
Playing Using Tones
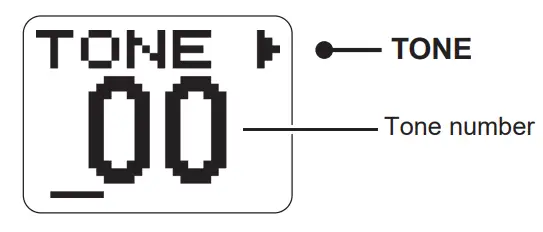
- Press 7 (TONE).

- Choose your favorite tone from the 10 (Tone list) or from the tone list in this User’s Guide, and then enter its number using the numbers or the plus (+) and minus (–) buttons 18.
• For example, to select “05 ELEC PIANO 2”, press “0” and then “5”.
• You can also use plus (+) and minus (–) buttons to change the number. (“+” increases the number and “–” decreases the number.) Holding the button down changes the number continuously.
• Press “+” and “–” at the same time to return to the original setting. - Use 11 (Keyboard) to play the tone you chose.

• You can use 12 (PIANO, TRUMPET, DRUMS) to quickly and easily select the GRAND PIANO (00), TRUMPET (50) and DRUM SET (99) tones.
Playing Using the Metronome
- Press 15 (METRONOME).
The metronome starts up. - .Press 15 (METRONOME) again to stop the metronome.
• For information on how to change the metronome tempo, see “Changing the Speed (Tempo) of a Rhythm or Built-in Song”.
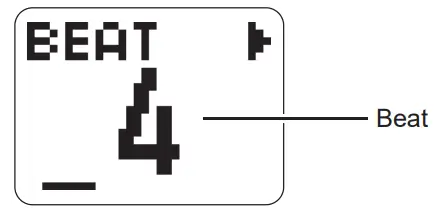
Changing the Beat
You can use the procedure below to configure the settings so that the Digital Keyboard sounds a chime on the first beat of each measure and a click on the remaining beats.
- Press 16 (FUNCTION) repeatedly until “BEAT” appears on the LCD panel.

- .Use the numbers or the plus (+) and minus (–) buttons 18 to enter the beat.
• Choose a beat setting from 0-9.
• If you choose “0”, no chime sounds on the first beat.
• The original display returns after a few moments.
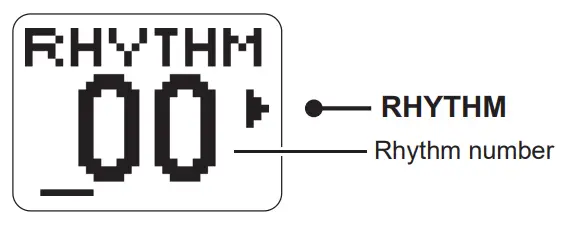
Playing Using a Rhythm
You can have rhythms from various musical genres play as backing while you play the Digital Keyboard.
- Press 8 (RHYTHM).

- Choose your favorite rhythm from 6 (Rhythm list) or from the rhythm list in this User’s Guide, and then enter its number using the numbers or the plus (+) and minus (–) buttons 18.
• The procedure for entering the number is the same as for tone numbers. - Press 17 (START/STOP) to play the rhythm you chose.
• To stop the rhythm, press 17 again.
• For information on how to change the tempo of the rhythm, see “Changing the Speed (Tempo) of a Rhythm or Built-in Song”.
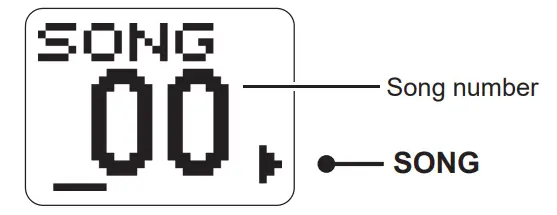
Listening to Built-in Songs
- Press 9 (SONG).

- Choose a song from 3 (Song list) and then enter its number using the numbers or the plus (+) and minus (–) buttons 18.
• When using numbers to choose a song, start by entering “0”. The procedure for entering the number is the same as for tone numbers.
• To listen through all the songs, display “AL” on the LCD panel. To display “AL”, either use the plus (+) and minus (–) buttons, or just press one of the number buttons “1-9” without first pressing “0”. - Press 17 (START/STOP) to play the song you chose.
• To stop the song, press 17 again.
• For information on how to change the tempo of the rhythm, see “Changing the Speed (Tempo) of a Rhythm or Built-in Song”.
• If you change the tempo, tone or any other setting for a song while listening to all the songs “AL”, the changed song settings revert to their initial values when the next song is played.
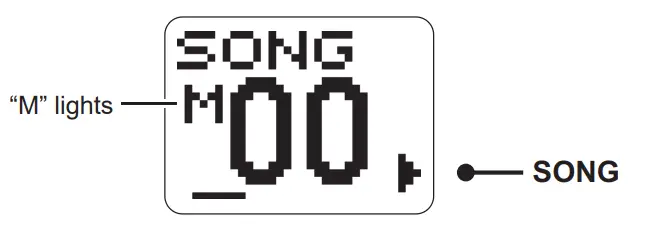
Muting the Song Melody So You Can Play it Yourself
- Hold down 9 (SONG).
This mutes the melody for built-in songs.
- .Press 17 (START/STOP).
The melody is not played, so you can play it yourself on the keyboard 11.
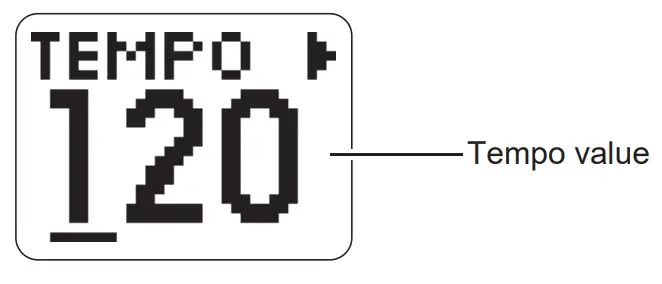
Changing the Speed (Tempo) of a Rhythm or Built-in Song
- Press 14 (TEMPO
 ).
).
- Change the tempo value by using 14 (TEMPO yt) or the plus (+) and minus (–) buttons 18.
• You can change the tempo in increments of 10 using 14 (TEMPO yt) or in single increments using the plus (+) and minus (–) buttons 18.
• You can set any value between 20 and 255.
• The original display returns after a few moments.
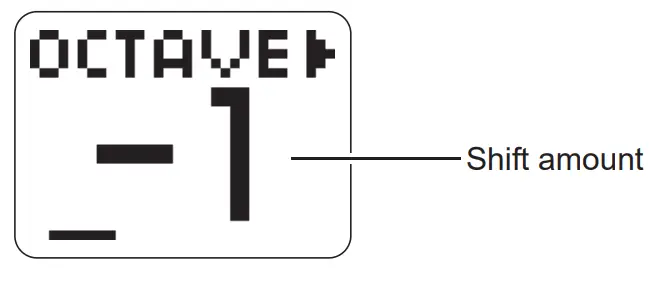
Changing the Pitch of the Sound in Octaves (Octave Shift)
- Press 13 (OCTAVE –/+).

- Use 13 (OCTAVE –/+) to change the shift amount.
• You can set any value between –1 and +1 octaves.
• The original display returns after a few moments.
Changing the Function Settings
Use the procedure below to change the function settings.
- Press 16 (FUNCTION).
• The setting changes each time you press 16 (FUNCTION).
Setting Display Values set Tuning TUNING 416 to 465 Reverb REVERB ON, OFF Beat BEAT 0 to 9 Transposition TRANS. –12 to 0 to +12 - Use the numbers or the plus (+) and minus (–) buttons 18 to enter a value.
• Press “+” and “–” at the same time to return to the original setting.
• The original display returns after a few moments.
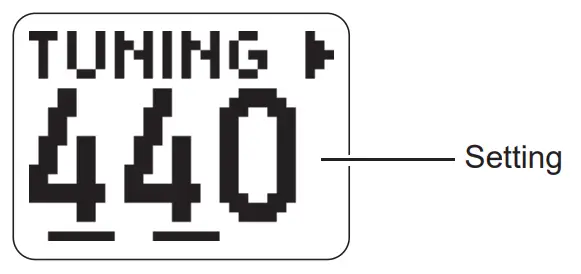
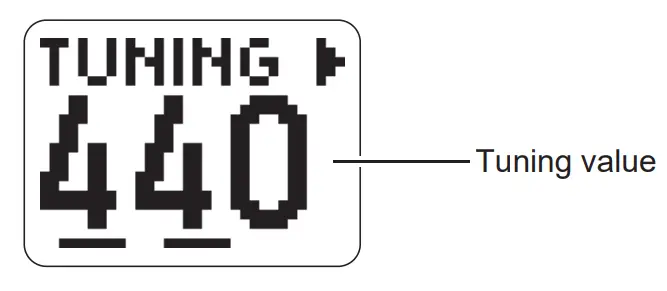
Fine Tuning the Pitch (TUNING)
You can adjust the pitch of all the Digital Keyboard’s tones using the A4 tone as the standard (in 1 Hz increments).
- Press 16 (FUNCTION) repeatedly until “TUNING” appears on the LCD panel.

- Use the numbers or the plus (+) and minus
(–) buttons 18 to enter a tuning value.
• You can set any value between 416 and 465 Hz.
• The original display returns after a few moments.
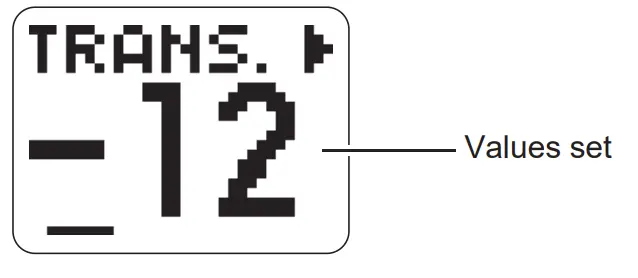
Adjusting the Pitch of the Sound in Semitone Increments (Transposition)
Transposition shifts the overall pitch of the sound in semitone increments.
- Press 16 (FUNCTION) repeatedly until “TRANS.” appears on the LCD panel.

- .Use the plus (+) and minus (–) buttons 18 to change the value set.
• You can shift the pitch up and down by one octave (max. –12 to +12 semitones).
• The original display returns after a few moments.
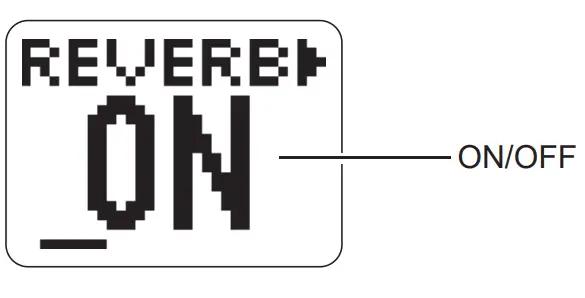
Using Reverb
You can use the procedure below to add reverb to the notes you play.
- Press 16 (FUNCTION) repeatedly until “REVERB” appears on the LCD panel.

- Press the plus (+) and minus (–) button in 18 to turn reverb ON and OFF. (+: ON, –: OFF)
• The original display returns after a few moments.
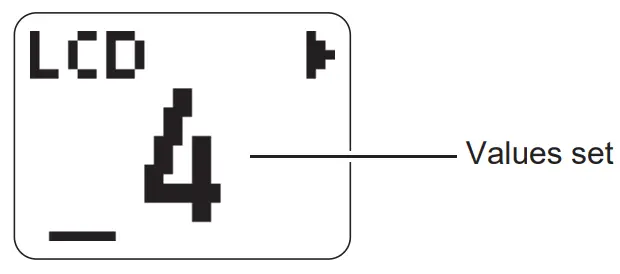
Making the Screen Easier to See
You can adjust the contrast of the LCD panel.
- Hold down 16 (FUNCTION) and press “0” in 18.

- Use the numbers or the plus (+) and minus (–) buttons 18 to enter a value.
• You can set any value between 1 and 8. - Press 16 (FUNCTION) again to complete the setting.
• The LCD contrast setting is retained even if you switch the Digital Keyboard off.
Settings at Power Off
When you turn the Digital Keyboard off, all settings such as the tone numbers and song numbers revert to their original settings. You cannot save your settings before turning the Digital Keyboard off.
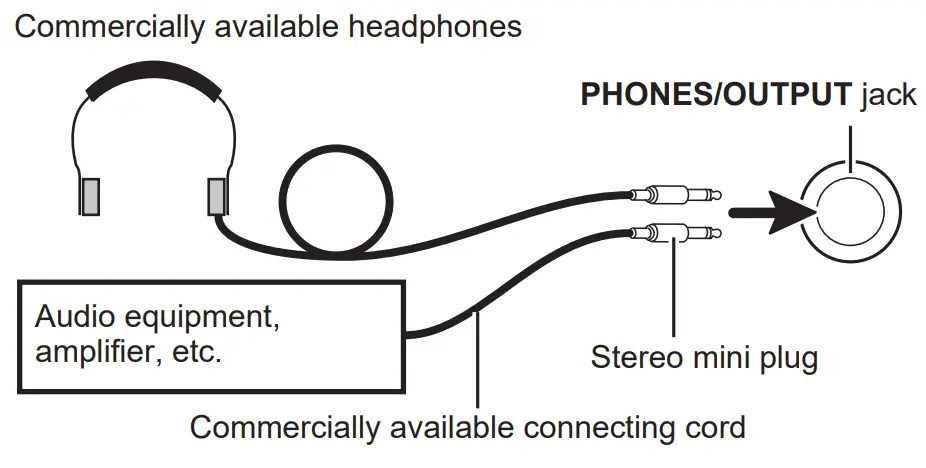
Using Headphones or Audio Equipment
Connect headphones or audio equipment to the PHONES/OUTPUT jack on the back of the Digital Keyboard.
- If the plug you are using does not match the jack, use a commercially available adaptor plug.
![]() IMPORTANT
IMPORTANT
- Do not listen to very high volume output over headphones for long periods. Doing so creates the risk of hearing damage.
- When connecting a musical instrument amplifier, set the Digital Keyboard volume to a low level and use the amplifier’s volume control to adjust to the desired volume level.
CASIO COMPUTER CO.,LTD.
6-2, Hon-machi 1-chome Shibuya-ku, Tokyo 151-8543, Japan
C MA2206-C Printed in China
© 2022 CASIO COMPUTER CO., LTD.
- Any reproduction of the contents of this manual, either in part or its entirety, is prohibited. Except for your own, personal use, any other use of the contents of this manual without the consent of CASIO is prohibited under copyright laws.
- IN NO EVENT SHALL CASIO BE LIABLE FOR ANY DAMAGES WHATSOEVER (INCLUDING, WITHOUT LIMITATION, DAMAGES FOR LOSS OF PROFITS, BUSINESS INTERRUPTION, LOSS OF INFORMATION) ARISING OUT OF THE USE OF OR INABILITY TO USE THIS MANUAL OR PRODUCT, EVEN IF CASIO HAS BEEN ADVISED OF THE POSSIBILITY OF SUCH DAMAGES.
- The contents of this manual are subject to change without notice.
- The actual appearance of the product may be different from that shown in the illustrations in this User’s Guide.
- Company and product names used in this manual may be registered trademarks of others.
NOTICE
This equipment has been tested and found to comply with the limits for a Class B digital device, pursuant to Part 15 of the FCC Rules.
These limits are designed to provide reasonable protection against harmful interference in a residential installation. This equipment generates, uses and can radiate radio frequency energy and, if not installed and used in accordance with the instructions, may cause harmful interference to radio communications. However, there is no guarantee that interference will not occur in a particular installation. If this equipment does cause harmful interference to radio or television reception, which can be determined by turning the equipment off and on, the user is encouraged to try to correct the interference by one or more of the following measures:
- Reorient or relocate the receiving antenna.
- Increase the separation between the equipment and receiver.
- Connect the equipment into an outlet on a circuit different from that to which the receiver is connected.
- Consult the dealer or an experienced radio/TV technician for help.
FCC WARNING
Changes or modifications not expressly approved by the party responsible for compliance could void the user’s authority to operate the equipment.
Declaration of Conformity
Model Name: SA-50, SA-51
Trade Name: CASIO COMPUTER CO., LTD.
Responsible party: CASIO AMERICA, INC.
Address: 570 MT. PLEASANT AVENUE, DOVER, NEW JERSEY 07801
Telephone number: 973-361-5400
This device complies with Part 15 of the FCC Rules, Operation is subject to the following two conditions:
(1) This device may not cause harmful interference, and (2) this device must accept any interference received, including interference that may cause undesired operation.
TO REDUCE THE RISK OF FIRE OR ELECTRIC SHOCK, REFER SERVICING TO QUALIFIED SERVICE PERSONNEL.
Important Information for Parents!
Parents should please note the following important information before letting children use this product.
- Before using the AD-E95100LE/LG/LJ/LU/LW adaptor to power the unit, be sure to check the AC adaptor for any damage first. Carefully check the power cord for breakage, cuts, exposed wire and other serious damage. Never let children use an AC adaptor that is seriously damaged.
- Never mix batteries of different types.
- Never mix old batteries with new ones.
- Use recommended batteries or equivalent types.
- Always make sure that positive (+) and negative (–) poles are facing correctly as indicated near the battery compartment.
- Replace batteries as soon as possible after any sign they are getting weak.
- Do not short-circuit the battery terminals.
- The product is not intended for children under 3 years.
- Use only CASIO AD-E95100LE/LG/LJ/LU/LW adaptor.
- Be sure to disconnect the AC adaptor before cleaning the product.
Be sure to read the “Safety Precautions” in the separate “READ THIS!” sheet, and use the product correctly.
![]() Manufacturer:
Manufacturer:
CASIO COMPUTER CO., LTD.
6-2, Hon-machi 1-chome, Shibuya-ku, Tokyo 151-8543, Japan
Responsible within the European Union:
Casio Europe GmbH
Casio-Platz 1, 22848 Norderstedt, Germany
www.casio-europe.com![]() Manufacturer:
Manufacturer:
CASIO COMPUTER CO., LTD.
6-2, Hon-machi 1-chome, Shibuya-ku, Tokyo 151-8543, Japan
Responsible within the United Kingdom:
Casio Electronics Co. Ltd.
10 Norwich Street, London, EC4A 1BD, U.K.
www.casio.co.uk