CyMedica Orthopedics QB1 Go System User Manual
![]()
Read this manual carefully before operating the QB1 NMES treatments.
Customer Service 1-844-CYM-2014
QB-0090-018 Rev. C
Introduction
CyMedica Orthopedics® QB1 Go System includes NMES Therapy components. The NMES System is intended for retardation or prevention of disuse atrophy. Refer to the QB1 User’s Manual for all the Intended Uses, Contraindications, Warnings, Precautions, and Adverse Reactions before operating this system.
Powered muscle stimulators should not be used on patients with cardiac demand pacemakers. Electrodes should not be applied over the neck or mouth. See your health care professional for electrode placement.
Explanation of Symbols
![]() The system is provided Non Sterile
The system is provided Non Sterile
![]() Legal Manufacturer name and address
Legal Manufacturer name and address
![]() Reference number; part number
Reference number; part number
![]() Lot number
Lot number
![]() Follow instructions for use
Follow instructions for use
![]() Consult instructions for use
Consult instructions for use
![]() Expiration date
Expiration date
![]() CE Marking
CE Marking
![]() Prescription only (USA)
Prescription only (USA)
![]() Authorized Representative
Authorized Representative
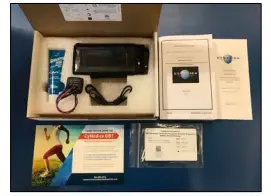
The QB1 Go System consists of the following
- User Interface
- NMES Pod
- NMES Electrodes Set
- Electrode Gel
- Universal USB charging cord
Electrodes Placement for NMES Treatment
For best results: Wash and dry skin. Apply electrode gel to electrode area of skin.
The physician will determine the proper anatomical location for electrodes placement. See Physician for further instructions on the location of the NMES electrodes.
Obtain the NMES pod. Remove plastic pin covers from each electrode lead pin. Connect the RF (Blue lead wire) and the COM (red lead wire) to the 2” x 3.5” electrodes. Connect the VMO (Black lead wire) to the 2” x 2” electrode. Alternatively, various combinations of 2” x 2” and/or 2”x 3.5” electrodes may be used according to comfort and anatomical location.
Plug in the electrode all of the way so that the metal pin is completely covered.
Operating the QB1 Device-NMES Treatment
All electrodes should be in direct contact with the patient skin. Turn on power to the UI by sliding the ON / OFF Switch to the ON position (I). The initial UI screen should appear briefly.
The UI screen will notify you to connect the UI to the NMES Pod by plugging it into the socket.
The UI will display the available treatments: NMES POST-OP and STRENGTH.
Select the treatment prescribed by your medical professional.
On the Stimulation Level screen, you set the intensity levels. Each level begins with a setting of 0 and has a maximum setting of 100.
The UI display will show “knee or thigh”; however, the electrodes may be placed on the muscle your healthcare professional chooses.
The knee area controls black and red wires. The thigh area controls the blue and red wires.
Press “+” to increase treatment intensity
Press “-” to decrease treatment intensity
NOTE: It is common to have different desired intensity levels for the electrodes.
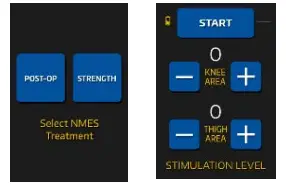
Once the intensity levels are set, select the “START” button. If you don’t start the program, the treatment will start automatically after 5 minutes. NMES treatment programs are 20 minutes long.
Once the treatment is completed, squeeze both sides of UI cable connector to disconnect from the NMES socket.
![]() Emergo Europe Prinsessegracht 20 2514 AP The Hague The Netherlands
Emergo Europe Prinsessegracht 20 2514 AP The Hague The Netherlands
![]()
![]() CYMEDICA ORTHOPEDICS
CYMEDICA ORTHOPEDICS
2120 East 6th Street, Ste. 8
Tempe, AZ 85281 USA
![]()


