episode ES-CORE-IW Speaker System  INTRODUCTION
 INTRODUCTION
Thank you for purchasing Episode® speakers. Visit our website for design recommendations and speaker calculators.
INSTALLATION
NEW CONSTRUCTION INSTALL
Episode speaker installations can be simplified by using Episode pre-construction brackets (sold separately). Install them prior to drywall to allow for precise placement of the speaker. Secure the wiring within reach of the bracket for easy access.
EXISTING CONSTRUCTION INSTALL
Make a cutout for the speaker using the supplied template. Allow space for the bezel if installing near adjacent objects, or cut the hole in two steps as shown below.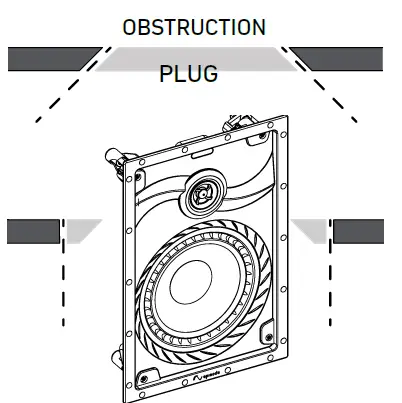
- Cut the drywall at a 45° angle so that if the speaker is too close to an obstruction, you can easily ‘plug’ the hole. This is known as a “pumpkin cut.”
- If there are no obstructions, cut the drywall again, this time at a 90° angle.
- Insert the speaker into the cutout.
CONNECT
Strip the insulation on each conductor approximately ¼” and insert into the speaker terminals. Ensure Amp no strands of wire protrude from the connectors.
Observe proper polarity for each speaker to the amplifier (+ to + and – to – ).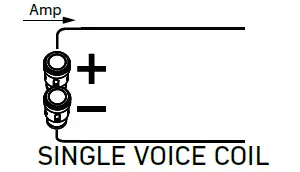
Dual Voice Coil / Surround (DVCS) Selector Switch (Select Models)
SINGLE VOICE COIL There are two options for DVCS (Dual Voice Coil / Surround) models, selected by using the selector switch on the crossover PCB. DVC (default position) and SURR.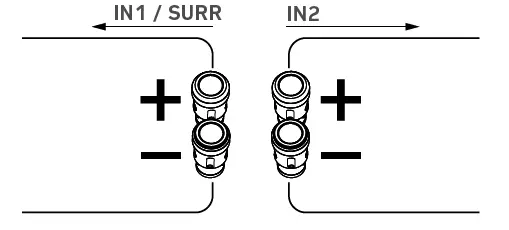
For DVC installs, wire the left channel to either of the two connections and wire the right channel to the other.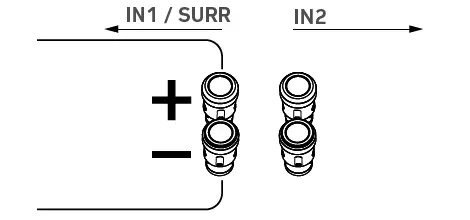
For SURR installs, wire the surround channel to In1/SURR.
NOTE: Do not use stereo inputs while in surround mode.
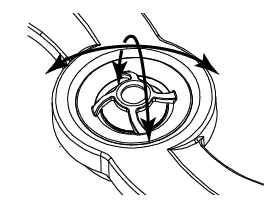
SECURE
Insert the speaker into the opening and tighten each of the three dog screws to clamp the speaker against the wall or ceiling.
Tighten until you feel resistance but do not over tighten.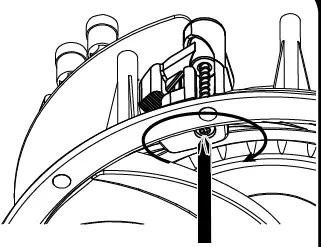
If using a drill / power screwdriver, use a low-torque setting.
FINE TUNE (SELECT MODELS)
Use the switch on the face of the speaker for sound adjustment. Switches can vary by model.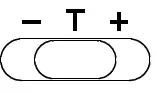 Tweeter Switch: Select +, T, or –
- The default setting is T, meaning flat.
- In furnished rooms, we recommend + increasing response by +3dB.
- In more open spaces, we recommend – decreasing response by -3dB.
Pivoting Tweeter (Select Models)
The pivoting tweeter assembly can be directed to focus the sound where desired.
Two common practices are to:
- Point it directly at the listening area for a more directed sound source.
- Reflect if off hard surfaces for a more diffused sound field.

WARRANTY
Limited Warranty
Find details of this product’s Limited Warranty at snapav.com/warranty, or request a paper copy from Customer Service at (866) 424-4489. Find other legal resources, such as regulatory notices and patent information, at snapav.com/legal.
Copyright ©2021, Wirepath Home Systems, LLC. All rights reserved. Control4 and Snap AV and their respective logos are registered trademarks or trademarks of Wirepath Home Systems, LLC, dba “Control4” and/or dba “SnapAV” in the United States and/or other countries. The episode is a registered trademark or trademark of Wirepath Home Systems, LLC. Other names and brands may be claimed as the property of their respective owners. All specifications are subject to change without notice.
200-ES-CORE-IW-A 21-05-04 TW


