MITSUBISHI ELECTRIC PEAD-A09 Air-Conditioners
Safety Precautions
- Before installing the unit, make sure you read all the “Safety Pre-cautions”.
- The “Safety Precautions” provide very important points regarding safety. Make sure you follow them.
- Please report to or take consent by the supply authority before connection to the system.
Warning:
- These appliances are not accessible to the general public.
- The unit must not be installed by the user. Ask the dealer or an au-thorized company to install the unit. If the unit is installed improperly, water leakage, electric shock or fire may result.
- Do not stand on, or place any items on the unit.
- Do not splash water over the unit and do not touch the unit with wet hands. An electric shock may result.
- Do not spray combustible gas close to the unit. Fire may result.
- Do not place a gas heater or any other open-flame appliance where it will be exposed to the air discharged from the unit. Incomplete com-bustion may result.
- Do not remove the front panel or the fan guard from the outdoor unit when it is running.
- When you notice exceptionally abnormal noise or vibration, stop opera-tion, turn off the power switch, and contact your dealer.
- Never insert fingers, sticks etc. into the intakes or outlets.
- If you detect odd smells, stop using the unit, turn off the power switch and consult your dealer. Otherwise, a breakdown, electric shock or fire may result.
- This air conditioner is NOT intended for use by children or infirm per-sons without supervision.
- Young children must be supervised to ensure that they do not play with the air conditioner.
- If the refrigeration gas blows out or leaks, stop the operation of the air conditioner, thoroughly ventilate the room, and contact your dealer.
- This appliance is intended to be used by expert or trained users in shops, in light industry and on farms, or for commercial use by lay persons.
- This appliance can be used by children aged from 8 years and above and persons with reduced physical, sensory or mental capabilities or lack of experience and knowledge if they have been given supervision or instruction concerning use of the appliance in a safe way and under-stand the hazards involved. Children shall not play with the appliance. Cleaning and user maintenance shall not be made by children without supervision.
- This appliance is not intended for use by persons (including children) with reduced physical, sensory or mental capabilities, or lack of ex-perience and knowledge, unless they have been given supervision or instruction concerning use of the appliance by a person responsible for their safety.
- Children should be supervised to ensure that they do not play with the appliances.
- When installing or relocating, or servicing the air conditioner, use only the specified refrigerant (R410A) to charge the refrigerant lines. Do not mix it with any other refrigerant and do not allow air to remain in the lines.
If air is mixed with the refrigerant, then it can be the cause of abnor-mal high pressure in the refrigerant line, and may result in an explosion and other hazards. The use of any refrigerant other than that specified for the system will cause mechanical failure or system malfunction or unit break-down. In the worst case, this could lead to a serious impediment to securing product safety.
Caution:
- Do not use any sharp object to push the buttons, as this may damage the remote controller.
- Never block or cover the indoor or outdoor unit’s intakes or outlets.
Disposing of the unit
When you need to dispose of the unit, consult your dealer.
Parts Names
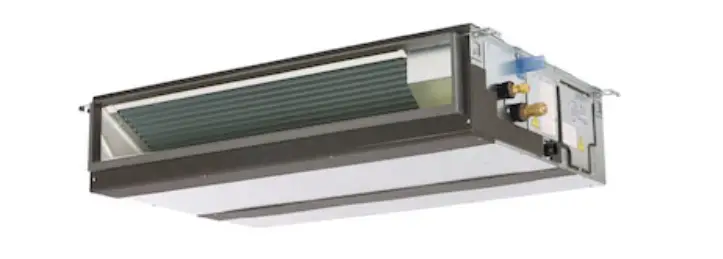
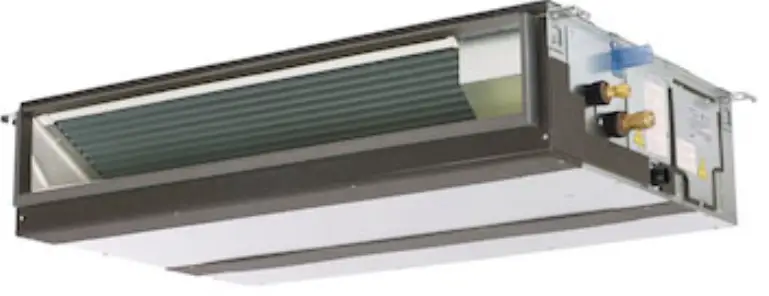
Indoor Unit
| PEAD-A·AA8 | |
| Fan steps | 3 steps |
| Vane | – |
| Louver | – |
| Filter | Normal |
| Filter cleaning indication | – |
PEAD-A·AA8
Ceiling Concealed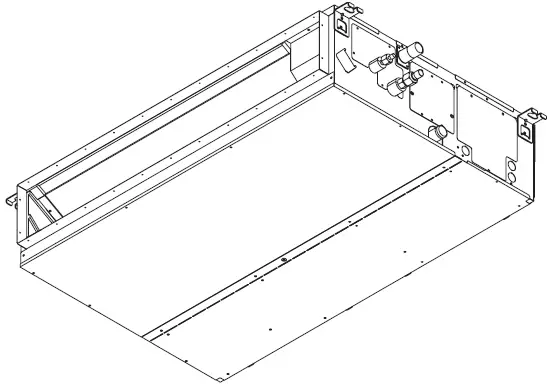
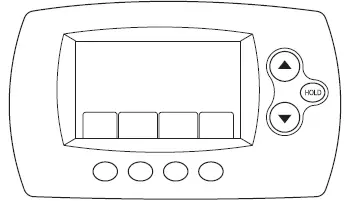
Remote controller (Optional parts)
| Radio frequency interface | Wired remote controller | IR wireless remote controller |
 |  |  |
| RF thermostat | ||
 |
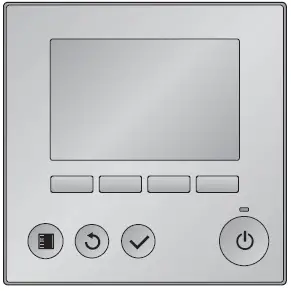
Wired Remote Controller
Controller interface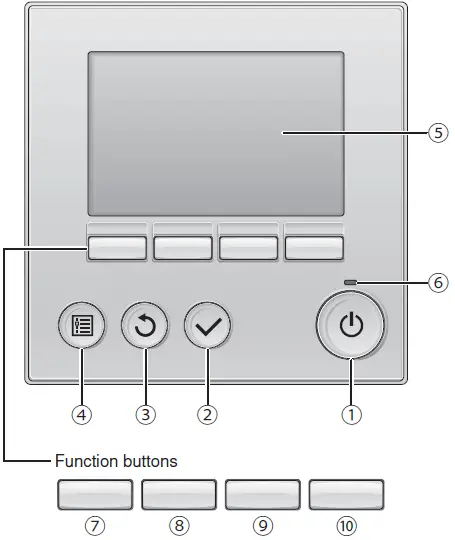 The functions of the function buttons change depending on the screen. Refer to the button function guide that appears at the bottom of the LCD for the functions they serve on a given screen. When the system is centrally controlled, the button function guide that corresponds to the locked button will not appear.
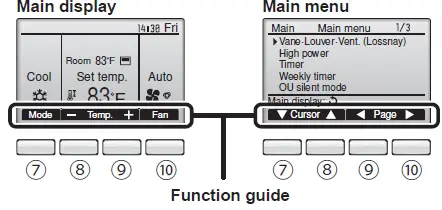
- [ON/OFF] button
Press to turn ON/OFF the indoor unit. - [SELECT] button
Press to save the setting. - [RETURN] button
Press to return to the previous screen. - [MENU] button
Press to bring up the Main menu. - Backlit LCD
Operation settings will appear.
When the backlight is off, pressing any button turns the backlight on and it will stay lit for a certain period of time depending on the screen.
When the backlight is off, pressing any button turns the backlight on and does not perform its function. (except for the [ON/OFF] button) - ON/OFF lamp
This lamp lights up in green while the unit is in operation. It blinks while the remote controller is starting up or when there is an error. - Function button [F1]
Main display: Press to change the operation mode.
Main menu: Press to move the cursor down. - Function button [F2]
Main display: Press to decrease temperature.
Main menu: Press to move the cursor up. - Function button [F3]
Main display: Press to increase temperature.
Main menu: Press to go to the previous page. - Function button [F4]
Main display: Press to change the fan speed.
Main menu: Press to go to the next page.
Display
The main display can be displayed in two different modes: “Full” and “Basic”. The factory setting is “Full”. To switch to the “Basic” mode, change the setting
on the Main display setting. (Refer to operation manual included with remote controller.)
<Full mode>
- All icons are displayed for explanation.

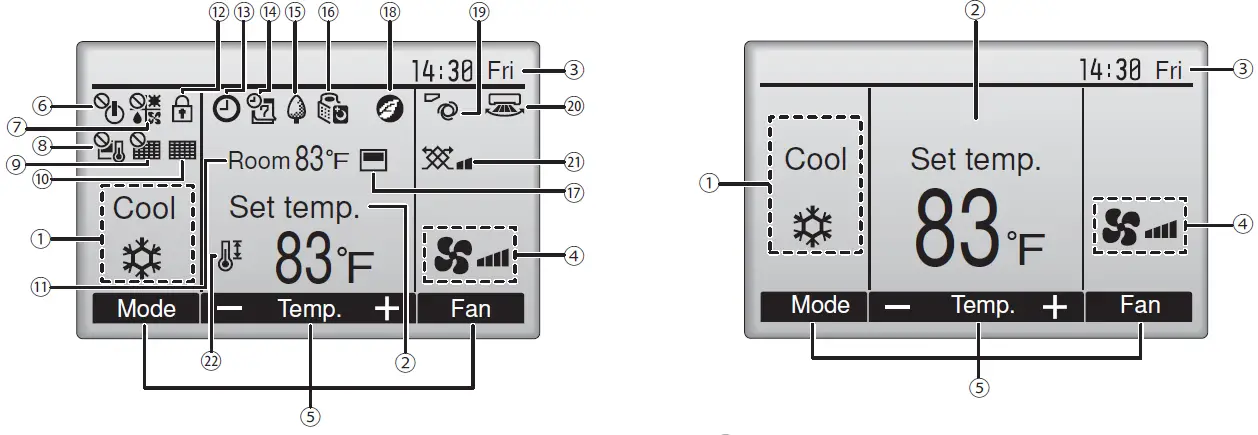
<Basic mode>
- Operation mode
Indoor unit operation mode appears here. - Preset temperature
Preset temperature appears here. - Clock (See the Installation Manual.)
Current time appears here. - Fan speed
Fan speed setting appears here. - Button function guide
Functions of the corresponding buttons appear here. - Appears when the ON/OFF operation is centrally controlled.
- Appears when the operation mode is centrally controlled.
- Appears when the preset temperature is centrally controlled.
- Appears when the filter reset function is centrally controlled.
- Indicates when filter needs maintenance.
- Room temperature (See the Installation Manual.)
Current room temperature appears here. - Appears when the buttons are locked.
Most settings (except ON/OFF, mode, fan speed, temperature) can be made from the Menu screen. (Refer to operation manual included with remote controller.) - Appears when the On/Off timer, Night setback, or Auto-off timer function is enabled.
appears when the timer is disabled by the centralized control system. - Appears when the Weekly timer is enabled.
- Appears while the units are operated in the energy-save mode. (Will not appear on some models of indoor units)
- Appears while the outdoor units are operated in the silent mode.
- Appears when the built-in thermistor on the remote controller is activated to monitor the room temperature (⑪).
appears when the thermistor on the indoor unit is activated to monitor the room temperature. - Appears when the units are operated in the energy-save mode with 3D i-see Sensor.
- Indicates the vane setting.
(This indication is not available for this model.) - Indicates the louver setting.
(This indication is not available for this model.) - Indicates the ventilation setting.
- Appears when the preset temperature range is restricted.
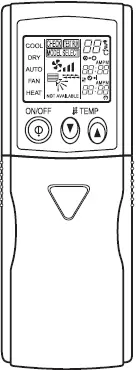
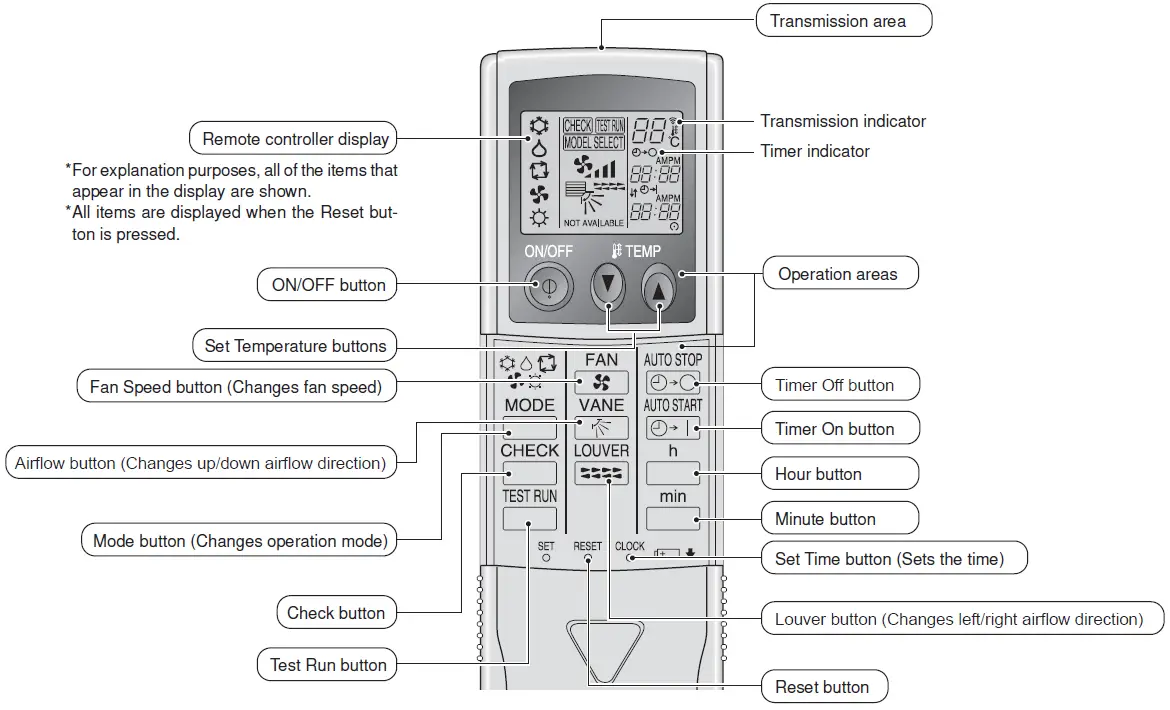
Wireless Remote-Controller
Note (Only for wireless remote controller):
- When using the wireless remote controller, point it towards the receiver on the indoor unit.
- If the remote controller is operated within approximately 2 minutes after power is supplied to the indoor unit, the indoor unit may beep twice as the unit is performing the initial automatic check.
- The indoor unit beeps to confirm that the signal transmitted from the remote controller has been received. Signals can be received up to approximately 7 meters, 275-19/32 inch in a direct line from the indoor unit in an area 45° to the left and right of the unit. However, illumination such as fluorescent lights and strong light can affect the ability of the indoor unit to receive signals.
- I f the operation lamp near the receiver on the indoor unit is blinking, the unit needs to be inspected. Consult your dealer for service.
- Handle the remote controller carefully! Do not drop the remote controller or subject it to strong shocks. In addition, do not get the remote controller wet or leave it in a location with high humidity.
- To avoid misplacing the remote controller, install the holder included with the remote controller on a wall and be sure to always place the remote controller in the holder after use.
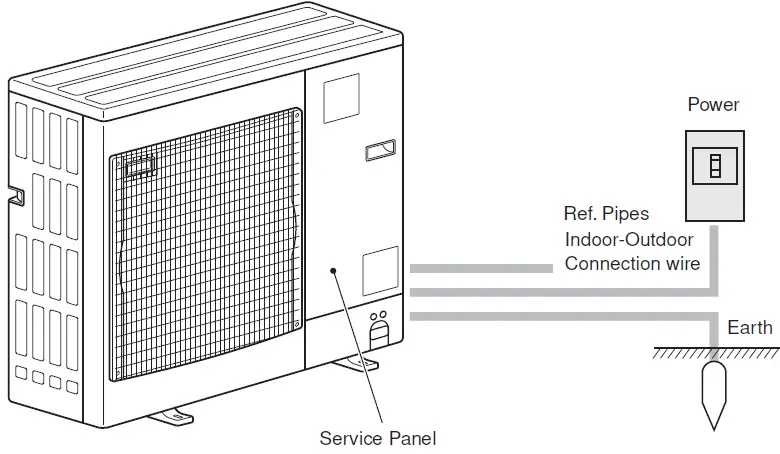
- Outdoor unit

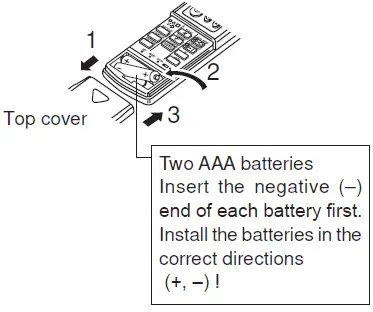
Battery installation/replacement
- Remove the top cover, insert 2 AAA batteries, and then install the top cover.

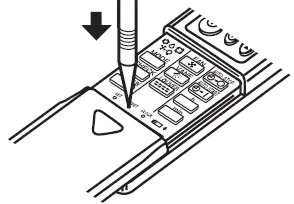
- Press the Reset button.

Operation
About the operation method, refer to the operation manual that comes with each remote controller.
Turning ON/OFF
[ON]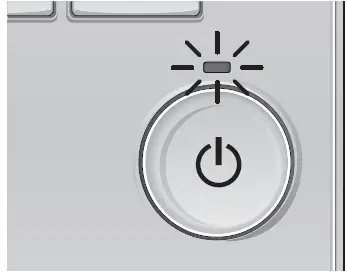 Press the [ON/OFF] button. The ON/OFF lamp will light up in green, and the operation will start.
[OFF]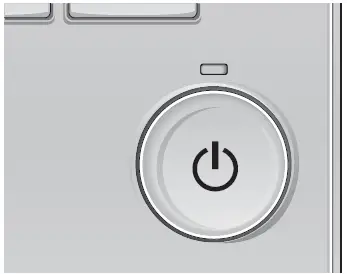 Press the [ON/OFF] button again. The ON/OFF lamp will come off, and the operation will stop.
Note:
Even if you press the ON/OFF button immediately after shutting down the operation is progress, the air conditioner will not start for about 3 minutes. This is to prevent the internal components from being damaged.
Operation status memory
| Remote controller setting | |
| Operation mode | Operation mode before the power was turned off |
| Preset temperature | Preset temperature before the power was turned off |
| Fan speed | Fan speed before the power was turned off |
Settable preset temperature range
| Operation mode | Preset temperature range |
| Cool/Dry | 67 – 87 ºF/19 – 30 ºC |
| Heat | 63 – 83 ºF/17 – 28 ºC |
| Auto | 67 – 83 ºF/19 – 28 ºC |
| Fan/Ventilation | Not settable |
Mode Selection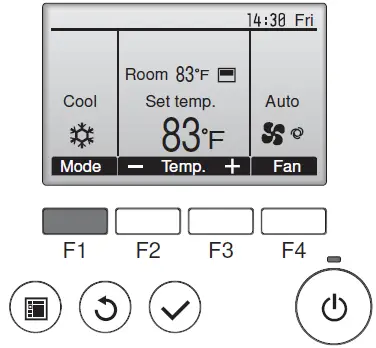
Press the [F1] button to go through the operation modes in the order of “Cool”, “Dry”, “Fan”, “Auto”, and “Heat”. Select the desired operation mode.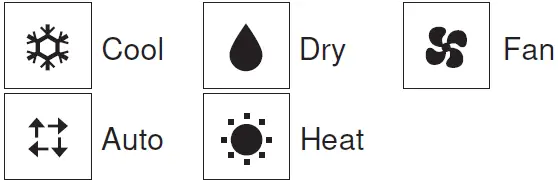
- Operation modes that are not available to the connected outdoor unit models will not appear on the display.
What the blinking mode icon means
The mode icon will blink when other indoor units in the same refrigerant system (connected to the same outdoor unit) are already operated in a different mode. In this case, the rest of the unit in the same group can only be operated in the same mode.
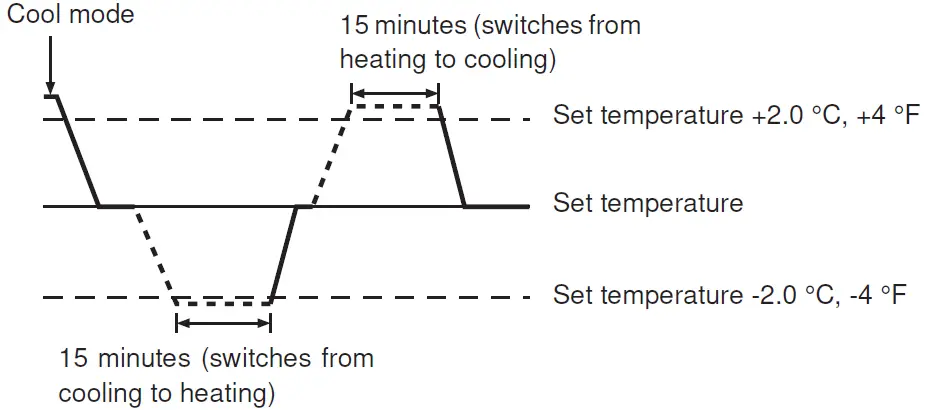
Automatic operation
- According to a set temperature, cooling operation starts if the room tempera-ture is too hot and heating operation starts if the room temperature is too cold.
- During automatic operation, if the room temperature changes and remains 2.0 °C, 4 °F or more above the set temperature for 15 minutes, the air conditioner switches to cool mode. In the same way, if the room temperature remains 2.0 °C, 4 °F or more below the set temperature for 15 minutes, the air conditioner switches to heat mode.

Temperature setting
<Cool, Dry, Heat, and Auto>
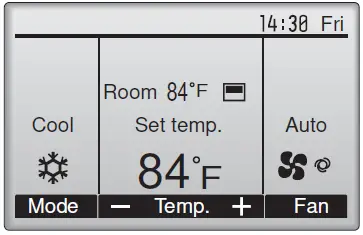 Example display (Centigrade in 0.5-degree increments)
Press the [F2] button to decrease the preset temperature, and press the [F3] button to increase.
- Refer to the table on page 6 for the settable temperature range for dif-ferent operation modes.
- Preset temperature range cannot be set for Fan/Ventilation operation.
- Preset temperature will be displayed either in Centigrade in 0.5- or 1-degree increments, or in Fahrenheit, depending on the indoor unit model and the display mode setting on the remote controller.
Fan speed setting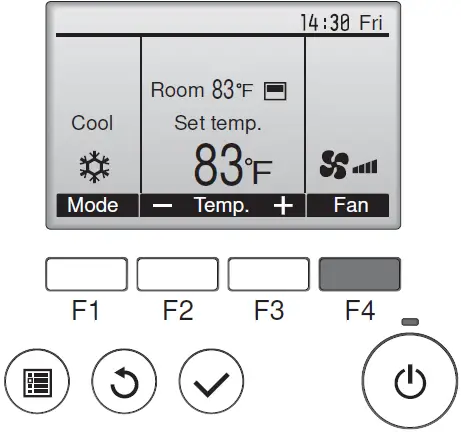 Press the [F4] button to go through the fan speeds in the following order.
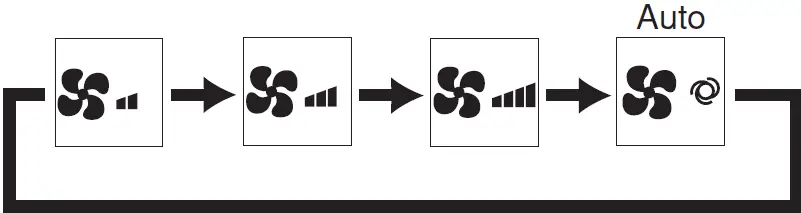
- The available fan speeds depend on the models of connected indoor units.
Notes:
- The number of available fan speeds depends on the type of unit con-nected.
- In the following cases, the actual fan speed generated by the unit will differ from the speed shown on the remote controller display.
- While the display is in “STAND BY” or “DEFROST” states.
- When the temperature of the heat exchanger is low in the heating mode.
(e.g. immediately after heating operation starts) - In HEAT mode, when room temperature is higher than the temperature setting.
- When the unit is in DRY mode.
Navigating through the Main menu
<Accessing the Main menu>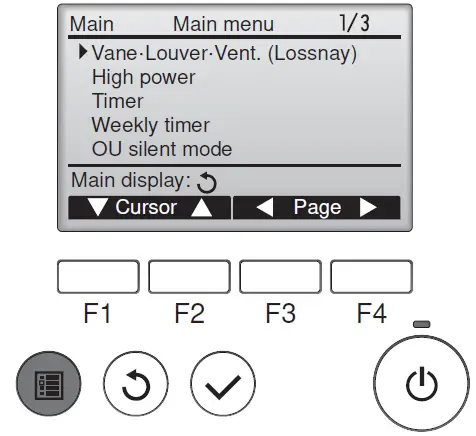 Press the [MENU] button. The Main menu will appear.
<Item selection>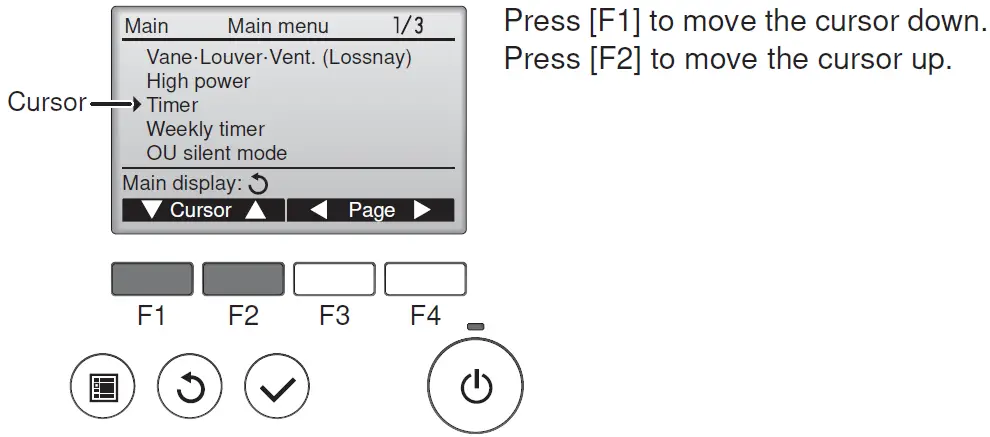 Press [F1] to move the cursor down. Press
[F2] to move the cursor up.
<Navigating through the pages>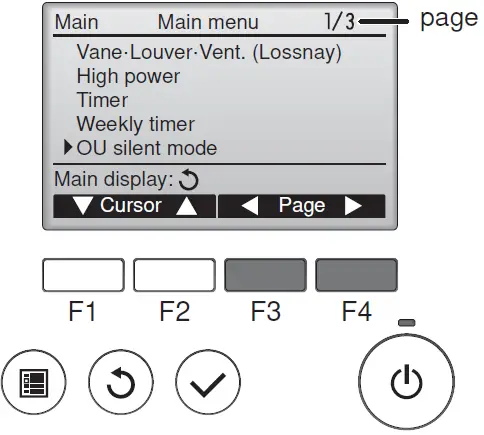 Press [F3] to go to the previous page.
Press [F4] to go to the next page.
<Saving the settings>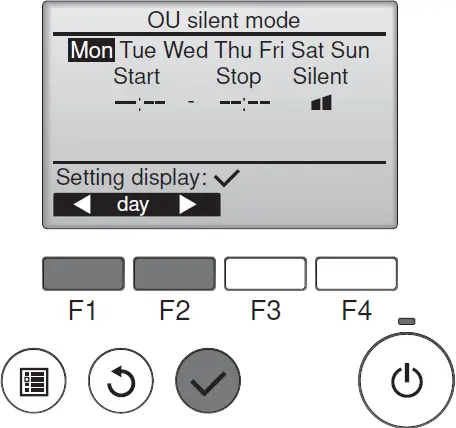 Select the desired item, and press the [SELECT] button.
The screen to set the selected item will appear.
<Exiting the Main menu screen>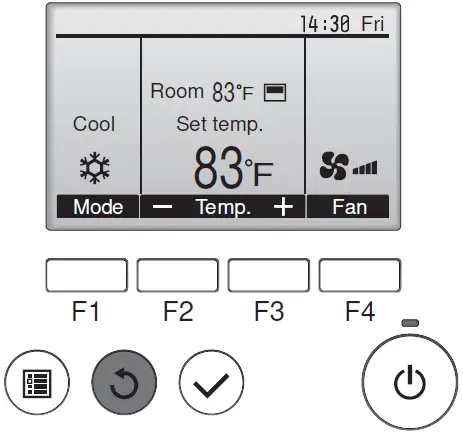 Press the [RETURN] button to exit the Main menu and return to the Main display.
If no buttons are touched for 10 minutes, the screen will automatically return to the Main display. Any settings that have not been saved will be lost.
<Display of unsupported functions>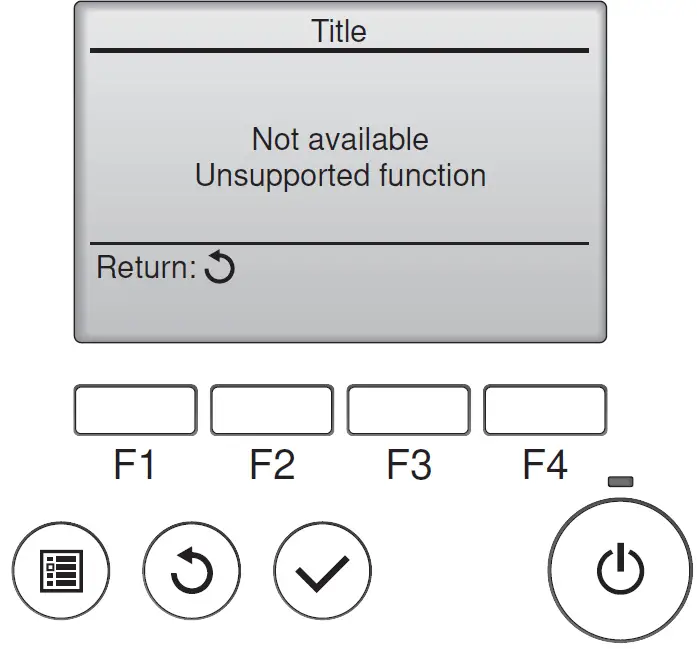 The message at left will appear if the user selects a function not supported by the corresponding indoor unit model.
Ventilation
For LOSSNAY combination
- The following 2 patterns of operation are available.
- Run the ventilator together with the indoor unit.
- Run the ventilator independently.
Note:
- With some model configurations, the fan on the indoor unit may come on even when you set the ventilator to run independently.
Note (for IR wireless remote controller and RF thermostat):
- Running the ventilator independently is not available.
- No indication on the remote controller.
- Timer functions are different by each remote controller.
- Refer to the operation manual that comes with each remote controller for the details included an operation method.
Emergency Operation for IR Wireless Remote Controller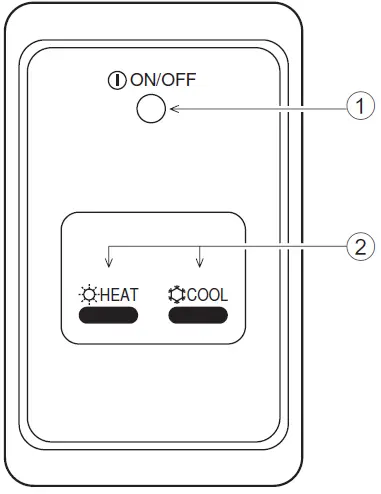
- ON/OFF lamp (lit when unit is operating; unlit when unit is not operating)
- Emergency operation
In cases where the remote control unit does not operate properly, use either the COOL or HEAT button on the wireless remote control signal receiver to toggle the unit on or off. On cooler only units, pushing the HEAT button toggles the fan on and off.
Pressing the COOL or HEAT button selects the following settings.
| Operation mode | COOL | HEAT |
| Preset temperature | 24 °C/75 °F | 24 °C/75 °F |
| Fan speed | High | High |
Care and Cleaning
Cleaning the filters
- Clean the filters using a vacuum cleaner. If you do not have a vacuum cleaner, tap the filters against a solid object to knock off dirt and dust.
- If the filters are especially dirty, wash them in lukewarm water. Take care to rinse off any detergent thoroughly and allow the filters to dry completely before putting them back into the unit.
Caution:
- Do not dry the filters in direct sunlight or by using a heat source, such as an electric heater: this may warp them.
- Do not wash the filters in hot water (above 122 °F [50 °C]), as this may warp them.
- Make sure that the air filters are always installed. Operating the unit without air filters can cause malfunction.
Caution:
- Before you start cleaning, stop operation and turn OFF the power sup-ply.
- Indoor units are equipped with filters to remove the dust of sucked-in air. Clean the filters using the methods shown in the following sketches.
Filter removal
Caution:
- In removing the filter, precautions must be taken to protect your eyes from dust. Also, if you have to climb up on a stool to do the job, be careful not to fall.
- When the filter is removed, do not touch the metallic parts inside the indoor unit, otherwise injury may result.
PEAD-A·AA8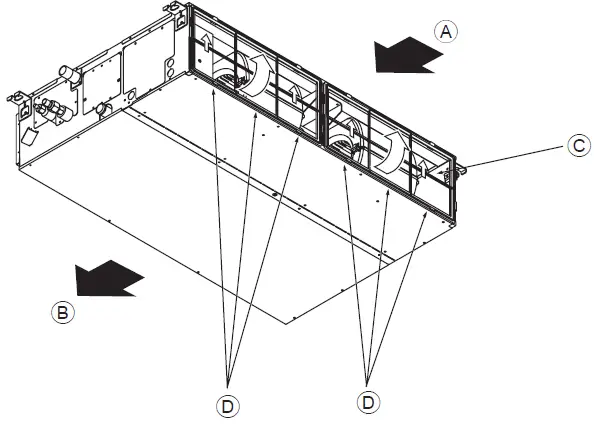
- While lifting the filter knob, pull it.
- Air intake
- Air outlet
- Filter
- Knob
Trouble Shooting
| Having trouble? | Here is the solution. (Unit is operating normally.) |
| Air conditioner does not heat or cool well. |
|
| When heating operation starts, warm air does not blow from the indoor unit soon. |
|
| During heating mode, the air conditioner stops before the set room temperature is reached. |
|
| When the airflow direction is changed, the vanes always move up and down past the set position before finally stopping at the position. |
|
| A flowing water sound or occasional hissing sound is heard. |
|
| A cracking or creaking sound is heard. |
|
| The room has an unpleasant odor. |
|
| A white mist or vapor is emitted from the indoor unit. |
|
| Water or vapor is emitted from the outdoor unit. |
|
| The operation indicator does not appear in the wired remote controller display. (*1) |
|
| “ ” appears in the wired remote controller display. (*1) |
|
| When restarting the air conditioner soon after stopping it, it does not operate even though the ON/OFF button is pressed. |
|
| Air conditioner operates without the ON/OFF button being pressed. (*1) |
|
| Air conditioner stops without the ON/OFF button being pressed. (*1) |
|
| Wired remote controller timer operation cannot be set. (*1) |
|
| “PLEASE WAIT” appears in the wired remote controller display. (*1) |
|
| An error code appears in the remote controller display. |
Turn off the power switch immediately and consult your dealer. Be sure to provide the dealer with the model name and information that appeared in the remote controller display. |
| Draining water or motor rotation sound is heard. |
|
| The fan speed changes in spite of not changing the setting. |
|
- Only for IR wireless remote controller
Specifications
PEAD-A·AA8 series
| Item Model | A09AA8 | A12AA8 | A15AA8 | A18AA8 | ||
| Power source | 208, 230V 60Hz | |||||
| Dimensions | Height mm [in] | 250 [9-7/8] | ||||
| Width mm [in] | 900 [35-7/16] | |||||
| Depth mm [in] | 732 [28-7/8] | |||||
| Net weight kg [lb] | 26 [58] | 27 [60] | ||||
| Fan | Airflow rate (Low-Mid-High) | CFM | 282-318-353 | 353-424-494 | 424-512-600 | |
| External static pressure*1 | in. WG | 0.14-0.20-0.28-0.40-0.60 | ||||
| [Pa] | [35/50/70/100/150] | |||||
| Sound level dB(A) (Low-Mid-High)*1 | 26-28-31 | 27-31-34 | 29-34-37 | |||
| Filter | Standard filter | |||||
| Item Model | A24AA8 | A30AA8 | A36AA8 | ||
| Power source | 208, 230V 60Hz | ||||
| Dimensions | Height mm [in] | 250 [9-7/8] | |||
| Width mm [in] | 1100 [43-5/16] | 1400 [55-1/8] | |||
| Depth mm [in] | 732 [28-7/8] | ||||
| Net weight kg [lb] | 30 [67] | 38 [84] | |||
| Fan | Airflow rate (Low-Mid-High) | CFM | 512-635-741 | 618-742-883 | 847-1024-1201 |
| External static pressure*1 | in. WG | 0.14-0.20-0.28-0.40-0.60 | |||
| [Pa] | [35/50/70/100/150] | ||||
| Sound level dB (A) (Low-Mid-High)*1 | 28-32-36 | 30-34-39 | 35-39-42 | ||
| Filter | Standard filter | ||||
Notes:
- The external static pressure is set to 0.20 in. WG (50 Pa) at factory shipment.


