
![]() Manual
Manual
9064782
Wood chipper (Translation of original Danish manual)
www.p-lindberg.de
User Manual
(Translation of original Danish user manual)
Woodchipper – Item no. 9064782
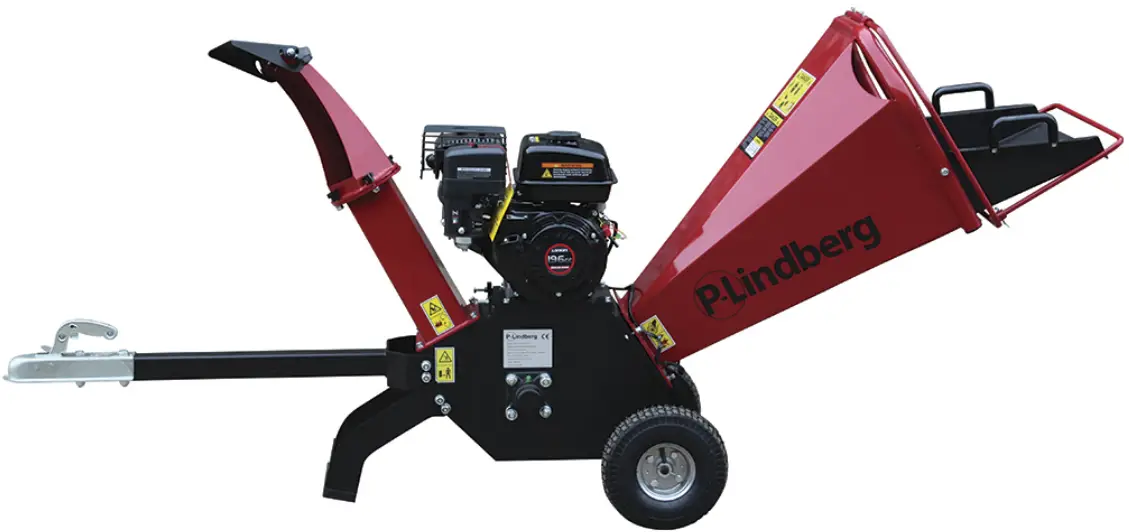
Description: A powerful woodchipper with a towbar, adjustable discharge chute, and safety bar. A wide 450 x 450 mm feed chute and strong, wide rubber flaps ensure the user does not come into contact with the blades when the machine is operating. The woodchipper has a recoil starter, and two V-belts for extra powerful transmission, as well as two blades and one counter knife. Supplied unassembled.
Intended use: Use the woodchipper only as described in the manual. All other use is deemed incorrect.
Technical specifications
| Engine | 4-stroke, 196 cc Loncin engine |
| Engine speed | 3,600 rpm |
| Idling speed | 1,800 rpm |
| Blade rotor speed | 2,400 rpm |
| Power | 4.1 kW |
| Starter type | Recoil starter |
| Fuel | Petrol |
| Engine oil | 0.6 I W10-30 or SAE 30 |
| Wood dimensions | Max. Ø80 mm (moist wood) |
| Number of blades | 2 blades + 1 counter knife |
| Number of belts | 2 |
| Wheels | 4.10-3.5-4 |
| Dimensions, without towbar (H x W x L) | 1040 x 555 x 1400 mm |
| Dimensions, with towbar (H x W x L) | 1040 x 555 x 2000 mm |
| Weight | 90 kg |
| IP rating | IP20 |
| Noise level | 115 dB(A) |
![]() Remember to check the engine oil
Remember to check the engine oil
and top-up before starting!
The towbar must not be used for transport on public roads!
Introduction
 This manual contains a description of the machine and the necessary instructions to be able to use it safely and correctly as well as for instructions for daily and periodic maintenance of the machine.
It is the duty of the employer (machine owner) to ensure that everyone who has to operate, service, maintain, or repair the machine has read the operating instructions.
It is recommended to use only original spare parts and accessories. Using nongenuine parts can be dangerous as well as reduce the life and performance of the machine. In addition, the warranty may lapse.
Should any doubts arise as to the interpretation of the instructions for use, please contact the supplier?
General information
The operating instructions are part of the safe operation of this machine and must always be kept with it. READ, UNDERSTAND AND FOLLOW the instructions in the operating instructions before using the equipment.
The illustrations in the instructions for use may differ from what is delivered, as components may have been removed to make the illustration clearer.
The operating instructions have been prepared in accordance with the Machinery Directive 2006/42 / EC and the relevant technical standards.
 The machine is equipped with safety labels, which must be maintained and replaced when they are no longer legible. This symbol together with the words: DANGER, ATTENTION, WARNING used in the operating instructions to draw attention to the safety and operation of the machine. It is important to follow all the guidelines given.
 Safety instructions
Safety labels
The machine has the following safety labels:
![]() DANGER
DANGER![]()
- Read and understand the operator’s manual before starting and using the unit
- Keep all shields and guards in place and securely attached.
- Keep hands, feet, face, clothing, and long hair out of the infeed bin, and discharge chute while the engine is running. Rotating cutting blades inside these openings can cause serious personal injury. The material being processed may bounce back from inlet openings or be thrown from the discharge chute. Long hair or loose clothing may be pulled or sucked into the inlet openings.
- If the chipper jams or becomes clogged, immediately shut off the engine and wait for all moving parts to come to a complete stop before clearing.
- If engine stalls because of a jam, move throttle control lever to stop position or shut off rocker to “0” if equipped before clearing,
- Do not install, remove, adjust, or service the discharge screen or any other part while the engine is running. Blade contact can occur.
- Do not operate on uneven ground where the unit is unstable.
- To avoid a fire hazard, keep leaves, grass, and other combustible materials away from the hot engines and muffler.
- Keep children and others away from the area of operation.
- Wear approved safety glasses, gloves, and ear protection.
- Do not operate on pavement, gravel, or other hard surfaces since objects can ricochet and cause injury.
![]() WARNING
WARNING![]()
DO NOT place wood or branches over 8 cm in diameter into the inked bin. The blades may get stuck or jammed.


- Wear gloves
- Wear eye protection
- Wear hearing protection
- Read the operating instructions
- No smoking
- Cutting parts
- Rotating parts
- Keep unauthorized persons at a distance
 Warning! Cutting hazard!
 Do not touch rotating parts!
 Warning! Ejected items hazard!
 Keep to a safe distance!
 Do not reach into openings, the feed chute, or discharge chute while the machine is operating.
Keep unauthorized people and pets at a safe distance.
Before putting the machine into operation
A. The user must be fully trained in how to use the woodchipper before it is put into operation.
B. The user must read and understand the user manual.
C. The machine must stand on a flat surface and all guards must be attached and be in good, reliable working condition.
D. The blades must be in good condition and be positioned correctly. All blades must be sharpened and mounted in sets.
E. All joints must be inspected and tightened if necessary.
F. Do not insert any material other than wood into the woodchipper. Remove all nails and screws.
G. Have fire-fighting equipment ready at the work location.
When the machine is running
A. Always insert material while standing next to, not in front of the machine.
B. Someone who is familiar with the machine should be present nearby.
C. Maintain strict discipline at all times and use the equipment in the specified periods.
D. Be aware of the discharge chute’s position and take account of the wind direction to avoid discharged material being blown out onto a public road or where it could otherwise be hazardous/inconvenient to the public.
E. NEVER put any part of your body in the feed chute while the machine is running.
F. NEVER operate the machinery after you have consumed alcohol or drugs.
G. NEVER use the machinery indoors or in a confined space and NEVER crawl down into the feed chute.
Note – this manual cannot cover all possible situations. If situations arise that are not described in this manual, it is important that the user uses his/her common sense and uses the woodchipper in the safest way. If necessary, contact the supplier for assistance.
Machine overview
(Photos are for guidance and may differ from the supplied product).
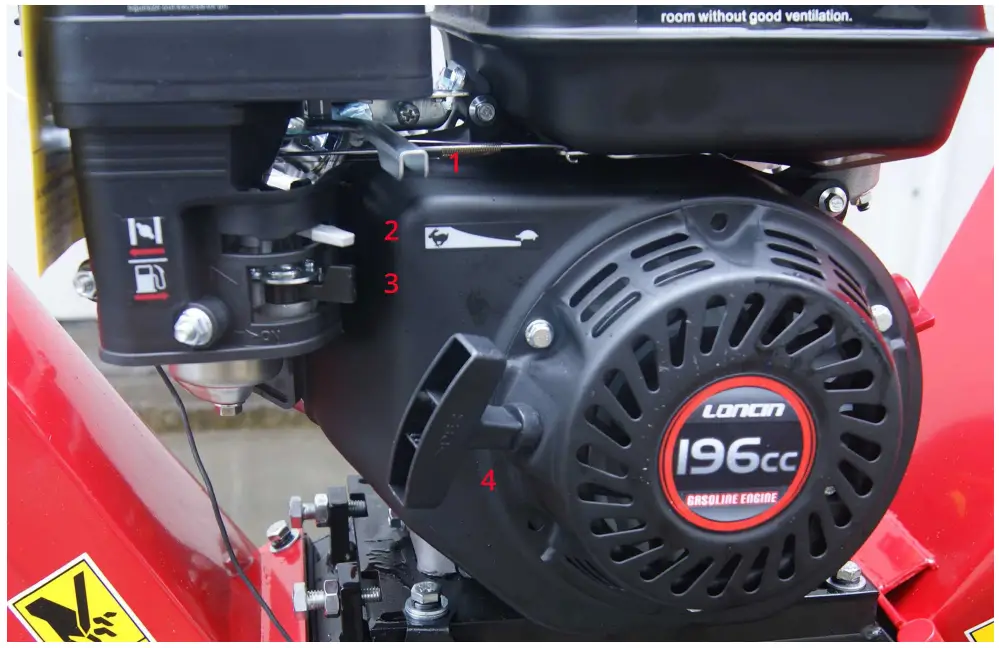
- Throttle lever, shown here in the lowest position.
- Choke lever, shown here closed/without choke.
- Petrol valve, shown here opened.
- Recoil starter
Topping up oil
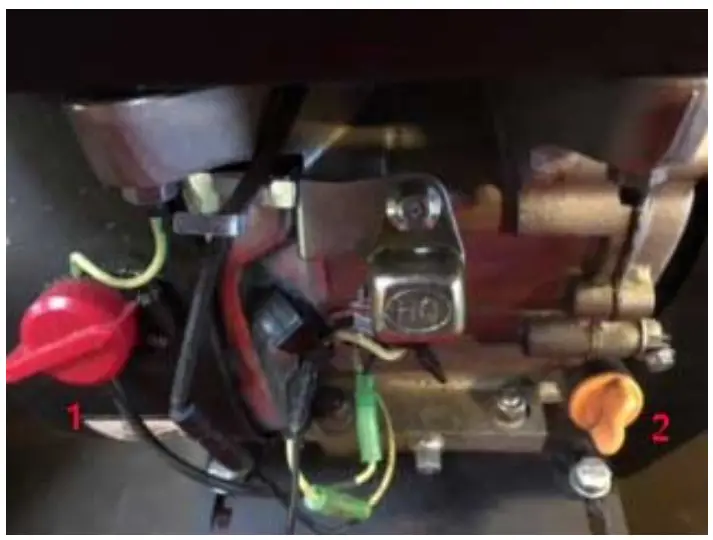
| 1 | On/Off switch |
| 2 | Oil filling/dipstick |
| NB: When starting to use a new machine, fill with 0.6 l of W10/30 or SAE 30 engine oil. Thereafter, when topping up, fill to edge of the hole. | |
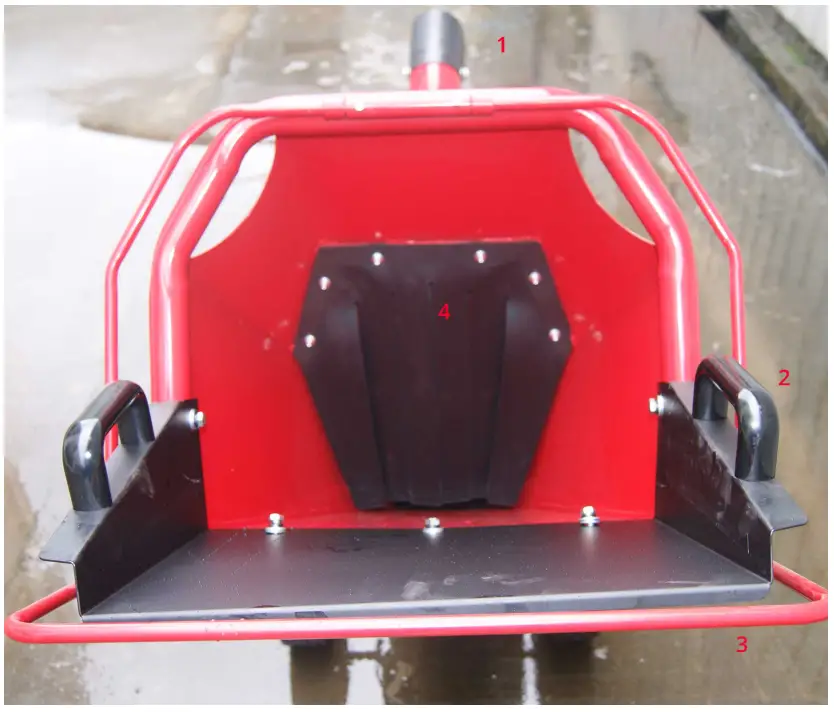
| 1 | Discharge chute | 2 | Feed slide with handles |
| 3 | Safety bar | 4 | Feed hole (covered by protective rubber flaps) |
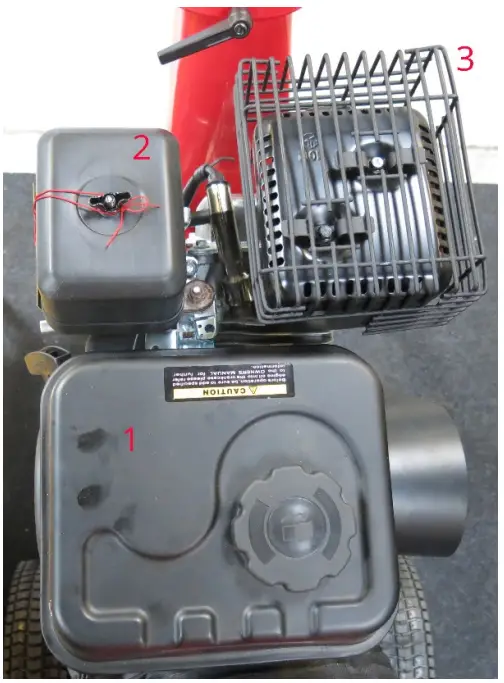
| 1 | Petrol tank/refueling |
| 2 | Air filter |
| 3 | Carburettor |
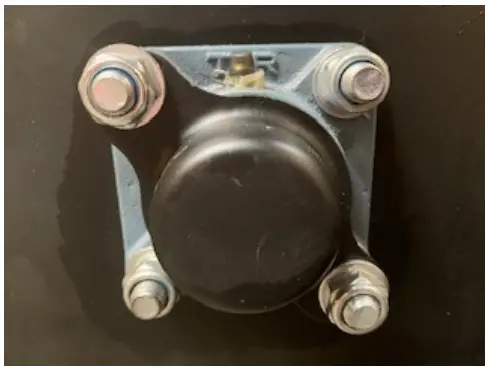
Counterknife
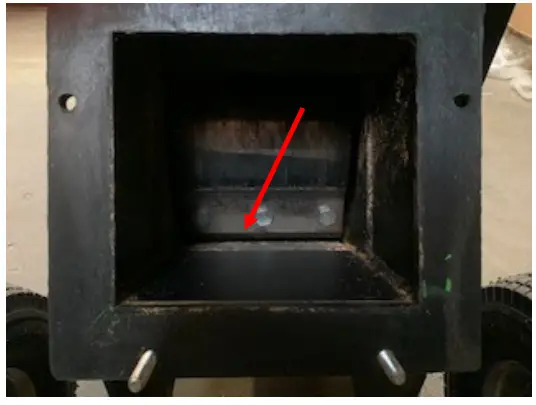
Check that the blade and counter knife have the correct distance – they must be positioned as close as possible against one another without hitting one another.
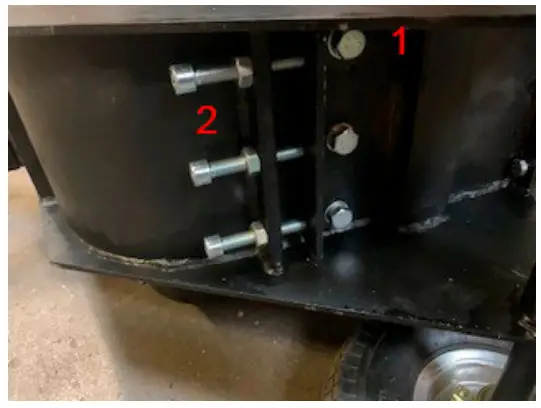
If it is necessary to adjust the distance between the blade and counter knife, lie the woodchipper down on its side and loosen the three bolts that hold the counter knife (1).
Next, adjust the distance using the three adjustment bolts (2).
Assembly Instructions
(Photos are for guidance and may differ from the supplied product).
NB:
Some of the components weigh over 20 kg. Fitting, therefore, requires at least two persons! Only fit when the engine is not running!
Open the box and take out all the parts.
Check that the delivery is complete. Delivery includes: Main machine Funnel Extension piece for the chute Safety bar Discharge chute Wheel axle with wheels Support leg Towbar and towbar hitch Tools User Manual
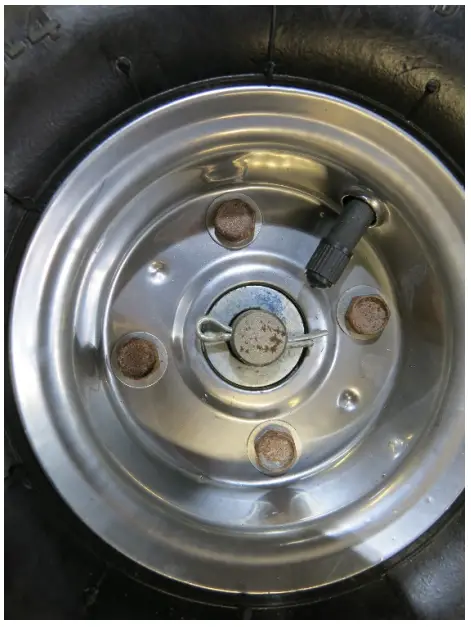 Remove one wheel pin and its wheel from the axle.
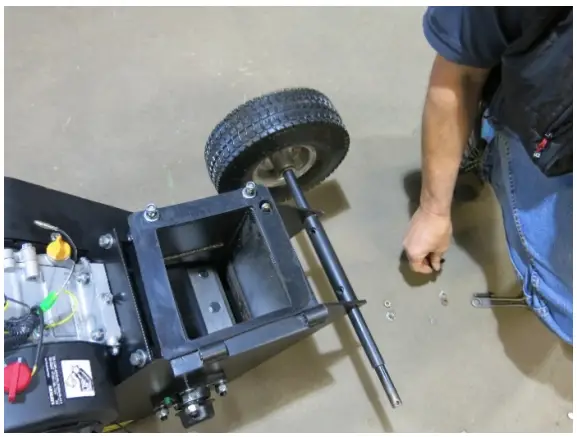
Guide the wheel axle through the bracket and remount the wheel. Secure the wheel using a spacer and the wheel pin. And secure the axle with two bolts.
Feed chute:
Position the chute on the blade box so that the assembly holes align with the holes in the chute. Fit the bolts, washers, and nuts.
Caution: Risk of cutting injuries!
The machine can now be laid down so it rests on the chute. If possible, place a piece of cardboard under the chute to avoid scratching the paint.
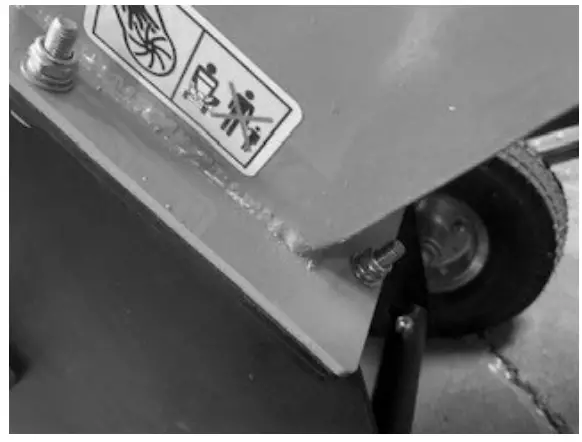
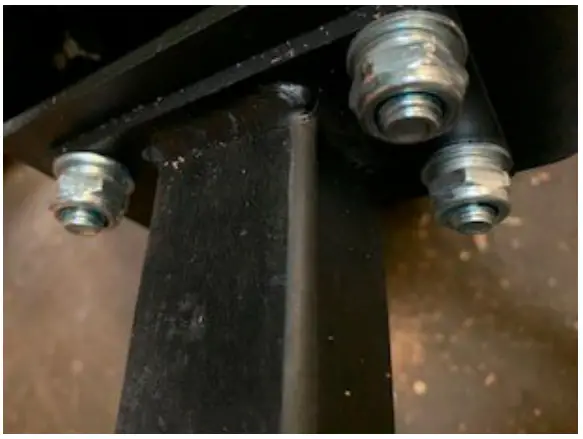
Slightly tip the blade box back and fit the support foot using M10 x 35 bolts, washers, and M10 nuts. Ensure that it is correctly positioned. Attach the rubber support. Attach the drawbar.

It is advisable that two people perform this task – so that one person can hold the chute while the other attaches the bolts!
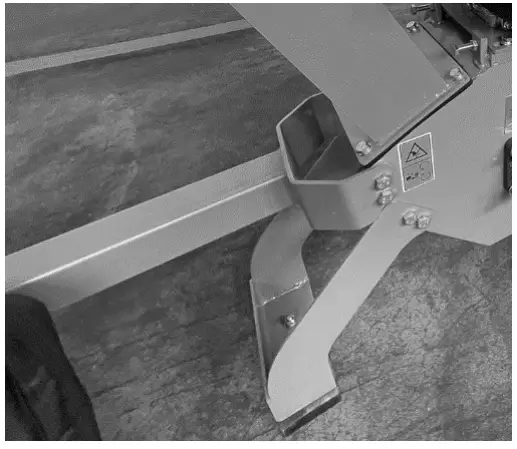
Position the discharge chute on the blade box so that the assembly holes align with the holes in the discharge chute. Secure using bolts, washers, and nuts.
Please note that the machine is pictured with a different type of support foot.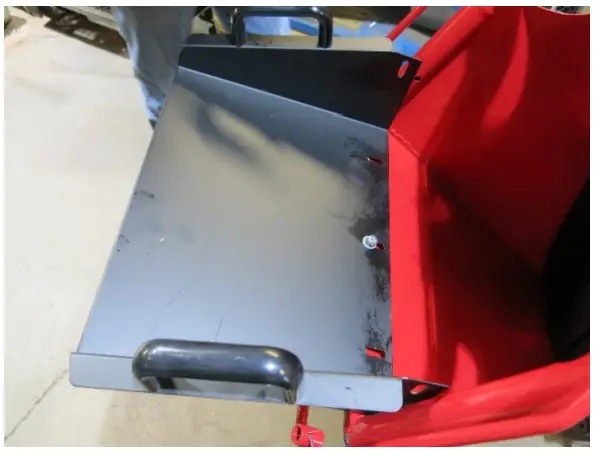 Next, attach the slide/extension piece to the chute using five bolts. Use the two long bolts on the outside! Be careful not to drop bolts or screws into the chute!

Fit the safety bar and secure it with the two pins.
Fit the towbar to the woodchipper using the four bolts, washers, and nuts. If the towbar hitch is not fitted on delivery, it must be fitted using bolts.
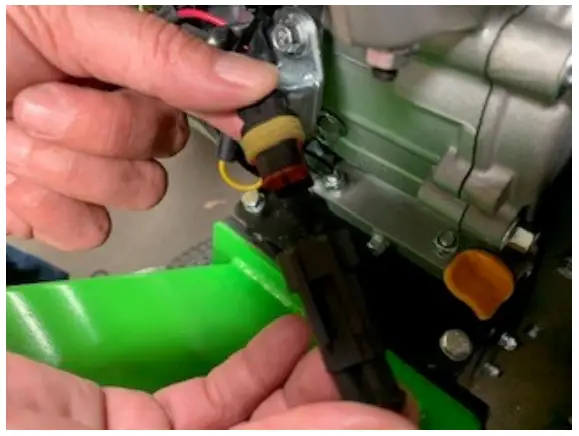
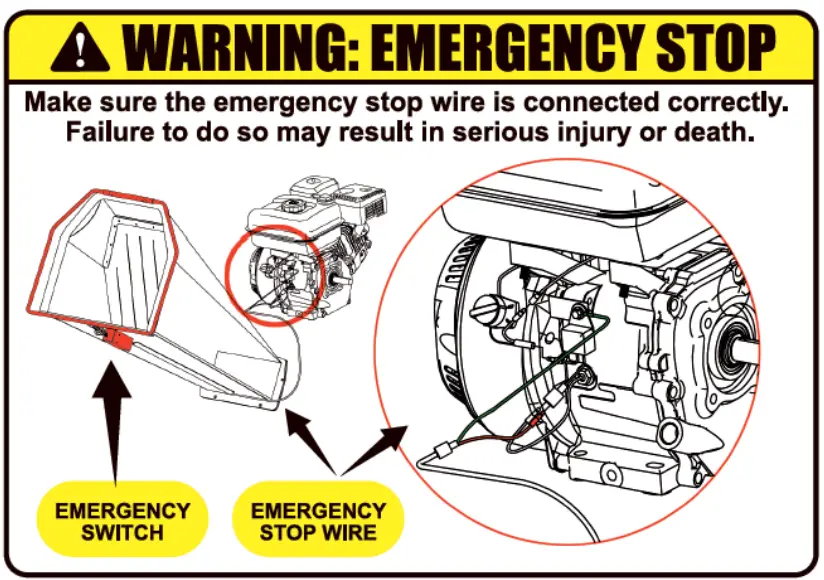
Lastly, connect the connector to the safety switch.
Remember to fill with 0.6 l 4-stroke oil before use!
WARNING
After fitting, check that all bolts and screws are tightened securely and if not, tighten securely. Also, check that the safety switch is correctly fitted and functions correctly.
User Instructions
A. Read and understand all instructions, safety-related rules, and warnings in the sections below before putting the equipment into operation. If there is any doubt or question
about the correct or safe use of the equipment described in this manual, contact the supplier.
B. When the woodchipper is running, ensure that you stand in the safe work zone at all times. Never place any part of your body anywhere where it could cause unsafe operation.
C. Before filling and starting the woodchipper, it is advisable to put on personal protective equipment, including safety glasses, ear defenders, tight-fitting gloves without ties/laces or loose-fitting cuffs, and shoes with steel caps.
D. Ensure that you are familiar with the correct and incorrect wood chipping methods. Never use an incorrect or unsafe method.
Start
- Place the woodchipper on an even, dry surface and chock the wheels so the machine cannot move.
- Ensure that the fuel cock is in the “ON” position.
- Engage the choke if the engine is cold.
- Set the throttle to “FAST” (the position furthest to the left).
- Put the on switch to “ON”. Grip the recoil starter handle and pull it slowly until you feel resistance. Let the cord recoil slightly and pull quickly and firmly to start the engine. It will typically take one or two attempts to start.
- If you engaged the choke, slowly disengage it when the engine is running satisfactorily.
- If the engine is cold, it can be warmed up at half throttle (the middle position) for 3- 4 minutes, after this apply full throttle.
Stop
- Set the throttle to idle (the position furthest to the right).
- Put the on/off switch to “OFF”.
Safe work zone:
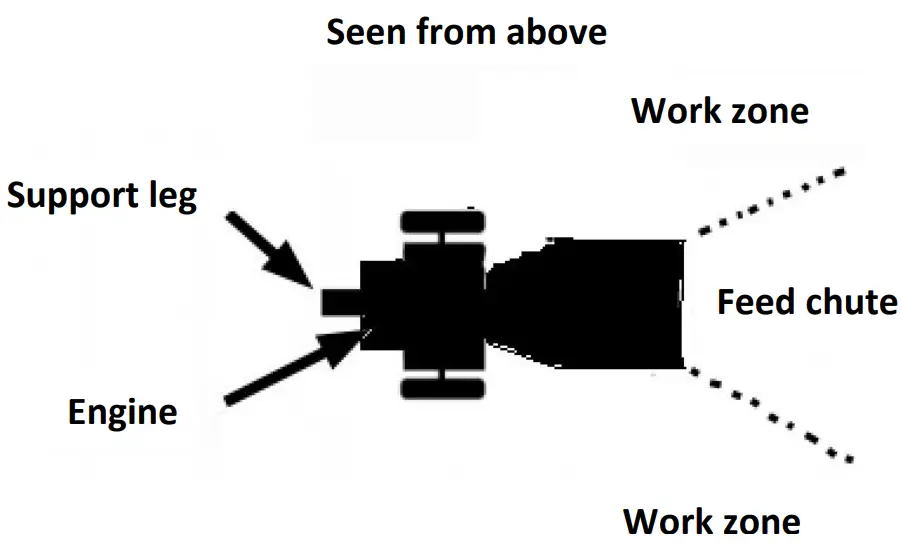
Wood chipping:
Do not feed or step out in front of the feed chute area while the woodchipper is running. This is a very DANGEROUS method that could cause personal injury or death.
In the event of a blockage
If anything gets stuck in the disks while chipping wood, stop the engine and remove the stuck material. Then restart the engine and resume wood chipping.
Maintenance
Regular maintenance is required to ensure the equipment’s best performance and long service life.
Maintenance plan
| Maintenance tasks and checks | Frequency |
| Check for loose and missing screws, nuts, bolts. | Before each use |
| Check for damage on all machine parts | Before each use |
| Check fuel level | Before each use |
| Check fuel tank for leaks | Before each use |
| Clean the machine | Before each use |
| Check the oil level | Before each use |
| Change motor oil | After the first five operating hours then after every 25 operating hours. |
| Check the safety switch function | Before each use |
| Check V-belt tension | Before each use |
| Check blade sharpness | Before each use |
| Lubricate the blade rotor | Every 25 operating hours |
| Clean the spark plug | Every 25 operating hours |
| Clean the engine’s exterior and radiator | Every 25 operating hours |
| Check the tyre pressure | Every 25 operating hours |
| Clean the air filter | Every 20-25 operating hours |
Cleaning the air filter
A blocked air filter reduces the engine’s performance significantly and leads to faulty motor function. It also reduces the lifetime of the engine! Remove the air filter cover. Remove the air filter. Clean the air filter. And drip some drops of oil onto the filter. Replace the filter.
Clean the spark plug
Remove the spark plug terminal from the spark plug. Loosen and remove the spark plug. Remove carbon and deposits using a small brush. The electrode gap must be approximately 0.5–0.7 mm.
Lubricate the blade rotor
Lubricate the blade rotor bearings on both sides using the lubrication nipple. Also after cleaning!
- Remove the V-belt guard.
- Wipe clean the lubrication nipple using a cloth.
- Set the grease gun on the lubrication nipple and pump grease into the nipple.
- Re-fit the V-belt guard.
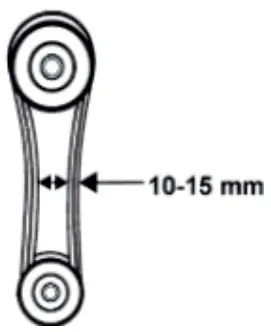
Adjusting the V-belt
The V-belt connects the engine to the blade rotor. Especially on new machines and after the V-belt has been replaced, the belt becomes wider and thus looser. If the V-belt gives more than 10–15 mm when pressing with a thumb, the belt requires re-tensioning.
- Switch off the machine and remove the pulley guard.
- Loosen the four nuts on the engine.
- Move the engine back to increase the tension of the V-belt or forward to decrease the tension of the V-belt.
- Position the engine and pulley in parallel (if required, use a ruler). Loosen the four nuts on the engine again.
- Re-fit the pulley guard.
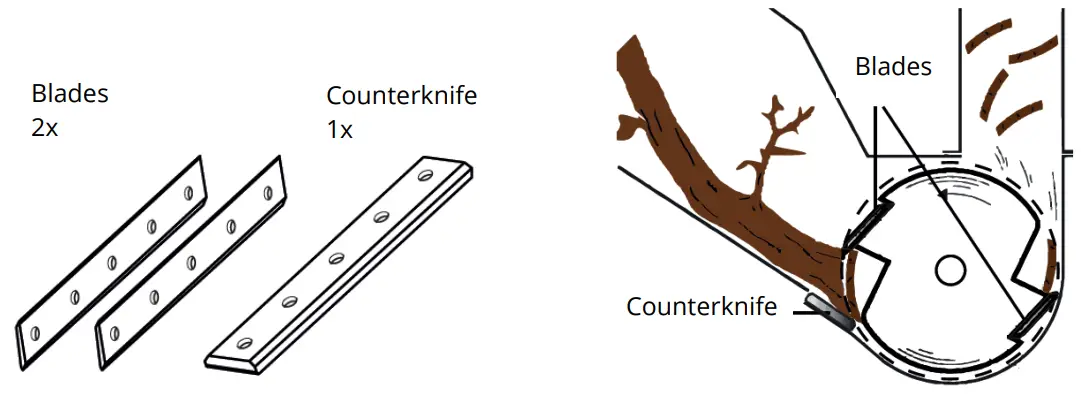
Blades
 NB:
NB:
- Wear safety gloves.
- During normal operating conditions, the blades will become blunt after approximately 30–50 operating hours.
- Signs of blunt blades:
o Abnormally noisy
o Reduced speed
o The V-belt slips (even after tightening) - The blades and counter knife can be reversed once.
- Immediately replace faulty blades!
Loosen the screws, reverse the blades (grind as required) and fit them securely into position again. Adjust the distance between the counter knife and the blades to 0.5 mm.
Carburettor
NB – The carburetor settings may only be set by a qualified professional!
Fuel, re-filling
Use standard, unleaded octane 95 or higher petrol. Never use petrol that has been mixed with oil or contaminated petrol. Avoid water, rust, or dirt entering the petrol tank.
NB – It is not recommended that alternatives to petrol are used, as this might damage the fuel system’s components.
Cleaning
Clean the machine and accessories of dirt. Wipe the machine’s guards regularly using a damp cloth and mild soap. Apply a thin layer of oil on all untreated surfaces.
NB: If solvents, aggressive chemicals, or abrasive agents are used, this will damage the machine’s guards.
Storage
If the machine is to be stored for more than 30 days:
- Let the machine cool down.
- Clean and dry the machine.
- Completely empty the tank and carburetor, avoiding spills.
- Store dry and covered, and out of the reach of children.
 Disposal
The machine may not be deposed of as ordinary waste. Contact your local authority for information about its proper disposal. Avoid contaminating the environment with operating agents: Drain fuel, engine oil, and any other operating agents before disposing of the machine.
Troubleshooting
Most problems are easy to solve. See the troubleshooting table below for normal problems and how to resolve them. If a problem cannot be solved, contact the supplier.
Troubleshooting table
| Problem | Possible cause | Solution |
| The motor does not start | Ignition switch defective | Repair or replace |
| No fuel | Replenish with fuel | |
| Spark plug defective or damaged | Clean or replace | |
| Fuel hose defective | Check hoses for damage or kinks. Replace/rectify | |
| The engine lacks power | Dirty air filter | Clean or replace |
| V-belt | Tighten or replace | |
| Overloading | Adjust feeding of material | |
| Blockage | Remove the blockage | |
| Blunt blades | Reverse/sharpen blades | |
| Automatic feeding of material not functioning. | Blunt blades | Reverse/sharpen blades |
| Abnormal sound | Loose joints, screws, nuts, etc. | Tighten |
NB
If you are unable to carry out the necessary repairs correctly or do not possess the necessary experience, then only let a qualified professional carry out the task.
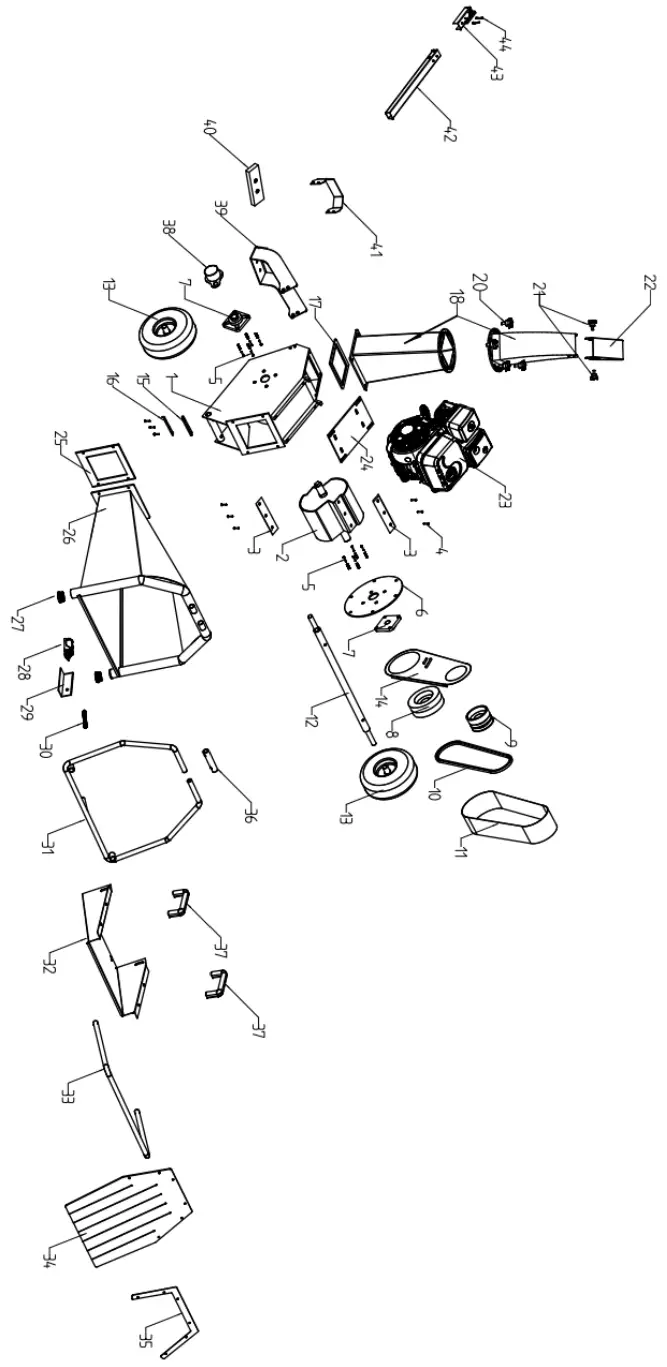
Exploded-view drawing
 List of components
 List of components
| No. | Description | No. | Desalpdon |
| 1 | Frame | 23 | Engine |
| 2 | Blade rotor | 24 | Fitting plate for engine |
| 3 | Blade | 25 | Rubber seal |
| 4 | M10 x 25 hex bolt | 26 | Feed chute |
| 5 | M12 x 40 hex bolt | 27 | Pipe plugs |
| 6 | Mounting plate for bearings | 28 | Emergency stop switch |
| 7 | Bearing | 29 | Fitting for emergency stop |
| 8 | Pulley | 30 | Spring |
| 9 | Coupling | 31 | Safety bar |
| 10 | 13x860Li V-belt | 32 | Infeed chute |
| 11 | Belt guard | 33 | Safety bar |
| 12 | Wheel axle | 34 | Rubber flaps |
| 13 | Wheel | 35 | Mounting strip for rubber flaps |
| 14 | Internal belt guard | 36 | Manifold |
| 15 | Counterknife | 37 | Handle for infeed chute |
| 16 | Fitting | 38 | Bearing cover |
| 17 | Rubber seal | 39 | Support leg |
| 18 | Discharge chute | 40 | Rubber foot for support leg |
| 18 | Discharge chute | 41 | Towbar connection |
| 20 | M8 x 15 star bolt | 42 | Towbar |
| 21 | M8 x 15 star bolt | 43 | Coupling |
| 22 | Adjustable ejector | 44 | M12 x 80 hex bolt |
EU Declaration of Conformity
 EU DECLARATION OF CONFORMITY
Manufacturer.
P. Lindberg NS
Sdr. Ringvej 1
DK-6600 Vejen
Phone: +45 70212626
E-mai: [email protected]
CVR: 25903110
www.p-lindbero.dk
Hereby declare that the following Woodchipper with drawbar, 4,1 kW machine: Pt- item no. 9064782
Type / model: GS650
Complies with the following 2006/42/EEC directives: 2014/301EEC
Applied standards and norms: EN ISO 12100:2010 EN ISO 14982:2009

We reserve the right to change the technical parameters and specifications of this product without prior notification.
P. Lindberg A/S
Tel.: +45 70212626
Sdr. Ringvej 1
6600 Vejen, Denmark
MAN 9064782 EN V1
www.p-lindberg.dk
E-mail: [email protected]


