![]()
PRS-26 Instructions
PARK TOOL CO.5115 Hadley Ave N, Saint Paul, MN 55128 (USA) parktool.com
PRS-26 Team Issue Portable Repair Stand
Set Up (Figure 1)
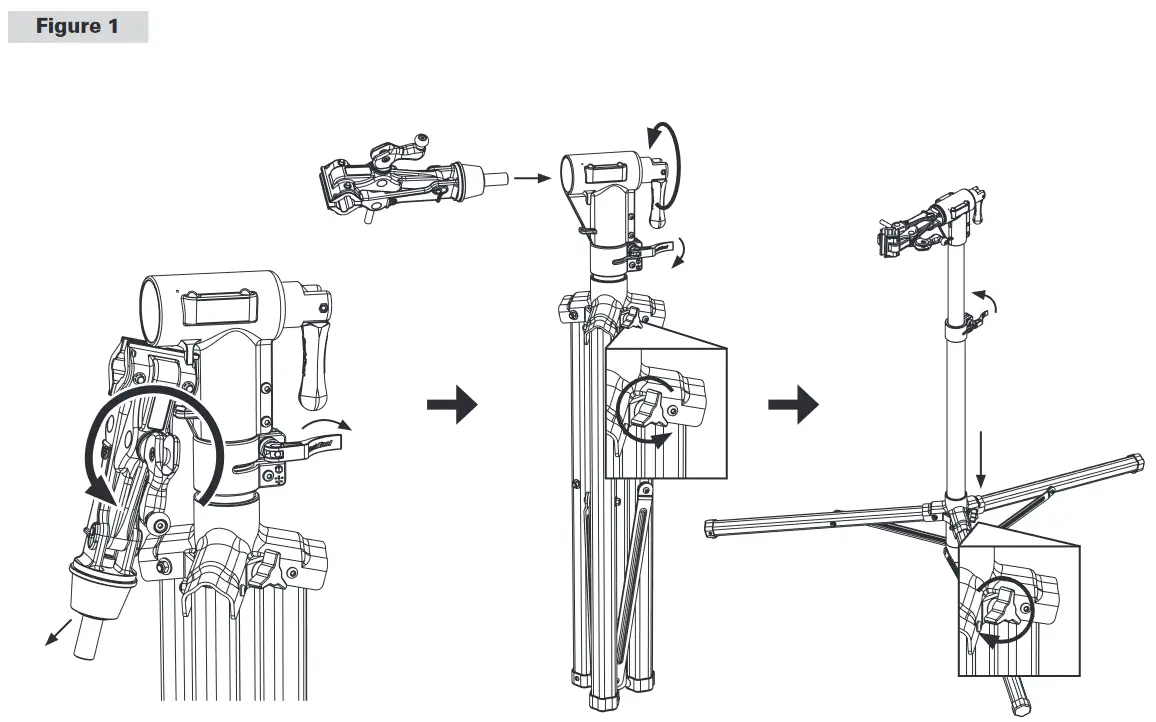
- Turn cam handle (#35) on clamp (#20) counterclockwise one turn.
- Pull bottom of clamp outward to remove from top tube (#17).
- Insert clamp into top tube assembly. Engage threads of handle with threads of clamp. Turn handle clockwise to secure clamp.
- Turn knob (#13) on yoke (#1) counterclockwise one turn. Slide yoke down upright tube (#3) until it comes into contact with the height sleeve (#19). Turn knob clockwise to lock yoke into place.
- Open quick release lever on collar (#16). Pull top tube upward to desired height.
Close quick release lever to lock. Note: Do not exceed the “Max Height” line on the upright tube (#3).
Clamping Bike (Figure 2)
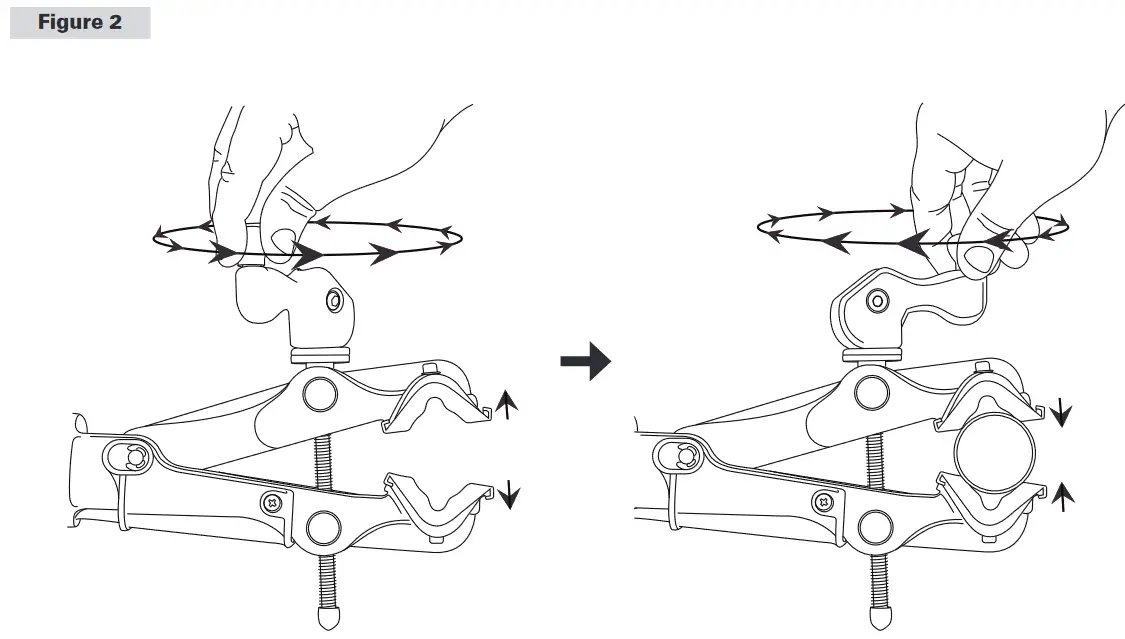
- Turn cam handle (#35) counterclockwise until jaws accommodate frame tube or seat post.
- Turn cam handle clockwise to close jaws on tube. Adjust final clamping pressure To avoid damage to tube, do not over tighten.
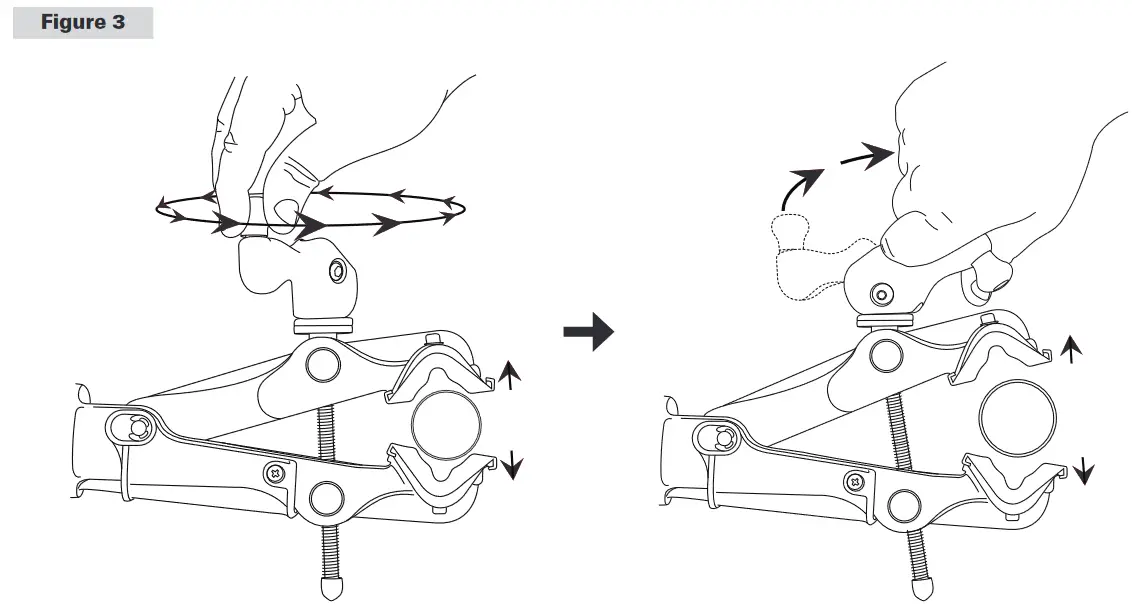
Releasing Bike (Figure 3)
 Turn cam handle counterclockwise half to one full turn to remove clamping pressure from tube.
- Flip cam handle 180 degrees to quickly release tube from jaws.
 Turn cam handle counterclockwise half to one full turn to remove clamping pressure from tube.
Folding for Storage (Figure 4)
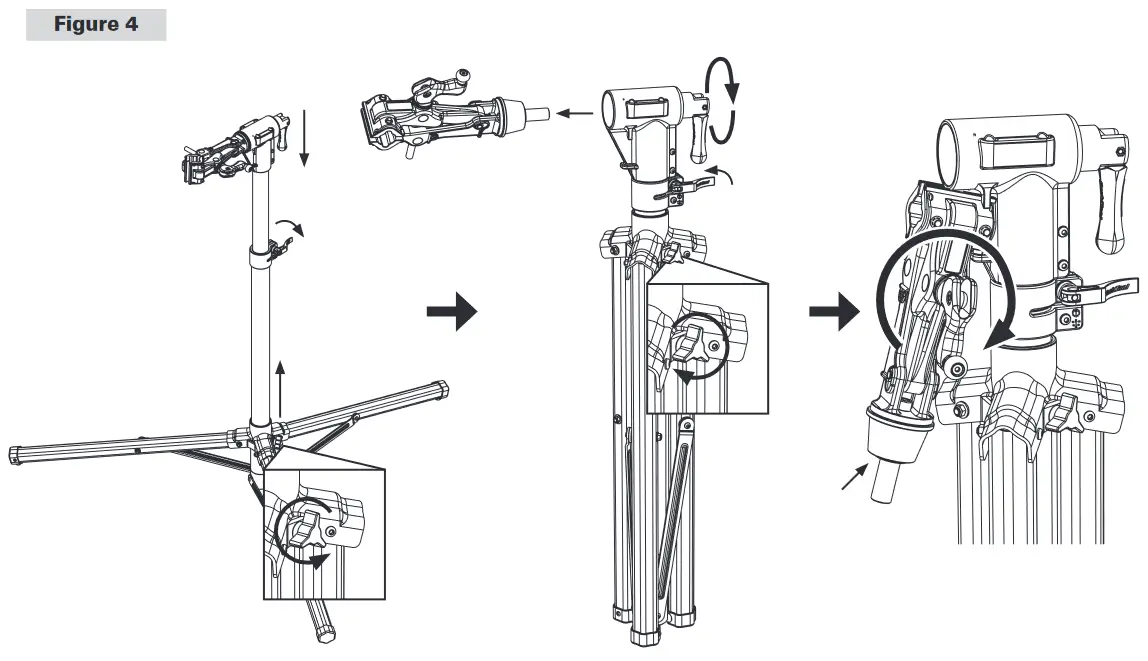
- Open quick release lever on collar (#16). Lower extension tube (#15). Close quick release lever to lock.
- Turn knob (#13) on yoke (#1) counterclockwise one turn. Slide yoke upwards to fold legs (#2). Turn knob clockwise to lock yoke into place.
- Turn handle on back of top tube assembly (#17) counterclockwise to remove clamp (#20).
- Turn cam handle (#35) clockwise until the jaw opening is approximately 0.5” [13 mm].
- Angle clamp as shown and insert between tabs on top tube assembly as shown.
Turn cam handle clockwise to secure clamp to top tube.
Notes
- The clamp of the repair stand can be rotated 360 degrees, allowing easy access to any component of the bike. To adjust the rotational angle of the clamp, loosen the locking handle on the back of the top tube assembly (#17), rotate the clamp to the desired position, and re-tighten the handle to lock the clamp.
- Some bike manufacturers recommend not clamping thin-walled or carbon fiber frames. Consult manufacturer for suggested clamping location.
- To avoid damage to finish, clean tube before clamping.
- The two clamping jaws each have a recess to provide clearance for cables. Be sure any brake or shift cables are in one of the recesses before clamping.
- If saddle or other components interfere with rotation of cam handle, reverse clamp in repair stand so cam handle faces opposite direction.
Optional Accessories
- BAG-15 Travel and Storage Bag
- #106 Work Tray
- PTH-1 Paper Towel Holder
Assembly
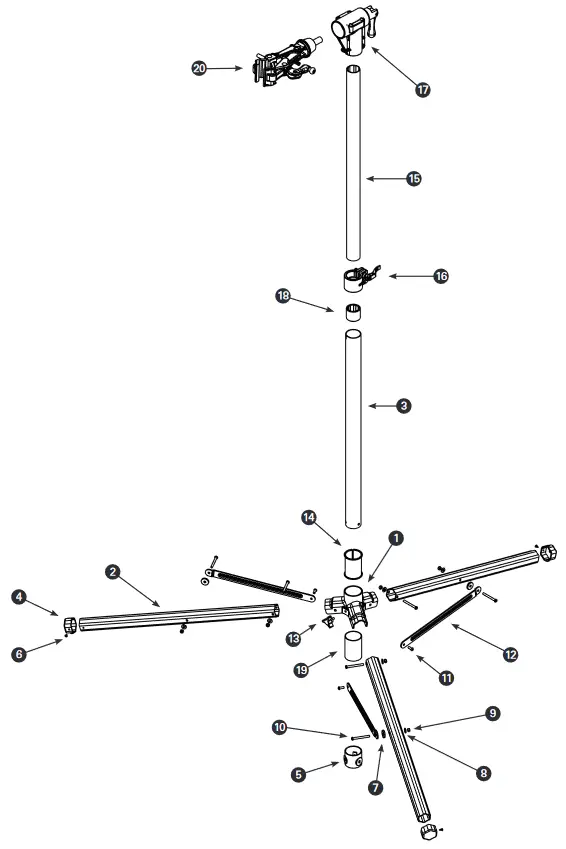
- Slide yoke (#1) and height sleeve (#19) onto upright tube (#3). Install knob (#13) into yoke but do not tighten.
- Install upright end cap (#5) onto end of upright tube and align holes. Install leg straps(#12) oriented as shown, using M6 x 16 mm screws (#11). Secure to approximately 4 Nm.
- Install leg tubes (#2) onto yoke using M6 x16 mm screws (#10), washers (#8), and lock nuts (#9), oriented as shown. Ensure legs are oriented so that foot pad on leg end cap (#4) will face the ground. Secure screws to approximately 3 Nm.
- Install leg tubes onto leg straps using M6 x 16 mm screws, spacers (#7), washers,and lock nuts, oriented as shown. Secure screws to approx 4 Nm.
- Push yoke down upright tube until it contacts the yoke sleeve (#14) and tighten knob.
- Install clamp (#20) into top tube assembly (#17). Turn top tube handle clockwise to secure clamp.


Parts
PRS-26 PART NUMBERS
| Ref. # | Part # | Description | Qty. |
| 1 | 2705 | Yoke | 1 |
| 2 | 2940-3 | Leg Tube | 3 |
| 3 | 2941 | Upright Tube | 1 |
| 4 | 1920L | Leg End Cap | 3 |
| 5 | 2703 | Upright End Cap | 1 |
| 6 | 1921-2 | Leg End Cap Screw | 3 |
| 7 | 1924-3 | Leg Spacer | 3 |
| 8 | 1926-4 | Washer | 6 |
| 9 | 1883-4 | Nylok Nut, M6 x 1.0 | 6 |
| 10 | 1923-4 | Leg Screw | 6 |
| 11 | 1928-2 | Button Head Cap Screw, M6 x 1.0 | 3 |
| 12 | 2942-3 | Leg Strap | 3 |
| 13 | 220K | Knob | 1 |
| 14 | 2701 | Yoke Sleeve | 1 |
| 15 | 2944 | Upright Extension | 1 |
| 16 | 2945A | Height Adjustment Collar Assembly | 1 |
| 17 | 2943A | Top Tube Assembly | 1 |
| 18 | 2947 | Extension Bearing | 1 |
| 19 | 2948 | Yoke Height Sleeve | 1 |
| 20 | 100-25D | Clamp Assembly | 1 |
100-25D PART NUMBERS
| Ref. # | Part # | Description | Qty. |
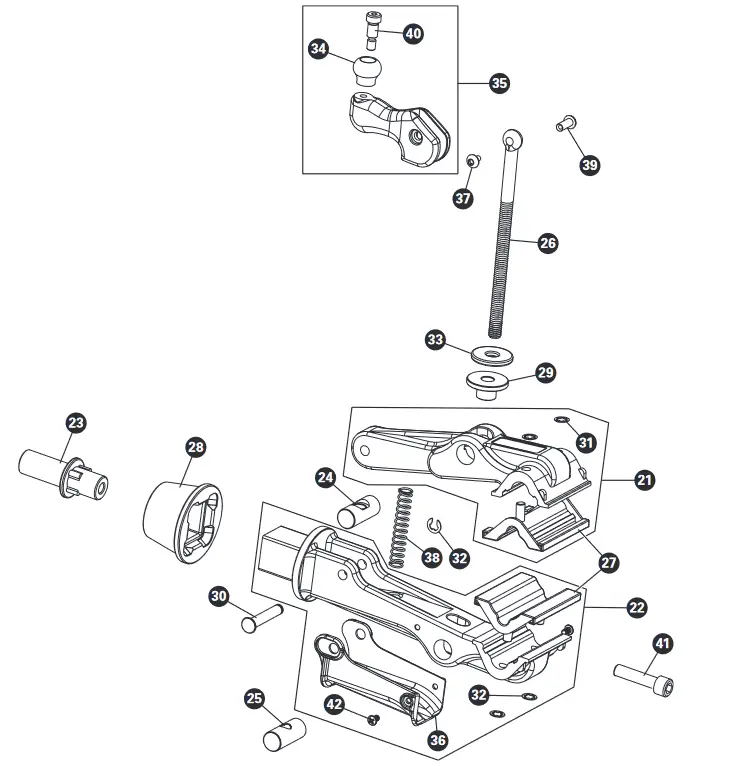
| 21 | 1957A | Moveable Jaw and Cover Assembly | 1 |
| 22 | 1955A | Main Jaw and Cover Assembly | 1 |
| 23 | 1951 | Threaded Bullet | 1 |
| 24 | 1962X | Non Threaded Barrel | 1 |
| 25 | 1961X | Threaded Barrel | 1 |
| 26 | 1963X | Clamp Screw | 1 |
| 27 | 1960 | Jaw Cover Set (includes clips) | 1 |
| 28 | 1953 | Tapered Donut | 1 |
| 29 | 1808X | Clamp Handle Spacer | 1 |
| 30 | 1959 | Clevis Pin | 1 |
| 31 | 467-1 | Jaw Cover Clip | 4 |
| 32 | 107-2 | E-Clip | 1 |
| 33 | 1809X | Nylon Washer | 1 |
| 34 | 1967 | Cam Handle Knob | 1 |
| 35 | 1966A | Cam Handle Assembly | 1 |
| 36 | 1956 | Saddle Cradle | 1 |
| 37 | 1965 | Handle Screw Cap | 1 |
| 38 | 1958 | Clamp Spring | 1 |
| 39 | 1964 | Handle Screw | 1 |
| 40 | 1968 | Clamp Knob Screw | 1 |
| 41 | 1954 | Socket Head Cap Screw | 1 |
| 42 | 1921-2 | Saddle Nose Cover Screw | 2 |
![]()
© 2022 Park Tool Co.
PARK TOOL® and the color BLUE are registered trademarks of Park Tool Co.


