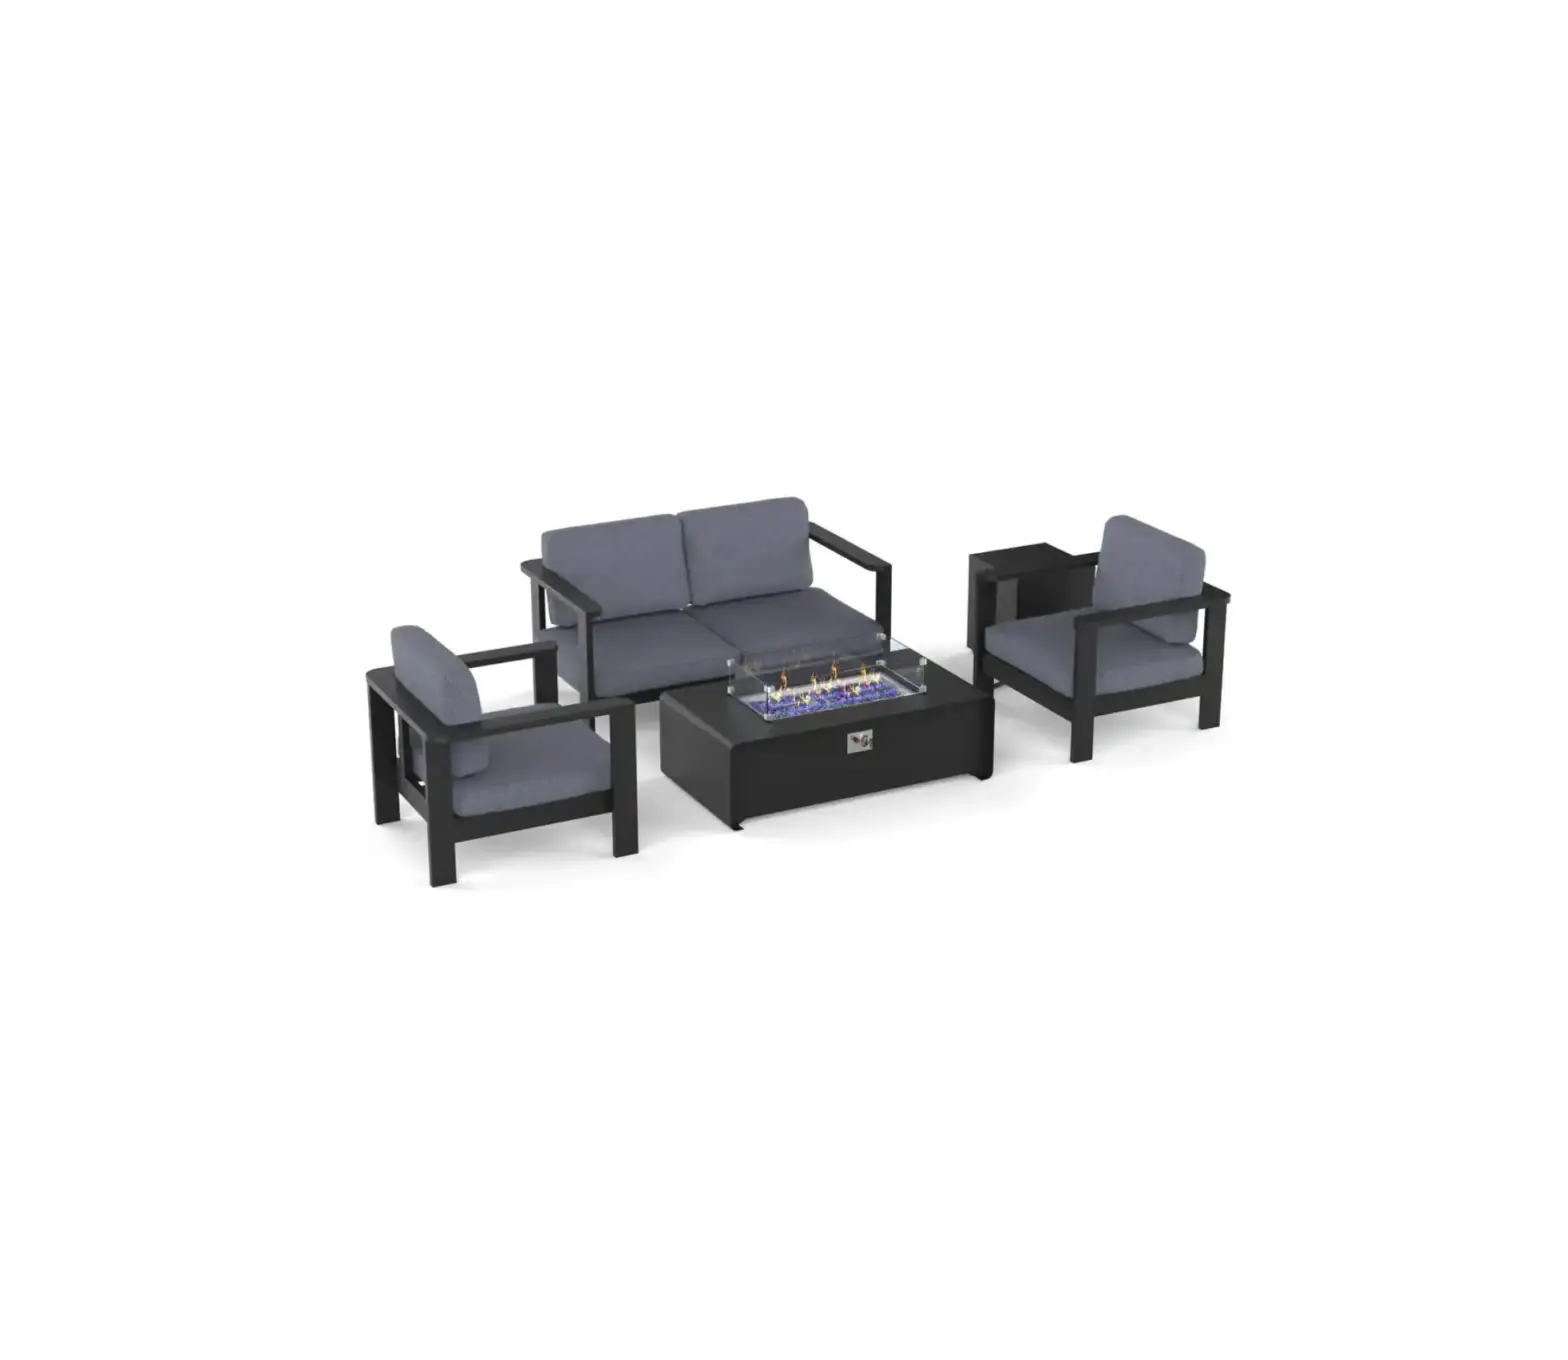
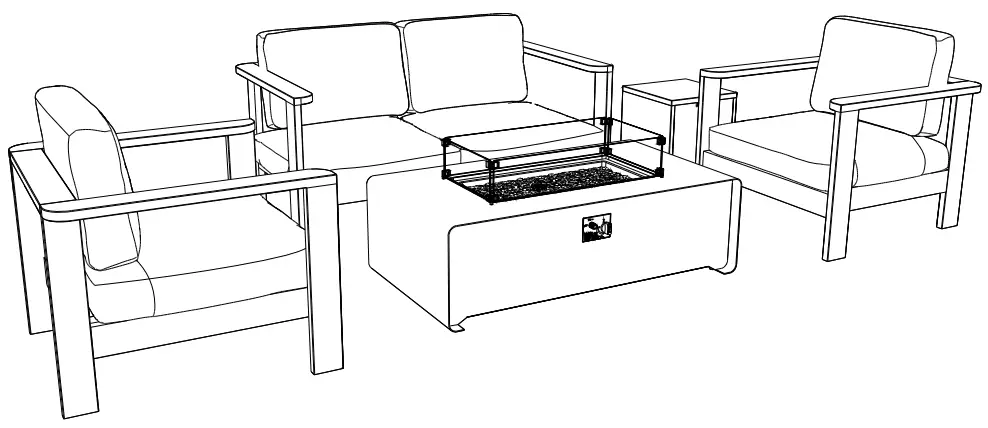
HOME DECORATORS 64108 Settlers Notch 5pc Fire Pit Chat Set
Important Safety Instructions
SAVE THESE INSTRUCTIONS
 | WARNING: FUELS USED IN LIQUEFIED PROPANE GAS APPLIANCES, AND THE PRODUCTS OF COMBUSTION OF SUCH FUELS, CAN EXPOSE YOU TO CHEMICALS INCLUDING BENZENE, CARBON MONOXIDE, LEAD, CHROMIUM (HEXAVALENT COMPOUNDS), DI(2-ETHYLHEXYL) PHTHALATE (DEHP) AND DIISONONYL PHTHALATE (DINP), WHICH ARE KNOWN TO THE STATE OF CALIFORNIA TO CAUSE CANCER AND CAUSE BIRTH DEFECTS OR OTHER REPRODUCTIVE HARM. For more information go to: www.P65Warnings.ca.gov. |
| WARNING: READ ALL INSTRUCTIONS BEFORE USE To reduce the risk of injury to persons:
|
 | IMPORTANT: SAFETY INFORMATION This appliance has been tested to and complies with the ANSI Z21.97-2017, Outdoor Decorative Gas Appliances CGA CR 97-003 Outdoor Gas Fireplaces. The installation must conform to local codes or in the absence of local codes to the National Fuel Gas Code ANSI Z223.1. This manual contains important information about the assembly, operation and maintenance of this fire pit. General safety information is presented in these first few pages and is also located throughout the manual. Keep this manual for future reference and to educate new users of this product. This manual should be read in conjunction with the labeling on the product. Safety precautions are essential when any mechanical or propane fueled equipment is involved. These precautions are necessary when using, storing, and servicing. Using the equipment with the respect and caution demanded will reduct the possibilities of personal injury or property damage. The symbols shown at right are used extensively throughout this manual. Always heed these precautions, as they are essential when using any mechanical or propane fueled equipment. |
 | DANGER: indicates a hazardous situation which, if not avoided, will result in death or serious injury. |
| WARNING: indicates a hazardous situation which, if not avoided, could result in death or serious injury. |
 | CAUTION: indicates a hazardous situation which, if not avoided, could result in minor or moderate injury. |
| IMPORTANT: means the instruction should be carefully followed for correct assembly or use. |
 | NOTE: indicates a situation which, if not avoided, could result in damage to the product or another item. |
| WARNING:
|
| CAUTION:
|
| IMPORTANT: CODE AND SUPPLY REQUIREMENTS: This outdoor fire pit must be installed in accordance with local codes and ordinances, or, in the absence of local codes, with the latest National Fuel Gas Code, ANSI Z233.1/NFPA54, NFPA58 Natural Gas and Propane Installation Code, CSA B149.1, or Propane Storage and Handling Code, B149.2. |
| DANGER: FIRE OR EXPLOSION HAZARD FOR YOUR SAFETY: If you smell gas:
Failure to follow these instructions could result in fire or explosion, which could cause property damage, personal injury, or death. |
| DANGER Failure to comply with the precautions and instructions provided with this product can result in death, serious bodily injury and property loss or damage from hazards of fire, explosion, burn, asphyxiation, and/or carbon monoxide poisoning. Only persons who can understand and follow the instructions should use or service this product. |
| WARNING: Do not store or use gasoline or other flammable vapors and liquids in the vicinity of this or any other appliance. An LP cylinder not connected for use shall not be stored in the vicinity of this or any other appliance. |
| IMPORTANT: INSTALLATION PRECAUTION This fire pit requires a minimum 18 inches of cross-ventilation in all directions. Failure to provide proper ventilation can void the warranty. |
| WARNING: FOR YOUR SAFETY:
|
| WARNING: Installation and service must be performed by an NFI Certified or other qualified professional installer, service agency, or the gas supplier. |
| DANGER EXPLOSION – FIRE HAZARD
|
| WARNING:
|
| WARNING: Solid fuels shall not be burned in this appliance. |
| WARNING: We cannot foresee every use which may be made of this fire pit. Check with your local fire safety authority if you have questions about fire pit use. Other standards govern the use of fuel gases and heat producing products for specific uses. Your localauthorities can advise you about these. If no local codes exist, follow National Fuel Gas Code, ANSI Z223.1. In Canada, installation must conform to local codes. If no local codes exist, follow the current National standards of CANADA CAN/CGA-B 149.2. |
| DANGER: FOR OUTDOOR USE ONLY CARBON MONOXIDE HAZARD
|
| WARNING:
|
| WARNING: FOR YOUR SAFETY
|
| IMPORTANT:
|
| CAUTION:
|
NOTICE:
|
Warranty
5-YEAR LIMITED WARRANTY WHAT IS COVERED
For customers in the contiguous United States, with proof of purchase from an authorized retailer, this product is warranted for a period of 5 years from original purchase date against defect in materials and workmanship under normal use. At the manufacturer’s sole discretion, products under warranty will be repaired and/or replaced at no charge to the customer. Returns for refund (of new, unused, unassembled items) must be sent via prepaid freight in original retail packaging. This warranty is extended only to the original owner. Proof of purchase is required before
WHAT IS NOT COVERED
This warranty does NOT cover normal wear/weathering; exposure to water, freezing temperatures, oils, fluids, or chemicals; use in a commercial context if the unit is not designated as a commercial model; failures resulting from accident, negligence, misuse, abuse, neglect, mishandling, alteration/modification, failure to maintain, improper assembly/maintenance, unauthorized service, use of aftermarket components; or damage attributable to acts of God/nature.
Contact the Customer Service Team at 1-800-986-3460 or visit www.HOMEDEPOT.com/HOMEDECORATORS.
Pre-assembly
PLANNING ASSEMBLY
Before beginning assembly of each piece of the set, completely empty contents of the relevant cartons and remove all packing material.
Make sure all parts and hardware are present. If any parts are missing, contact the Customer Service Team.
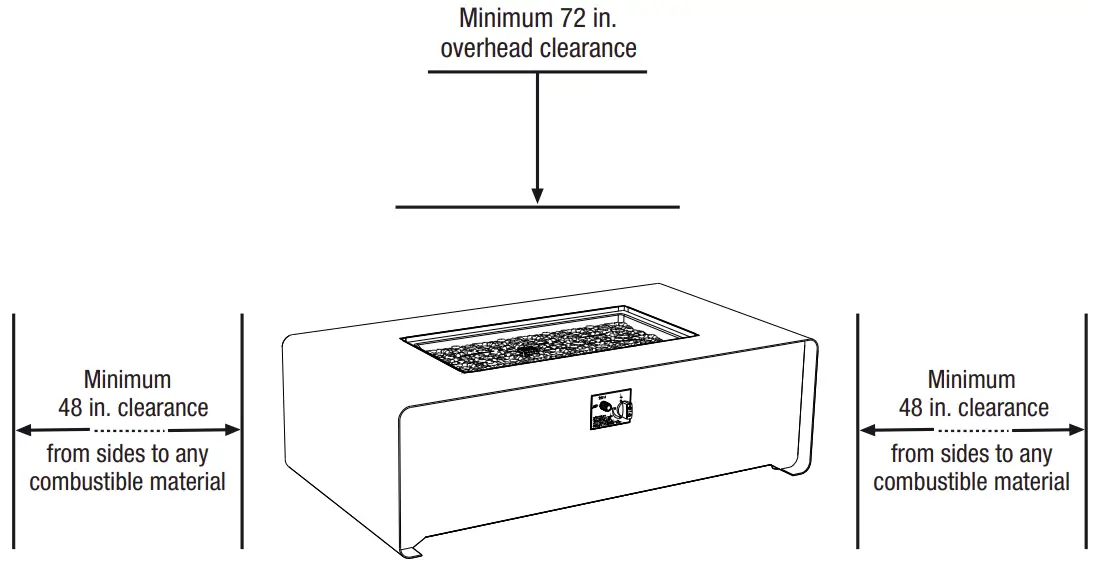
Before installing the unit, check the minimum clearances to combustibles below to ensure that the surrounding area is properly sized for the installation.
SELECTING A LOCATION
- Choose an area that is level and clear of debris.
- The area should be large enough to comfortably accommodate the full set of fire pit table, seating, and tank housing without blocking entrances or exits from the immediate area or adjacent buildings.
- Ideally, locate the fire pit table in an open area without a roof or overhang.
- Minimum clearances from the fire pit burner to combustible materials are: 48 in. (4 ft.) from all sides and 72 in. (6 ft.) overhead.

Pre-assembly – Fire pit table
SUPPLIES REQUIRED
| NOTE: Place all parts on a soft, nonabrasive, level surface t:,.l for assembly. Do not overtighten hardware connections. |
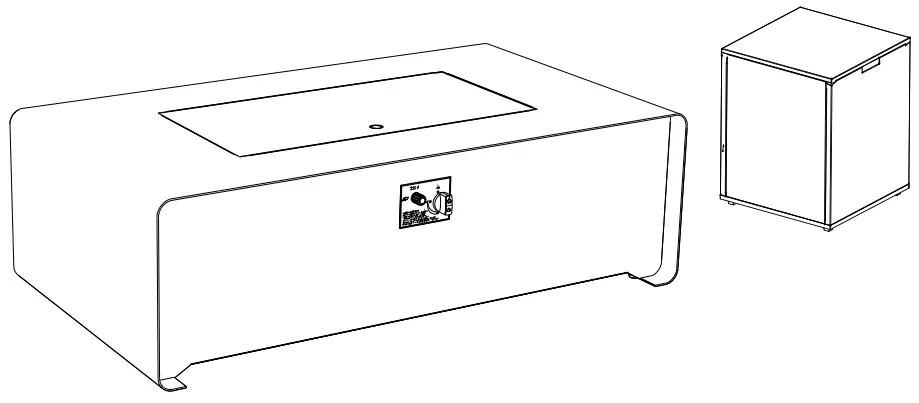
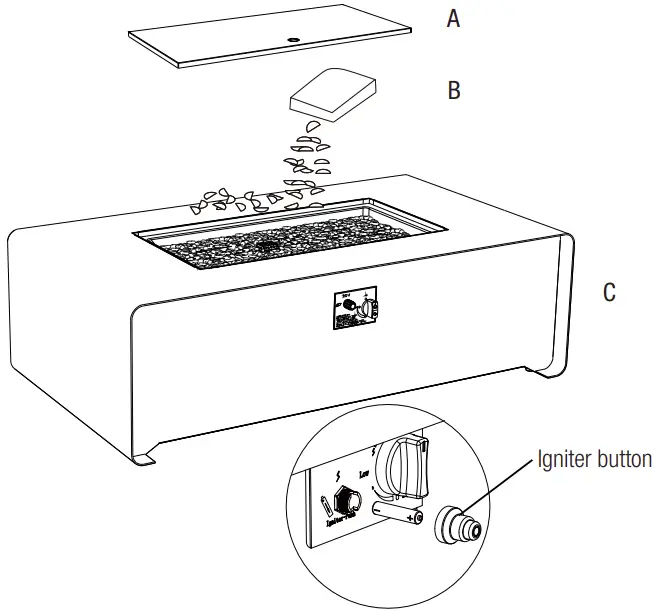
PACKAGE CONTENTS

Part | Description | Quantity |
| A | Burner cover | 1 |
B | Fire glass | 1 |
| C | Fire pit table | 1 |
Assembly – Fire Pit Table
Assembling the fire pit table
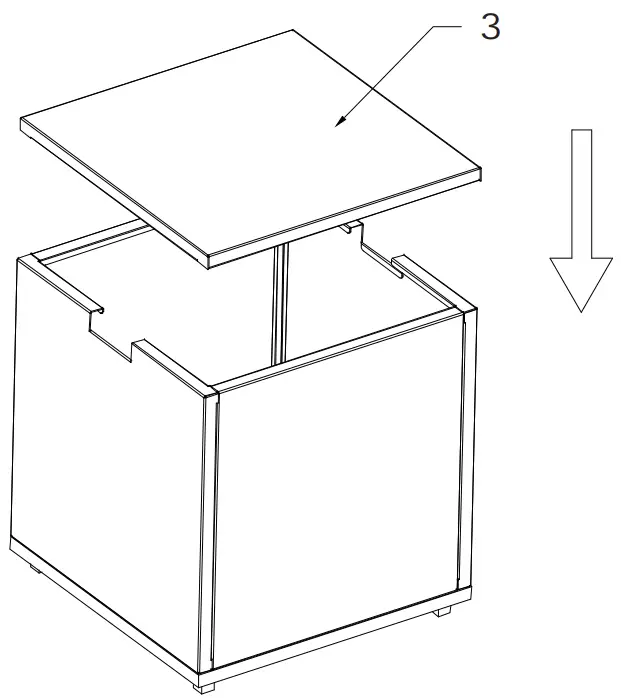
- Place the fire pit table (C) in the desired location, then gently pour the fire glass (B) into the burner pan.
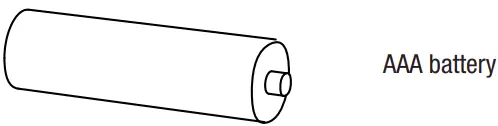
- Install a AAA battery by unscrewing the igniter button on the control panel and inserting the battery. Replace the igniter button.
- When the fire pit table (C) is not in use, cover the burner pan with the burner cover (A).

Connecting to an LPG tank
| WARNING: Use a standard 20 lb. propane (LPG) cylinder only. Follow the guidelines below for safe use and storage of LPG gas.
|
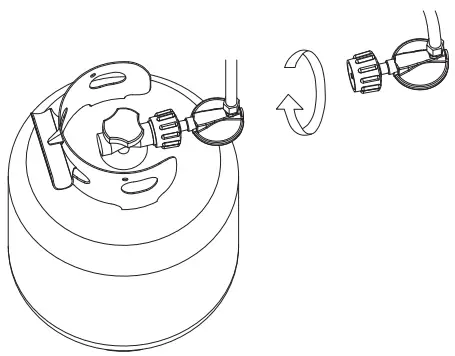
- Connect the hose and regulator to a standard 20 lb. LPG cylinder by turning the knob firmly clockwise until it stops, being careful not to cross-thread.
- Route the gas hose in such a way that it is out of the way of normal foot traffic and does not pose a tripping hazard.
- Place the cylinder as far away from the appliance as practical while connected.
- Do not proceed with lighting the appliance until you have completed a full leak check and read the operation instructions located later in this manual.

Pre-assembly – Tank housing
PLANNING ASSEMBLY
Before beginning assembly, completely empty contents of carton and remove all packing material. Make sure all parts and hardware are present. If any parts are missing, contact the Customer Service Team.
Estimated assembly time: 45 minutes
| NOTE: Place all parts on a soft, nonabrasive, level surface for assembly. Do not overtighten hardware. |
TOOLS REQUIRED
HARDWARE INCLUDED
| NOTE: Hardware not shown to actual size. |
Part | Description | Quantity |
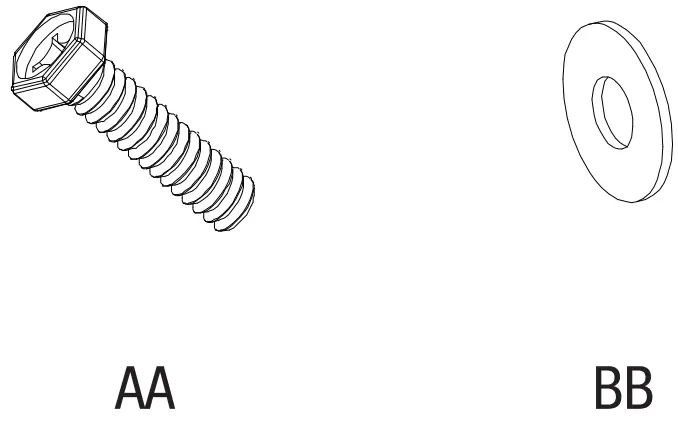
AA | Phillips hex bolt – ¼x16mm | 18 (including 2 extra) |
| BB | Washer | 18 (including 2 extra) |
| NOTE: Place all parts on a soft, nonabrasive, level surface for assembly. Do not overtighten hardware connections. |
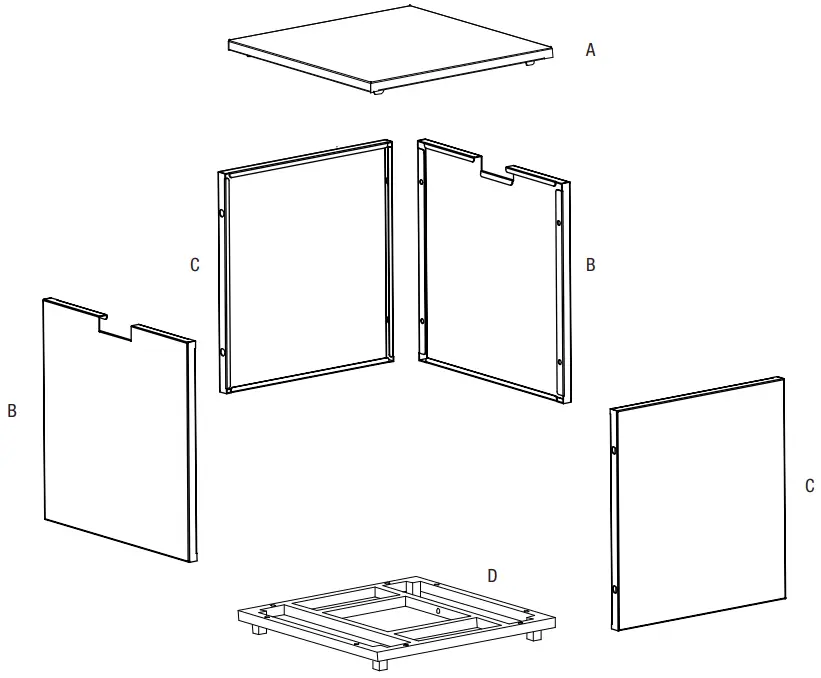
PACKAGE CONTENTS
Part | Description | Quantity |
| A | Removable housing cover | 1 |
| B | Side panel with hand gap | 2 |
| C | Solid side panel | 2 |
| D | Base | 1 |
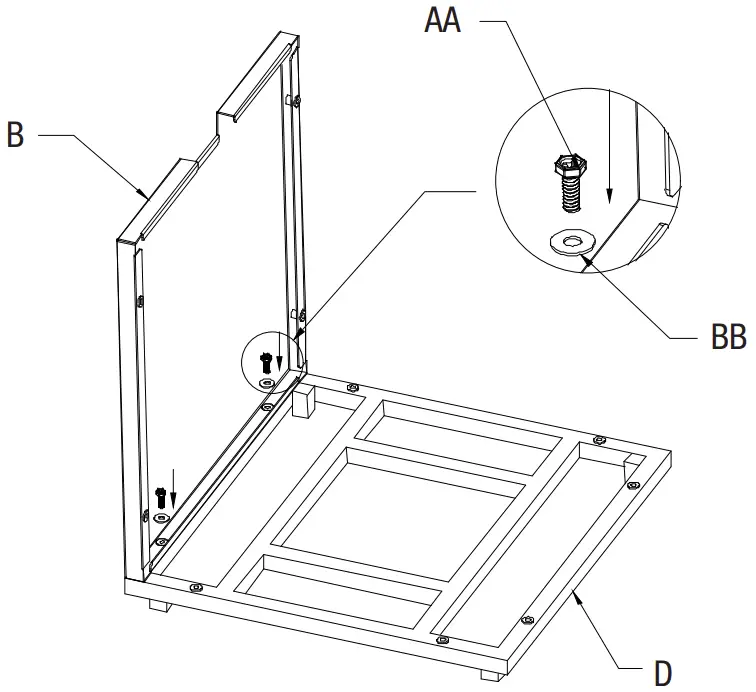
Attaching the first side panel
- Place the base (D) on a level surface.
- Align the first side panel with hand gap (B) vertically along one side of the base as shown.
- Place a washer (BB) on each of two bolts (AA), then insert the bolts through the holes in the bottom edge of the side panel (B) and into the base (D).
- Gently finger-tighten the bolts (AA), but do not fully tighten to allow for adjustments as you continue assembly

Attaching the second side panel
- Align the second side panel with hand gap (B) vertically opposite the previously attached side panel, as shown.
- Place a washer (BB) on each of two bolts (AA), then insert the bolts through the holes in the bottom edge of the side panel (B) and into the base (D).
- Gently finger-tighten the bolts (AA), but do not fully tighten to allow for adjustments as you continue assembly.

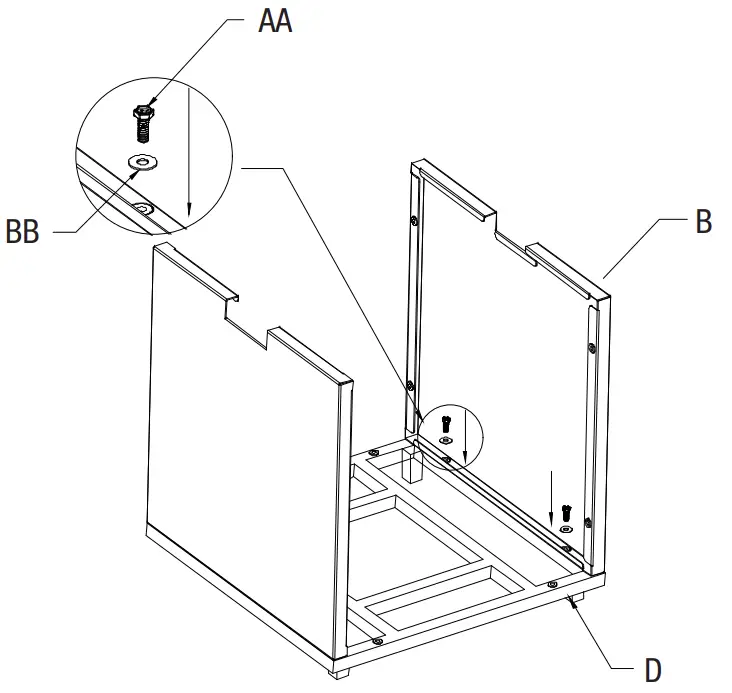
Attaching the solid side panels
- Align the first solid side panel (C) vertically between the two installed panels, as shown.
- Place a washer (BB) on each of two bolts (A), then insert the bolts through the holes in the bottom edge of the solid side panel (C) and into the base (D).
- Place a washer (BB) on each of four bolts (AA), then insert the bolts through the holes in the vertical edges of the solid side panel (C) and into the adjoining side panels (B).
- Repeat the above steps to install the final solid side panel (C).
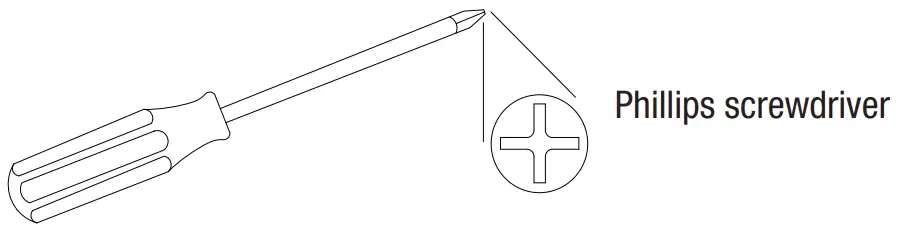
- After all four side panels (B and C) are installed, fully tighten all bolts (AA) using a Phillips screwdriver or an adjustable wrench. Do not overtighten hardware to avoid stripping threads.

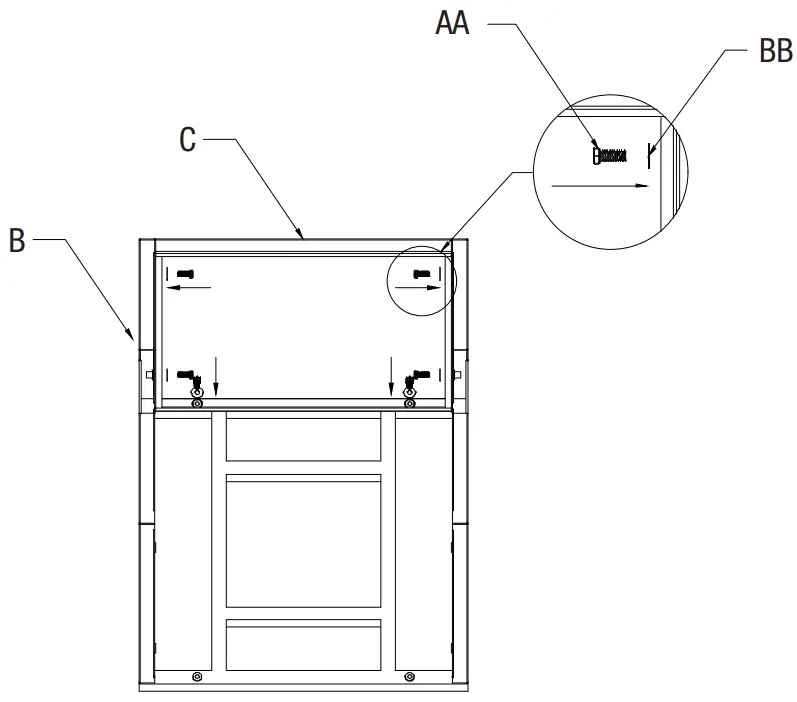
Placing the cover
- Place the removable housing cover (A) on top of the assembled housing.
- The cover (A) is easily removed for convenient access to the LPG tank (not included).

Placing the housing
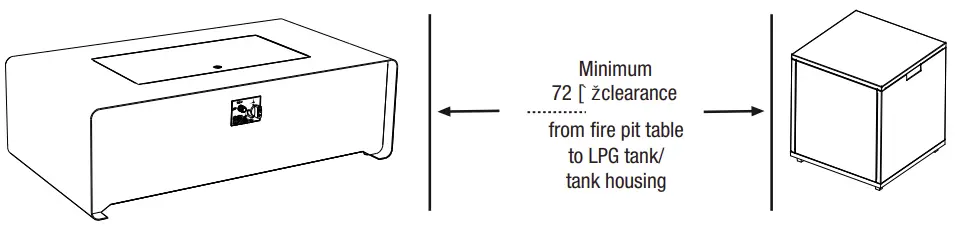
- Place the tank housing in a location convenient to the fire pit table, but no closer than 72 g, (6 ft.) away.
- Place an LPG tank inside the tank housing.
- When the fire pit table is connected to the LPG tank, be sure to run the gas hose in such a way that it will not pose a tripping hazard.

Operation
| CAUTION: Do not attempt to operate until you have read and understand all general safety information in this manual, all assembly is complete, and a leak test has been performed. |
| DANGER FOR OUTDOOR USE ONLY: CARBON MONOXIDE HAZARD Never use this appliance inside a house or other unventilated or enclosed areas. This fire pit consumes air (oxygen). Do not use in unventilated or enclosed areas to avoid endangering your life. |
| WARNING Very hot while in operation! Never lean over the fire pit while in use. Do not touch the table top or burner assembly while fire pit is in operation. Fire pit will be hot after use. Handle with care. Wait until fire pit has cooled after use before placing burner cover over burner or touching any surfaces. Failure to follow these instructions may result in serious bodily harm. |
| WARNING FOR YOUR SAFETY Be careful when attempting to manually ignite this fire pit. Holding in the control knob for more than 10 seconds before igniting the gas will cause a ball of flame upon ignition. |
| CAUTION: Never use this appliance for other than the intended use. DO NOT use this appliance to prepare food. |
| NOTE: This product is not for commercial use. It is intended for residential use only. |
| CAUTION:
|
| CAUTION:
|
LEAK CHECK
| WARNING
|
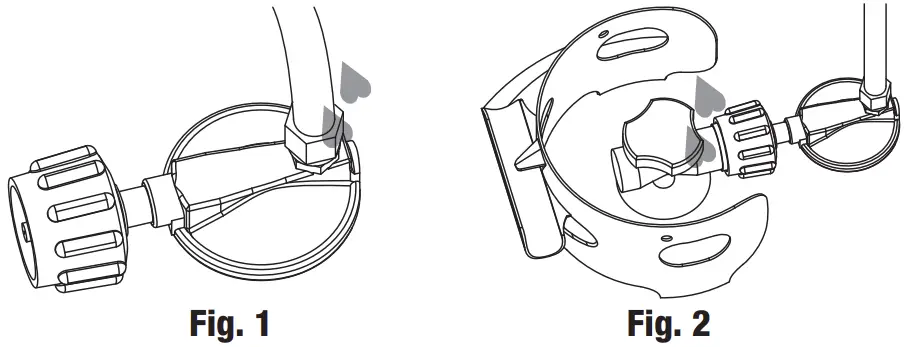
- Make 2-3 oz. of leak test solution (one part liquid dish soap to three parts water)
- Use a spray bottle or brush to apply several drops of solution where the hose attaches to the regulator (Fig. 1 ).
- Apply several drops of solution where regulator connects to the cylinder (Fig. 2).
- Make sure all valves are turned OFF.
- Turn the cylinder valve ON.
If bubbles appear at any connection, there is a leak. - Turn the cylinder valve OFF.
- If the leak is at the hose/regulator connection, tighten the connection and perform another leak test. If bubbles continue to appear, return the hose to the place of purchase.
- If the leak is at the regulator/cylinder valve connection, disconnect, reconnect, and perform another leak test. If bubbles continue to appear after several attempts, the cylinder valve is defective. Return the cylinder to the supplier for replacement.
If NO bubbles appear at any connection, the connections are secure. - Whenever gas connections are loosened or removed , you must perform a complete leak check.
OPERATION CHECKLIST
For a safe and pleasant heating experience, review this checklist before each use:
- I am familiar with the entire owner’s manual and understand all precautions noted.
- All components are properly assembled, intact, and operable.
- No alterations have been made.
- All gas connections are secure and do not leak.
- Wind velocity is below 1 O mph.
- I understand that the fire pit is for outdoor use (outside any enclosure).
- There is adequate fresh air ventilation.
- The fire pit is away from gasoline and other flammable liquids or vapors.
- The fire pit is away from windows, air intake openings, sprinklers, and other water sources.
- The fire pit is at least three ft. on all sides/front/back and six ft. overhead from combustible materials.
- The fire pit is on a hard and level surface.
- There are no signs of spider/insect nests in the fire pit orifices.
- All burner passages and air circulation passages are clear.
- I understand that children and adults should be alerted to the hazard of high surface temperatures and should stay away to avoid burns or clothing ignition.
- I understand young children should be carefully supervised when in the area of the fire pit.
- I understand clothing or other fabric material should not be hung from the fire pit or placed on or near the fire pit.
- I understand that any guard or other protective device removed for servicing the fire pit must be replaced prior to operation.
- I understand installation and repair should be done by a qualified service person, and that the fire pit should be inspected before each use and at least annually by a qualified service person.
- I understand that more frequent cleaning may be required as necessary and that it is imperative that the control compartment, burner, and circulating air passageways of the fire pit be kept clean.
- The fire pit is constructed of aluminum, a relatively soft/ flexible metal, and I should not allow anyone to sit or lean heavily on the top of the fire pit, which can cause bending or warping.
BEFORE LIGHTING
| NOTE: This model has an electronic igniter and requires the installation of one MA battery behind the igniter button. |
- Smell all around the unit area for gas. Be sure to smell near the floor, because gas is heavier than air and will settle to the lowest point. If you smell gas, shut off the gas to the appliance, extinguish any open flame, and if odor persists, call your gas supplier or the fire department.
- Fire pit should be thoroughly inspected before each use, and by a qualified person at least annually. Suspect areas should be leak tested. If the hose leaks, it must be replaced prior to operation. Only use a replacement hose assembly specified by the manufacturer.
- If relighting a hot fire pit, always wait at least five minutes for lingering gas to dissipate.
LIGHTING
Initial Lighting: On first operation, the appliance may emit a slight odor. This is a normal and temporary condition caused by the burning off of oils used in manufacturing. Simply allow the burner to run on high for approximately one-half hour.
| NOTE: Use only your hand to depress or turn the control knob. Never use tools. If the knob will not depress or turn by hand, DO NOT try to repair it. Call a qualified service technician. Force or attempted repair may result in a fire or explosion and will void the warranty. |
- Turn the control knob to “OFF” position.
- Fully open LPG cylinder valve.
- Depress and turn the control knob to “LO” to begin the ignition sequence.
- Depress and turn the control knob counterclockwise to “HI”. While depressing the control knob, push the electronic ignition button to ignite the burner. (The ignition will produce a soft snapping/crackling sound. If the fire pit does not light and there is no snapping sound, replace the battery.)
- After the fire pit lights, wait 45 seconds, then release the control knob.
- Observe the flame height when lit. Flame should mostly vary between 3 in. and 13 in. in height. Overly short or tall flame can indicate a problem.
- To decrease the flame, turn the control knob clockwise to “LO”. To increase the flame, turn the control knob counterclockwise to “HI”.
| NOTE: If burner fails to remain lit, close all valves and wait at least 5 minutes before attempting to relight. |
SHUT DOWN
- To extinguish the burner, depress the control knob and turn it clockwise to OFF.
- Turn the cylinder valve clockwise to OFF.
- Disconnect the regulator when the fire pit is not in use.
POST-OPERATION CHECKLIST
- Gas control knob is in OFF position.
- Gas tank valve is off.
- Gas line is disconnected.
- Fire pit is allowed to cool before touching, cleaning, or covering.
Maintenance
To enjoy years of outstanding performance from your fire pit, perform regular maintenance. While cleaning the unit, keep the area around the burner dry at all times. If the gas control is exposed to water, it must be replaced. Do NOT attempt to use it.
Air flow must remain unobstructed. Keep controls, burner, and circulating air passageways clean. Signs of possible blockage include:
- Gas odor with extreme yellow tipping of flame.
- Burner does NOT reach the expected temperature.
- Flame is excessively uneven.
- Flame makes popping noise.
If any of these conditions are present, immediately turn off the fire pit and do not attempt to use until after performing burner maintenance.
BURNER MAINTENANCE
- Turn the control knob to “OFF” position.
- Turn LP cylinder to “OFF” position.
- If hot, allow the fire pit table to cool completely before commencing maintenance activities.
- Wearing work gloves to protect from sharp edges, remove the fire glass from the burner pan.
- Discard any glass shards or other debris from bottom of burner pan.
- Inspect all openings (including burner venturi) for signs of buildup, dust, debris, pollen, insect nests, etc. These dangerous conditions can damage the burner and render it unsafe.
- Carbon deposits may create a fire hazard. Clean all parts of the burner that exhibit carbon buildup.
- The burner is made from stainless steel, but extreme heat and a corrosive environment can cause surface corrosion to occur. This can be removed with a brass wire brush. Inspect the burner for corrosion, cracks, or other damage.
- Remove any visible debris from burner exterior using a dry brush or cloth. Do not use spray cleaners or soaking wet cloths to clean around the burner area.
- Remove debris from orifices using a small brush or heavy-duty pipe cleaner. Compressed air may assist in hard-to-reach areas.
- Wipe out the burner pan using a soft cloth.
- Return the fire glass to the burner pan.
- Cover the burner pan with the burner cover
Care and Cleaning
To preserve the appearance of your fire pit, perform regular basic cleaning and store when not in use. While cleaning the unit, keep the area around the burner dry at all times. If the gas control is exposed to water, it must be replaced . Do NOT attempt to use it.
CLEANING
- Turn the control knob to “OFF” position.
- Disconnect gas supply.
- Use a dry cloth or warm soapy water for cleaning exterior surfaces of the fire pit. Never use flammable or corrosive cleaning agents.
- Keep the area around the fire pit free of debris and plant matter to reduce debris, buildup, and pest nests in the interior of the fire pit.
STORAGE BETWEEN USES
- Turn the control knob to “OFF” position.
- Disconnect gas supply.
- Store fire pit upright in an area sheltered from direct exposure to inclement weather (such as rain, sleet, hail, snow, dust and debris).
- If desired, cover fire pit to protect exterior surfaces and to help prevent buildup in air passages.
STORAGE DURING PERIODS OF DISUSE OR TRANSPORT
- Turn the control knob to “OFF” position.
- Disconnect gas supply and move to a secure, wellventilated outdoor location. DO NOT store in direct sun or where temperatures exceed 125°F.
- Store fire pit upright in an area sheltered from direct exposure to inclement weather (such as rain, sleet, hail, snow, dust and debris).
- If desired, cover fire pit to protect exterior surfaces and to help prevent buildup in air passages.
| WARNING: Wait until fire pit is cool before covering |
| WARNING: Wait until fire pit is cool before covering. |
Troubleshooting
| Problem | Cause | Solution |
| Flame and heat are low although valve is turned to high. |
|
|
| Predominantly yellow flame, smell of gas is detected. |
|
|
| Burner will not light with the igniter, but will light with a match. |
|
|
| Burner will not stay lit when control knob is released . |
|
|
| The regulator is humming. |
|
|
| The valve is set to high but there is low heat output. There is also a rumbling noise and a fluttering blue flame at the burner surface. |
|
|