![]()
Adhesive Anchor
Instruction Manual
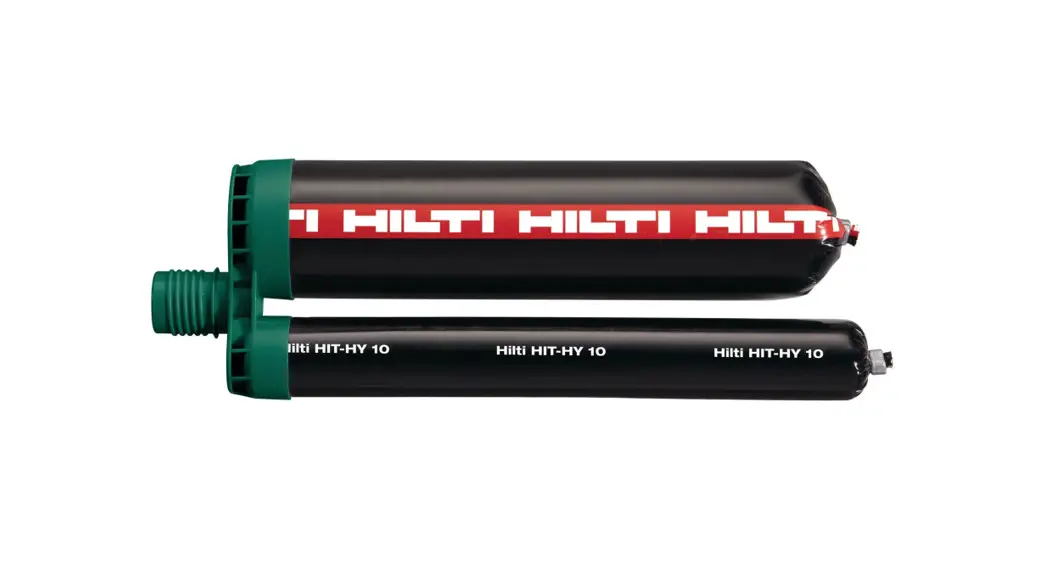
HIT HY 10 Adhesive Anchor
Warning![]()
Contains: Hydroxypropyl methacrylate(A), dibenzoyl peroxide (B)![]() May cause an allergic skin reaction. (A,B) Causes serious eye irritation (A) Very toxic to aquatic life. (B)
May cause an allergic skin reaction. (A,B) Causes serious eye irritation (A) Very toxic to aquatic life. (B)
Hilti HIT-HY 10
 |  |
Hilti HIT-HY 10

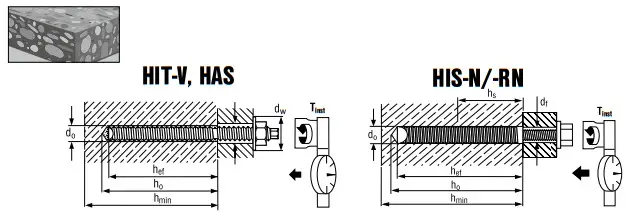
| Table 1: Setting details | HIT-V, HAS, HAS-E, threaded rods | ||||||||
| Anchor size | M6 | M8 | M10 | M12 | |||||
| Sieve sleeve | HIT-SC… | 12×50 | 12×85 | 16×50 | 16×85 | 16×50 | 16×85 | 18×50 | 18×85 |
| do Drill bit diameter 1i | mm | 12 | 12 | 16 | 16 | 16 | 16 | 18 | 18 |
| ho Hole depth | mm | 60 | 95 | 60 | 95 | 60 | 95 | 60 | 95 |
| het Effective anchoring depth | mm | 50 | 80 | 50 | 80 | 50 | 80 | 50 | 80 |
| hmin Min. base material thickness | mm | 80 | 115 | 80 | 115 | 80 | 115 | 80 | 115 |
| dt Max. Clearance hole | mm | 7 | 7 | 9 | 9 | 12 | 12 | 14 | 14 |
| Tinst Max. tightening torque | Nm | 3 | 3 | 3 | 3 | 4 | 4 | 6 | 6 |
| Filling volume | ml | 12 | 24 | 18 | 30 | 18 | 30 | 18 | 36 |
| MD 2000/2500 HDM 330/500 | approx. number of trigger pulls | 2 | 4 | 3 | 5 | 3 | 5 | 3 | 6 |
| ED 3500 HDE 500 | approx. number of trigger pulls | 3 | 6 | 4 | 7 | 4 | 7 | 4 | 9 |
| Table 1: Setting details | HIT-IC | |||
| Anchor size | M8 | M10 | M12 | |
| Sieve sleeve | HIT-SC… | 16×85 | 18×85 | 22×85 |
| do Drill bit diameter 1) | mm | 16 | 18 | 22 |
| ho Hole depth | mm | 95 | 95 | 95 |
| het Effective anchoring depth | mm | 80 | 80 | 80 |
| hmin Min. base materialthickness | mm | 115 | 115 | 115 |
| dt Max. Clearance hole | mm | 9 | 12 | 14 |
| hs Length boltengagement | mm | min. 10 — max. 75 | ||
| Tinst Max. tightening torque | Nm | 3 | 6 | 6 |
| Filling volume | ml | 30 | 36 | 45 |
| MD 2000/2500 HDM 330/500 | approx. number of trigger pulls | 5 | 6 | 8 |
| ED 3500 HDE 500 | approx. number of trigger pulls | 7 | 9 | 11 |
- TE 2-S; TE 2-M; TE 6-S.

| Table 2: Setting details | HIT-V | HAS, HAS-E, HAS-R | ||||||
| Anchor size | M8 | M10 | M12 | M8 | M10 | M12 | M16 | |
| do Drill bit diameter | mm | 10 | 12 | 14 | 10 | 12 | 14 | 18 |
| ho Hole depth | mm | 85 | 85 | 85 | 85 | 95 | 115 | 130 |
| hef Effective anchoring depth | mm | 80 | 80 | 80 | 80 | 90 | 110 | 125 |
| hmin Min. base material thickness | mm | 115 | 115 | 115 | 115 | 120 | 140 | 170 |
| df Max. Clearance hole | mm | 9 | 12 | 14 | 9 | 12 | 14 | 18 |
| Tinst Max. tightening torque | Nm | 5 | 8 | 10 | 5 | 8 | 10 | 10 |
| Filling volume | ml | 4 | 5 | 7 | 4 | 6 | 10 | 15 |
| MD 2000/2500 HDM 330/500 | approx. number of trigger pulls | 0. | 1 | 2 | 1 | 1 | 2 | 3 |
| ED 3500 HDE 500 | approx. number of trigger pulls | 1 | 2 | 2 | 1 | 2 | 3 | 4 |
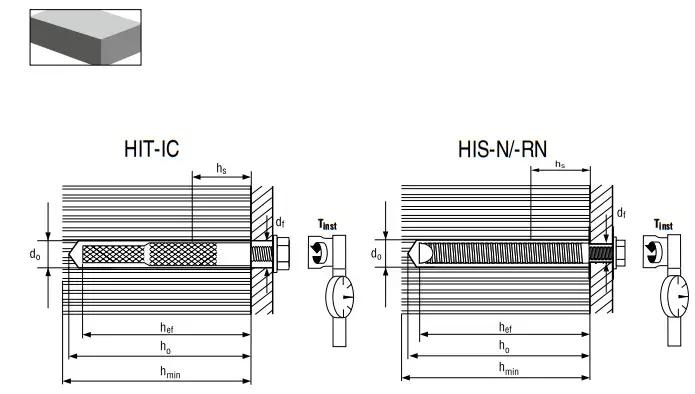
| Table 3: Setting details | HIT-IC | HIS-N/-RN | |||||
| Anchor size | M8 | M10 | M12 | M8 | M10 | M12 | |
| do Drill bit diameter | mm | 14 | 16 | 18 | 14 | 18 | 22 |
| ho Hole depth | mm | 85 | 85 | 85 | 95 | 115 | 130 |
| hef Effective anchoring depth | mm | 80 | 80 | 80 | 90 | 110 | 125 |
| hmin Min. base material thickness | mm | 115 | 115 | 115 | 120 | 150 | 170 |
| df Max. Clearance hole | mm | 9 | 12 | 14 | 9 | 12 | 14 |
| hs Length bolt engagement | mm | min. 10 — max. 5 | min. 8- max.20 | min. 10- max.25 | min. 12- max.30 | ||
| Tinst Max. tightening torque | Nm | 5 | 8 | 10 | 5 | 8 | 10 |
| Filling volume | ml | 6 | 6 | 6 | 6 | 10 | 16 |
| MD 2000/2500 HDM 330/500 | approx. number of trigger pulls | 1 | 1 | 1 | 1 | 2 | 3 |
| ED 3500 HDE 500 | approx. number of trigger pulls | 2 | 2 | 2 | 2 | 3 | 4 |
| Table 4: Setting details | HIT-V, HAS | HIS-N/-RN | ||||||
| Anchor size | M8 | M10 | M12 | M16 | M8 | M10 | M12 | |
| do Drill bit diameter | mm | 10 | 12 | 14 | 18 | 14 | 18 | 22 |
| ho Hole depth | mm | 85 | 95 | 115 | 130 | 95 | 115 | 130 |
| hef Effective anchoring depth | mm | 80 | 90 | 110 | 125 | 90 | 110 | 125 |
| hmin Min. base material thickness | mm | 115 | 120 | 140 | 170 | 120 | 140 | 170 |
| df Max. Clearance hole | mm | 9 | 12 | 14 | 18 | 9 | 12 | 14 |
| hs Length bolt engagement | mm | – | min. 8 max.20 | min. 1 max.25 | min. 12- max.30 | |||
| Tinst Max. Tightening torque | Nm | 10 | 20 | 40 | 80 | 10 | 20 | 40 |
| Filling volume | ml | 4 | 6 | 10 | 15 | 6 | 10 | 16 |
| MD 2000/2500 HDM 330/500 | appfox. number of trigger pulls | 1 | 1 | 2 | 3 | 1 | 2 | 3 |
| ED 3500 HDE 500 | approx. number of trigger pulls | n Z | 2 | 3 | 4 | 2 | 3 | 4 |
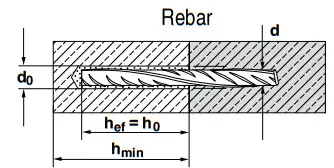
| Settin Parameter | S mbol Unit | 8 | 10 | 12 | 13 | 14 | 16 |
| Rebar Diameter Setting Detail | d mm | 9 | 11,5 | 13,5 | 15 | 16 | 18,5 |
| Drill bit diameter | do mm | 12 | 14 | 16 | 18 | 18 | 20 |
| Effective anchoring depth | he mm | 80 | 90 | 110 | 120 | 125 | 145 |
| Min. base material thickness | hmin mm | her + 50 mm | |||||
Adhesive mortar for anchor and rebar fastenings
Safety instructions
Contains: Hydroxypropyl methacrylate(A), dibenzoyl peroxide(B)![]()
![]()
Warning
H317 May cause an allergic skin reaction. (A,B)
H319 Causes serious eye irritation (A)
H400 Very toxic to aquatic life. (B)
P262 Do not get in eyes, on skin, or on clothing.
P280 Wear protective gloves/protective clothing/eye protection/face protection.
P302+P352 IF ON SKIN: Wash with plenty of soap and water.
P305+P351+P338
IF IN EYES: Rinse cautiously with water for several minutes. Remove contact lenses, if present and easy to do. Continue rinsing.
P333+P313 If skin irritation or rash occurs: Get medical advice/attention.
P337+P313 If eye irritation persists: Get medical advice/attention.
Disposal considerations
Empty packs:
▶ Leave the mixer attached and dispose of via the local Green Dot recovery system ![]()
▶ or EAK waste material code: 150102 plastic packaging
Full or partially emptied packs:
▶ Must be disposed of as special waste in accordance with official regulations.
– EAK waste material code: 08 04 09* waste adhesives and sealants containing organic solvents or other dangerous substances.
– or EAK waste material code: 20 01 27* paint, inks, adhesives and resins containing dangerous substances.
Hilti accepts no liability for damage or failure caused by:
– Storage and transport not in accordance with the specified conditions.
– Failure to observe the instructions for use and setting data, incorrect use
– Inadequate design of the anchor points, inadequate load bearing capacity of the base material
– Other influences of which Hilti is not aware or on which Hilti has no influence, e.g. use with products from a third party.
Net contents: 330 ml/500 ml
Adhesive mortar for anchor and rebar fastenings
Suitable for use in hollow and solid clay brick, sand-lime block, concrete, concrete block, cellular concrete and natural stone.
Read the instructions for use and safety instructions before using this product.
Expiry date: see imprint on manifold (month/year). Do not use expired mortar!
Transport and storage: cool, dry and dark, +5 °C to 25 °C.
Foil pack temperature: must be between +5 °C and 40 °C during application.
Base material temperature: must be between 0 °C and 40 °C during application – Exception in solid clay brick: between +5 °C and 40 °C.
The foil pack opens automatically at start of dispensing.
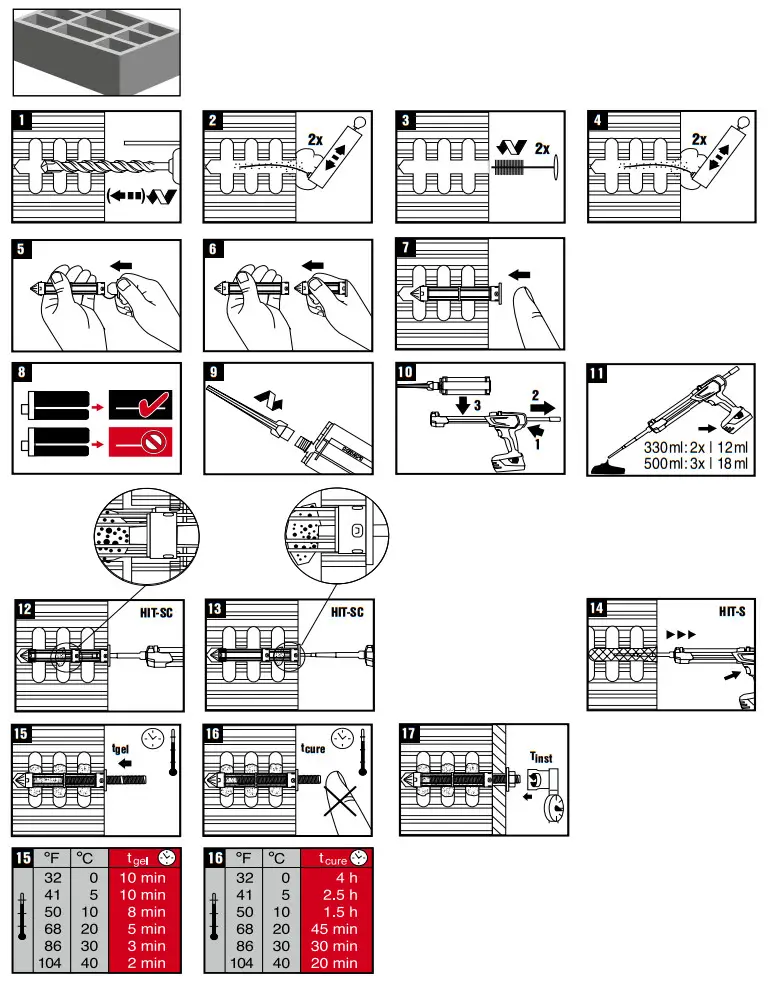
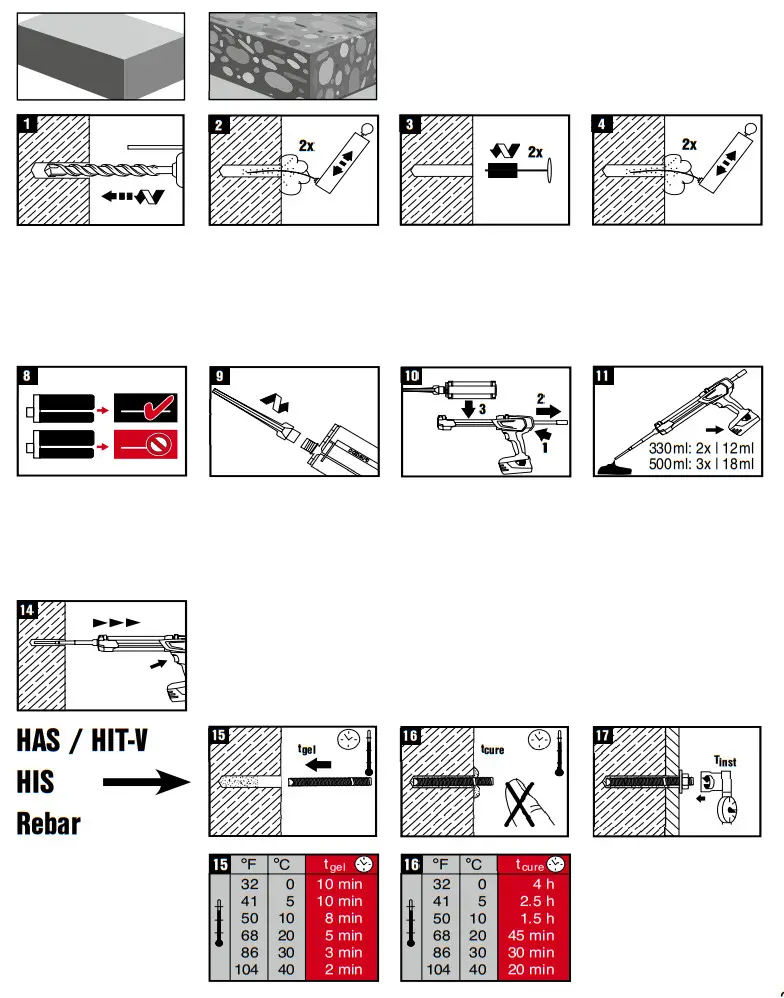
Installation instructions: Illustration of the sequence of operations: see pictograms 1-17
Detailed setting data: for hollow materials see table 1; for solid materials see tables 2 and 3
1. Drill the hole with a rotary hammer. Check to determine whether the material is solid or hollow (with cavities). Use of a diamond coring tool to drill the hole is not permissible.
2-4Clean the drilled hole immediately before setting the anchor: 2 x blowing – 2 x cleaning with a wire brush – 2 x blowing. Holes must be free of dust, water, ice, oil/grease and other contaminates. Inadequate hole cleaning = poor load-bearing values
5-7 Base materials with cavities ➔ Use a mesh sleeve – either HIT-SC composite mesh sleeve or HIT-S metal mesh sleeve. Do not use damaged sleeves. HIT-SC: First fit the entering cap, check that it engages (5) and then insert the mesh sleeve in the drilled hole (7). HIT-SC sleeve combinations: Fit the centering cap on the outer mesh sleeve 5), connect the outer mesh sleeve to the inner mesh sleeve (6), check that parts are well engaged and then insert the combined sleeves in the hole (7).
8. Place the foil pack in the foil pack holder. Caution! Never use damaged foil packs and/or damaged or very dirty foil pack holders.
9. Screw the mixing nozzle tightly onto the foil pack. Do not modify the mixing nozzle in any way, unless specified by Hilti.A new mixing nozzle must be used with each new foil pack.
10.Insert the foil pack holder, with the foil pack, in the dispenser. Discard initial quantity of mortar: Do not use the initial quantity of mortar dispensed from the mixing nozzle for making fastenings. The quantity of mortar to be iscarded epends on the size of the foil pack. See pictogram
11. The initial quantity of mortar must be discarded each time the mixing nozzle is changed.
12- 13 Filling the HIT-SC plastic mesh sleeve: Fill the mesh sleeve with mortar from the centering cap until mortar escapes at the centering cap (filling control) (13).
Filling HIT-SC mesh sleeve combinations: Push the mixing nozzle through the centering cap and through the bottom of the outer mesh sleeve (if necessary: use mixer xtension). Fill the inner mesh sleeve (12). For the number of trigger pulls required: see table 1. Then pull the mixing nozzle back to the centering cap of the outer mesh sleeve nd fill the outer mesh sleeve until mortar escapes from the centering cap (filling control) (13).
14.Filling the HIT-S metal mesh sleeve: Insert the mixing nozzle to the bottom of the mesh sleeve and then retract the mixing nozzle approx. 10 mm after each trigger pull of the dispenser.
14.Solid materials: Fill the drilled hole without trapping air! Insert the mixing nozzle to the base of the borehole (use an extension for deep holes) and then retract the nozzle, tep by step, after each trigger pull of the dispenser. Fill the hole to approx. 2/3 with mortar.
15.Push the fastening element into the mortar-filled hole or mesh sleeve up to anchoring depth „h ef “ in accordance with ables 1-3. Afterwards the annular gap must be ompletely filled with mortar.Observe the working time „tgel“, which varies according to temperature of base material.
16.Once the working time „tgel“, has elapsed, do not move or apply a load to the fastening element until the curing time „tcure“ has passed.
17.A load may be applied to the fastening element only after the curing time „tcure“ has elapsed.
Partly-used foil packs may be reused within 4 weeks. Leave the used mixing nozzle screwed on and store the partly-used foil pack in accordance with storage instructions. Before reuse, screw on a new mixing nozzle and discard the initial quantity of mortar dispensed, as described at paragraph 11.
Hilti (Gt. Britain) Ltd.
1 Trafford Wharf Road
Trafford Park
GB-M17 1BY Manchester
Tel +44 161 886 1000 Fax +44 161 872 1240
![]()
![]() ade in GermanyHilti = registered trademark
ade in GermanyHilti = registered trademark
of Hilti Corporation, Schaan, Liechtenstein
www.hilti.group
Printed in Germany © 2022
Right of technical changes reserved S.E. & O.


 10 Screw Anchors User Manual")


