![]()
Focus on Every Powerful Moment
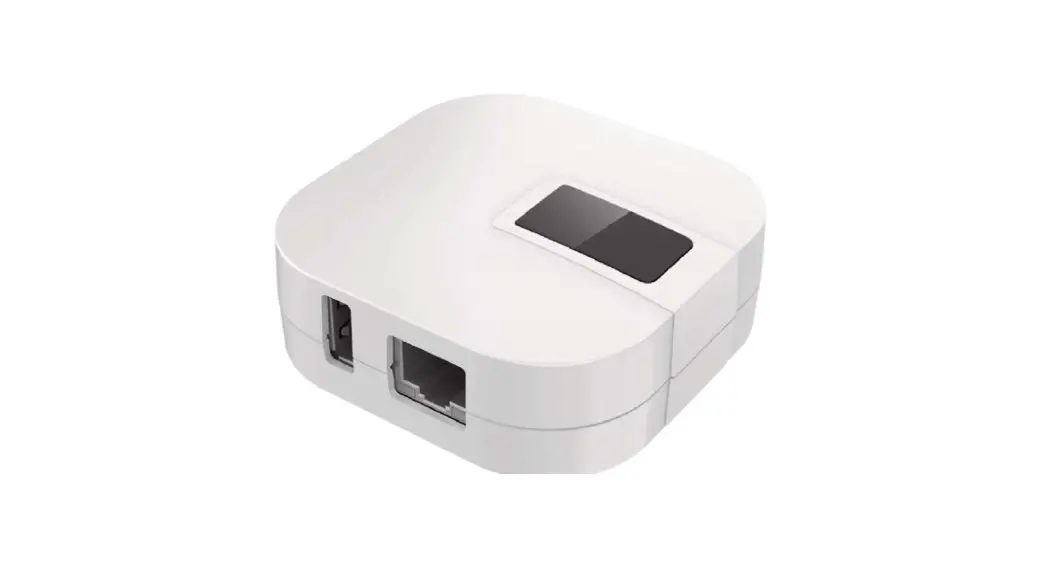
Wi-Fi Dongle
Quick Start Guide


PRODUCT INTRODUCTION
The user manual download link: https://munbyn.biz/wifidum
What’s in the box?
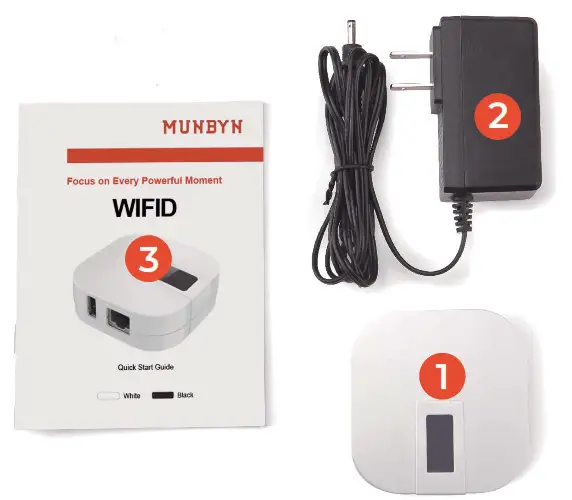
- Wi-Fi Dongle
- Adapter
- User Manual
1. Supported System
I0S, Android, MacOS, Windows, Linux, ChromeOS
2. Setup Video Guide Link:
For iPhone/iPad printing: https://munbvn.biz/wifid-ios
For Android printing: https://munbvn.biz/wifid-android
For Mac printing: https://munbvn.biz/wifid-mac
For Windows printing: https://munbvn.biz/wifid-win
For Chromebook printing: https://munbvn.biz/wifid-chrome
For Linux printing: https://munbvn.biz/wifid-linux
SPECIFICATIONS
| Config Wi-Fi Name | AirBravura-ConfigAP |
| Config Wi-Fi Password | 12345678 |
| Default IP | 192.168.101.1 |
| Wi-Fi | 2.4G H z, 802.11.b/g/n |
| Interface | USB 2.0,10M/100M Ethernet port(PJ45) |
| Adapter | 12v lA |
| Dimensions | 70*70*30mm |
LED-SCREEN STATUS AND PORT DESCRIPTION
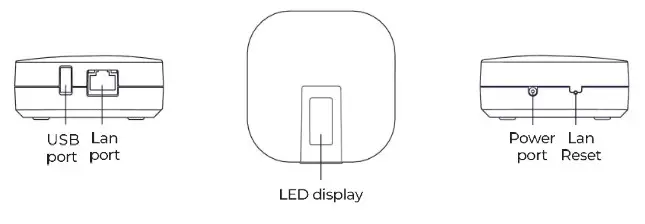
1. Screen Status Description
| Printer data icon | |
| Wi-Fi signal icon | |
| Status: Idle | Printer Online |
| Status; Offline | Printer Offline |
| IP:xxx.xxx.xxx.xxx | IP address after access to LAN |
| Static: DHCP | Network protocol of LAN |
2. Port Description
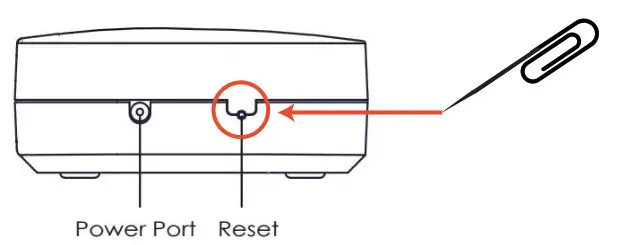
| Power Port | Connect to the power adapter |
| USB Port | Connect to Munbyn printer by USB cable |
| Lan Port | Connect to P345 wired cable Mini connection customers do not need to connect). It supports the DHCP model. |
| Reset | Reset all settings. How to use: Insert the end of a small paper clip into the hole, press firmly and hold until LED screen shows Munbyn logo. Wi-Fi Dongle will restart and restore factory default settings |
PRODUCT INSTALLATION
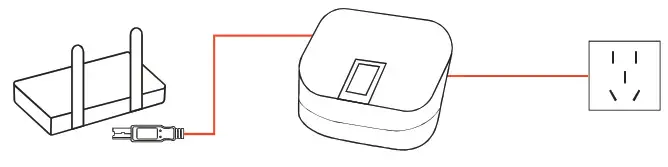
Step 1 Connect Wi-Fi Dongle to printer
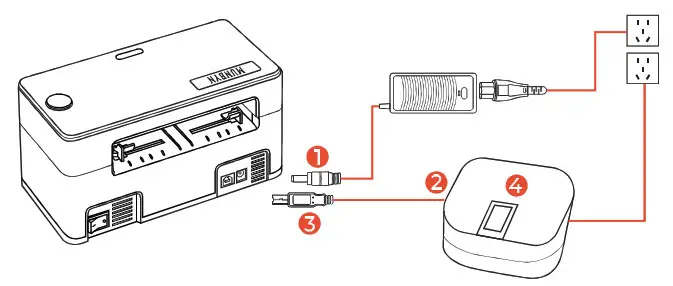
- Plug the power adapter into the power port.
- Plug the USB cable into the USB Port of the Wi-Fi Dongle.
- Plug USB cable into Munbyn printer, and power on the printer.
- Wait for about one minute until LED-screen display logo and items:
![]()
Step2 Configure Wi-Fi settings
Wi-Fi Dongle supports two ways to connect the network
- Wired cable model
Plug RJ45 wired cable into Lan port, when the IP address is displayed, it indicates that network configuration is successful, please go to step3 to continue. It supports DHCP (Dynamic Host Configuration Protocol).
- Wireless model lips:
Only need to configure Wireless settings for one time, you can use a mobile phone (Android/iPhone) or computer device.
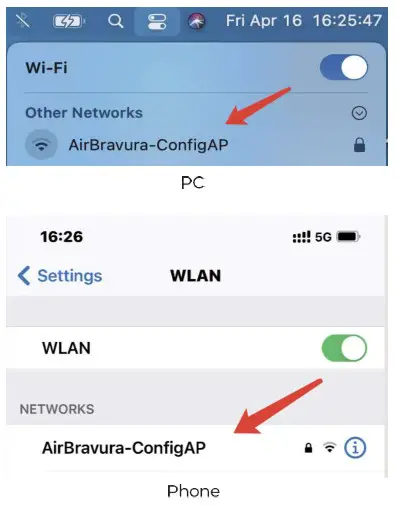
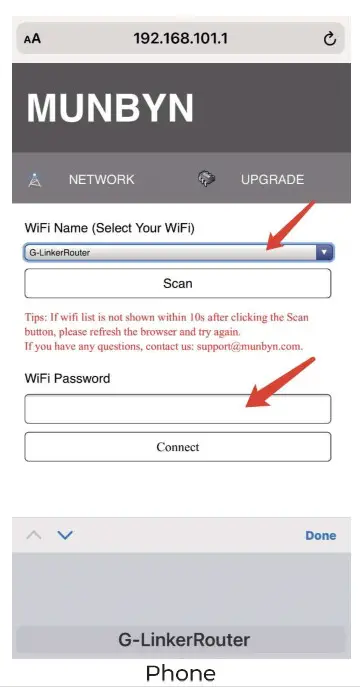
2.1 Connect to Wi-Fi network named “AirBravura-ConfigAP” with Password 12345678
2.2 Enter 192.168.101.1 in the browser, Click [Scan] to scan Wi-Fi network nearby (if the Wi-Fi list is not shown within 10s, please refresh the browser and try again).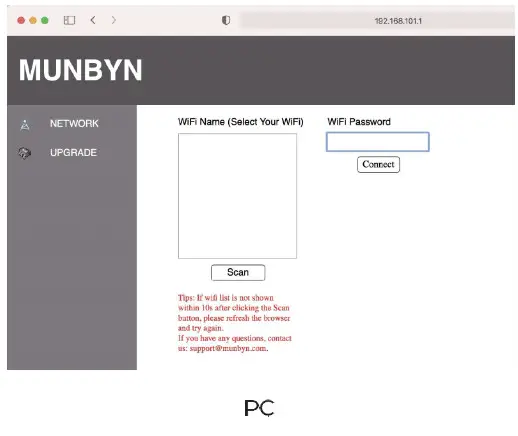
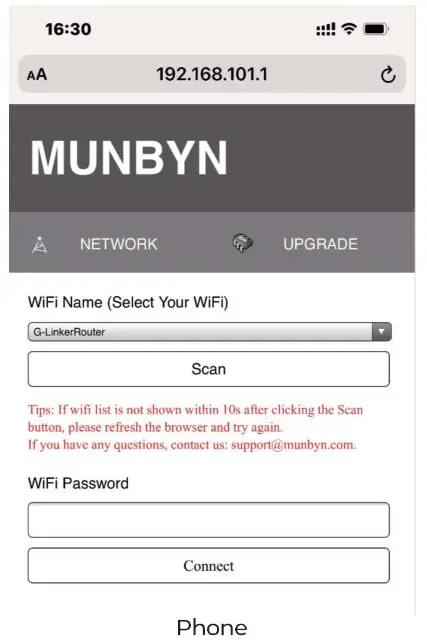 2.3 When scan is finished, choose Wi-Fi name you want to connect and enter the correct password, then click [Connect] button. It will restart after 3 seconds. If you are using a phone, please click the drop-down list button.
Note: The connection here is the wifi name of your router.
 2.4 It will take about 20 seconds to wait until the LED-screen display IP address, which indicates that Wi-Fi configuration is successful. Please check the [Status] has become [Idle] when you connect the printer to Wi-Fi Dongle. Now you can go to step3.
Warning:
- Please make sure Wi-Fi Dongle and your phone/computer are connected to the same Wi-Fi network, otherwise, you will find the printer.
- After entering 192.168.101.1 in the browser, if it appears that you cannot enter the web page, you need to close the web page and re-enter.
Tips: Wi-Fi Dongle supports AP mode. If you don’t have a wireless router, or you just want to use AP mode, please ensure that the distance between Wi-Fi Dongle and phone/computer does not exceed 2 meters.
Step 3 Print via Wi-Fi Dongle
Please watch the video: For iPhone/iPad printing: https://rnunbyn.biz/wifid-ios
For Android printing: https://nnunbyn.biz/wifid-android
For Mac printing: https://munbyn.biz/wifid-mac
For Windows printing: https://munbyn.biz/wifid-win
For Chromebook printing: https://munbvn.biz/wifid-chrome
For Linux printing: https://munbvn.biz/wifid-linux
Reminder: Printing requires a waiting time of 2 to 10 seconds, depending on your network conditions. The Wi-Fi dongle will generate heat during use, which is a normal phenomenon during the use of electronic products, please don’t worry.
FAQ
Q1:Why can’t I find or add a printer?
Al: Please make sure Wi-Fi Dongle and your phone/computer are connected to the same Wi-Fi network. If you are using an Android phone, you should enable “Default Printe Service”.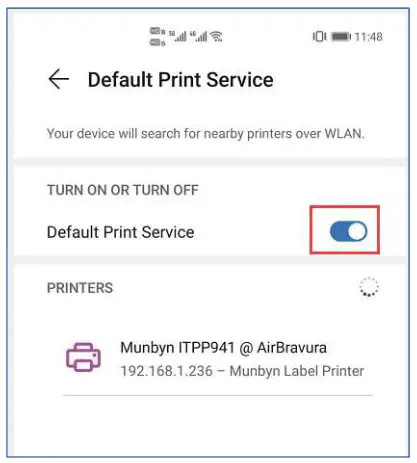
Q2.Can I print from my computer and mobile phone at the same time?
A2: Yes! Wi-Fi Dongle supports multiple computers and mobile phones to print at the same time.
Q3: Why can’t I change paper size in iOS system?
A3: IOS system does not support user-defined paper, please make sure that your printed document should not be larger than 4*6 inches.
Q4: The printer suddenly fails to print, or LED screen can’t display IP address.
A4: Check your Wi-Fi network is not disconnected. Or try to reset Wi-Fi Dongle and configure again by these steps: Insert the end of a small paper clip into the hole, press firmly and hold until LED-screen shows Munbyn logo, Wi-Fi Dongle will restart and restore factory default settings.
QS: Why cannot I get my Wi-Fi list when I visit the IP: 192.168.101.1?
AS: Please make sure Wi-Fi Dongle has connected to Wi-Fi named “AirBravura-Conf gap”, then refresh the browser and scan again if you has connected to the Wi-Fi of your router, you should visit the P shown in LED-screen instead of IP:192.168.101.1
SUPPORT
Need Tech Support, contact us by:
E-mail: [email protected]
Whatsapp: +8617817881067
Skype: munbyn
Official website: https://www.munbyn.com/
Support time: Monday to Friday 24 hours.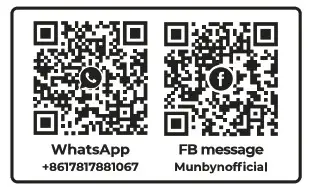 https://www.facebook.com/munbyn/
https://wa.me/qr/5R2RRPLNUBYNH1
FCC WARNING
This device complies with part 15 of the FCC Rules. Operation is subject to the following two conditions: (1) this device may not cause harmful interference, and (2) this device must accept any interference received, including interference that may cause undesired operation.
Any changes or modifications not expressly approved by the party responsible for compliance could void the user’s authority to operate the equipment.
NOTE: This equipment has been tested and found to comply with the limits for a Class B digital device, pursuant to Part 15 of the FCC Rules. These limits are designed to provide reasonable protection against harmful interference in a residential installation. This equipment generates, uses and can radiate radio frequency energy and, if not installed and used in accordance with the instructions, may cause harmful interference to radio communications. However, there is no guarantee that interference will not occur in a particular installation. If this equipment does cause harmful interference to radio or television reception,
which can be determined by turning the equipment off and on, the user is encouraged to try to correct the interference by one or more of the following measures:
— Reorient or relocate the receiving antenna.
— Increase the separation between the equipment and receiver.
— Connect the equipment into an outlet on a circuit different
from that to which the receiver is connected.
— Consult the dealer or an experienced radio/TV technician for help.
To maintain compliance with FCC’s RF exposure guidelines, This equipment should be installed and operated with a minimum distance between 20cm the radiator your body: Use only the supplied antenna.


