![]()
USER’S GUIDE
SILICIUM ONE – WIFI
SILICIUM ONE – WIFI
INTRODUCTION
Congratulations on the purchase of your SILICIUM ONE low consumption heater!!
The product you have just purchased has undergone numerous tests and inspections to guarantee the highest quality. We hope it will give you entire satisfaction.
Please, read carefully this user’s guide before installing your device.
– Make sure the supply voltage corresponds with that on the nameplate (located on the left side of the device).
– The Schuko plug must be connected to a compatible Schuko socket.
– Do not place the device right under an electrical outlet.
– If the supply cord is damaged, it must be replaced by the manufacturer, its after-sales service, or any other qualified person.
– Not intended for children under the age of 3 unless duly supervised.
– Children over 3 and below the age of 8 must only turn on/off the device whenever it has been duly placed or installed, has been given supervision or instructions concerning the use of the appliance. Children from 3 to 8 must not plug, regulate and clean the device, nor carry out any maintenance activity.
– Not intended for use by persons (including children over 8) with reduced, physical, sensory or mental capabilities, or lack of experience and knowledge, unless they have been given supervision or instruction concerning use of the appliance by a person responsible for their safety. Children must not play with the device. Cleaning and maintenance must not be carried out by children without prior supervision.
– WARNING: some parts of this device may overheat and cause burns.
Pay special attention when children and vulnerable people are around.
![]() To avoid possible overheating, do not cover the device.
To avoid possible overheating, do not cover the device.
INSTALLATION INSTRUCTIONS
– The device includes a mounting kit with the required bolting: plugs and 6mm screws, and the wall support.
– Plugs supplied with the mounting kit are not suitable for plaster walls. These walls require specific plugs.
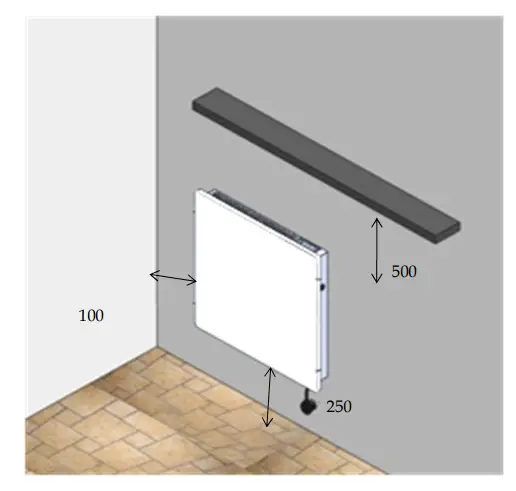
– Recommended clearances required to maintain optimum performance are indicated in the picture
– Once decided the location to install the device, remove the packaging and extract the device and its mounting kit.
– Fix the radiator to the wall as detailed below
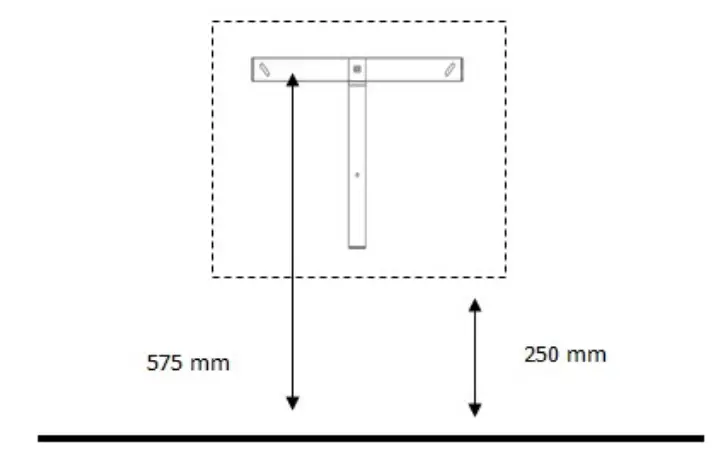
![]() Check dimensions and level before drilling.
Check dimensions and level before drilling.![]() Dimensions in mm.
Dimensions in mm.
STARTING AND SETTING UP
-SETTING UP THE WIFI CENTRAL UNIT
It is necessary for a Smartbox to control the heater using web or Smartphone apps. The Smartbox communicates the heater through the internet using the home router.
- Register on the web app: avantwifi.climastar.es to connect via your computer or download the CLIMASTAR WIFI app from Google PlayStore or Apple
AppStore and register. - The smart box communicates by radiofrequency to the heaters and it is connected to the home router using WIFI. Do as follows:
Enter your account to set home data. Now follow the steps shown on the screen
HOW TO LINK HEATERS TO THE WIFI CENTRAL UNIT
Only if the heaters are linked to the WIFI central unit can they be controlled by the APPs.
To link a heater, first, enter the App, click “INSTALL” and follow the assistant:
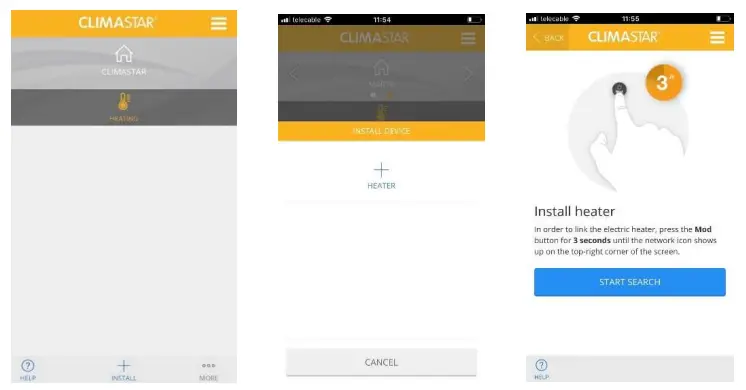
Once linked, an antenna with the Word “Link” will appear right-side up. The heater is ready to be controlled by the APPs.
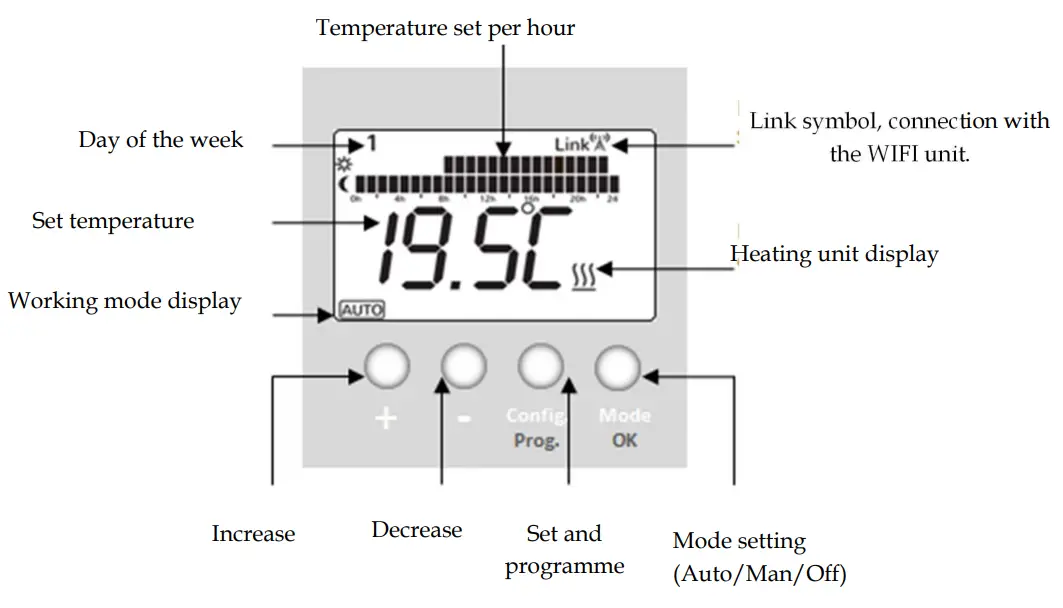
SCREEN DISPLAY
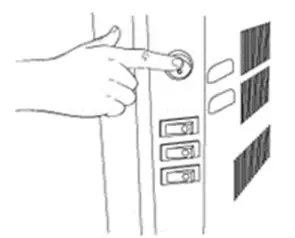
To turn on the device, connect the power cable to a mains power outlet and click the switch on the right. The display illuminates.
SETTING UP THE HEATER
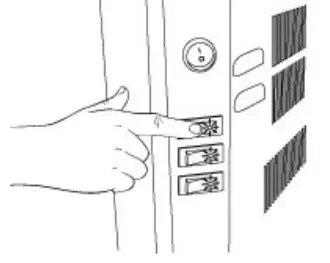
First, you have to set the level of maximum power that the heater will develop by connecting the appropriate switches placed on the right lateral side of the heater.
- By selecting the round shape Switch in I position we will connect 500 W:

- After this, by selecting the switch at the bottom we will have 1000W.
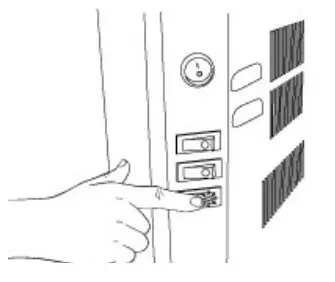
- After this, be selecting the middle switch to get 1500W
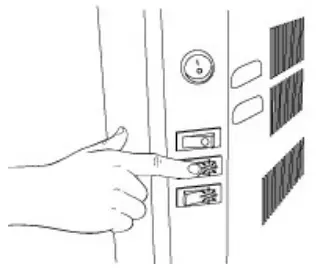
- If you select after this, the first switch below the round shape one, we will have all the switchers connected, this will provide 2000 W.

Once the heater power is decided, the user can set up the heater through the Web App (computer) or the mobile App in a very easy and intuitive way.
In case there is no internet access, you can also set up the heater This can be done directly on the keyboard placed on the upper side of the device. To do so, follow these steps:
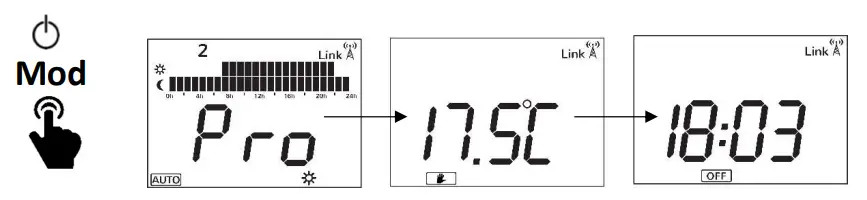
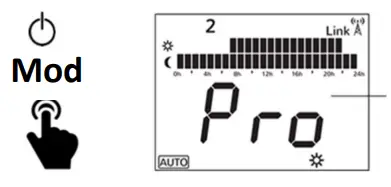
Operating modes
3 operating modes:
- Auto: the device works on a programmed time schedule based on 3 temperatures: comfort, economy, and frost protection. Bars on the screen show the programmed temperature per hour.
- Manual: Comfort temperature is fixed as per the user’s personal settings.
- OFF. The device is OFF.
Press ![]() / Mod to change the operation mode:
/ Mod to change the operation mode:
Manual mode
– Select the manual mode
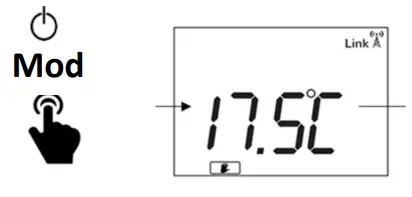
– Select the desired temperature by clicking +/-.
Automatic mode
– Select the automatic mode
– Temperature settings:
In the automatic mode, the set temperatures automatically change a per the user’s
settings. The user assigns one of the 3 temperature options below per hour:
- Comfort,
 set by the user is at home, maximum comfort.
 - Saving or economy,
 used at night or in short periods of absence.
 - Frost protection or minimum, used to set a minimum temperature when absent.
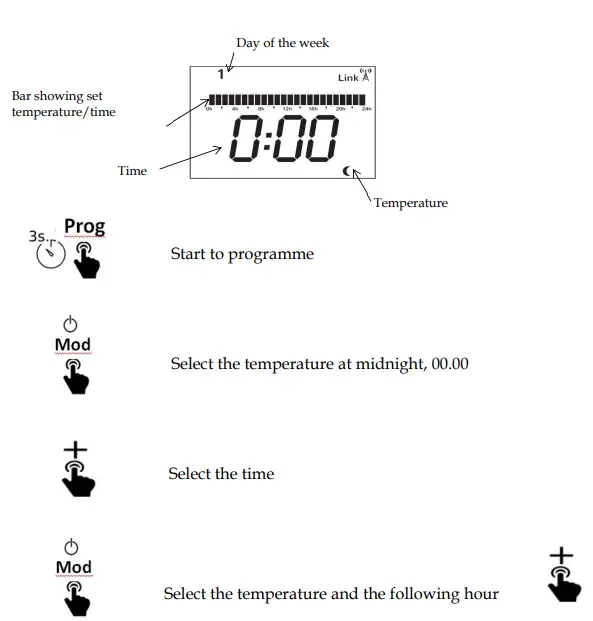
How to set the temperature values:
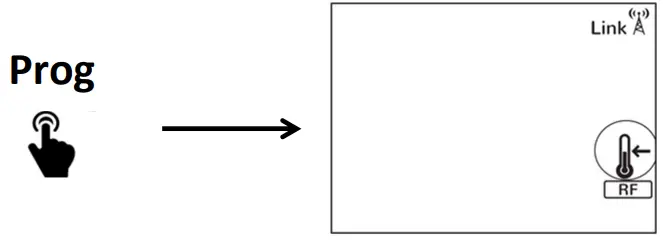
Select the temperature to set: comfort, economy, or frost.

How to modify the selected temperature (e.g. comfort):
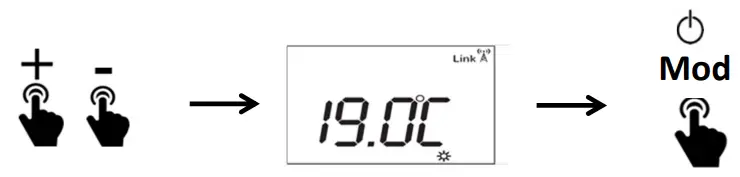
Do not forget to confirm and validate:
– Time schedule modification
Each radiator can be programmed hour per hour at any of the 3 available temperatures: comfort, eco, and frost protection.
E.g.
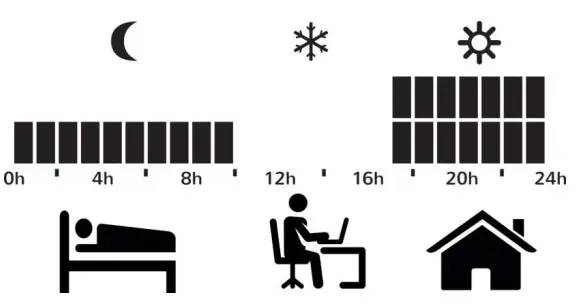
IMPORTANT: The schedule starts on day 1 of the week at midnight.
And so on until you have programmed each hour and each day of the week.
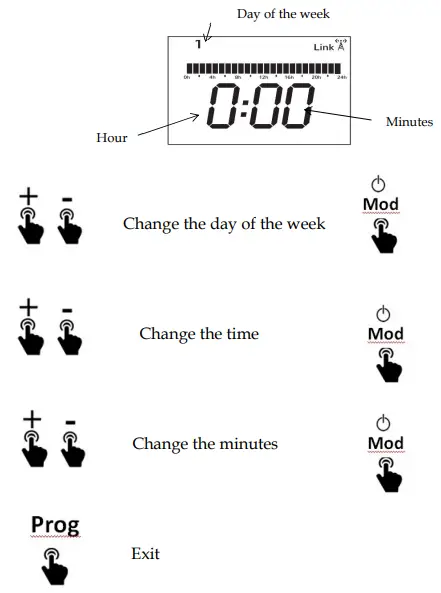
Do not forget to confirm and validate. Exit and set a real date and time on the heater.
If the device is already connected to the internet and the wifi Gateway, the time is automatically set. If not, proceed as follows to set the time:
– Temporary manual mode operation
Being on the automatic mode, the user can increase or decrease the temperature; said modification will be set up until the next change in the program.
Modify manually the temperature in Auto mode.
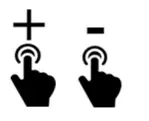
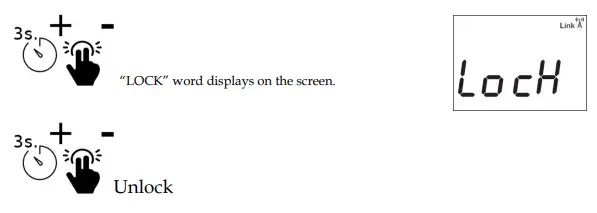
KEY LOCK FUNCTION
RESET
How to reset the heater
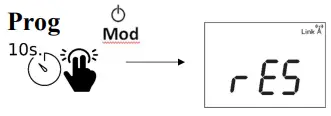
Do not forget to press “MOD” to confirm the reset
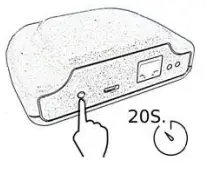
– How to reset the smart box
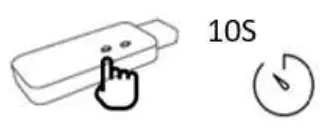
– How to reset the USB smart box
CLEANING AND MAINTENANCE
– Keep the room clean to avoid possible spots on the walls due to convection.
– At the beginning of the year’s heating season, vacuum any dust that has accumulated in the inner heating element while the radiator has been off for long periods during warmer weather.
– The device can be washed with a moistened cloth or with any washing conventional product.
TECHNICAL SPECIFICATIONS
DK1-WIFI
| Power: (W) | 500 – 1000 – 1500 – 2000 W | ||
| Dimensions: (mm) | H 500 x W 600 x D 80 | ||
| Weight: (Kg) | 14 | ||
| Voltage: | 230v -AC | Class: | II |
| Frequency: | 50 Hz | IP: | 24 |
| Ceramic component: | DUAL KERR | ||
| External Housing: | Powder-coated steel structure | ||
| Thermostat | Temperature range from 0 to 30’C | ||
| Safety thermostat | Bimetallic. Automatic. Rated Temperature: 90 ±5ºC.Reset Temperature: 65 ±5ºC | ||
| Heat output | 500 – 1000 – 1500 – 2000 W | ||
| Nominal heat output | P nom | 2,0 kW | |
| Minimum heat output (indicative) | P mln | 0,5 kW | |
| Maximum continuous heat output | P,max,c | 2,0 kW | |
| Auxiliary electricity consumption | 500 – 1000 – 1500 – 2000 W | ||
| At nominal heat output | e/max | A. | |
| At minimum heat output | e /mln | N.A. | |
| In standby mode | e/sb | 0,000 kW | |
| Type of heat input (select one) | |||
| manual heat charge control, with integrated thermostat | no | ||
| manual heat charge control with room and/or outdoor temperature feedback | no | ||
| electronic heat charge control with room and/or outdoor temperature feedback | yes | ||
| fan assisted heat output | no | ||
| Type of heat output/room temperature control | |||
| single-stage heat output and no room temperature control | no | ||
| two or more manual stages. no room temperature control | no | ||
| with mechanic thermostat room temperature control | no | ||
| with electronic room temperature control | no | ||
| electronic room temperature control plus day timer | no | ||
| electronic room temperature control plus week timer | yes | ||
| Other control options (multiple selections possible) | |||
| room temperature control, with presence detection | no | ||
| room temperature control, with open window detection | yes | ||
| with distance control option | yes | ||
| with adaptive start control | yes | ||
| with working time limitation | yes | ||
| with black bulb sensor | no | ||
CLIMASTAR GLOBAL COMPANY, S.L
Carretera AS-266 Oviedo-Porceyo, Km 7.
33192 Pruvia (Llanera) – Asturias – Spain
FAQs
PROBLEM | PROBABLE CAUSE | SOLUTION |
| low heal ter does not warm-up | The heater is in energy-saving mode | Increase the temperature in the heater if you need more room temperature. |
| The room does not reach the desired temperature | Incorrect setting of the set temperature | Check the set temperature on the display to verify it is the desired temperature. |
| Improper sizing, the heater is too small for the room | The power rating of the heater is not adequate for the place in which it has been installed. Select a larger heater. | |
| Large Height | Make sure the heater is installed at the correct mentioned height or increase the set temperature to compensate for the probe reading. | |
| Lower and upper grids are obstructed. | Do not place anything on top or below the radiator. | |
| The heater does not operate | Set temperature below the room temperature | Rise the radiator’s set temperature until it is I degree above the room temperature. |
| Control panel switch and protection down | Check that the automatic control is not down. | |
| Make sure the installation is correct and that there are independent lines for the heating system with a 2.5 m112 cable gauge and a maximum power of 3500 w | ||
| The switch at the side of the heater is turned OH: | Set the switch at the right side of the heater to position “I”. | |
| The set program is in an OFF period. | Check that the set program is correct for the time period and change if necessary or put in manual mode and override. | |
| The appearance of stains on the wall just above the radiator | The heater located at a wry height lo | The minimum height from the floor to the radiator’s lower part must be at least 25 an |
| Dust accumulation in the lower grid. | Vacuum any dust and loose carpet fibers below the heater. | |
| Type of painting on the wall. | Saints with a high content in ruffle are likely to darken. | |
| No response from buttons | The Control panel has been locked to prevent the pressing of buttons | Press both + and – for3 seconds, check 3.5. |
| Problems setting the WiFi gateway | Orange and green lights flash every 5 seconds. | No server communication, check the Internet connection |
| Red light flashes | The Wifi network is not well set | |
| Red and orange lights flash quickly | The smart box is not connected to the router | |
| Orange and green lights flash quickly. | The muter does not assign a valid IP. Check the Internet connection. | |
| The heaters do not communicate with the WiFi gateway | The heaters are not linked to the Win gateway. | Make sure the Link icon is fixed; if not, try linking again. |
| Distance exceeding 30 m and 2-3 walls. | First link the nearest heaters, since each heater acts as a signal repeater. | |
| “Link” icon flashes. | Check the Wifi gateway |
GUARANTEE
CLIMASTAR guarantees that at the moment of its purchase the product is free of any defect in the materials and in the workforce (limited guarantee). CLIMASTAR offers a commercial and voluntary guarantee; conditions included are similar to those of the legal guarantee, being CLIMASTAR responsible for the non-conformities arising in the terms and conditions mentioned below. Moreover, CLIMASTAR offers a total warranty of 2 years in spare parts.
– CLIMASTAR is responsible for the non-conformities arising within the 6 months following the date of sale. If the non-conformity arises after those 6 months, the user shall prove that the non-conformity already existed when delivered. The user must inform
CLIMASTAR of said non-conformity in a period inferior to two months.
– To obtain the service under the terms of this warranty it is important to detail the device’s purchasing date because the warranty period starts with the purchase invoice of the system customer. However, in no case, this warranty will be liable for defects that may arise after thirty-six months from the manufacture date.
– This warranty is strictly limited to the repairing in the factory of the manufacturing defect part or parts of the device, or to the complete replacement of the system when, in the opinion of the manufacturer, it is not possible or is uneconomical. This does not include any other type of expenditure as an installation, assembly, disassembly, or transport.
– This warranty does not cover defects and/or malfunction caused by accidents, misuse, negligence, wear, breakage, incorrect installation, and poor electricity supply to the system. This warranty is also excluded if it is used for another purpose other than heating, for an alteration, modification, tampering, or unauthorized repairing of the product, and by other different causes beyond the manufacturer’s reach after the delivery of the product.
– The warranty does not cover the costs and expenses incurred to access the device or installation, such as in hidden locations, heights, non-practicable ceilings. Neither does it include the costs derived from removing or replacing any structural element to access the device or the installation.
– No heating system will be returned to CLIMASTAR without a previous codified and official MERCHANDISE RETURN AUTHORISATION. CLIMASTAR assumes no liability for any equipment that is returned without the previously mentioned
– CLIMASTAR and/or its agents have the right to decide whether to replace the system or to repair the damaged components.
None of these options will extend the original warranty period.
– Any reparation must be done by the Technical Service and authorized by the manufacturer and/or any of its agents; any manipulation done by unauthorized personal will void this warranty. In case of substitution of the device, the buyer must go to the selling center which will be in charge of receiving the system.
– RESPONSIBILITY LIMITATION: CLIMASTAR as a manufacturer is not responsible for any personal or material damage that directly or indirectly might result of a non-proper installation, from improper handling, or neither for the lack of technically qualified staff nor for the installation costs which are expressly excluded from this warranty.
– None of the present conditions may be extended or modified without the express consent of CLIMASTAR.
![]()
CLIMASTAR GLOBAL COMPANY S.L.
Carretera AS-266 OVIEDO-PORCEYO/ Km.7 Pruvia
33192 – Llanera (Asturias)- SPAIN
Telf: 902 999 040
www.climastar.es
![]() CARDBOARD PACKAGING CAN BE RECYCLED
CARDBOARD PACKAGING CAN BE RECYCLED
![]() DO NOT PLACE THE ELECTRICAL ITEM IN THE GENERAL WASTE (IT SHOULD BE TAKEN TO A LOCAL RECYCLING CENTRE).
DO NOT PLACE THE ELECTRICAL ITEM IN THE GENERAL WASTE (IT SHOULD BE TAKEN TO A LOCAL RECYCLING CENTRE).
ONE WIFI Rev. 270120


