COOSPO BC107 GPS Bike Computer for Professional Cycling User Manual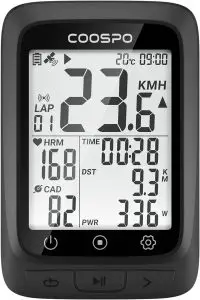
Left Button
Short Press: Mark a new lap
Hold for 2 seconds: Power off (Power on: short press the button)
(Short press in setting mode: exit / return and save the setting)
Mid Button
Short Press: Pause / Continue (Short press to start recording after power on)
Hold for 2 seconds: save the exercise record and exit the exercise
(Short press in setting mode: enter the current setting / switch the number of digits)
Right Button
Short Press: Page turning
Hold for 2 seconds: setting mode
(Short press in setting mode: switch setting options / switch the numerical)
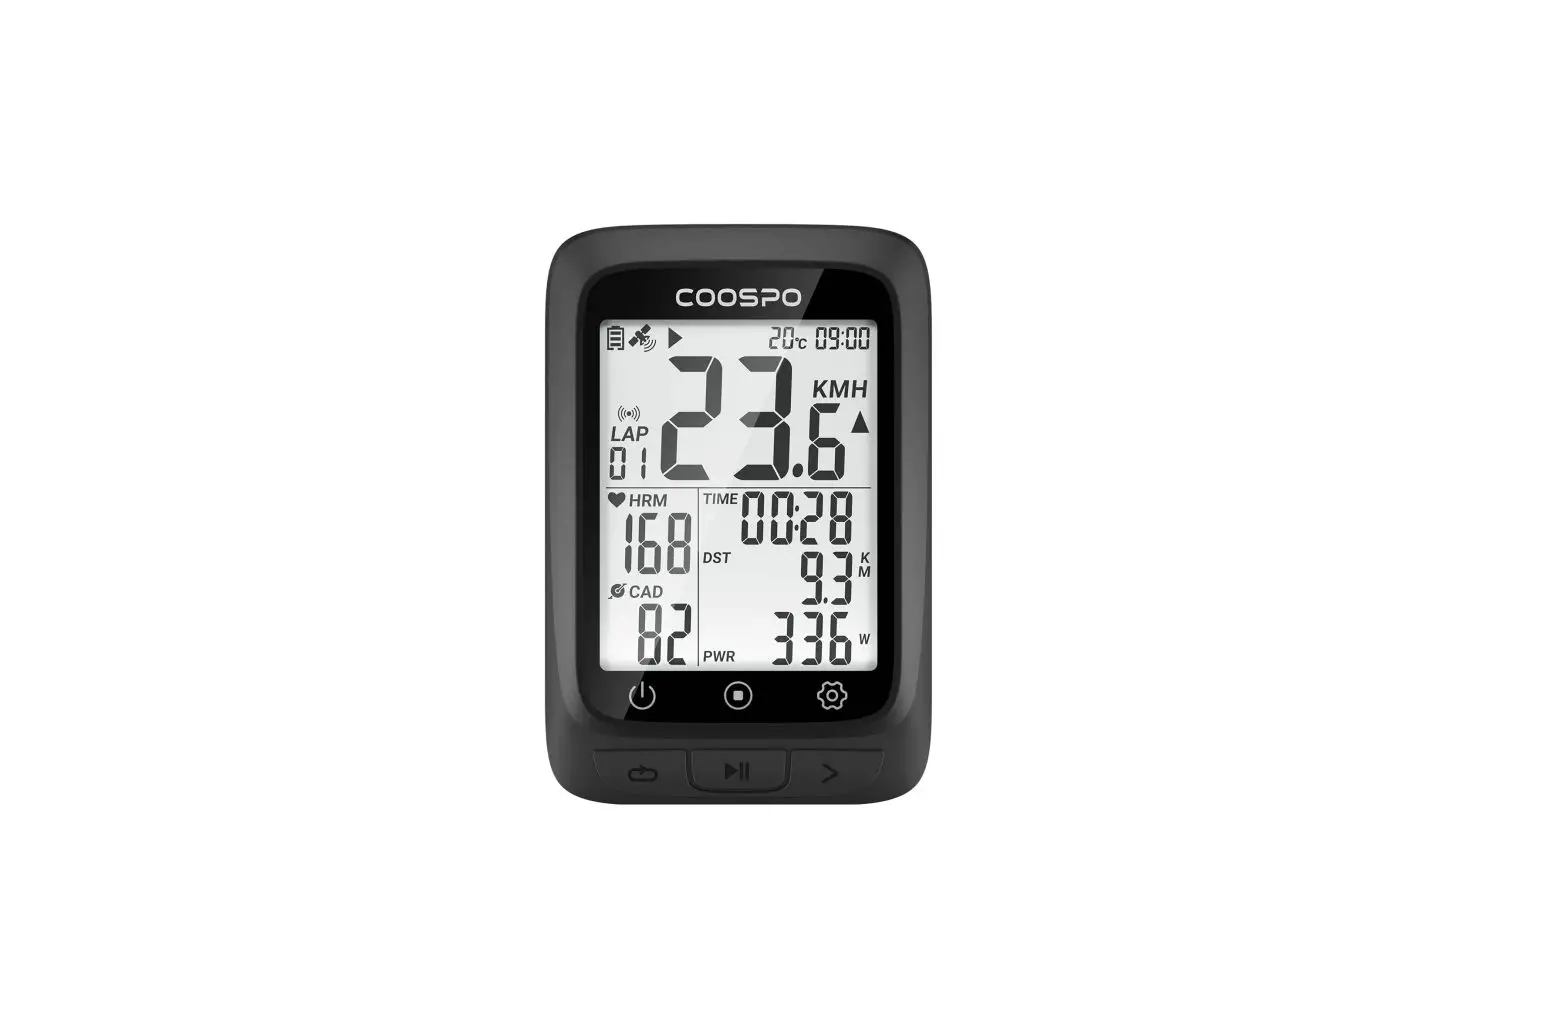
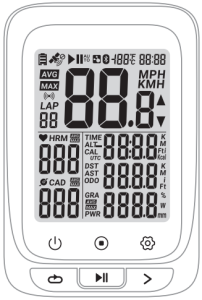
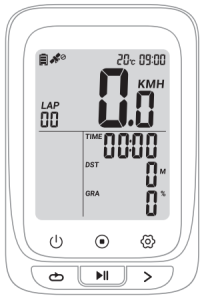
Status Icons
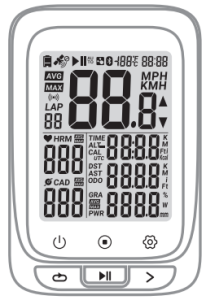
| Time | |
| No satellite signal | |
| Satellite signal level | |
| Accessory connecting status | |
| Under exercising | |
| Manual pause | |
| Connected with App by BLE | |
| Temperature | |
| Battery level | |
| Average | |
| Maximum | |
| MPH | Miles per hour |
| KMH | Kilometers per hour |
| Increased & Decreased | |
| Heart Rate | |
| Cadence | |
| GRA | Gradient |
| TIME | Sport time |
| ALT | Altitude |
| ODO | Odometer (Total distance) |
| DST | Distance |
| AST | Ascend Distance |
| CAL | Calories |
| LAP | LAP |
| PWR | Power |
| UTC | UTC Time zone |
Standard accessories
- Main Device x 1

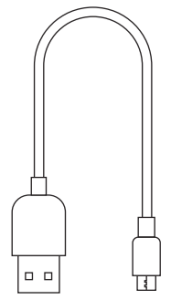
- Charging Cable x 1

- User Manual x 1

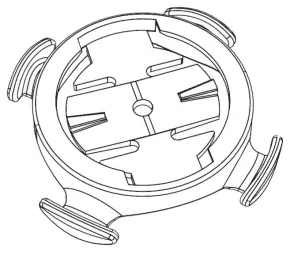
- Standard bike mount x 1

- Rubber pad for standard bike mount x 1
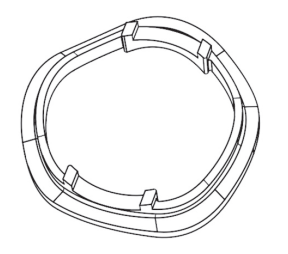
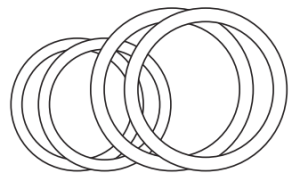
- Big size rubber ring x 2
Small size rubber ring x 2

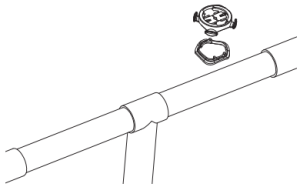
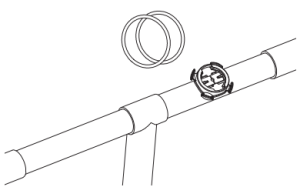
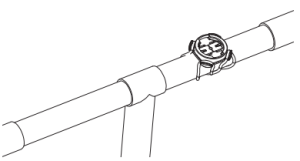
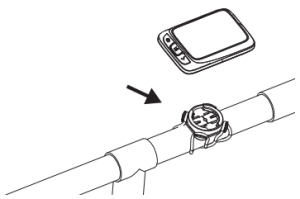
How to Install
Standard Mount Installation
- Install the rubber pad onto the mount

- Tie the mount onto the bar with the rubber rings
- Tie up the mount

- Install the main device onto the mount

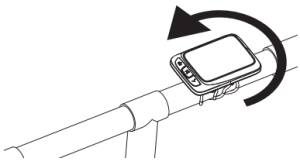
- Rotate the main device for 90 degrees

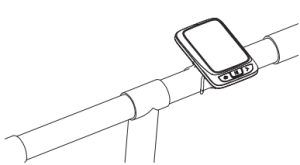
- Installation completed
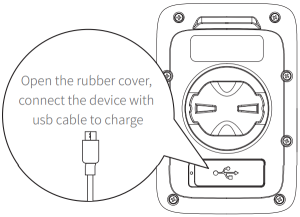
Charging
- Please charge the device before first time use.
- Please use DC 5V power adaptor for charging.
- During the charging, the battery icon will flash until fully charged.

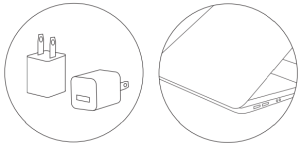
USB DC 5V power adaptor / Computer
Acquiring Satellite Signals, Time Setting and Auto Backlight
Auto Backlight
This device will automatically calculate the sun rise and sun set time, from the time half an hour before sun set to half an hour after sun rise, the backlight will be automatically lighten up, in the rest of the time, the backlight will be turned off if no operation detected in 15 seconds.
Acquiring Satellite Signals
Please make sure the device is outdoor and under a clear view of sky. Usually it may take 15~90 seconds to locate satellite signals, remain stationary when acquiring satellite signals. This device can use speed sensor or GPS for speed tracking, when the speed sensor is not connected, the device will use GPS for speed tracking, and will use speed sensor when the sensor is connected.
Time Setting
The time and date will be calibrated automatically after locate the satellite signals when the device is powered on (Please set the time zone correctly, refer to the time zone setting chapter) or connect the device to the App (Coospo Ride) to sync the time.
Connecting with ANT+ Sensors
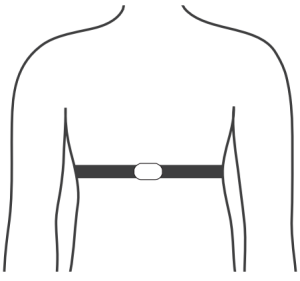
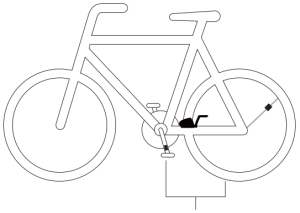
- Please make sure the sensors are in wake-up mode(For example, the heart rate monitor should be worn on properly, and the speed cadence and power meter should be awakened by turning the pedals or wheels).
Wear it correctly, wake up the heart rate belt
The speed cadence and power meter are awakened by turning the pedals or wheels
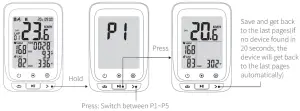
- Hold the
 to get into setting mode;
- There are 5 settings pages available (P1 ~ P5), press the to switch to P1;
- Press
 to select to enter;
 - The computer automatically searches for ANT+ peripherals, and automatically connects after searching for ANT+ peripherals;
- Press
 to save the found accessories and return. If no ANT+ accessory is found, the device will return to the last pages automatically (When a power device is connected during riding, the computer will display power data first, and when there is no power device, it will display GRA slope data).
- There are 5 settings pages available (P1 ~ P5), press the
Setting the Wheel Size
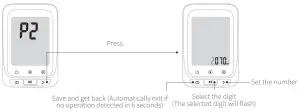
- Hold the to get into setting mode;
- There are 5 settings pages available (P1 ~ P5), press the to switch to P2;
- Press to select to enter;
- Press to select the setting digit, press the to set the numbers;
- Press to save and exit (Automatically exit in 6 seconds if no operation detected).

Common wheel size and circumference(Wheel Size L (mm)
- 12 × 1.75 935mm
- 14 × 1.5 1020mm
- 14 × 1.75 1055mm
- 16 × 1.5 1185mm
- 16 × 1.75 1195mm
- 18 × 1.5 1340mm
- 18 × 1.75 1350mm
- 20 × 1.75 1515mm
- 20 × 1-3/8 1615mm
- 22 × 1-3/8 1770mm
- 22 × 1-1/2 1785mm
- 24 × 1 1753mm
- 24×3/4 Tubular 1785mm
- 24 × 1-1/8 1795mm
- 24 × 1-1/4 1905mm
- 24 × 1.75 1890mm
- 24 × 2.00 1925mm
- 24 × 2.125 1965mm
- 26 × 1.75 2023mm
- 26 × 1.95 2050mm
- 26 × 2.00 2055mm
- 26 × 2.10 2068mm
- 26 × 2.125 2070mm
- 26 × 2.35 2083mm
- 26 × 3.00 2170mm
- 26 × 7/8 1920mm
- 26 × 1(59) 1913mm
- 26 × 1(65) 1952mm
- 26 × 1.25 1953mm
- 26 × 1-1/8 1970mm
- 26 × 1-3/8 2068mm
- 26 × 1-1/2 2100mm
- 26 × 1.40 2005mm
- 26 × 1.50 2010mm
- 27 × 1 2145mm
- 27 × 1-1/8 2155mm
- 27 × 1-1/4 2161mm
- 27 × 1-3/8 2169mm
- 27.5×1.75 2114mm
- 27.5×2.125 2174mm
- 27.5×1.5 2074mm
- 27.5×1.95 2146mm
- 29×2.1 2288mm
- 29×2.2 2298mm
- 29×2.3 2326mm
- 650× 35A 2090mm
- 650 × 38A 2125mm
- 650 × 38B 2105mm
- 700 × 18C 2070mm
- 700 × 19C 2080mm
- 700 × 20C 2086mm
- 700 × 23C 2096mm
- 700 × 25C 2105mm
- 700 × 28C 2136mm
- 700 × 30C 2170mm
- 700 × 32C 2155mm
- 700C Tubular 2130mm
- 700 × 35C 2168mm
- 700 × 38C 2180mm
- 700 × 40C 2200mm
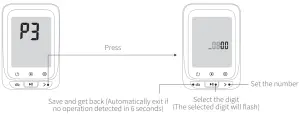
Time Zone Setting
- Hold the to get into setting mode;
- There are 5 settings pages available (P1 ~ P5), press the to switch to P3;
- Press to select to enter (Default time zone: UTC/GMT + 08:00);
- Press to select the setting digit, press the to set the numbers;
- Press to save and exit (Automatically exit in 6 seconds if no operation detected).

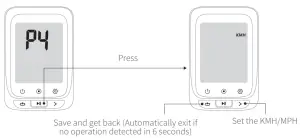
Setting Metric and Imperial Units
- Hold the to get into setting mode.
- There are 5 settings pages available (P1 ~ P5), press the to switch to P4.
- Press to enter(Default: KMH).
- press the to switch.
- Press to save and exit (Automatically exit in 6 seconds if no operation detected).

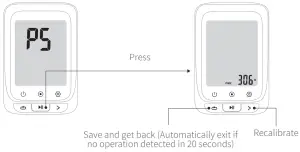
Power calibration
- Hold the to get into setting mode;
- There are 5 settings pages available (P1 ~ P5), press the to switch to P5, it will automatically calibrate;
- Short press to recalibrate, the value flashes during the calibration, the value does not flash after the calibration is successful;
- After the calibration is successful, press to save and exit(Automatically exit in 20 seconds if no operation detected).

- Short press
GPS Positioning
- GPS searching is Auto after power on. Please start cycling after the GPS positioning is successful.
- If you start riding when the GPS is not positioned successfully (speed sensor not connected), the speed data(real-time, average, maximum) will be displayed as”
 ”, and the rest of the data remains the same.
 - Tips: You can stand still 3-5 minutes to get more connections with satellites for better GPS signal.


No signal No satellite signal
Weak
Normal
Strong
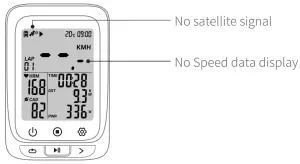
Note: Please make sure you are outdoor when positioning. Bad weather and dense forest may affect GPS signal.
Cycling
Turn on the device, press ![]() to start an exercise and recording(During the cycling, when the cycling speed is 0, the device will pause automatically, if no data get for speed, cadence and heart rate in 15 minutes the device will turn into sleep mode, press
to start an exercise and recording(During the cycling, when the cycling speed is 0, the device will pause automatically, if no data get for speed, cadence and heart rate in 15 minutes the device will turn into sleep mode, press ![]() to resume).
to resume).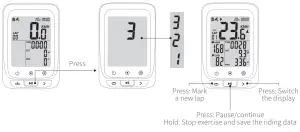
Bluetooth Connection
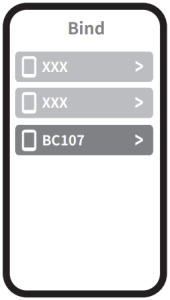
- Download CoospoRide in Google Play or App Store


- Compatible with

iOS 9.0 version and above, iphone 4s and above
Any Bluetooth 4.0 enabled Android device with Android 4.3 and above
- Compatible with
- Power on the bike computer;
- Open the CoospoRide App, enter the binding computer step, select the BC107 computerin the device list to bind the device, (the phone needs to turn on Bluetooth and allow Bluetooth permissions);

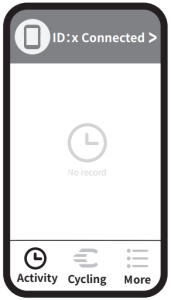
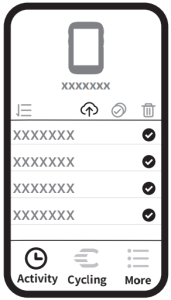
- In the activity page of the App, click on the connected device to enter the record synchronization operation page (through the authorization to Strava in the App more settings, the computer data can be synchronized to the Strava platform at the same time);
- Select the record to be synchronized and click
 Sync, and the record on the computer will be deleted automatically after synchronization.


Basic Parameters
| Wireless | ANT+ f & Bluetooth | Language | English |
| Display | FSTN Screen, 2.3 inch | Battery Capacity | 1000nnAh |
| Backlight | Yes | Battery Life | 28 hours for a single use after fully charged |
| Locate mode | GPS 84 BDS | Material | PC+ABS+TPU |
| Lap Count | Yes | Dimension | 81x54x20.6 mm |
| Storage Format | .fit | Accessories Supported | ANT+ peripherals (Heart Rate Monitor, Speed Sensor Cadence Sensor, Speed and Cadence 2 in 1 Sensor, Power Meter) |
| Water Resistance | IPX7 | ||
| Weight | 64g | File Transfer | Bluetooth (Specified App Compatible) |
Attentions
The water resistant level of the bicycle computer is IPX7. It can be used in the rain if you close the protective cover on the back tightly. It is recommended to take down the bicycle computer and put it into waterproof bag if it rains heavily.
Responsibility Disclaimer
- The information contained in this manual just for reference. The product described above may be subject to alteration owing to the manufacturer’s continuing research and development plans, without making an announcement in advance.
- We shall not bare any legal responsibility for any direct or indirect, accidental or special damages, losses and expenses arising from or in connection with this manual or the contained product.


