
AVANTCO 177EMBS94SS 94 Inch Electric Meat and Bone Saw User Manual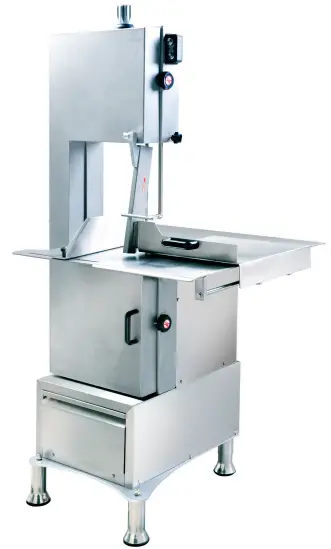
WARNING
The warnings, cautions, and instructions discussed in this instruction manual cannot cover all possible conditions or situations that could occur. It must be understood by the operator that common sense and caution are factors that cannot be built into this product, but must be supplied by the operator.
General Safety Regulations
Please use this machine according to these cautions. The user should understand all rules. Please carefully read them before you operate the machine. This machine may cause harm to the health of the operator if the user removes or changes equipment in the machine.
We are not responsible for any injuries resulting from improper operation of this machine. Please operate according to “Operation Method” instructions and follow the proper operation procedures while using. Take care while assembling and operating, in order to avoid scratching skin. Please avoid putting hands around the saw blade to prevent any possible injuries. Please read the instruction manual.
- Keep all loose clothing, away from moving parts when the saw is in use.
- Keep fingers and hair away from moving parts when saw is in use.
- Turn the unit off before unplugging it from the outlet.
- Always unplug it when changing a part on the saw.
- Unplug when assembling or disassembling the unit.
- Always provide supervision when this appliance is being used near children.
- Do not disassemble the saw during operation.
- Avoid contact with moving parts.
- Do not use the saw if the power cord is broken.
- To protect against risk of electrical shock, do not put any electrical components, such as the motor or cord, in water or other liquids.
- Unplug this unit from the outlet before putting on or taking off parts, and before cleaning.
- Do not use fingers to scrape food away from the discharge disc while the appliance is operating. A cut type injury may result.
- Do not operate your appliance if it has a damaged cord or plug, after it malfunctions, or if it is dropped and damaged in any manner.
- The use of attachments not recommended or sold by the manufacturer may cause fire, electric shock, or injury.
- Do not use outdoors.
- Do not let the cord hang over edge of table or counter.
- SAVE THESE INSTRUCTIONS.
Technical Details
| Motor | 3HP (2200W) |
| Blade | 94″ (2400mm) |
| Blade Speed | 72’/Second |
| Cutting Thickness | 10″ (253mm) |
| Max Cutting Height | 14″ (356mm) |
| Max Cutting Width | 10″ (253mm) |
| Table Size | 28″x31.5″ (710x800mm) |
IF YOU USE AN EXTENSION CORD, MAKE SURE TO USE ONLY UL APPROVED CORDS WITH THE CORRECT GAUGE AND LENGTH. SEE BELOW:
| Nameplate | Extension Cord Length | |||||
| Amperes | 25’ | 50’ | 75’ | 100’ | 150’ | 200’ |
| 0-5 | 16 | 16 | 16 | 14 | 12 | 12 |
| 5.1-8 | 16 | 16 | 14 | 12 | 19 | – |
| 8.1-12 | 14 | 14 | 12 | 10 | – | – |
| 12.1-15 | 12 | 12 | 10 | 10 | – | – |
| 15.1-20 | 10 | 10 | 10 | – | – | – |
Assembly & Operation Instructions
Before Use
When unpacking, checking to make sure all parts shown are included.
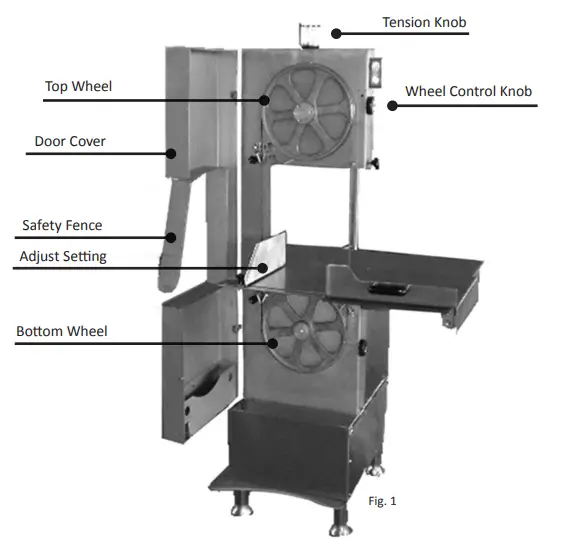
Installation (See Fig 1)
- The Tabletop Butcher Saw is fully assembled and is ready to be used right out of the box.
- The Tabletop Butcher Saw should be put on a flat, level surface capable of withstanding vibration.
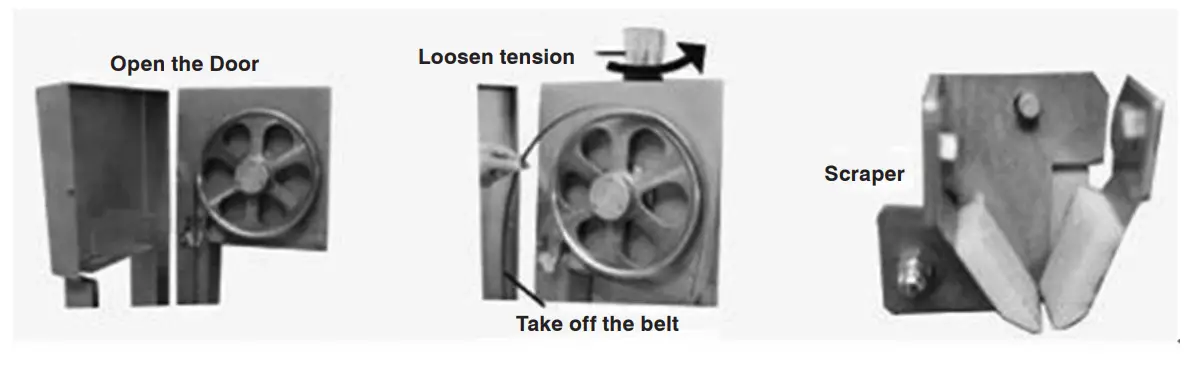
- Open the door cover (#44) of the machine and inspect if the saw blade is correctly fixed on the top and belt of the wheels (#19, #37); the teeth edge of the blade should be flush with the edge of the wheels.
- Close the door cover (#44), and turn the wheel control knob (#16) counterclockwise, then plug the saw in. Turn on the switch to start the work, turn off the black switch to stop it. When the machine works, ensure the blade drives in a clockwise manner.
Operation Instructions
- When you stand by the machine, please put the meat between the saw blade and the (#45). Control the safety fence with your right hand and the meat with the left hand. Then use the handle of the safety fence to guide the blade through the meat.
- Use the thickness adjustor to control the thickness of cuts.
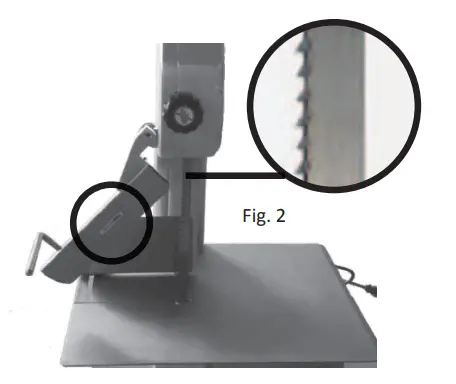
- When using the saw, push the handle of the safety fence evenly and parallel from left to right as shown below (See Fig. 2).
NOTE
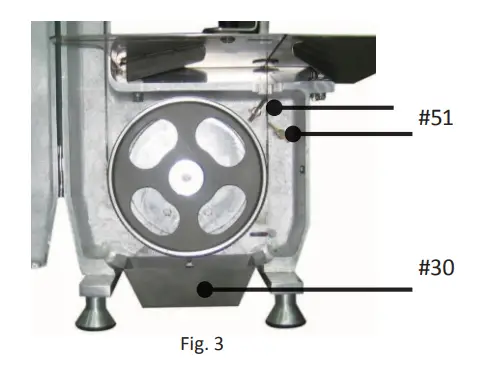
- Before using the machine, check the scraper to ensure that it leans against the blade, but ensure that it does not touch to the teeth of blade. The scraper removes the meat scraps from the blade when the machine is working. Empty the scrap tray (#43) regularly. (See below Fig. 3)
- When the tabletop butcher saw is not in use, unscrew the tension knob (#5) counterclockwise for two revolutions to release the tension; when it is time to use the machine, tighten it by screwing it clockwise two revolutions. Following this procedure could increase the useful life of the blade.
- When the operator opens the door cover of the machine, the open door-cut off power switch will stop the operation, but the saw blade still will continue to spin for a time. Allow the blade to stop completely.
- Always use safety gloves when operating the tabletop butcher saw.
Replace Saw Blade
- Loosen the blade by turning the tension knob counterclockwise.
- Carefully remove old blade and replace with new blade. Pay special attention to the direction the saw tooth blades are going. Otherwise, the saw blade will break off from the machine.
- Make sure the saw blade and slicer are installed between the top wheel and bottom pulley/middle plate and that it passes through the guide groove.
- After installing the new blade, turn the tension knob to the point that the loosened wheel can make a slicing sound. This sound means the blade has the correct amount of tension.
- Be sure to match the right saw blade to the type of food you are cutting.
Cleaning, Inspection & Maintenance
WARNING
Always disconnect this butcher saw from its electrical power supply source before performing any cleaning, inspection, or maintenance. Always wear heavy-duty gloves when adjusting and handling the saw blade.
Cleaning
Disconnect machine from power source before cleaning. Open the door of machine, loosen the tension, and take off the saw blade. Loosen the scraper protection knob, just enough to take off scraper. It’s best to clean the machine with hot water and a hard brush.
You can also use hot water to scour and wash the main parts, belt, and protective device. Afterwards, wipe off all water from the machine with a dry cloth.
Pay attention to cleaning the dead angle, wheel, and chain wheel bottom parts.

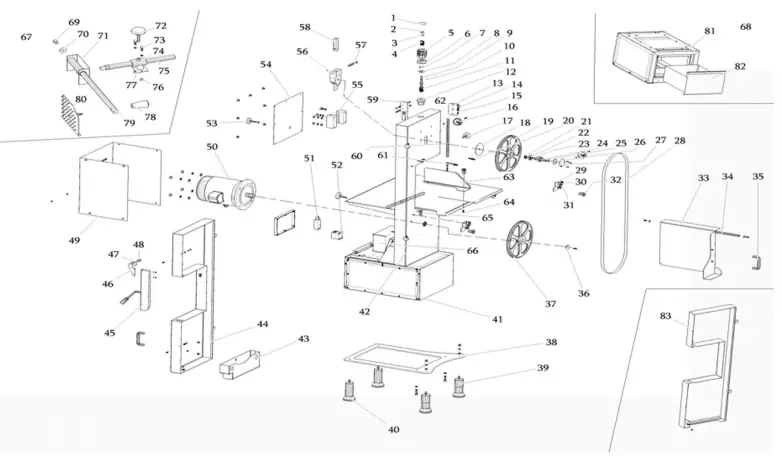
Exploded Parts List
| PART NO. | DESCRIPTION | QTY. |
| 1 | Cover | 1 |
| 2 | Nut | 1 |
| 3 | Gasket | 16 |
| 4 | Spring | 1 |
| 5 | Adjusting Handle | 1 |
| 6 | Sheath | 1 |
| 7 | Steel Ball | 4 |
| 8 | End Cover | 1 |
| 9 | Mandrel | 1 |
| 10 | Equatorial Bond | 1 |
| 11 | Pressure Spring | 1 |
| 12 | Tension Guide Bush | 1 |
| 13 | Switch Box | 1 |
| 14 | Stop Button | 1 |
| 15 | Start Button | 1 |
| 16 | Control Knob | 2 |
| 17 | Handle | 2 |
| 18 | Manger Board | 1 |
| 19 | Belth Wheel 1 | 1 |
| 20 | Guiding Shaft | 1 |
| 21 | One-Way Rubber Sealing Ring | 1 |
| 22 | Bearing | 2 |
| 23 | Space Ring | 1 |
| 24 | Shaft | 1 |
| 25 | Thrust Washer | 1 |
| 26 | O-Rings | 1 |
| 27 | Gland 1 | 1 |
| 28 | Saw Blade | 1 |
| 29 | Holder | 2 |
| 30 | Cleaning Shell | 4 |
| 31 | Clean Sheet | 2 |
| 32 | Handle | 1 |
| 33 | Sliding Countertops | 1 |
| 34 | Cover Plate | 1 |
| 35 | Bakelite Handle | 2 |
| 36 | Detent Ring | 1 |
| 37 | Belt Wheel 2 | 1 |
| 38 | Baseboard | 1 |
| 39 | Adjusting Foot | 2 |
| 40 | Non-Adjusting Foot | 2 |
| 41 | Base | 1 |
| 42 | Body | 1 |
| 43 | Scrap Tray (Not for Type A) | 1 |
| 44 | Dover Cover | 1 |
| 45 | Safety Fence | 1 |
| 46 | Spindel | 1 |
| 47 | Protect Tooth Holder | 1 |
| 48 | Spindle | 1 |
| 49 | Back Frame | 1 |
| 50 | Motor | 1 |
| 51 | Open The Power Switch | 1 |
| 52 | Contactor & Thermal Relay | 1 |
| 53 | Handle | 1 |
| 54 | Cover Board | 1 |
| 55 | Guide Block | 1 |
| 56 | Slider | 1 |
| 57 | Axle | 1 |
| 58 | Cullis | 2 |
| 59 | Mobile Shield Block | 1 |
| 60 | Sliding Square Shaft | 1 |
| 61 | Guide Block | 1 |
| 62 | Switch Rubber Mat | 1 |
| 63 | Locring Plate | 1 |
| 64 | Lock Screw | 1 |
| 65 | Angle Block | 1 |
| 66 | Motor Support Frame | 1 |
| 67 | The Tailing Treatment Plant | 1 |
| 68 | Base (With the Drawer) | 1 |
| 69 | Screw | 18 |
| 70 | Gasket | 1 |
| 71 | Transition Socket | 1 |
| 72 | Handle | 1 |
| 73 | Screw | 1 |
| 74 | Fixed Seat | 1 |
| 75 | Shaft | 14 |
| 76 | Nut | 10 |
| 77 | Spring Washer | 1 |
| 78 | Handle | 1 |
| 79 | Move Axis | 1 |
| 80 | Rod Holding Plate | 1 |
| 81 | Base (With the Drawer) | 1 |
| 82 | Door | 1 |
Exploded Parts Diagram
http://www.avantcoequipment.com/


