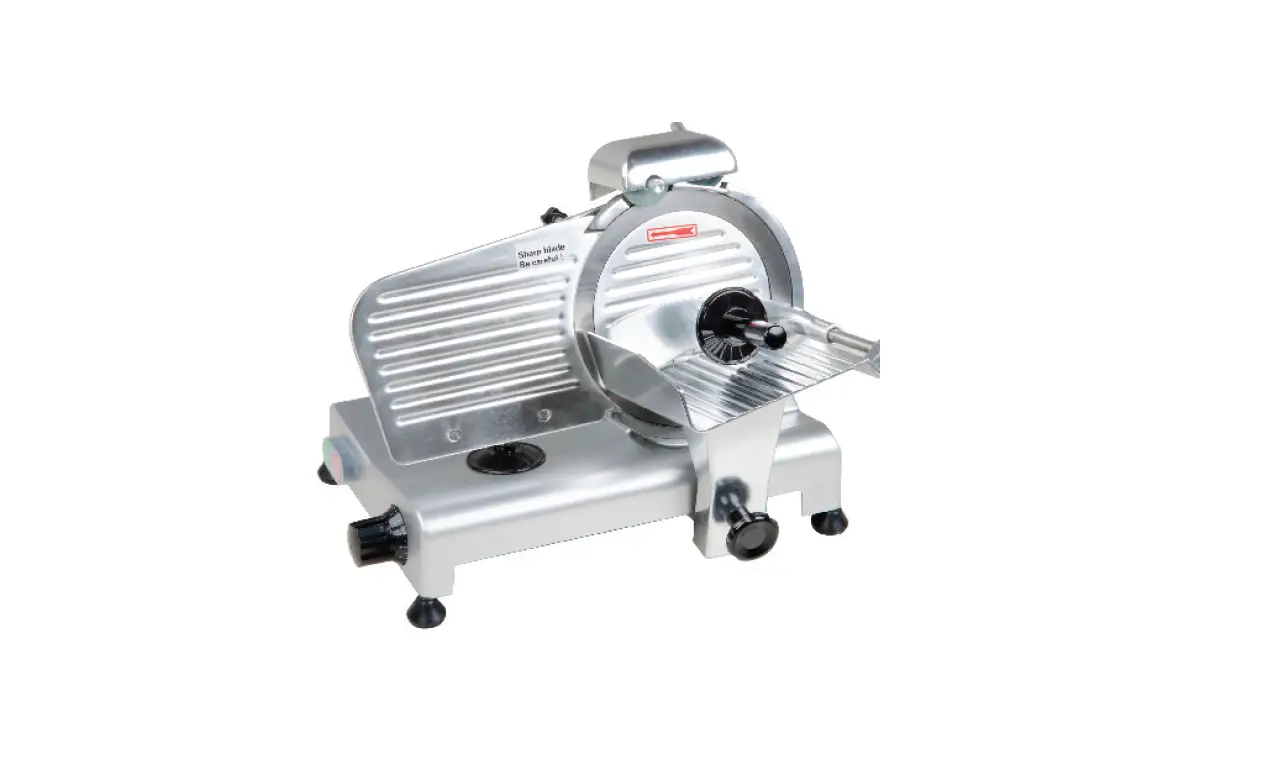
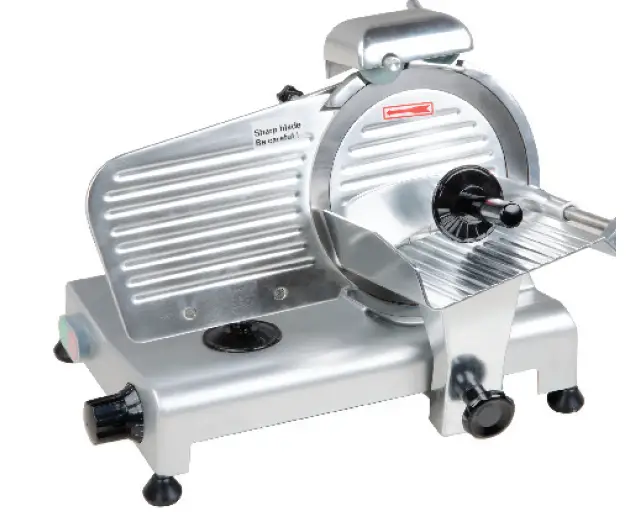
AVANTCO SL309 9 Inch Manual Gravity Feed Meat Slicer
Unpacking:
Unpack the product and check for any damage incurred during transit. This should be reported to the responsible carrier, railway or postal authority, and a request for a damage report should be made.
General Installation And Operation
Instructions:
The Avantco Auto/Manual slicer is a medium duty electrically driven appliance. The unit has been designed to meet the highest safety and hygiene standards. The robust aluminum construction and powerful drive motors ensure long and reliable operation and use.
- Place the unit in the desired location with the on/off switch facing the operator. DO NOT plug the unit in at this point. The supporting table should be stable and at the correct working height. The work surface should be in a dry location and preferably away from heavy traffic areas.
- Clean the unit with a DAMP cloth using a neutral P.H. dish detergent. Wipe and dry the machine. (See Cleaning in-structions on page 3 of this manual.
 Cut through the greasiest dishes, glassware, cutlery, pots, and pans with Sunbright pot and pan dishwashing liquid. This heavy-duty pot and pan dishwashing liquid was specially designed for the institutional environment with its super concentrated, high active, high sudsing formula. Available in 32 oz. bottles (12/case) or 5 gallon bulk supply.
 - Set the thickness of slice required using the control knob adjacent to the on/off switch.
- The meat support platform should be in the start position that is close to the operator. Lift up the food pusher; place the meat to be sliced on the support platform against the raw edge. Return the food pusher to its original position now on top of the meat to be sliced.
- Switch on the motor and using the handle on the food pusher, push the carriage back and forth to begin cutting the food.
- After you are finished cutting, turn off machine and collect the product slices in the exit area.
- Please Note: The blade-sharpening device is NOT factory fitted on MODELS SL310, SL312 SL512 AND SL713MAN. To fit, follow the procedure below.
- Fit the sharpening device in the socket provided, ensuring the grinding stones are positioned at the rear of the machine.
- Tighten the safety locking screw.
To replace the belt, please remove the knife and motor, then remove belt through the hole under the knife. Then, install the new belt and reassemble.
 Cut through the greasiest dishes, glassware, cutlery, pots, and pans with Sunbright pot and pan dishwashing liquid. This heavy-duty pot and pan dishwashing liquid was specially designed for the institutional environment with its super concentrated, high active, high sudsing formula. Available in 32 oz. bottles (12/case) or 5 gallon bulk supply.
Safety
- The units are designed to operate an alternating current (A.C) only. DO NOT CONNECT TO DIRECT CURRENT (D.C).
- Please ensure that the power supply cord does not come into contact with hot surfaces.
- If the supply cord is damaged, it must be replaced with a new cord assembly. (Available from the suppliers agent.)
- The appliance must only be used for its intended purpose.
- I t is strongly suggested that the operators of this machine wear close fitting clothes. It is essential when blade maintenance or cleaning is undertaken that suitable hand protection gloves are used.
- ALWAYS unplug the slicer before undertaking cleaning or maintenance of the unit.
- These machines must be operated by trained personnel and should never be used by unskilled operators or children.
- The blade must be replaced when it has reduced in size by 5mm.

LubriQuik food grade silicone spray lubricant is ideal for use on virtually any equip-ment or machinery that makes contact with food, such as slicers, conveyor sys-tems, bottling and canning machinery, bakery equipment, and dairy equipment.
Blade Sharpening
- This operation should be undertaken if the cutting blade becomes dull. It should be noted that the blade is made from hardened material and under normal use should only need sharpening once a year.
- Unplug the unit.
- Ensure that the slice thickness knob is in the ‘0’ position.
- CAREFULLY clean the part of the blade to be sharpened.
- Unlock the sharpening device using the safety locking screw. Lift up the sharpening assembly and rotate it 180° so that both grinding wheels are in the correct position. Lower the sharpening device and lock in position.
- Plug in the machine and switch on.
- Using the button at the rear of the sharpening unit, push the stone against the rotating blade for approximately 30 seconds.
- After sharpening, it is important to remove the grinding wheel from the blade by letting go of the push button on the front of the sharpening device. Run the slicer for 2-3 seconds after letting go of this button.
- Return the sharpening device to its original position by unlocking the safety screw and rotating by 180°.
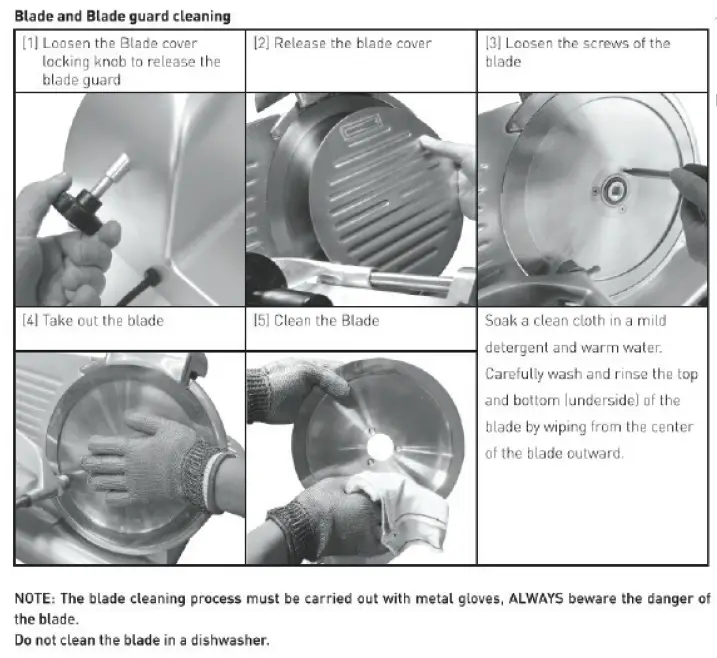
Cleaning
- It is essential to follow all the safety instructions at all times.
- Make sure that the unit is unplugged before cleaning.
- The unit should never be immersed in water.
- Do not use abrasive cleaning agents or solvents to clean this machine. Clean with a damp cloth.
REMEMBER! The blade is extremely sharp and for safety, ensure that the slice thickness knob is in the ‘0’ position. - After cleaning, wipe the appliance with a dry cloth and allow the unit to dry completely before reuse.
- If the operation of the food carriage is not smooth, lay the machine on its side, clean the slide bar and lubricate with a food safe lubricant, like Lubriquik .
Cleaning and Sanitizing:
- Turn the slicer off and unplug.
- Turn the thickness control knob all the way to the right.
- Remove the product table locking knob, and then remove the product table.
- Remove Slicer Deflector that is over the knife.
- Clean all removed parts, slicer knife and base with hot water and detergent.
- Rinse with hot water and sanitize.
- Reassemble slicer

Electrical Connection Information
Electrical Connection Information
| ModelD escription Volts /HZ HP WattsP lug Type | |||||
| SL309A | vantco Slicer 9” | 120 / 60 | 1/4 HP | 200 WN | EMA 5-15P |
| SL310A | vantco Slicer 10”1 | 20 / 601 | /3 HP | 320 W | NEMA 5-15P |
| SL312A | vantco Slicer 12”1 | 20 / 601 | /3 HP | 420 WN | EMA 5-15P |
| SL512A | vantco Slicer 12” Medium Duty1 | 20 / 605 | /8 HP4 | 50 W | NEMA 5-15P |
| SL713MAN | Avantco Slicer 13” Medium Duty | 120 / 60 | 3/4 HP | 630 WN | EMA 5-15P |
Technical Specification
| ModelB | lade Dia.B | lade Rotation Speed | Cut ThicknessC | ut CapacityN | et WeightO | perating Noise Level |
| SL3099 | ” | 532 rpm | 0 – 0.4”6 | .3 x 7.5”2 | 9lbs |
60-67 dB(A) |
| SL3101 | 0” | 465 rpm | 0 – 0.4”6 | .7 x 7.5”3 | 2lbs | |
| SL5121 | 2” | 300 rpm | 0 – 0.6”9 | .3”x 6” | 64lbs | |
| SL3121 | 2” | 428 rpm | 0 – 0.6”9 | .4x 6” | 54lbs | |
| SL713MAN | 13”5 | 30 rpm | 0 – 0.6”1 | 5.5x 10.5” | 114lbs |
Wiring Diagram 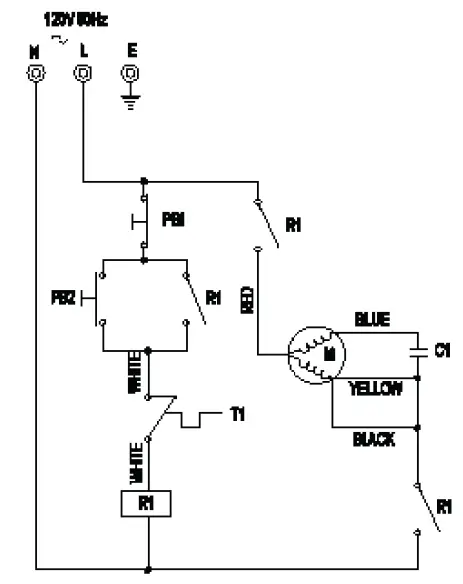
| LEGEND DescriptionP art Number | ||
| PB1P | ush Button Stop1 | -PB-SLR |
| PB2P | ush Button Start | 1-PB-SLR |
| T1 | Oven Temp. Safety MotorI | nternally Fitted In Motor |
| R1 | Relay 120V | 1-Rel-SLR |
| C1 | Capacitor 20MF | 1-CAP-SLR |
| MM | otor SL309 – 120V | 1-MOT-SL309 |
| MM | otor SL310 – 120V1 | -MOT-SL310 |
| MM | otor SL512/SL312 – 120V1 | -MOT-SL512 |
| MM | otor SL713MAN – 120V | 1-MOT-SL713MAN |
Exploded Parts Diagrams – SL309, SL310
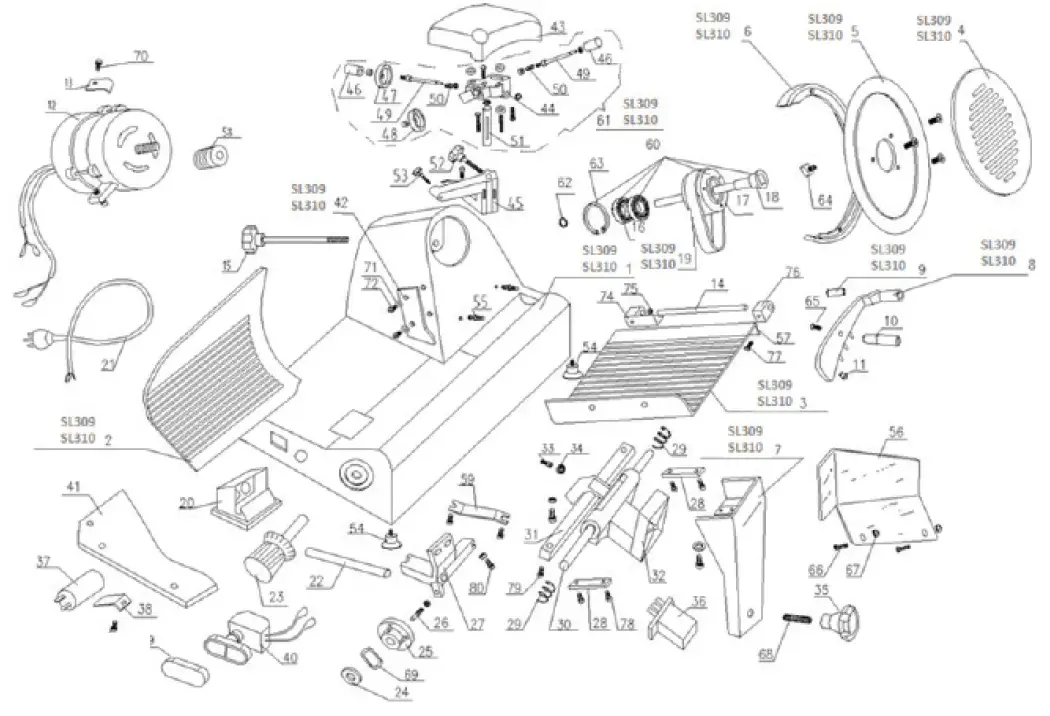
| Diagram # | Part Name | Replacement Part # |
| 1 | Base | |
| 2 | Regulator Plate | 177PSL92 (SL309), |
| 177PSL102 (SL310) | ||
| 3 | Carriage Feed Tray | |
| 4 | Blade Cover | 177PSL94 (SL309), |
| 177PSL104 (SL310) | ||
| 5 | Blade | 177SL309BLD (SL309), |
| 177SL310BLD (SL310) | ||
| 6 | Guard Ring | 177PSL96 (SL309) |
| 177PSL6 (SL310) | ||
| 7 | Carriage Bracket | |
| 8 | Pusher Arm | 177SL309ARM (SL309), |
| 177SL310ARM (SL310) | ||
| 9 | Pusher Arm Bushing | |
| 10 | Pusher Handle | 177SL309PH (SL309), |
| 177SL310PH (SL310) | ||
| 11 | Handle Bumper | |
| 12 | Motor | 177SL309MTR (SL309), |
| 177SL310MTR (SL310) | ||
| 13 | Motor Bracket | |
| 14 | Feed Tray Pusher Guide Pin | |
| 15 | Blade Guard Bolt | |
| 16 | Ball Bearing | |
| 17 | Blade Belt Wheel | |
| 18 | Belt Wheel Pin | |
| 19 | Belt | 177SL309BELT (SL309), |
| 177SL310BELT (SL310) | ||
| 20 | Feed Tray Support | |
| 21 | Power Cord | |
| 22 | Slide Axle | |
| 23 | Thickness Adjuster Knob | 177SLTKNOB |
| 24 | Spring Gasket | |
| 25 | Cam Regulator | 177PSL25 |
| 26 | Cam Pin | 177PSL926 |
| 27 | Regulator Carriage | 177PSL27 |
| 28 | Slide Axle Bracket | |
| 29 | Towing Bracket Spring | |
| 30 | Towing Bracket Axle | 177SL3PTGR |
| 31 | Quadrate Axis | |
| 32 | Towing Bracket | 177PSL32 |
| 33 | Hex Head Screw | |
| 34 | Ball Bearing | |
| 35 | Carriage Knob | 177SL3CRGKNB |
| 36 | Relay | 177SL3RLY |
| 37 | Capacitor | 177SL3CAP |
| 38 | Capacitor Retainer |
| Diagram # | Part Name | Replacement Part # |
| 39 | Switch Cover | 177PSL39 |
| 40 | 177PSL40 | |
| 41 | Base Cover | 177PSL41 |
| 42 | Director | |
| 43 | Sharpener Cover | 177PSL43 |
| 44 | Sharpener Cover Bracket | |
| 45 | Sharpener Base Bracket | 177PSL45 |
| 46 | Sharpener Button | |
| 47 | Grinding Wheel | |
| 48 | Sharpening Stone | 177PSL48 |
| 49 | Sharpener Pin | |
| 50 | Shaprener Spring | |
| 51 | Sharpener Bracket Pin | |
| 52 | Guard Knob | 177SL3RBGK |
| 53 | Sharpener Knob | 177PSL53 |
| 54 | Rubber Foot | 177SLFEET |
| 55 | Blade Guard Pin | |
| 56 | Meat Blocking Board | |
| 57 | Slide Axle Bracket | |
| 58 | Motor Belt Wheel | |
| 59 | Slide Driver | |
| 60 | Blade Pulley | 177PSL60 |
| 61 | Sharpener Assembly | 177SL309SA (SL309), |
| 177SL310SA (SL310) | ||
| 62 | Spring Gasket (Bearing) | |
| 63 | Spring Gasket (Hole) | |
| 64 | Square Head Nut | |
| 65 | Pusher Arm Handle Bolt | |
| 66 | ||
| 67 | ||
| 68 | Carriage Knob Bolt | |
| 69 | Spring Gasket | |
| 70 | Motor Bolt | |
| 71 | Director Washer | |
| 72 | Director Screw | |
| 73 | Capacitor Bolt | |
| 74 | Feed Tray Guide Bracket | |
| (Back) | ||
| 75 | Feed Tray Guide Bearing | |
| 76 | Feed Tray Guide Bracket | |
| (Front) | ||
| 77 | Front Feed Tray Guide | |
| Bracket Screw | ||
| 78 | Slide Axle Bracket Bolt | |
| 79 | Quadrate Axis Screw | |
| 80 | Slider Adjust Bolt |
Exploded Parts Diagrams – SL312
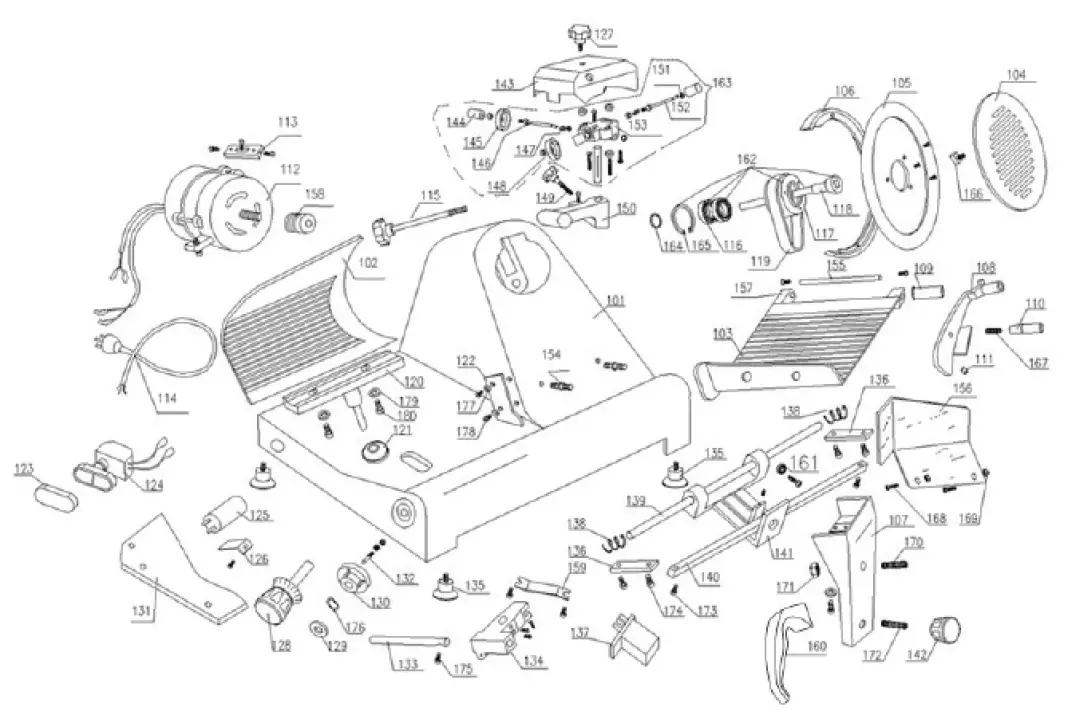
| Diagram # | Part Name | Replacement Part # |
| 101 | Base | |
| 102 | Regulator Plate | 177PSL2102 |
| 103 | Carriage Feed Tray | |
| 104 | Blade Cover | 177PSL2104 |
| 105 | Blade | |
| 105A | ||
| 106 | Guard Ring | 177PSL106 |
| 107 | Carriage Bracket | |
| 108 | Pusher Arm | 177PSL108 |
| 109 | Pusher Arm Bushing | |
| 110 | Pusher Handle | 177SL312PH |
| 111 | Handle Bumper | |
| 112 | Motor | 177SL312MTR |
| 113 | Motor Bracket | |
| 114 | Power Cord | |
| 115 | Blade Guard Knob | 177SL312RBGK |
| 116 | Ball Bearing | |
| 117 | Blade Belt Wheel | |
| 118 | Belt Wheel Pin | |
| 119 | Belt | 177SL312BELT |
| 120 | Feed Tray Support | |
| 121 | Cable Jacket | |
| 122 | Director | 177PSL122 |
| 123 | Switch Cover | |
| 124 | 177PSL40 | |
| 125 | Capacitor | 177SL312CAP |
| 126 | Capacitor Retainer | |
| 127 | Sharpener Knob | |
| 128 | Thickness Adjuster Knob | |
| 129 | Spring Gasket | |
| 130 | Cam Regulator | |
| 131 | Base Cover | |
| 132 | Cam Pin | 177PSL926 |
| 133 | Slide Axle | |
| 134 | Regulator Carriage | 177PSL120 |
| 135 | Rubber Foot | 177SL312FEET |
| 136 | Slide Axle Bracket | |
| 137 | Relay | |
| 138 | Towing Bracket Spring | |
| 139 | Towing Bracket Axle | 177SL3PTGR |
| 140 | Quadrate Axis |
| Diagram # | Part Name | Replacement Part # |
| 141 | Towing Bracket | 177PSL141 |
| 142 | Carriage Knob | 177SLCKNOB |
| 143 | Sharpener Cover | |
| 144 | Sharpener Button | |
| 145 | Grinding Wheel | 177PSL145 |
| 146 | Sharpener Pin | |
| 147 | Sharpener Spring | |
| 148 | Sharpening Stone | 177PSL148 |
| 149 | Sharpener Tightening Knob | |
| 150 | Sharpener Base Bracket | 177PSL150 |
| 151 | Wheel | |
| 152 | Rubbing Stone Pin | |
| 153 | Sharpener Cover Bracket | |
| 154 | Blade Guard Pin | |
| 155 | Feed Tray Pusher Guide Pin | |
| 156 | Meat Blocking Board | |
| 157 | Feed Tray Guide Bracket | |
| 158 | Motor Belt Wheel | |
| 159 | Slide Driver | |
| 160 | Carriage Handle | 177PSL12HNDL |
| 161 | Washer | |
| 162 | Blade Pulley | |
| 163 | Sharpener Assembly | 177SL312SA |
| 164 | Spring Gasket (Bearing) | |
| 165 | Spring Gasket (Hole) | |
| 166 | Square Head Nut | |
| 167 | Pusher Arm Handle Bolt | |
| 168 | ||
| 169 | ||
| 170 | Carriage Handle Bolt | |
| 171 | Carriage Handle Nut | |
| 172 | Threaded Stud for Carriage | 177SLCTHREAD |
| Knob | ||
| 173 | Quadrate Axis Screw | |
| 174 | Slide Axle Bracket Bolt | |
| 175 | Slide Axle Bolt | |
| 176 | Spring Gasket | |
| 177 | Director Shim | |
| 178 | Director Screw and Washer | 177PSL178 |
| 179 | Feed Tray Support Washer | |
| 180 | Feed Tray Support Screw |
Exploded Parts Diagrams – SL512
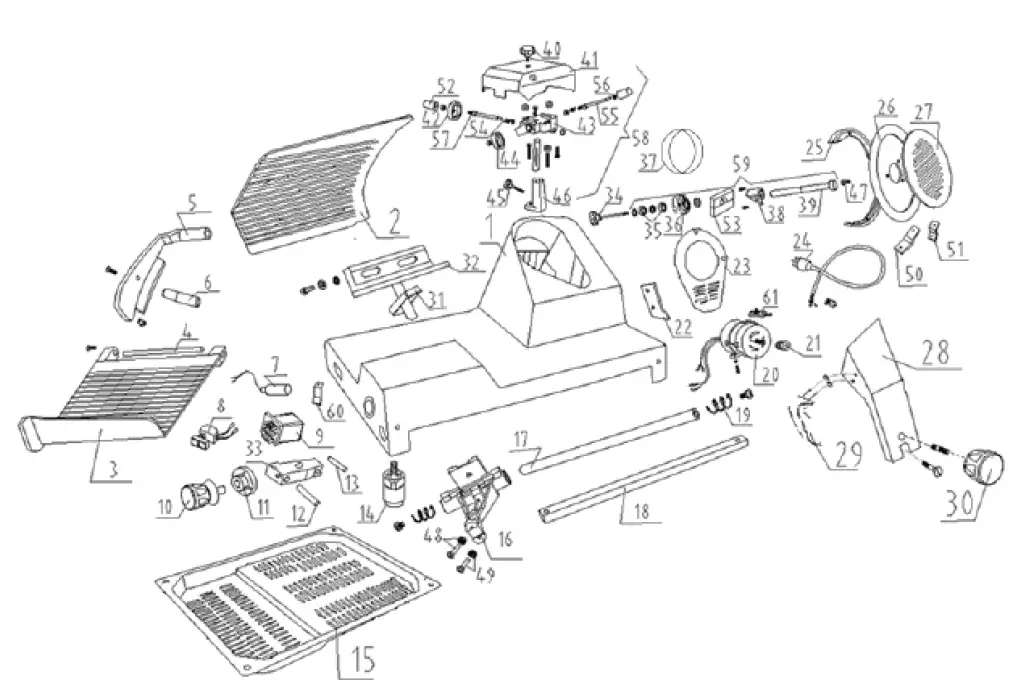
| Diagram #P art Name Replacement Part # | ||
| 1B | ase | |
| 2R | egulator Plate | |
| 3 | Carriage Feed Tray | |
| 4F | eed Tray Pusher Guide Pin | 177SL5PTGR |
| 5P | usher Arm | |
| 6P | usher Handle | 177SL512 |
| 7C | apacitor | 177SL512CAP |
| 8 | 177PSL40 | |
| 9R | elay | 177SL512RLY |
| 10 | Thickness Adjuster Knob1 | 77SL512TKNB |
| 11 | Cam Regulator1 | 77PSL51211 |
| 12 | Slider Shaft | |
| 13 | Slider Bearing | |
| 14 | Metal Foot | 177SL512FEET |
| 15 | Bottom Plate | |
| 16 | Towing Bracket | |
| 17 | Towing Bracket Axle | |
| 18 | Main Spindle | |
| 19 | Towing Bracket Spring | |
| 20 | Motor1 | 77SL512MTR |
| 21 | Motor Belt Wheel | |
| 22 | Director | |
| 23 | Protective Film | |
| 24 | Power Cord | |
| 25 | Guard Ring | 177PSL225 |
| 26 | Blade1 | 77SL512BLD |
| 26A | ||
| 27 | Blade Cover | |
| 28 | Carriage Bracket | |
| 29 | Carriage Push Handle | 177PSL12HNDL |
| 30C | arriage Knob & Threaded Stud | 177SLC512KN, 177SLCTH512 |
| Diagram #P art Name Replacement Part # | ||
| 31F | eed Tray Support Base | |
| 32F | eed Tray Support | |
| 33 | Slider | |
| 34G | uard Knob | |
| 35B | all Bearing | |
| 36P | ulley | |
| 37B | elt1 | 77SL512BELT |
| 38B | elt Wheel Fixing Base | |
| 39B | elt Wheel Pin | |
| 40 | Sharpener Knob | |
| 41 | Sharpener Cover | |
| 42 | Grinding Wheel | |
| 43 | Sharpener Cover Bracket | |
| 44 | Sharpening Stone | |
| 45 | Guard Knob | 177SL512BGK |
| 46 | Sharpener Base Bracket | |
| 47 | Plate Protection | |
| 48 | Screw and Washer | |
| 49 | Screw and Washer | |
| 50 | Blade Bracket | |
| 51 | Blade Bracket | |
| 52 | Sharpener Button | |
| 53 | Belt Wheel Clamping Base | |
| 54 | Shaprener Spring | |
| 55 | Sharpener Pin | |
| 56 | Wheel | |
| 57 | Grinding Wheel Pin | |
| 58 | Sharpener Assembly | 177SL512SA |
| 59 | Blade Pulley | |
| 60 | Capacitor Bracket | |
| 61 | Motor Bracket | |
Exploded Parts Diagrams – SL713MAN
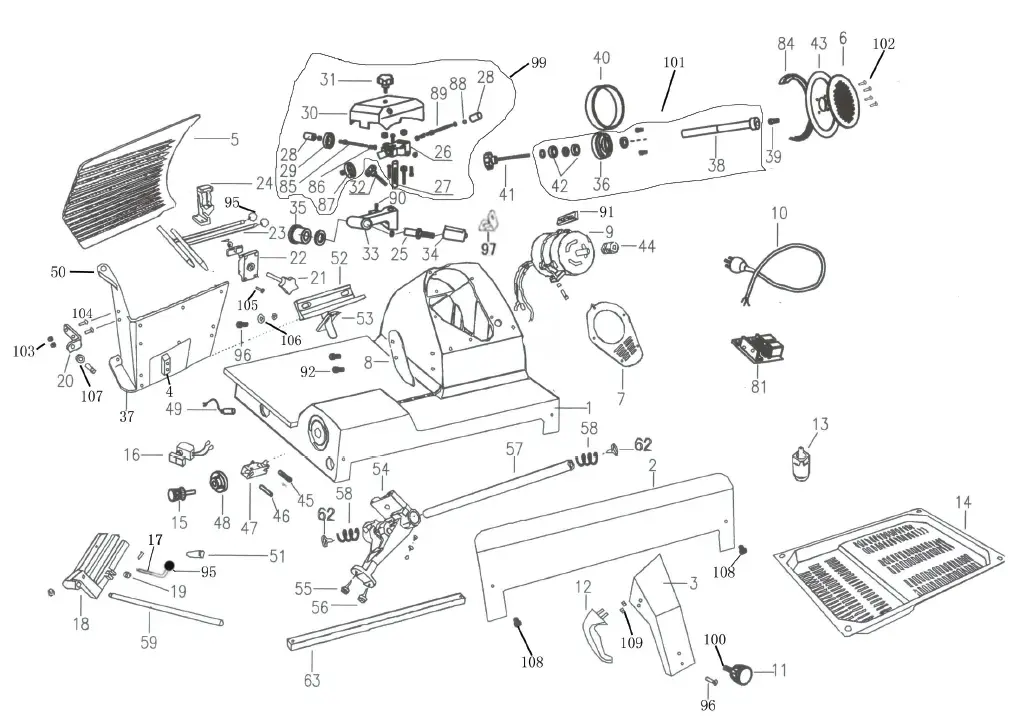
| diagram# | Part Name | Replacement Part# |
| 1 | Base | |
| 2 | Front protecting plate | |
| 3 | Carrier support | |
| 4 | Food carrier | |
| 5 | Movable clapboard | 177P7135 |
| 6 | Blade guard canopy | 177P7136 |
| 7 | Protective gasket | |
| 8 | Meat baffle | 177PSLA8 |
| 9 | Motor | 177P7139 |
| 10 | Power line | |
| 11 | Carrier knob | 177PSLA11 |
| 12 | Arc-shaped handle | 177PSLA12 |
| 13 | Feet | 177PSLA13 |
| 14 | Bottom plate | |
| 15 | Thickness adjusting knob | 177PSLA15 |
| 16 | Switch | |
| 17 | Meat press plate handle | 177PSLA17 |
| 18 | Meat press plate | |
| 19 | Fixing arm pulley | |
| 20 | Aluminum sheet | |
| 21 | Clamping box knob | 177PSLA21 |
| 22 | Clamping box base | |
| 23 | T-iron | |
| 24 | Cripping box seat | |
| 25 | Adjusting screw rod | |
| 26 | Sharpener components seat | |
| 27 | Sharpener column | |
| 28 | Upper button of the sharpener pin | |
| 29 | Fine gringding wheel | 177PSLA29 |
| 30 | Sharpener cover | 177PSLA30 |
| 31 | Sharpener cover knob | 177PSLA31 |
| 32 | ejector assy parts 25,32,33,34,35 | 177PSLA32 |
| 33 | Sharpener frame | |
| 34 | Ejector pin of meat retainer | |
| 35 | Ejector pin knob | |
| 36 | Pulley | |
| 37 | Tray bushing A | |
| 38 | Pulley wheel axle | |
| 39 | Blade guard canopy screw nut | |
| 40 | Belt | 177PSLA40 |
| 41 | Cover tie rod | 177PSLA41 |
| 42 | Belt bearing | |
| 43 | Blade | 177P1343 |
| 44 | Small belt pulley for motor | |
| 45 | Eccentric shaft of slider | 177PSLA45 |
| 46 | Sliding axle | 177PSLA46 |
| 47 | Slider | 177PSLA47 |
| 48 | Cam | 177PSLA48 |
| 49 | Running capacitor for blade motor uF | 177PSLA80 |
| 50 | Tray bushing A | |
| 51 | Meat press plate auxiliary handle | |
| 52 | SLIDER GAUGE CARRIAGE ASSY52,53 | 177PSLA52 |
| 53 | Meat retainer bracket cover | |
| 54 | Upper towing bracket | 177PSLA54 |
| diagram# | Part Name | Replacement Part# |
| 55 | Towing frame bearing | |
| 56 | Drag frame adjustment bearing | |
| 57 | Upper towing bracket axle | 177PSLA57 |
| 58 | Buffer spring | 177PSLA58 |
| 59 | Meat press plate axle | |
| 62 | Drag frame screw | |
| 63 | Upper towing bracket spuare axle | |
| 84 | Blade guarding ring | 177P1384 |
| 85 | Fine sand wheel | |
| 86 | Wheel spring | |
| 87 | Course grinding wheel | 177PSLA87 |
| 88 | ¢4.75wheel | |
| 89 | Crude sand wheel | |
| 90 | Knife rack fixed screw | |
| 91 | Adjust seat assembly | |
| 92 | Active clapboard screw | 177PSLA92 |
| 94 | Tray bracket screw | |
| 95 | Ball handle | |
| 96 | Bolt for Carrier support | |
| 97 | Blade guard ring support | 177PSLA97 |
| 99 | Sharpener Setting | 177PSLA99 |
| 100 | Bolt for Carrier knob | 177PSLA100 |
| 101 | Belt Wheel Setting | 177PSLA101 |
| 102 | Blade bolt | |
| 103 | Nut for Bracket of sliding axle | |
| 104 | Bolt for Bracket of sliding axle | |
| 105 | Bolt for Clamping box base | |
| 106 | Shim for Tray bracket | |
| 107 | Bolt for Aluminum sheet | |
| 108 | Bolt for Front protecting plate | |
| 109 | Bolt for Arc-shaped handle |
Exploded Parts Diagrams – SL612A, SL713A
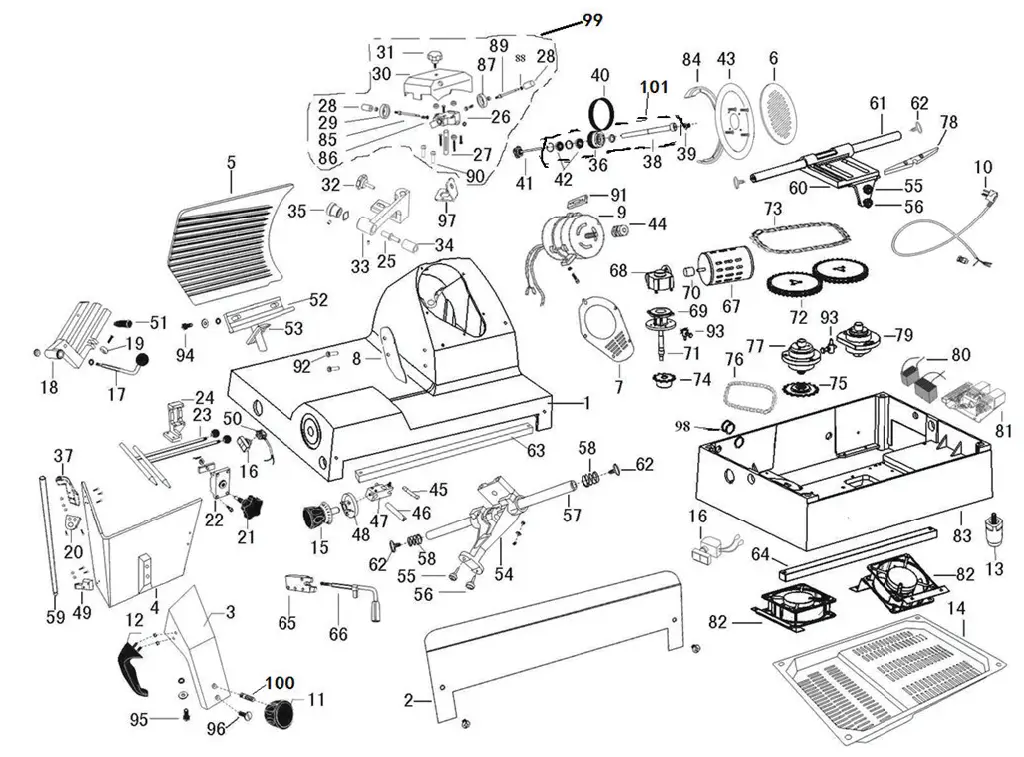
Exploded Parts Legend
| # | Part Name | SL612A Replacement Part # | SL6713A Replacement Part # | Quantity Needed |
| 5 | Movable Clapboard | 177PSLA5 | 177P7135 | 1 |
| 6 | Blade Cover | 177PSLA6 | 177P7136 | 1 |
| 8 | Director | 177PSLA8 | 177PSLA8 | 1 |
| 9 | Motor | 177PSLA9 | 177P7139 | 1 |
| 11 | Carriage Knob | 177PSLA11 | 177PSLA11 | 1 |
| 12 | Carriage Push Handle | 177PSLA12 | 177PSLA12 | 1 |
| 13 | Metal Feet | 177PSLA13 | 177PSLA13 | 4 |
| 15 | Thickness Adjusting Knob | 177PSLA15 | 177PSLA15 | 1 |
| 17 | Clamp Handle | 177PSLA17 | 177PSLA17 | 1 |
| 21 | Clamping Box Knob | 177PSLA21 | 177PSLA21 | 1 |
| 29 | Fine Sharpening Stone | 177PSLA29 | 177PSLA29 | 1 |
| 30 | Sharpener Cover | 177PSLA30 | 177PSLA30 | 1 |
| 31 | Sharpener Cover Knob | 177PSLA31 | 177PSLA31 | 1 |
| 25, 32, 33, 34, 35 | Ejector Assembly | 177PSLA32 | 177PSLA32 | 1 |
| 40 | Belt | 177PSLA40 | 177PSLA40 | 1 |
| 41 | Blade Guard Knob | 177PSLA41 | 177PSLA41 | 1 |
| 43 | Blade | 177PSLA43 | 177P71343 | 1 |
| 45 | Cam Pin | 177PSLA45 | 177PSLA45 | 1 |
| 46 | Sliding Axle | 177PSLA46 | 177PSLA46 | 1 |
| 47 | Gauge Carriage | 177PSLA47 | 177PSLA47 | 1 |
| 48 | Cam Regulator | 177PSLA48 | 177PSLA48 | 1 |
| 49 | Capacitor | 177PSLA49 | 177PSLA49 | 1 |
| 52, 53 | Carriage Assembly | 177PSLA52 | 177PSLA52 | 1 |
| 54 | Upper Towing Bracket | 177PSLA54 | 177PSLA54 | 1 |
| 57 | Upper Towing Bracket Axle | 177PSLA57 | 177PSLA57 | 1 |
| 58 | Upper Towing Buffer Spring | 177PSLA58 | 177PSLA58 | 2 |
| 60 | Lower Towing Bracket | 177PSLA60 | 177PSLA60 | 1 |
| 61 | Lower Towing Bracket Axle | 177PSLA61 | 177PSLA61 | 1 |
| 66 | Manual Mode Handle | 177PSLA66 | 177PSLA66 | 1 |
| 67 | Automatic Motor | 177PSLA67 | 177PSLA67 | 1 |
| 80 | Motor Capacitor | 177PSLA80 | 177PSLA80 | 1 |
| 81 | Relay Circuit Board Assembly | 177PSLA81 | 177PSLA81 | 1 |
| 82 | Radiator Fan | 177PSLA82 | 177PSLA82 | 2 |
| 84 | Blade Guarding Ring | 177PSLA84 | 177P71384 | 1 |
| 87 | Coarse Sharpening Stone | 177PSLA87 | 177PSLA87 | 1 |
| 92 | Director Screw | 177PSLA92 | 177PSLA92 | 1 |
| 97 | Support Bracket | 177PSLA97 | 177PSLA97 | 1 |
| 99 | Sharpener Assembly | 177PSLA99 | 177PSLA99 | 1 |
| 100 | Threaded Carriage Knob Stud | 177PSLA100 | 177PSLA100 | 1 |
| 101 | Blade Pulley Assembly | 177PSLA101 | 177PSLA101 | 1 |


