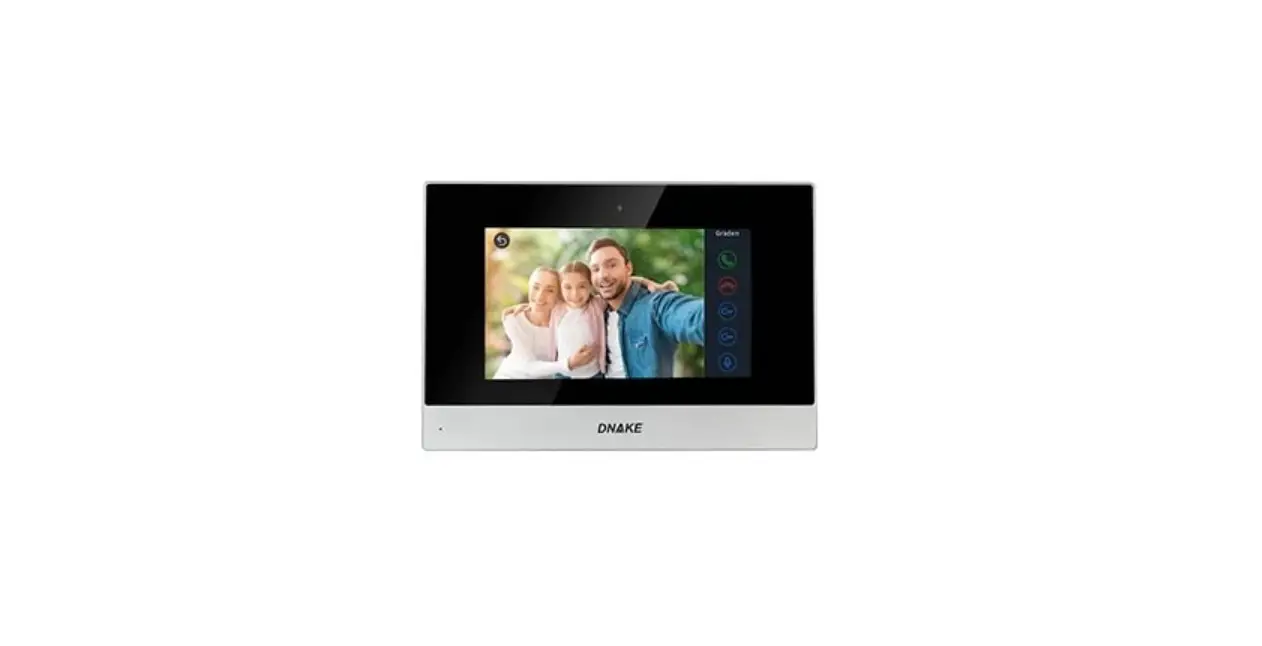
DNAKE 280M-S8 Wireless Door Phone User Manual
REMARK
Please follow the user manual for correct installation and testing. If there is any doubt please call our tech-supporting and customer center.
Our company applies ourselves to reformation and innovation of our products. No extra notice for any change. The illustration shown here is only for reference. If there is any difference, please take the actual product as the standard.
The product and batteries must be handled separately from household waste. When the product reaches the end of service life and needs to be discarded, please contact the local administrative department and put it in the designated collection points in order to avoid the damage to the environment and human health caused by any disposal. We encourage recycling and reusing the material resources.
PRODUCT FEATURES
- Building intercom application: Talkback: Support video call, monitoring, unlocking and checking of call records. Security: Support 8 alarm zones with three states, zone and scene setup. Smart: Support smart home extension by RS485 communication.
- Operating system: Linux
TECHNICAL PARAMETERS
Voltage: DC 12V POE
Rated power: 9W
Standby power consumption: 1.5W
Display screen: 7”
Touch screen: Capacitive touch screen
Resolution: 800×480
Working Temperature: -10℃ to +55℃
Storage Temperature: -10℃ to +60℃
Working Humidity: 10% to 90% (non-condensing)
PACKAGE CONTENTS
Please make sure the package contains the following iteams
MODEL: 280M-S8
PICTURES
OPERATIONS
Main menu: Security, Smart, Intercom, Message and Setup. Status bar: Network connection and security precautions. Shortcut key: Do Not Disturb, Message, Records. Instructions of status bar and shortcut key:
- DND
 :Click icon, the system will enter DND or undo DND. You can use Do Not Disturb service when you don’t want to be disturbed by calls(The valid time is 8 hours).
 - Message
 : Click it to enter the Message interface.
 - Network connection
 : When the icon keeps lit, the indoor monitor is connected to the network.
 - Security precautions
 : The icon flashes during activation time andkeeps lit after arming successfully.
 - SIP Registration Status
 : This icon keeps lit when SIP account is registered.
Security
Clicking “Security” icon on the main interface, the system will enter the following interface: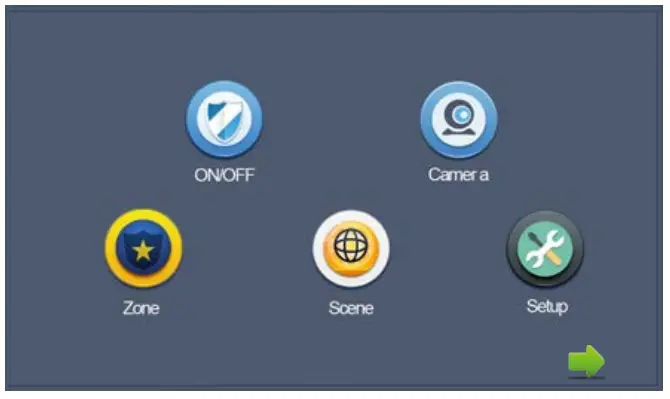
ON/OFF
Clicking “ON/OFF” icon, the system will enter the following interface: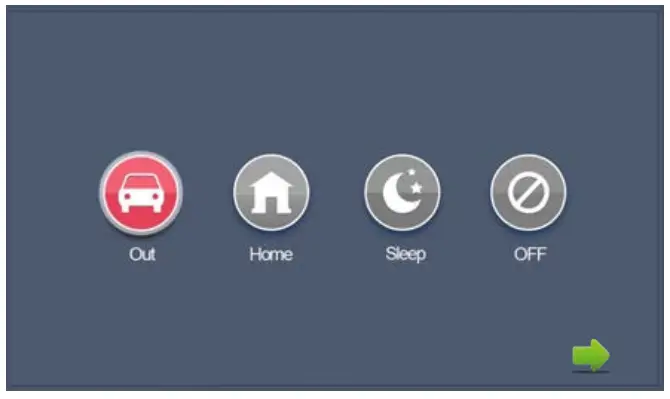
ON
Click “Out” “Home”, or “Sleep” icon to activate the alarm sensors. The corresponding icon on the main interface will be lit up with a beep and it will stay lit
OFF
(1) During the delay time of arming, clicking “OFF” icon, the system will emit a beep. Then the alrm will be stopped.
(2) Input user password(the default password is 1234) to stop the alarm under ON status.
Camera
Clicking “Camera” icon, the system will enter into the following interface:
Click![]() icon or
icon or ![]() icon button to select the camera you want, and then click
icon button to select the camera you want, and then click![]() to monitor the IP camera. If you want to cancel monitoring, click
to monitor the IP camera. If you want to cancel monitoring, click![]() to stop it
to stop it
IP Camera Setting
Login the webpage of indoor monitor by username: user, password:1234, and then you can access the following webpage: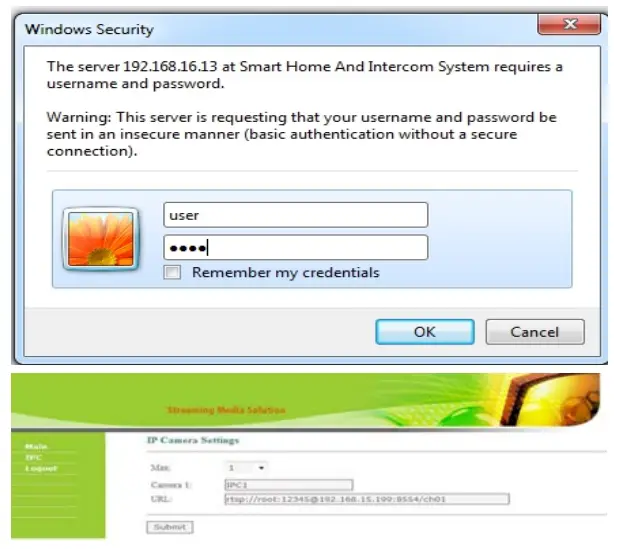
Fill in with the RTSP format: rtsp:// user: password@ Camera IP. IP is the IP address of your IP Camera. Then you can monitor IP Camera in Security menu on your indoor monitor: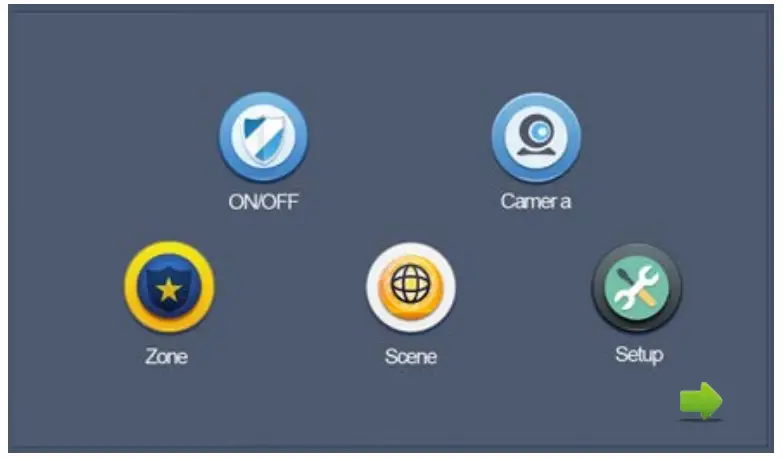
Clicking “Camera” icon, the system will enter into the following interface:
Click ![]() icon or
icon or ![]() icon button to select IP Camera to monitor, and then click
icon button to select IP Camera to monitor, and then click ![]() icon to monitor. Click
icon to monitor. Click ![]() to stop monitoring.
to stop monitoring.
Zone
Remark: It should be set when the alarm is OFF. Click “Zone” icon and input 1-16 digits password(the default password is 1234), the system will enter into the following interface: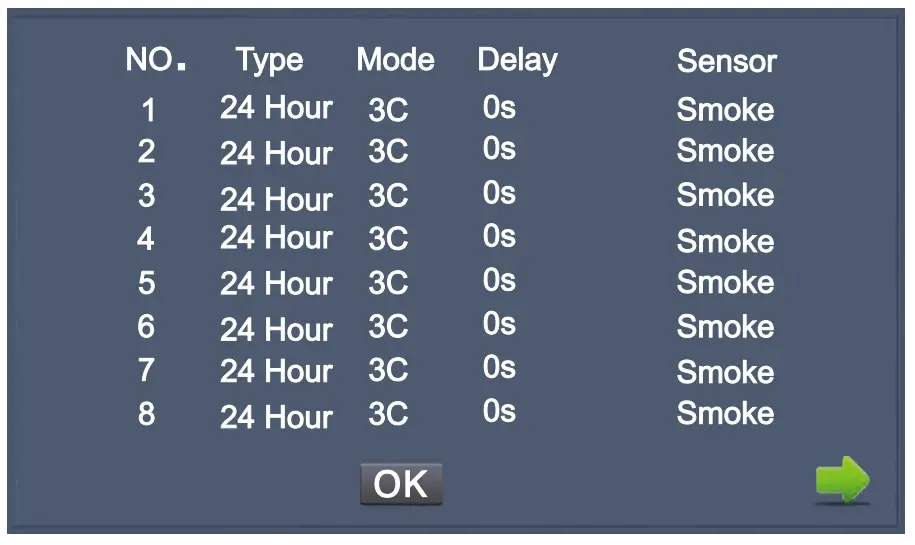
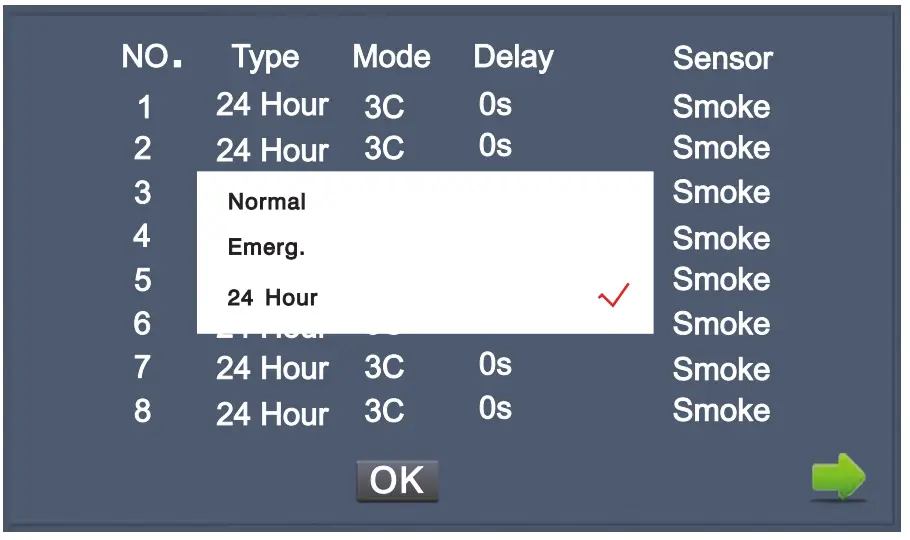
Alarm Type
Clicking input box of type, a dialog box will pop up as below. On this interface, you can set alarm type as: Normal, Emergency or 24H. 24H and Emergency type are always active
.
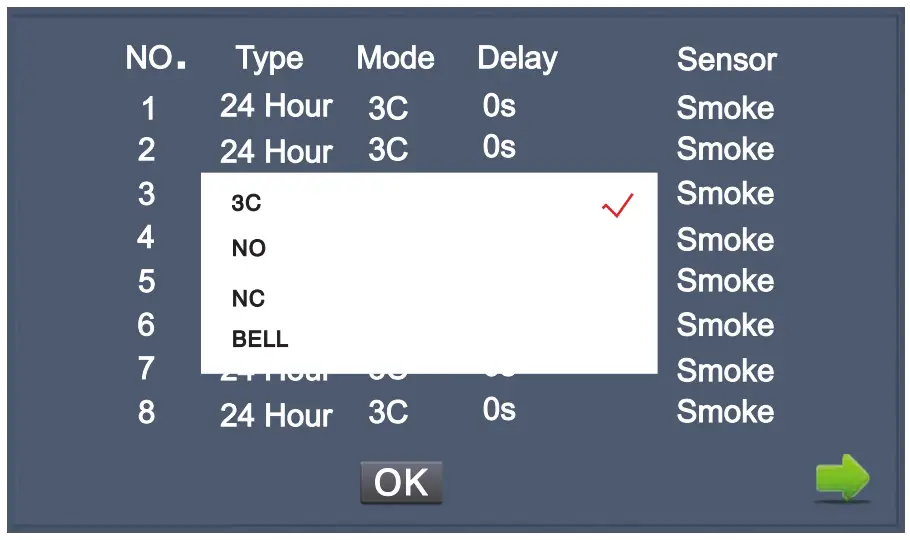
Mode
Clicking mode setting box, it will pop up a dialog box as the following interface. On this interface, you can set mode as: 3C, NO, NC or BELL.
When alarm sensor is triggered, the indoor monitor will make a loud alarm sound, and the system will enter into the following interface as well as send alarm message to master station(if master station is installed in your system):
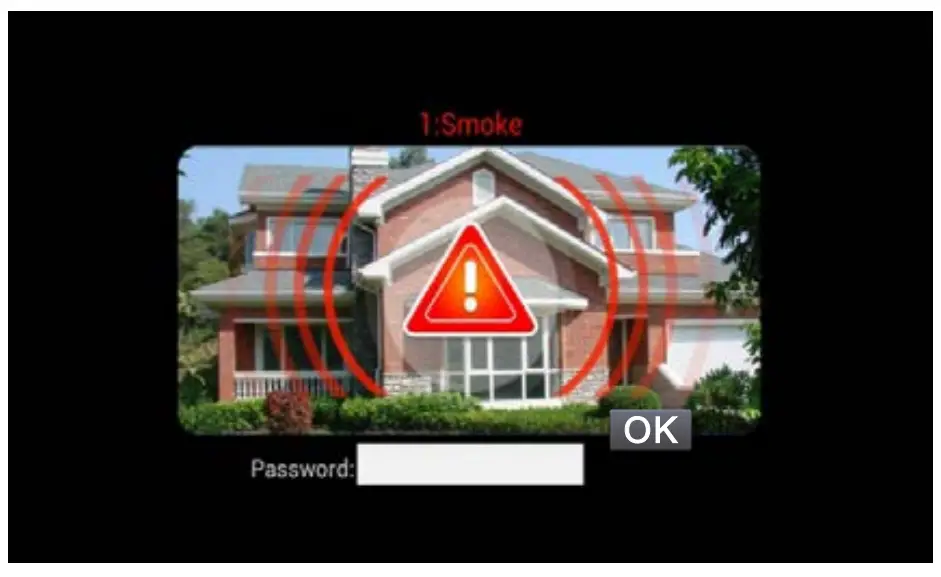
You can see the No. and sensor type in red color shown at the top of interface. Fox example, “1: Smoke” indicates that smoke sensor in zone 1 is triggered. To stop the alarm sound, input the password (the default password is 1234).
Scene
Clicking “Scene” icon, the system will enter into the following interface: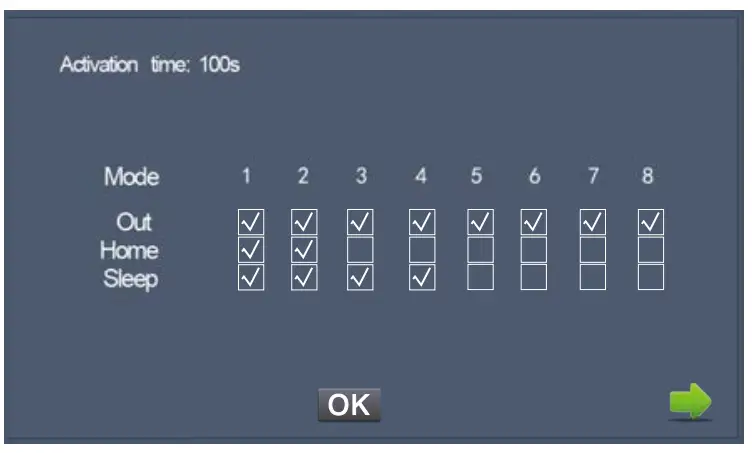
![]() refers to Alarm ON, and
refers to Alarm ON, and ![]() refers to Alarm OFF. To set the sensor of alarm stations, you can click the corresponding station with
refers to Alarm OFF. To set the sensor of alarm stations, you can click the corresponding station with ![]() icon. Click “Activation time” to choose the corresponding time. The options of activation time include NONE, 30s, 40s, 60s, 100s and 300s.
icon. Click “Activation time” to choose the corresponding time. The options of activation time include NONE, 30s, 40s, 60s, 100s and 300s.
Setup
Clicking “Setup” icon, the system will enter into the following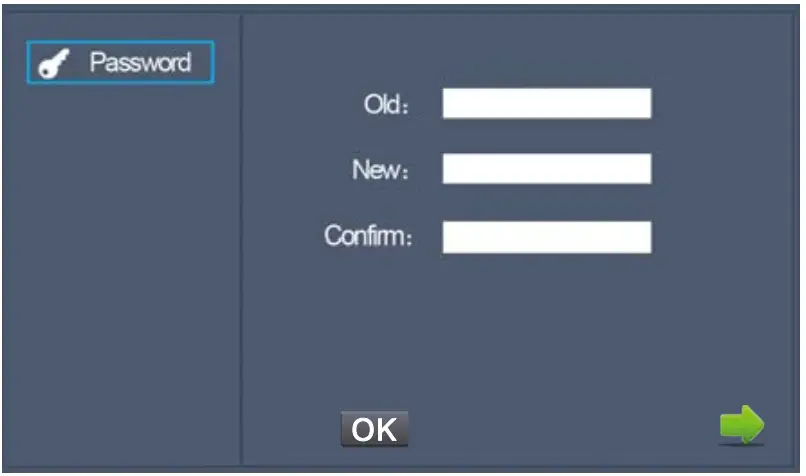
You can set the new user password with 1-16 digits (the default password is 1234). User password is used for security.
Smart
Clicking “Smart” icon on the main interface, the system will enter into the following interface: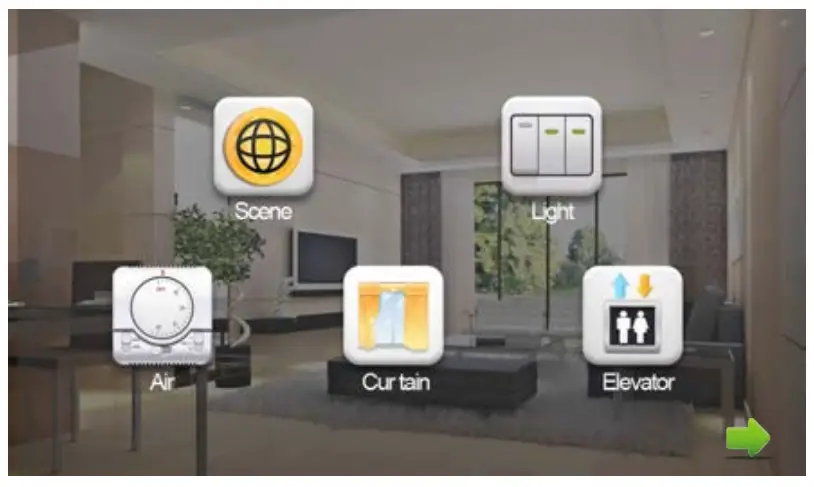
Scene
Clicking “Scene” icon, the system will enter into the following interface: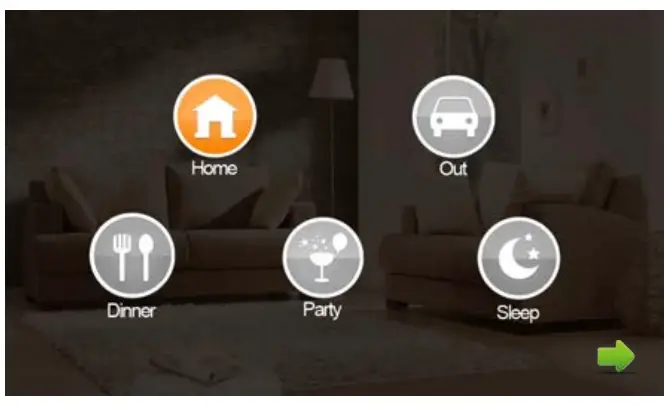
Scene mode includes: Home, Out , Dinner, Party and Sleep.
Light
Clicking “Light” icon, the system will enter into the following interface:
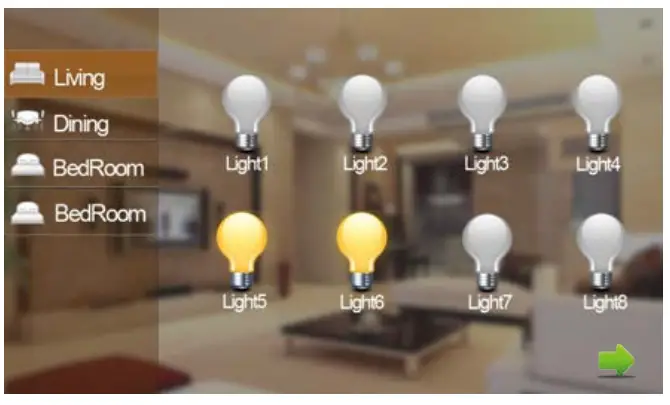
Set the light of corresponding room, such as Master, Sub, Living and Dining Rooms (see the room setting for details). Up to 8 lights can be set in every room. Clicking the corresponding light icon, you can turn the light ON/OFF.
Curtain
Clicking “Curtain” icon, the system will enter into the following interface: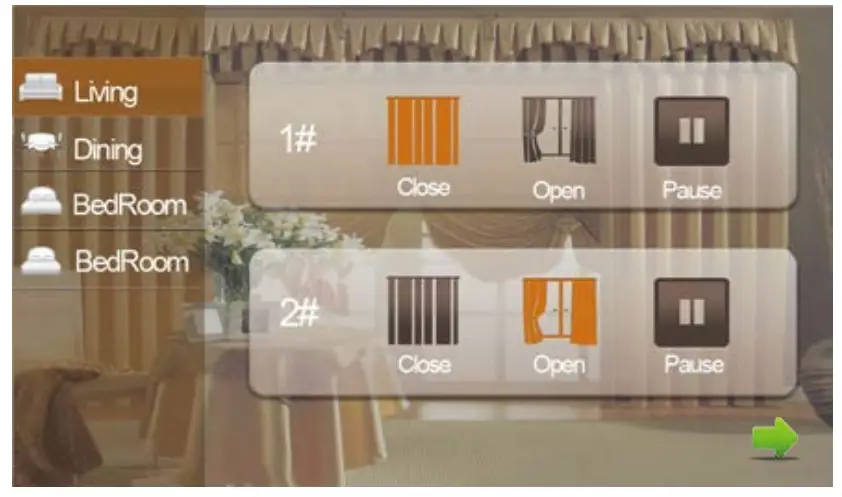
By clicking “Close” icon, the curtain will be closed; by clicking “Open” icon, the curtain will be open; by clicking “Pause” icon, the curtain will be paused.
Elevator
Clicking “Elevator” icon, the system will enter into the following interface: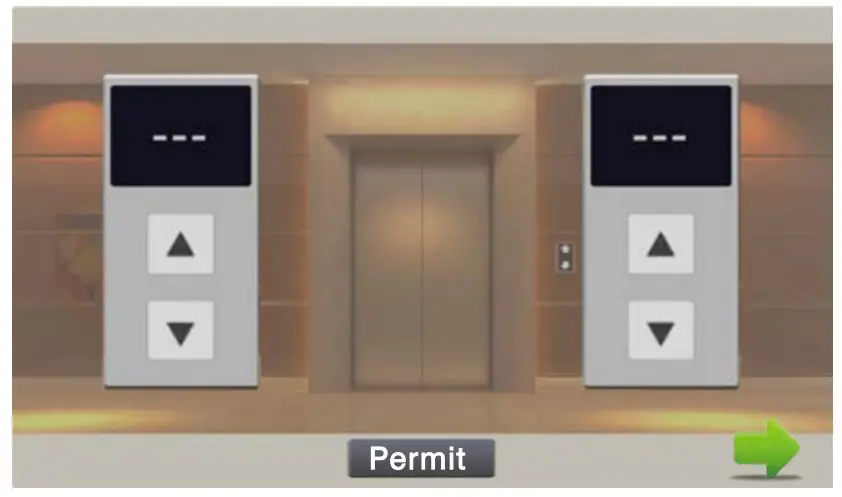
Click ![]() or
or ![]() icon to control the up and down of the elevator. Click “Permit” icon to permit access to the floor where the indoor monitor locates. Remark: To support this interface, your system must be connected with “Elevator Control” module. Kindly check with your system provider.
icon to control the up and down of the elevator. Click “Permit” icon to permit access to the floor where the indoor monitor locates. Remark: To support this interface, your system must be connected with “Elevator Control” module. Kindly check with your system provider.
Intercom
Clicking “Intercom” icon on the main interface, the system will enter into the following interface: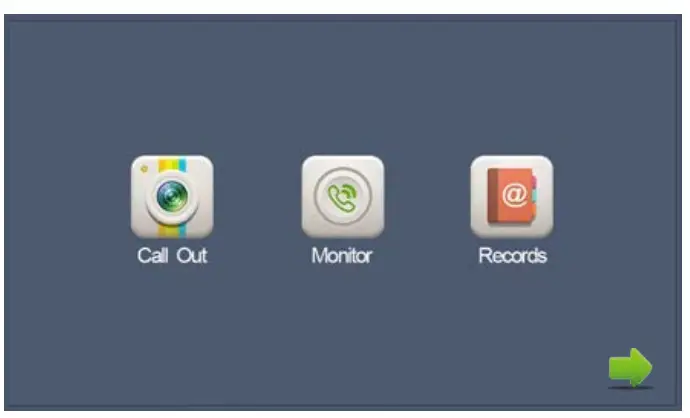
Call Out
Clicking “Call Out” icon, the system will enter the following interface: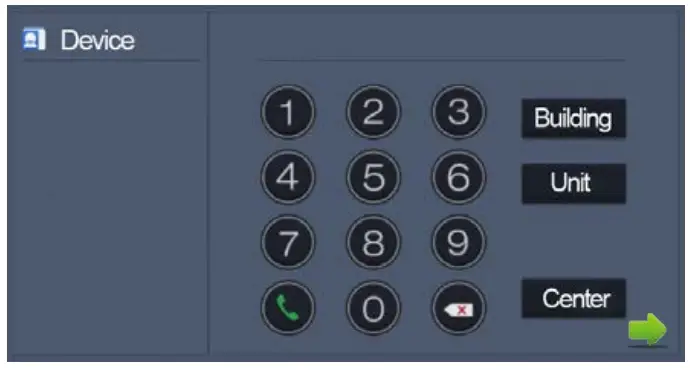
Call unit resident
Input 1-3 digit building No.+ “Building” + 2-digit Unit No. + “Unit” +4-digit room No., then ![]() click icon to call. The system will enter into the following interface:
click icon to call. The system will enter into the following interface:
When answering the call, the system will enter into call status: Click ![]() icon to communicate with door station A; click
icon to communicate with door station A; click ![]() icon to end the call; click
icon to end the call; click ![]() icon to unlock the door.
icon to unlock the door.
Call management center
Clicking “Center” icon to call management center (namely master station), the system will call management center 1 to 5 sequentially. If the management center cannot be searched or the call failed, the system will call next management center. When the management center answers, the indoor monitor will ring and stop calling. Click ![]() icon to end the communication.
icon to end the communication.
Monitor
Clicking “Monitor” icon, the system will enter the following interface:
lick “Door1” icon to switch the type of door station, then ![]() click or
click or ![]() icon to select the area you want to monitor, and click
icon to select the area you want to monitor, and click ![]() icon to monitor the door station or secondary door station. Click icon to stop monitoring. Click
icon to monitor the door station or secondary door station. Click icon to stop monitoring. Click![]() icon to unlock the door.
icon to unlock the door.
Remark: The system’s default monitoring time is 25s.
Records
Clicking “Records” icon, the system will enter the following interface: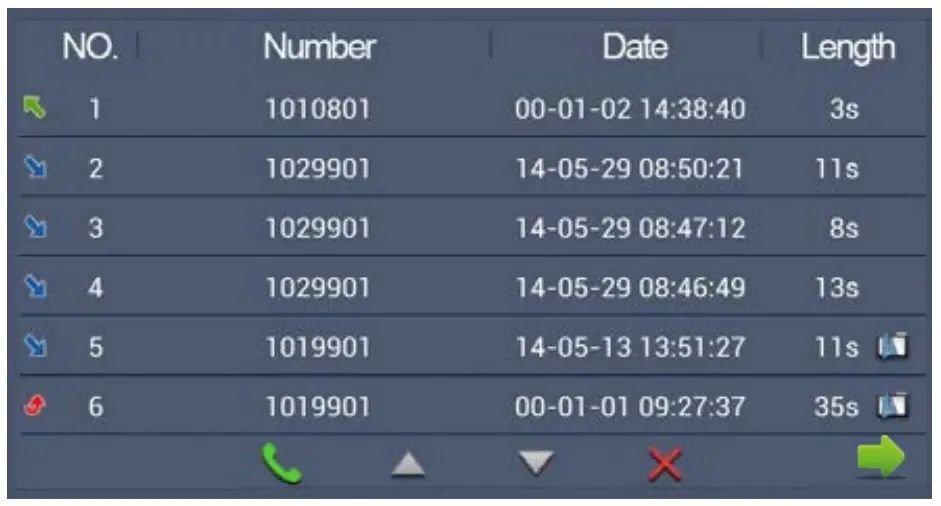
![]() refers to call-out record;
refers to call-out record; ![]() refers to call-in record;
refers to call-in record; ![]() refers to missed call record. It can save up to 64 records. Click
refers to missed call record. It can save up to 64 records. Click ![]() or
or ![]() icon to search for records. Select one record and click icon to call; click
icon to search for records. Select one record and click icon to call; click ![]() icon to delete it. If the snapshot is taken, click
icon to delete it. If the snapshot is taken, click ![]() icon to view it.
icon to view it.
Message
Clicking “Message” icon, the system will enter into the following interface: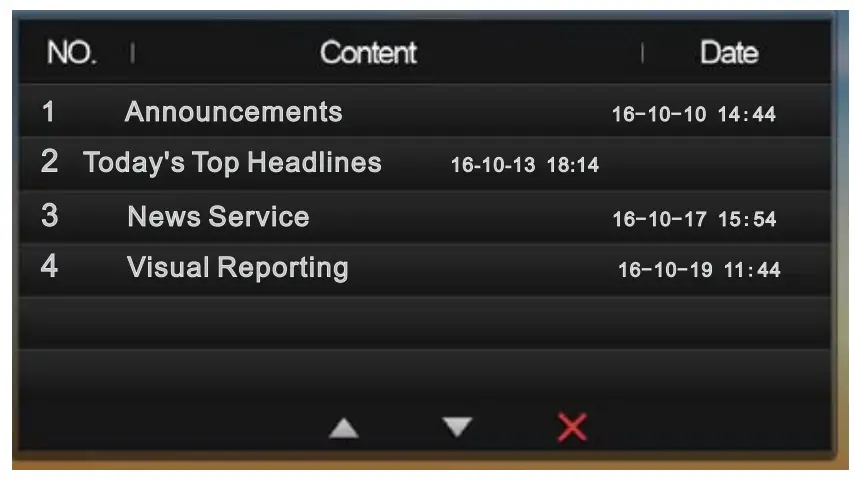
Note: only by installing the management software on PC which is usually located at guard center, can indoor monitor receive the message sent by PC. Click ![]() icon to page up; click
icon to page up; click ![]() icon to page down; click icon to delete the record.
icon to page down; click icon to delete the record.
Setup
Clicking “Setup” icon, the system will enter into the following interface:
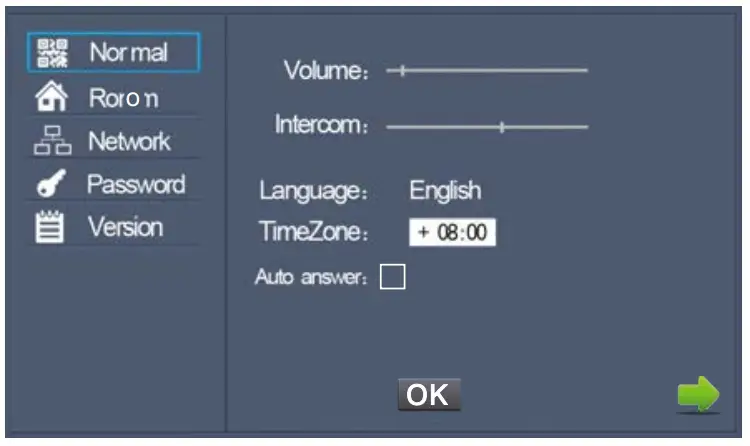
Normal
You can select the volume, intercom, language, time zone and auto answer.
Room
Click “Room” icon, then input 1-16 digits password (the default password is 123456 ) to enter into the following interface:
Network
Click “Network” icon, then input 1-16 digits password (the default password is 123456 ) to enter into the following interface: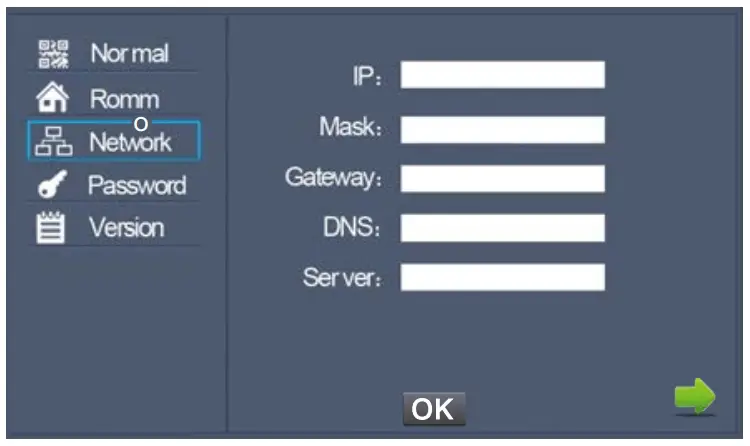
IP: the system will automatically display IP address of the indoor monitor. IP address is unique. The default Mask address is 255.255.255.0. Normally, it is unnecessary to modify. If you would like to modify it, a keypad will pop up when clicking the setting box twice. Enter your new Mask address. The Gateway in one system must be on the same segment.
DNS: domain name resolution address (DNS of local operator). If indoor monitor is used on WAN, the address must be entered correctly; if it is used on LAN, the address can be ignored.
Server: the system will automatically display IP address of the current indoor monitor
Password
Click “Password” icon to enter into the following interface: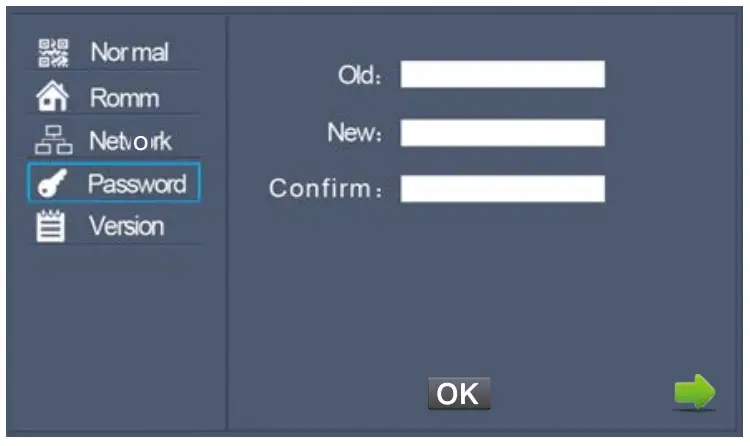
You can set the new system password with 1-16 digits (the default password is 123456). System password is used for system settings.
Version
Click “Version” icon to enter into the following interface: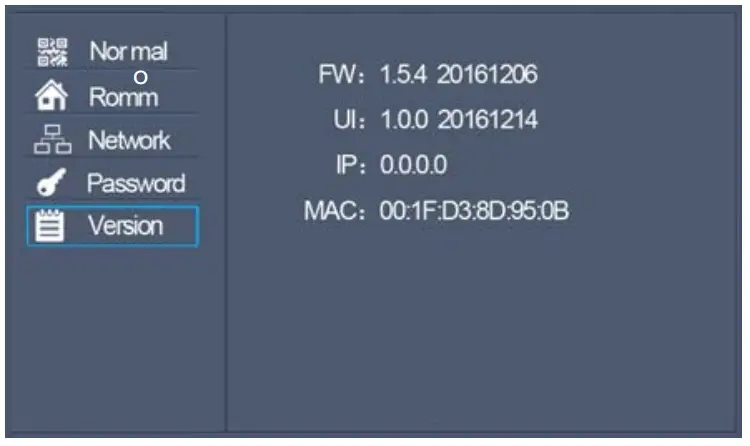
You can look over the relevant information.
WEB SETTINGS
Please refer to 5.3 to view IP address. Connect the indoor monitor and computer by network switch. Input the indoor monitor’s IP address in the browser, then input user name and password (the default user name is “admin”, the password is “123456″ to enter into the web setting interface)
Network
Click “Network” icon to enter into the following interface: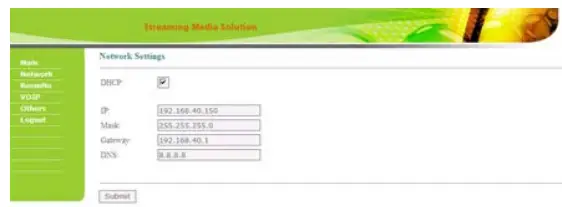
The user can change the IP address of indoor monitor. By checking the box of DHCP, it will get IP address of current indoor monitor automatically. Click “Submit” icon to save the settings.
Room No
Click “RoomNo” icon to enter into the following interface: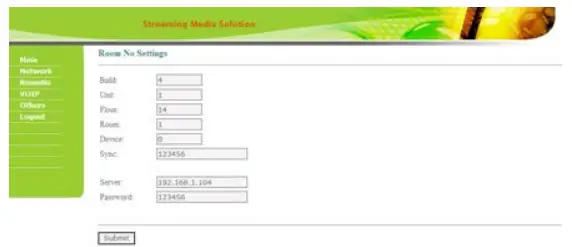
Please refer to 5.2 for room settings. Click “Submit” icon to save the settings.
VOIP
Click “VOIP” icon to enter into the following interface: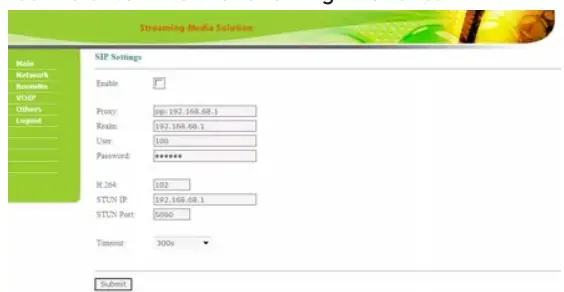
The settings are the same with the ones of indoor monitor. To connect with SIP phone, check “Enable” and input the number registered in SIP server.
Timeout: Setting of talking time. Click “Submit” icon to save the settings
Logout
Click “Logout”icon to enter into the following interface:
Clicking “Submit” icon, you will log out from the system.
SYSTEM CONFIGURATION
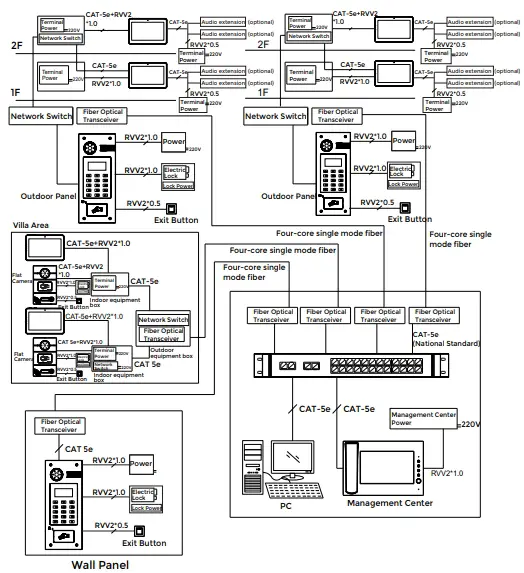
SYSTEM DIAGRAM
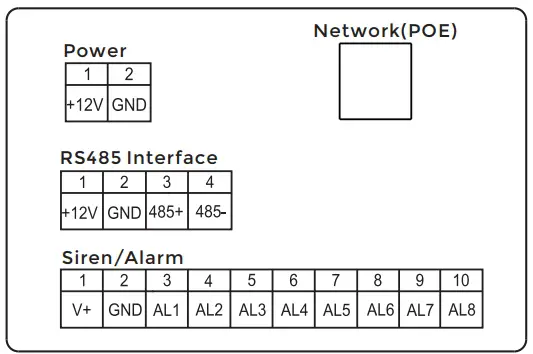
Power
Power input interface connect with 12V power adapter.
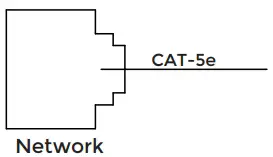
Network
Connect with outdoor panel, indoor monitor or other network equipment by network switch. When indoor monitor has PoE function, the interface can supply power by connecting with PoE network switch. If network interface has 12V power supply, pin No. 4 and No. 5 of RJ45 interface should connect with +12V of power interface, and pin No. 7 and 8 should connect with GND of power interface.
RS485 Interface
Connect with RS485 interface device; RS485 interface can output 12V/100mA power supply. If RS485 equipment to be connected doesn’t require the power supply, no need to connect +12V.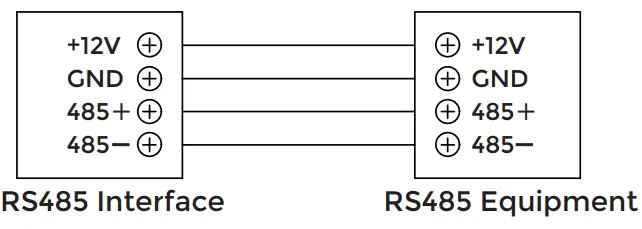
Alarm interface
Interface of alarm zones connects with normally-open or normally-closed switch. When the alarm zone is triggered, it will output 12V/100mA power.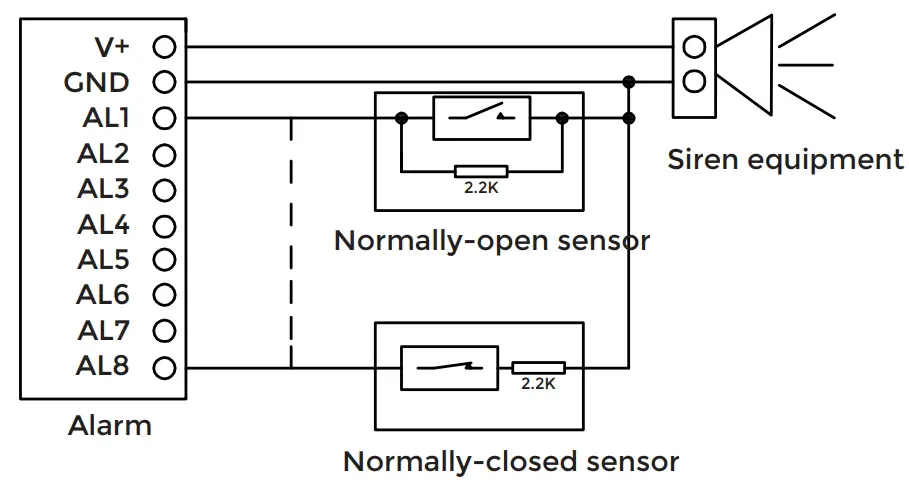
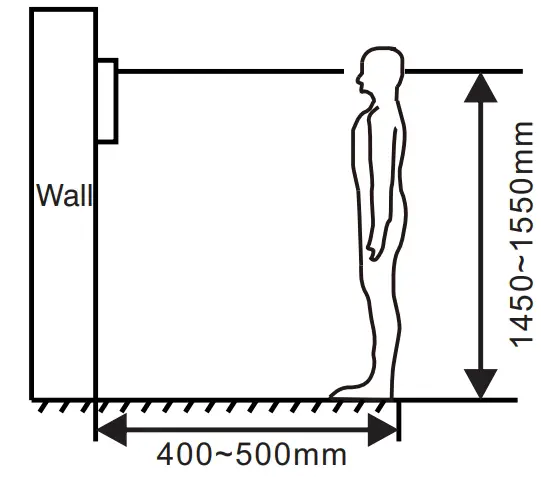
INSTALLATION
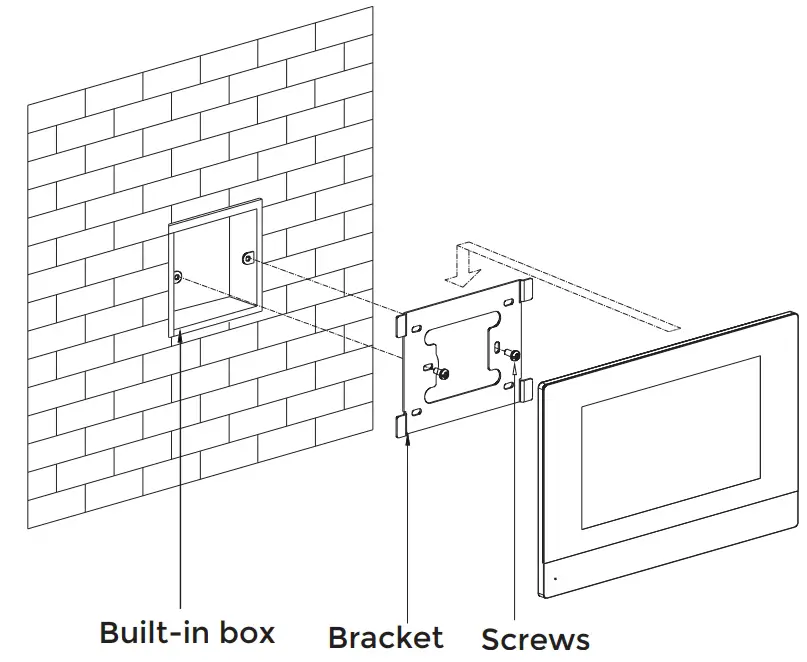
Installation Instructions:
[Suggestion]: During the installation, the camera should be 1450〜1550mm above the ground. The camera tether for photographing human face should be the top priority.
TROUBLESHOOTING
The indoor monitor cannot start up or power off automatically.
- Check whether it has power-failure, and power it on again.
The indoor monitor display screen is too dim.
- Check whether the brightness and contrast settings of screen are correct.
No sound during the communication.
- Check whether the indoor monitor is set as mute mode, or the volume is set to the lowest.
The indoor monitor cannot monitor the outdoor panel.
- Other user is using the system, so you can use it once he/she finished the operation.
Multimedia files cannot be played normally.
- Check whether the system supports the file format. Please refer to multimedia setting for details.
No response when clicking indoor monitor display screen.
- Press “Unlock” button for 5s, or slowly slide horizontally or vertically on the LCD to make touchscreen calibnation. It needs to be calibrated twice.
Touchscreen responses slowly or cannot make calibnation.
- Take down any protective paster, since it may affect identification and input for device;
- Ensure the finger is dry and clean when clicking touchscreen;
- Restart the device to clear any temporary software error.
The temperature of device is too high.
- Long-term use leads to high emperature. It’s normal and will not affect the device’s use life and performance.
SAFETY INSTRUCTIONS
In order to protect you and others from harm or your device from damage, please read the following information before using the device.
Do not install the device in the following places:
- Do not install the device in high-temperature and moist environment or the area close to magnetic field, such as the electric generator, transformer or magnet.
- Do not place the device near the heating products such as electric heater or the fluid container.
- Do not place the device in the sun or near the heat source, which might cause discoloration or deformation of the device.
- Do not install the device in an unstable position to avoid the property losses or personal injury caused by the falling of device.
Guard against electric shock, fire and explosion: - Do not use damaged power cord, plug or loose outlet.
- Do not touch the power cord with wet hand or unplug the power cord by pulling.
- Do not bend or damage the power cord.
- Do not touch the device with wet hand.
- Do not make the power supply slip or cause the impact.
- Do not use the power supply without the manufacturer’s approval.
- Do not have the liquids such as water go into the device.
Clean Device Surface:
- Clean the device surfaces with soft cloth dipped in some water, and then rub the surface with dry cloth.
Other Tips:
- In order to prevent damage to the paint layer or the case, please do not expose the device to chemical products, such as the diluent, gasoline, alcohol, insect-resist agents, opacifying agent and insecticide.
- Do not knock on the device with hard objects.
- Do not press the screen surface. Overexertion might cause flopover or damage to the device.
- Please be careful when standing up from the area under the device.
- Do not disassemble, repair or modify the device at your own discretion.
- The arbitrary modification is not covered under warranty. When any repair required, please contact the customer service center.
- If there is abnormal sound, smell or fume in the device, please unplug the power cord immediately and contact the customer service center.
- When the device isn’t used for a long time, the adaptor and memory card can be removed and placed in dry environment.
- When moving, please hand over the manual to new tenant for proper usage of the device.