![]()
User Manual
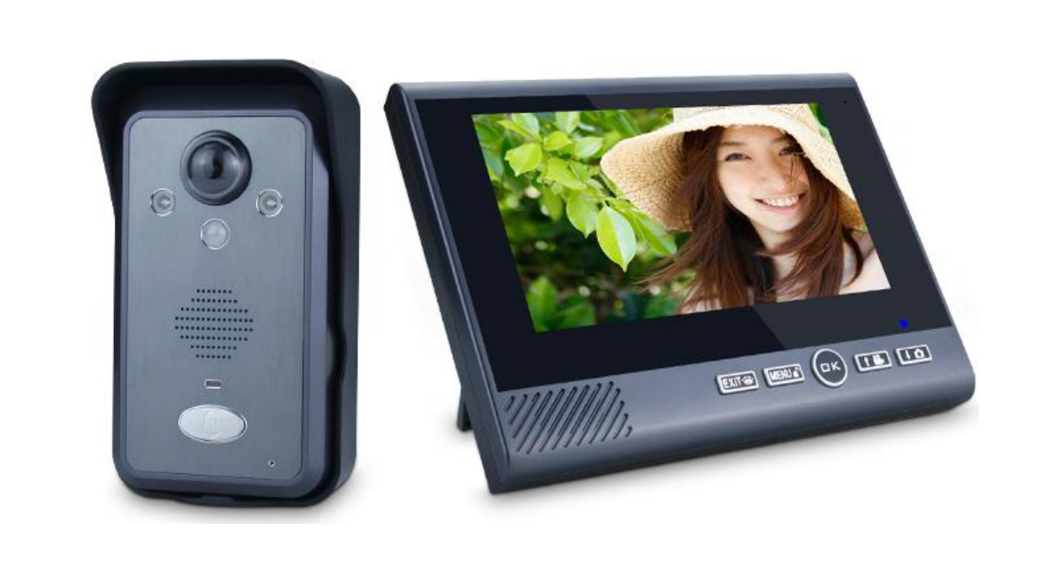
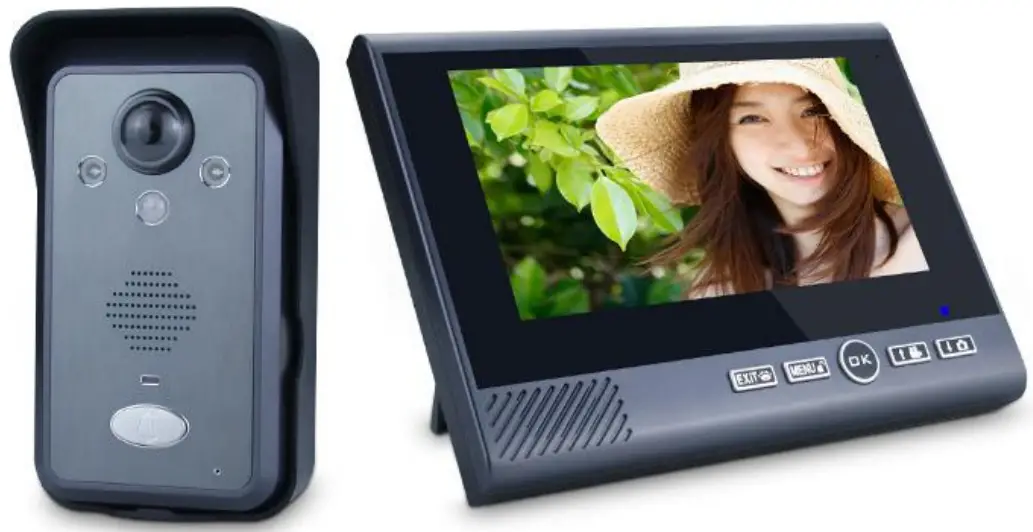
7 inch Wireless Video Door Phone
Introduction
- Thank you for choosing this wireless video door phone. Please read this manual carefully to fully understand its usage, perfect functions, and simple operation.
- Before using this product, please read these Attentions carefully to ensure the safe and proper operation of this product.
- The Company reserves the right to modify this Manual from time to time without prior notice.
Safety Warning & Attentions
- Please keep this product dry, as rainwater, moisture, humidity, and liquids or moisture content may contain mineral matters that erode the circuit.
- Do not keep this product in any place with high temperatures. As high temperatures may shorten the lifespan of electronic devices, damage the battery, and cause deformation or melting of certain plastic parts and components.
- Do not keep this product in any place with low temperatures. As when being moved from a place with low temperature to a place with normal temperature, it may generate humidity inside, which may cause damage to the circuit board.
- Do not attempt to dismantle this product. Improper handling by nonprofessional personnel may cause damage to the device.
- Do not toss, knock or shake this product, as tough operation mode may damage the motherboard inside the device.
- If this product is made wet by mistake, shut it down, remove the battery, and restart the product after confirming it completely dry after 24 hours.
- Do not have the metal parts (specially configured interfaces of charger and data line excluded) in contact with charger interface to avoid short circuit.
- Use a clean and dry soft cloth to clean the lens, infrared lamp, and light sensor.
! Warning: the improper operation will void the warranty!
Outdoor unit
| Power | Customized lithium battery 3400mah |
| Consumption | 400mA |
| Outline dimension | 134*74*31mm |
| Weight | 122g |
| Environmental condition | -10°C—+50°C |
| Waterproof grade | IP55 |
| Placement | Hang on the outer wall beside the door |
| Surface material | ABS & hardware accessories |
| Camera | 300,000pixels |
| View angle | 120° wide angle |
| Night vision pattern | 2 IR lamp |
| PIR | 3m*100° |
| Working time | 7 hours continuously |
| Standby time | 6 months |
| Charge time | 6 hours |
| External power | AC9-16V/DC9—’16V |
Indoor monitor
| Power | Customized lithium battery 4000mah |
| Consumption | 600mA |
| Outline dimension | 200*150*27mm |
| Weight | 387g |
| Environmental condition | 0°C—+40°C |
| Placement | Put on a table or hang on the wall |
| LCD size | T TFT color screen |
| Wireless communication mode | 2.4GHz |
| Frame rate | 20fps |
| Image Format | PEG |
| Working time | 6 hours continuously |
| Standby time | 800 hours |
| Charge time | 6.5 hours |
| External power | DC9-16V |
| Application distance | About 300 meters in an exposed area |
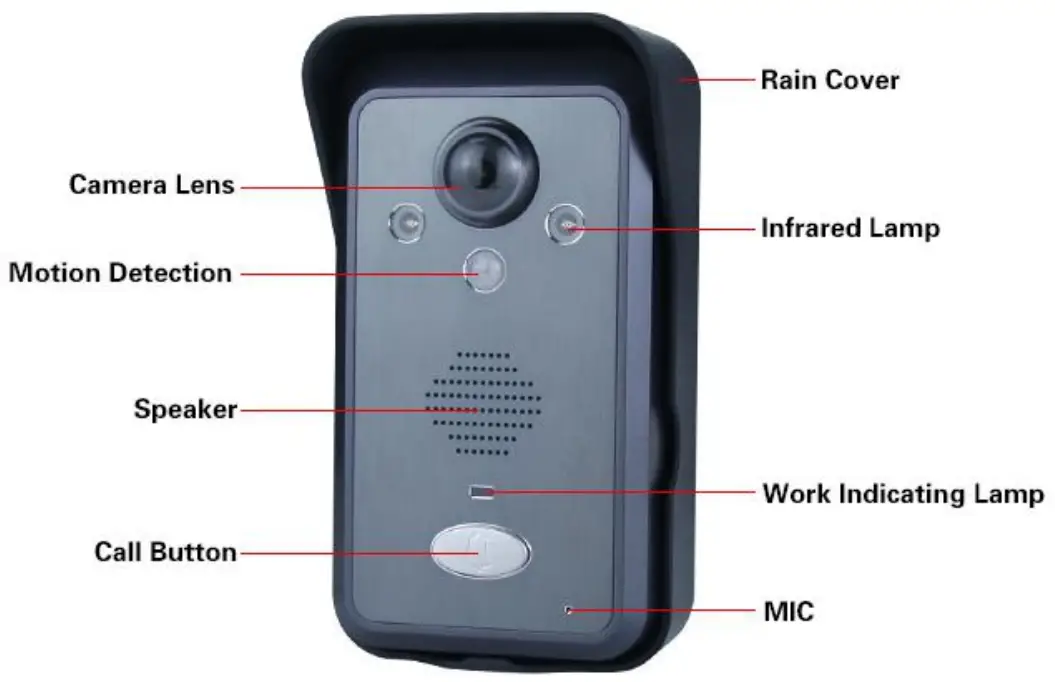
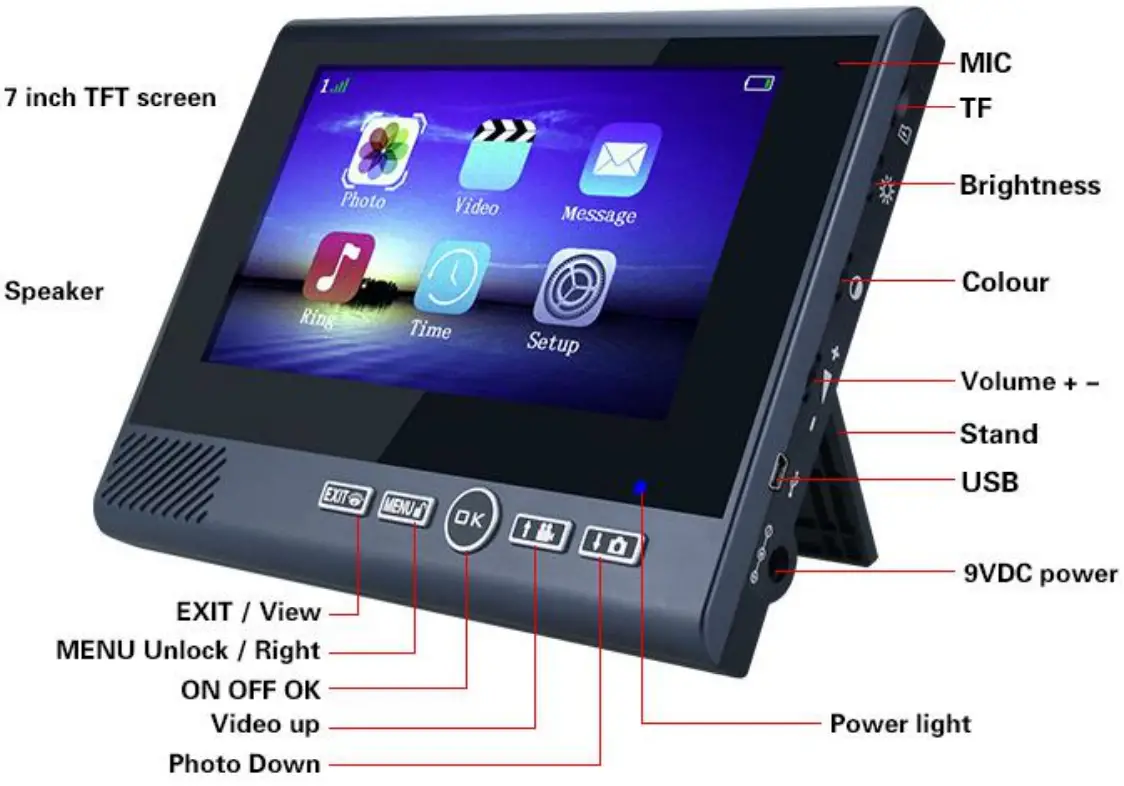
Product Diagram
Outdoor unit
Indoor monitor
Installation Guide
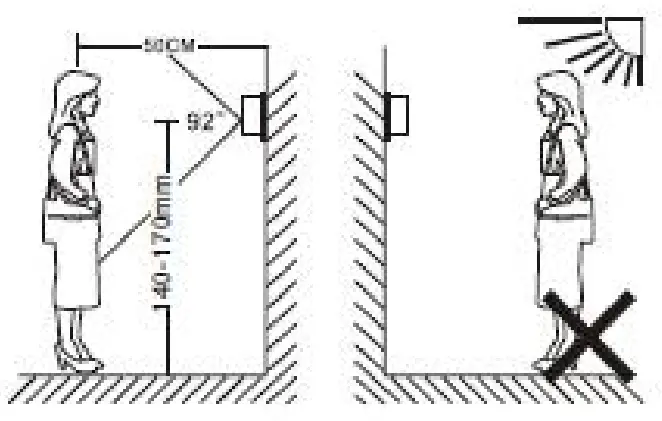
- The outdoor unit shall be installed at 1.4~1.7 meters above the floor, and the camera shall avoid facing the sunlight directly.

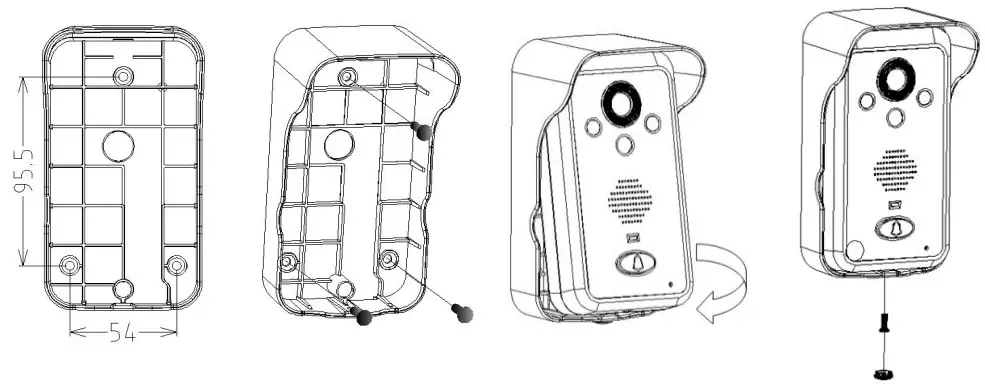
- Installation steps
A.Fix the rain cover on the wall with screws.
B.Put the outdoor unit into rain cover, and install the screw at the bottom.
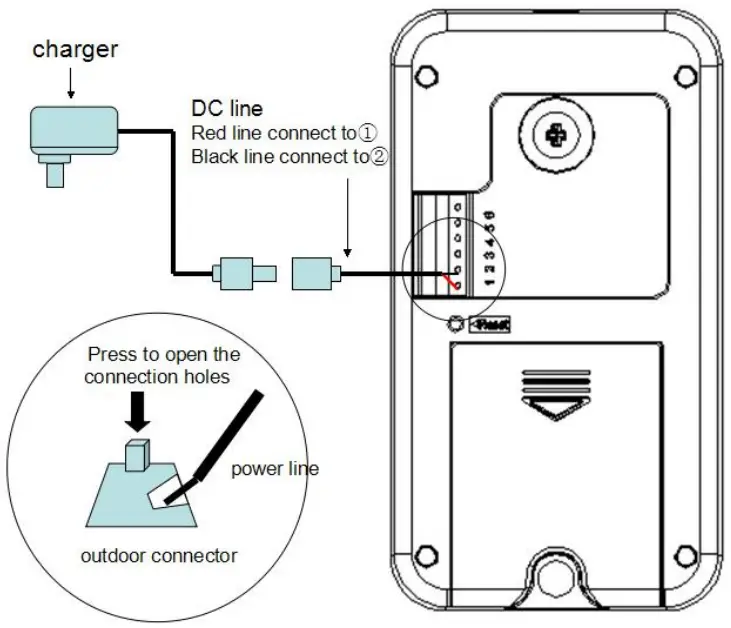
- Connect DC line according to the wiring diagram (the diameter of the hole for wire getting through should be 16~30mm). Red wire (positive pole) connects to point 1; black wire (negative pole) connects to point 2. If powered by AC power, connect the wire to point 1 and point 2.

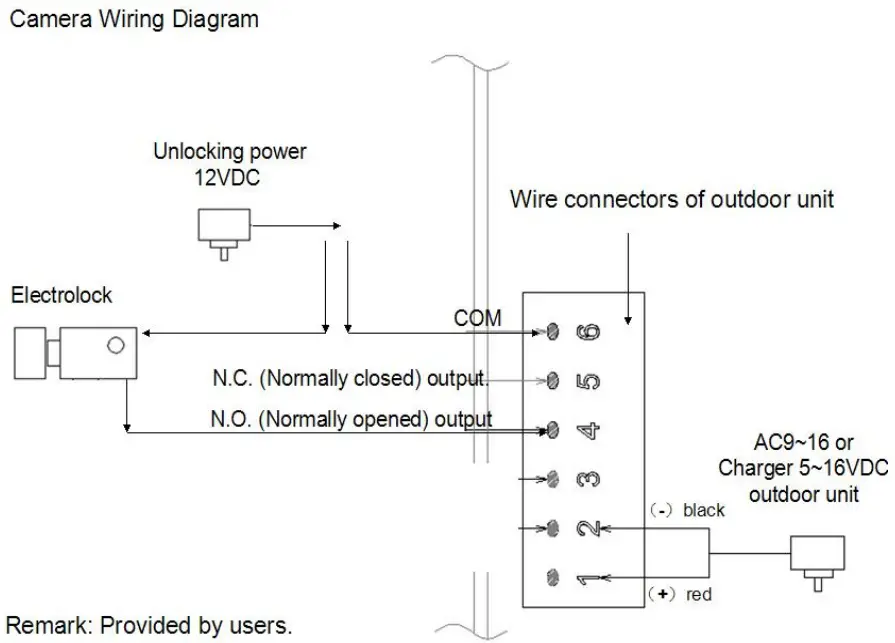
- Electronic lock and power supply connection, as shown below: If electric lock maintains always open: connect to point 4 If electric lock maintains always close: connect to point 5 Two power lines of lock: one connects to lock, one connects point 6.
Note: electric lock and external power supply should be prepared by the user.
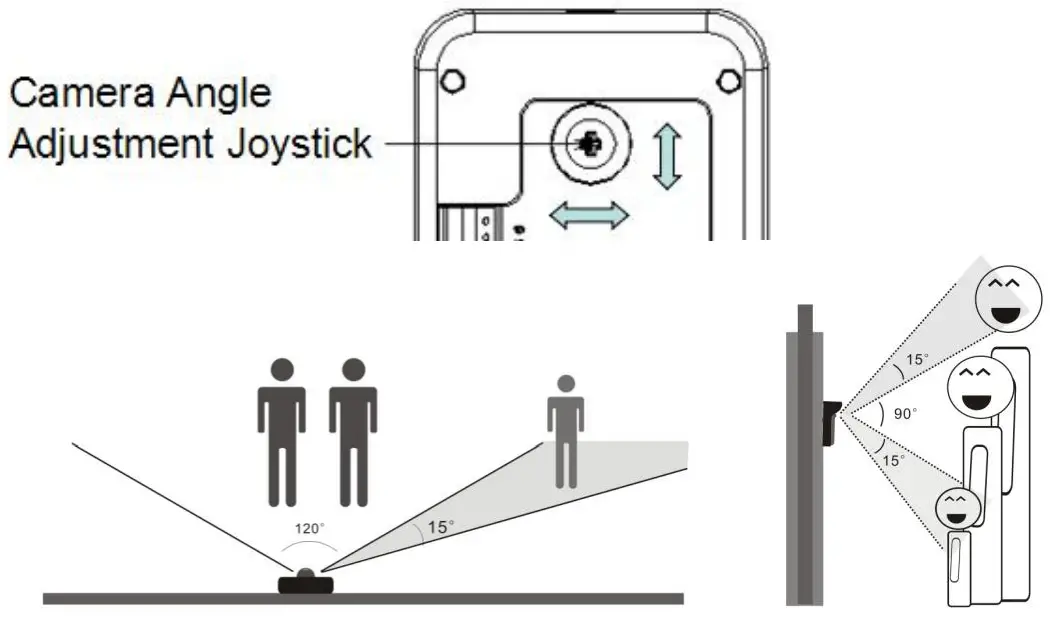
- The camera lens can be adjustable.

- Wall holder

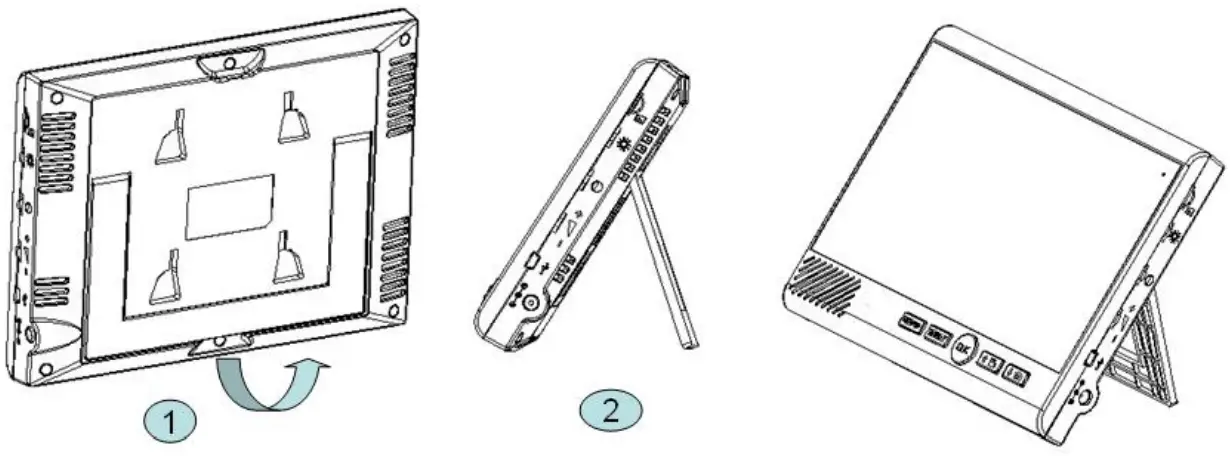
- Table holder

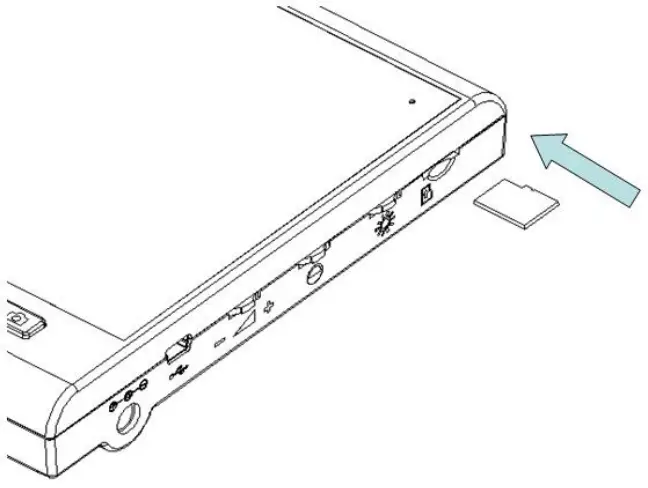
- Installation of Storage Card
A. Insert the storage card in the correct way as shown in the diagram and you’ll hear a clicking sound
B. Improper insertion of storage card may cause system failure, please confirm the correct inserting direction of the card.
C.Take out of the storage card —- push in the storage card until you hear a clicking sound, then the storage card will pop up
Attentions During Installation
- An outdoor infrared sensor cannot be hidden or blocked by other objects.
- Do not expose the outdoor unit to direct sunlight.
- Install the cable correctly, otherwise, the doorbell may be damaged.
Storage cared introduction
- This product supports TF(micro-SD) card as an external storage device, when there is no storage card in the product, the photo-taking and video-recording functions are impossible.
- If a self-provided storage card is used:
- Please use a storage card with Class 2(2MB/Sec) or above.
- Up to 32GB storage card supported.
- This machine has an automatic cyclic storage function when the storage card is full, the original file will be overwritten.
Indoor monitor Keys(Functions)
| —-ON/OFF —-Talking —- work as confirm key for MENU | |
| —work as monitor key for standby mode —-as exit key for MENU | |
| —-work as unlock key when communicating with the outdoor unit —-as right moving key for MENU | |
| —-work as option key for MENU —-as video key when calling or monitoring —-as option key when calling extension monitor | |
| —-work as option key for MENU, —-as photo key when calling or monitoring, —-as entrance key for exposure adjust, |
“Bright/Colour/Volume”:
—-Increase and reduce for adjustment.
Turn on/off
- Outdoor unit: Install the battery to turn on. Take out the battery to turn it off.(DC/AC9-16V, Lithium battery)
- Indoor Unit: with 4000mah Lithium battery, DC/AC9-16V. Press the “OK” key for about 3S to turn on. Then, press the “OK” key for about 3S to enter the shutdown interface: select”Yes” to turn off.
UI operation instruction
Press the “MENU” key enter the main menu interface![]() see&delete the photo record.
see&delete the photo record.
Can store 180pcs photos. Automatically cover the earliest photo when memory is full.![]() video record.
video record.
Support 32G Max. TF(micro-SD) card. Automatically cover the earliest video when memory is full.
![]() message for missed call or ring.
message for missed call or ring.
Will have a message if miss any call or ring.Can store 10 messages at most.A message with photo(as setting) or video(as setting). Automatically cover the earliest message. It will not have a new message if the indoor unit is shut down or powered off.![]() Ring setting. There are 4 default rings.
Ring setting. There are 4 default rings.
MP3 format music in TF(micro-SD) card also can play. You can select the ring as you likeMP3 music name can not include Chinese characters). Meanwhile, can adjust the ring volume by pressing the MENU ![]() key. Volume has 6 levels.
key. Volume has 6 levels.![]() Time&date setting.
Time&date setting.
Can set time,date. For example,12:00 01-09-2018.
 Setting.Enter settings.
- Backlight time. Standby backlight time 10-60S setting.
- Motion sensor. Turn PIR on or offsetting.
- Auto-video record. Automatically take video record when ringing. If put TF card in the device, setting “automatically record”, it will take video record automatically when ringing. But if setting “manual record”, it will take one photo record automatically when ringing.
- Alarm setting. Turn on or off the tamper alarm.
- Language selection. Have 6 languages,
English, Spanish, German, French, Russian, and Chinese. The factory default language is English. - Advanced setting.
- Pairing. Match code, give code, receive code.
- Unlock time. Unlock remaining time setting,3S/5S/8S.
- SD card formatting. Insert the TF(micro-SD) card, can format the content.
- Version. The version number of the device.
Communication instruction
- Intercom between indoor unit and outdoor unit.
- Under standby status, press “Call” of the outdoor unit–Indoor unit will ring–
Show on-screen–Press the “OK” key, and show
 on the screen, then can talk with each other.
 - To call/monitor the outdoor unit is to press
 if show the
 on the screen, which means not able to the intercom. Press again, it will show on the screen, which means can intercom with the outdoor unit.
 - Under intercom state, press screen.
 to take photos. Will show
  on
on - Under intercom state, press screen.
 to take video. Will show
 on screen
 - Under intercom state, press
 to unlock the door. It Will show
 on the screen.
 - Press the upper wheel key of the indoor unit on the right side. To adjust the brightness of the screen. It Will show on the
 screen.
 - Press the middle wheel key of the indoor unit on the right side. To adjust the contrast ratio of the screen. It Will show
 on the screen.
 - Press the third wheel key of the indoor unit on the right side. To adjust the volume. It Will show
 on the screen.
 - If turn on PIR, will automatically take a photo or video(require TF card inside), will show
 on the screen.
 - During intercom, show
 on indoor unit screen, the below battery icon is for outdoor unit power, it will be red color when low power.
  the number stands for different indoor units. The green lines stand for intercom signal.
- When standing by, press the
 key to monitor outside.
 - PIR: when turning on the motion sensor, the outdoor unit camera senses the person within 2 meters and will take 3pcs photos record (require TF card inside) automatically.
- Anti-tamper alarm of outdoor unit. When the rain covers separate from the device, it will alarm with a big sound. At the same time, will take a 5pcs photos record. It Will show
 on the screen.
 - Intercom between indoor units.
- If there are only 2 indoor units, press
 the key, and can call another indoor unit.
 - If there are 3 indoor units, call another 2 indoor units. Press the key to call the smaller ID no. between the 2 indoor units. Press the key to call the bigger ID no. between the indoor units.
Pairing Instruction
1V1 Match code: (put outdoor unit next to the Indoor monitor)
- Select “code” in setting on the indoor monitor — press OK key– enter into the match code mode.
- Meanwhile, long-press the “Reset” hole on the outdoor unit back, until you hear one “Beep” sound, then release.
- When the indoor monitor displays “Successful”, the outdoor unit has “di-di-di” three sounds, which means matching successfully.
- If matching failed in 16 seconds, the indoor monitor shows “failed”, the outdoor unit makes a “di” sound. Please try the above steps again.
NOTE: By default, the monitor is paired well with the outdoor unit.
1V2 (add the 2nd monitor)- Match code :
- Select “Give code ” on the 1st paired indoor monitor –press OK key–enter into the giving code mode.
- On the new (second) indoor monitor, select “receive code” — press the OK key. It will have “di-di-di” three sounds, and displays “Successful” on the screen, which means matching the 2nd monitor ok.
1V3(add the 3rd monitor) – Match code:
- Select “Give code ” on the 2nd paired indoor monitor press OK key– enter into the giving code mode.
- On the new (third) indoor monitor, select”receive code”– press the OK key. It will have “di-di-di” three sounds, and displays “successful” on the screen, which means matching the 3rd monitor ok.
Add one more outdoor unit – Match code
- Select “Give code ” on anyone paired indoor monitor –press OK key-enter into giving code mode.
- On the new (second) outdoor unit: Long press the “reset” hole until you hear “di-di,” two sounds. If match successfully, the outdoor unit will have “didi-di” three sounds and means adding the 2nd outdoor unit ok.
- After matching ok, please use the No. 2 outdoor unit to call all indoor monitors for testing. if not ok, please repeat the above steps again.
Package Include
| Outdoor unit *1 Indoor monitor *1 Manual *1 Rain cover *1 Wall hang holder *1 | Charger *2 DC line *1 Lithium battery 3400mA/h *1 Lithium battery 4000mA/h *1 Screw M3 *1 |
Statement
- The standard configuration for a door phone is one indoor monitor and one outdoor unit. The door phone has a finished code match and can be used directly.
- If you need more pieces of indoor monitors or outdoor units, please contact your local distributors (Maximum 2 outdoor units to 3 indoor monitors supported).
- For the added units, please reference the Give Code and Receive Code in the Code Menu.
General faults and solutions
| Fault | Cause(s) | Solution(s) |
| Can not startup | Neglected to press the switch button | Press switch button |
| Lithium battery is not installed | Install lithium battery | |
| Low battery | Charge up lithium battery | |
| No connection to power adapter when the battery runs out | Connect to the power adapter | |
| Can not charge | The adapter connector doesn’t connect to the charging port of the machine correctly | Reconnect correctly |
| The adapter doesn’t connect to 110V– 240V alternating current | Plug into the socket to connect to alternating current | |
| Outdoor unit cannot call or connect to Indoor monitor | Code match failed | Clear code, and re-match code |
| Image has noisy point or flickers | The handset is placed near to TV player, microwave oven, daylight lamp, or mobile phone which produces electromagnetic wave interference. | Keep handset far away from the interference items |
| No signal for Indoor monitor | The outdoor unit doesn’t connect to the power | Connect to the power |
| Distance between outdoor unit and Indoor monitor is too far | Adjust to the appropriate distance | |
| Disturbed by the magnetic field around | Keep handset far away from magnetic field. |


