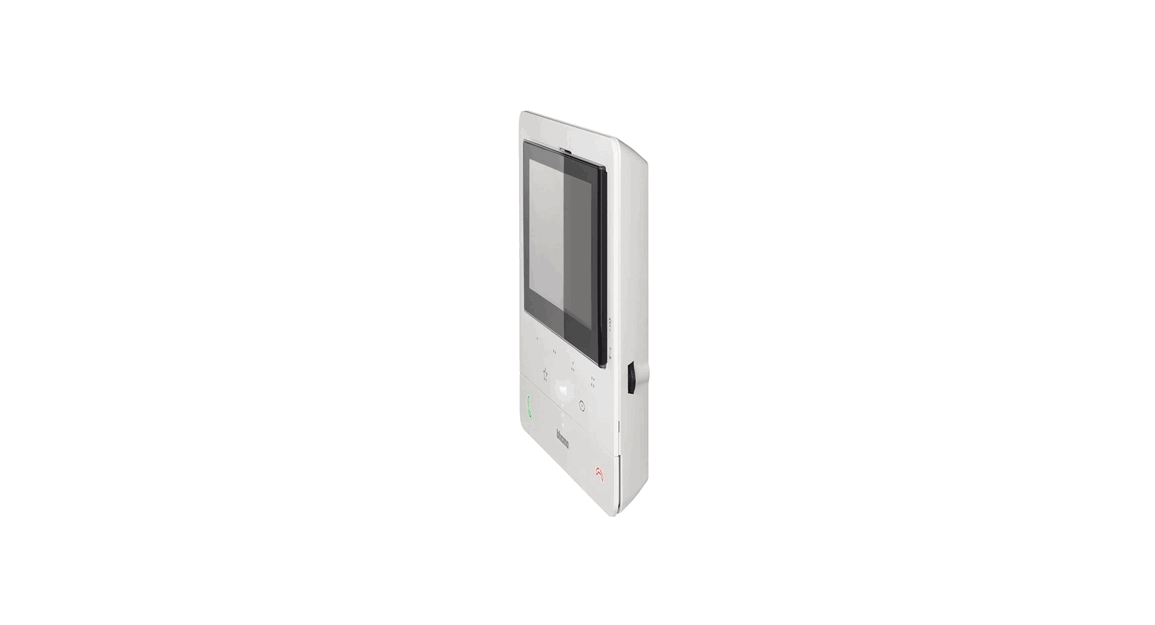
![]() CLASSE 100 Video Doorphone Door Entry System
CLASSE 100 Video Doorphone Door Entry System
User Manual
CLASSE 100 Video Doorphone Door Entry System
Description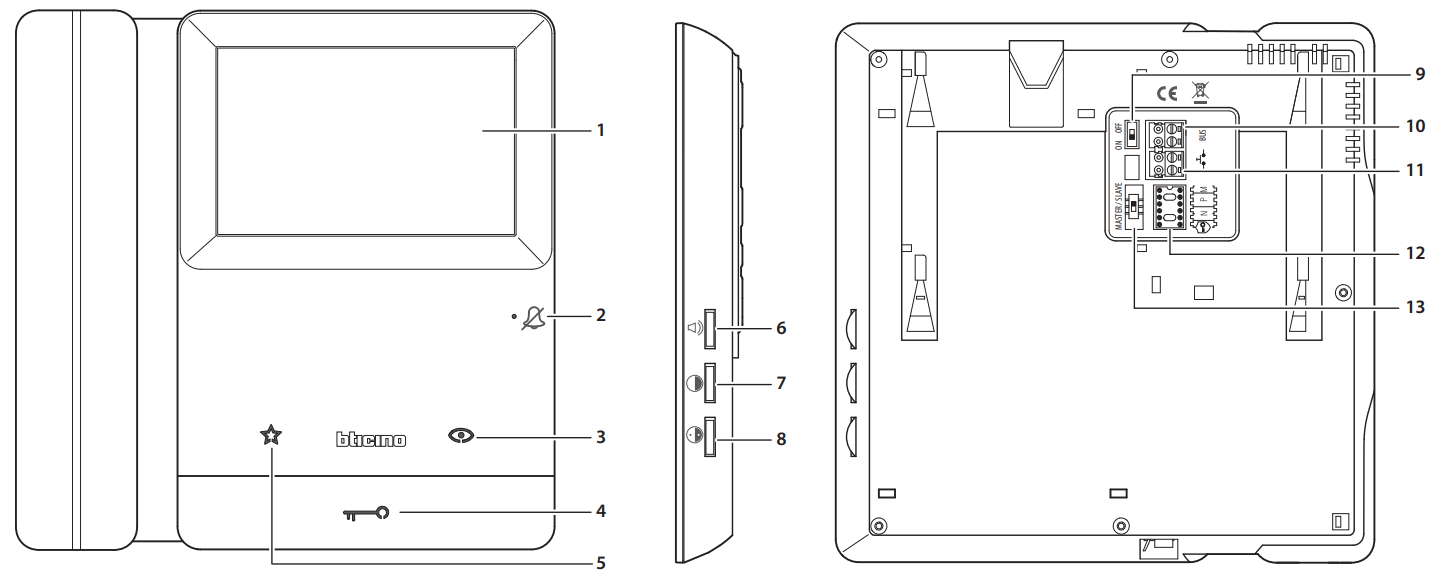
- Display
- Red LED steady: bell exclusion
Red LED flashing: call bell selection
Green LED steady: communication in progress
Green LED flashing: incoming call - Auto-switching on/Scrolling key
Direct entrance panel activation (without call) / Cycling / Call to the switchboard (if applicable) - Door lock release pushbutton
Direct door lock activation or activation of the door lock of the active entrance panel.
LED steady: door lock pushbutton pressed
* LED flashing: door open
* LED OFF: door closed - “Favourites” pushbutton (see M configuration mode)
- Volume adjustment and bell exclusion
- Image brightness adjustment
- Image colour adjustment
Note: when pressed, keys 3/4/5 light up and emit a “beep” that cannot be disabled - ON/OFF micro-switch for the closure of the line at the last internal unit of the riser or leg. Switch to ON if the device is the last of the riser or leg
- BUS connection clamp
- Call to the floor pushbutton
- Configurator socket
- “Master/Slave” selector
* Door status function
This function indicates the status of the door lock: when open, the “door lock LED” flashes, when closed, it’s off (only for systems with door locks or actuators intended for this function).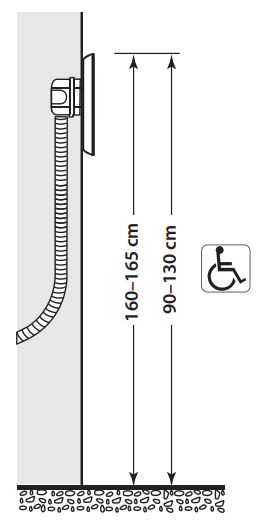 Recommended height, unless different regulations are specified.
Configurator socket
Safe door lock | It allows the opening of the door lock only if the entrance panel and the internal unit are communicating.Connect the JMP** configurator to activate the function. Note: this function does not allow the operation of the door lock pushbutton when idle, or the “Favorites” key (only if M = 1) when idle. |
| NN | Internal unit address: The configurators connected to the N socket of the device assign a system identification number to each internal unit.The internal units must be configured in progressive order.Internal units with parallel connection (max 3 are allowed inside apartments without item 346850) must be configured using the same N configurator. In parallel with the video internal unit, additional internal units, video internal units and/or bells may be installed. |
| PP | Entrance panel association: the configurators connected to the P socket of the device identify the associated EP, the first EP activated when the auto switching on or door lock internal unit pushbuttons are pressed when the same is idle. |
| M | Operating modes: Mod 0 = Staircase Light Activation. Mod 1 = Direct entrance panel door lock opening (configured with P+1) without call, or activation of the actuator item 346210 (configured with P+1 and MOD=5), or activation of door lock actuator item 346230 (configured with P+1). Mod 2 = Automatic activation of the EP (configured with P+1) camera, directly without call, or activation of the actuator item 346210 (configured with P+1 and MOD=9). Mod 3 = Intercom among internal units; it sends calls to internal units configured with the same address. General intercom. It sends a call to all the internal units of the system. Mod 4 = Intercom among configured internal units N=1 N=2. N=1 sends a call to N=2. N=2 sends a call to N=1. Mod 5 = Predefined intercom.“Preset intercom” function with intercom call to the Internal Unit configured with N=1. Mod 6 = It is possible to send an intercom call from the system Internal units to the internal unit configured with N= 1. The entrance panel configured with N=1 can intercom calls, but is unable to send them. |
** Note: the JMP configurator (item 3501/JMP) in not supplied.![]() In case of device reconfiguration, wait one minute before reconnecting it to the system.
In case of device reconfiguration, wait one minute before reconnecting it to the system.
Installation with 503E box
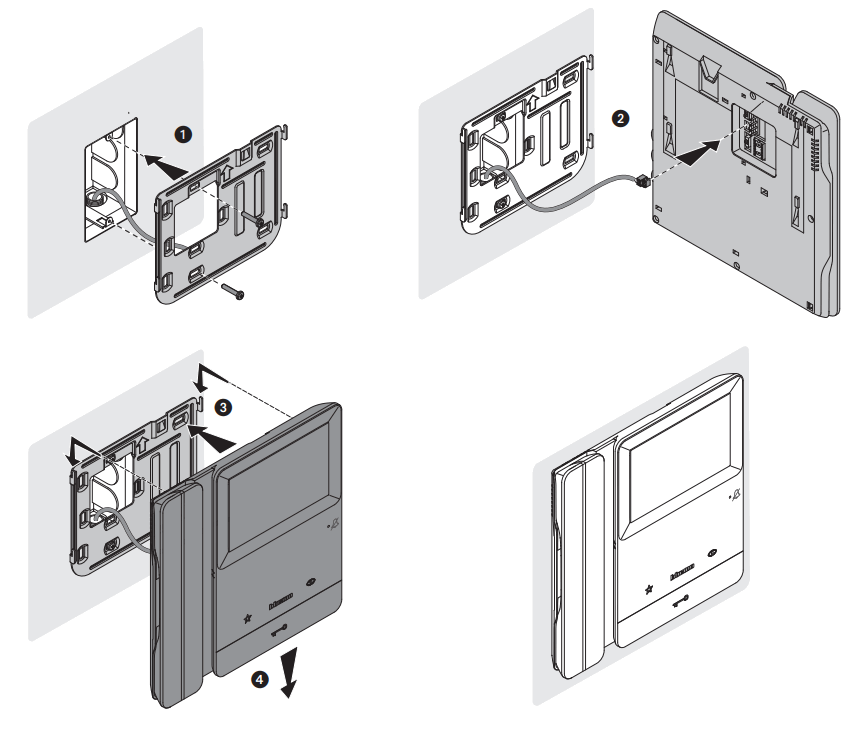 Video wiring diagram
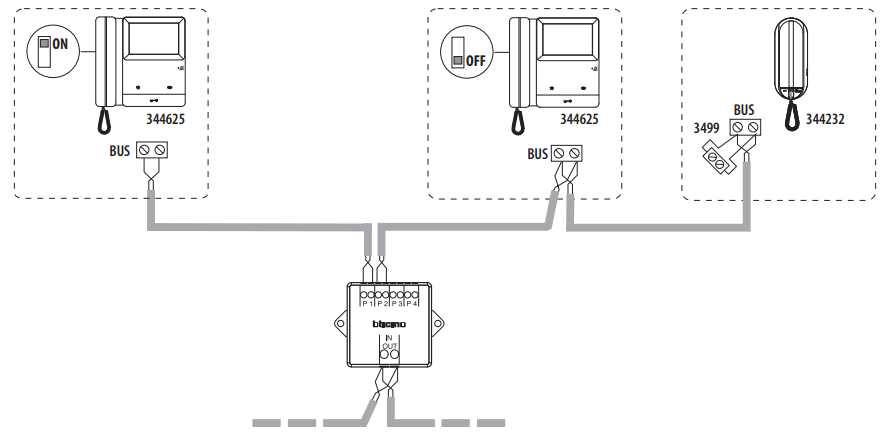 Call bell selection
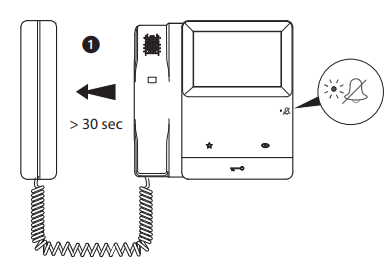 Lift the handset and wait at least 30”. The LED will flash red to indicate that the device is in programming mode.
- Call bell selection from the main entrance panel (S=0)

- Intercom call bell selection

- Floor call bell selection

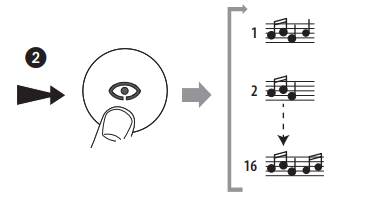
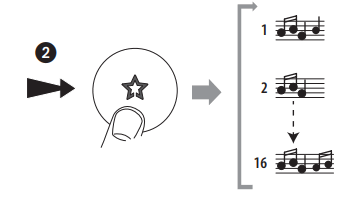
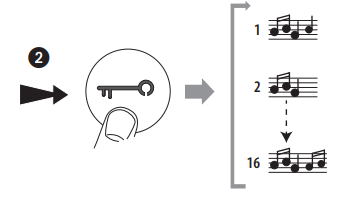
 Replace the handset to confirm the selection or wait for the ringtone to end to avoid saving.
Note: if no action is performed during call ringtone selection mode for more than 20”, the device returns to normal operating mode.![]() When selecting the call ringtone, do not move the handset close to your ear.
When selecting the call ringtone, do not move the handset close to your ear.
Warnings and consumer rights![]() Read carefully before use and keep for future reference
Read carefully before use and keep for future reference![]() Touching the units with wet hands is forbidden Using liquid cleaners or aerosols is forbidden Blocking the ventilation openings is forbidden Modifying the devices is forbidden Removing protective parts from the devices is forbidden It is forbidden for unqualified operators to carry out the installation work Installing the units near liquids and powders is forbidden Installing the units near heat/cold sources or hot/cold air emission points is forbidden Installing the units near harmful gases, metal dusts or similar is forbidden Fastening the units on unsuitable surfaces is forbidden
Touching the units with wet hands is forbidden Using liquid cleaners or aerosols is forbidden Blocking the ventilation openings is forbidden Modifying the devices is forbidden Removing protective parts from the devices is forbidden It is forbidden for unqualified operators to carry out the installation work Installing the units near liquids and powders is forbidden Installing the units near heat/cold sources or hot/cold air emission points is forbidden Installing the units near harmful gases, metal dusts or similar is forbidden Fastening the units on unsuitable surfaces is forbidden![]() Danger of electrical shock
Danger of electrical shock![]() Risk of devices falling because the surface on which they are installed collapses or inappropriate installation Switch the power supply OFF before any work on the system
Risk of devices falling because the surface on which they are installed collapses or inappropriate installation Switch the power supply OFF before any work on the system![]() Caution: Installation, configuration, starting-up and maintenance must be performed exclusively by qualified personnel. Check that the wall installation has been carried out correctly Lay out the wires respecting the standards in force Connect the power supply wires as indicated Use only the items indicated in the technical specifications for any system expansions
Caution: Installation, configuration, starting-up and maintenance must be performed exclusively by qualified personnel. Check that the wall installation has been carried out correctly Lay out the wires respecting the standards in force Connect the power supply wires as indicated Use only the items indicated in the technical specifications for any system expansions
![]() RAEE/WEEE: bticino.com/disposal
RAEE/WEEE: bticino.com/disposal
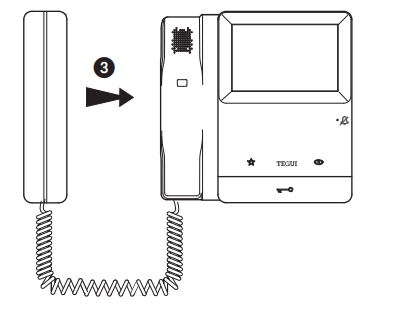
Classe100 V16M Video internal unit with handset
Description
2 WIRE video internal unit, with handset, for surface installation. It has a 4.3” (16:9) colour display. Available pushbuttons: auto-switching on, door lock release, staircase light control/various actuators. Depending on the configurator inserted in (M), the same pushbuttons will perform different functions (see the specific configuration section). LEDs for: call exclusion, communication with entrance panel. Side adjustment for: display colour and brightness as well as call exclusion/volume (16 different selectable tones). The surface installation must be made with the supplied metal base.
Technical data
| BUS/SCS consumption: | 18 – 27Vdc |
| Consumption at rest: | 10 mA |
| Max. operating absorption: | 200 mA |
| Operating temperature: | 5 – 40°C |
Dimensional data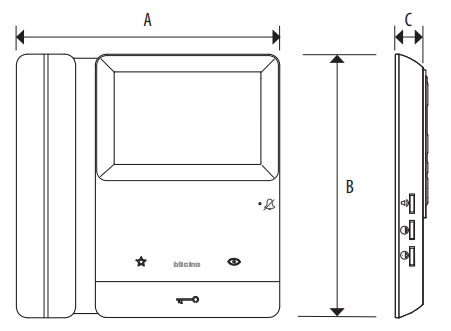
| A | B | C |
| 200 mm | 200 mm | 21 mm |
Front view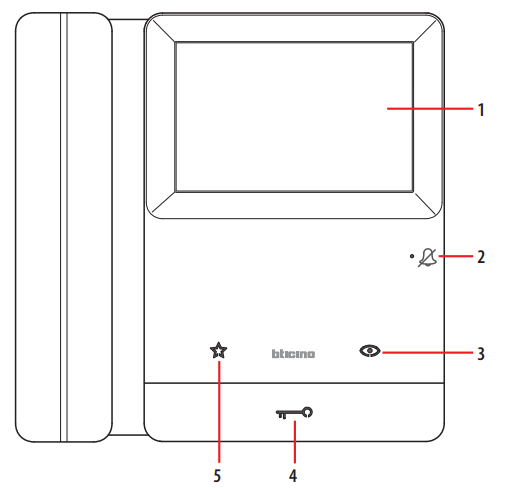 Legend
- Display
- Call exclusion/device status LED*
- Auto-switching on/Scrolling key
Direct entrance panel activation (without call) / Cycling / Call to the switchboard (if applicable) - Door lock release pushbutton**
Direct door lock activation or activation of the door lock of the active entrance panel.
5. “Favourites” pushbutton (see M configuration mode)
Note: When pressed, keys 3/4/5 light up and emit a “beep” that cannot be disabled
* Notification by means of two-colour LED of the operating status
| Red LED ON steady | bell exclusion |
| Red LED ON flashing | call bell selection |
| Green LED ON steady | communication in progress |
| Green LED ON flashing | incoming call |
** Notification by means of white LED of the door status
| LED ON flashing | door open |
| LED OFF | door closed |
Side view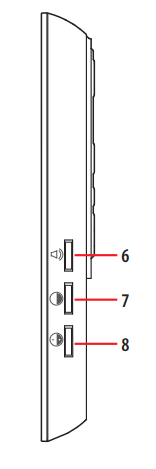 Rear view
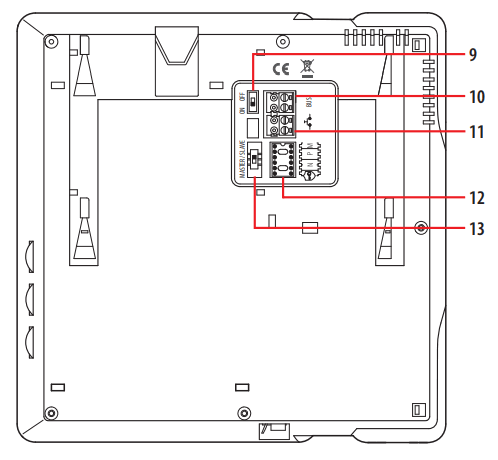 Legend
6. Volume adjustment and bell exclusion
7. Image brightness adjustment
8. Image colour adjustment
9. ON/OFF micro-switch for the closure of the line at the last internal unit of the riser or leg. Switch to ON if the device is the last of the riser or leg
10. BUS connection clamp
11. Call to the floor pushbutton
12. Configurator socket
13. “Master/Slave” selector
Configuration
The device must be only physically configured.
N – Internal unit number
The configurators inserted in the N socket of the internal unit assign a system identification number. The internal units must be configured in progressive order.
Internal units with parallel connection (max 3 inside apartments without item 346850) must be configured using the same N configurator. In parallel additional audio and video internal units may be installed.
P – Entrance panel association
The configurators connected to the P socket of the internal unit assign the associated EP, the first entrance panel that switches on with the auto-switching on pushbutton and
which door lock is activated when pressing the door lock pushbutton while the internal unit is idle.
Configurator socket
Safe door lock | It allows the opening of the door lock only if the entrance panel and the internal unit are communicating. Connect the JMP* configurator to activate the function. Note: this function does not allow the operation of the door lock pushbutton when idle, or the “Favorites” key (only if M = 1) when idle. |
| NN | Internal unit address. |
| PP | Entrance panel address with activation in idle condition and direct auto-switching ON. |
| M | Operating modes: Mod 0 = Staircase Light Activation. Mod 1 = direct entrance panel door lock opening (configured with P+1) without call, or activation of the actuator item 346210 (configured with P+1 and MOD=5), or activation of door lock actuator item 346230 (configured with P+1). Mod 2 = Automatic activation of the EP (configured with P+1) camera, directly without call, or activation of the actuator item 346210 (configured with P+1 and MOD=9). Mod 3 = Intercom among internal units; it sends calls to internal units configured with the same address. Mod 4 = General intercom. It sends a call to all the internal units of the system. Mod 5 = Intercom among configured internal units N=1 N=2. N=1 sends a call to N=2. §N=2 sends a call to N=1. Mod 6 = Predefined intercom. “Preset intercom” function with intercom call to the Internal Unit configured with N=1. It is possible to send an intercom call from the system Internal units to the internal unit configured with N= 1. The internal unit configured with N=1 receives Intercom calls but cannot send them. |
* Note: the JMP configurator (item 3501/JMP) in not supplied.
Door Status Function
This function indicates the status of the door lock: when open, the “door lock LED” flashes, when closed, it’s off (only for systems with door locks or actuators intended for
this function).
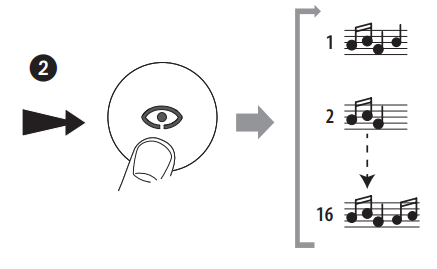
Bell programming
The video internal unit offers the possibility to select among 16 types of bells with programmed ringtones, which can be freely associated to the following type of c- Calls from the entrance panel (configured with S=0);
- INTERCOM call;
- Floor call.
The general call bells coming from the EP configured with S=1, S=2 & S=3 are configured as default and cannot be changed.
Call bell selection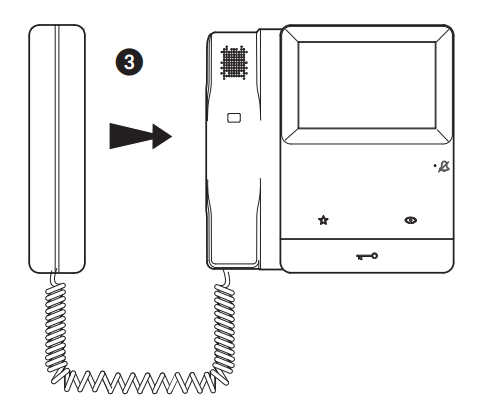 Lift the handset and wait at least 30”. The LED will flash red to indicate that the device is in programming mode.
- Call bell selection from the main entrance panel (S=0)
 • Intercom call bell selection
 - Floor call bell selection

 • Intercom call bell selection
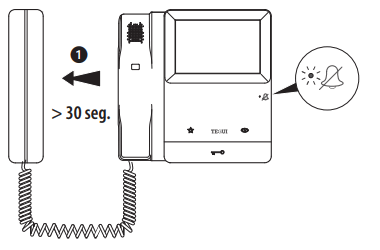
Note: if no action is performed during call ringtone selection mode for more than 20”, the device returns to normal operating mode.![]() When selecting the call ringtone, do not move the handset close to your ear.
When selecting the call ringtone, do not move the handset close to your ear.
 | ||
| https://elkesan.fi/d10000822 | https://elkesan.fi/d1000883 | https://elkesan.fi |
![]()


