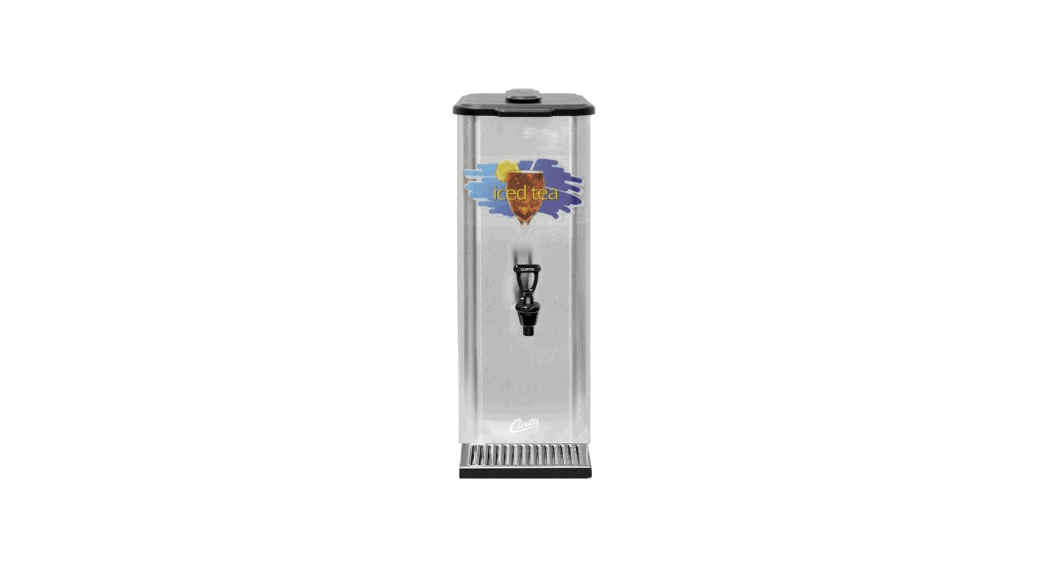
![]() TCCI Liquid Concentrate Iced Tea/Coffee Dispensers
TCCI Liquid Concentrate Iced Tea/Coffee Dispensers
User Guide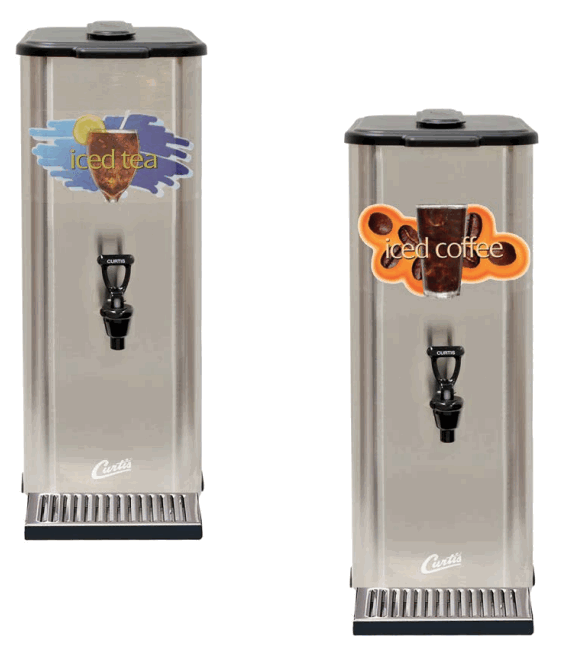
TCCI Liquid Concentrate Iced Tea/Coffee Dispensers
KEY FEATURES/SPECIFICATIONS/SYSTEM REQUIREMENTS
Key Features
- Mixing chambers have been designed and engineered for enhanced blending performance
- Easily adjustable concentrate-to-water mixing ratio
- Drip tray and quick disconnect included
- Braided hoses
- Extra length hose for under-counter or remote bag-in-box applications
Specifications (Selected Models )
Physical
| MODEL# | DESCRIPTION | CUPCLEARANCE | COMPARTMENT CAPACITY | REGULATOR SETTING | CONCENTRATE RATIO | CONCENTRATE CONNECTOR | DISPENSER FLOW RATE |
| TCC1 | Single faucet, icedtea | 8.44″ [21.4 cm] | 3.0 gal. max [11.4 L max] | 15.0 psi[1.0 bar] [103.0 kPa] | Adjustable | QCD2 | 0.6 gpm[2.3 Ipm] |
| TCC1 C | Single faucet, icedcoffee | 8.44″ [21.4 cm] | 3.0 gal. max [11.4 L max] | 15.0 psi[1.0 bar.] [103.0 kPa] | Adjustable | SCHOLLE “L” | 0.6 gpm[2.3 Ipm] |
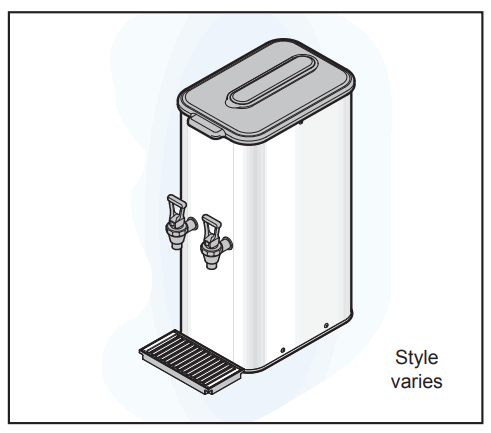
| TCC2 | Dual faucet, iced tea | 8.44″ [21.4 cm] | 2 x 1.5 gal. max [2 x 5.7 L max] | 15.0 psi[1.0 bar.] [103.0 kPa] | Adjustable | QCD2 | 0.6 gpm[2.3 Ipm] |
| TCC3 | Triple faucet, icedtea | 8.44″ [21.4 cm] | 3x 1.0 gal. max [3 x 3.8 L max] | 15.0 psi[1.0 bar.] [103.0 kPa] | Adjustable | QCD2 | 0.6 gpm[2.3 Ipm] |
Dimension Water Supply Requirements
| MODEL # | HEIGHT | WIDTH | DEPTH | SHIP WEIGHT | SHIP CUBE | OPERATIONAL WEIGHT | WATER CONNECTOR | WATER PRESSURE | MIN.FLOW RATE |
| TCC1 | 24.62″ [62.5 cm] | 9.35″ [23.7 cm] | 17.83″ [45.3 cm] | 20.0 lb.[9.1 kg] | 6.2 Cu.ft. [0.17 m3] | 45.0 lb. [20.4 kg] | 1/4″ flare | 20 – 90 psi [138 – 620 kPa] | 1.0 gpm [3.8 Ipm] |
| TCC1C | 24.62″ [62.5 cm] | 9.35″ [23.7 cm] | 17.83″ [45.3 cm] | 20.0 lb.p.1 kg] | 6.2 C. ft. p.17 m3] | 45.0 lb. [20.4 kg] | 1/4 “flare | 20 – 90 psi [138 – 620 kPa] | 1.0 gpm [3.8 Ipm] |
| TCC2 | 24.62″ 62.5 cm] | 9.35″ [23.7 cm] | 17.83″ [45.3 cm] | 21.0 lb.[9.5 kg] | 6.2 Cu..ft.[0.17 m3] | 46.0 lb. [20.9 kg] | 1/4 flare | 20 – 90 psi [138 – 620 kPa] | 1.0 gpm [3.8 Ipm] |
| TCC3 | 28.10″ [71.4 cm] | 14.23″ [36.1 cm] | 13.92″ [35.4 cm] | 22.0 lb.[10.0 kg] | 6.2 Cu..ft. [0.17 m3] | 47.0 lb. [21.3 kg] | 1/4 flare | 20 – 90 psi [138 – 620 kPa] | 1.0 gpm [3.8 Ipm] |
IMPORTANT SAFEGUARDS
Symbols
This is the safety alert symbol. It is used to alert you to potential physical injury hazards. Obey all safety messages that follow this symbol to avoid possible injury or death.![]() DANGER – Indicates a hazardous situation which, if not avoided, will result in death or serious injury.
DANGER – Indicates a hazardous situation which, if not avoided, will result in death or serious injury.![]() WARNING – Indicates a hazardous situation which, if not avoided, could result in death or serious injury.
WARNING – Indicates a hazardous situation which, if not avoided, could result in death or serious injury.![]() CAUTION – Indicates a hazardous situation which, if not avoided, could result in minor or moderate injury.
CAUTION – Indicates a hazardous situation which, if not avoided, could result in minor or moderate injury.![]() NOTICE – Indicates a situation which, if not avoided, could result in property damage.
NOTICE – Indicates a situation which, if not avoided, could result in property damage.![]() IMPORTANT – Provides information and tips for proper operation.
IMPORTANT – Provides information and tips for proper operation.![]() SANITATION REQUIREMENTS
SANITATION REQUIREMENTS
WARNING – This product can expose you to chemicals including Acrylamide and Bisphenol A (BPA), which are known to the State of California to cause cancer and birth defects or other reproductive harm. For more information visit www.P65Warnings.ca.gov.
Important Safeguards/Conventions![]() WARNING:
WARNING:
- Make sure that this appliance is installed and grounded according to the INSTALLATION INSTRUCTIONS by quali ed personnel before attempting to use it. Failure to follow the INSTALLATION INSTRUCTIONS could result in personal injury or void the warranty.
- This appliance is designed for commercial use. Any service other than cleaning and preventive maintenance should be performed by an authorized Wilbur Curtis service technician.
- To reduce the risk of re or electric shock, DO NOT open the service panels. There are no user serviceable parts inside.
- Keep hands, arms and other items away from hot surfaces of the unit during operation.
- Clean the appliance and any dispensers completely before using them for the rst time according to the CLEANING INSTRUCTIONS. Clean them regularly as instructed in the CLEANING INSTRUCTIONS.
- Use this appliance only for its intended use, brewing/dispensing hot and/or cold beverages/water.
- This appliance is not intended for use by persons (including children) with reduced physical, sensory or mental capabilities or lack of experience and knowledge, unless they have been given supervision or instruction concerning use of the appliance by a person responsible for their safety. Children should be supervised to ensure that they do not play with the appliance.
- Avoid spillage onto the power (mains) connector.
CE Requirements
- This appliance must be installed in locations where it can be overseen by trained personnel.
- For proper operation, this appliance must be installed where the temperature is between 5°C to 35°C.
- This appliance is not suitable for outdoor use.
- This appliance shall not be tilted more than 10° for safe operation.
- An electrician must provide electrical service as speci ed in conformance with all local and national codes.
For safe use, an all-pole disconnection must be incorporated into the xed wiring in accordance with the wiring rules outlined in clause 7.12.2 of IEC 60335 for meeting the minimum electrical safety of this standard. - This appliance must not be cleaned by water jet.
- This appliance can be used by persons aged from 18 years and above if they have been given supervision or instruction concerning use of the appliance in a safe way and if they understand the hazards involved.
- Keep the appliance and its cord out of reach of children aged less than 18 years.
- Appliances can be used by persons 18 years and above with reduced physical, sensory or mental capabilities or lack of experience and knowledge if they have been given supervision or instruction concerning use of the appliance in a safe way and understand the hazards involved.
- Children under the age of 18 years should be supervised to ensure they do not play with the appliance.
- If the power cord is ever damaged, it must be replaced by the manufacturer or authorized service personnel with a special cord available from the manufacturer or its authorized service personnel in order to avoid a hazard.
- Machine must not be immersed for cleaning.
- Cleaning and user maintenance shall not be made by children unless they are older than 18 years and supervised.
- This appliance is intended to be used in household and similar applications such as:
– staff kitchen areas in shops, of ces and other working environments;
– by clients in hotels, motels and other residential type environments;
– bed and breakfast type environments. - This appliance not intended to be used in applications such as:
– farm houses - Access to the service areas permitted by Authorized Service personnel only.
- The A-Weighted sound pressure level is below 70 dBA.
- This product contains plastic, metal and electronic components and is considered e-waste. At the end of its life, this product must not be disposed of in normal household waster but can be instead delivered to a collection point for recycling electric and electronic appliances, consult with the local municipality for proper disposal guidelines.
INSTALLATION INSTRUCTIONS
![]() WARNING: Installation is to be performed only by a qualified installer.
WARNING: Installation is to be performed only by a qualified installer.![]() NOTICE: DO NOT connect this appliance to a hot water supply. Do not exceed the maximum water pressure stated in the SPECIFICATIONS section.
NOTICE: DO NOT connect this appliance to a hot water supply. Do not exceed the maximum water pressure stated in the SPECIFICATIONS section.![]() IMPORTANT: Observe all governing codes and ordinances. :
IMPORTANT: Observe all governing codes and ordinances. :
Installation Requirements
- A water filtration system is required to maintain trouble-free operation. Wilbur Curtis Co., Inc. recommends a Wilbur Curtis approved water filter. See the Curtis Equipment Catalog for a full Inc of Wilbur Curtis approved water filters.
- Potable water supply Inc connection from the water filter capable of supplying the minimum flow rate required by the specifications. The water supply line most be able to connect to the flare fitting on the back of the unit. See the SPECIFICATIONS section for the correct size. The water line should also be capable of being controlled by a shut off valve. Do not connect the water line to a saddle valve or needle valve.
![]() NSF International requires the following water connection:
NSF International requires the following water connection:
- A quick disconnect or additional coiled tubing (at least two times the depth of the unit) is required so that it can be moved for cleaning underneath.
- This equipment is to be installed with adequate back-flow protection to comply with applicable federal, state and local codes.
- Water pipe connections and fixtures directly connected to a potable water supply shall be sized, installed and maintained in accordance with federal, state and local codes.
The International Plumbing Code of the International Code Council and the Food and Drug Administration (FDA) Food Code manual, direct that this equipment most be installed with adequate back-flow prevention in compliance with federal, state and local codes. For cots installed outside of the U.S.A., make sure that the installation is in compliance with the applicable plumbing/sanitation code for your area.
Installation
Leveling
- Position the unit on a level counter top capable of supporting its operating weight. See the SPECIFICATIONS section.
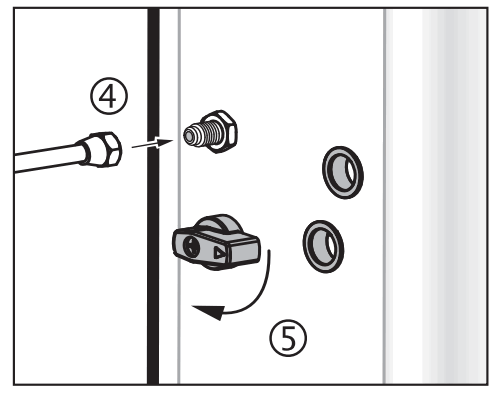
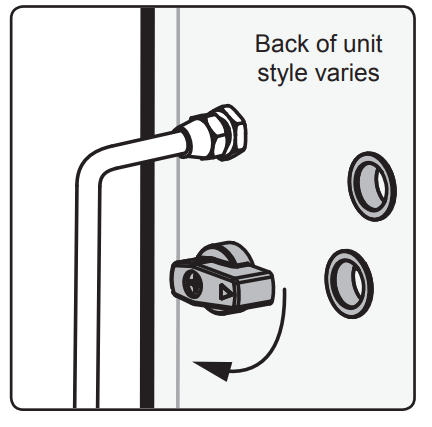
 Connect the Water Supply
 - Make sure that the water supply valve on the back of the unit is in the OFF position.
- Flush the water supply line before connecting it to the tubing.

- back of the unit.
- Open the water supply valve running to the unit. Also, turn the valve handle on the back of the unit itself to the ON position.
- Sanitize the dispensing system according to the instructions in the CLEANING INSTRUCTIONS incoming water line for leaks.
 Connect the Water Supply
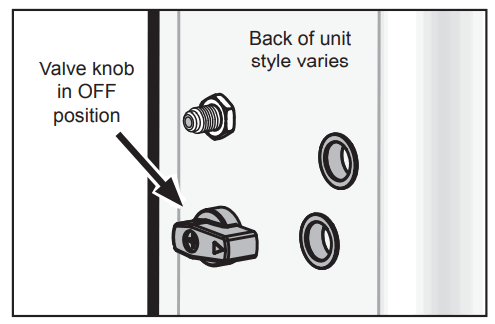
OPERATING INSTRUCTIONS
Use Instructions![]() WARNING – DO NOT refrigerate unused tea overnight for later consumption. Never hold dispensed tea for ore than eight hours at room temperature. Discard any unused tea after eight hours.
WARNING – DO NOT refrigerate unused tea overnight for later consumption. Never hold dispensed tea for ore than eight hours at room temperature. Discard any unused tea after eight hours.![]() NOTICE – Curtis strongly recommends that the water supply valve, behind the unit, be turned off during non-business hours.
NOTICE – Curtis strongly recommends that the water supply valve, behind the unit, be turned off during non-business hours.
The liquid concentrate tea/coffee dispenser is factory preset for optimal performance.
- Make sure that the appropriate liquid concentrate bag(s) are connected to the unit. See the instructions below.

- The main water supply and the water valve on the back of the unit should both be in the on position.

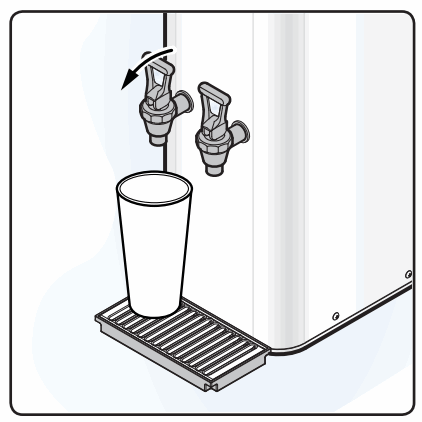
- Hold a cup under the faucet nd pull forward on the handle to dispense.
Changing/Attaching the Liquid Concentrate Bag
Reload the concentrate bag and re-prime the unit immediately when the bag is empty.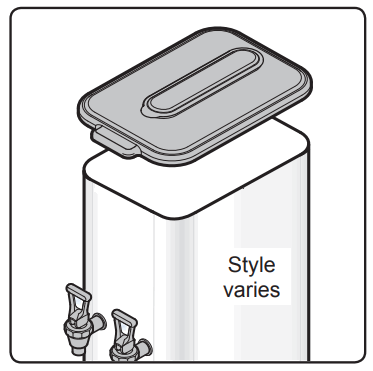
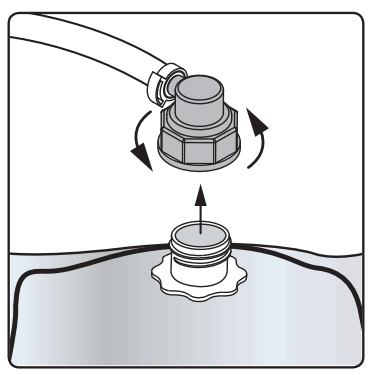
- Remove the top cover from the TCC dispenser and pull the empty concentrate bag and hose out.

- On units with a Scholle type connector, unscrew the connector from the bag and pull it up and off.

- On units with a QCD type connector, release it bypulling up on the hose and cap assembly on the opposite sides. The plunger will pop up in the center of the QCD. Slide sideways to remove.
Changing/Attaching the Liquid Concentrate Bag (continued)
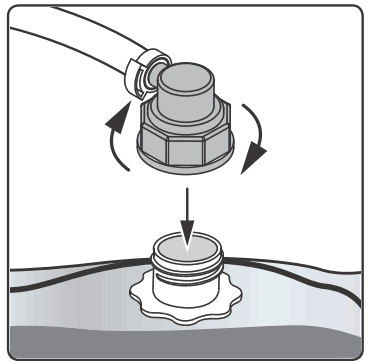
- Place the new tea/coffee concentrate bag on the counter next to the TCC dispenser. Remove the shipping cap on the spout.

- On units equipped with a Scholle type connector,place the connector over the bag spout and thread the connector all the way into the spout. Skip to step 8.

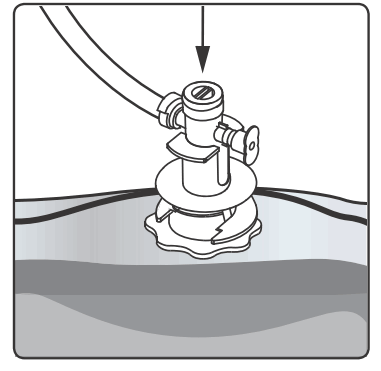
- On units with a QCD connector, place the QCD next to the spout, then slide sideways until it stops.

- Push in on the QCD plunger until it snaps into place.

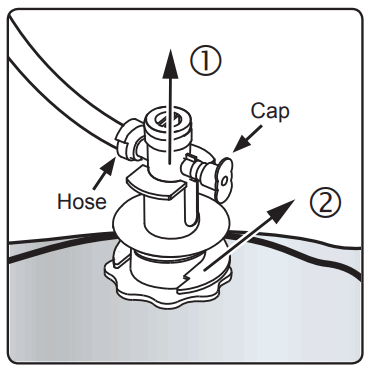
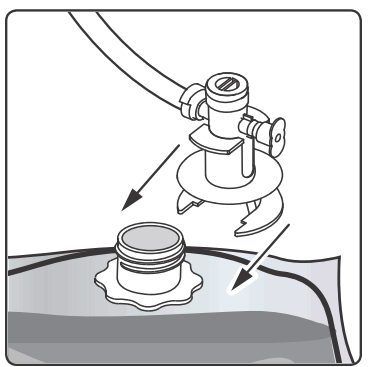
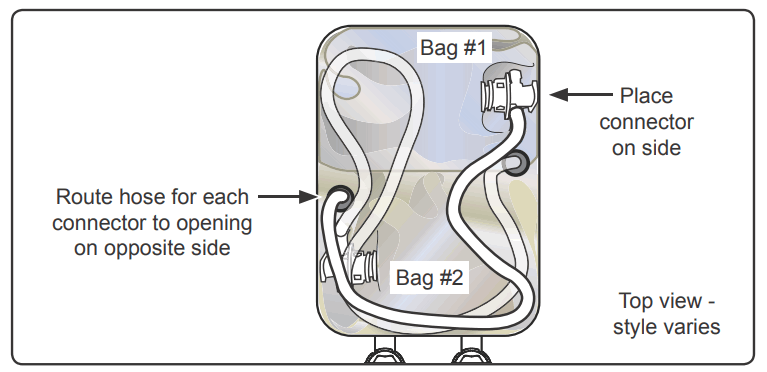
- Carefully lift the bag and set it inside the dispenser. Rest the tubing on top of the bag. Route the tubing to the opposite product intake hple on the floor dispenser as shown.

- Replace the top cover and dispense beverage fromeach faucet until darker product starts to appear (approximately 5 to 10 seconds).

Mixing Valve Adjustment
- Usually, the factory settings do not require adjustment. However, for customers who wish to adjust the flavor of the drink, the mixing valve changes the water to concentrate ratio. This valve is very sensitive. Only slight rotation of the mixing rod is needed to change the ratio (1/16th to 1/8th of a turn). The factory setting is approximately 7:1 ratio, which will result in a 5 to 8 percent brix when sweet tea concentrate is used.
 NOTICE – Do not rotate the adjusting rod more than 2 full turns from the closed position. More turns will cause the adjustment rod to disengage from the mixing valve, resulting in a leak.
 - Tilt the dispenser on its side.
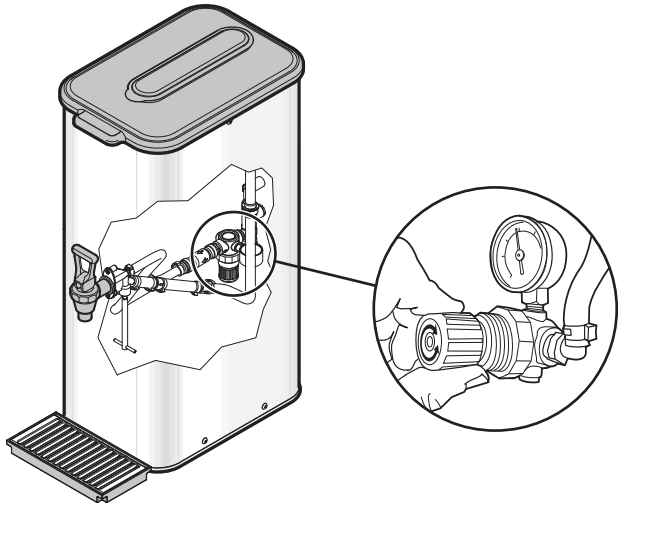
- Before adjusting the mixing valve, check to make sure that the pressure regulator is set to 15 psi. If the regulator is not properly set, the mixing valve will not work properly. See Setting the Pressure Regulator for instructions.
- Locate the adjusting rod (see diagram below). Turn it counter-clockwise (looking from the bottom) for a stronger concentration – turn clockwise for a weaker concentration. Taste the tea/coffee with each adjustment to determine the desired consistency.
 Setting the Pressure Regulator
![]() NOTICE – Do not exceed 25 psi (static). Equipment failure or leakage will result.
NOTICE – Do not exceed 25 psi (static). Equipment failure or leakage will result.![]() IMPORTANT – Do not use the pressure regulator alone to adjust the taste/brix level. Confirm that the regulator is properly set, then adjust the taste/brix level using the Mixing Valve Adjustment instructions.
IMPORTANT – Do not use the pressure regulator alone to adjust the taste/brix level. Confirm that the regulator is properly set, then adjust the taste/brix level using the Mixing Valve Adjustment instructions.
The purpose of the regulator is to provide uniform water pressure, so that the mixing valve can produce a stable and uniform blend of concentrate and water, and also to protect the hydraulics of the dispensing unit from excessive line pressure.
- Tilt the dispenser on its side.
- Locate the regulator adjustment knob and turn it until the pressure level on the gauge reads 15 psi.

CLEANING INSTRUCTIONS
NOTIbCE – Do not use cleaning liquids, compounds or powders containing chlorine (bleach) or corrosives.
USE OF THESE PRODUCTS WILL VOID
THE WARRANTY. Do not immerse the unit in water or any other liquid.
NOTICE – Do not use cleaning liquids, compounds or powders containing chlorine (bleach) or corrosives. These products promote corrosion and will damage the finishes. USE OF THESE PRODUCTS WILL VOID THE WARRANTY. Do not immerse the unit in water or any other liquid.
Daily Cleaning
- Prepare a mid cleaning solution of dish-washing detergent and warm water.
- Wipe any spills, dust or debris from the exterior surfaces, with a damp cloth. Apply a stainless steel polish to prevent scratches.
- Turn off the water supply at the valve behind the unit
- Open the faucet to relieve pressure in the system lines.
- Remove the top cover and clean with the detergent solution.
- Clean the faucet assembly:
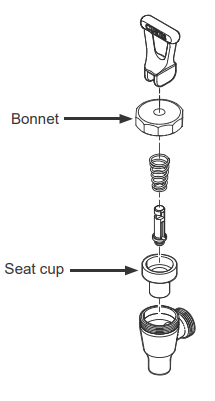
• Remove the handle/seat cup assembly from the faucet by holding the bonnet and unscrewing.
• Inspect the seat cup. Replace if torn or damaged.
• Clean the bonnet and silicone seat cup.
• Use a spiral brush soaked in cleaning solution to clean inside the faucet body. - Rinse and dry parts that were removed. Assemble the dry parts onto the unit.

Weekly Cleaning and Sanitizing
The following cleaning process requires a mild solution of dish-washing detergent and warm water for washing, and for sanitizing, One-Pro Beverage Equipment Cleaner (Curtis PN WC-79001) or BevClean Bag-in-Box (BIB) type cleaning solution. Note: For BevClean BIB solution, multi-outlet manifolds are available for sanitizing up to eight beverage lines at one time.
- Turn on the water supply to the dispenser.
- Remove the QCD (quick disconnect) from each concentrate bag.
- Pull the cap off of the QCD(s) and place in a bucket containing the mild detergent solution.
- Place a large empty container under the faucet.
- Open the faucet and dispense until only the detergent solution is being dispensed. Repeat for additional faucets.
- Allow the dispenser to sit for 20 minutes before proceeding to step 7. continued…
 Weekly Cleaning and Sanitizing (cont.)
 - Flush the system by placing the QCD(s) in a bucket the faucet(s) until all the detergent solution has been
- Remove the QCD(s) from the bucket. If using BevClean BIB sanitizer, replace the QCD cap(s).
 Sanitizing
 - Set up for the sanitizing process:
If using BevClean, place the BIB sanitizer container(s) next to the TCC dispenser (one for each faucet). Pull the spout from the sanitizer BIB through the marked area. Remove the protective cap from the spout. Since the BIB has an inner seal the cap can be removed without spillage. Snap the QCD onto the bag spout(s) and push the plunger on the end in until it clicks into place.
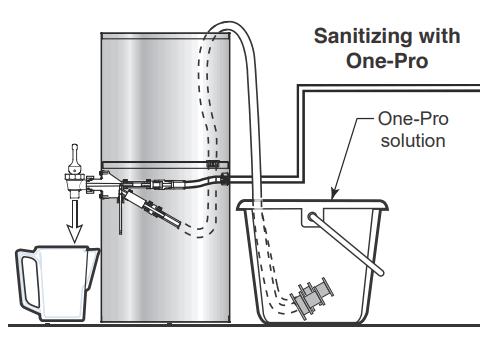
If using One-Pro Beverage Equipment Cleaner, mix 1 oz. (28 g.) of cleaner in a 5 gal. (19 L) bucket of hot water (122°F/50°C min.). - With an empty container underneath, open the faucets

 DO NOT FLUSH. Allow the sanitizing solution to sit in the system lines overnight before proceeding with the line flushing steps below.
 - Flush the sanitizer out of the unit:
If using BevClean, remove the QCD(s) from the BevClean BIB and reattach the concentrated BIB product. Open the faucet(s) and allow fluid to run out until mixed beverage flows from each faucet. If using One-Pro cleaner, flush out the system by placing the QCD(s) in a bucket filled with clean hot water (no cleaning solution). Open the faucet(s) and flush the lines until 2 gal. (8 L) of water has been flushed through each line. Remove the QCD(s) from the bucket and replace the QCD cap(s). Reattach the concentrated BIB product. Open the dispensing faucet(s) in front of the dispenser and allow fluid to run out until mixed beverage flows from each faucet.
 Weekly Cleaning and Sanitizing (cont.)
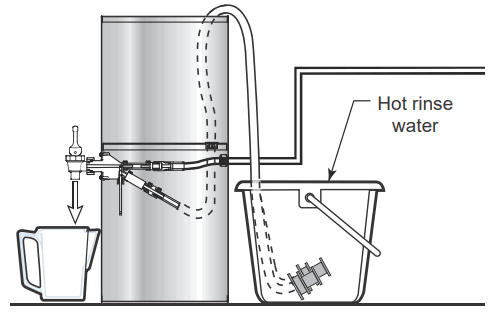 Sanitizing
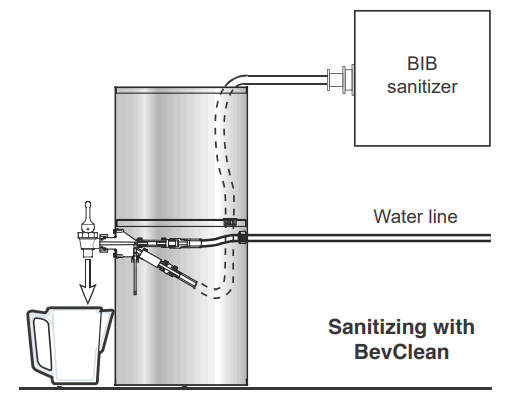
 If using One-Pro cleaner, flush out the system by placing the QCD(s) in a bucket filled with clean hot water (no cleaning solution). Open the faucet(s) and flush the lines until 2 gal. (8 L) of water has been flushed through each line. Remove the QCD(s) from the bucket and replace the QCD cap(s). Reattach the concentrated BIB product. Open the dispensing faucet(s) in front of the dispenser and allow fluid to run out until mixed beverage flows from each faucet.
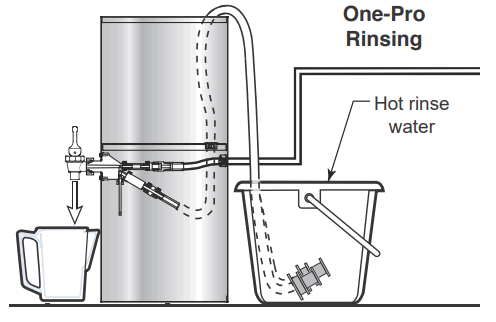
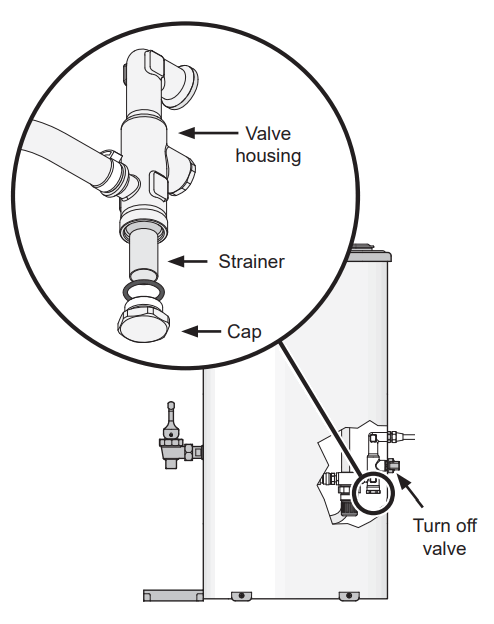
Cleaning The Strainer – Monthly or As Needed
- Turn off the water supply valve on the back of the unit. Open one of the dispensing faucets to relieve pressure in the tubing system.
- Tilt the dispenser on its side.
- Locate the strainer cap, located on the bottom of the water supply valve. Use a pair of pliers to grab the valve housing while removing the strainer cap with an adjustable wrench.
- Remove the wire strainer and clean any debris out of the valve housing.
- Use a spiral bristled brush to clean inside the strainer.
- Rinse the strainer and reinsert it into the valve housing.
- Replace the strainer cap.
- Tilt the unit back into place and turn on the water supply valve.
ROUGH-IN DRAWINGS
TCC1[C]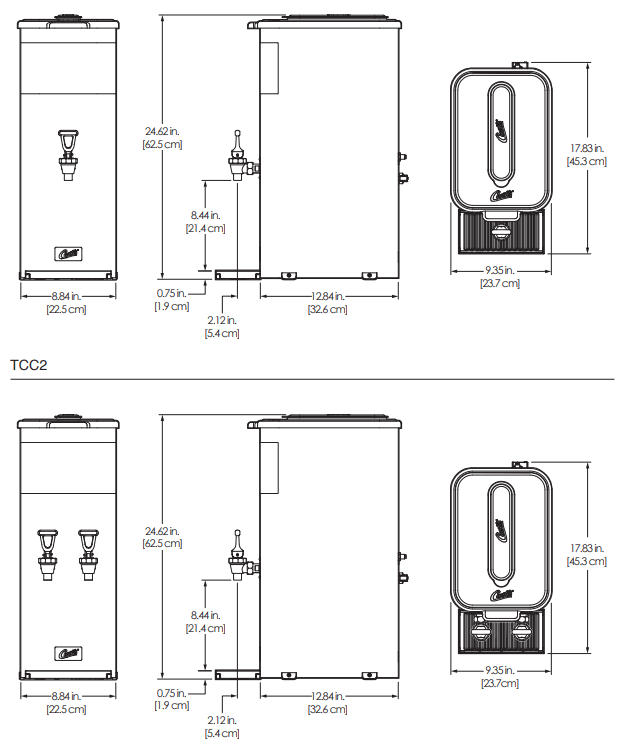 TCC3
TCC3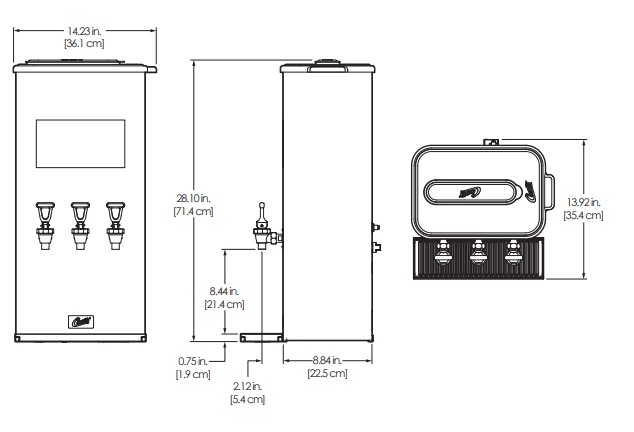
ILLUSTRATED PARTS/RECOMMENDED PARTS
TCC1[C]/2/3 – Outer Chassis – Exploded View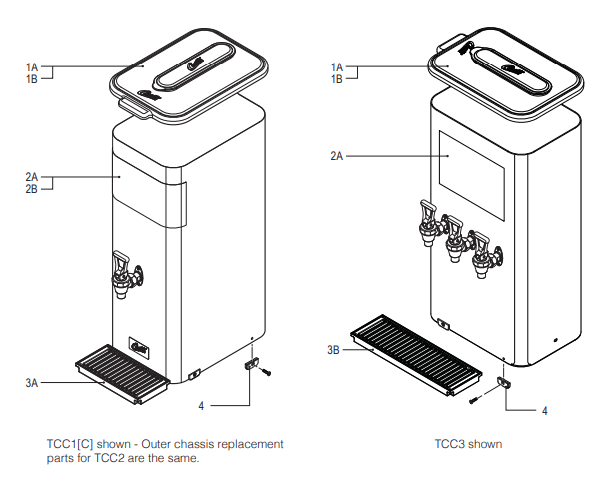 TCC1[C]/2/3 – Outer Chassis – Parts List
| ITEM # | PART # | DESCRIPTION |
| 1A | WC-5683 | LID, SOLID/BREW-THRU (OPTIONAL USES) TCO’S |
| 1B | WC-5683-101 | LID, SOLID/BREW-THRU BLUE TCC/TCO (OPTIONAL) |
| 2A | WC-384711’3’4 | LABEL FRONT TCO ICED TEA GENERIC |
| 2B | WC-384722 | LABEL FRONT TCOC ICED COFFEE GENERIC |
1TCC1,2TCC1C,3TCC2,4TCC3
Recommended Parts to Stock
| ITEM # | PART # | DESCRIPTION |
| lA | WC-5683 | LID, SOLID/BREW-THRU (OPTIONAL USES) IGO’S |
| 3A | DTP-08 | DRIP TRAY. ASSY PLASTIC 8″ |
| 3B | DTP-13 | DRIP TRAY. ASSY PLASTIC 13″ |
| ITEM # | PART # | DESCRIPTION |
| 3A | DTP-081’2’3 | DRIP TRAY, ASSY PLASTIC 8″ |
| 3B | DTP-134 | DRIP TRAY, ASSY PLASTIC 13″ |
| 4 | WC-3531 | LEG, PLASTIC GLIDE TCN |
TCC1[C] Mixing/Dispensing System – Exploded View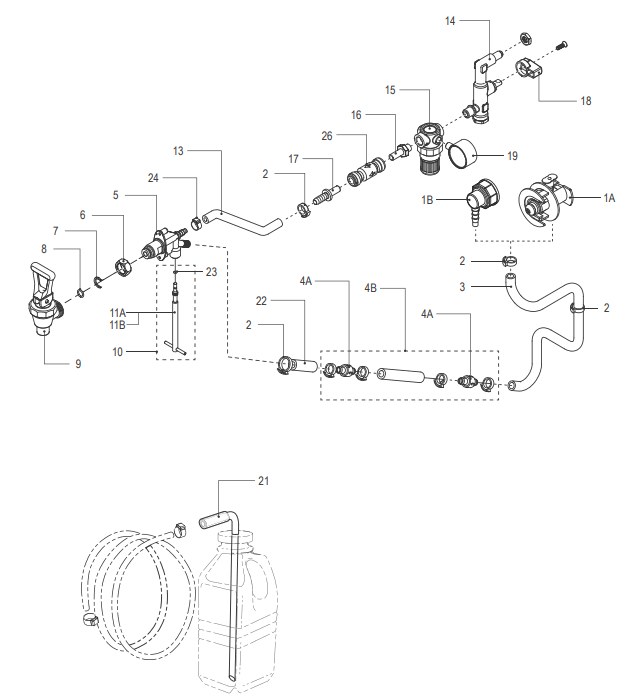 TCC2 Mixing/Dispensing System – Exploded View
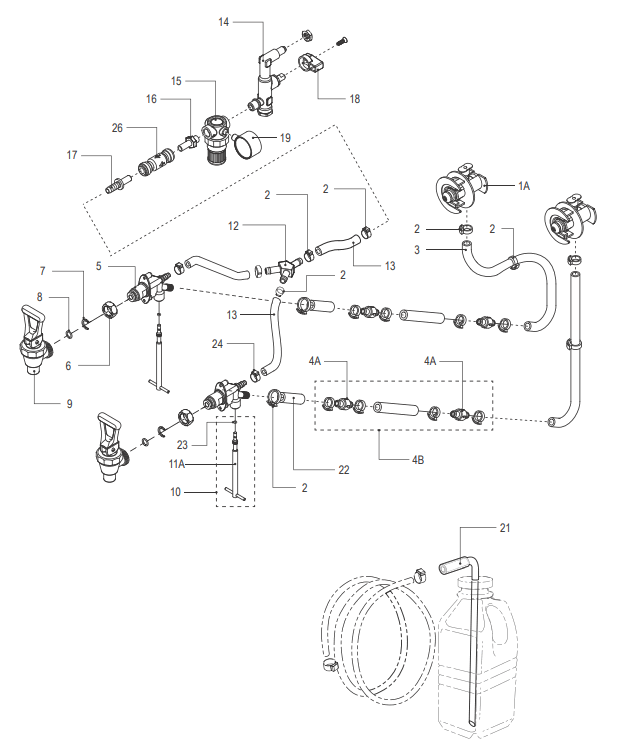 TCC3 Mixing/Dispensing System – Exploded View
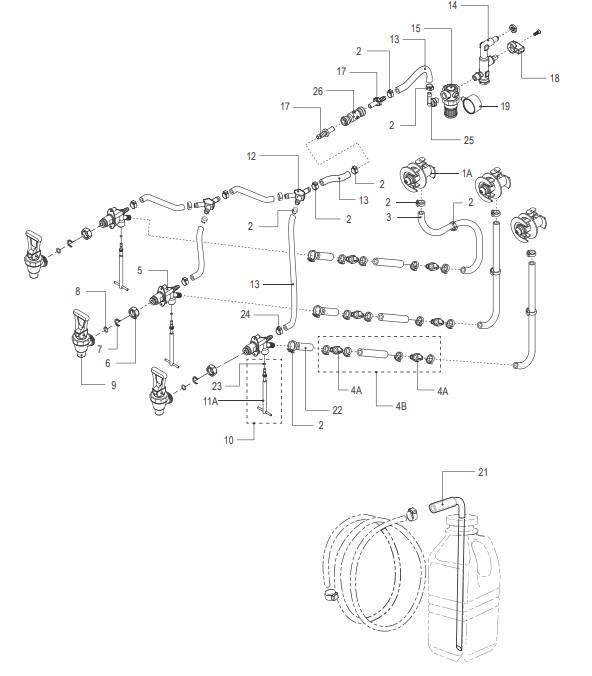
ILLUSTRATED PARTS/RECOMMENDED PARTS
| ITEM # | PART # | DESCRIPTION |
| 1A | WC-86531’3’4 | QCD, LIQUID BOX BAG CONNECTOR TCC1/TCC2 |
| 1B | WC-86542 | CONNECTOR, SCHOLLE #1910L BLACK FOR .38 ID TUBE |
| 2 | WC-43002 | CLAMP, HOSE SNAP NYLON .525/.605 TCC |
| 3 | WC-53116 | TUBE, CLEAR BEV 5/8 0.D X 3/8 I.D SWEETENER SYSTEMS |
| 4A | WC-37293 | KIT, CHECK VALVE TCC (INCLUDES 2 CLAMPS) |
| 4B | WC-37288 | KIT, CHECK VALVE AND INSTRUCTIONS TCCS |
| 5 | WC-894 | VALVE, MIXING TCC |
| 6 | WC-1903 | NUT, UNION SHANK WB-10/ WB-10-60/WB-30-12 |
| 7 | WC-1906 | “C” RING .917 X .760 X .090 TT-3 TC’S |
| 8 | WC-4320 | O’RING, 0.487I.D.x 0.6930D x0.103CS BUNA-N #112 |
| 9 | WC-1829 | FAUCET, ASSY TCC |
| 10 | WC-373121’3’4 | KIT, ADJUSTING ROD & 0-RING TCC’S FOR TEA |
| 11A | WC-290691’3’4 | TREOAD, ADJUSTABLE MIXING VALVE TCC’S FOR |
| 11B | WC-290702 | ROD, ADJUSTABLE MIXING VALVE TCC’S FOR COFFEE |
| 12 | WC-22193’4 | Y- FITTING, BARBED 1/4X1/4X1/4 WHITE |
| 13 | WC-53113 | TUBING, .25″ ID X .50″ OD BRAIDED SILICONE 60 DUROMETER |
| ITEM # | PART # | DESCRIPTION |
| 14 | WC-12011 | VALVE, STRAINER ANGLED ALL TCC’S |
| 15 | WC-811-101 | REGULATOR, PRESSURE 1/4″ 0-50 PSIG PLASTIC |
| 16 | WC-24511’2’3 | ADAPTER, 3/8 OD STEM X 1/4 NPTF JOHN GUEST |
| 17 | WC 2445 | STEM, 3/8 BARB X 3/8 STEM SWEETENER SYSTEMS |
| 18 | WC-12011-101 | CAP, HANDLE PLASTIC ALL TCC’S |
| 19 | WC-569 | GAUGE, REGULATOR 0-30 PSI |
| 20 | WC-43059 | CLAMP, HOSE SNAP NYLON .616/.707 |
| 21 | WC-53117-101K. | KIT, 1 GALLON JAR PRODUCT TUBE ASSEMBLY |
| 22 | WC-53114 | TUBING, .375″ ID X .625″ OD X 1011 BRD SILICONE 60 DUROMETER |
| 23 | WC-43084 | O’RING, .070″ ID X .070W BUNA-N TCC1/TCC2 |
| 24 | WC-14022 | CLAMP, TUBING 15.3-18.5mm SS OETIKER |
| 25 | WC-24354 | ELBOW, 1/4″ MNPT X 1/4 BARB NATURAL KYARR TCC |
| 26 | WC-2452 | VALVE, CHECK 3/8 OD TUBE X 3/8 OD TUBE JOHN GUEST |
1TCC1,TCC1C3TCC24TCC3
* OPTIONAL
Recommended Parts to Stock
| ITEM # | PART # | DESCRIPTION |
| 1A | WC-8653 | QCD, LIQUID BOX BAG CONNECTOR TCC1/TCC2 |
| 3 | WC-53116 | TUBE, CLEAR BEV 5/8 0.D X 3/8 I.D SWEETENER SYSTEMS |
| 4A | WC-37293 | KIT, CHECK VALVE TCC |
| 4B | WC-37288 | KIT, CHECK VALVE AND INSTRUCTIONS TCCS |
| 5 | WC-894 | VALVE, MIXING TCC |
| 6 | WC-1903 | NUT, UNION SHANK WB-10/ WB-10-60/WB-30-12 |
| 7 | WC-1906 | “C” RING .917 X .760 X .090 TT-3 TC’S |
| 8 | WC-4320 | O’RING, 0.487I.D.x 0.6930D x0.103CS BUNA-N #112 |
| 9 | WC-1829 | FAUCET, ASSY TCC |
| ITEM # | PART # | DESCRIPTION |
| 12 | WC-2219 | Y- FITTING. BARBED 1/4X1/4X1/4 WHITE |
| 13 | WC-53113 | TUBING. .25″ ID X .50″ OD BRAIDED SILICONE 60 DUROMETER |
| 19 | WC-569 | GAUGE. REGULATOR 0-30 PSI |
| 22 | WC-53114 | TUBING. .375″ ID X .625″ OD X 1011 BRD SILICONE 60 DUROMETER |
| 23 | WC-43084 | O’RING. .070″ ID X .070W BUNA-N TCC1fTCC2 |
TROUBLESHOOTING GUIDE
Troubleshooting Guidelines This troubleshooting guide identifies some, but not all, of the possible causes for common problems that can occu,
Nothing Comes Out of the Faucet
- Check to make sure that ),Q112 the water supply valve for the water supply line gis, the valve on the back of the unit are turned on.
- Check for a clogged water supply filter.
Only Water Flows from t. Faucet, Not Tea/Coffee
- Check to make sure that the concentrate bag is not empty.
- Check to make sure that the concentrate supply hose is not kinked or blocked. Trace the hose all the way from the concentrate bag to the mixing valve.
- Check to make .re that the mixing valve is not completely closed. If it is, turn it 1/4 counter-clockwise (looking from the bottom of the unit). 4 Check to see if the check valve in the concentrate line is stuck closed.
Tea/Coffee Is Weak
- Check to see if the mixing valve is out of adjustment. See Mixing Valve Adjustment in the OPERATING INSTRUCTIONS. 2 Check to see if the check valve in the concentrate line is stuck closed. Check to make sure that the valve is installed in the correct orientation (arrow must point in direction of flow).
Tea/Cottee Coming from the Faucet Is Foamy or Bubbly 1 Make sure all air is purged from the concentrate bag. - Check the 0-ring/gasket on the concentrate bag connector. A worn out 0-ring/gasket can allow air to be sucked into the hose.
- Check for lose clamps on the concentrate hose. All clamps must be tight. Check all of the clamps tracing from the concentrate bag to the mixing valve.
Faucet Drips Constantly
- Check for worn or dirty faucet seat cup. See CL.NING INSTRUCTIONS.
- Check to make sure that the pressure regulator is set to 15 psi. If the regulator cannot be adjusted down to 15 psi, check to make sure that the incoming pressure does not exceed 90 psi. If it does, an external pressure regulator may be required to lower the incoming pressure. If the pressure going into the regulator is within specifications (less than 90 psi), but cannot be adjusted down to 15 psi, the regulator is probably defective.
PRODUCT WARRANTY
Wilbur Curtis Co., Inc. certifies that its products are free from defects in material and workmanship under normal use. The following limited warranties and conditions apply: 3 years, parts and labor, from original date of purchase on digital control boards
2 years, parts, from original date of purchase on all other electrical components, fittings and tubing
1 year, labor, from original date of purchase on all other electrical components, fittings and tubing Additionally, Wilbur Curtis Co., Inc. warrants its grinding burrs for four (4) years from the date of purchase. Stainless steel components are warranted for two (2) years from the date of purchase against leaking or pitting. Replacement parts are warranted for ninety (90) days frorn the date of purchase or for the remainder of the limited warranty period of the equipment in which the component is installed.
All in-warranty service calls most have prior authorization. For authorization, call the Technical Support Department at 800-995-0417. Additional conditions rnay apply. Go to www.wilburcurtis.com to view the full product warranty information.
CONDITIONS & EXCEPTIONS
The warranty covers original equipment at time of purchase only. Wilbur Curtis Co., Inc., assumes no responsibility for substitute replacement pads installed on Curtis equipment that have not been purchased from Wilbur Curtis Co., Inc. Wilbur Curtis Co., Inc. will not accept any responsibility if the following conditions are not rnet. The warranty does not cover:
- Adjustments and cleaning: The resetting of safety thermostats and circuit breakers, programming and temperature adjustments are the responsibility of the equipment owner The owner is responsible for proper cleaning and regular maintenance of this equipment.
- Replacement of items subject to normal use and wear: This shall include, but is not limited to, spray heads, faucets, light bulbs, shear disks, “0” rings, gaskets, silicone tubing, silicone elbows, canister assemblies, whipper chambers and plates, mixing bowls, agitation assemblies and whipper propellers.
The warranty is void under the following circumstances: - Improper operation of equipment: The equipment must be used for its designed and intended purpose and function.
- Improper installation of equipment: This equipment must be installed by a professional technician and must comply with all local elec-trical, mechanical and plumbing codes.
- Improper voltage: Equipment must be installed at the voltage stated on the serial plate supplied with this equipment.
- Improper water supply: This includes, but is not limited to, excessive or low water pressure and inadequate or fluctuating water flow rate.
- Damaged in transit: Equipment damaged in transit is the responsibility of the freight company and a claim should be made with the canier
- Abuse or neglect (including failure to periodically clean or remove lime accumulations): The manufacturer is not responsible for variation in equipment operation due to excessive lime or local water conditions. The equipment must be maintained according to the manufacturer’s recommendations.
- Unauthorized repair or modification: This equipment must be serviced only by qualified service technicians, using factory specified parts to factory specifications.
- Modified/Missing Serial Tag: The serial number label (tag) must not be defaced or removed.
Repairs andlor Replacements are subject to Curtis’ decision that the workmanship or parts were faulty and the defects showed up under normal use. All labor shall be performed during regular working hours. Overtime charges are the responsibility of the owner. Charges incurred by delays, waiting time, or operating restrictions that hinder the service technician’s ability to perform service is the responsibility of the owner of the equipment. This includes institutional and correctional facilities. Wilbur Curtis Co., Inc. will allow up to 100 miles, round trip, per in-warranty service .11.
Return Merchandise Authorization (RMA): All claims under this warranty must be submitted to the Wilbur Curtis Technical Support Departrnent prior to performing any repair work or return of this equipment to the factory. All returned equipment must be properly re-packaged in the original carton and received by Curtis within 45 days following the issuance of a RMA. No units will be accepted if they are damaged in transit due to improper packaging. NO UNITS OR PARTS WILL BE ACCEPTED WITHOUT A RETURN MERCHANDISE AUTHORIZATION (RMA). THE RMA NUMBER MUST BE MARKED ON THE CARTON OR SHIPPING LABEL. All warranty claims must be submitted within 60 days of service. Invoices will not be processed or accepted without a RMA number. Any defective parts must be returned in order for warranty invoices to be processed and approved. All in-warranty service calls must be performed by an authorized service agent. Call the Wilbur Curtis Technical Support Department to find an agent near you.
Contact Information
Wilbur Curtis Co., Inc.
6913 Acco Street
Montebello, CA 90640 US
Phone: 323-837-2300
Toll Free: 800-421-6150
Email: [email protected]
Web: www.wilburcurtis.com
A.M. – 4:00 P.M. PT
Email: [email protected]


