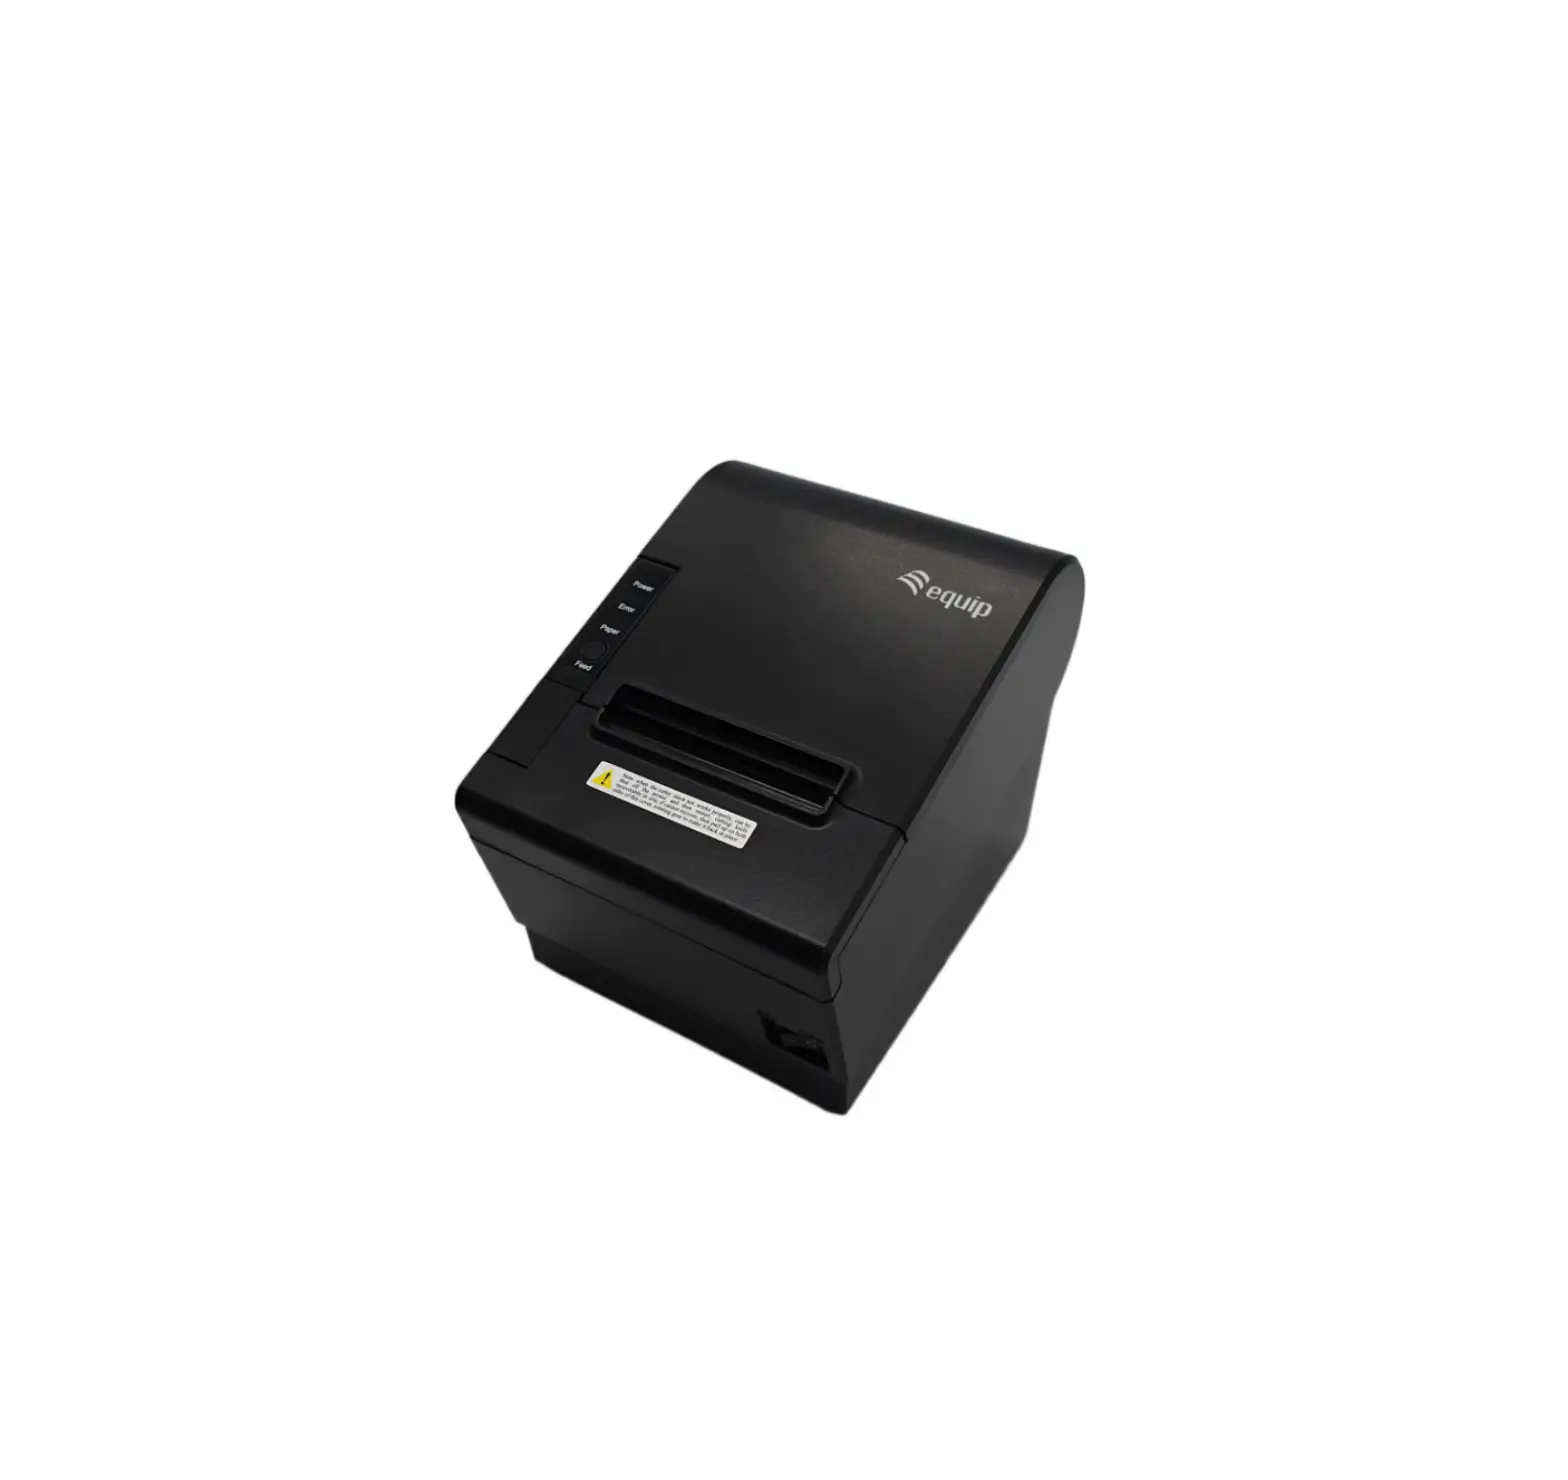
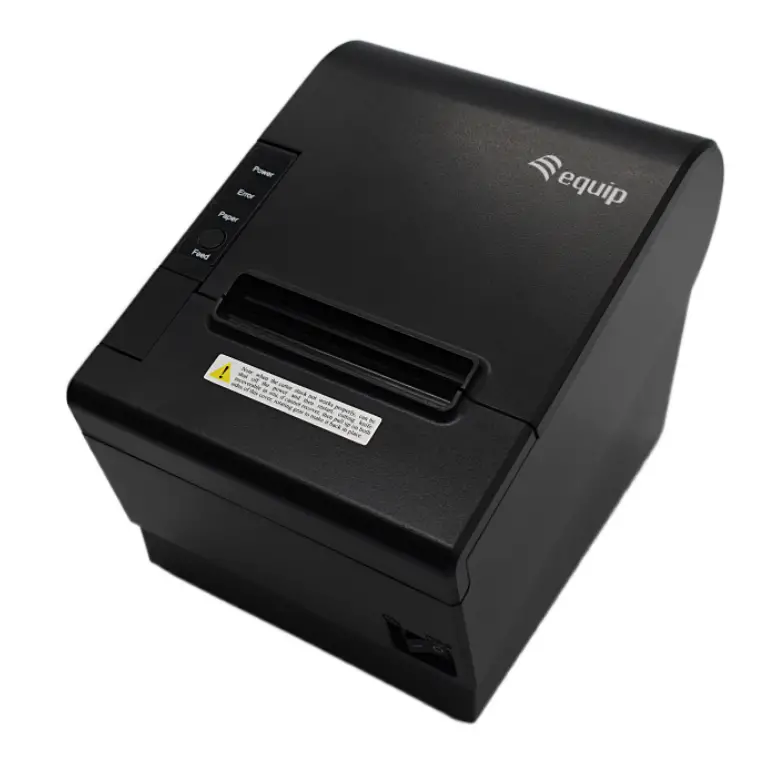
equip 351002 80mm POS Thermal Printer
Introduction
Brief introduction
Equip® thermal POS printer with auto-cutter has good printing quality, high printing speed and high stability,
which is widely used in POS system, food service industry and many other fields.
It offers drivers for WINDOWS and LINUX operating systems.
The supported operating systems are as below:
WINDOWS XP
WINDOWS 7 32/64
WINDOWS 8
WINDOWS 10
UBUNTU 12.04 32/64
UBUNTU 14.04 32/64
MAC OS
Main features
- Low noise direct thermal printing
- Printing density: 8 dots/mm(203DPI)
- Printing width: 72mm; Paper width: 80mm
- Auto cutter with long lifespan
- With cash drawer interface
- 351002: USB connection
- 351003: USB, Serial, Ethernet connection
- 351004: USB, Bluetooth, WiFi connection
- Metal through shaft, quality more stable
- Metal paper cover, good texture
Specification
| Item | Parameter | |
| Printing parameter | Printing method | Thermal printing |
| Resolution | 203DPI,8 dots/mm | |
| Printing width | 72mm(576 dots) | |
| Printing speed | 351002: 150 mm/s , 351003: 150 mm/s , 351004: 250 mm/s | |
| Interfaces | 351002: USB, cash drawer 351003: USB, Serial, Ethernet, cash drawer 351004: USB, Bluetooth, WiFi, cash drawer | |
| Page mode | / | Support |
| Command set | / | ESC/POS compatible commands |
| Storage | RAM | RAM 8M bytes, receive buffer area 1M bytes |
| FLASH | FLASH 4M bytes, NV bitmap 256K bytes | |
| characters | Chinese | GB18030 24×24 |
| Words, figures | ASCII 9×17,12×24 | |
| User-defined | Support | |
| Code pages | Optional international character sets 45 TRADITIONAL CHINESE CHINESE CP437 [U.S.A., Standard Europe] Katakana CP850 [Multilingual] CP860 [Portuguese] CP863 [Canadian-French] CP865 [Nordic] WCP1251 [Cyrillic] CP866 Cyrillic #2 MIK[Cyrillic /Bulgarian] CP755 [East Europe Latvian 2] Iran CP862 [Hebrew] WCP1252 Latin I WCP1253 [Greek] CP852 [Latina 2] CP858 Multilingual Latin Ⅰ+Euro) Iran II Latvian CP864 [Arabic] ISO-8859-1 [West Europe] CP737 [Greek] WCP1257 [Baltic] Thai CP720[Arabic] | |
| CP855 CP857[Turkish] WCP1250[Central Europe] CP775 WCP1254[Turkish] WCP1255[Hebrew] WCP1256[Arabic] WCP1258[Vietnam] ISO-8859-2[Latin 2] ISO-8859-3[Latin 3] ISO-8859-4[Baltic] ISO-8859-5[Cyrillic] ISO-8859-6[Arabic] ISO-8859-7[Greek] ISO-8859-8[Hebrew] ISO-8859-9[Turkish] ISO-8859-15 [Latin 3] Thai2 CP856 | ||
| Chart | / | Supports different density dots and images printings |
| Supports grating bitmap printing | ||
| Supports download bitmap printing, every bitmap size should less than 256K, and the total capacity of download bitmap is 256K. | ||
| Bar codes | 1D | UPC-A、UPC-E、EAN-8、EAN13、CODE39、ITF、CODEBAR、CODE128、CODE93 |
| 2D | PDF417、QR Code | |
| Detection function | Sensor | Paper out, cover opened |
| LED indicator | Power indicator | Green |
| Paper out indicator | Red | |
| Error indicator | Red | |
| Paper Requirement | Type | Standard thermal receipt paper |
| Width | 79.5±0.5mm | |
| Thickness | 0.056~0.1mm | |
| Diameter | 80mm(Max.) | |
| Physical characteristics | Paper loading | Easy paper loading |
| Paper cutting | Manual or automatically cut paper | |
| Operating condition | -10℃ ~ 50℃,25% ~ 80%RH | |
| Storage condition | ~40℃ ~ 70℃,≤93%RH(40℃) | |
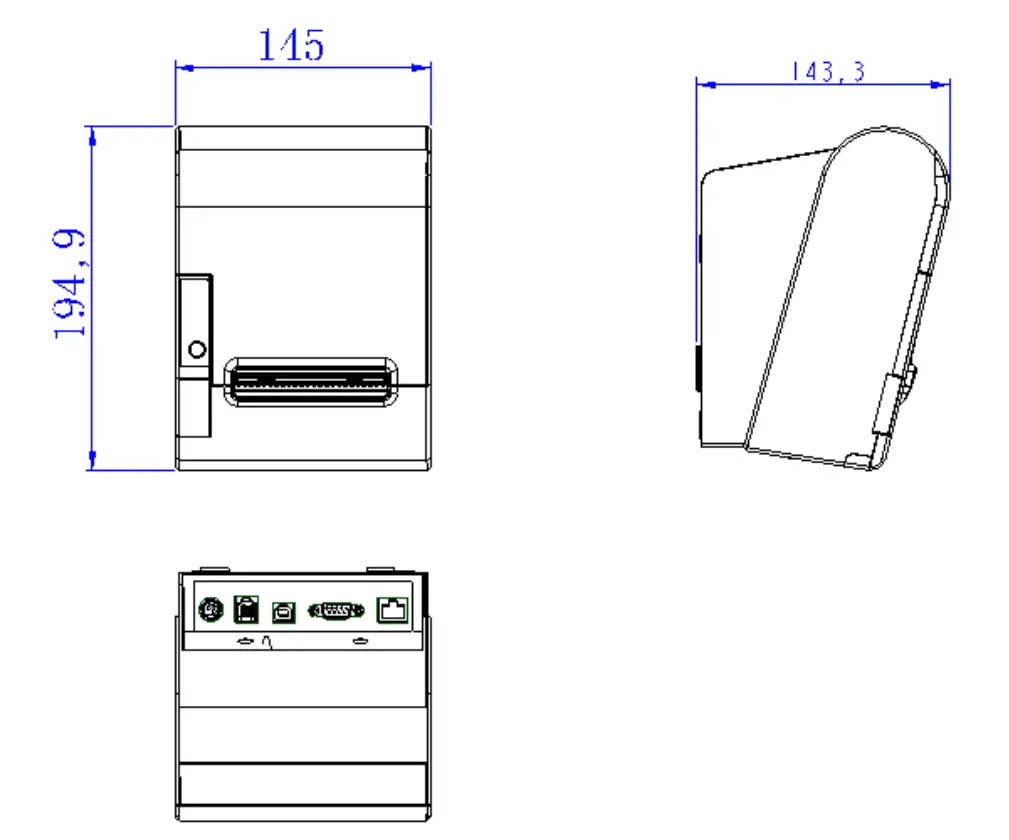
| Outline dimension | 195mm×145mm×143.3mm(L×W×H) | |
| Weight | 2Kg | |
| Reliability | TPH life | 100km |
| Cutter life | 1,000,000 times | |
| Motor life | 360,000 hours | |
| Software function | Driver procedure | Windows(WIN7/WIN8/WIN10/Vista/XP/2000) Ubuntu 12.04 32/64, Ubuntu 14.04 32/64 MAC OS |
Printing material requirements
Paper parameters
- Paper type: thermal receipt paper/thermal black mark paper
- Paper width:80±0.5 mm
- Paper roll diameter: 80 mm (Max.)
- Paper thickness:0.065 ~ 0.10mm
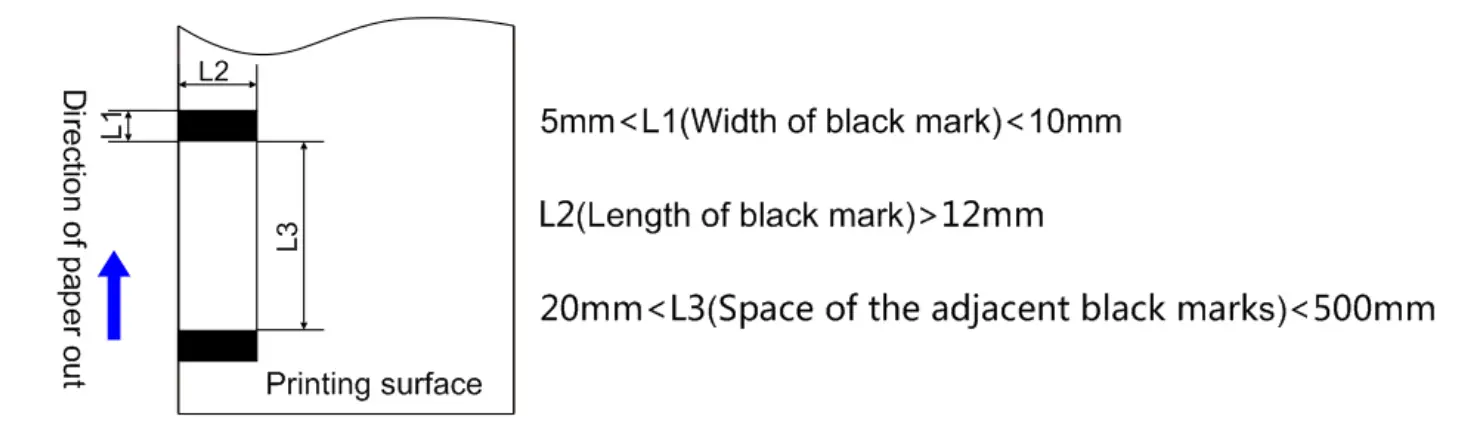
Mark paper parameters
Paper using attention
![]() Note:
Note:
- Please use good quality paper, otherwise, it will effect printing quality and even reduce printer head life.
- Don’t make the paper stick on axis.
- Paper will be fading out or reduced thermal sensitivity if it is polluted by chemical or oil, which will affect printing effects.
- Don’t use nail or hard things to clash printing paper, otherwise, it will be fade out.
- Paper will be fading out if the environment temperature exceeds 70°C. So please take note the temperature, humidity and illumination effects.
Printing and paper cutting position
Printing position

L1-Paper storehouse’s width: 82±0.5mm
L2-Effective printing width: 80mm
L3-Distance between print head to paper storehouse’s left edge (fixed width): 3±0.3mm
L4-Distance between print head to paper storehouse’s right edge (fixed width): 3±0.3mm
L5-Left margin: Default is 4mm
L6-Printing area width: it is set by commands (refer to programming manual). Default is 72mm.
L7-Right margin: Default is 4mm.
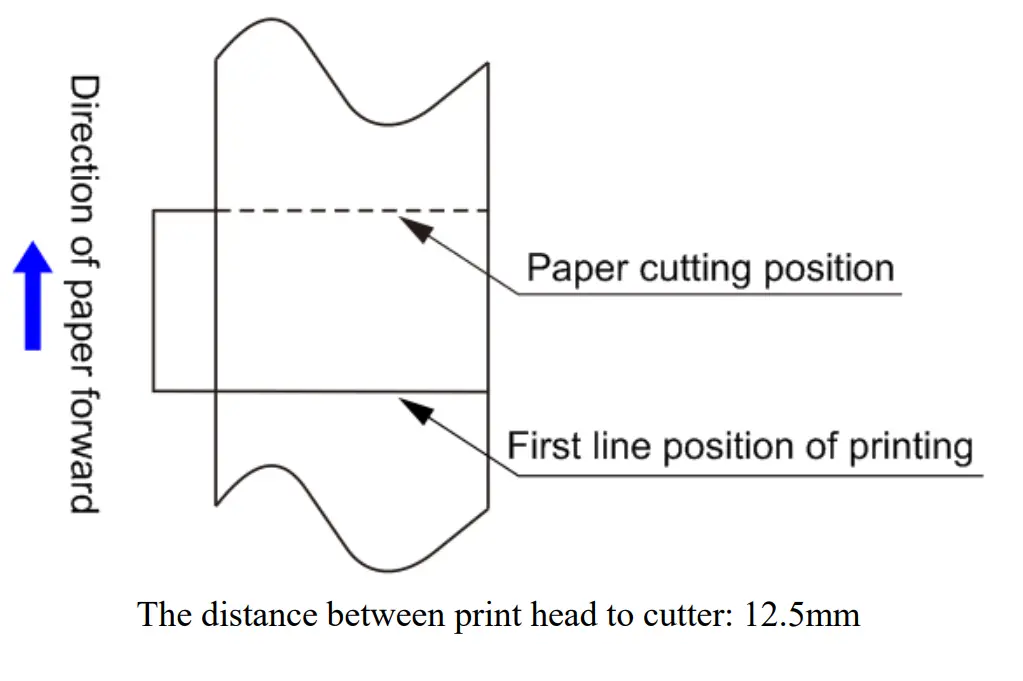
Paper cutting position
Appearance and components
Overview
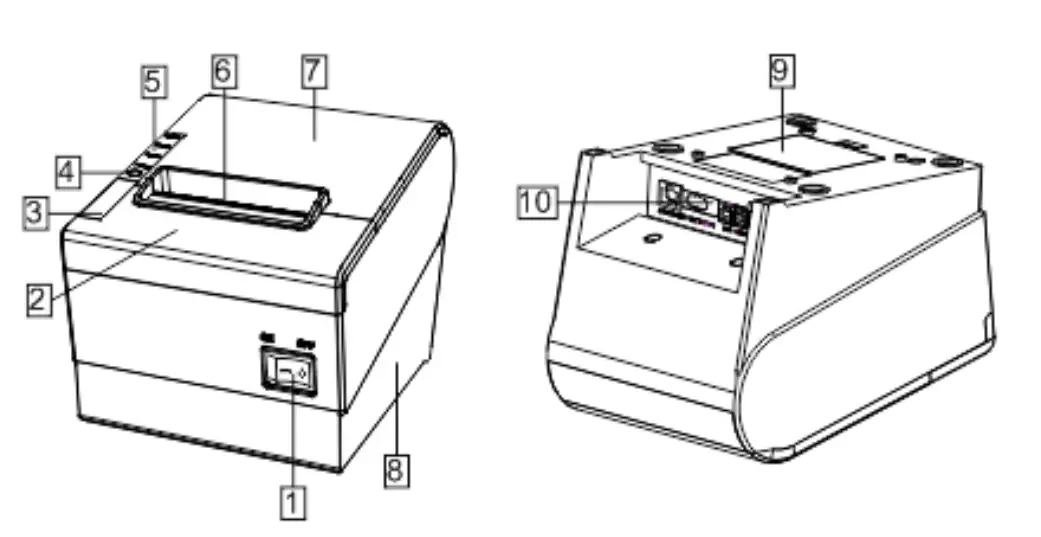
- Power switch
- Cover of Cutter
- Paper cover’s o,pen1ing button
- Paper feeding button
- lndicators(Power/Error/Paper)
- Mouth of paper out
- Cov,er of paper warehouse
- Bottom of printer
- Bottom cover(Optional)
- Power & Communication ports
Function instruction of components
- Power switch
Press “O” side to power off, press “I” side to power on. - Power indicator(green)
The indicator is on when power on, and it is off when power off. - Error indicator (Red)
Error indicator is on when it detects error. Such as: paper out, upper cover is open and cutter is stocked. - Paper indicator(red)
Paper out indicator is on when it detects the paper is out. Please put a new paper roll to printer inside then.
Indicator and buzzer instruction
- Function instruction of indicators and buzzer
| Name | Status | Instruction |
| Power indicator (Power) | On | Printer is power on |
| Off | Printer is power off | |
| Error indicator (Error) | On | Printer is in error status |
| Off | Printer is in normal status | |
| Paper out indicator Paper) | On | Printer is in paper out status |
| Off | Printer is in normal status |
| Description | Power Indicator | Error Indicator | Paper Indicator | Buzzer |
| Open printer cover | On | On | On | It rings 6 times by 1.5s. |
| Paper is enough | On | Off | Off | Silent |
| Paper out | On | On | On | It rings 3 times by 1.5s. |
Printer installation
Open the package
Please make sure everything is in good status when you open the package. Otherwise, please contact to distributor in time.
Requirements of installation position
- Put the printer on a stably place.
- Let the printer far away from water, fire, and sunlight.
- Avoid to put it on oscillatory and impassive place.
- Make sure to connect printer with ground safety
Connect to power adapter
- Make sure the printer is power off.
- Connect power adapter’s DC output plug to the printer.
- Connect power adapter’s AC input plug to a power outlet.
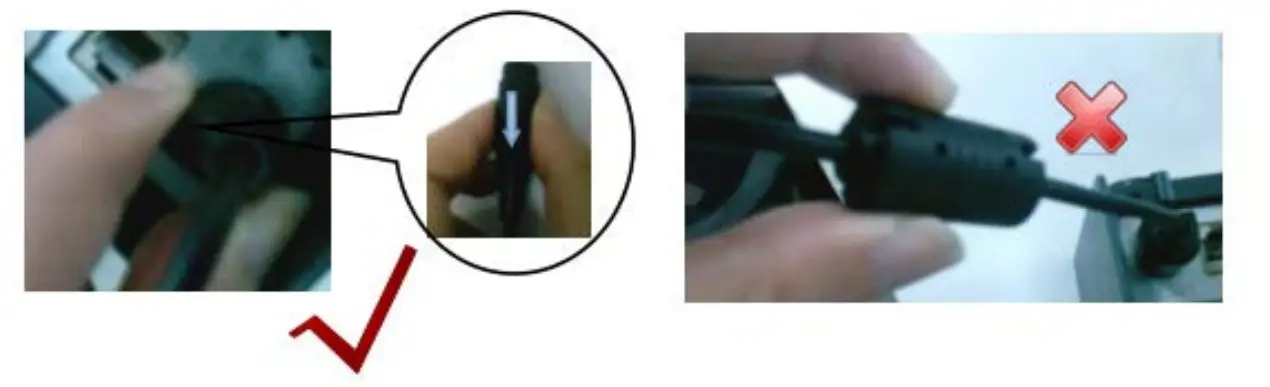
- Please be careful to operate correctly when plug out the plug of power cord to avoid damage.
Connect Communication cables
- Make sure the printer is power off.
- Connect communication cable to the printer’s port, and fix it as plug lag spike (or snap spring).
- Connect communication cable to the other side host.
Connect to cash drawer
- Make sure the printer is power off.
- Connect cash drawer to cash drawer port behind the printer.
 Warning: The Voltage of cash drawer port is 24V. (It cannot connect to telephone cable.)
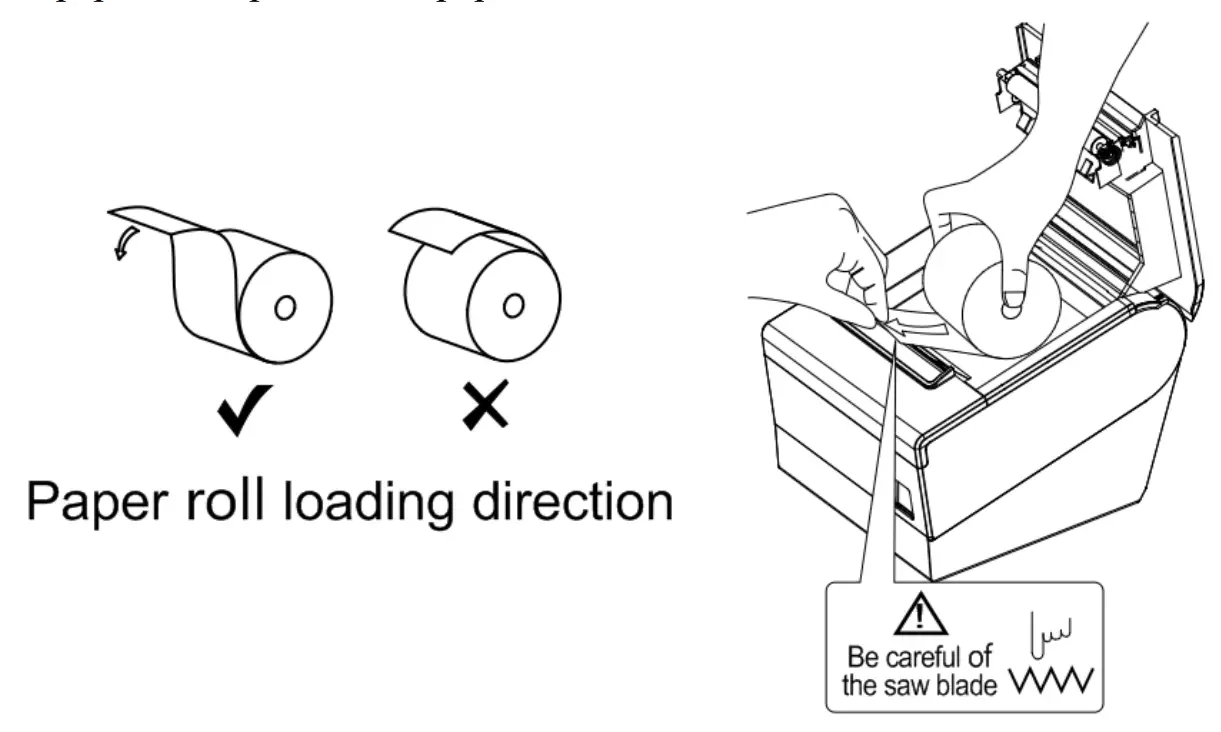
Paper roll loading
Printing paper type confirmation
You can load paper roll to print after connecting power adapter and communication cables. Please make sure the printing paper type before printing. The default paper type is continuous thermal receipt paper.
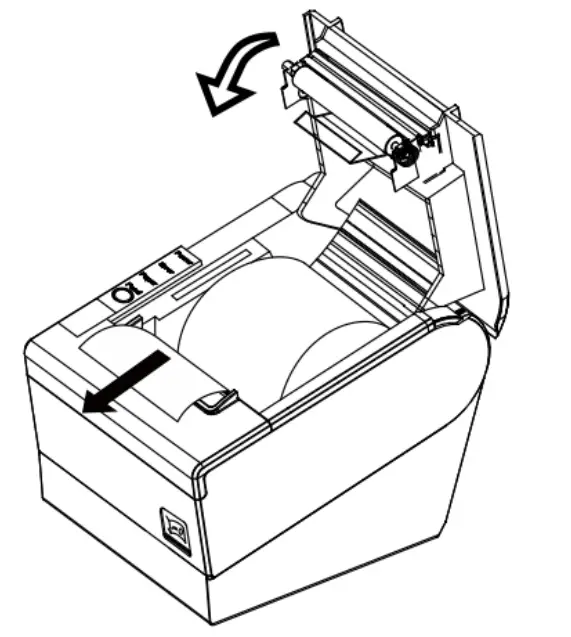
Loading or change paper roll
- Power off the printer.
- Press paper roll storehouse button, and then open storehouse cover.
- Draw out paper roll tap, and load paper roll as below.

- Draw out a printing paper, and leave some on the paper out month, then close the storehouse cover.

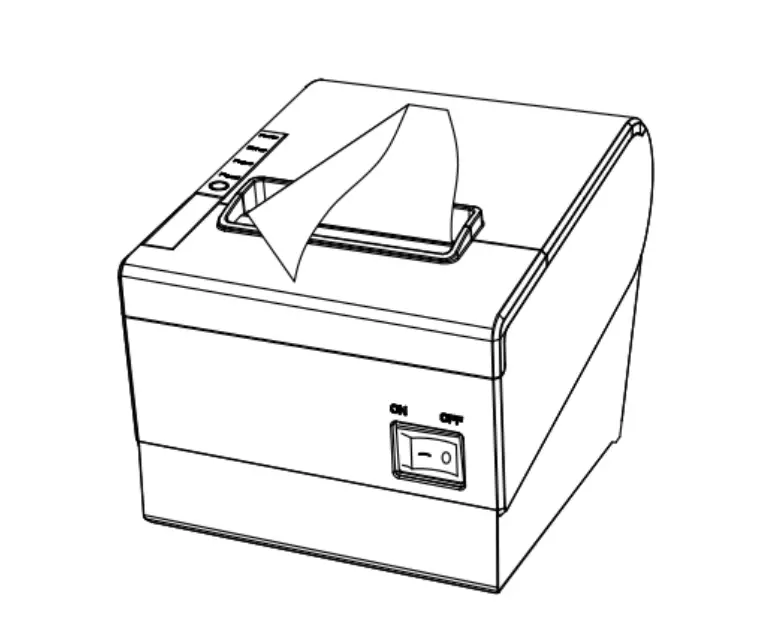
 Warning: Please make sure the paper roll in tense status, if not, it maybe cause paper jam or other problems.
 - The status after paper loading

Printing self-test page
- Make sure the printer loaded paper roll correctly.
- Press down [FEED] button and hold on, then power on the printer, the printer will print a self test page.
CD execute: Tools -> Windows -> PrinterSetting
Printer setting tool
Communication port
Communication port: driver, serial port, network port, USB、parallel port;
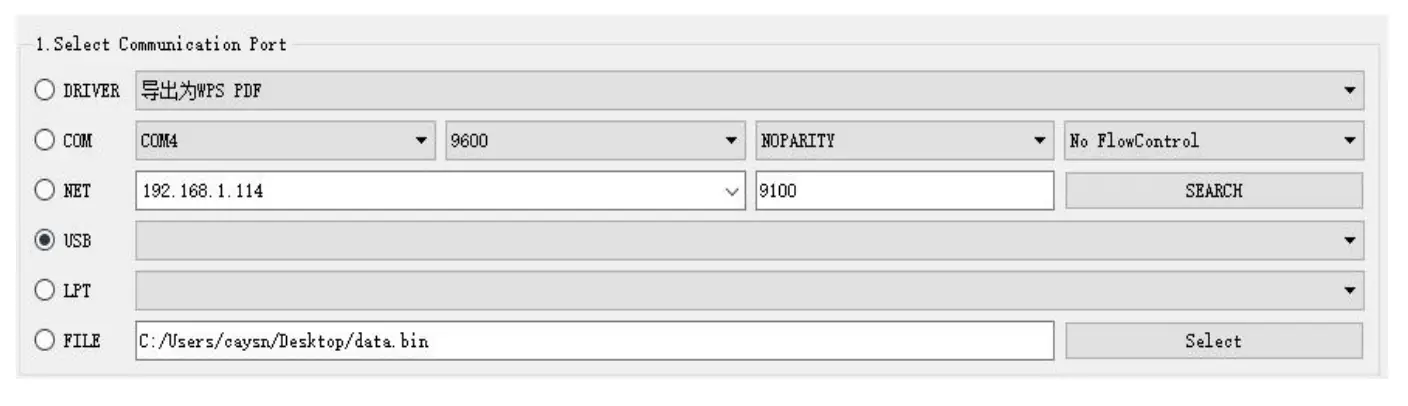
Driver:click on the drop box shows all installed printers.
Serial port: point drop box shows all COM ports that have been assigned to the device.
Network port: click on the right side bottom of the search, can detect the printer connected to all printers IP host through the network port, appears in the drop-down box .
USB: click the drop-down box to shows all the printers that are connected via the USB printer.
Parallel port: click the drop-down box shows all the equipment has been assigned the LPT parallel port.
NOTE: Below will prompt the currently selected port, click on the button of Check Port will command the printer to print a string of text, please check printer output to deter mine is OK. After OK, enter para setting.
select module
Basic
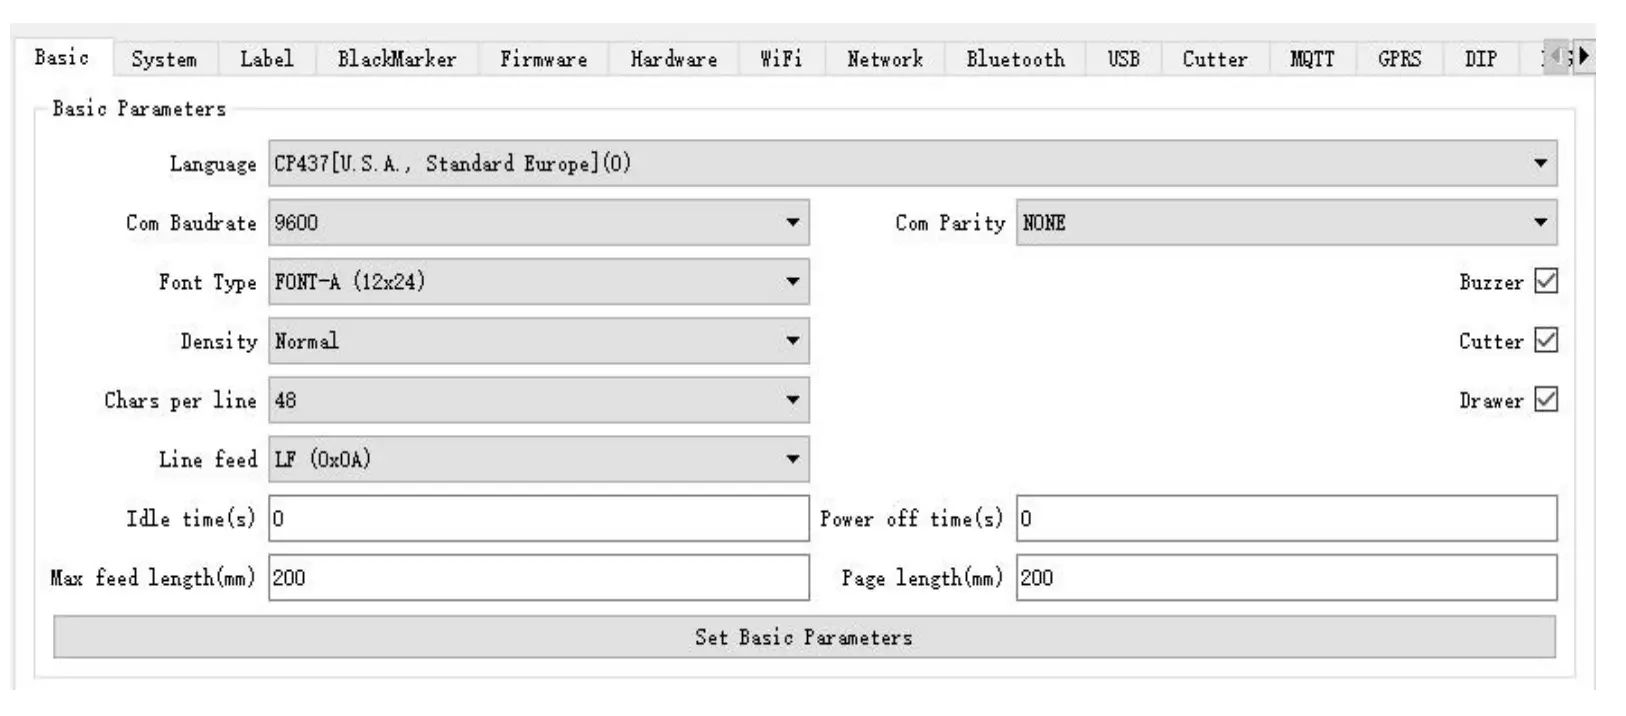
Language :
| CP437 [USA, standard Europe ] | CP852 [Latina 2] | ISO-8859-2[Latin2] |
| KataKana | CP858 [Multilingual | ISO-8859-3[Latin3] |
| CP850 [Multi-languege] | IranⅡ | ISO-8859-4[Baltic] |
| CP860 [Portuguese] | Latvian | ISO-8859-5[Cyrillic] |
| CP863 [Canadian-French | CP864 [Arabic] | ISO-8859-6[Arabic] |
| CP865 [Nordic ] | ISO-8859-1 | ISO-8859-7[Greek] |
| WCP1251 [Cyrillic | CP737 [Greek] | ISO-8859-8[Hebrew] |
| CP866 Cyrilliec #2 | WCP1257 [Baltic] | ISO-8859-9[Turkish] |
| MIK[Cyrillic/Bulgarian] | Thai | ISO-8859-15[Latin 9] |
| CP755 [East Europe,Latvian | CP720[Arabic] | Thai 2 2]
|
| Iran | CP855 | CP856 |
| Reserve | CP857[Turkish] | CP856 |
| Reserve | WCP1250[Central Europe] | |
| Reserve | CP775 | GBK2312 |
| Reserve | WCP1254[Turkish] | UTF-8 |
| CP862 [Hebrew] | WCP1255[Hebrew] | SHIFT-JIS(Japanese) |
| WCP1252 [Latin 1] WCP1253 [Greek] | WCP1256[Arabic] WCP1258[Vietnam] | EUC-KR (Korean) |
Baud rate : 4800;9600;19200;38400;57600;115200;1200(The corresponding selection according to the self testing page )
Verify: NONE;ODD;EVEN
Font: FONT-A/FONT-B
Density :Normal/Dark
Line code:48/40 (Bytes)
The last one will automatically print: when out of paper, printer automatic reprint the last one.
NOTE: Set common properties of the printer,dial the code switch model,will be subject to dial the code switch settings.
Ethernet
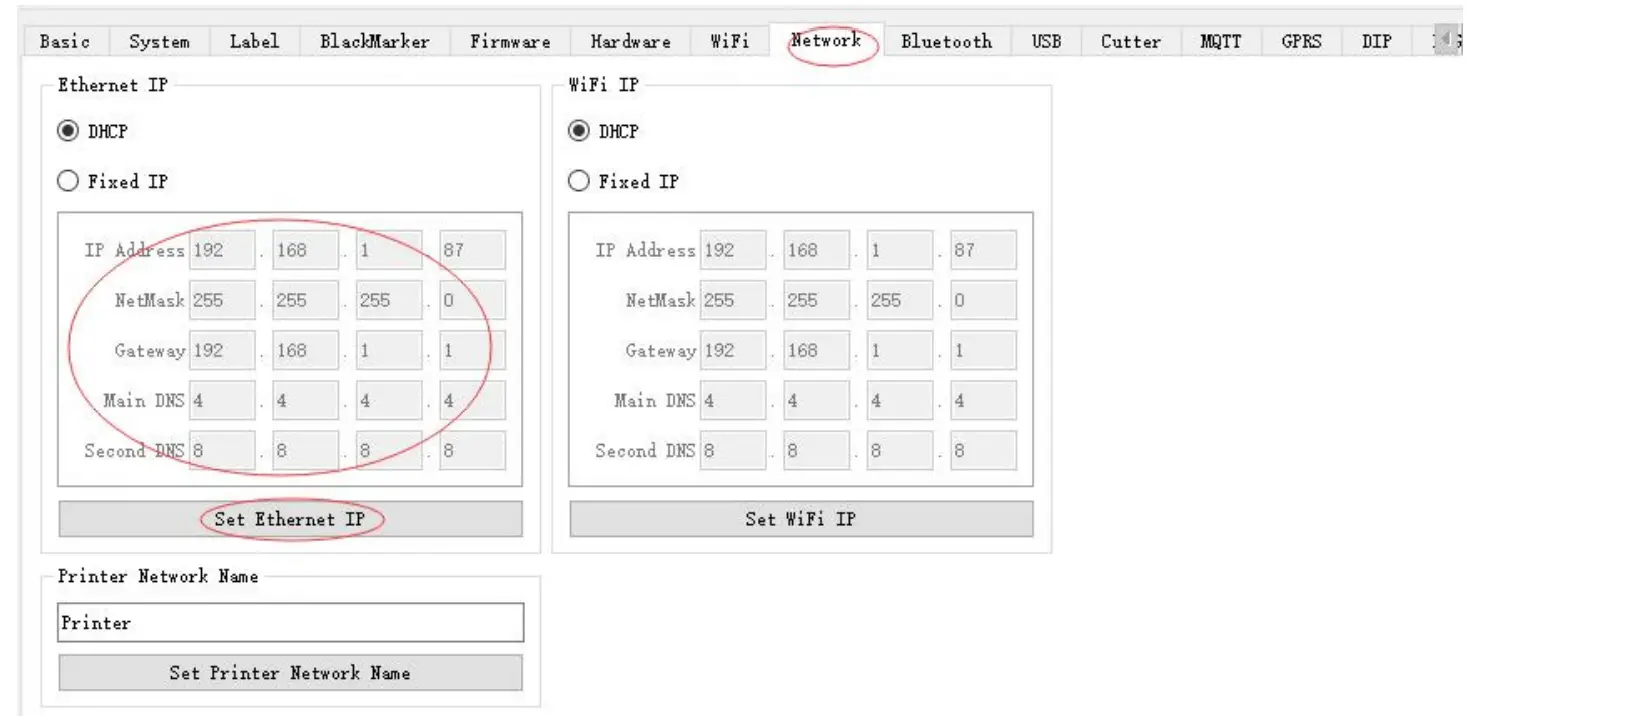
Ethernet to modify the corresponding parameters according to requirements.
NOTE: If you do not know the MAC address, please do not arbitrarily set this property, otherwise could force through the network printer for printing.
WIFI
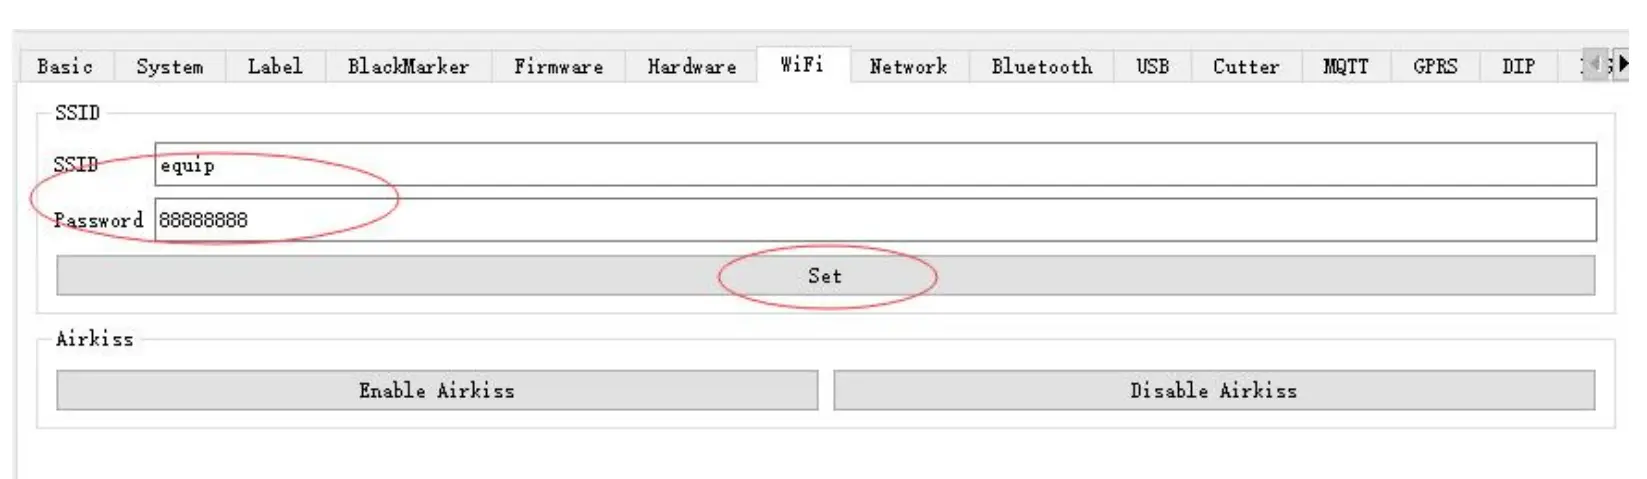
WiFi module PCB of the printer, according to the router set the wireless mode to click on the corresponding model, and fill in the network name, key password, authentication type, encryption algorithm. Set wireless IP
NOTE: Set up WIFI printer’s wireless connection parameters, the settings should be consistent with the parameters of the wireless router.
Bluetooth
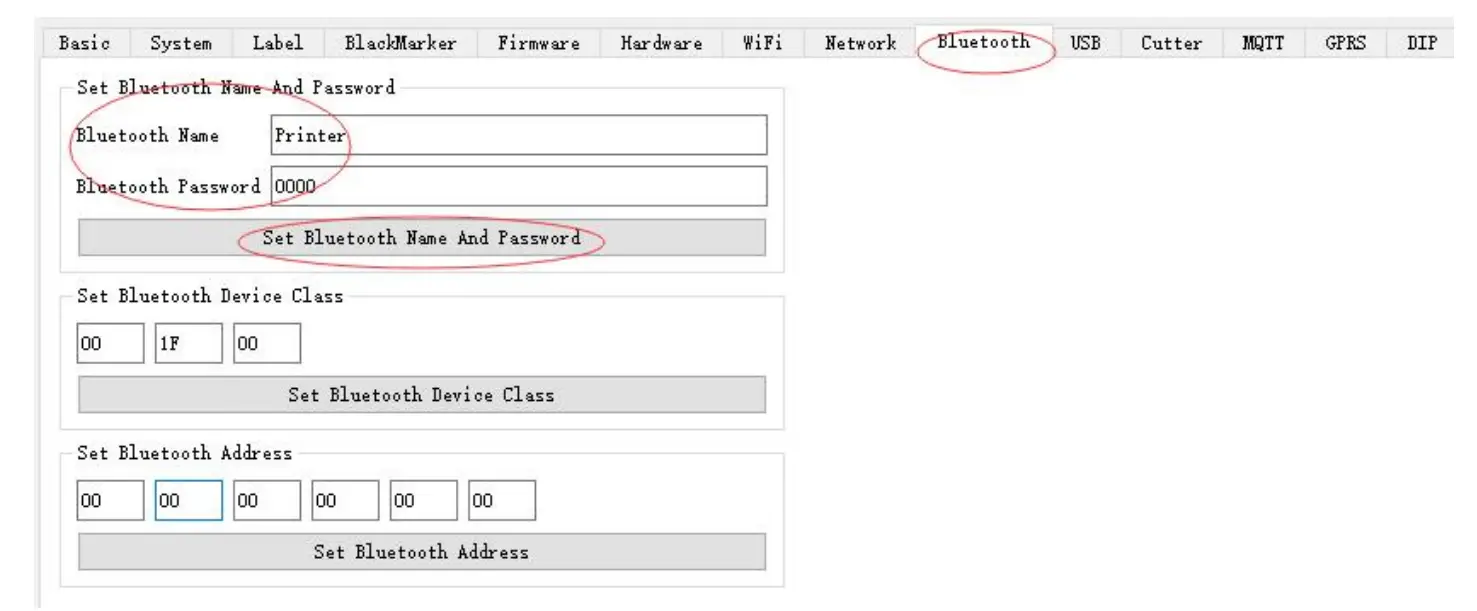
After set ,print a self-test page to check the setting determine is OK.
Black label
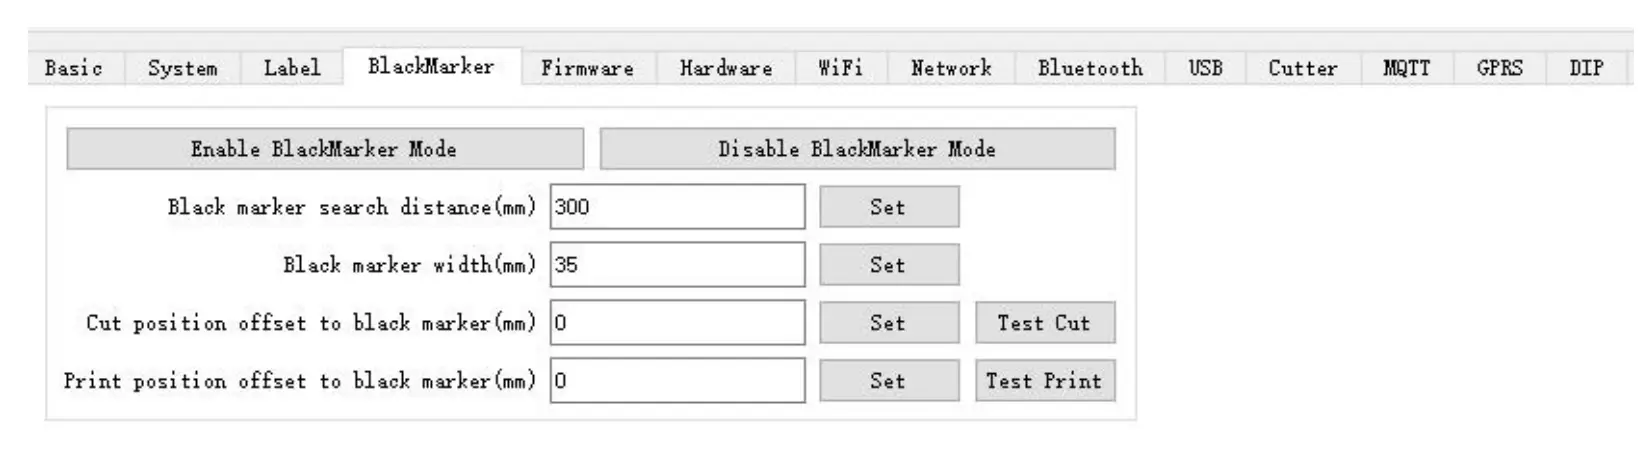
NOTE:
Enable the black label pattern and disable the black label pattern are both settings take effect the need to restart the printer. The button of test cut and test print can adjust the cutting and printing position, find a suitable location to set.
Download
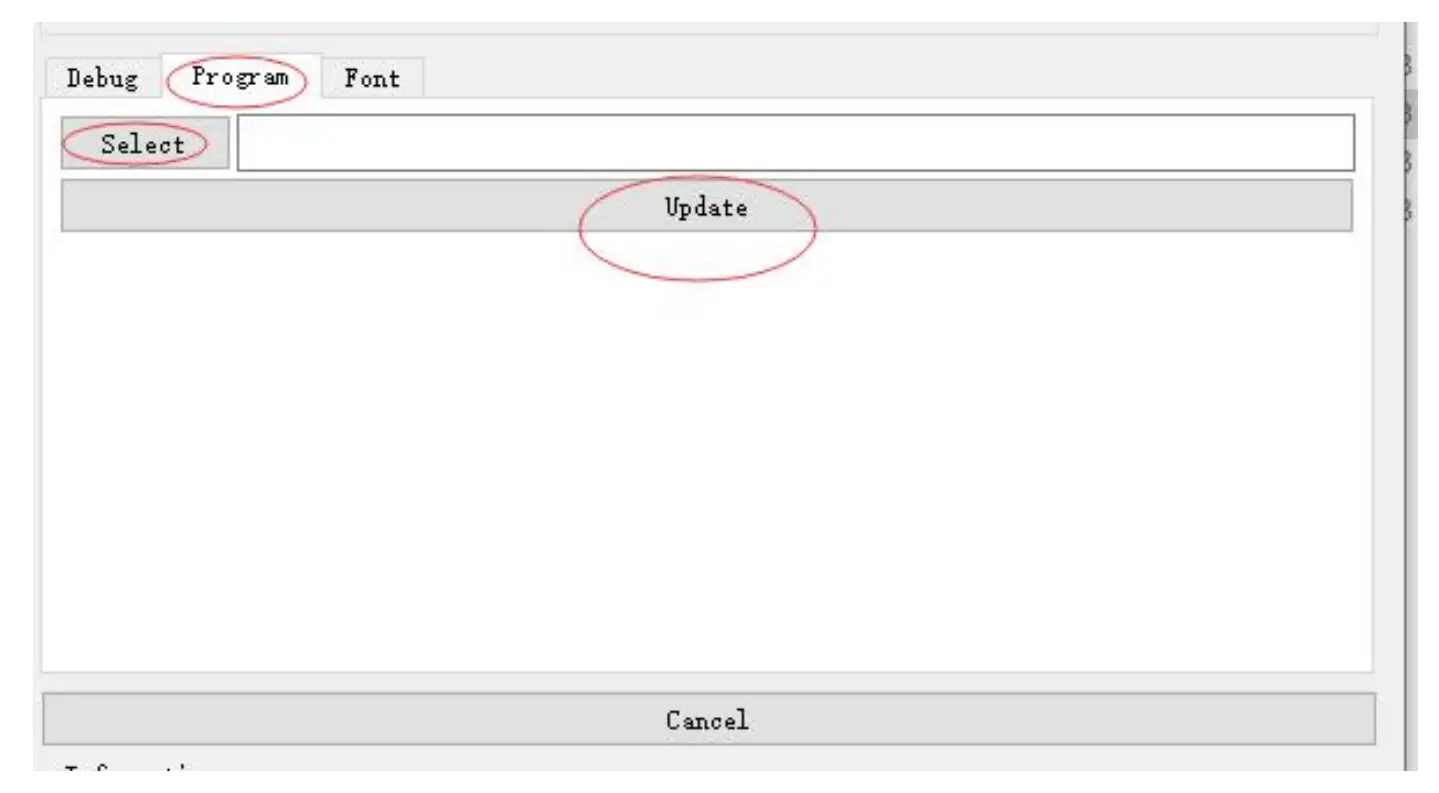
Update the printer firmware
- Select the file
- Update(please don’t change the firmware if not necessary)
Hardware
For example: As the picture show ,setting cutter available.
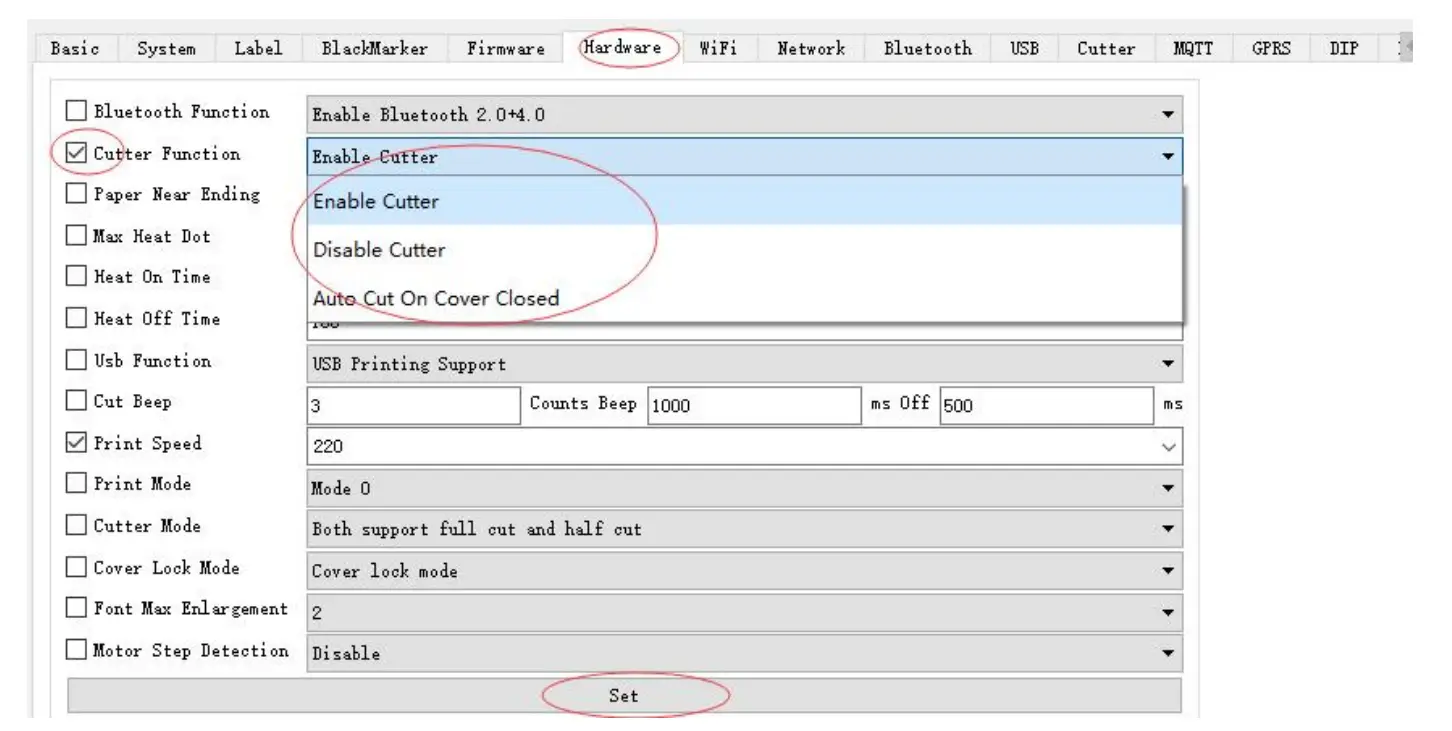
Click on the settings, the left bottom display status! Is successful, and the printer will print a short set of content; or Failed.
Select settings according to requirements.
Set Ethernet port IP Address
The printer’s Ethernet IP address can be set directly via printer inserted web setting page. The operation steps are as below:
- Connect printer and PC in a same Ethernet LAN.
- Print a printer self-test page to get printer recent IP address (self-test page printing operation method refers to “4.8 printer self-test” instruction): You can find the printer’s IP address is same as 192.168.1.87 in self-test page“IP address: 192.168.1.87”
- Set network card IP address in PC and printer IP address as different IP address in the same network segment.(Such as 192.168.1.xxx, xxx is a number among 1 to 254);
- Please enter address “http://printer IP address” in browse of PC after making sure that printer connects with Ethernet.(e.g.: If printer IP address is “192.168.1.87”, please enter “http://192.168.1.87”), then press Enter key, open Ethernet port setting page in browser as below:

- Click “Configure Interface” link in the left side, then enter the modified target IP and click “save” button to save setting. Click “Reboot” button to reset printer if you want the setting to take effect.
- Enter the new IP address as the above step 4 procedure, and re-open printer Ethernet port setting web page, then click “Printer Status” link in the left side. And click “Printer Test Page” button to print self-test page, and check the IP Address contents in the self-test page is right or not.

Interface pin definitions
The printer has a cash drawer driver interface and many kinds of communication interfaces: Serial (RS-232), USB and Ethernet ports. USB port and cash drawer interfaces are standard interfaces, and it has Ethernet, serial and parallel ports as optional.
USB interface pin definition(standard B type female base)
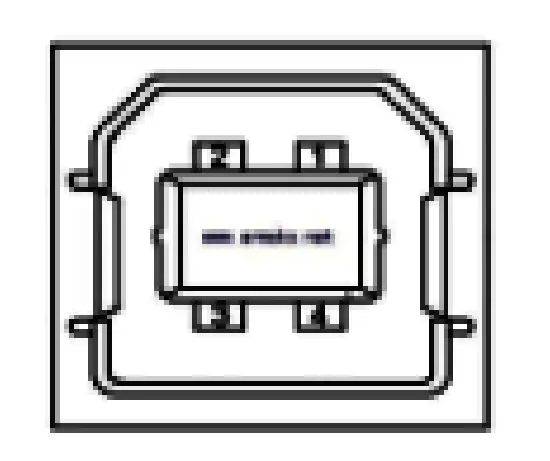
- Pin definition
Pin Number Signal name Typical wire color 1 VBUS Red 2 D- White 3 D+ Green 4 GND Black
Power interface pin definition(MPC-3-001B)

- Pin definition
Pin number Signal name 1 +24V 2 GND 3 N.C SHELL F.G
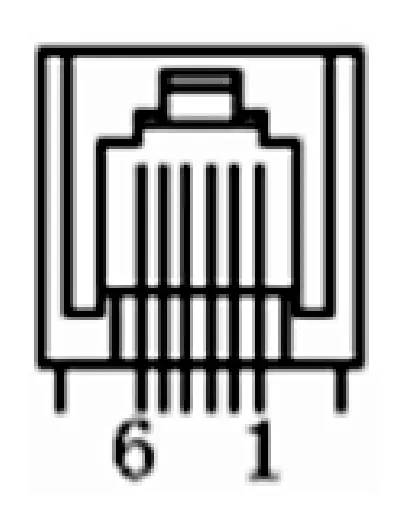
Cash drawer interface pin definition(RJ11-6P6C)
- Electrical specification Driver voltage: DC24V Driver current: Max. 0.8A (within 510ms) Cash drawer status tests signal: “L” = 0~0.5 V ; “H” = 3~5 V
- Cash drawer interface socket uses RJ-11 6P type connector;
- Interface signal definition
Pin number Signal function 1 FG Printer cover 2 DRAWER 1 Cash drawer 1 driver signal 3 DRSW Cash drawer status detection signal 4 VDR Cash drawer driver power 5 DRAWER 2 Cash drawer 2 driver signal 6 GND Common ground circuit
Notes:
- Prohibit socket with power to pull out communication wire
- Please avoid to parallel with strong power when wring communication cables av
- Communication cables use with shielded
Serial port pin definition(DB9F)
Printer serial port is compatible with RS-232, the interface socket is DB9 female socket.
User can check interface setting status via printing setting self-test page. Printer default serial interface is set as: baud rate 19200bps, 8 bit data bits, no parity,1 bit stop bit, and the handshakes method is DTR/DSR。
| Pin number | Definition |
| 1 | CD |
| 2 | TD |
| 3 | RD |
| 4 | DSR |
| 5 | GND |
| 6 | DTR |
| 7 | CTS |
| 8 | RTS |
| 9 | RI |
Ethernet interface pin definition(RJ45)
| Pin number | Definition |
| 1 | TX+ |
| 2 | TX- |
| 3 | RX+ |
| 4 | n/c |
| 5 | n/c |
| 6 | RX- |
| 7 | n/c |
| 8 | n/c |
Faults handling
Please refer to the methods as below when printer can’t work normally. Please contact your supplier directly if it still can’t work normally.
Printer does not work
| Problems | Probably reasons | Solutions |
| The Power indicator is not light. Printer does not work | Printer is not power on. | Power on printer |
| Printer switch is not on. | Press down the “O” side of printer button | |
| PCB is damaged | Contact with agents or factory directly |
Indicator error and buzzer warning
| Problems | Probably reasons | Solutions |
| Paper indicator is on constantly Buzzer warns | Paper maybe out | Load a new paper roll |
| Paper out indicator light is on constantly Error indicator is on constantly Buzzer warns | Paper roll warehouse cover maybe lit up | Close paper roll warehouse cover correctly |
| Error indicator is blinking Buzzer warns | Print head is overheated | Power off printer power, and wait that print head temperature returns normal. |
| Voltage is too high | Use assigned voltage to print | |
| Voltage is too low | Use assigned voltage to print |
Problems when it is printing
| Problems | Probably reasons | Solutions |
| Color strips occur on the paper | Paper maybe out | Load a new paper roll. |
| Printing is not clear or have dirty spots | Paper roll loading incorrectly | Check paper roll loading correctly or not |
| Paper can’t meet the requirements | Use the recommended thermal paper | |
| Print head or printer rubber roller is dirty | Clean print head or printer rubber roller | |
| Printing density sets too light | Increase printing density to satisfy the requirements. | |
| Paper can output normally | Paper jam | Open upper cover or check paper feed channel to get to know paper jam. |
| Vertical printing contents get lost | Print head or printer rubber roller is dirty | Clean print head or printer rubber roller |
| Print head error | Contact supplier or factory directly |
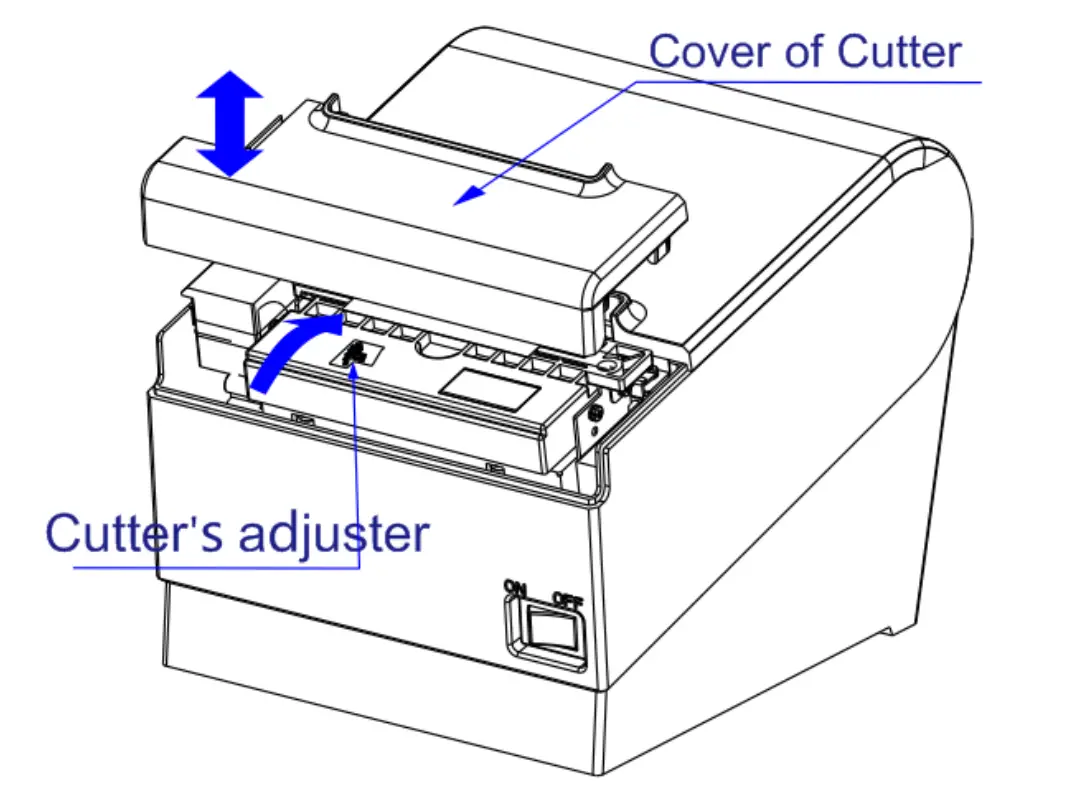
Problems when cutting paper
Please power off if it is paper jam, and eliminate paper jam in correct method.
- Press the paper cover and open it to eliminate paper jam. Then re-install paper roll to power
- Please use the method as below if step 1 cannot open paper cover:
Warning: Do not open the paper roll warehouse cover forcibly when you cannot open it normally if it is paper jam, which to avoid damaging the printer.
- Make sure the printer power is
- Take off the cutter adjusting cover in vertical direction as
- Adjust paper-cutter to make the cutter set back to print mechanism completely as photo direction
- Open paper cover and eliminate paper
- Install cutter adjusting cover vertically
- Re-loading paper, close the paper cover and then power

CUSTOMER SUPPORT
 Equip® is a registered trademark of Digital Data Communications GmbH
© Copyright Digital Data Communications GmbH. All Rights Reserved. www.equip-info.net