
parmco RT52G1000 520mm Integrated Turbo Pak Plus Rangehoods Instruction Manual

As part of Parmco Appliances commitment to improving and updating product ranges, we reserve the right to alter, change and update technical specifications and appearance attributes of all Parmco Appliances products. E&OE.
Dear Valued Customer,
Thank you and congratulations on purchasing your new Parmco appliance.
All Parmco products are made to the highest quality and design standards. We are sure you will enjoy your new appliance.
As a note, please read through these instructions carefully. These will assist you in gaining a complete understanding of the functions and features offered by your appliance.
Please take special note of all detailed technical information and installation instructions. It is essential that you follow these instructions to ensure the safety and reliability of this appliance.
Furthermore, not using appropriate personnel to install this appliance may affect any future warranty claims lodged, so please check with Parmco Appliances before any installation is carried out.
We hope you enjoy your new appliance. If you would like to find out more about this product or any other products in Parmco’s extensive range, visit us online at www.parmco.co.nz.
Regards,
The Parmco Team
The Warranty:
- This appliance is intended for domestic use in the owners’ Use of the appliance for commercial purposes will limit the warranty period (please see Parmco website for commercial details).
- Subject to the terms and conditions contained within this warranty, if the product is not of Acceptable Quality (as defined in the Consumer Guarantees Act) within 7 years of the date of original purchase, then Parmco Sales undertakes to repair or, at it’s sole discretion, replace the product.
- The warranty does not cover the costs of transport, mileage or travelling time if the product is located beyond 30km of a recognised Service Agent.
- This warranty is offered as an extra benefit, and does not affect other legal rights, which can not be modified or excluded by agreement.
- This warranty only applies to goods supplied and installed in the North and South Islands of New Zealand.
- The provisions of this warranty are in addition to the rights and remedies available to consumers under the Consumer Guarantees Act 1993.
Product
Date of purchase
Serial Number
Dealer / Retailer Name
Please retain this Warranty card together with receipt or other proof of purchase date when seeking service during the warranty period
The Warranty is not valid:
- If the product is not installed and operated in accordance with the operating instructions.
- If the product is not installed to comply with the electrical, gas, plumbing and other Regulations and Codes of Practice in New
- If the product is operated on voltages or frequencies outside the normal range for domestic appliances in New Zealand.
- If the product is not used in normal domestic use, or if it is used in a business as defined in the Consumer Guarantees Act.
- If any serial number has been removed or
- If proof of date of purchase is not supplied, except at the sole discretion of Parmco Sales. Proof of purchase can be for the product itself, or if installed with a kitchen or house then proof of purchase can be from a Parmco reseller of products supplied by
- If the products are purchased in a second hand condition from other parties (including but not limited to TradeMe, Sella, )
Liability under this warranty will not be accepted for:
- Wear and tear caused by normal domestic use of the product.
- Damage in
- Damage caused to the product by neglect, abuse, negligence, wilful act or misuse.
- Any costs associated with the repair, replacement, removal or reinstallation of products installed in a damaged condition.
- Any defect caused by accident, misuse, neglect, tampering with or unauthorised modifications of the appliance or any a ttempt at internal adjustment or repair by any person other than an Authorised Service Agent.
- Service calls that relate principally to the following:
- Instruction on how to use the
- Repair or replacement of house fuses, electrical wiring, gas fitting or plumbing.
- Normal or scheduled maintenance including blocked filters or
- Consumable items such as light
- Any damage to hobs caused by spills when
- Any breakage or damage of glass
- Any damage caused by non recommended product used for cleaning, maintaining, lubricating or similar.
- Any aspect relating to the installation of the product, or damage caused during installation including blocked access for
Any third party (including reseller) or consequential loss or damage (direct or indirect) however arising
Thank you for purchasing this rangehood. Please read the instructions manual carefully before you use the rangehood and retain the manual in a safe place for future reference.
Any installation work must be carried out by a qualified electrician. Before you use the rangehood, make sure that the voltage (V) and the frequency (Hz) indicated on the rangehood are exactly the same as the voltage (V) and the frequency (Hz) in your home.
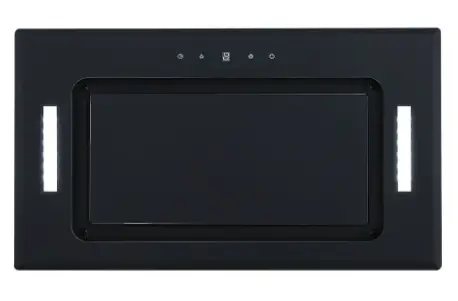
Functions and Features
- The rangehood is made of high quality materials with a modern design, thatwill complement your kitchen
- The rangehood is equipped with a powerful low noise electric
- The grease filter is easy to remove and
Installation
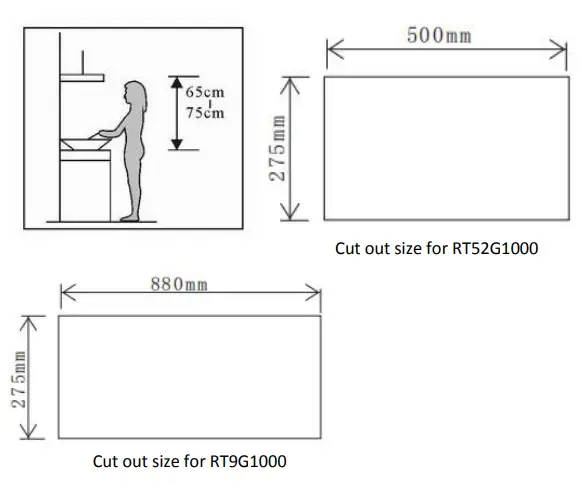
- The rangehood should be placed at a distance of 65cm above an electric cooktop or 75cm above a gas
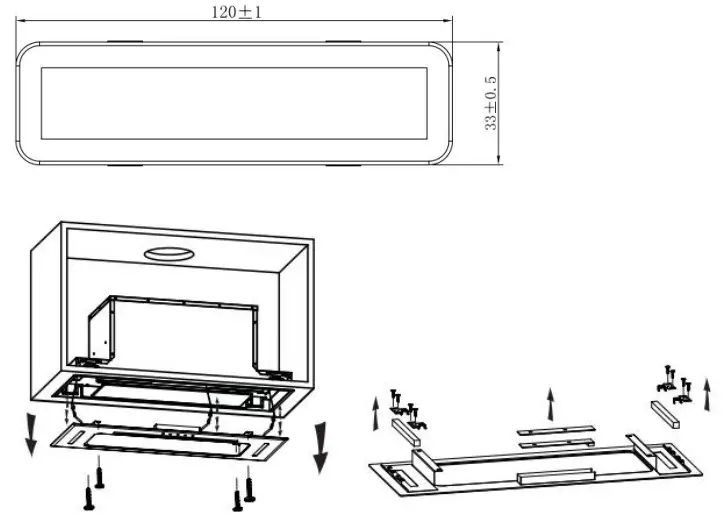
- Cut a hole in the cupboard, with hole wide 500*275(mm) for model RT52G1000 and hole wide 880*275(mm) for model RT9G1000. Make sure the hole edge to the cupboard edge at least 35mm

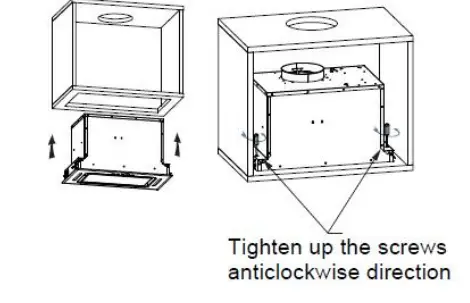
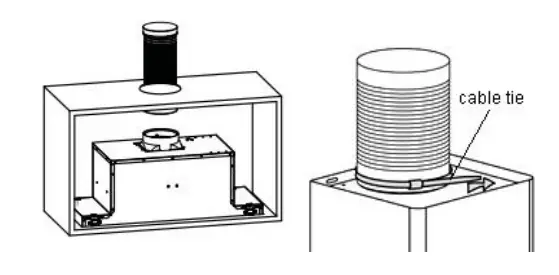
- Put the hood into the cabinet, tighten up the screws by screwdriver, and make sure the hood was fixed.


- Fix the expansion pipe on the outlet with a cable (Note: the expansion pipe is not included in the product).


Changing the Light bulb
- Unscrew 4 screws of the outer glass assembly, dismantle the the light connecting wire and switch Take away the outer glass.
- Unscrew the screws of lamp bracket ,then take out off the lamp bracket and replace the
- Apply the reverse procedure to install the light
- ILCOS D code for this lamp is: DSS-1.5/65-S-120/33
- LED modules– rectangle lamp
- Max wattage: 2 × 5 W
- Voltage range: DC 12V
- Dimensions:

How to use the Control Panel
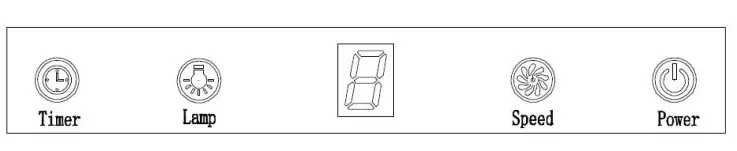
- Press the “Power” button, the button control the “on” & “off ” of the
- Press the button “Speed” time after time, the motor works as 4 speeds,and the LED display will indicate as 1-2-3-4
- Press “Lamp” button, the light is on, press this button again, the light is off. Please note the Lamp is not under control of the on/off
- When the hood is working, if press the “Timer” button, the hood will go into the status of acquiescent working (acquiescent time is 9mins), and then, LED display will be shown 9.8.7.6 …decreasing by 1,when time is up, the hood will be off automatically and the lamp will extinguish. If pressing “Timer” button, the hood will go in or go out “Timer”
Maintenance
- The rangehood and its filter mesh should be cleaned regularly in order to keepit in good working condition. As the grease filters are made of metal, do not clean the filters with detergents that will corrode metal
- Clean the filters as below: Method one:
Put the filter in 40⁰C~50⁰C hot water. Pour in some grease-loosening detergent, soak it for about 2-3 minutes and then clean it with a soft brush. Do not brush too hard to avoid damaging the filter.
Method two: Put the filter into a dishwasher with detergent for cleaning. Set the temperature at around 60⁰C. Be careful not to use detergents that are corrosive to metal products, that is, most dishwasher powders.
- Toprotect the main body from corrosion over time, the rangehood should be cleaned with soapy hot water or non corrosive detergent once a Do not use grinding detergent as it will damage the body.
- Keep the motor and other spare parts free from water, as this will cause damage to the
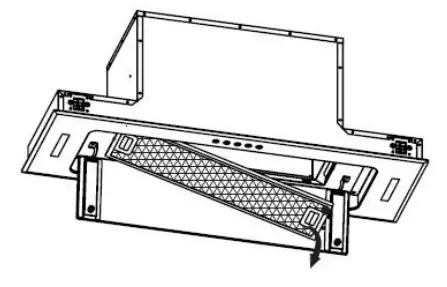
- Toremove and insert the filter press on the handle as illustrated

Attention
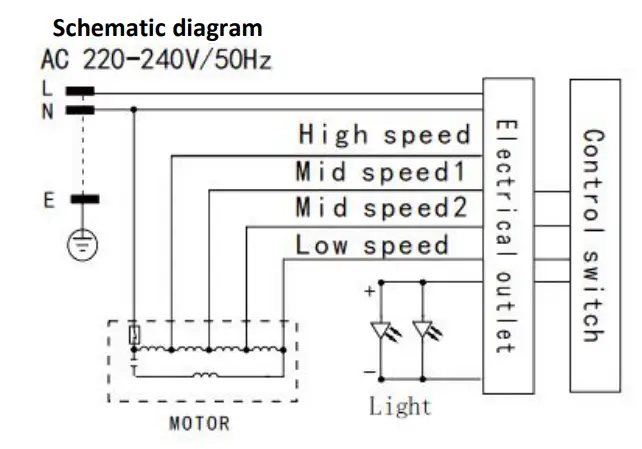
- The rangehood uses 220-240V, 50Hz
- Cut off the power when you
- Do not expose the filter to fire or
- Do not leave the filter lying around to avoid damage to the
- If there is damage to the plug or plug wire, contact a qualified electrician or professional to replace with the specific flexible
Technical Reference
| Model | RT52G1000; RT9G1000 |
| Rated voltage | 220~240V 50Hz |
| Lighting power | 1.5W x 2 |
| Motor power | 380W |
| Duct diameter | 150mm |
| Air flow | 1000 m3/h |
Warning
- Keep your children away from using the
- Your rangehood is intended for domestic use It is not suitable for barbecue, roast shop or other commercial use.
- Any installation work must be carried out by a qualified electrician or professional
- The rangehood and its filter mesh should be cleaned regularly in order to keepit in good working
- Before cleaning, always ensure that you have switched your rangehood
- Clean the rangehood according to the instructions manual and keepthe rangehood from any danger of
- Do not dry your rangehood using
- If there are any faults with your rangehood, please call the Parmco service department at 09 573 5678.
- Do not exhaust the air from the rangehood through the same flue as the cooktop or other kitchen
Troubleshooting Tips
If any problem occurs, please remove the plug from the socket and contact Parmco service department at 09 573 5678.
| Fault | Possible Cause | Solution |
| Light on, but motor does not work | Fan switch turned off | Select a fan switch position. |
| Fan switch failed | Contact service center. | |
| Motor failed | Contact service center. | |
|
Light does not work, motor does not work | House fuses blown | Reset/Replace fuses. |
| Mains power cable is loose or disconnected | Refit mains power cable to power outlet. Switch power outlet on. | |
|
Oil leakage | One way valve and the outlet are not tightly sealed | Take down the one way valve and seal with sealant. |
| Leakage from the connection of chimney and cover | Take chimney down and seal. | |
| Lights not working | Broken or faulty bulbs | Replace bulbs as per this instruction. |
| Insufficient suction | The distance between the cooker hood and the gas top is too far | Refit the cooker hood to the correct distance. |
| The Cooker hood inclines | The fixing screw is not tight enough | Tighten the hanging screw and make it horizontal. |


