
Bambu X1 Combo Combo 3D Printer

Product Information: 3D Printer
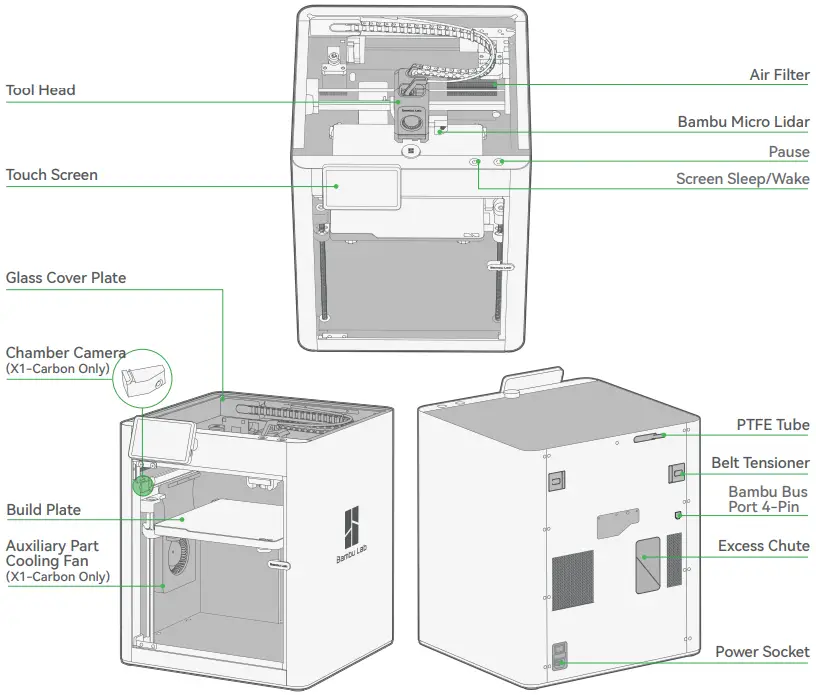
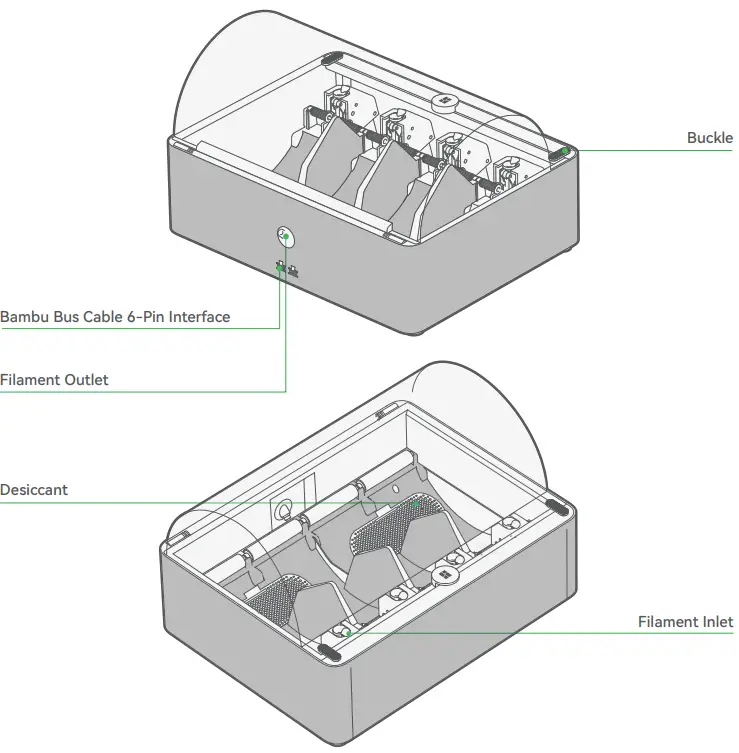
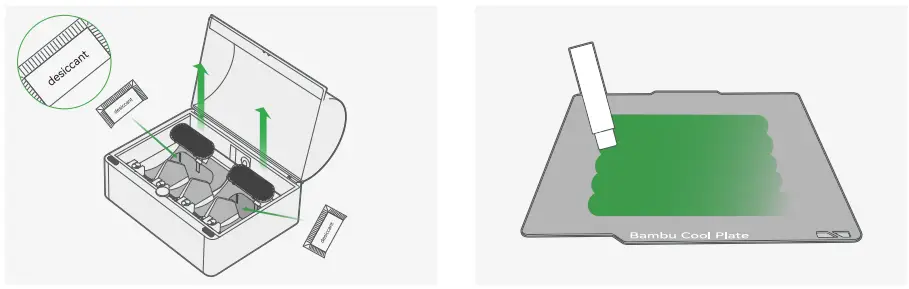
The 3D Printer comes with a Touch Screen, Glass Cover Plate, Chamber Camera (X1-Carbon Only), Build Plate, Auxiliary Part Cooling Fan (X1-Carbon Only), Air Filter, Bambu Micro Lidar, Pause Screen, Sleep/Wake, PTFE Tube, Belt Tensioner, Bambu Bus Port, 4-Pin Excess Chute, Power Socket, Bambu Bus Cable, 6-Pin Interface Filament Outlet, Desiccant, Buckle, Filament Inlet, and other accessories.
The AMS (Auto-Material Supply) supports spools with a width of 50-68mm and a diameter of 197-202mm. The 3D Printer is recommended to be used with Bambu Filament, which has been thoroughly tested to work with the AMS. It is advised to avoid using soft materials like TPU or damp PVA as they can get stuck in the AMS, and cardboard
spools are not recommended as the spool may slip. It is important to note that the warranty is voided if the AMS is not used as directed.
Product Usage Instructions: Quick Start
Before operating the printer, it is important to review the entire guide provided in the user manual. Also, do not connect the printer to power until assembly is complete to ensure safety.
AMS & Tool Head Unlock
- Use Allen Key H2 to remove the screws and take out the AMS by sliding it out through the top. We recommend using the short end of the Allen Key to unlock the screws more easily.
- Remove the four screws as indicated by arrows and take out the AMS cushioning.
- Remove the cardboard from the tool head and remove the foam from the excess chute.
AMS Assembly
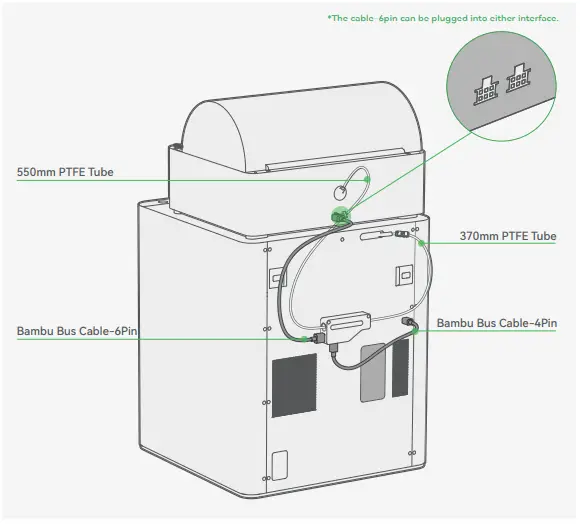
- Insert the 550mm PTFE tube into the AMS and connect the Bambu Bus Cable-6Pin to either interface.
- Insert the 370mm PTFE tube into the AMS and connect the Bambu Bus Cable-4Pin.
Spool Holder & Front Door Assembly
- Remove the screw as pictured with Allen Key H2.
- Secure the spool holder with two screws from the accessory box.
- Keep the front glass door closed and secure it with four screws from the accessory box. We recommend using tape to hold the door after setting it in place to help with assembly.
- Remove the three screws with Allen Key H2 to unlock the hot bed.
- Pull the Flexible Printed Circuit (FPC) out about 50mm.
- Insert the FPC into the port by pressing the terminal as pictured.
- Insert the screen back into the slot on the printer, then lock it by pushing it to the left.
First Print
- Apply a thin layer of glue on the build plate.
- Place at least one spool of Bambu Filament into the AMS.
- Turn on the power to start the printer and AMS.
- Insert the filament into the filament inlet. The filament will be automatically pre-loaded when detected.
- We recommend first printing a single-color model with the supplied Bambu PLA Basic.
- Press the internal button and select a file to start the first print. We recommend using one of the pre-loaded files as a starting point.
Please review the entire guide before operating the printer.
Safety Notice: Do not connect to power until assembly is complete.
Bambu Studio & Bambu Handy
https://bambulab.com/download

Warning:
The AMS supports spools with a width of 50-68mm and a diameter of 197-202mm. When operating the AMS, we recommend using Bambu Filament, which has been thoroughly tested to work with the AMS. Please make sure to avoid using soft materials like TPU or damp PVA, as they can get stuck in the AMS, and please avoid using cardboard spools as the spool may slip. Please note that the warranty is voided if the AMS is not used as directed. If you run into any issues with specific filaments, please let us know so that we can provide better advice to our community.

Component Introduction
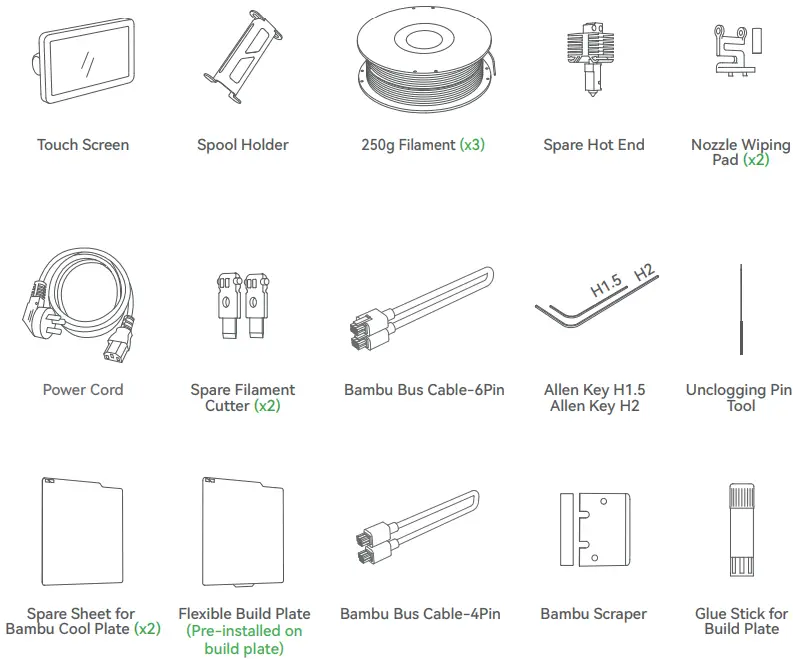
Accessory Specification
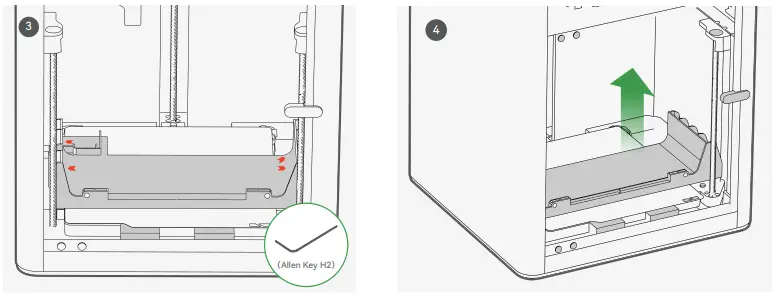
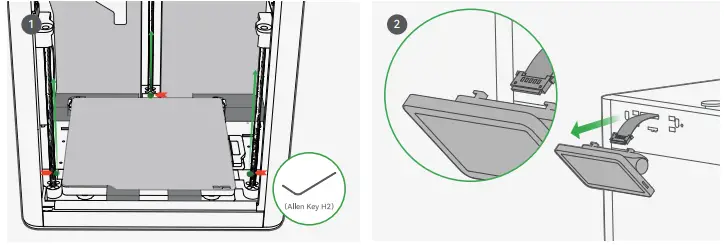
AMS & Tool Head Unlock
- Take out the accessory box. Use Allen Key H2 to remove the screws as pictured.
- Take out the AMS by sliding it out through the top.
*We recommend using the short end of the Allen Key to unlock the screws more easily.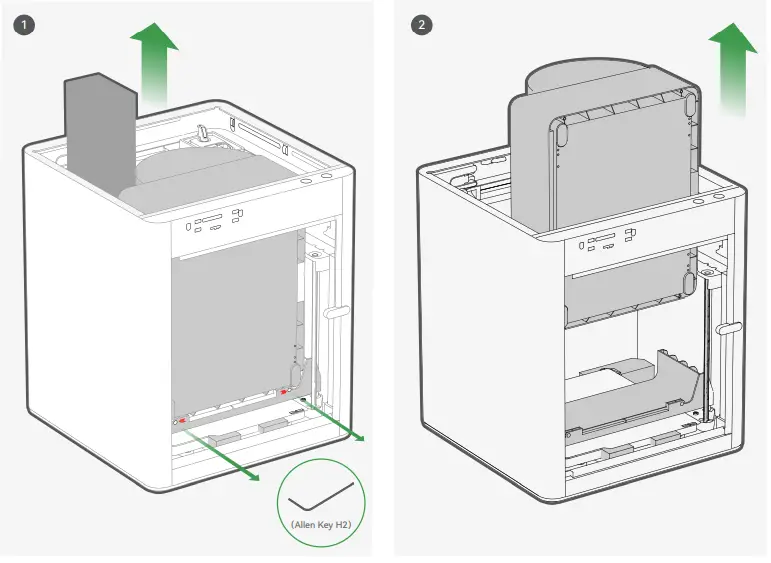
- Remove the four screws as the arrows indicate.
- Take out the AMS cushioning.
- Remove the cardboard from the tool head.
Romove the foam from the excess chute.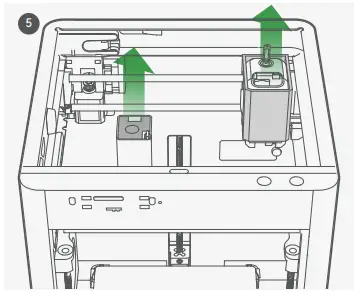
AMS Assembly
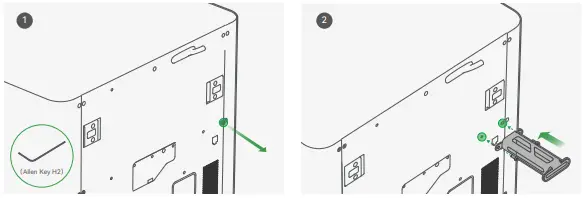
Spool Holder & Front Door Assembly
- Remove the screw as pictured with an Allen Key H2.
- Secure the spool holder with two screws from the accessory box.
- Keep the front glass door closed and secure it with four screws from the accessory box.
*We recommend using tape to hold the door after setting it in place to help with assembly.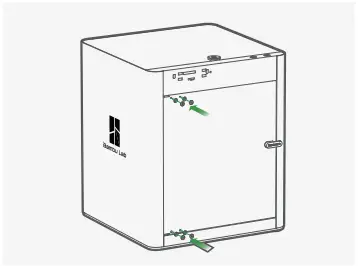
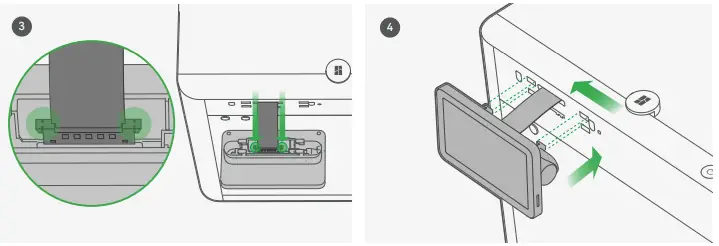
Hot Bed Unlock & Screen Installation
- Remove the three screws with an Allen Key H2 to unlock the hot bed.
- Pull the Flexible Printed Circuit(FPC) out about 50mm.
- Insert the FPC into the port by pressing the terminal as pictured.
- Insert the screen back to the slot on the printer, then lock it by pushing it to the left.
Printer Binding
- Download the Bambu Handy App. Register and log in to your Bambu Lab account.
- Connect the printer to power. Follow the instructions on the screen until getting to the page shown on the right side.

- Use Bambu Handy to scan the QR code on the screen, and bind your printer with your Bambu Lab account.
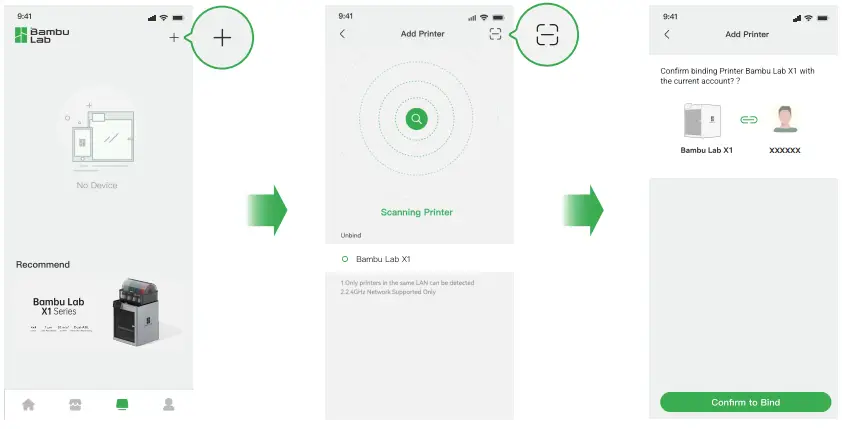
- Follow the instructions on the screen to complete the initial calibration.
It is normal to have vibration and noise during the calibration process.
DO NOT remove the protective foam from beneath the hotbed until after the initial calibration is complete.
First Print
- Apply a thin layer of glue on the build plate.
- Place at least one spool of Bambu Filament into the AMS. Turn on the power to start the printer and the AMS. Insert the filament into the filament inlet. The filament will be automatically pre-loaded when detected.
*We recommend first printing a single-color model with the supplied Bambu PLA Basic. - Press “
 ” – “internal”. Select a file to start the first print.
*We recommend using one of the pre-loaded files as a first test print.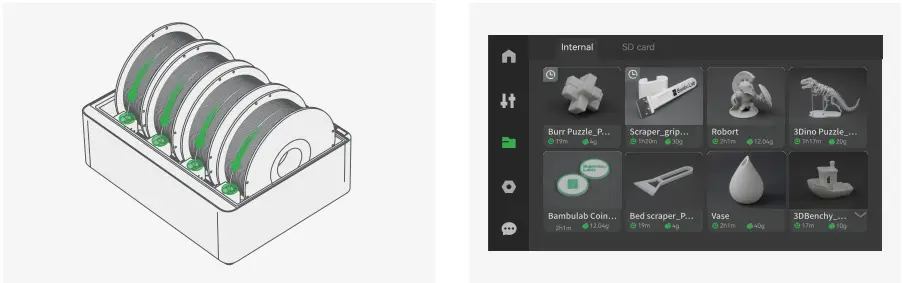
Bambu Studio
Download Bambu Studio: http://bambulab.com/download
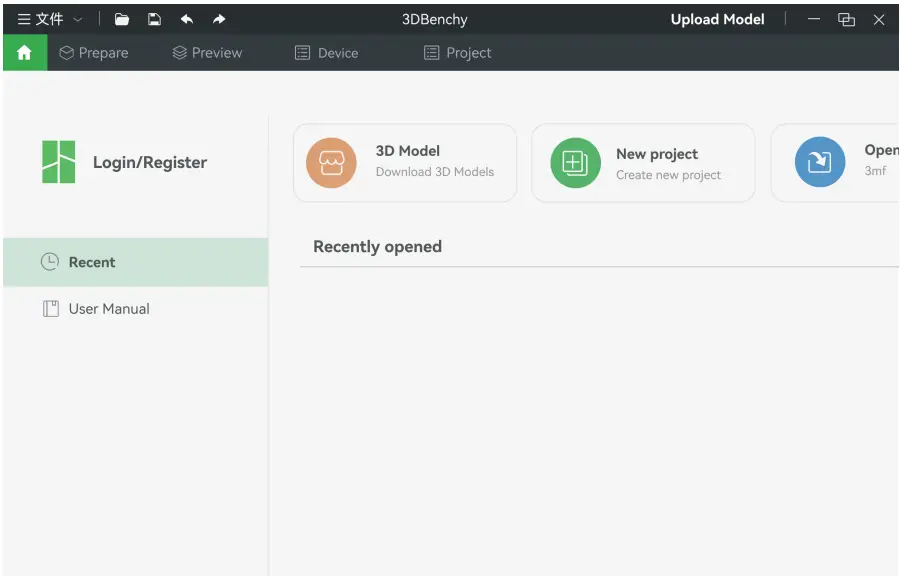
Log in to Bambu Studio with your Bambu Lab account, which is the same for the Bambu Online store. Create or open a project.
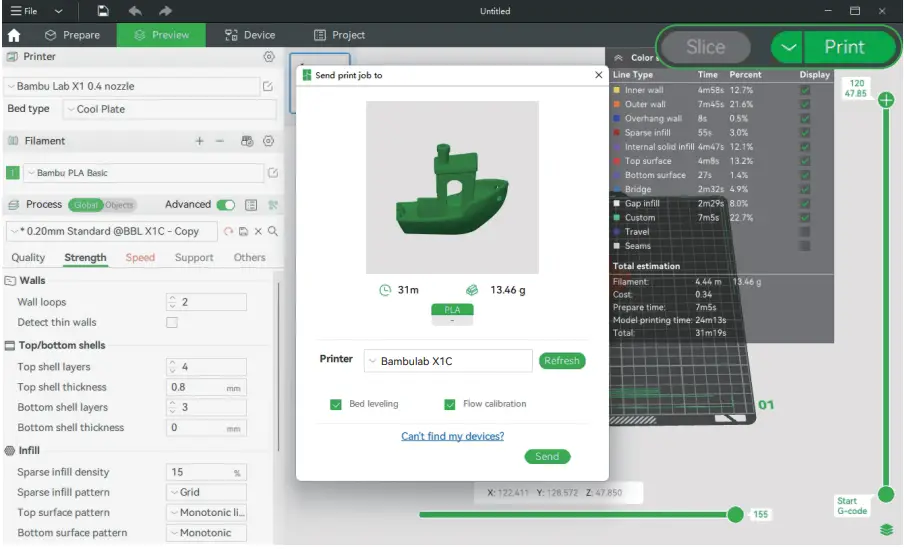
Slice the model, select your printer and send the model to print.
*We recommend performing bed leveling before each print and performing flow calibration after changing the filament.
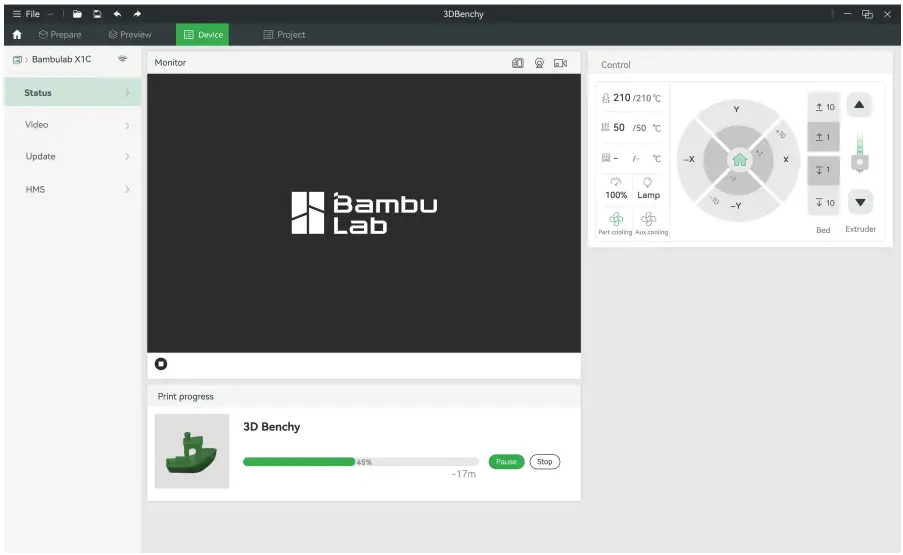
During printing, you can remotely monitor your print, or pause/stop printing on the “Device” interface.
*The live view can be seen only if a camera is mounted.
Specification
| Item | Specification | ||
| X1-Carbon | X1 | ||
| Printing Technology | Fused Deposition Modeling | ||
| Body | Build Volume(W*D*H) | 256*256*256 mm | |
| Chassis | Steel | ||
| Shell | Aluminum & Glass | Plastic & Glass | |
|
Tool Head | Hot End | All-Metal | |
| Extruder Gears | Hardened Steel | Steel | |
| Nozzle | Hardened Steel | Stainless Steel | |
| Max Hot End Temperature | 300 | ||
| Nozzle Diameter (Included) | 0.4 mm | ||
| Nozzle Diameter (Optional) | 0.2 mm, 0.6 mm, 0.8 mm | ||
| Filament Cutter | Yes | ||
| Filament Diameter | 1.75 mm | ||
|
Hot bed | Build Plate | Flexible Steel Plate | |
| Build Plate Surface(Included) | Bambu Cool Plate, Bambu Engineering Plate | ||
| Build Plate Surface (Optional) | Bambu High Temperature Plate | ||
| Max Build Plate Temperature | 110℃@220V, 120℃@110V | ||
| Speed | Max Speed of Tool Head | 500 mm/s | |
| Max Acceleration of Tool Head | 20 m/s^2 | ||
| Max Hot End Flow | 32 mm^3/s @ABS | ||
|
Cooling | Part Cooling Fan | Closed Loop Control | |
| Hot End Fan | Closed Loop Control | ||
| Control Board Fan | Closed Loop Control | ||
| Chamber Temperature Regulator Fan | Closed Loop Control | ||
| Auxiliary Part Cooling Fan | Closed Loop Control | Optional | |
| Air Filter | Activated Carbon Filter | Optional | |
| Supported Filament | PLA, PETG, TPU,ABS,ASA,PVA,PET | Yes | |
| PA, PC | Ideal | Capable | |
| Carbon/Glass Fiber Reinforced Polymer | Ideal | Not Recommended | |
|
Sensors | Bambu Micro Lidar | Yes | |
| Chamber Monitoring Camera | 1920*1080 Included | Optional | |
| Door Sensor | Yes | ||
| Filament Run Out Sensor | Yes | ||
| Filament Odometry | Optional with AMS | ||
| Power Loss Recover | Yes | ||
| Physical Dimensions | Dimensions | 389*389*457mm | |
| Net Weight | 14.13kg | 13.18kg | |
| Electrical Requirements | Voltage | 100-240 VAC, 50/60 Hz | |
| Max Power | 1000W@220V, 350W@110V | ||
|
Electronics | Display | 5-inch 1280*720 Touch Screen | |
| Connectivity | Wi-Fi,Bambu Bus | ||
| Storage | 4GB EMMC and Micro SD Card Reader | ||
| Control Interface | Touch Screen, APP, PC Application | ||
| Motion Controller | Dual-Core Cortex M4 | ||
| Application Processor | Quad ARM A7 1.2 GHz | ||
| Neural-Network Processing Unit | 2 Tops | ||
|
Software | Slicer | Bambu Studio Support third party slicers which export standard G-code such as Superslicer, Prusaslicer and Cura, but certain advanced features may not be supported. | |
| Slicer Supported OS | MacOS, Windows | ||
|
Wifi | Frequency Range | 2400MHz-2483.5MHz | |
| Transmitter Power(EIRP) | ≤ 21.5dBm(FCC) ≤ 20 dBm(CE/SRRC) | ||
| Protocol | 802.11b/g/n | ||
| Laser (Class 2) | Wavelength | 405nm, 808nm | |
| Maximum Output of Laser Radiation | <1mW | ||
Bambu Studio
Bambu Handy
Customer Support
Please visit the Bambu Lab Wiki for more setup and maintenance tutorials.
https://wiki.bambulab.com/en/home

If you need support, please try either of the two approaches:
Approach 1: Create a support ticket on the Official Website

Approach 2: Create a support ticket on the Bambu Handy App

Enjoy!


